WK4DS Amateur Radio Blog
Search Posts

Go bag POTA!
The idea behind building a POTA go bag is simple. You want everything you need in one place, ready to grab and go. No hunting for coax in the garage, no trying to remember which box has the paddle, no scrambling to charge batteries. Just grab the bag, throw it in the truck, and you're ready for a park activation. Or an emergency. That's the whole point!
The idea behind building a POTA go bag is simple. You want everything you need in one place, ready to grab and go. No hunting for coax in the garage, no trying to remember which box has the paddle, no scrambling to charge batteries. Just grab the bag, throw it in the truck, and you're ready for a park activation. Or an emergency. That's the whole point!
Why Build a POTA Go Bag?
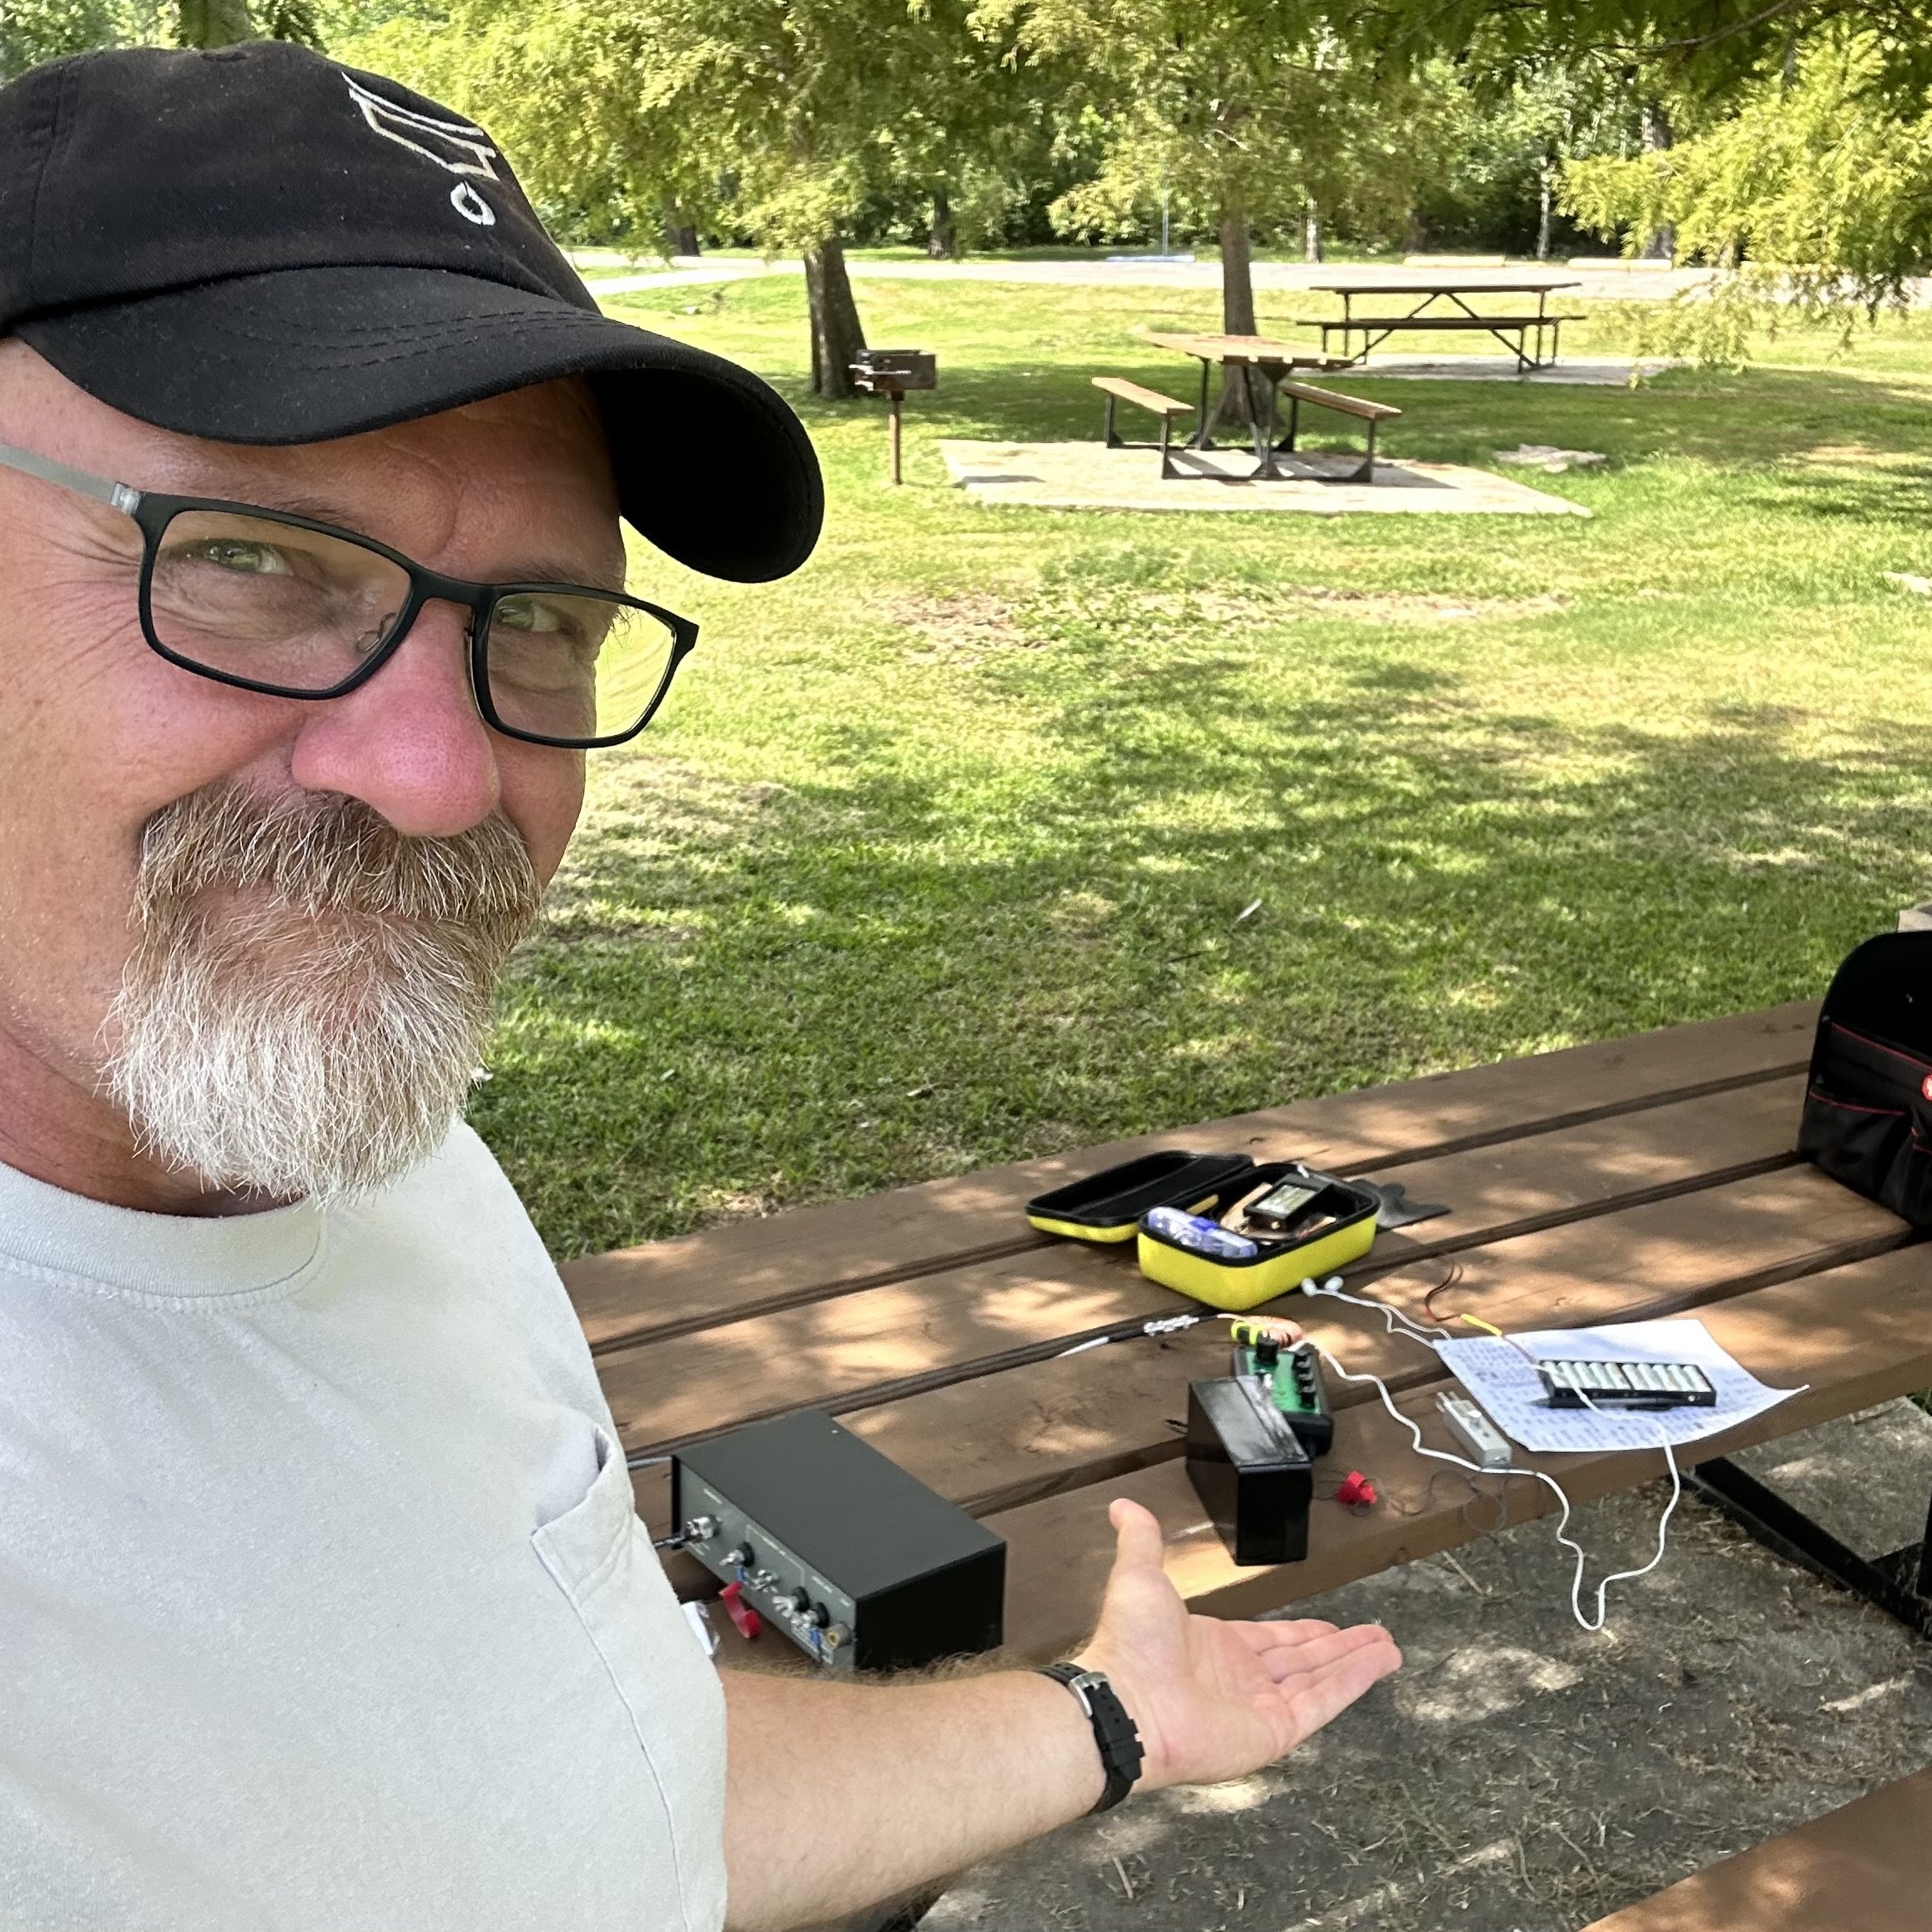
Today was about testing my emergency / travel radio kit to see how it actually performs in the field at Eagle's Nest (US-0716). Spoiler: it works better than I expected, even with some equipment drama along the way.

The QRP Guys SWR meter checking the Reliance Antennas 40m EFHW before starting the activation. I wanted to make sure the SWR was acceptable before putting power through it.
Complete Gear Walkthrough: Everything in the Bag
Here's every single item in my POTA go bag with approximate costs. This is everything you need for a complete field station that fits in one bag:
Radio and Accessories:
Penntek TR-35 QRP transceiver: N/A (no longer available… sad radio sounds…)
Xiegu G90 HF Radio Transceiver: 465$ (A great Alternative but not quite as small)
N6ARA CW paddle with case: ~$70
Headphones in ziplock bag: ~$20 (any decent pair works)
QRP Guys SWR meter: ~$20 (for field checks)
Power:
10-cell AA battery holder from Amazon: ~$12
10 rechargeable AA batteries (Eneloop or similar): ~$25
Power cord with Anderson Powerpoles: ~$10
Antenna System:
Reliance Antennas 40m EFHW: ~$60
ABR Industries coax with ferrite choke: ~$70
Backup coax (generic RG-8X): ~$30
Arborist throw line (40 feet): ~$8
Throw weight (1" nut from machine shop): Free!
Accessories:
Nylon tool bag from Amazon: ~$25
Small notebook for logging: ~$3
Pen (main) and pencil (backup): ~$5
Ziplock bags for organization: ~$2
Total Kit Cost: Approximately $825
Now, I know that seems like a lot upfront, but remember this includes the $465 radio. If you already have a QRP rig, you're looking at about $350 for everything else. And this entire kit lives in one bag ready to deploy. No hunting for gear, no forgetting critical pieces. That's worth something!
The beauty of this setup is that it's modular. Start with the basics (radio, antenna, power) and add the nice-to-haves over time. I didn't buy everything at once. I built this kit over about six months as I figured out what I actually needed in the field.
I did the entire activation from Eagle’s Nest in US-0716 with just the “kit” radio that I have put together. I have the QRP Guys SWR meter in the photo here as well (it is in the clear plastic case), but this is because I wanted to check the 40m Endfed Halfwave Antenna from Reliance Antennas to make sure the SWR was ok. He cuts them long so you can tune them once in the field and I have not cut mine yet.
You might be wondering, why go through the trouble of building a dedicated go bag instead of just grabbing gear as needed? Fair question! Here's my thinking:
For POTA operations: Having everything organized in one bag means I can decide to do an activation on a whim. If it's a nice day and I have two free hours, I don't need to spend 30 minutes gathering equipment. Grab the bag, drive to a park, and I'm on the air. This makes POTA way more accessible and way more fun.
For emergency communications: This is the real reason I built it this way. If there's ever a real emergency where I need to set up communications quickly (hurricane, power outage, whatever), I don't want to be hunting through the garage for my radio gear. The go bag concept means I can grab it and have a complete, tested, working field station ready to deploy immediately.
For travel: The bag is small enough to throw in the car for road trips or to check as luggage on a flight. Having everything self-contained makes it easy to operate from anywhere. I don't need to bring my whole shack, just this one bag.
The mindset shift: Building a go bag forces you to think about what you actually need versus what's nice to have. Every item has to justify its space in the bag. This makes you focus on core functionality rather than bringing every gadget you own. It's a good exercise!
The result is a system that's ready when you are, tested and proven in the field, with no excuses for not getting on the air.

One side of the bag showing the Penntek TR-35, the 40m EFHW antenna, power cord with Anderson Powerpoles, and the throw line with weight. Everything organized and ready to deploy.
The Penntek TR-35: Heart of the Go Bag
This particular nylon bag came from Amazon and has two main sides that unzip and lay flat. Inside each side are additional pockets to hold small, thin items as well. I have organized mine to hold the Penntek TR-35 and all the stuff needed to deploy it in the field. Literally everything. Let’s go for a short “walk” through this bag.
In the above photo is the radio, antenna and a power cord with Anderson Powerpoles installed. I also have the battery pack in the zippered pocket (more on that later). As well as a rope and weight for throwing a line up into a tree to haul up the wire antenna with. I just wound off about 40’ or so of arborist throw line for this kit and I have included a huge 1'“ nut from the machine shop for a throw weight, which works perfectly…
The other side contains the coax for the antenna and this is the only thing that I have two of in the kit. Coax has let me down more than once while out at parks so I now carry backup coax. No matter how careful you are with this stuff, it will fail on you. It just ins’t designed for all that movement and eventually you will break the center conductor. This is also why I check my system with the nanoVNA before starting…except today where I used the little SWR meter instead. One of the coaxial cables is the gold colored one made by ABR Industries and it has the ferrite common mode choke built into it. This is really wonderful coax and I wished I had learned how important quality coax was a long time ago…it makes a huge difference.
Also in view in the below photo is the N6ARA CW key in the little storage box it comes in and the headphones are in a ziplock bag to keep dust and dirt out of them. Nestled into the pocket behind the coax is a small notebook for logging. I also have a pen (my preferred tool for logging as I can see it easier than pencil) and a pencil since a pencil never runs dry, it is my long term back up to me pen…lol. I dont really trust pens either…haha.

The other side holds coax (including backup coax, because it will fail on you eventually), the N6ARA CW key in its case, headphones in a ziplock bag, and a notebook with pen and pencil for logging.

The N6ARA CW key comes in this little storage box which fits perfectly in the bag. Headphones stay clean in a ziplock, and the notebook/pen/pencil combo is my preferred logging method in the field.
So here is the station assembled and under power. You would be surprised at how long this radio will run on those AA batteries too. It is really shocking to me how well this little system works. I have yet to have the batteries die during an activation and one of them was three hours long. I need to run them till the radio dies to just see how long they will last at some point, but for now I know I can get at least three hours out of them. Also note that it is 10 AA rechargeable batteries, this gives me almost 14 volts which is what a car battery produces when new.
The station assembled and under power at Eagle's Nest (US-0716). You'd be surprised how long this radio runs on 10 AA batteries. I've never drained them during an activation!

Pointing to how I routed the coax. Started with it in a U-shape and got 2.6:1 SWR. Straightened it out and SWR dropped to 1.7:1, much better! This is why you check things in the field.
Here I am pointing to the coax that I used showing how I laid it out. I started with it in a “U” shape at first but the SWR showed to be 2.6:1 and I did use this for a bit as the TR-35 has final protections that make it pretty much impossible to damage them.
After a few minutes though, I decided to straighten the coax and this moved the SWR down to about 1.7:1 making me much more comfortable. I then checked all the bands that the TR-35 covers and only 30 meters was not usable. So that is why you see contacts on three bands instead of 4 today. Haha

My makeshift antenna support keeping tension on the wire and keeping it off the coax. It worked okay, but next time I want to get the wire higher. 30-40 feet would be better than the 15-20 feet I got here.
This is what I came up with to keep tension on the wire antenna and keep it off of the coax. It worked OK, but it the future, I would prefer to get the antenna higher. I also want to add another piece of cord so I can raise the transformer end of the antenna off the ground too. I think this will also help with radiation angle and pattern. The Reliance Antenna EFHW works really well and I am glad I got one from them. This is one of those items from the “Ham Made Gear” forum on QRZ.com. I have bought a few items from this area and have never been disappointed.
In the below photo, you can see my truck parked where I normally activate from and on the right side of that are a couple of trees that I tied the antenna up into. It is strange looking out on it now that it is cleared compared to just a few weeks ago.

Wide shot showing my truck where I normally park and the trees on the right where I tied up the antenna. This area was just cleared a few weeks ago so it looks different than it used to.

Here's what happens when you short circuit a 10-cell AA battery pack! The springs melted completely through the plastic housing. This is what I get for storing it with the power connector attached. Live and learn!
The Battery Pack Disaster (And What I Learned)
Now I need to tell you about the battery pack disaster, because this is the kind of thing that happens when you're figuring stuff out in amateur radio!
When I pulled the batteries out to charge them before this activation, I noticed the springs were melted completely through the housing. Like, melted through the plastic and everything. It took me a few minutes to figure out what happened, and when I did, I felt pretty dumb.
Here's what went wrong: The power connector barrel plug has the ground connection on the outside ring. When I stored the battery pack in the bag with the power cord attached, that barrel connector must have shifted and contacted one of the metal points along the battery bank on the outside of the holder. This shorted several batteries directly to ground!
Turns out when you short circuit AA batteries, they dump a LOT of current very quickly. Those poor springs turned into heating elements and melted the plastic housing. I'm honestly lucky the whole thing didn't catch fire or rupture the batteries. This could have been way worse!
What I learned (the hard way):
NEVER store the battery pack with the power connector attached. Ever.
A simple inline fuse would have prevented this entirely. I'm adding one.
I stretched out the melted springs and the pack still works, but I'm watching it closely.
I now store the last battery in the bank in a separate ziplock bag so nothing can short across the holder.
This is why we test equipment before we need it in an emergency! If this had been a real emergency situation and my battery pack was dead because of a storage mistake, that would have been a problem. Now I know better, and hopefully you can learn from my mistake without melting your own battery pack.
AA Battery Power: 3+ Hours of Runtime
Let me talk about why I went with AA batteries instead of the fancy LiFePO4 packs everyone recommends. Yeah, LiFePO4 batteries are great. They're lighter, hold more capacity, and last longer. They also cost $100 to $200 for a decent pack!
This 10-cell AA battery holder cost me $12 on Amazon, and a set of 10 Eneloop rechargeable AAs runs about $25. That's $37 total for a power solution that gives me 3+ hours of runtime with the Penntek TR-35. I've done a three hour activation and never came close to draining the pack.
Even better: AA batteries are available everywhere. If I'm traveling and forget to charge my batteries, I can walk into any gas station or convenience store and buy alkaline AAs to get me through an activation. Try that with a LiFePO4 pack!
The 10 cells in series give me about 14 volts when freshly charged (this presents a small problem with Alkaline batteries as the voltage is greater by .3 volts! I guess I need to get two dummy cells so I can “detune the pack for Alkaline batteries), which is perfect for the TR-35. As they discharge, voltage drops to around 12 volts, but the radio still works fine all the way down. I typically recharge them when I get home, even if they're not fully drained, just to keep them ready to go.
Is it the most elegant power solution? No. Is it the lightest? Definitely not. But it's cheap, reliable, and universally available. For a go bag / emergency radio setup, those qualities matter more than saving a few ounces.

Close-up of the melted springs. The barrel connector contacted the battery holder and shorted several cells to ground. Those springs turned into heating elements real fast. I'm lucky it didn't catch fire!

My paper log showing contacts on three bands (20m, 17m, 40m). 30m wouldn't tune because I haven't trimmed the antenna to resonance yet. I still use paper logging as my primary method in the field.

Complete Go Bag Checklist and Cost Breakdown
1. Get the antenna higher I only got the wire up about 15-20 feet using the tree right next to my operating position. This worked fine, but higher is always better for HF propagation. Next time I'm bringing a longer throw line so I can aim for branches 30-40 feet up. The extra height will help with DX contacts and cleaner signal patterns.
2. Add a second cord for the transformer end Right now the EFHW transformer just hangs near the ground. I want to add another piece of cord so I can raise that end off the ground too. This should help with the radiation pattern and might improve performance on the higher bands.
3. Inline fuse for the battery pack Yeah, after the melting springs incident, this is happening. A simple 5-amp inline fuse between the battery pack and the power connector would have saved me a lot of stress. I'll add this before the next activation.
4. Pre-tune the antenna The Reliance Antennas EFHW comes cut long so you can trim it to perfect resonance in the field. I still haven't done this trimming, which is why 40 meters wouldn't tune properly (SWR was a little high). I need to take an hour and actually tune this antenna across all the bands the TR-35 covers. Then I'll know it'll work on 40m,, 20m, and maybe 17m (if I can live with the SWR) without field adjustments. (30 meters never tunes on these antennas so I dont count it.)
5. Add a small groundsheet The bag sits directly on the dirt/grass right now. A small tarp or groundsheet would keep everything cleaner and drier if I'm setting up in damp conditions. Nothing fancy needed, just something to protect the gear.
What's working perfectly:
The bag itself is the right size
Having backup coax has saved me multiple times
Coax with ferrite common mode choke from ABR Industries
The AA battery runtime is more than adequate
The throw weight works great
Everything fits and is organized
Overall, I'm really happy with how this kit performs. These are all minor tweaks, not major problems. The core concept of "everything in one bag" is solid!
Let me give you the actual numbers from this Eagle's Nest activation using just the go bag kit:
Activation Details:
Park: Eagle's Nest, US-0716
Date: November 13, 2024
Equipment: Penntek TR-35 at 5 watts QRP
Antenna: Reliance 40m EFHW at ~15-20 feet
Power: 10 AA rechargeable batteries
Bands: 20m, 17m, 40m (30m wouldn't tune)
Contact Breakdown: I started on 20 meters calling CQ and had a good little run of contacts. After working through the initial pile-up, I switched to hunting for other POTA activators on the band. Then I moved to 17 meters (one of my favorite bands these days!) for a few more contacts before finishing up on 40 meters.
Total activation time was probably 90 minutes, and the batteries still had plenty of charge left. I didn't drain them even close to empty. This confirms what I've seen before with this setup: you can easily get 3+ hours of field time on a single charge of AAs.
The go bag concept worked exactly as intended. I grabbed the bag from my truck, walked about 50 feet to my operating spot, threw the wire up in a tree, and was on the air in maybe 15 minutes. When I was done, everything packed back into the bag just as quickly. No loose gear rolling around in the truck, no forgetting pieces of equipment. It all stays together!
72
Activating a park in bad conditions
POTA activating in bad conditions can be challenging… for some modes. Seems that FT8 doesn’t really care if the bands are crappy and will gleefully allow you to play radio anyway.
This was an experiment to see if the sBitx amateur radio could work in terrible space weather like you see below in the report.


The above and below photo show how fast the band conditions changed on me while activating on this day. The band noise could be seen on the display “walking” across the band segment at times. This band noise would pretty much wipe out what you could hear on the band, but the radio could still decode the FT8 signals so I was able to work almost 20 stations in about an hour even with this sort of noise coming into and out of the band.
I normally dont bother activating in bad band conditions, but this day I really wanted to see just how good FT8 was at extracting signals from the noise. I can honestly say that I was impressed by the performance of this mode. Digital modes have their place and this is very much one of those places. Weak signal in poor band conditions shows just how important it is to use all the modes available to the amateur radio operator. I was once a die hard CW only op and to be honest, it is still one of my favorite modes, but of late I have started getting into SSB more and now I am also dipping my toe into digital modes more and more and I am really liking it. Dont limit yourself out of a stigma like I did, you might just like what you find.

Below is a photo of the display that shows something that i had never seen before and that is the pulsing band noise. That was a new one for me. It too would come in waves and these would last much longer it seemed. The sBitx just kept chugging along though, I would sometimes pick calls and sometimes answer calls and this is what makes FT8 awesome. I couldn’t have possibly made SSB contacts in these conditions…


Here you can see the operating position for the day. Perfect blue skies and nice temps makes for a great day on the air at a park. I had to goto this spot as the lower lot was completely full since the weather was so nice, it was fall and a Saturday. Sometimes going to this spot has it’s perks like lower band noise from the campground inverters and such so I dont really mind it.
I had planned on using a battery and setting up on the picnic table I usually occupy down next to the canyon rim, but there just wasn’t anywhere to park and I didn’t want to wait on someone to leave just so I could park.


This radial is on it’s last leg. I have twisted this broken radial back together for months now and on top of that, the connector on the other end has also broken off. This is almost comical as this is the best performing radial in my set! That is why I am reluctant to repair it at this point…lol. It just works and if it ain’t broke (figuratively) then dont fix it.
I dont know when this bug (I think it is a jumping spider) decided to join in on the fun but here he was playing on the antenna mount. By the time I finished the activation, this little guy was long gone. Kinda fun to notice the little things like this when you are out in the park.


By the end of the activation, I had worked 18 unique contacts and garnered one dupe because I didn’t read my logbook very carefully and called one ham two times…then I decided to attempt to work some CW. This was pretty futile though as I only worked one contact out of about 15 minutes of calling as this is abysmal for me when I work CW. I can usually work about one call per minute even when I am running QRP power levels. So when I only work one…that is bad band conditions. The stations would literally just disappear then reappear and it was impossible to get complete calls so I called it quits after one.
All in all, it was still a great day in the field. Hope to work you soon!
WK4DS
40 meters QRP is FUN!
Today saw the introduction of my newly acquired 40 meter QRP CW radio that I picked up at the Orlando Hamcation. Read on to see what I think of this radio and how the activation went.

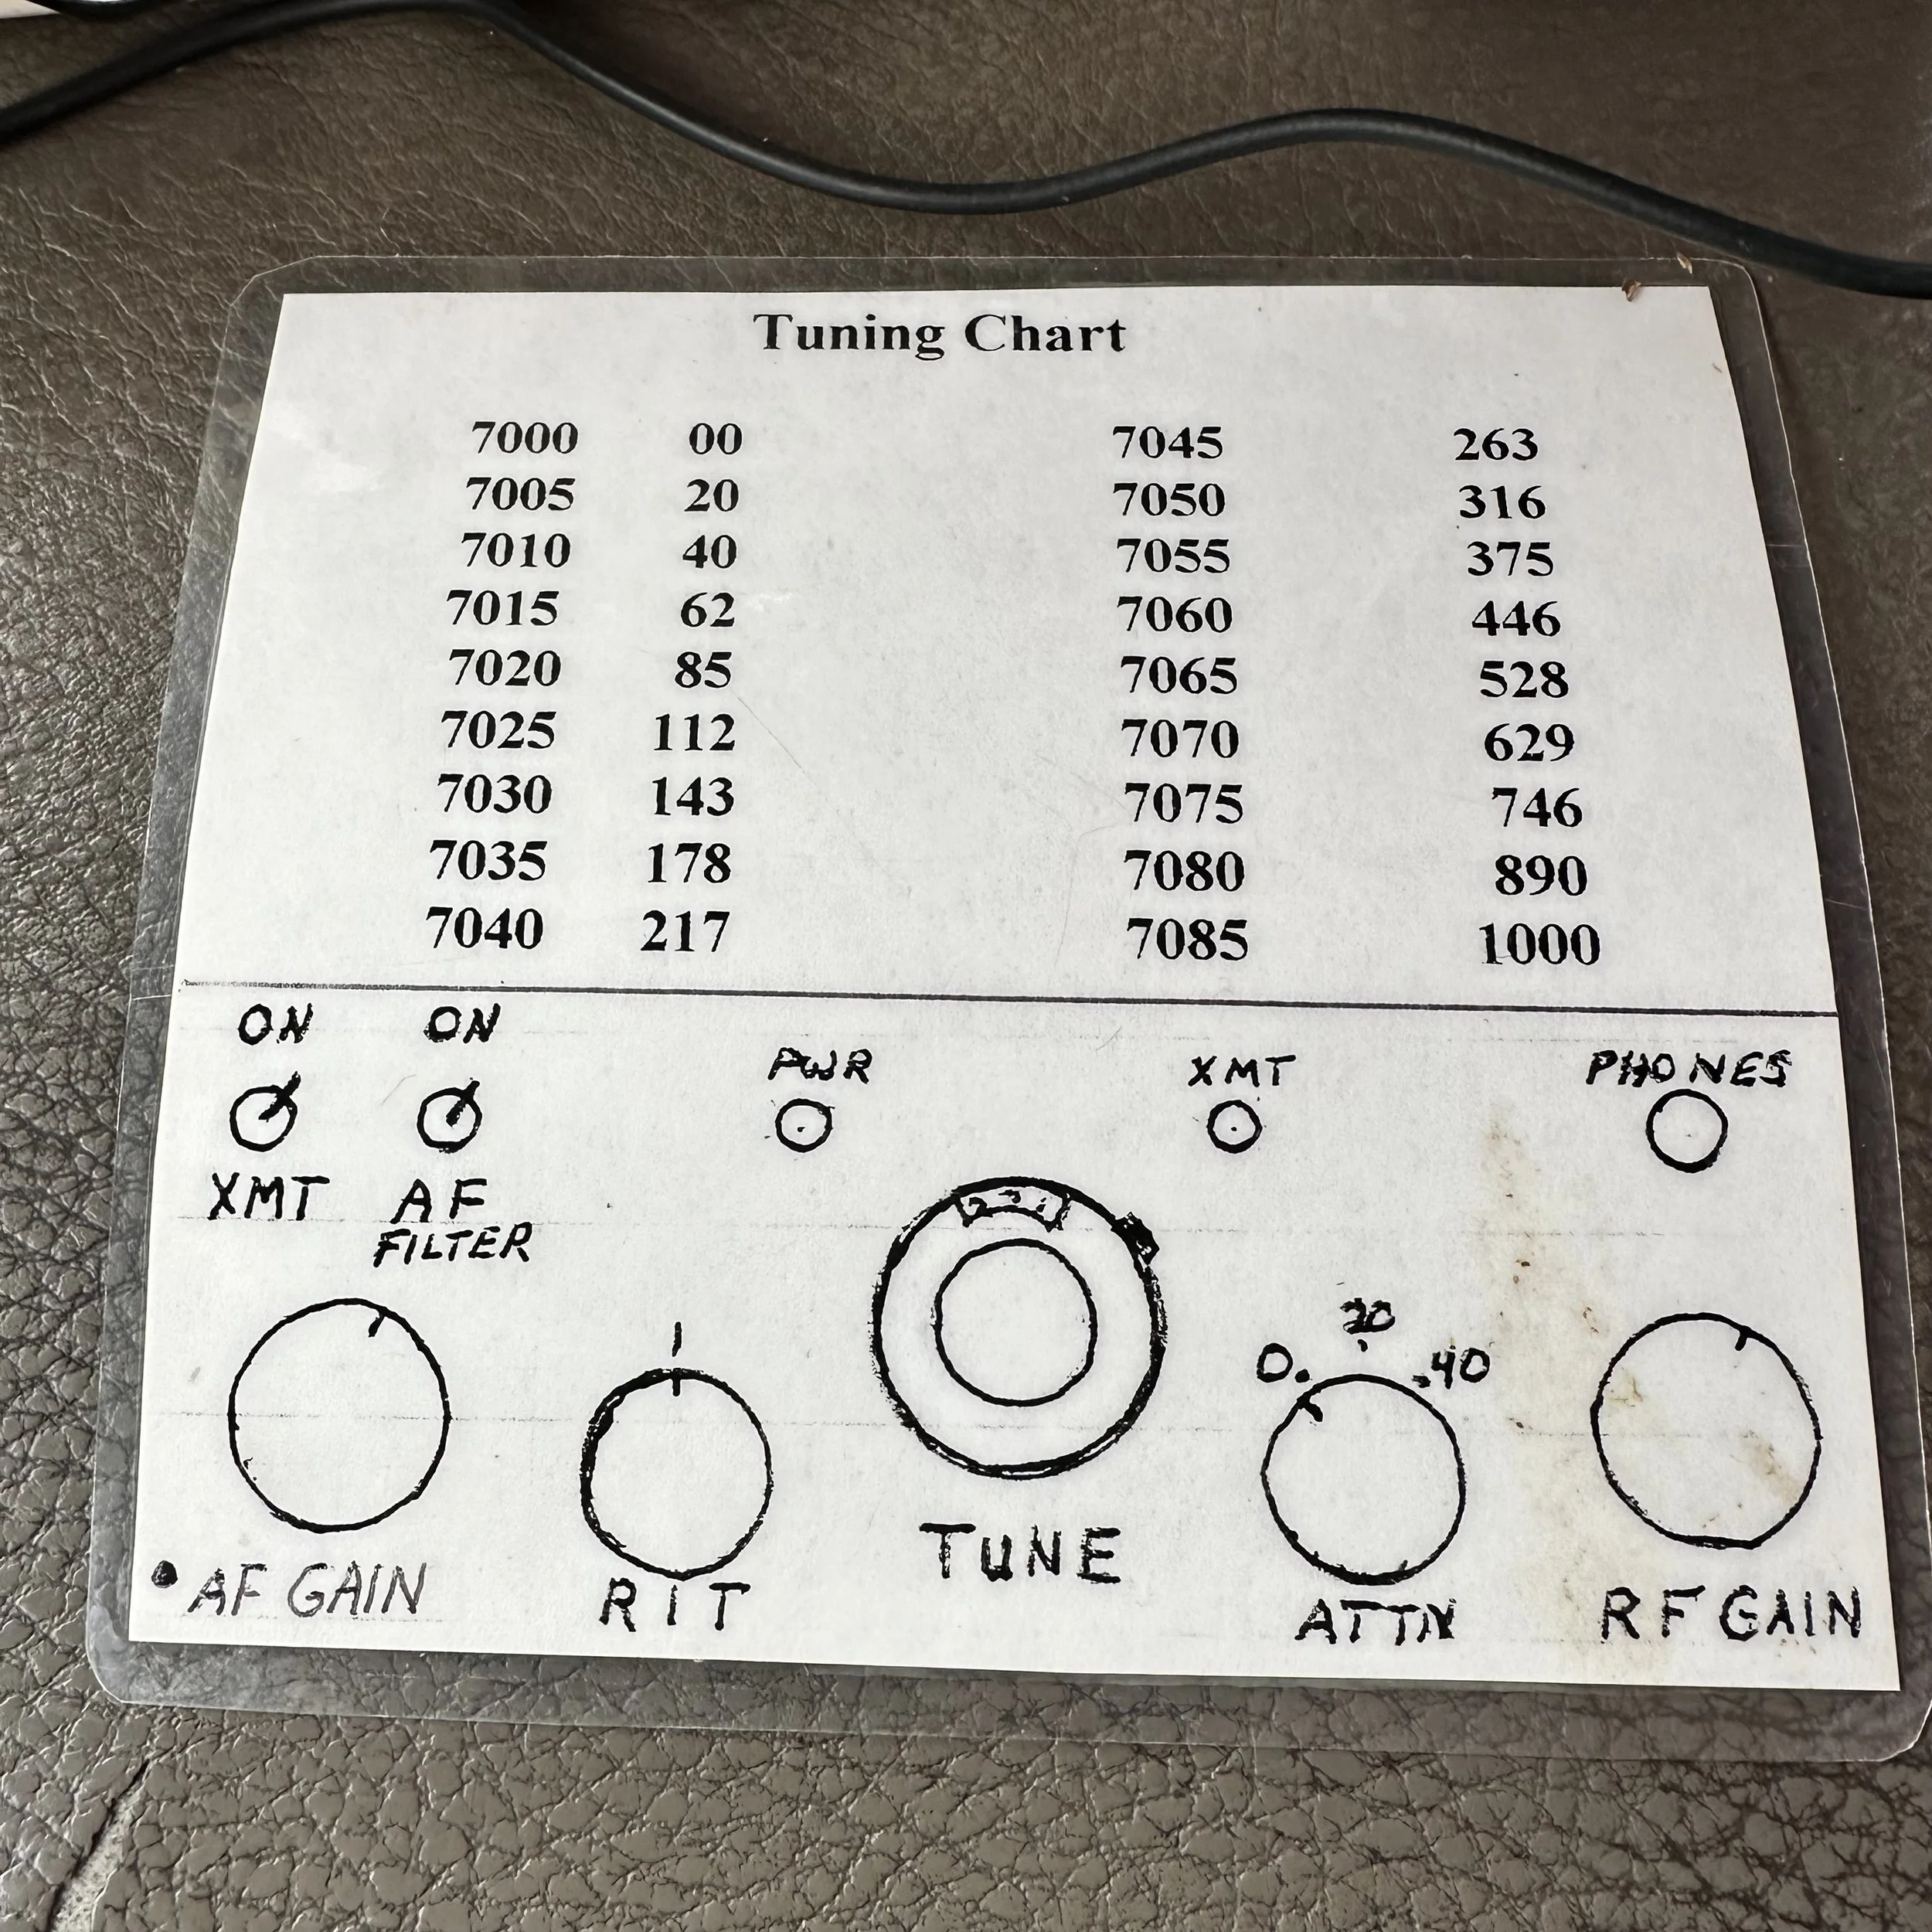
A quick over view of the radio. The transceiver is built by a silent key (W9SR) and I purchased it from the estate. The first thing you will notice is that it has no obvious numerical display except the ten turn potentiometer in the center. This is in fact the VFO or most likely the VCO if I had to guess. I am guessing as I have not dismantled the radio and really dont want to risk breaking it since it is a working machine currently. I can guess this though as it is a resistor and a resistor will allow you to vary the voltage easily on a varactor diode creating a Voltage Controlled Oscillator.
The next thing you will notice about it is that it doesn’t have any labels for the controls. At first I was worried about this, but then the fellow who sold me the radio showed me that there was a legend card included with the radio which has two critical pieces of information on it. The first is the chart that shares the value correlation of the potentiometer with the frequency of the radio output. The next thing it shows is what all the knobs and switches are used for on this little radio.
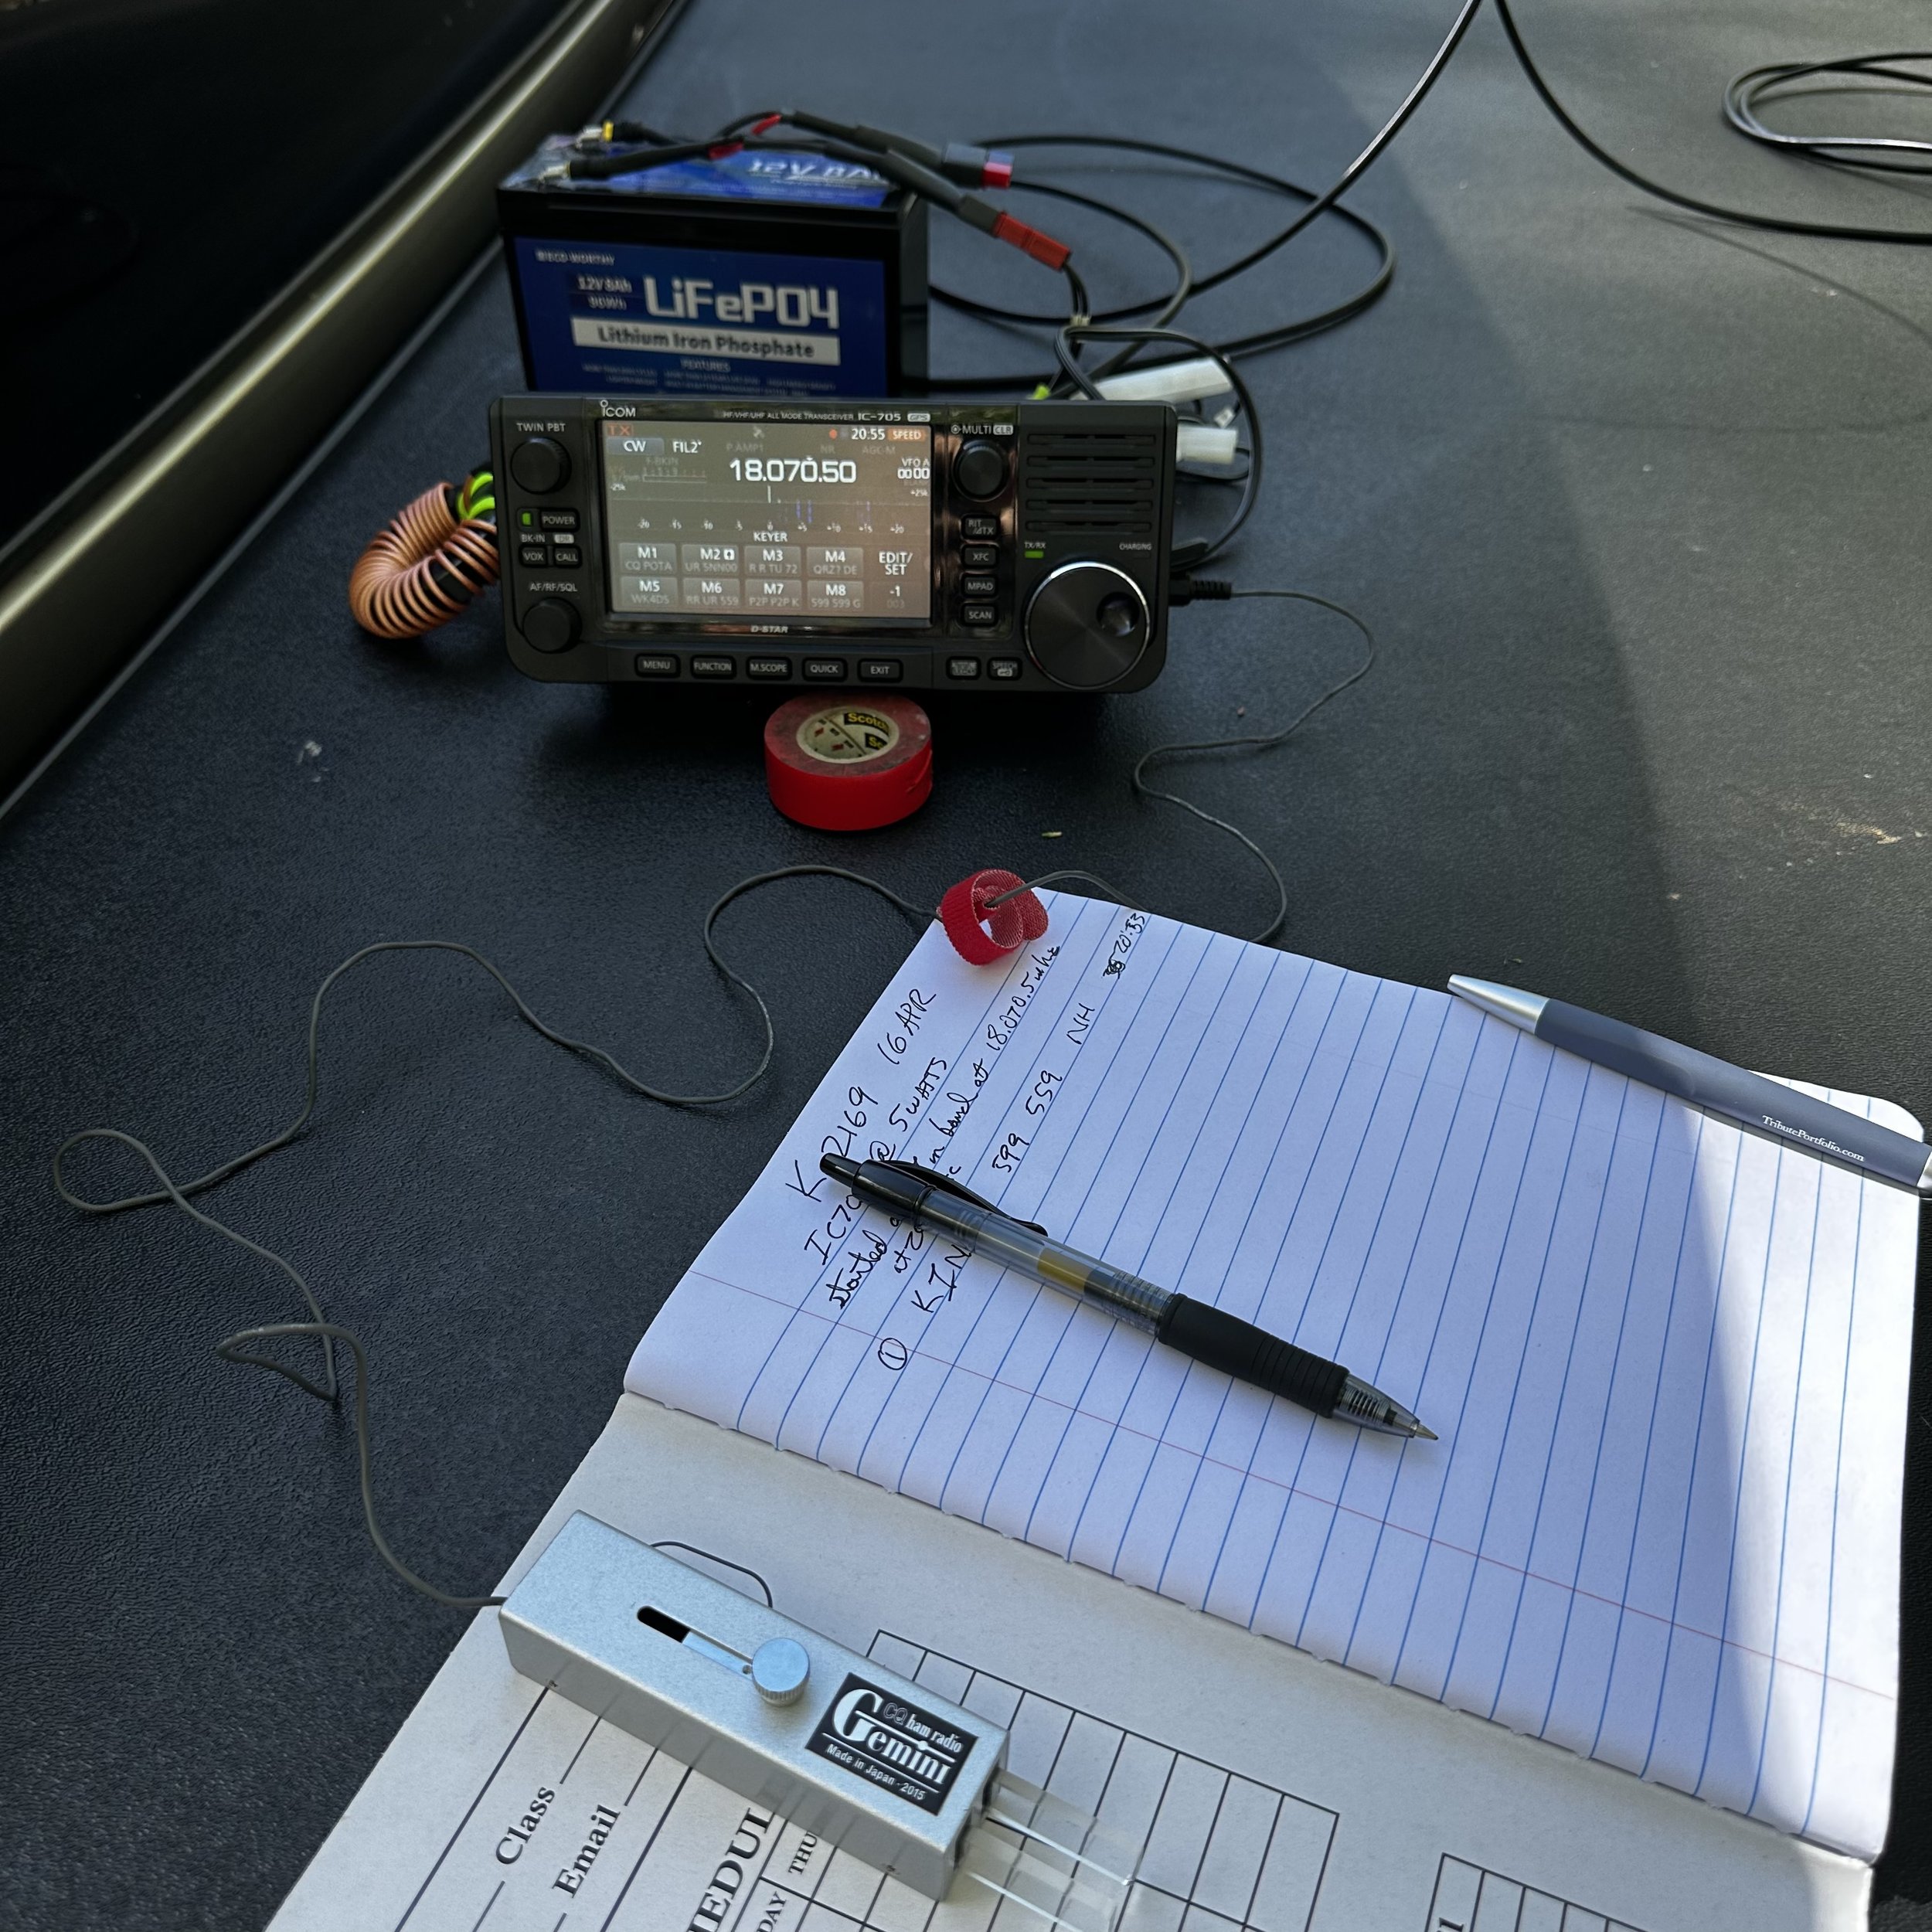
I decided to use this radio as I had a chance to activate a park earlier than usual today so I grabbed it and headed over to US-2169 (no longer K-2169 since the POTA people had to update all the parks due to the increase in activity and such with the program.) Heading over to the park I also took the Argonaut 5 kit as it has some keying gear in it I wanted to use. This turned out to be a good call as I could not get the SWR to pull down on the antenna today and I ended up adding the tuner that is also in this kit. This allowed me to add some inductance and get the antenna system to a nominal 50 ohm impedance match to the transceiver output as well as pull it to the center of the smith chart for an almost purely resistive load as well. The nanoVNA is invaluable for seeing things like this and it is why I like having it in the field.
Once at the park, I went to my usual spot at the frisbee golf course parking lot and proceeded to set up the system.

As you can see from the photo, it was really crowded today and I had trouble getting around all the people to setup my antenna system… lol. Only one park ranger and one truck passed through the lot during my whole activation, I was a little surprised by this as the weather was nice and there was a bunch of people down at the canyon, so I figured there would be a bunch playing frisbee golf too, but there wasn’t.
I have had trouble with my 40 meter hamstick the whole time I have owned it. This problem comes in the form of high SWR and I can only surmise it to be because there is not enough counter poise. I put out what I though to be enough radials and checked it and found the SWR to be 2.5:1 which is outside my personal limit of 2:1 so I added another radial from my kit that is usually for another band and checked it and it was a little better, but not great…maybe 2.1:1 or something like that.
So then I thought I would do something out of the ordinary and took my 17 meter radial set (it is one wire but it has a tap in the center with a STA-KON connector to attach it to my antenna mount). This in itself is not unusual, but the way I deployed it was. I figured I would make a single LONG radial out of it instead and see what would happen. Wouldn’t you know it, it helped ALOT!

You are seeing that right, it has a clove hitch tying it to the tree branch. Maybe that helped a little, I don’t know at this point. But I decided at this point to do some experimenting where I remembered in the past something about curtain dipoles and how you could drop a line down from the horizontal and it would change the antenna. I had some little gator clip leads in my nanoVNA kit so I grabbed one of these and clipped it to the STA-KON in the middle of the line and it made a difference too! Nothing extraordinary, but it did help so I left it. Checking the nanoVNA on the smith chart showed I had a good 50 ohm impedance to the antenna but the system was capacitive so I added the tuner so I could balance this out and get a clean load presented to the radio as I don’t want to burn this little guy up on the first outing. I ended up with a total of 5 radials put out to get the antenna and radio happy today and it looked ODD to say the least. I normally will run one or two at the most, so this looked like a spider web… lol.

I had intended to setup on the bed cover today as the weather rwas pretty nice to start with, but by the time I got to the park the wind had picked up to the point it was out of the question to try to hear CW with the radio fighting wind noise too. Because of this I setup inside the truck again and this made it easier too as I could just plug into the truck and go. So the station look like what you see below today. The N3ZN key and the Hamgadgets keyer into the W9SR 40 meter monoband CW transceiver and out of it into my little MFJ antenna tuner I keep with my Ten Tec Argonaut 5 transceiver kit.

Now, something about this little radio that is cool and most new comers to the CW corner of ham radio wont know about. This radio has relay keying. And the relay is kinda loud. It is almost comical with today’s diode switched radios that are silent and FAST. This little radio is far from a full QSK machine, but it works well none the less. I only missed a letter a couple of times and had to get a repeat to confirm it. Not bad for a radio that is probably built in the 1970s if I had to guess.
Another thing I have noticed about me lately is that I am drawn to this kind of radio more than the big box machines. I have owned some impressive radios in my day to include a Kenwood TS-950 SD, Ten Ten Omni 6+, as well as a Ten Tec Omni 7 and anybody who knows CW rigs, will know that these are all stellar CW machines of the highest order. These radios work so well that to work stations becomes almost no challenge at all. I have easily worked a metric ton of ops over the years on these radios and have loved doing it, but in the end, QRP really brings a challenge to the table that these machines cant. I know I could simply turn down the power of the bigger rig and sometimes I do, but these don’t travel well and besides it is just fun to use the tiny little machines.

Here are a few more photos of note about this radio before i I close out the showcase. It came in this ballistic nylon rigid pouch that holds it perfectly. Also I changed the ancient Molex connector over to power poles as I could not find a molex to fit it and it even how a 9 volt socket on the back that I am guessing is for some sort of accessory that is no longer needed… maybe a keyer like the Ten Tec keyers or something like that possibly? Who knows, but it is a great little radio.


As for the activation itself, I never have a bad outing, either it is good or better. Today was a good day. Any day I can make contacts is a good day to me. I made 13 contacts kind late in the day for 40 meters to be honest and to also only be using 3 1/2 watts too also made it a lot more sporty. There was a good bit of band noise today so most signals were weaker than usual, the radio did well though in that I could pick out even the weakest signals and was able to work them. I was impressed to say the least. I will be using this radio more if for no other reason than nostalgia. I love it and if you are into CW, you probably would too.

Thanks for following along today and I hope this blog post inspries you to get out and setup a radio. Until next week, 72 and GUD DX
WK4DS
POTA Activation AAR and some antenna testing.
Let’s take a look at hamstick antennas and see how they perform without tuning the counterpoise for each band.

No POTA outing is complete without some good ole McDonalds java to get you cranked up. I normally make my coffee at home but today I was in a bit of a hurry so I went through the drive through and picked up some of their magic water. Today I chose the Sittons Gulch parking lot at the bottom of the mountain as it is significantly closer to my home compared to the upper lot. Google Maps says it is a full 15 minute drive from one lot to the other. So operating from here gives me an additional 1/2 hour on the air. That is awesome.

So I setup the station in the truck today and learn a few things that I didn’t know before. One is that the power port on the dash I use is not great at carrying the load of a 20 watt radio. I can see the voltage dip to almost 11 volts on transmit. This is not good. So I opted to switch to the battery and get the voltage back to where it needs to be. This means that I now have another side project to fix this socket… But I am also going to install a direct power feed to the cab of the truck for my winter time ops so I can power the radio off of the truck batteries directly and install a anderson powerpole outlet inside the truck.

Today saw the battery deliver another 2 amp hours of supply, that is four total so far for the 8 amp hour cell. If I get 6 out of it at this point, I will be happy. It is over a year old at this point and it is still going strong. This is not some big name brand battery either but rather some cell I found on Amazon last year. It has seen many activations too. I used it heavily when I was using the Icom IC-705 and kept it in the backpack with the radio. Then when I transitioned to my Penntek TR-35 I used it with that radio for months. So this battery has seen a significant amount of use. I am impressed.

Another thing I have been doing is testing the antennas on the same set of radials (the set I tuned for 40/20 meters) and just switching out the vertical radiator only. I was pleasantly surprised at what I found out today to be quite honest.
Ham-stick antennas work shockingly well for what they are. So well in fact that I am about to go on a 10 park rover operation and use only the 20 meter ham stick (unless the band closes then I will move… lol) for the whole event. My strategy being that 20 meters is the most popular band by far so I should be able to get ten contacts at each park pretty easily. This should give me the best odds at completing my rove and making it to ten in one day. Below is the report from my nanoVNA showing each band I have a ham-stick for and just using the same counterpoise every time. (Side note here, I was also deploying the counterpoise differently too so as to keep them out of the way and this also affects the antenna, see the photo below there is a photo further down in the post showing them). The plots are arranged from the highest band to the lowest but after seeing the results, I don’t think it matters as I dont see a pattern to be honest.

15 meters kinda threw me for a loop. I need to trim the “stinger” some and push this one up into the band more. The null is actually at something like 20.250mhz so yeah, this one needs work. I didn’t have my cutters with me or I would have done it right then. Even so, the SWR was still low enough to get on the air and I was getting RBN reports as high as 20dB which is phenomenal for a 15 watt signal out of a ham-stick several hundred miles away…that is off-tune.

17 meters also caught me off guard. Look at that plot with radials tuned for 20 meters instead! Ft8 on this band will be epic! I have plans to start doing some digital modes during POTA outings in the future so I am happy to see this.

20 meters actually needs trimming too. I have known this for a while, but it is close enough for CW so I have not bothered yet. As you can see, at 14.060mhz on this day, with this radial arrangement, it was still less than 1.2:1SWR. I have had this particular radiator the longest out of my entire collection and bought it last year in anticipation of winter ops. Which it worked perfectly for me in that role. This is why I have slowly collected the set I have now. They just work.

30 meters is honestly the best looking lower band out of the three that I have. 20 is tuned low and 40 needs some help with more radials (most likely), but 30 meters lands just right, with the null point covering the whole band.

40 meters is odd to me. It works and has respectable SWR even with a poor radial field but I would like to see it even better if possible. I think this is more to do with the antenna design and poor counterpoise than anything else. The other bands work great but this one is just not that awesome and I am still sorting it out. Dont get me wrong, 1.46:1 SWR is great but I think it can be alot better. I just need to dial in the counterpoise or something. I am also going to setup another trace on smith chart to see if I am capacitive or inductive and not purely resistive. That might be part of the problem. The SWR plot is nice for simple and quick checks but there is more data to consider. More to come on this…


I did all my tests with the common mode choke installed so I would know what the radio actually is transmitting into. This way I dont get surprises along the way from things not being like they were when I did my test.
The logbook today looked good too. I didn’t have a long time to work the activation so I was happy to see 23 get into the log today. That is a good day for me. I was a little sad though since I was getting picked up on the RBN and could hear stations on 15 meters but no one could hear me… Oh well, maybe next time.

I messed up the sequence and had to correct it. Hence all the scribble in the margin… sorry about that.

Thanks for coming along on this after action report, hope to work you on the air soon!
72
WK4DS
Activating a park in Louisiana was different…

I went to New Orleans for a conference and we stayed one extra day to do some sightseeing. We did a tour in the morning and ate lunch and figured I had time to ride over to a nearby state park and get an activation in before supper. I chose Bayou Segnette State Park (K-2356) as it was only about a 30 minute drive from the B&B we were staying at.

We get there to find a beautiful state park and almost every pavilion was occupied by these huge family reunions! That is fine though as the park is really roomy and there were plenty of picnic tables elsewhere. We looked for a picnic table in the shade of a tree that was keep kind of close to the parking lot so I didnt have to transport my gear very far.
We also decided to come during an apparent heat wave too! The temps easily reaching 99 degrees (37.2C) every day so it was like standing in front of a blow dryer while outside. It was just plain hot… This was the reason I was looking for some shade to setup in, at least we didnt have the sun beating down on me while I worked some contacts.

So I found a table by this abandoned playground. Lol! It really wasn’t abandoned but no kid wanted to touch that stuff with the air temp that high!!! The shade made all the difference though as it was kinda pleasant once you sat there a minute, got a little sweaty and then a breeze would blow.

I had my TR-35 kit in the truck from an activation last week so I got out the throw line and threw it up into this cypress tree. In the photo below you can see the table and I am pointing to the spot where the throw line went over the tree. The antenna didn’t reach into the tree itself so it was a great placement in my book. The wire being fully exposed and not crossing tree branches makes a big difference to me if for no other reason.

This made my wire a sloper running uphill to the southeast. I ran the counterpoise out at about a 90 degree angle to the 41’ wire and connected them to the tuner.

I tuned it up on 17 meters and dial around the band for a minute to find HA3NU booming in and working a fairly deep pile up. I thought about trying to work him for a minute but finally decided to find an open frequency and call CQ instead as I wasn’t sure how much time I would have. Turns out I had about an hour… good call.

I called CQ for about 1 minute and was blown away when I worked SM2SUM in Sweden right out of the gate. Today is going to be a good day…I thought. The very next station was KP4M in Puerto Rico!!! It just keeps getting better!!! I worked a few more on 17 meters and then made the jump to 20 meters (where the scores can really change…)

I worked another 26 people on 20 meters in about a half hour or so, bagging KP4M again on 20! Shoot, I even worked Paul KJ7DT today up in Idaho! The bands were pretty good if you ask me.
I wished I had time and a radio that would cover more bands to be able to get a few more out of it, TenTec Argonaut 5 I’m looking at you buddy... Maybe next time… It was a great day though and I added Louisiana to my states that I have activated!! I hope this motivates you to get out and do some POTA too. Thanks and 72!
Quickie Activation with some cool DX!

When I started this activation, I had no idea how the bands would act, there has been a lot of QSB lately so it is kinda a crap shoot. I only had about an hour so I figured I would try to get a few contacts… little did I know I was about to have a lot of fun!

God showed his power to me today when I got on 17 meters and started calling CQ. I had gotten my first contact pretty fast and it was another activator, so I got a Park to Park right out of the chute. Then I started hearing this station just up the band from me… I dialed up and found it was a fellow down in Turks and Caicos! I waited till he called CQ and threw my call back to him…and he HEARD IT!!! DX in the log and I am just getting started!!! Woohoo! Then the VERY NEXT QSO was Sweden calling me!!! For me, this is cool dx, as I dont get to work other countries very often, especially with a QRP radio…

If you look close (right beside the key), you can see where I pieced together the call sign for the VP5 call sign. He was going faster than I normally can copy so I grab letters one or two at a time till I build the whole call. Then I listen for the exchange and at that point I am ready to try to call them. I think they were probably running about 25 WPM of maybe just a little faster, and I normally operate at around 18 to 20 WPM…

On this day I used my Penntek TR-35 radio on the bed cover of the truck. This is a fun operating position as I get to interact with other people in the park some as well. On this day, there was a family that wanted to know what all the wires were about so I took a short break and explained what I was doing to them. This is why there is a 10 minute period between contacts 3&4 in the logbook.

Another point about this common mode choke on the TR-35, it is the perfect size to hold up the radio when operating like this… lol. It does look “techie” too so it makes the little station look cool in my opinion. Lol.


The radial connection works really well for the multiple setup like I am using here. This is all the radials to cover all four bands the TR-35 has access to, 40, 30, 20 & 17 meters. This way I only need to switch the verticals to change bands. It is actually really fast like this and I am debating whether or not to make the multiple antenna mount now…

As noted in a previous blog post, I added an Anderson Powerpole socket to the little module for other things to be able to share the power as well. I don’t need it with this radio but it is nice to have when I run my IC-705 as the antenna tuner has it’s own power cable.
So to wrap things up, you never know when the band will open and you can make a 4500 mile contact with your QRP rig on a hamstick till you hook it up and try. So get your radio out and go play with it somewhere. Until next time…
72
WK4DS
AAR from a couple of short activations
The last couple of days has actually been good for my radio habit…errrrr…hobby. Yeah, hobby… lol.

Both were at K-2169 as I am working towards getting 100 activations at this park and it is close to home as well, so I can go play with my radios fairly easily here too. The new part about this trip is that I went to a different part of the park, this section is on the east side of the park and is a trail head for mountain bikers and hikers mostly. I knew I was fully in the park when I saw the boundary sign at the entrance to the parking lot.

These two photos show how convenient it was to setup here. The first photo shows the view from the road in front of the park with the boundary sign out front. It also shows the yellow electric gate behind it as well. The next photo shows my truck parked in the corner of the lot with the yellow gate in the foreground. It was pretty busy here too, there was a lot of people out riding as it was a Sunday and the weather was perfect.

Here lately I have been using the Icom IC-705 QRP radio as it is easy to use, has memory keying and METERS! I can actually confirm the SWR is good before just trying to load it and hoping for the best. Also note the common mode choke too as well as the 8aH battery behind it, I have been using this battery since last summer and it works wonderfully. I can activate at least 3 times with it before even needing to be charged. That is incredible! One other thing about the IC-705 that I like is that it has an external speaker. That is nice if I can setup on the truck bed cover like I did here so I don’t have to mess with my headphones.
Below is a problem I have not had before. The antenna was in the tree branches and I am certain that it was killing my signals. I moved the whole truck forward 2 feet and got out of the branches and immediately started making contacts. So a note to myself is that I don’t need to let my hamsticks touch the tree limbs when I setup in a park…

17 meters has been crazy lately, as in this contact to Italy with 5 watts. I was weak to him, but he heard me! He probably had a tri-bander or a dedicated 17 meter Yagi pointed my way, but I don’t know…


Once I switched to 20 meters the signals were much stronger and I quickly secured the activation and was able to wrap it all up and be back on the road in just under an hour. Not bad for a guy with a few hamsticks and 5 watts of power…

The next activation happened 2 days later and this time I was also only able to stay for about an hour. So this time I wanted to see just how much I could trim off the setup and go full on minimalist with the activation this time. The weather was nice so I didn’t even have to run the coax into the cab of the truck. As you can see, this time I used the internal battery on the IC-705 as the radio will run 5 watts when using this battery anyway and it was super fast this way! I could have probably left the common mode choke off as well but I liked knowing it was there protecting the radio…

I bought a pack of various BNC adapters off of Amazon and here is the male to male coupler connecting the coax to the choke. This makes setup of the cable to the antenna a breeze.

Here is another time saving item I used today, instead of both radials, I used just one of them and stayed on 20 meters the whole time to eliminate the time needed for band changes. It seems to work at about 85% as good as both radials so it gets the job done but if I am not in a hurry I will deploy both radials as it just seems to work better.


All of the strike thru partial QSOs are from what I can only explain as strange band conditions. It was like the band would be fully turned on one minute then like a switch it was gone the next. I would try a bunch of times to get them back but finally figured out the band was dead to that area and had to move on. It was really strange how it kept happening too. I mean they would be LOUD and then gone… Most likely it was them listening for me as I was QRP and the reports are showing not so great reports when I did get contact. So I am guessing I just faded into the noise floor on their end to be perfectly honest about it.

All in all, it was still great to get a coup[le of activations in and have some fun on the air at the same time. Thanks for reading along about my exploits.
One of the reasons I like POTA
The first picture is one of the main reasons I like POTA. Being out in the field with a portable radio and being able to make a reliable contact with it is just special to me.

The parking lot was almost full when I arrived and fortunately for me, the space I wanted was open! That is me all the way over to the left at the end of the row. The perfect spot to be if others are in the lot as there is no trail here so no one will be tripping over the antenna parts when the come and go.

Today I found I had about an hour of free time and the weather was perfect for a change so I gathered up the gear and went to K-2169 for a quick activation. Since the weather was so nice I opted to setup on the tailgate.
When I operate at home, I am in my “shack” which is actually a spare bedroom I have repurposed for my hobbies. That is the one thing I like and don’t like about it. It is indoors. I like it when it is raining or cold outside but I don’t like it when it’s nice weather outside. This is the biggest reason I like going to Field Day in June, that is second only to the camaraderie with the other people.

Today, since I wasn’t in my regular truck (I commandeered one of my shop trucks while they put new shoes on the dodge) I didnt have my usual antenna kit. So today I deployed the 41’ random wire antenna that I used in Hawaii. I also coupled it to my Icom IC-705 with the automatic antenna tuner as well. This makes band changes a breeze…

I threw a line over a tree beside the truck and pulled the wire up as high as I could and tied on a 13’ counterpoise. The tuner connects to the radio with two cables, a co-ax transmission line and a signal/control cable that is simple a 3.5mm stereo cable commonly referred to as a “AUX” cable. It has two AA batteries in it and works fine with these but if possible I will power it with the main battery I feed the radio with, so I also included a power cable in my harness I made up for it. This harness is 6’ long and allows me to connect random wires right to the tuner.

To lift the burden of the wire tension off of the tuner, I also have a small cord connected to the radio end of the 41’ wire so I can anchor it to something near the tuner. This works really well and keeps me from pulling the tuner off the table when something moves the wire like wind, squirrels or people which in turn would cause damage to my tuner.
Today was a pretty good day too, I got my activation in a fairly short amount of time, I was outside in the wonderful weather and I was able to just play radio a little while. That being said, I netted less than 20 QSOs today with signal reports showing I was not very strong…probably because the wire was poorly deployed and not even all the way.

The key of choice today was once again the Gemini I picked up off of eBay a while back. I have ran into two problems with it since getting it. I also use it a lot as it has a great feel and normally works very well. Issue number one is detailed in a previous blog post where I bumped the lever arms at some point and this shifted the action off center causing it to send dits nonstop. I dismantled the key and realigned the lever arms, which is really easy once you see what needs to be done. The second happened just the other day during an activation. I got all setup and started to call QRL and it was just sending trash. I couldn’t get it to send anything correctly at all, just a mess of dits and dahs with no coherent outcome. So I fell on the backup, the N6ARA key and it saved the day. Once back home, I took the key apart to find that the center ground post that the contacts touch when keying, had worked loose and it was about to fall out. It has one small screw that holds it on the base plate and I simply tightened this screw and it was back in business. The lesson here is to have a spare key with you…fortunately I had one and was able to get the activation.

Looking at the map, we can see how the radiation pattern started about 700 miles away probably due to my terrible antenna deployment, but people were still able to hear me so that is all that mattered. lol…

Do you have any tales from the outer planets that relate to anything like what has happened here? If so, let me know in the comments. I look forward to working all of you on the air at some point.
72 de WK4DS
Activating a park in Hawaii with with the Elecraft K1
I will be honest here, I thought this would be easier…

Let me explain. You see first off, I live on the east coast of the mainland USA where getting an activation completed or even dozens of QSOs in an activation, is rather easy even at QRP power levels. I have done activations with 4 watts and once I think it was only 1 watt. But someone joked in the past, “that is because you are where all the HAMs are at!” Nothing could be truer as I found out.
So here is the setup for the opportunity. We decide after some travel plans fall through, to goto Hawaii (the big island) for a week or so. This is two fold, we want to see the active volcano as that is a bucket list item for us and it is warm in February…which is always a plus. Well, I talk to the wife and come to the conclusion that there will be time to do a park or two while we are there as well. So I start figuring out what radio to bring.

Just read the previous blog post to see what I brought and why (spoiler, it is the Elecraft K1). So once I figured out the radio and storage/travel bag, I started looking for parks on the POTA app.
We are staying in the town of Hilo so I naturally started looking near there for possible parks. My criteria was that I wanted a park that wasn’t blocked by mountains or in a canyon, preferably one near the beach (I mean, who doesn’t want to do an activation on the beach???) and has a tree to allow me to get the antenna up as close to vertical as possible. This last part is going to be the biggest challenge I would come to find out. Since I packed only wire antennas in my kit, I would need something I could throw a line over to haul up a wire with.
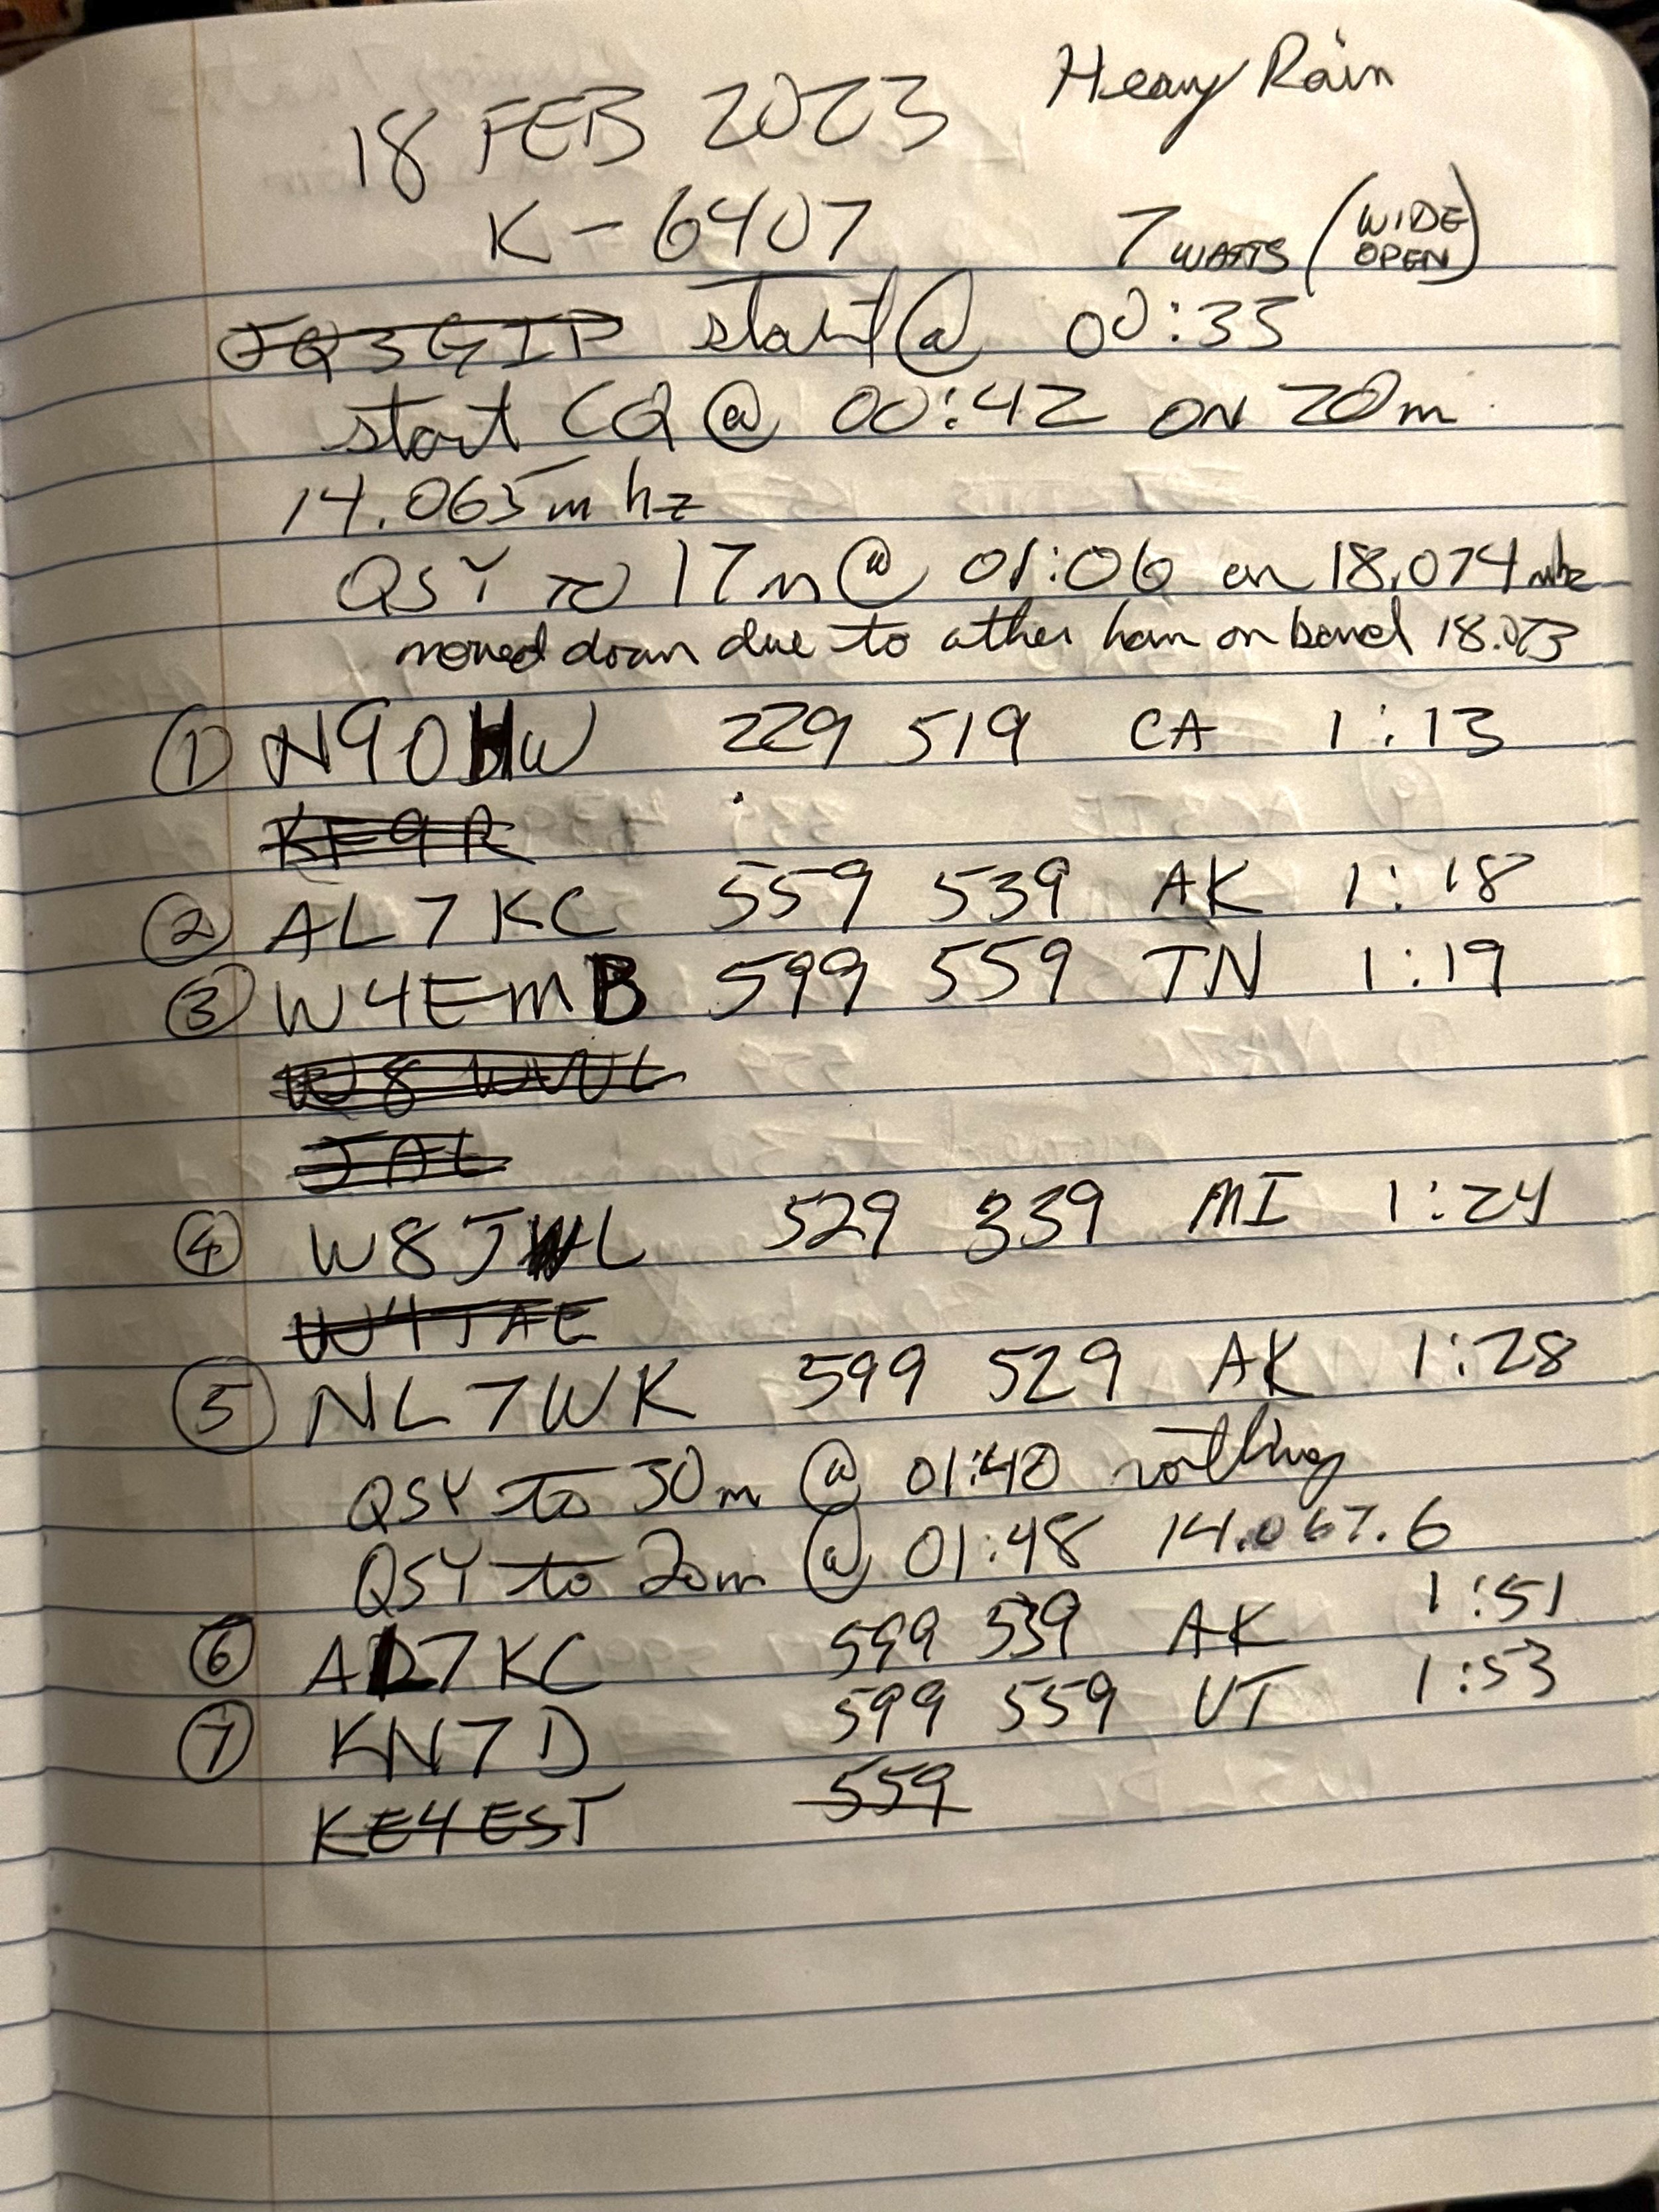
Well, the first park I chose was not really suitable as it didnt have any trees near the parking lot and also no tables nears the trees that are there. The next problem showed up on day two and lasted till almost time to leave…the rain… seems Hilo is a literal rain forest and I failed to do the proper research to learn this ahead of time. Maybe I was not supposed to know this so I would take my gear, I don’t know either way, but it rained 14” of rainfall in a 36 hour period of time at one point. yes, FOURTEEN inches fell in a 36 hour period… The rain was near continuous for many days. Well, on day four, we had about 3 hours to kill in the afternoon so I looked at a park in Hilo proper, it is down by the beach and runs all the way down the the royal gardens. I drove by it and scouted the area and found some trees that would hold a wire. This is park number K-6407 (Wailoa River State Recreation Area) and basically it fit all the criteria.

This is where it gets messy… I decide to give it a try as it is a good time of day to reach the west coast of the US. Grey line would be coming across the US for the next few hours and I need all the help I can get with my measly 7 watts. The only problem is that the rain is coming down in sheets at this point… where to setup??? I opted for the car.
So I get out in the deluge and throw a line over a nearby tree and haul up the antenna which turned out to be more of a sloper this time than a vertical. This antenna is a 41’ radiator and a 13’ counterpoise and is almost resonant on the 40 meter band. I roll the window down a little and run the counter poise and radiator into the car and hook then to the radio.

Once the radio was connected I tried to run the car for the heater and power port only to find it was producing a significant amount of rf hash that the little Elecraft radio couldn’t handle. So I got out the battery and shutoff the car. This actually worked really well, I could hear much better and the car was actually quite warm so I and Teresa were happy. Yep, she sat with me in the car and read a book which I worked you guys on HF.

The next problem I ran into was the contest… I had no idea there was a contest running this weekend and had planned around that literally zero… Well, now what? I went to where I couldn’t hear anyone and started calling CQ and called for ten straight minutes with no answers.
You can see in the log that I got on the air and spent ten minutes finding a clear frequency and called CQ for probably 20 minutes before giving up and moving to 17 meters. Now remember that the whole time this is happening that it is pouring rain. So I am starting to lose hope…
17 meters proved to be MUCH more productive. I found a clear spot tuned up and went to work. Here it still took several minutes of calling for people to hear me. I am going to guess they swung their beams around to me as some of them came booming in to my little wire in the middle of the ocean! I was starting to get somehwere when it seemed my band opening on 17 just stopped so I tried the 30 meter band in hopes of getting something there but no one replied. Next I figured I would give 20 meters another try. I went fairly high in the CW area to get away from the contesters and it seemed to work. I did get a couple of contacts, but it was at this point that I had to pack it up so we could go to the airport to pick up our daughter who was flying in… with 7 QSOs in the log. I really wanted to get this activation and as fate would have it, I started right after the new UTC day began so I actually had time. This was the most difficult hour and half of my POTA life thus far. I had netted 7 contacts in over 90 minutes of air time…I had not anticipated this. Normally, due to the spot page, I get an activation in short order. I have a new appreciation for Hawaii call signs now that I could not have before.
The next thing that happened was fate working in my “POTA” favor. You see the airline let Sierra wait in Maui for an extra two hours due to issues with the gates in the airport. So since the airport in Hilo is 10 minutes from this park I was activating, we just drove back over to the park and I found a better tree to get the wire almost completely vertical this time.
Launching into the “second session” I got on 30 meters hoping to get something there but nobody answered me after quite a while. So I just moved back to 20 meters and again went high in the CW portion. I have never went to 14080 mhz before so I wasn’t sure how this would work. It worked fairly well to be honest, as I got my activation completed during this time part of the time!!!

Since I had my 10 QSOs finally, I wanted to try and work someone on every band I could use on the radio which meant moving down to 40 meters for a while. I finally worked NA7C in Utah on 40 meters with just 7 watts!!!!! I also learned from the RBN that my K1 needs to be aligned. It was consistently off frequency by at least 200 hertz.

So for this trip I took the Gemini travel key as I really like the form factor of this key for these kinds of operations. It is the perfect size and design for ops where there is no surface to set the key on. Also take notice how my trousers are still very wet from stringing the antenna up in the tree. Lol. I wondered how much signal I was losing to the rain… The logbook is a mess because of the terrible band conditions and me making tons of notes about the activation.

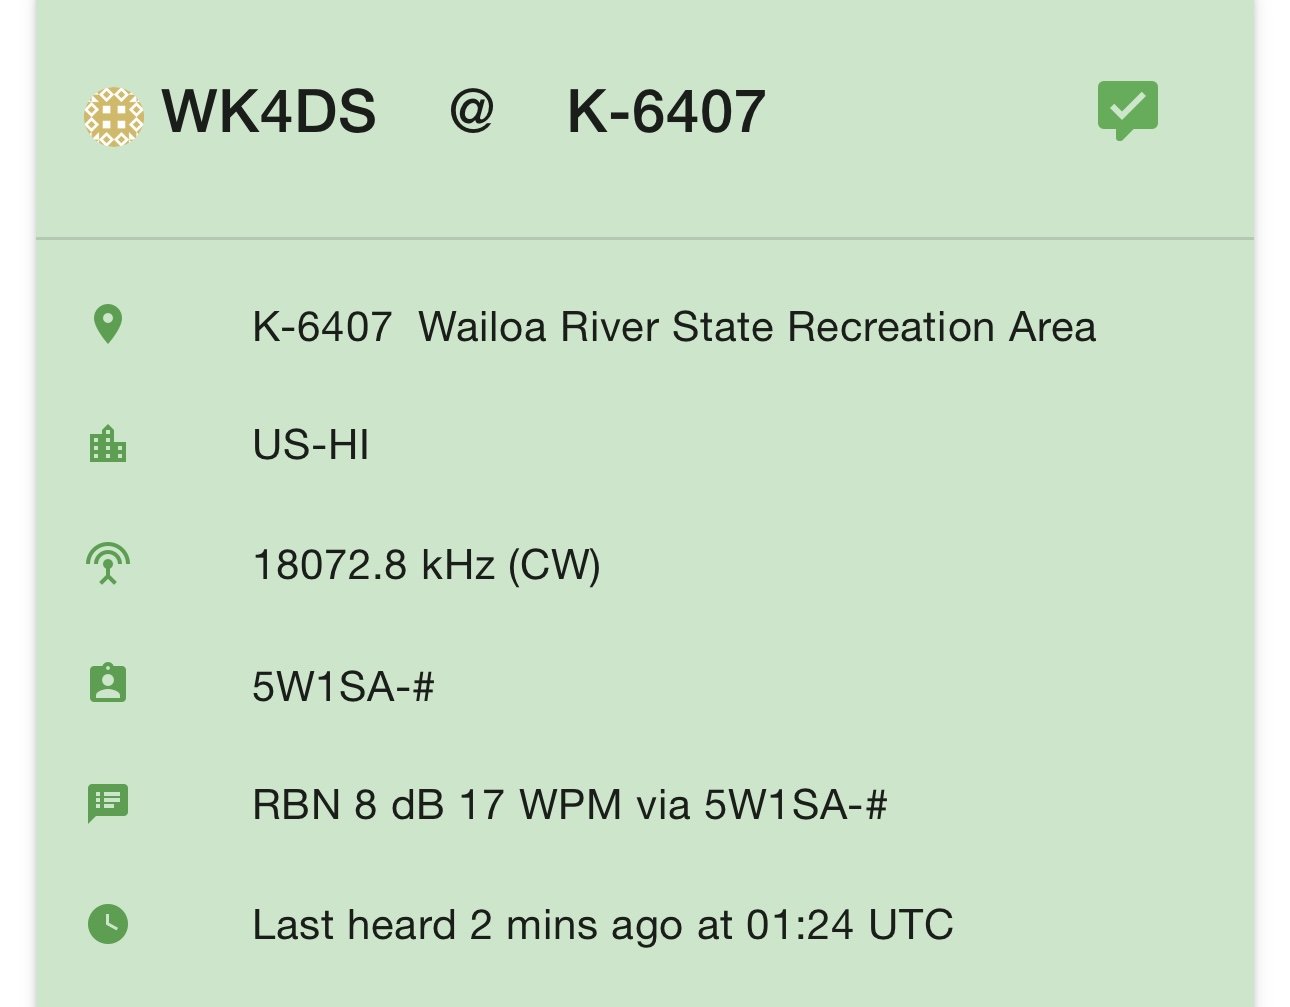
Take a look at my original spot note. Lol I had a big idea there!!!

I was also hopeful when I saw the RBN pick me up. So I knew my signal was propagating out to the mainland. You can understand then why I was getting worried when I got no calls for all that time I was calling CQ on 20 meters…

Here you can see my RBN spot on 17 meters as well. It was weak, but it spotted from two different regions. Check that out. But it was during this time that people actually start hearing me and answering!

I was really impressed by some of the signals too. These people have wonderful radio stations and they are my heros to be honest. Below is a spot from the second session of when I had a couple more hours due to the fight delays and was able to finish the activation.


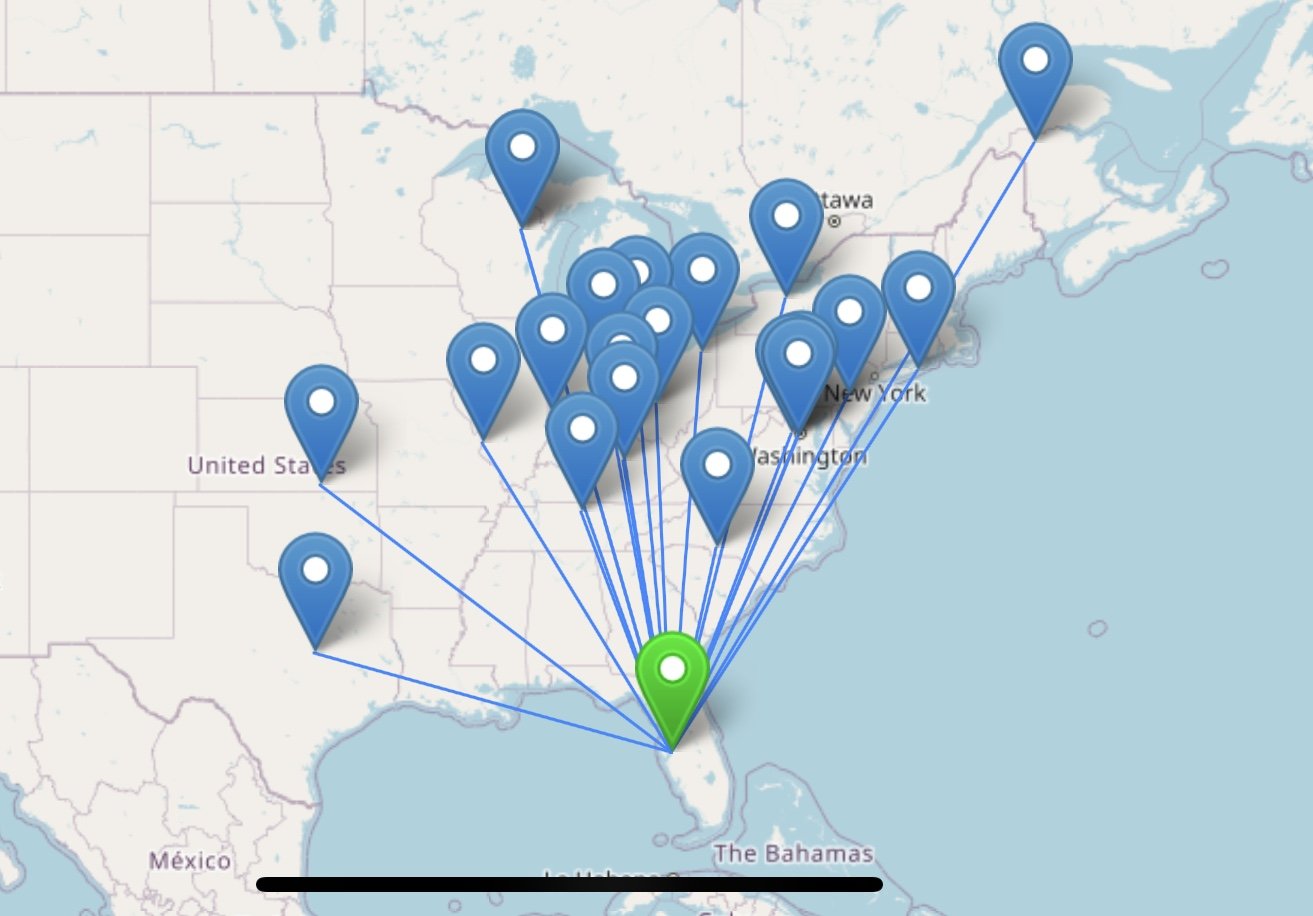
The QSO map looks a lot like I thought it would other than I didn’t expect the mid west and eastern contacts at all. I also figured on a few Japan contacts to be honest, I really thought I would get a couple with how active the Japanese people are in POTA. I only heard a few “J” calls the whole time and none of them could hear me. So when I was spotted by 5W1SA in Samoa then again by VE6WZ in Canada I was just sure I would get some Japan calls, but nothing. Figures. Maybe I did the grey line wrong…who knows.


So when I wrapped up the activation, the antenna was drowned and when I got back to the room I spread all of it out to dry. Note it took more than one day to dry since it rains here almost nonstop and the humidity wont let the stuff dry very fast. It probably won’t be done drying ít till I get home.
Well, that is the story of my activation from the isle of Hawaii while I was on vacation. Thank you for reading along and now go have some fun! What is your most insane story about an activation? Leave me a comment below and let’s have some fun.
The simplest radio and antenna setup I know of…
Ok, first the setup. I get the opportunity to do some ham radio on the big island of Hawaii. It is with about a two week notice and we are flying. Of course, I have this primal fear of my check baggage not making it to the destination with me or ever for that matter. So I have to carry my radio in my carry-on bag… with me. This bag has to house the radio, power source, antenna and any accessories I need as well, such as CW key, headphones, etc. The other bag will have my camera gear so it is pretty much full already. I will balance the load to get everything in those two bag though.

This is the little radio I finally decided on, the Elecraft K1.
So now you understand what I can take is a small QRP radio with a simple wire antenna and some sort of battery. It will be a cw rig, which typically perform better at QRP power levels anyway. At least this is what I have seen when attempting to work POTA with SSB at 10 watts… The radio I initially chose was the Penntek TR-35. It is really small and has all the bells and whistles I like to have on a POTA outing (which is what I plan to do while there) and I just plain like this little radio. I started immediately working on a resonant antenna for it so I could fore go the tuner and quickly realized that wire antennas are not really reliable for resonance without a lot of extra effort on site. Moving the wire around will change SWR. At least it did while I was experimenting with radiators the other day. I spent several hours with my nanoVNA and an EFHW and found I could easily get the SWR maladjusted by simply moving the counterpoise so I have some more homework to do on that before I am up to speed on that kind of antenna.

This is the situation so far, so now what do I do. Well, the solution is to use a different antenna and that means either bringing a tuner or some other kind of antenna that is more bulky. Well, due to space constraints, I chose to use a different radio.
Backing up and punting, so to speak, I chose the Elecraft K1 and a random wire antenna. The K1 that I have, has an internal antenna tuner that the TR-35 lacks so I don’t have to contend with getting the antenna just right once on location. This is a huge bonus since now I dont have to deal with possibly having something happen to the antenna and not being able to get an activation. I can tune just about anything with the K1.

So what does the kit look like now? I have the following:
Elecraft K1 (4 band radio with ATU)
Gemini travel key
41’ random wire with various radials
(8)AA battery pack for remote power. Emergency backup.
Small earbud headphones
Messenger bag style carry bag to house the goodies. (Peak Design Everyday Messenger)
Notebook and pens for logging
Throw line and weight to get antenna in the trees
Misc. little widgets like the BNC to screw lug adapter and a power cord for the cigarette lighter socket in the car.
8Ah LiFePo4 battery with charger.
There is probably a few more little items I have not mentioned here but you get the idea. This will allow me to setup a QRP CW station and work some epic DX stations that I normally dont hear at my home QTH. At least that is what I am hoping for…maybe I will actually be able to work some of those Japan calls I keep seeing in the evenings! Now I have worked QRP for a long time and I am fully aware that I may not even hear the next island, it is the nature of the beast. But I can usually squeak out at least the ten needed for an activation. So I am hopeful that it will work out. The only caveat is that I will have 2000 miles worth of ocean in basically every direction so the take off angle of my antenna is really important. I am hoping there will be a tall tree so I can get it as vertically oriented as possible. This will give me my best shot at getting an activation.
Oh, to be honest, I am pretty sure that this is not the simplest radio I have ever had, but for a portable system that will cover multiple frequencies effectively, the Elecraft K1 works really well. I really think this rig is a great combination of features and it is sad that Elecraft no longer makes this radio. If you love QRP then I can recommend this little radio…as long as you can live with just 4 bands and CW…which I can.
So there you have it, the radio going to Hawaii… wish me luck!
What draws me to QRP?
This is something I have asked myself over the years…

Penntek TR-35 QRP Transceiver
It seems that it is more than just the low power. It is the lifestyle of using small radios with little power into some sort of cobbled together antenna. (The antenna bit here is of my own doing, some QRP ops use really nice antennas and the performance speaks for itself) It is making contacts on this compromised system. It is using morse code with these little radios, as I also have a love of CW. It is something to do with the kit being small enough to fit into a small backpack including the battery. All this and more…
You see, I have never really wanted to deal with all the headaches that come with using amplifiers. They have all sorts of things that happen with them that you have to build infrastructure to support. Things like making sure your transmission line can carry the power, you HAVE to make sure that the system is properly grounded, all of it. If it isn’t grounded properly then there is all sorts of odd stuff that happens, like the cabinet becoming “hot” with stray RF and can cause RF burns if you touch it. You have a much more complicated system that must be connected correctly or you will damage something. You have to make sure your output from your transceiver is set to the correct level or you can damage the input to the amplifier, and so on. You also have to make sure your antenna is rated for the power you are delivering to it. I prefer simple systems that don’t require all the considerations that QRO involve.

ICOM IC-705 setup for a POTA activation.
QRP doesn’t have to deal with any of this. It does have other considerations though. Things like how efficient your antenna is or what the angle of takeoff is for your antenna. How much loss is in the transmission line? This is a big concern as you are already starting out with limited output power so a lossy transmission line will just exacerbate the problem.
Even with these short comings, I still find using low power to be really rewarding. The personal satisfaction of making a contact with just a couple of watts of power over great distances is intriguing and rewarding at the same time. Now, QRP is not without frustrations, like you answer a CQ just for them to keep calling as they can not hear you. Another problem is QSB will just shut off a QSO due to poor band conditions. Another problem I see is that others will start using the frequency I am on because they can not hear me and do not know I am already in a QSO. This is pretty common to be honest…

Small travel CW keys are really cool to collect.
One thing I have seen is that you either love it or hate it and there really is no in-between. You are either a QRO (high power) or a QRP (low power) ham radio operator… Strange how divided the hobby is in this regard but it is. Anyway, these are some of the reasons I am drawn to QRP operations and not QRO, what do you like about the mode you prefer? Leave me a comment and lets see what people like!
Today I activated the smallest park I have personally ever seen.

This activation included me having to use my backpack rig in its entirety. I used the ICOM IC-705, wire antenna and the rest of the whole kit from the normal pack I use.

I have been wanting to activate this park since we arrived in Tampa over a week and a half ago, but the park is closed on certain days and I had to arrange it to where I would be in Ybor city, and the park would be open at the same time…with good weather. Today was that day.
I even found a good parking space relatively close to the park and only had the walk about one block. This is unusual for me, as I am never able to find parking that is even remotely close to the location I want to go. So the Lord was already looking down on me on this day.

So this park is really nothing more than a museum with a large patio area that is also fenced with a huge brick and wrought iron wall, on the side of the museum. It sits on about 1/2 of one city block of space, this includes both “park” and building.
So today it is only me, a chicken and the park employees who were cleaning the fountain while I was there.

Ybor city has some sort of ordinance that protects the chickens, and there are chickens literally everywhere.
So in order to draw less attention to me and to not risk getting thrown out of the park for putting antennas in the trees, I opted not to throw a line into the trees to haul up an antenna, but rather instead, ran it across the back corner area and fixed the end of the antenna to the top of the fence gate as shown in the photo.
I ran the radials along the ground. I know this is not a very good setup, but I really only wanted to get the activation and then go shoot some photography as well.
Well, I started on 15 meters since I could see it was open and actually made several contacts there before moving to 17 meters. 17 meters actually netted me some contacts today too!!! Boy howdy! Today, even with my terrible antenna setup, I have landed an activation and still have yet to goto 20 meters. This is in large part to a team of dedicated hunters who are listening with good receivers and MUCH better antennas than what I am using. 20 meters netted several more contacts and I shut down after 50 minutes.

Way back over there in the back is where you can see the table that I used for the activation. It is kinda nice to have a big table to spread all the gear out on when you are doing an activation. Plus, in the middle of the day there is little to no activity in this park so I didn’t have to share space with anyone else too. If I could have escaped the band noise, and put the antenna in the tree (to be honest I probably could have if I had just done it quietly) and it would have been an epic activation.

The whole rig packs really neatly into this old camera bag. Thanks to KV9L for the idea on repurposing a camera bag for my POTA gear. That was genius of him and I had about 4 bags just sitting in the corner not being used at all…

I tied the end of my wire to the top of the wrought iron fence (which I think is actually aluminum but who’s checking?) and then laid it on top of some bushes in between my radio tuner and the fence to get it off the ground a little. I am obviously getting some capacitive coupling with the fence and this may be why I got as many contacts as I did. I also used 10 watts and not 5 today for all but 2 of the contacts… I know it says 5 on the log, but I made the note, that after the second QSO I turned it up to 10 after I took this photo. Something quite rare for me is to run more than 5 watts, but as you can see in the reports, people were barely able to copy me and then it was much easier after that with 10 watts. Once things got going I forgot to turn it back down and so you have it… From the map below, it looks like decent single hop propagation and since I was running such low power and a terrible antenna, I am happy to see even this many contacts.

Got K9IS in the log on two different bands today, that is kinda cool and I am starting to recognize several other calls that are showing up in my logs more and more. K4RUM, W8NGA, and WA9VFD area calls I have seen before that I am aware of, I am slowly trying to put names to these calls too as I like to learn the first name if possible. This is just something I like to do.

This is the remote tuner for the IC-705, It is designed to be used with it and it is actually designed to be strung up in the trees as a remote tuner. I made up a 6 foot cable for it that has the power, tuner control and coax all in one cable so it stores more conveniently. It is rolled up in the bag photo on the top right corner of the bag, I just used the spiral wire loom to make up the cable, that way when one of the three cables wears out, I can replace it easily.

Here is the view from the end of one of the radials to the tuner module. I ran two 10’ radials in opposite directions to help the wire get out.

The antenna ran up to this fence section across those bushes, so as you can see, it was really low to the ground. This still got me an activation though so I am happy with it.

You can see the park employee in the background where they were cleaning the fountain. This is why I didn’t bother putting up a wire or even asking about radio, since I was running CW, I wore headphones and I don’t think they even knew what I was doing. No one ever came over to see…
Here you can see the power setup for running the external battery, I run a power distribution block with power poles so I can plug in the tuner and the radio power, then I run them through a power meter back to the battery. Both the radio and the tuner have separate fuses for them so none of the devices are powered without fuse protection.

There was a good bit of rf hash in the area, but then again, there are numerous neon signs and no telling what else in the area, it is right smack dab in the middle of the city here so all bets are off here… I could still hear pretty well once I dialed the filters in a little better.
All in all, it was a great activation and I am happy to add Ybor City Museum to my list of parks. I think I have activated as many parks in Florida now as I have in Georgia! LOL Anyway, get that radio out and power that sucker on!!!
72 (well this time I was using 10 watts so 73 haha)
David WK4DS
How well do compromise antennas actually work?
Well, they work really good…for what they are.

3 DEC 2022 TenTec Argonaut 5 @ 5watts CW into the 20 meter Hamstick.
To expound on this simple statement, I have been using a 20 meter hamstick for a while now and making charts of my contacts to see how well they work by looking at the direction, distance, and minimum range of these little non-descript antennas. I keep a fairly detainles logbook too and I part of that log is RST information as well.
All of this information has been collected using QRP transmitter power of 5 watts or less to see how the other station can hear me and how many of those stations I can contact as well. To be honest, I was shocked at how good this little antenna works. It is fairly quiet (when you are not near man-made noise) and I can hear CW signals surprisingly well even on the tiny little Penntek TR-35 radio.

To get an idea of what you can do, just take a look at some of my recent AAR blogposts like Monte Sano State Park for instance. That one was done with the Penntek TR-35 and the 20 meter hamstick as well. Actually all of these recent activations have been with the lowly hamstick so far since it has gotten cold or rainy.

10 DEC POTA Activation map 20 meter hamstick and 5 watts of CW output in 30 minutes.
The above image shows what I was able to do with 5 watts and the 20 meter hamstick on a day when there was not quite so many amateurs on the air that could hear me either. I will check on some other hams and they will have tons of pile up activity and when I call CQ, it is quite different most of the time. I can occasionally get a small pile up going with just 5 watts, but I am not skilled at managing a pile up so I end up still working just about 1 per minute or maybe a little more than that. So I normally run about 1 per minute on a good day for the entirety of my activation and normally I don’t activate over 2 hours max, most of the time it is 1 hour or maybe a little less, so the maps wont be quite so buried, but they do show the effectiveness of the antenna anyway. The first QSO that day was to Puerto Rico and the longest was to California. Not bad for 5 watts and a tiny antenna!
I was going to try to come up with some sort of scientific way to measure the long range effectiveness but in the end, there just ins’t any way to do it. The only thing I have is this little map and that is a pretty good representation. You see if it is to be scientific, there has to be a control and there has to be non-subjective measurements and the test has to be repeatable. This last one is the real problem, the atmosphere changes constantly, this is why we have QSB,,, So we cant reproduce the test exactly with a different antenna since when we test the second one, it will have different atmospheric conditions. We can try, but there is no real way of knowing if the two antennas got tested with the same conditions… so it really is pointless to compare them to other antennas.
So to summarize… A hamstick antenna is a type of portable antenna commonly used by amateur radio operators. It consists of a flexible metal rod, or "stick," that is mounted on a base and can be easily taken down and transported.
The metal stick of the hamstick antenna is actually a type of coil called a loading coil. This coil is designed to resonate at a specific frequency, which is determined by the length of the coil and the type of wire used. When the hamstick antenna is connected to a radio transmitter or receiver, the radio's electrical signals are sent through the loading coil, which converts the signals into radio waves that can be transmitted or received.
One of the advantages of a hamstick antenna is that it is easy to set up and take down. It can be mounted on a car or other vehicle, or it can be placed on a tripod or other base. This makes it a popular choice for portable operation, such as field day events or emergency communication.
Another advantage of the hamstick antenna is that it is relatively inexpensive and requires minimal maintenance. It is a simple yet effective way to get on the air and make contacts with other amateur radio operators.
Overall, a hamstick antenna is a convenient and cost-effective way for amateur radio operators to communicate on the airwaves. It is a popular choice for portable operation and can be easily set up and taken down as needed.
So grab your hamstick and take to the airwaves and make some contacts!!!
David
WK4DS
72
POTA in the rain, it is still fun if you go prepared for it.

The fog was incredible on this day.
If you knew that I had already written this post once already…my rapid fire mouse press killed the first one. So here goes again…

Looking at this now, I look like an old wet hen in this photo…lol.
This day started off with a lot of rain and a ton of fog at the top of the mountain. I got to the location and found it to be thoroughly inundated with water and it actively raining making it even soggier…if that is even a word. Once I found the parking space I like… right smack dab in the middle of the parking lot, I proceeded to setup my antenna.

The antenna is the 20 meter hamstick but since it was raining so much I added my drip proofing kit to it with the empty peanut pack. This peanut pack is metal foil so it is probably interacting with the antenna somehow, but I don’t know if it is as I have not checked yet…

Even with the rain, setup is fast and the system just plain works. Even with it slightly detuned, I still was able to work a little over 40 stations in about an hour. This antenna (a hamstick) with tuned radials just works really well, even with QRP power levels. It takes about 3 or 4 minutes to screw the sections together and spread out the radials and then it is back into the dry truck for the rest of the operations.

Here we have one of the counter weights that holds my radials taught without having to use ground stakes or ropes or anything. Also of note is that it is raining so much that the grass is literally flooded around the truck with a couple of inches of standing water in the grass. I was hoping this would help my antenna, and it may have, but it being detuned hurt me more I am sure…

Just lay the radial in the water, it will be fine…
As you can see here I tested the system once I got into the truck to see what the center of the SWR null was and is it at 13.9mhz, which is about 150khz below where I set it when I first tuned the antenna. Once it stops raining, I plan to have a session where I hook up the antenna and check it again, and probably retune it with new radials and possible tune it to 14.1mhz to get the antenna closer when deployed wet.

The radio of choice for today’s adventure is the Penntek TR-35. I chose it because of the compact size and the fact that it is just plain fun to use. The compact size allows me to set everything up on the console of my front seat in the truck and I still have room to log. That is a big perk of this radio, it is so small that it literally just sits in the corner of the space out of the way and it has a dedicated knob for everything I like to change while operating. What a dream little radio… I cant wait to get a shot at operating the TR-45L at some point, that is gonna be sweet.

My mobile POTA setup currently, as of 2022.
Another big deal about this radio is this feature pictured below, this is the menu for the memory keyer. Yes, it has two memories and that is the perfect amount to have for an activation. More would be better, but two gets me a CQ memory and a closing memory. By having these memories I can do some house keeping between contacts at times like add times or park numbers and such to the logbook. This is super helpful when there is a pile up as I like to document time, band, call, and signal report. This is just my preference though and is not needed for POTA, but it does help when someone sends me a QSL card as I can confirm the contact properly.

The take away from this activation is that you need to check your resonant antennas if you plan to operate in inclement weather as they can change and your radio could see high SWR and not get out very well or worse, it could be damaged from excessive SWR… So I like to check the SWR occasionally now to make sure things have not changed and if they have, that they are still within operational parameters so I can activate with out fear of damaging my radio. All in all it was a great day as I netted 42 contacts in about an hour and this is a great trip for me. I operate alone almost exclusively so I have to do everything myself, this is why I paper log while activating and then I enter the log into the HAMRS app once I get home. I have a wireless Bluetooth keyboard that I use with my iPhone and it goes really fast that way. Thanks for taking the time to read my blog and please hit the like button if you liked it.
Get out there and get on the air!
David
WK4DS
72
Ten Tec Argonaut 5 goes to the park and then gets a new fan!
I love this radio, it works so well and is really easy to use with minimal menu settings. Then again I love all TenTec radios and have an unhealthy addiction to the brand…lol. Is it really that bad of a problem? I bought this one “for field use”, you know… like Field Day in June or POTA, but I have found things about it that keep me reaching for other radios most of the time. Let’s take a look at some of these short comings for a field radio that I like to use while doing an activation.

So I get this radio out much less for a couple of reasons… The main one is that it doesn’t have a CW keyer memories built in like the ICOM IC-705 and the Penntek TR-35 have in them. This is a big deal if you plan to activate for more than an hour or so as calling cq over and over manually can be strenuous to say the least with time. You see the keyer does something for me other than relieve me from having to pound out the CQ all the time, it BUYS me time. I am able to make log notes and fill in missing parts of the log while it is happily sending the CQ for me. This is a huge help after a quick string of QSOs and I am getting the times written down along with my usual log notes I like to make.
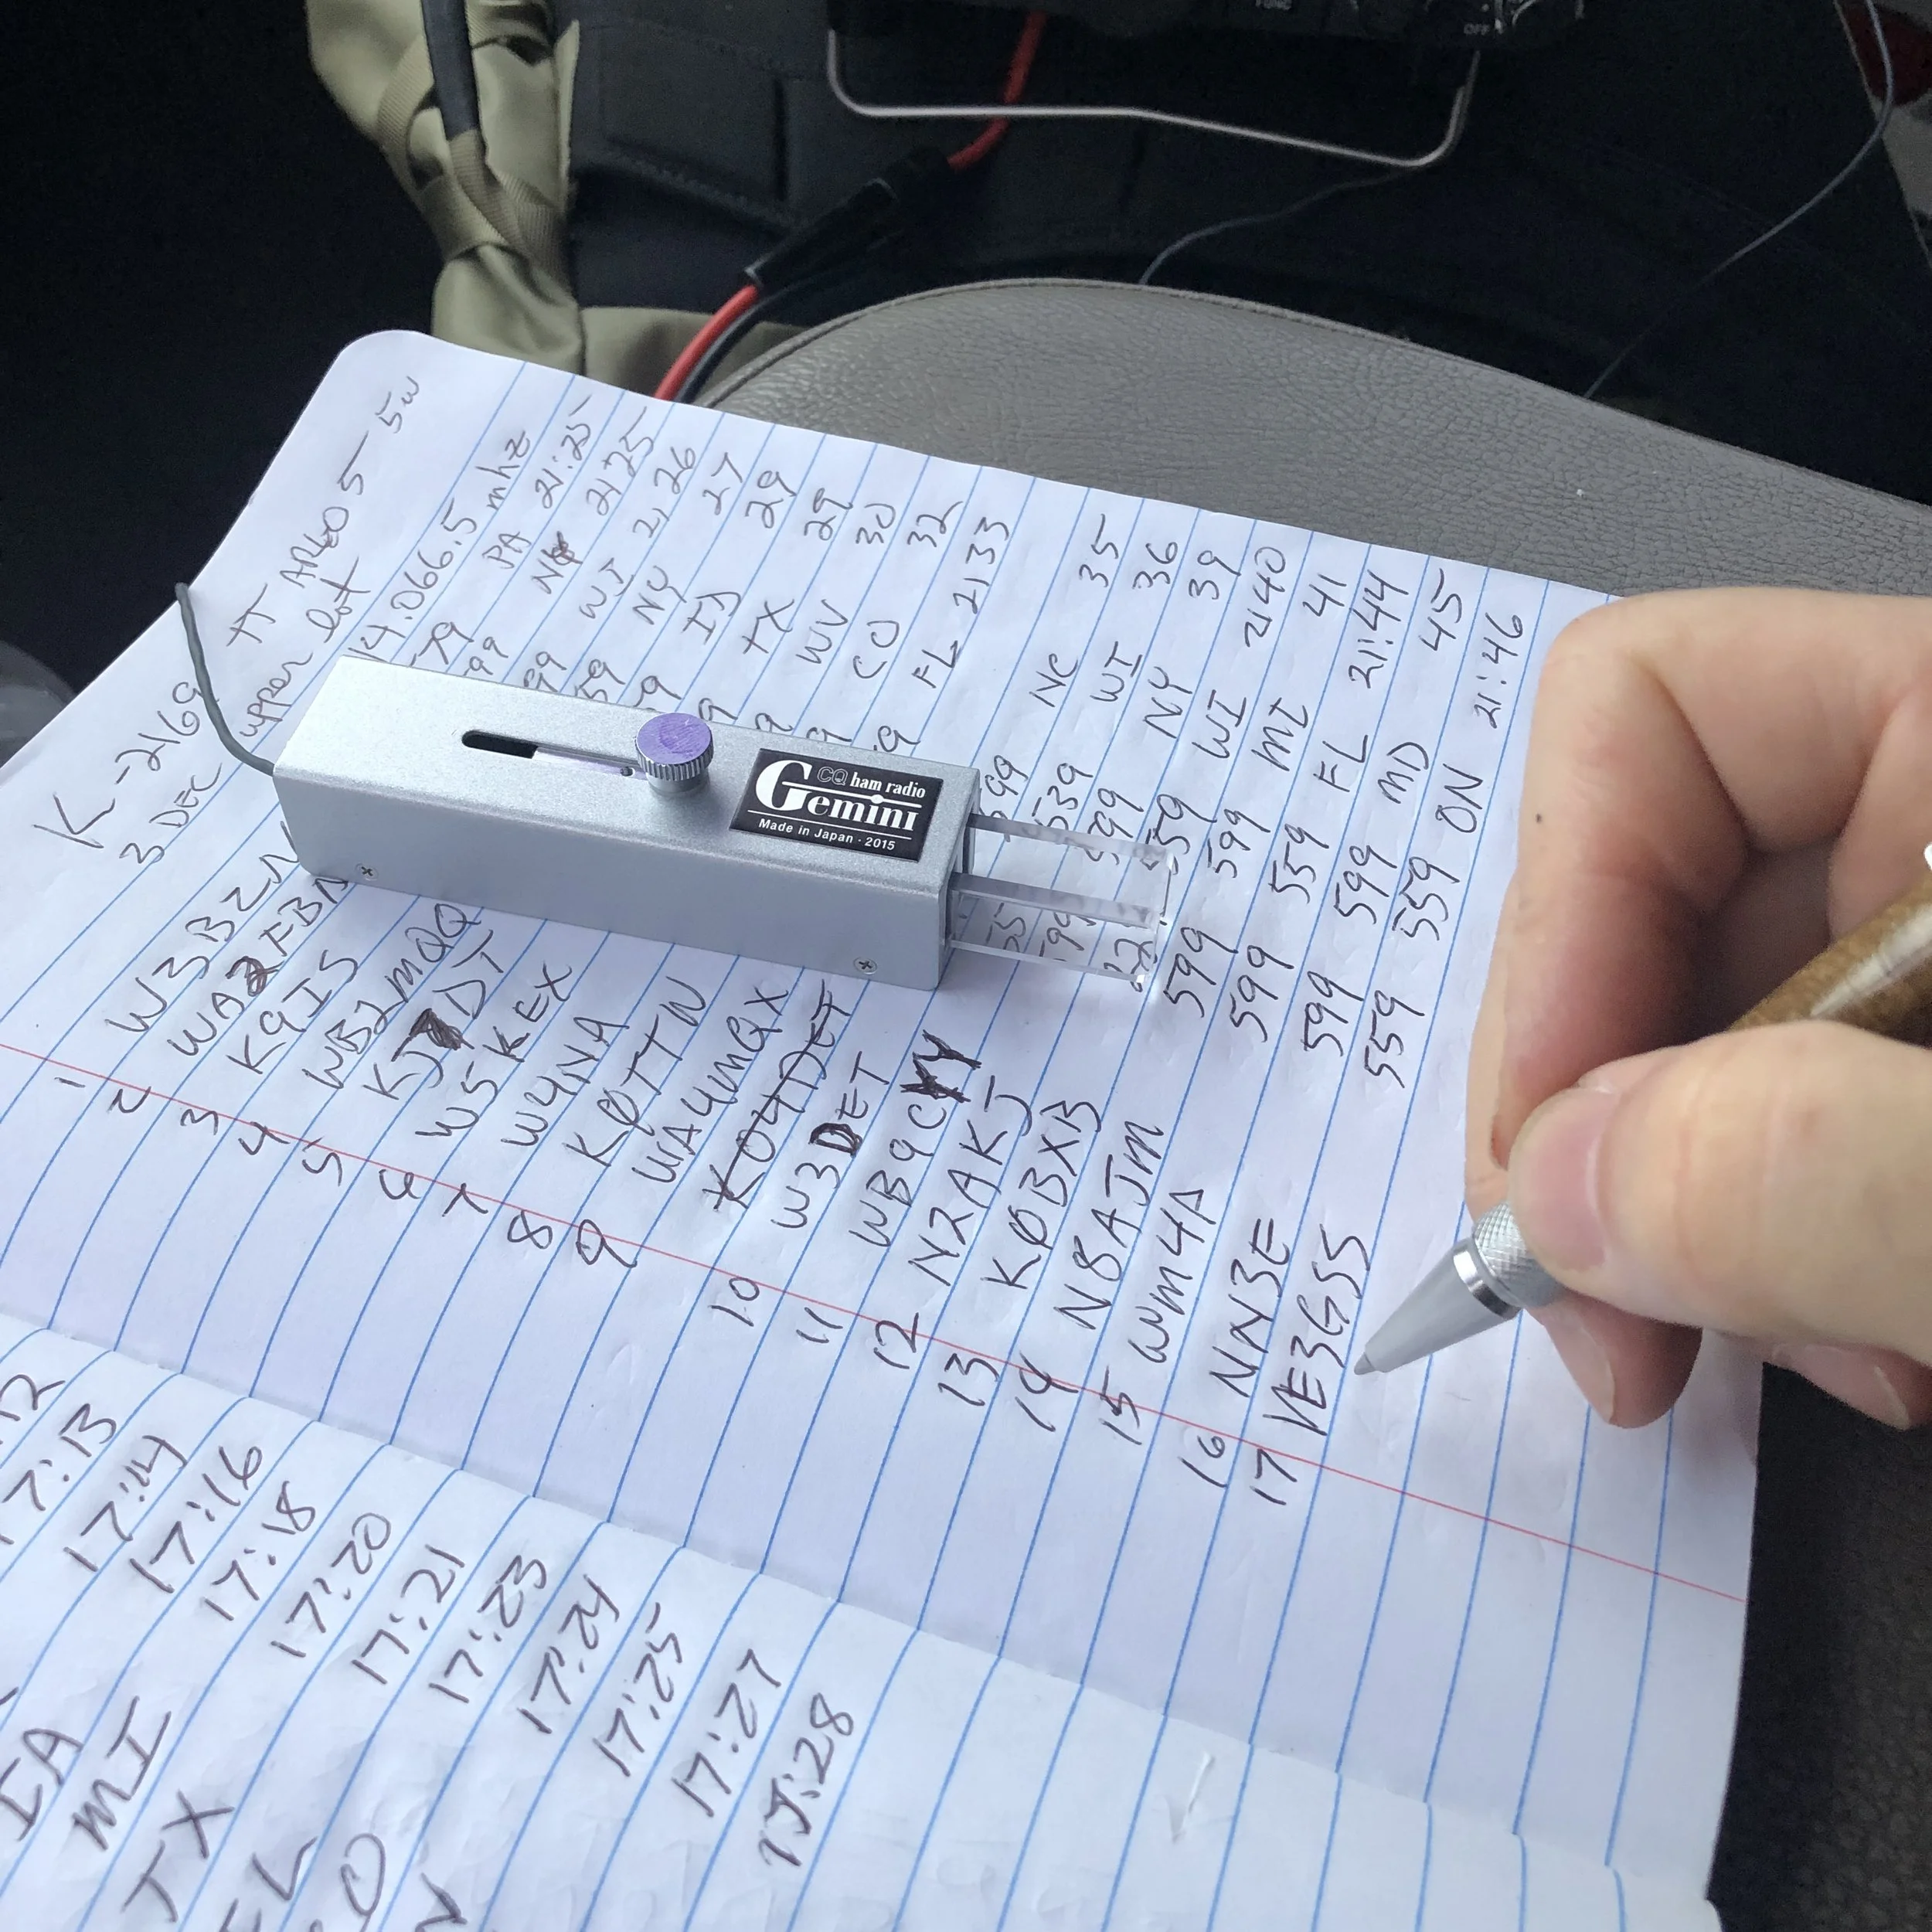
Quick rabbit to chase here… There is a few notable call signs for me on this page. K9IS is my first Hunter to get to 50 QSOs with me and KJ7DT has been showing up in my log more frequently lately too. The other call is the Canadian, just because he is DX…lol. Always cool to have those DX callsigns in the logbook. Now back to your regularly scheduled chat about the radio.
The next reason I don’t normally grab this radio is that it is fairly large compared to the other radios too. When I am operating in the truck, space is a valuable commodity and I am not able to spread all the gear around easily, if you will notice in the above photo I actually have the Argonaut balanced on my camera bag so it wont be in the way of logging… This actually worked out pretty well though and I think I will come up with something for the other radios to sit in the same area in the future, it was really convenient having the whole surface for my book and key.
The next reason is that the fan is crazy loud and runs non-stop even when I have it turned down to 5 watts for my QRP ops.

A little about the activation today is also in order. I went to K-2169 (my local park) and went to my quiet place at the top of the hill. As you can see, I had the place to myself as usual.

So I get parked, then start assembling the antenna and getting the coax into the cab of the truck when I notice that the cable adapter I have on the base of the antenna is loose, I am not sure how long it has been loose, but it was pretty loose today, to the point the BNC connector spun when I went to install it. This is how I found it was loose. Point here is check those screw together connections from time to time. They work loose too. The one on the back of the radio was loose too… which I thought was odd since I have only used it a couple of times so far.

Although today I didn’t need them, the BNC converter is a nice adapter to have in your kit. I could have used regular PL=259 connectors today, but I had forgot that the antenna and the radio both use them so I just used the same cable I use for the other radios and it worked great.
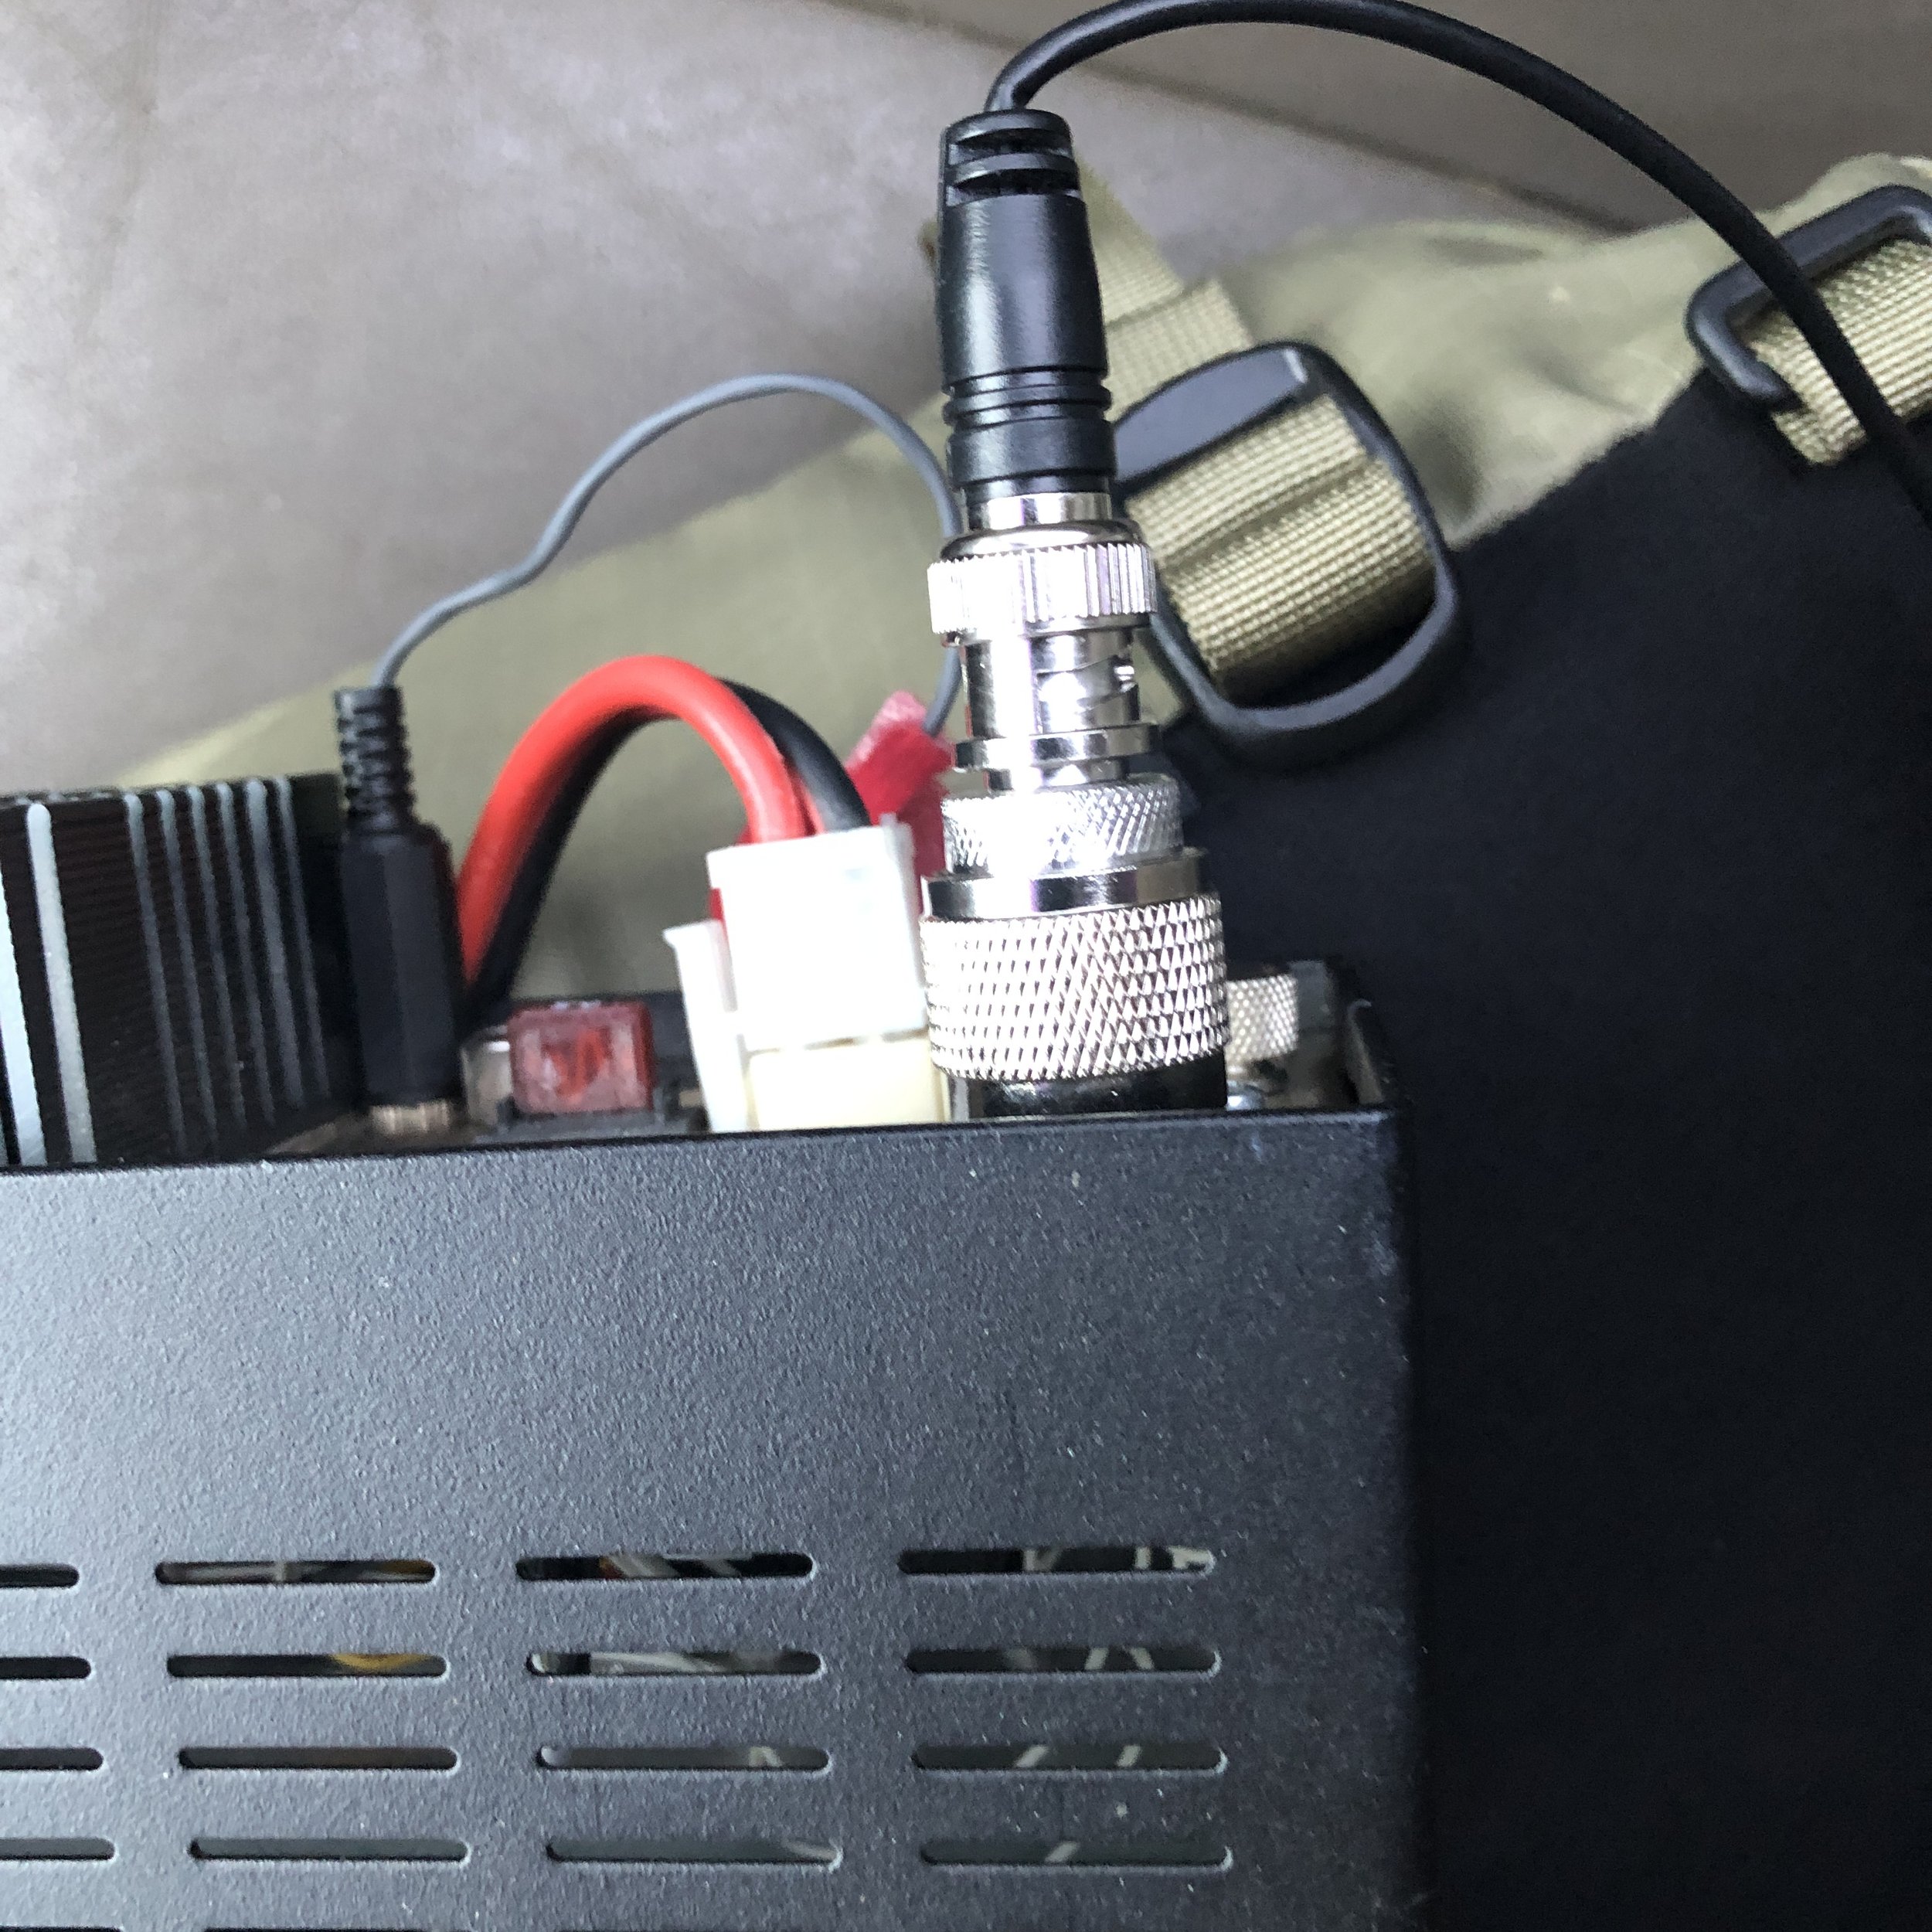
Another thing I have done is converted the power cable to use power-poles so I can plug it into any power source I use, which now also includes the power port in the truck too. I feel this is a worthwhile thing to do if you plan to work field ops a lot, standardization of the power connectors just makes sense.
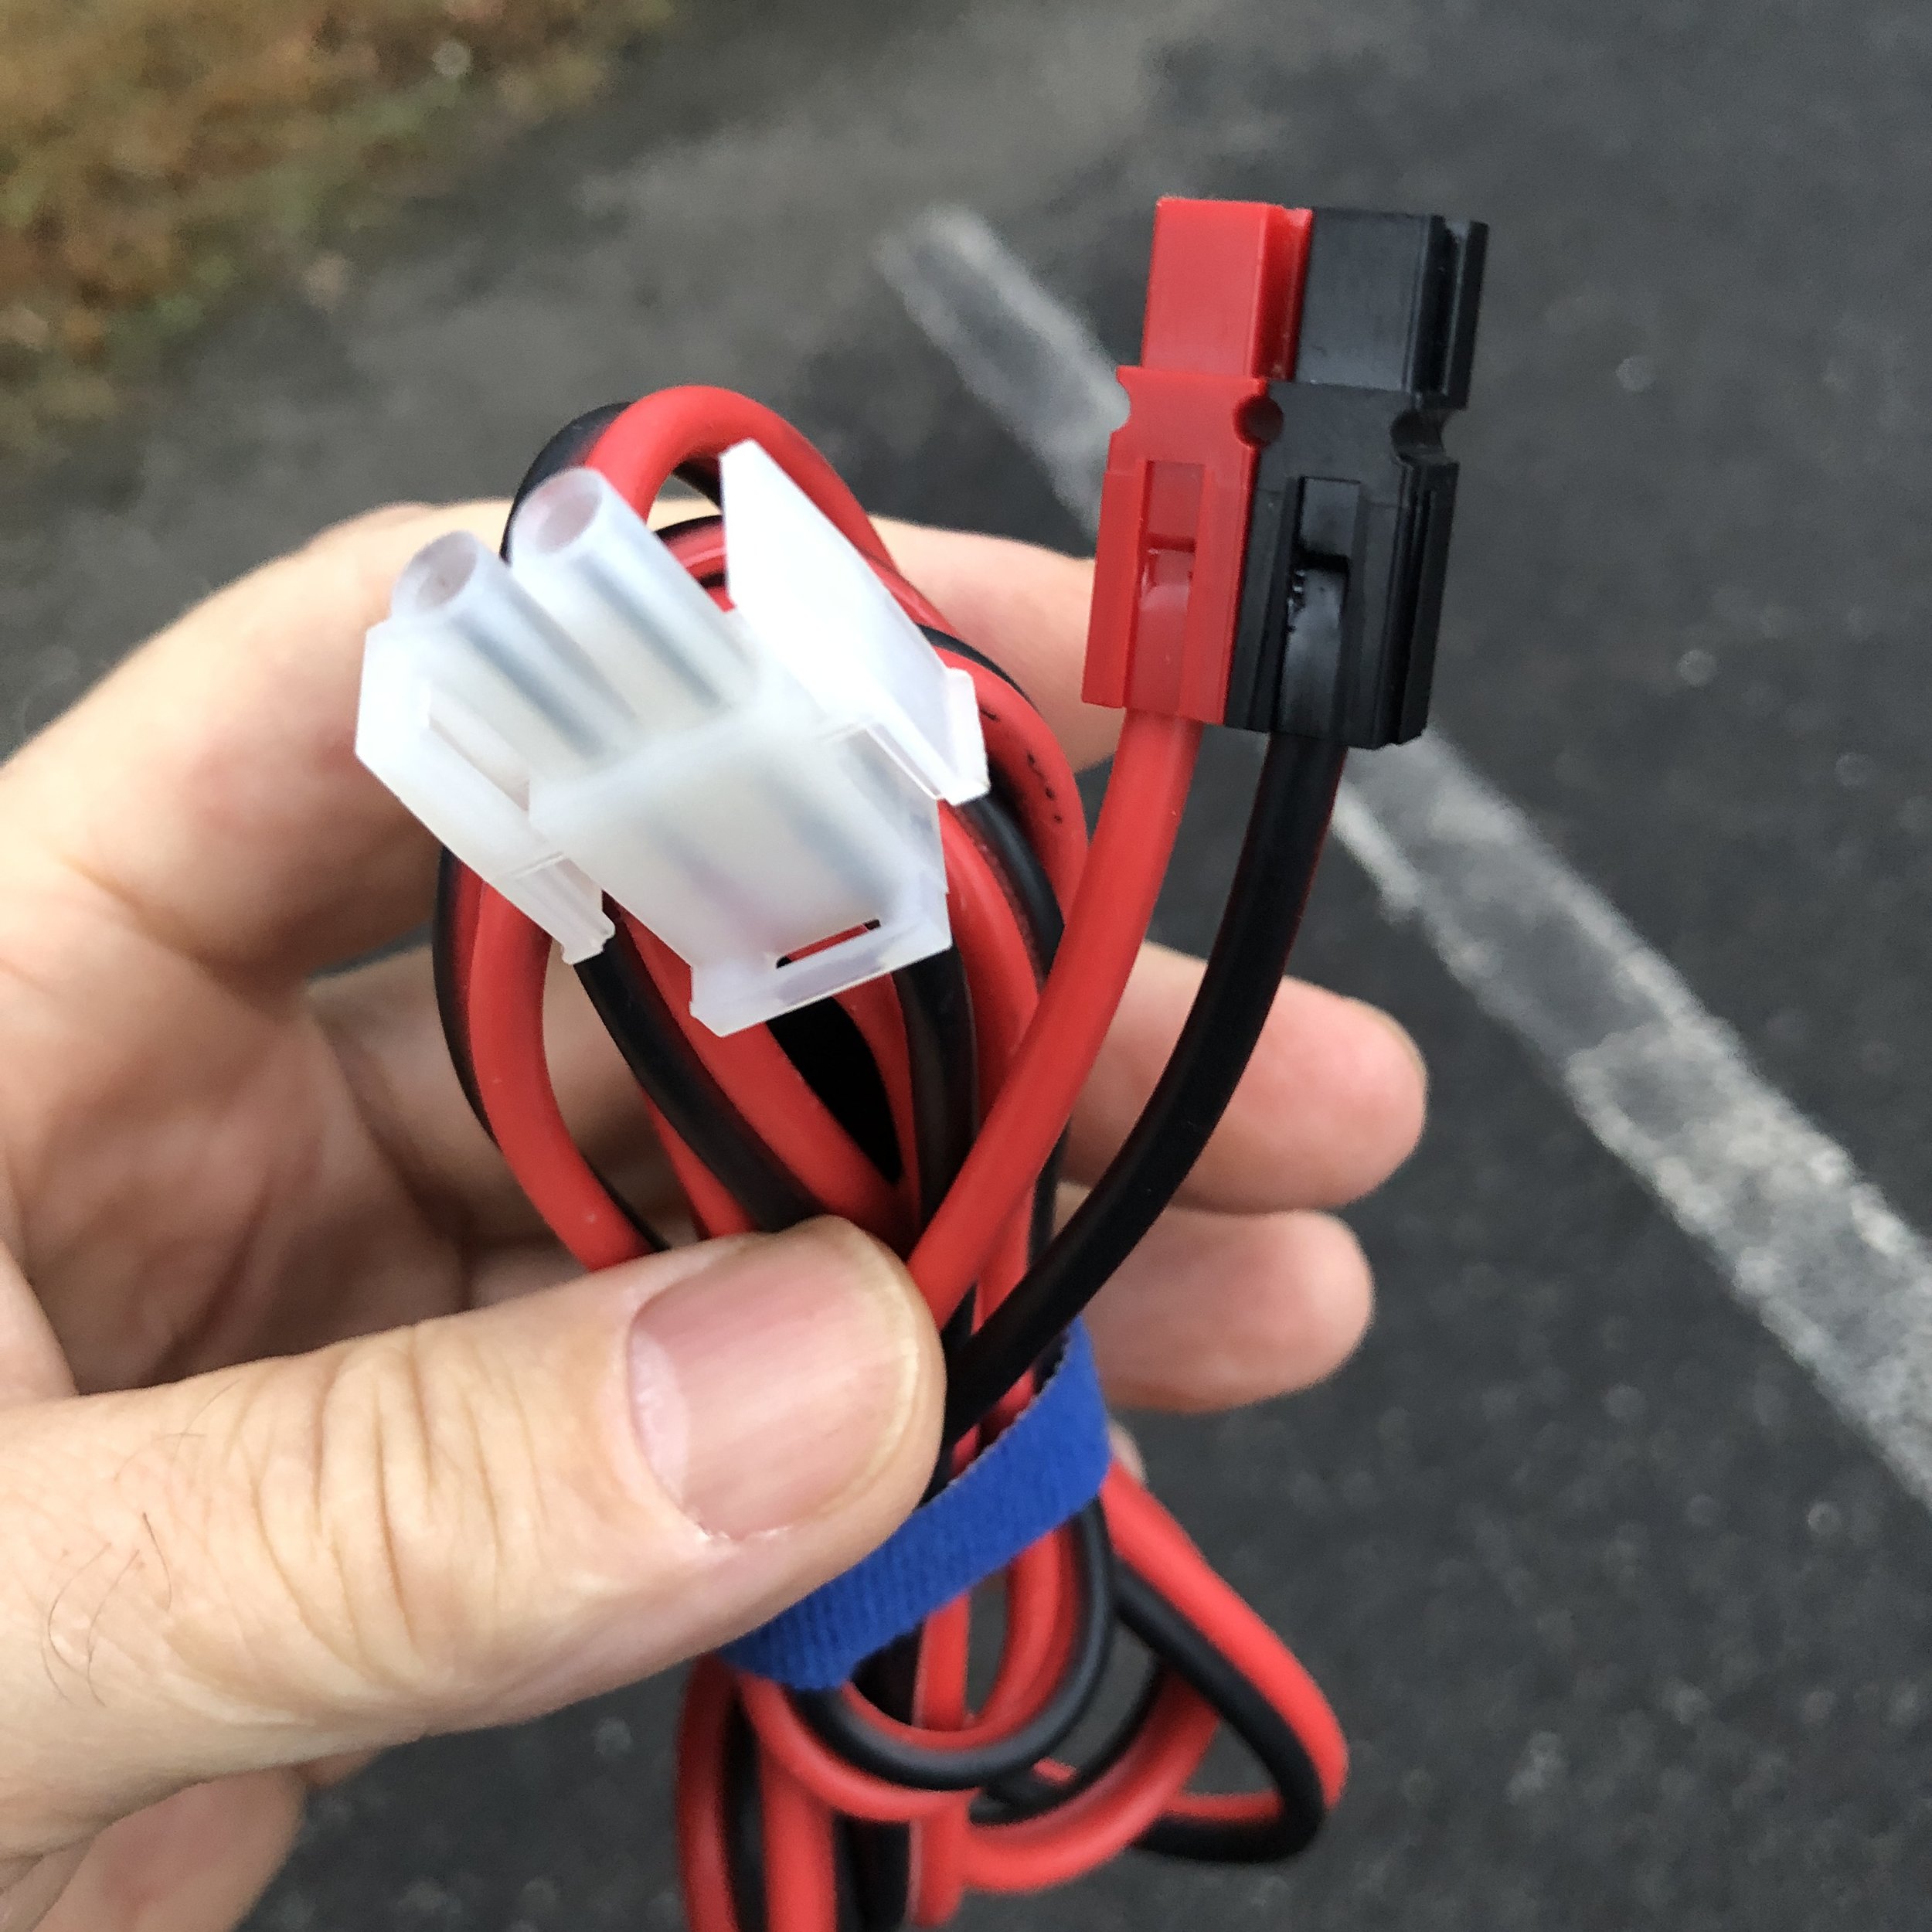
I bought this case at the Huntsville Hamefest from Gigaparts and it is for some sort of military radio, but with a little cutting here and there and a little foam here and there it now houses the Argonaut 5 and a MFJ manual tuner as well as a wire antenna and some other miscellaneous items


Me and Roger (KG4WBI) have this obsession of printing out and binding all the owners manuals for all our radios. So I keep this one in the case with the radio and it was needed on this outing to see how to set a couple of menu items I had forgotten about.

Now for the Argonaut 5 Radio Fan…
The fan on this radio is just plain loud, that is the only way you can say it. It is also wired to run non-stop for some reason. This is also a pretty large current drain for no real reason at all other than to make absolutely certain the finals don’t get too hot… At some later point, I plan to make a small thermal sensing circuit that will fire a relay to cycle the fan instead of it just running all the time. but first things first, I am changing the fan itself with one of the low noise fans that another op from a TenTec group shared and it worked really well for them. I downloaded a sound meter app for my phone to see if it was measurable and have the two meter readings to see for myself. Ignore the AVG and MAX values, I watched the meter for a few minutes and did a screen capture of what was really going on to get a more representative number. 65 seems pretty low, but when you are listening for signals near the noise floor, every dB matters so the new fan comes in at 45(44.9 is what I captured in the screenshot and this was a pretty good average from what I watched on the meter.) Now also remember this is an iPhone app and not a legit sound meter, but it does give us something to look at for reference. If it is right, which is possible, then this is a 20dB difference. This is huge as decibels are logarithmic in nature and not linear, this is equal to 100 times quieter! That is awesome and totally worth the effort! To the ear, this new fan is dead silent, I didn’t think it was even running when I turned the radio on actually. So I am really pleased with how this mod turned out, the radio has one less detriment to keep me from using it at parks!

Old fan measured right at the back of the radio.

New fan measured in the same place as the old fan, that is a 20dB change!!!!

This was the ham shack with the Argonaut turned off for reference.

Orderd this little guy from amazon and had it in a couple of days.
This fan is literally a plug-n-play replacement for the factory fan in the radio. I literally removed the case screws, the fan screws, one wire tie on the wiring harness and unplugged the fan. It was the easiest mod I have ever done to a radio…ever.

Something of note, this new fan is thicker and the old screws would not work in my application, but I had a couple of screws in the junk drawer that were about 1/4” longer that worked great so I am back in the game!

The fan connector is a standard computer fan plug so it doesn’t need anything special at all. This is refreshing as it seems everybody wants to use proprietary connectors these days for some reason.

All in all, this has turned out to be a great little excursion in more than one way. I got the Argonaut on the air and I also got the fan upgraded afterwards too. I really like the ergonomics of the little machine so I will see how I can fit it into my regular activations and use it more now. Do you have a radio that you love, but just dont use because of some little issue? Let’s hear what it is and see if I am the only guy that does this.
72
David
WK4DS
Wormsloe State Historic Area POTA AAR

This is still the driveway for the original family that still lives on the property. It is also the entrance to the historic site as well. I could live with this being the driveway to my house, how about you?

Today I had my first taste of a deliberate QRM attempt on my activation. At least that is what I thought it was when it happened. I was operating on 14.061Mhz and all at once there was a station sending endless dashes on top of my activation.
I was telling Teresa what had happened and she asked if I had considered that it could have been someone with a broken key that was not aware or had pushed their paddle up against something and didnt realise it. You know, we are so quick to judge, it did persist long enough though, that I moved up to 14.061.5 to get clear of it and resumed operations unimpeded.
This got me to thinking, we want to think it is some LID just holding down the key to be annoying, but it could have honestly been a legit mistake by a hunter who was on freq and might have had to goto the door for something and in their haste to get up, they slid the logbook over against the key and since they might have also been wearing headphones, they couldnt hear it sending non-stop dashes over the air. I mean, it could happen…maybe. It could also just as easily have been someone who has a sked on that freq every day at that time and they dont want to move for some reason. We have no real way of knowing unless they tell us.
With CW, this is much harder to decipher since you normally dont hear music or some other non-sense on frequency. It will be a “ditter”or something like that. I still made my activation today with 23 QSOs in the log before going QRT and doing some sight seeing with the wife.

I am starting to enjoy activating different parks, it is interesting when you see different people and they ask what you are doing. I talked with a couple of different park employees and they were very positive when I showed them what I was doing and how my rig was basically a zero impact setup. One actually joked that I should take a look at THEIR radios and see why they cant talk across the park! LOL So word is starting to propagate about our POTA hobby and the response I have gotten so far has been positive. I didn’t think to get a photo with a park ranger for the blog…next time I will remember.

The park has some interesting ruins on site and we walked around and saw them while we was there. It is a really interesting location if you are in the Savannah area with s radio and some time on your hands, it is worth a look. It does have a day use fee though so be prepared for that if you are going into the area, you part to enter per person.

Anyhow, you can always tell if I am activating the park, just look at what way I am parked in the space. lol. I back into the space so I can use my hamstick with the radials run into the grass. I operated today on the truck rear lid as a table, it worked great. I used the IC-705 and weather worked with me too. I am looking forward to seeing what parks I find myself near in the not to distant future with my radio in the truck… I now find myself looking at the idea of rotting a coax into the cab along the chassis so I only need to deploy the antenna and get back in the truck where it OSS warm…LOL It is always something…

Like this post if you enjoyed it and let me know if you have ever had to work around a problem on the air.
72
WK4DS
David
A good day in the field for QRP CW...
This after action report is brought to you by yours truly as I have no sponsors at this time. HiHi Anyway, I went to the local state park for an evening activation and didn’t know what I was in for.
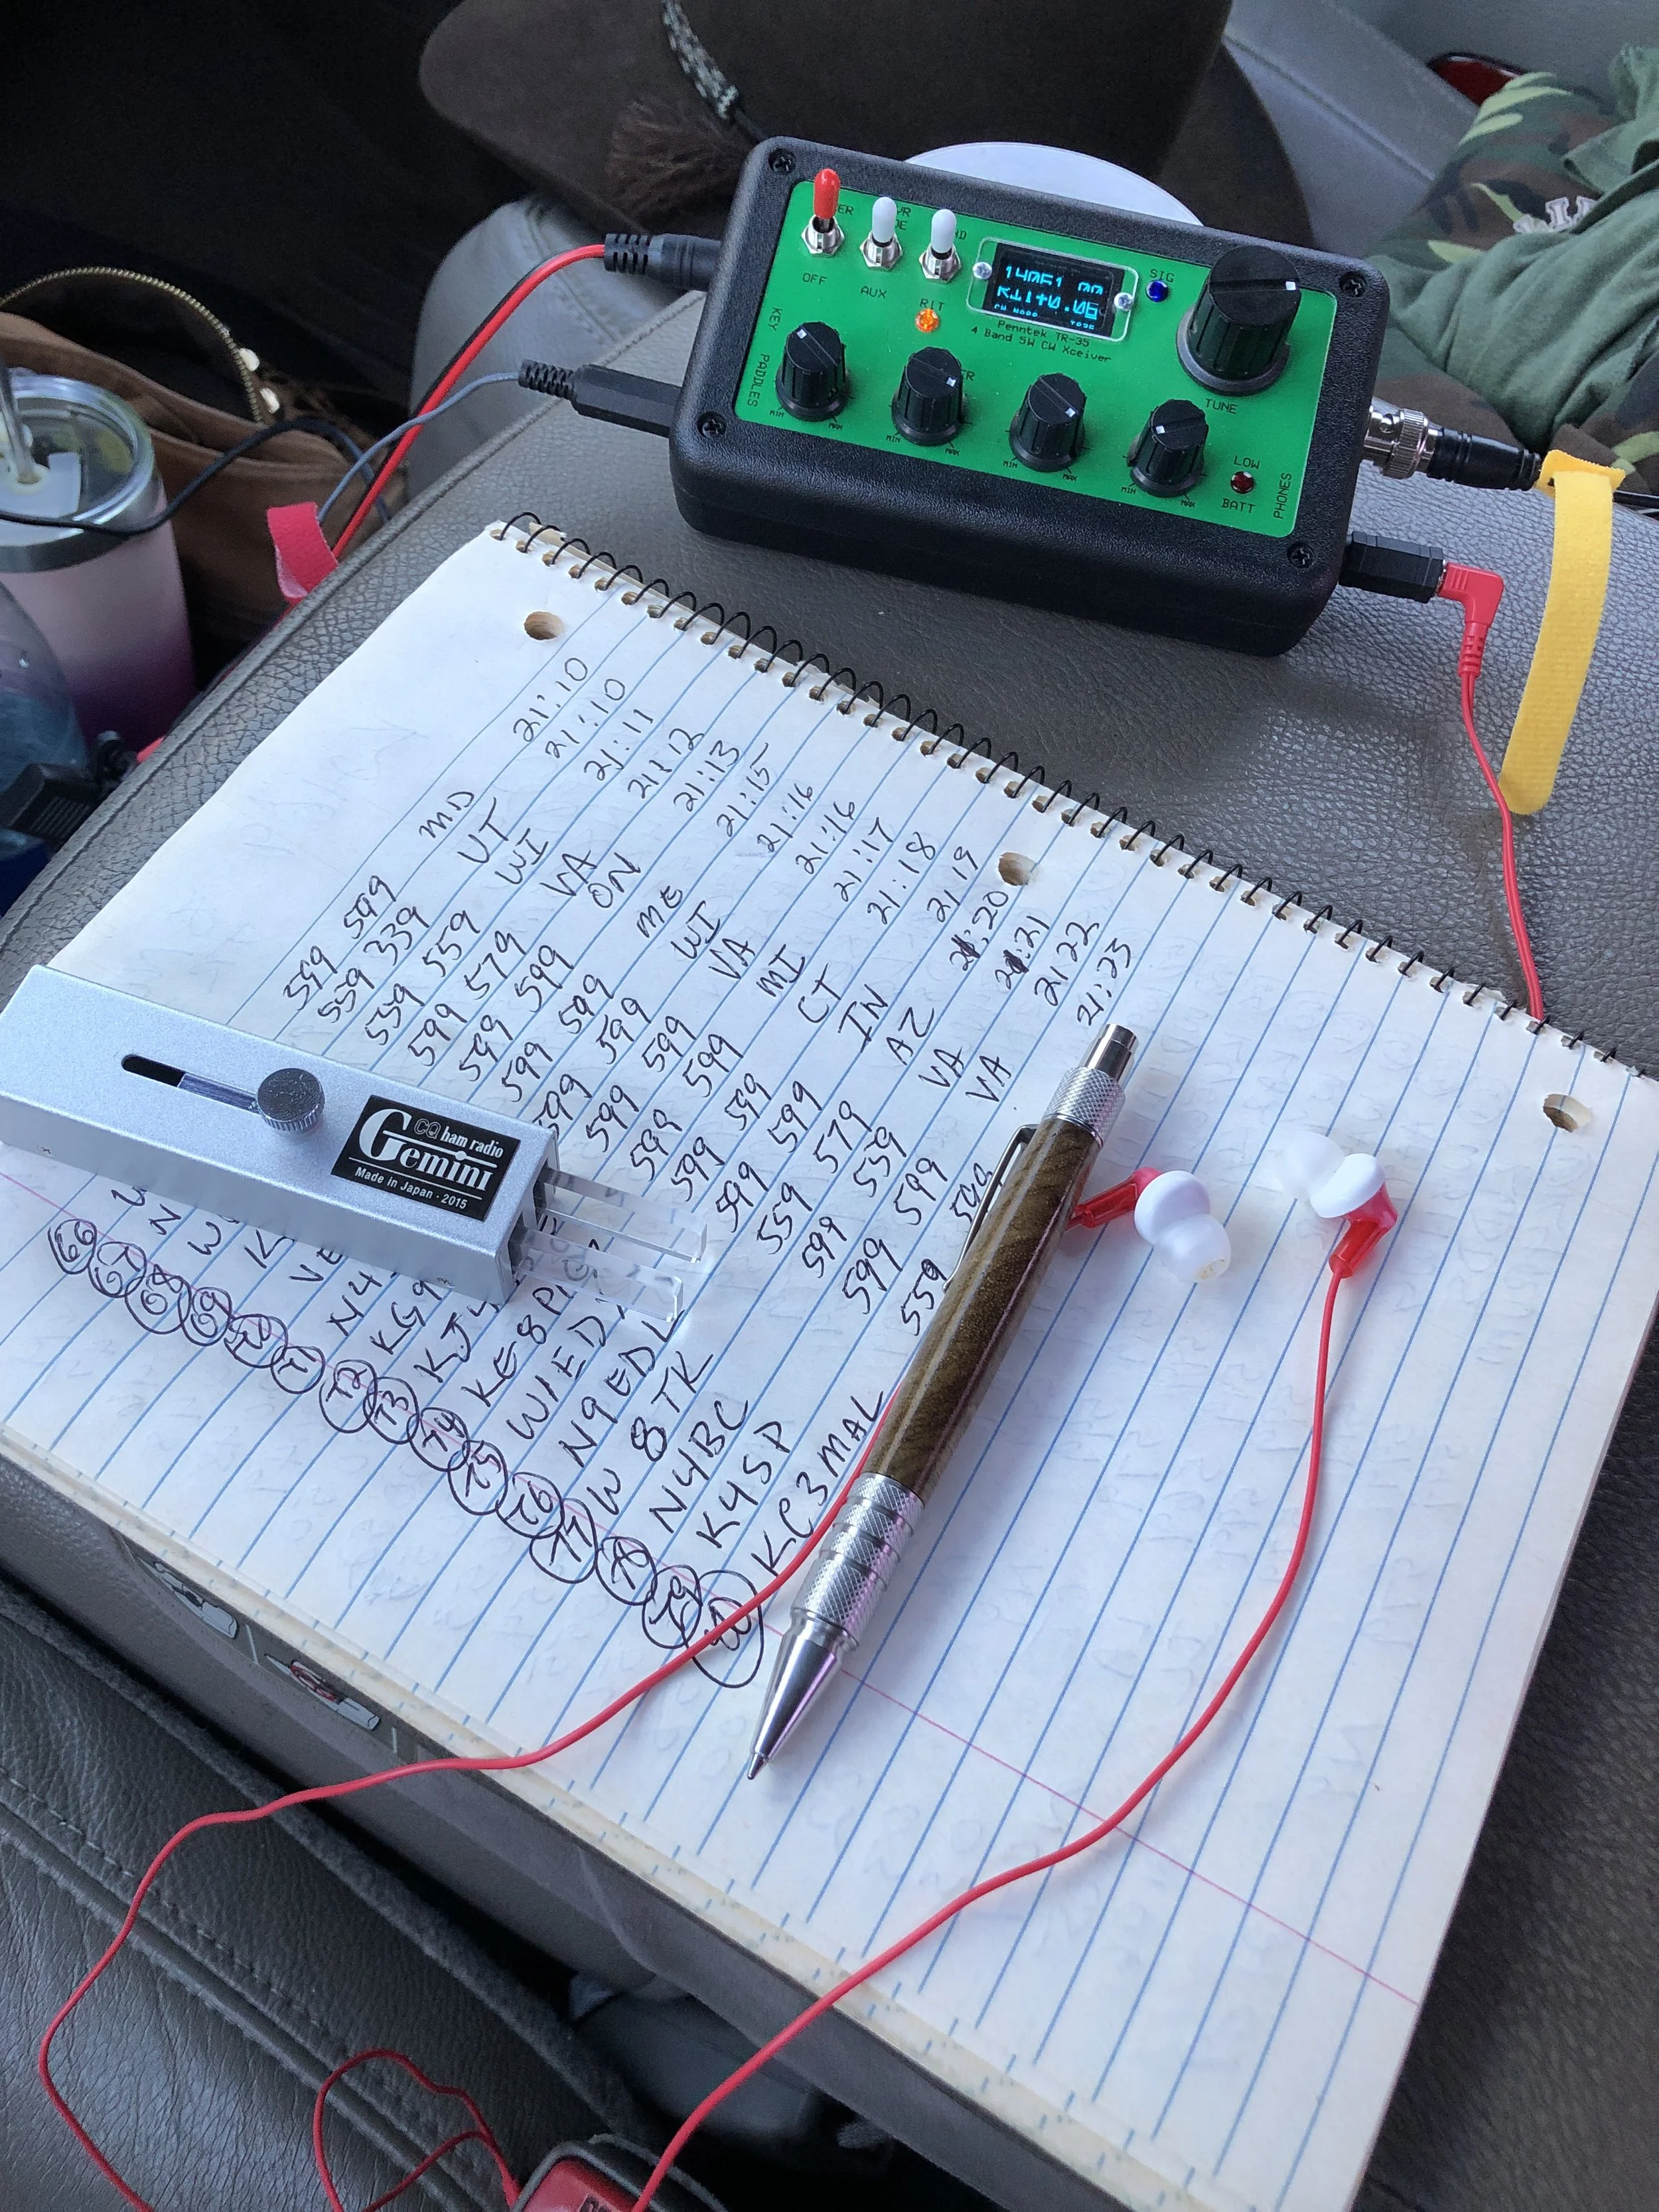
I setup the TR-35 with the “Trucktenna” (I think I will just start calling it that. LoL) and got on the air, but today I thought I would back the power down a little to about 4.5 watts to see if anyone would notice. That is a 10% reduction from my usual output power. Well the QSO speaks for itself.

Seems if the band is open, it really doesnt matter how little power you have, you will have a great time. I am about to build one of the little qrp power meter kits from here:
This way I can accurately set the output power prior to starting a activation and I will know how much it is for sure.


I made 80 QSOs and off I had more time, I think I could have made 100! The TR-35 is turning out to be a great little radio that I enjoy using. Even though it doesn’t do all the stuff that the other radios can do, it just works REALLY well. I can highly recommend it.


I also made up a power cord for my radios when inside the truck since they are all QRP and don’t pull much more than 1 amp max. The power port in my truck is rated for way more than that, so it is good to go. It would be interesting to know just how long those two huge lead acid batteries under the hood would last worth the TR-35…lol

Quickie activation of K-2175 (Fort McAllister State Historic Site)

I got an opportunity to activate a state park a long way from home. I went to Savannah GA on business and we stayed in an airBNB. Well, this BNB was just two short miles from a designated POTA site, how could I let THAT slip through my fingers?!?! Sometimes the best experience is the spontaneous one.
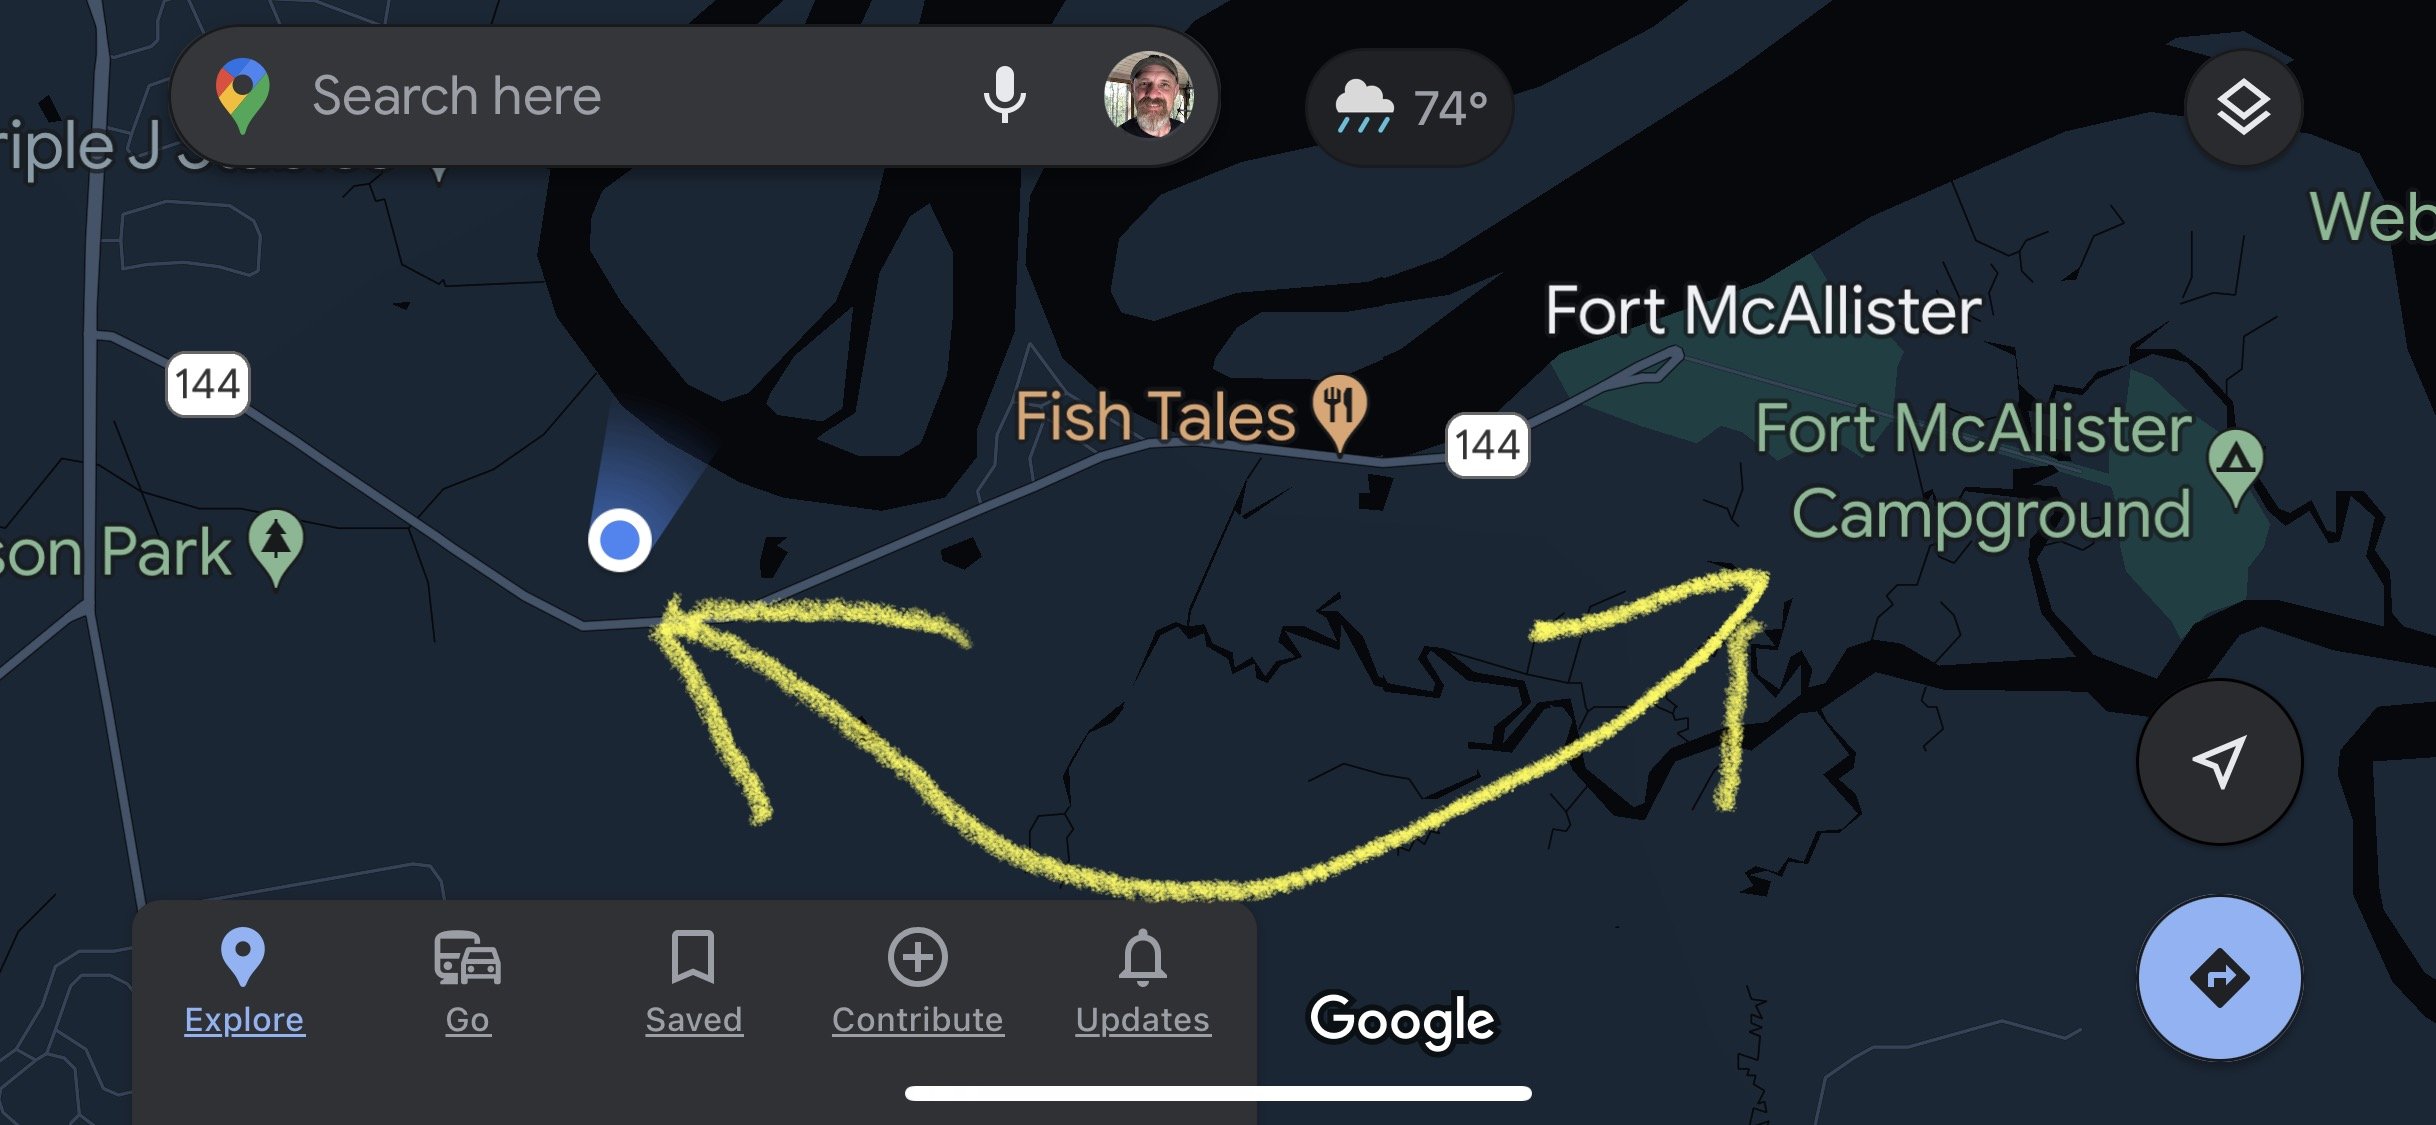

I had brought a couple of radios (TR-35 & IC-705) and antennas (40m EFHW kit and a 20m Hamstick) with me with the hopes of setting up on the beach one day for a little while, so I chose my IC-705 and the 20 meter hamstick antenna as these are the fastest to deploy. I only had an hour or so and wanted to maximize my time on the radio.
Fort McAllister is a tiny park and has a campground in a gated area. It is well kept and has a museum on site. The museum was closed by the time I got done playing on the radio so I can’t speak for it, but it was nice on the outside…
Did I mention that it was raining due to a tropical storm? Yeah, it was. Alot. So to keep the rain out of my BNC connections I fabricated a drip cover to keep the rain at bay for the time I was going to be activating the park.

What your looking at is a bag with both ends cut out from a pack of peanuts. Lol. I slid it over the connector and then taped it on with electrical tape for my temporary seal. It worked long enough to get the activation in without my SWR getting crazy so it must have done the job.
I also pretty much had the whole park to myself since it was raining. This was awesome as nobody was there to trip over my antenna and I could pick the best place to setup.


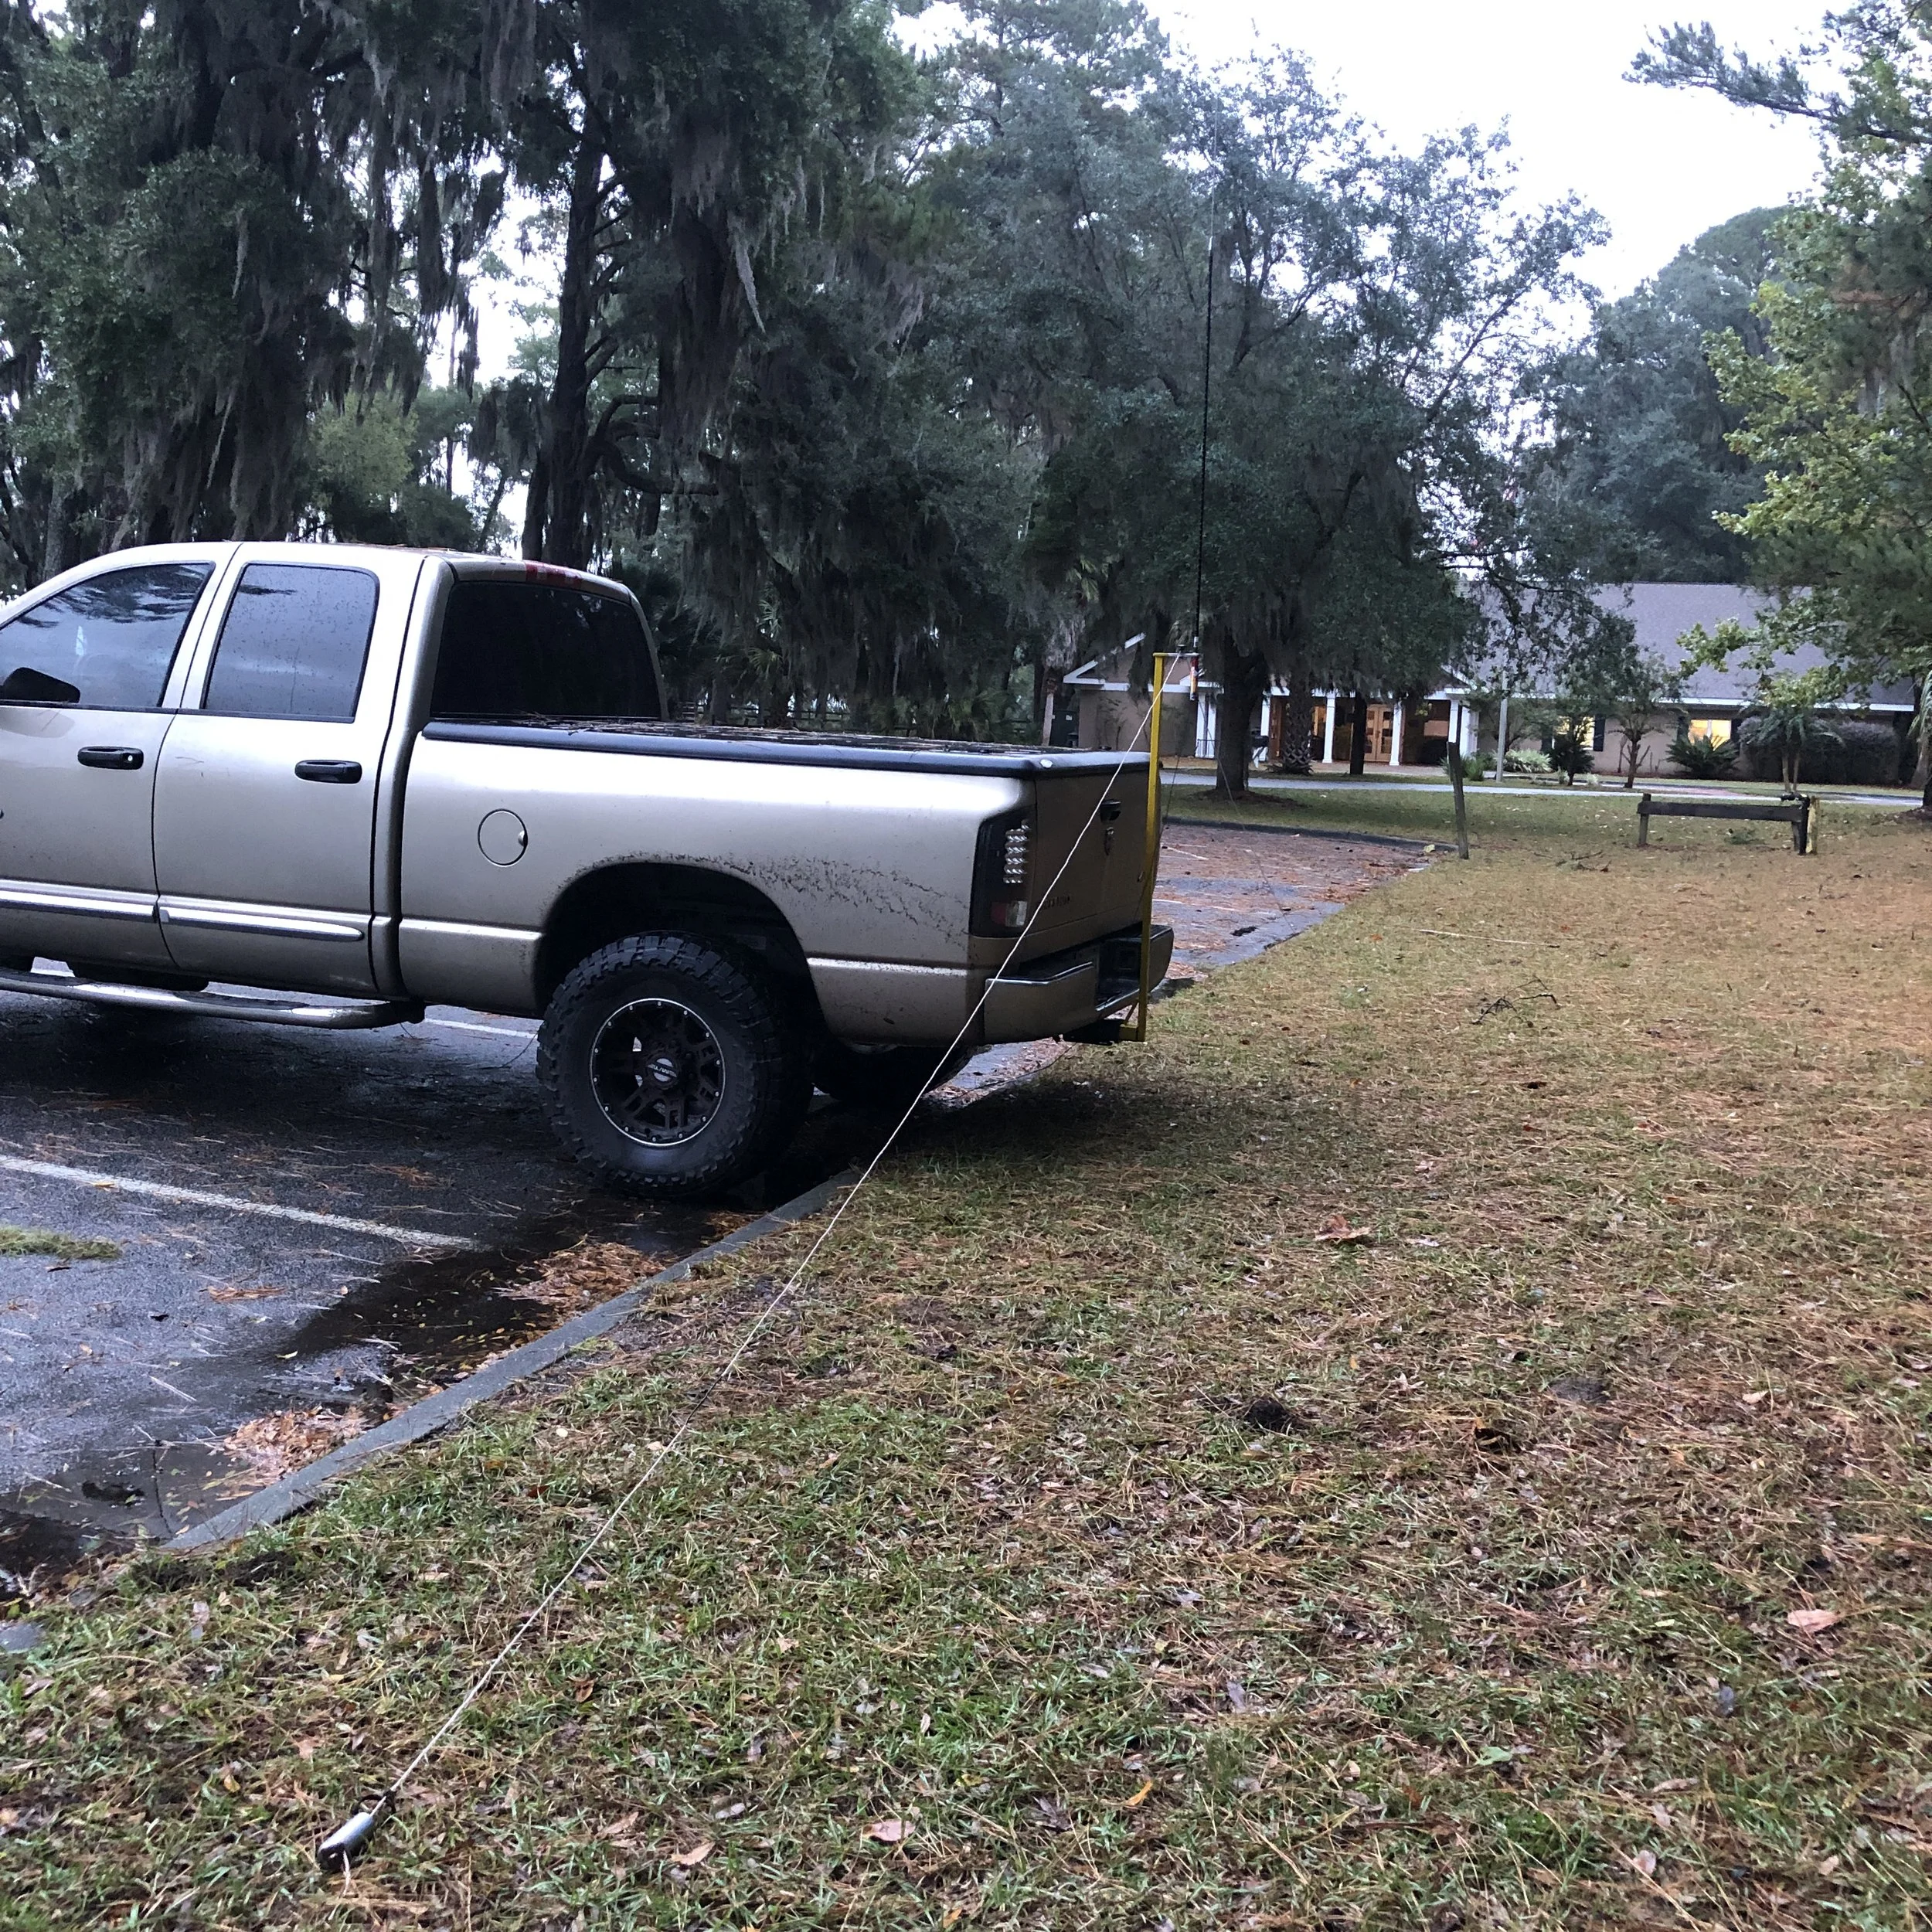
What you see is one of the two counter poise wires held in position by a stainless steel weight at the end. This worked way better than I thought it would to be quite honest. This rig goes up in just a couple of minutes and requires zero tools. Quite literally two minutes and the coax is at the radio. Propagation is good too, just look at the qso chart below. It is on 20 meters with 5watts so there nearest contact is about 425 mile to Nashville TN. If I ever get the 40 meter version put together, I should get some closer stuff, at least that is the idea. Lol.

Although not as compact as the TR-35 I have been using, the IC-705 has a mountain of features that the little TR-35 just doesn’t have. Things like 8 message memories, an SWR meter, a output power meter, and tons of modes the other little rig just can’t do. I also like it since it is super easy to just operate with. It will run on the rear mounted battery but I made up a cigarette lighter cord with Anderson Powerpoles on the other end. I just plug my radio into my truck when operating like this and I am off to the races.

It didn’t take long to get a bite either. I started the memory keyer calling cq while I went to enter a spot on the POTA page and immediately got a call back way even before I got the spot up on the site! That was when I knew it was gonna be a good day. I logged 37 QSOs in, right at, 40 minutes, which is awesome! I was basically at a good stopping point when I cleared all the calls and the rain let up and I had made an official activation so I went QRT and packed up to go eat supper.
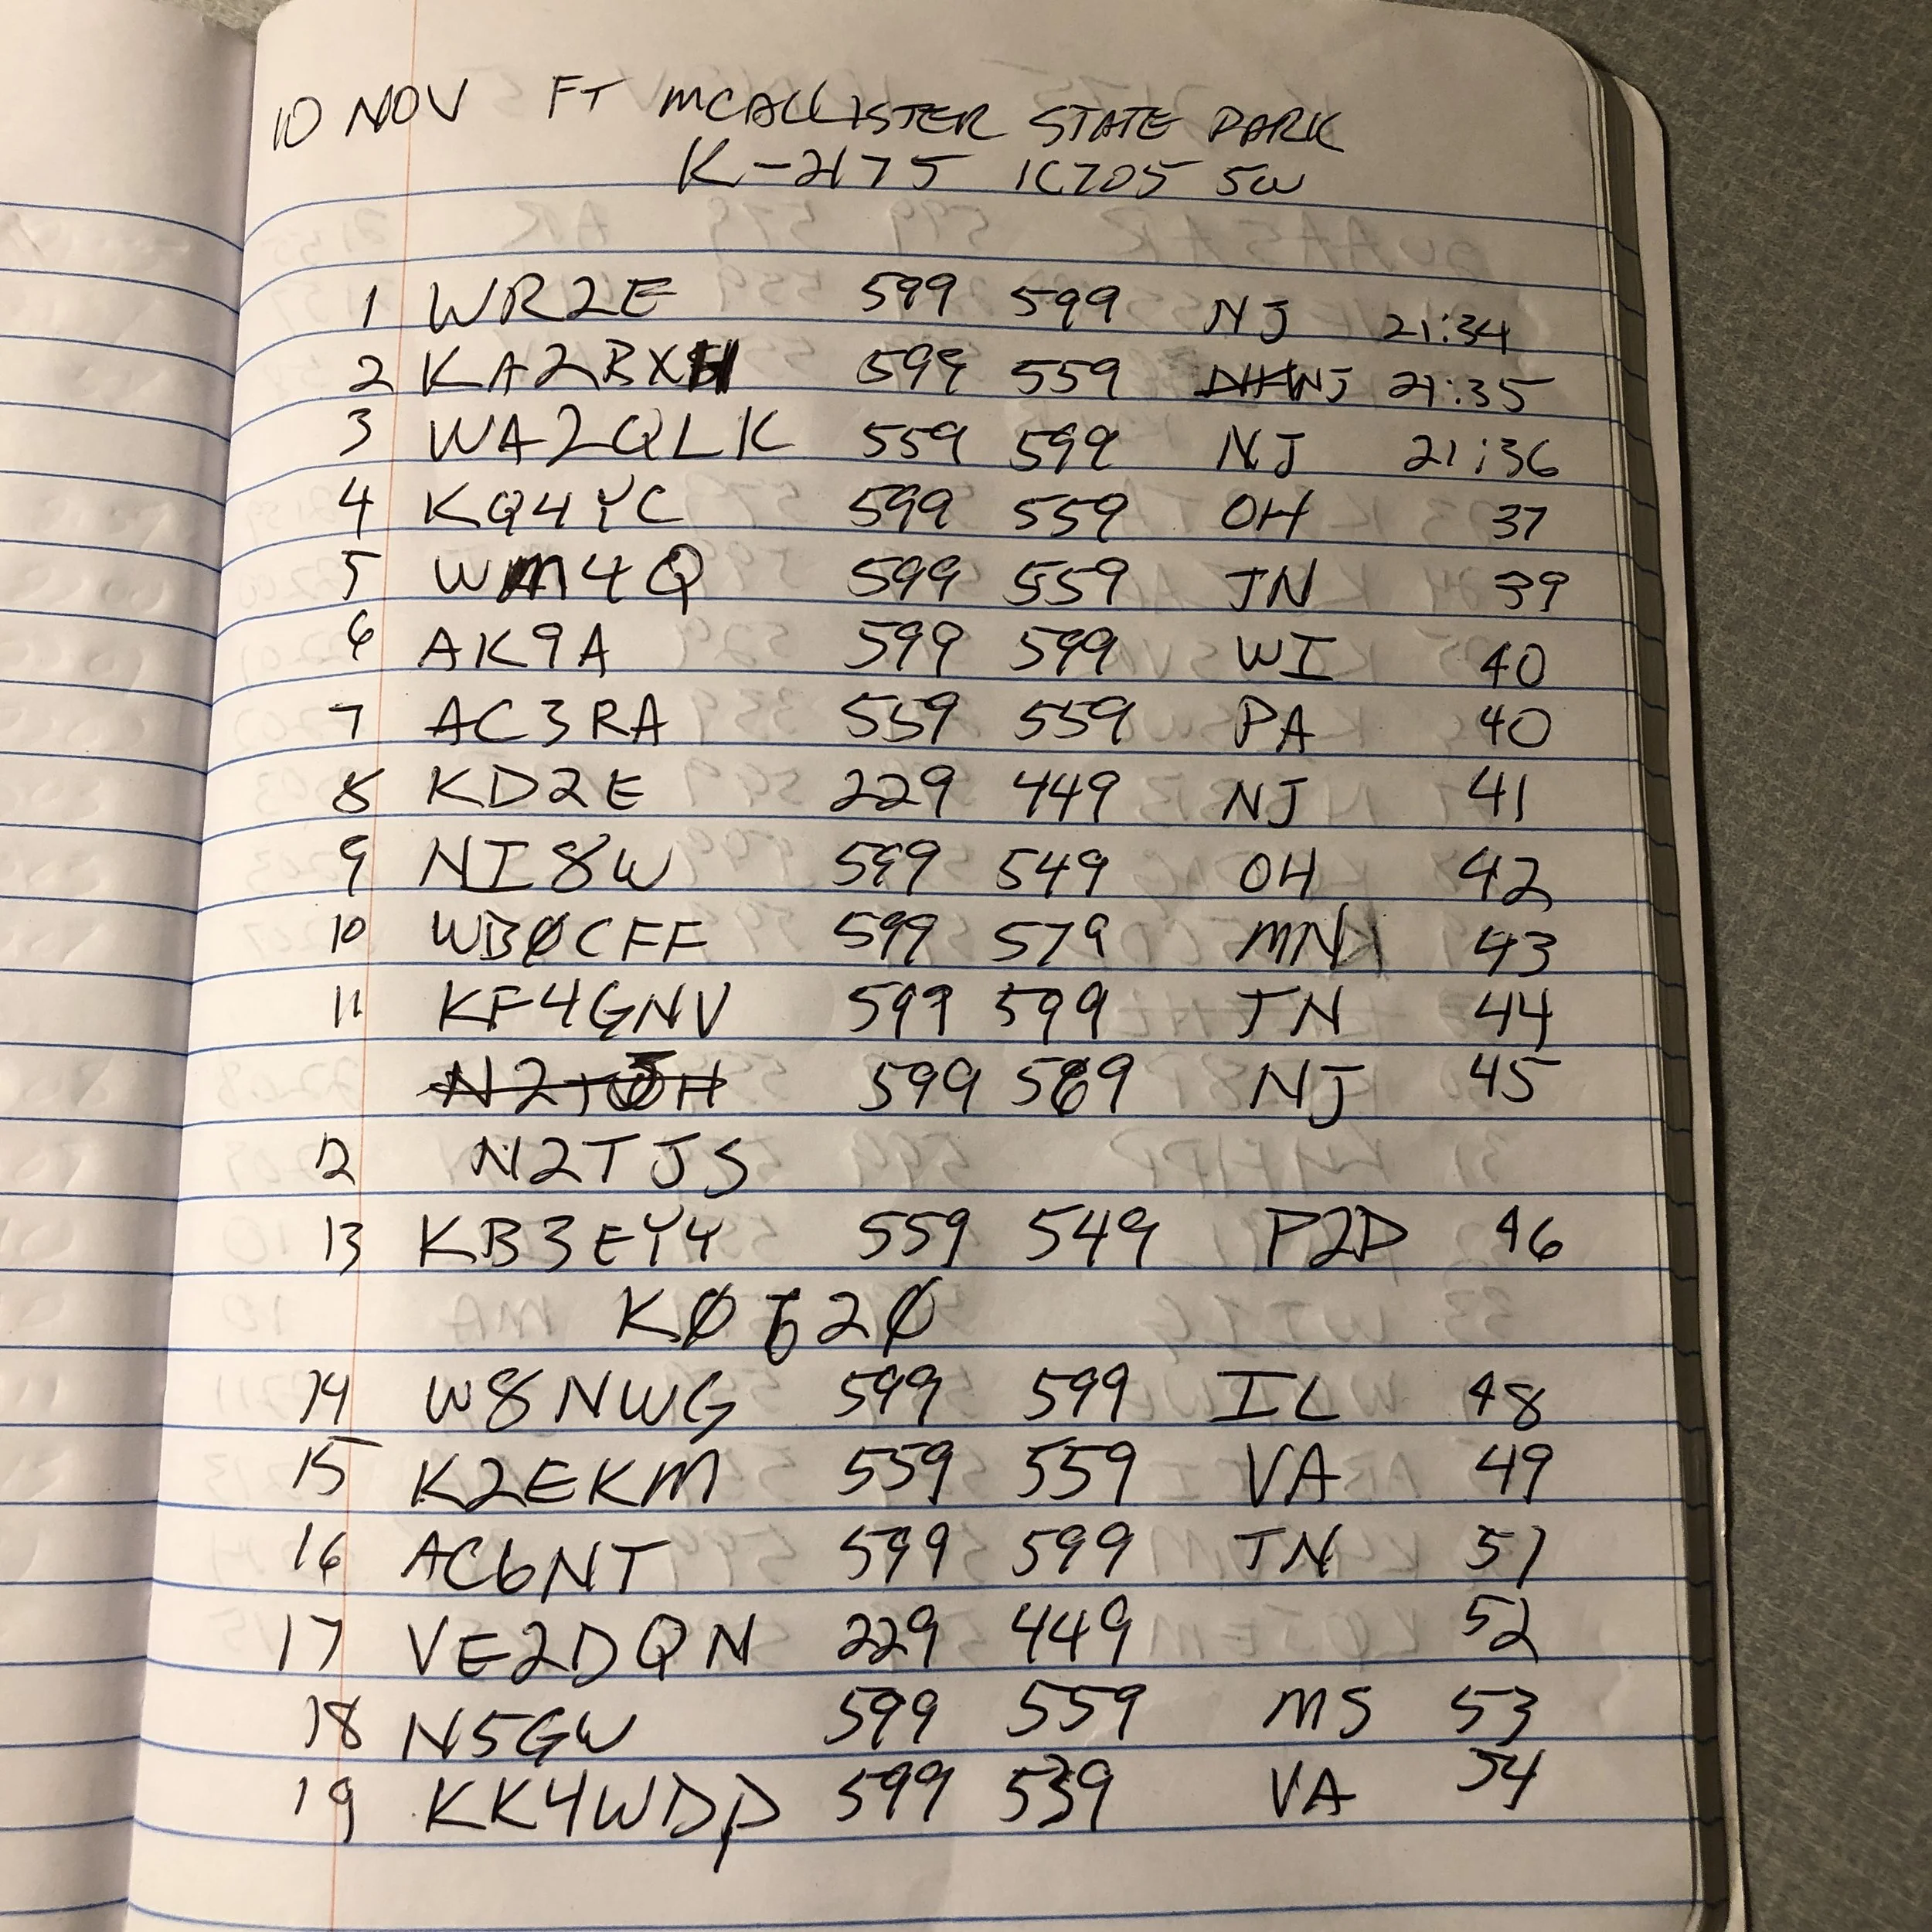

Two pages of QSOs is a good day for me. Thank you to all the hunters out there for listening for my CQ. It was a good outing because of you.
72
WK4DS
David
Stranger (Ham Radio) things... have happened to me lately with QRP.

As you know, I have been active lately with POTA (Parks on the Air) and have been going to the local parks near me and activating them regularly. I occasionally get an anomalous call on a band that I shouldn’t get, (due to my compromised antenna or low transmitter power…or BOTH) but simply chalk it up to them have REALLY good antennas pointed straight at me or a tropospheric duct opening or some such, but let me tell you a story about a man named Dave…(cue the Beverly Hillbilly’s music)

I have gotten calls from Alaska with my poorly arranged and noisy wire antennas in the past and a few from our friends “across the pond” in Europe with my lowly 5 watts of transmitter power, but nothing like what happened on the 27th of August 2022.
On this day, I literally had a window of time that was one hour in length, that’s right, just one hour to setup, get an activation (10 QSOs minimum) and take it all down and stow it away. I could not go to my usual location because it was in the wrong direction and would have put me being late, so Cloudland Canyon was out of the running, I only had one choice really. The only location was the Chickamauga and Chattanooga Military Park as it has two sections, one in Georgia (the Chickamauga half) and one in Tennessee (the Chattanooga half) the Chattanooga portion was literally on my way to my meeting so I started looking at the map to find a suitable location that complied with the POTA rules for an activation.
So I find a location on the west side of Lookout mountain right off the highway and drive to it, only to find that there is nowhere to pull off of the roadway. Upon learning this I start exploring my way around the northern end of Lookout Mountain and found a spot called Eagles Nest with a “pull off” big enough to get my vehicle out of the road safely.

I hurriedly set up my radio on the back of my truck and string the antenna horizontally out through the opening along side the trail and across the sign in the photo literally draping it over the sign and tying it into a tree to maintain the horizontal layout just to get the antenna off of the ground a little bit. Then I quickly threw two of my 10 foot counterpoises out on the ground and tuned the radio with the automatic tuner. I did not get out my external battery to save set up time. Since I was running off of the internal battery in the radio it limits the output power to 5 watts automatically.
As you can see from the logbook entries, I started on 40 m and worked my way up to 20 m. As expected I was getting my more local states on 40 meters such as Kentucky, South Carolina, Alabama, Georgia and the like. Similarly with 20 m I was getting stations a little further away like Arizona , New York and Maine. This is completly normal for me on a POTA outing too. Then… right after I finish with Maine, I here this call sign fading in and out somewhat and could have sworn the first letter was a “Y”! So I had him repeat it a time or two to confirm I had copied it correctly and there it was on the logsheet right in front of me…YC2VOC!

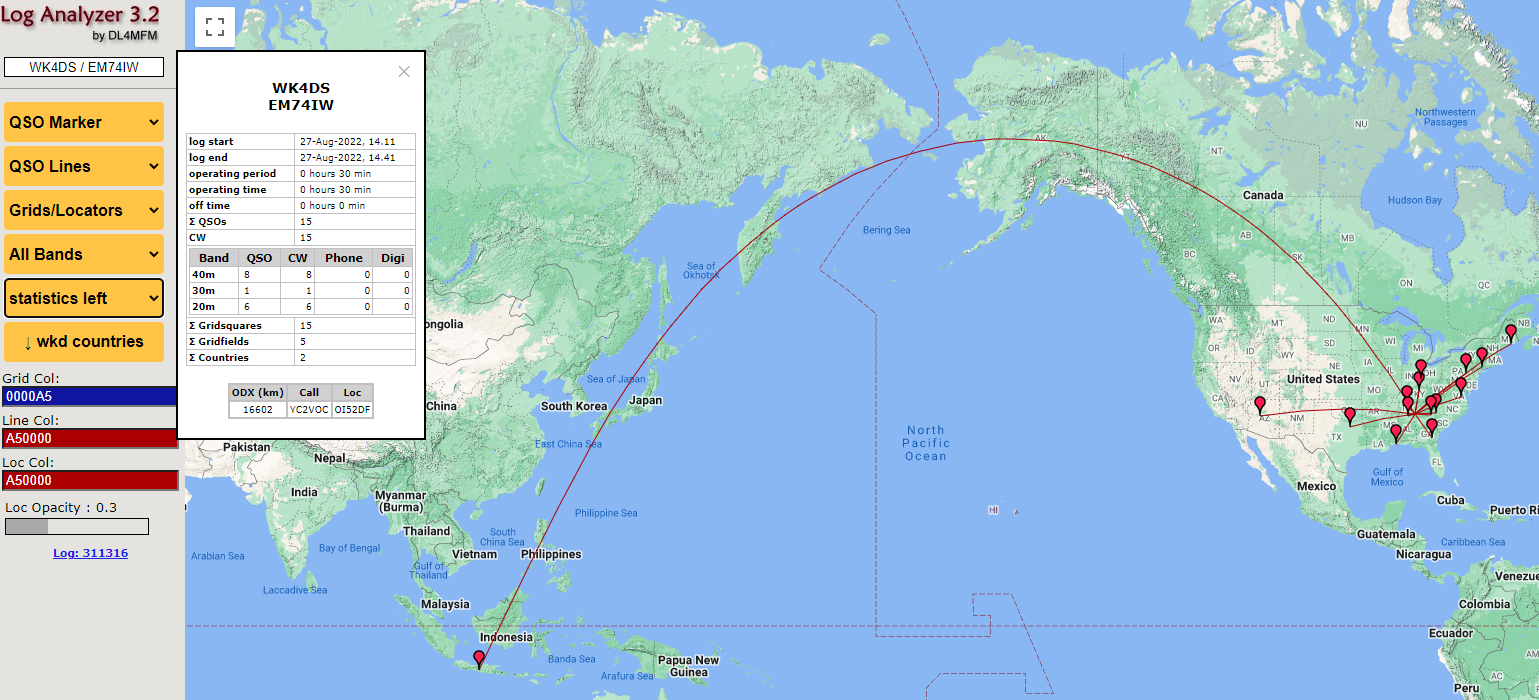
I had no idea at the moment, just how far away he was when we heard each other. So I worked him as a POTA contact and by the last time he had repeated his call, I could hear him pretty well. Still with a little QSB here and there, but I was certain of the call sign at this point. Here I am thinking I am going to hopefully get an activation in with the limited time I have and I get this amazing dx call back from my CQ!!! You see I have never heard that part of the world on my radio before. I don’t have great antennas (if your new to ham radio, it is immensely important to have good antennas to reach the farthest parts of the planet from your location) nor do I have them at elevation for proper gain benefits either. This means I normally hear the US, western Europe and some central America for the most part… I just couldn’t believe my ears that day.
There are numerous places on the web to get the great circle distance like I have here, this one is part of Log Analyzer 3.2. This maths out to about 500 milliwatts per 1000 miles or better said, 2063 miles per watt! . The conditions were just right between him and I that day to make it work with only 5 watts of output power on my end.

I want to say thank you to Galih for working with me that day to get the contact in the logs and tell all of yall reading this blog, that if you get out and turn on the radio, you just might have a conversation with someone in Indonesia!