WK4DS Amateur Radio Blog
Search Posts
40 meters QRP is FUN!
Today saw the introduction of my newly acquired 40 meter QRP CW radio that I picked up at the Orlando Hamcation. Read on to see what I think of this radio and how the activation went.

A quick over view of the radio. The transceiver is built by a silent key (W9SR) and I purchased it from the estate. The first thing you will notice is that it has no obvious numerical display except the ten turn potentiometer in the center. This is in fact the VFO or most likely the VCO if I had to guess. I am guessing as I have not dismantled the radio and really dont want to risk breaking it since it is a working machine currently. I can guess this though as it is a resistor and a resistor will allow you to vary the voltage easily on a varactor diode creating a Voltage Controlled Oscillator.
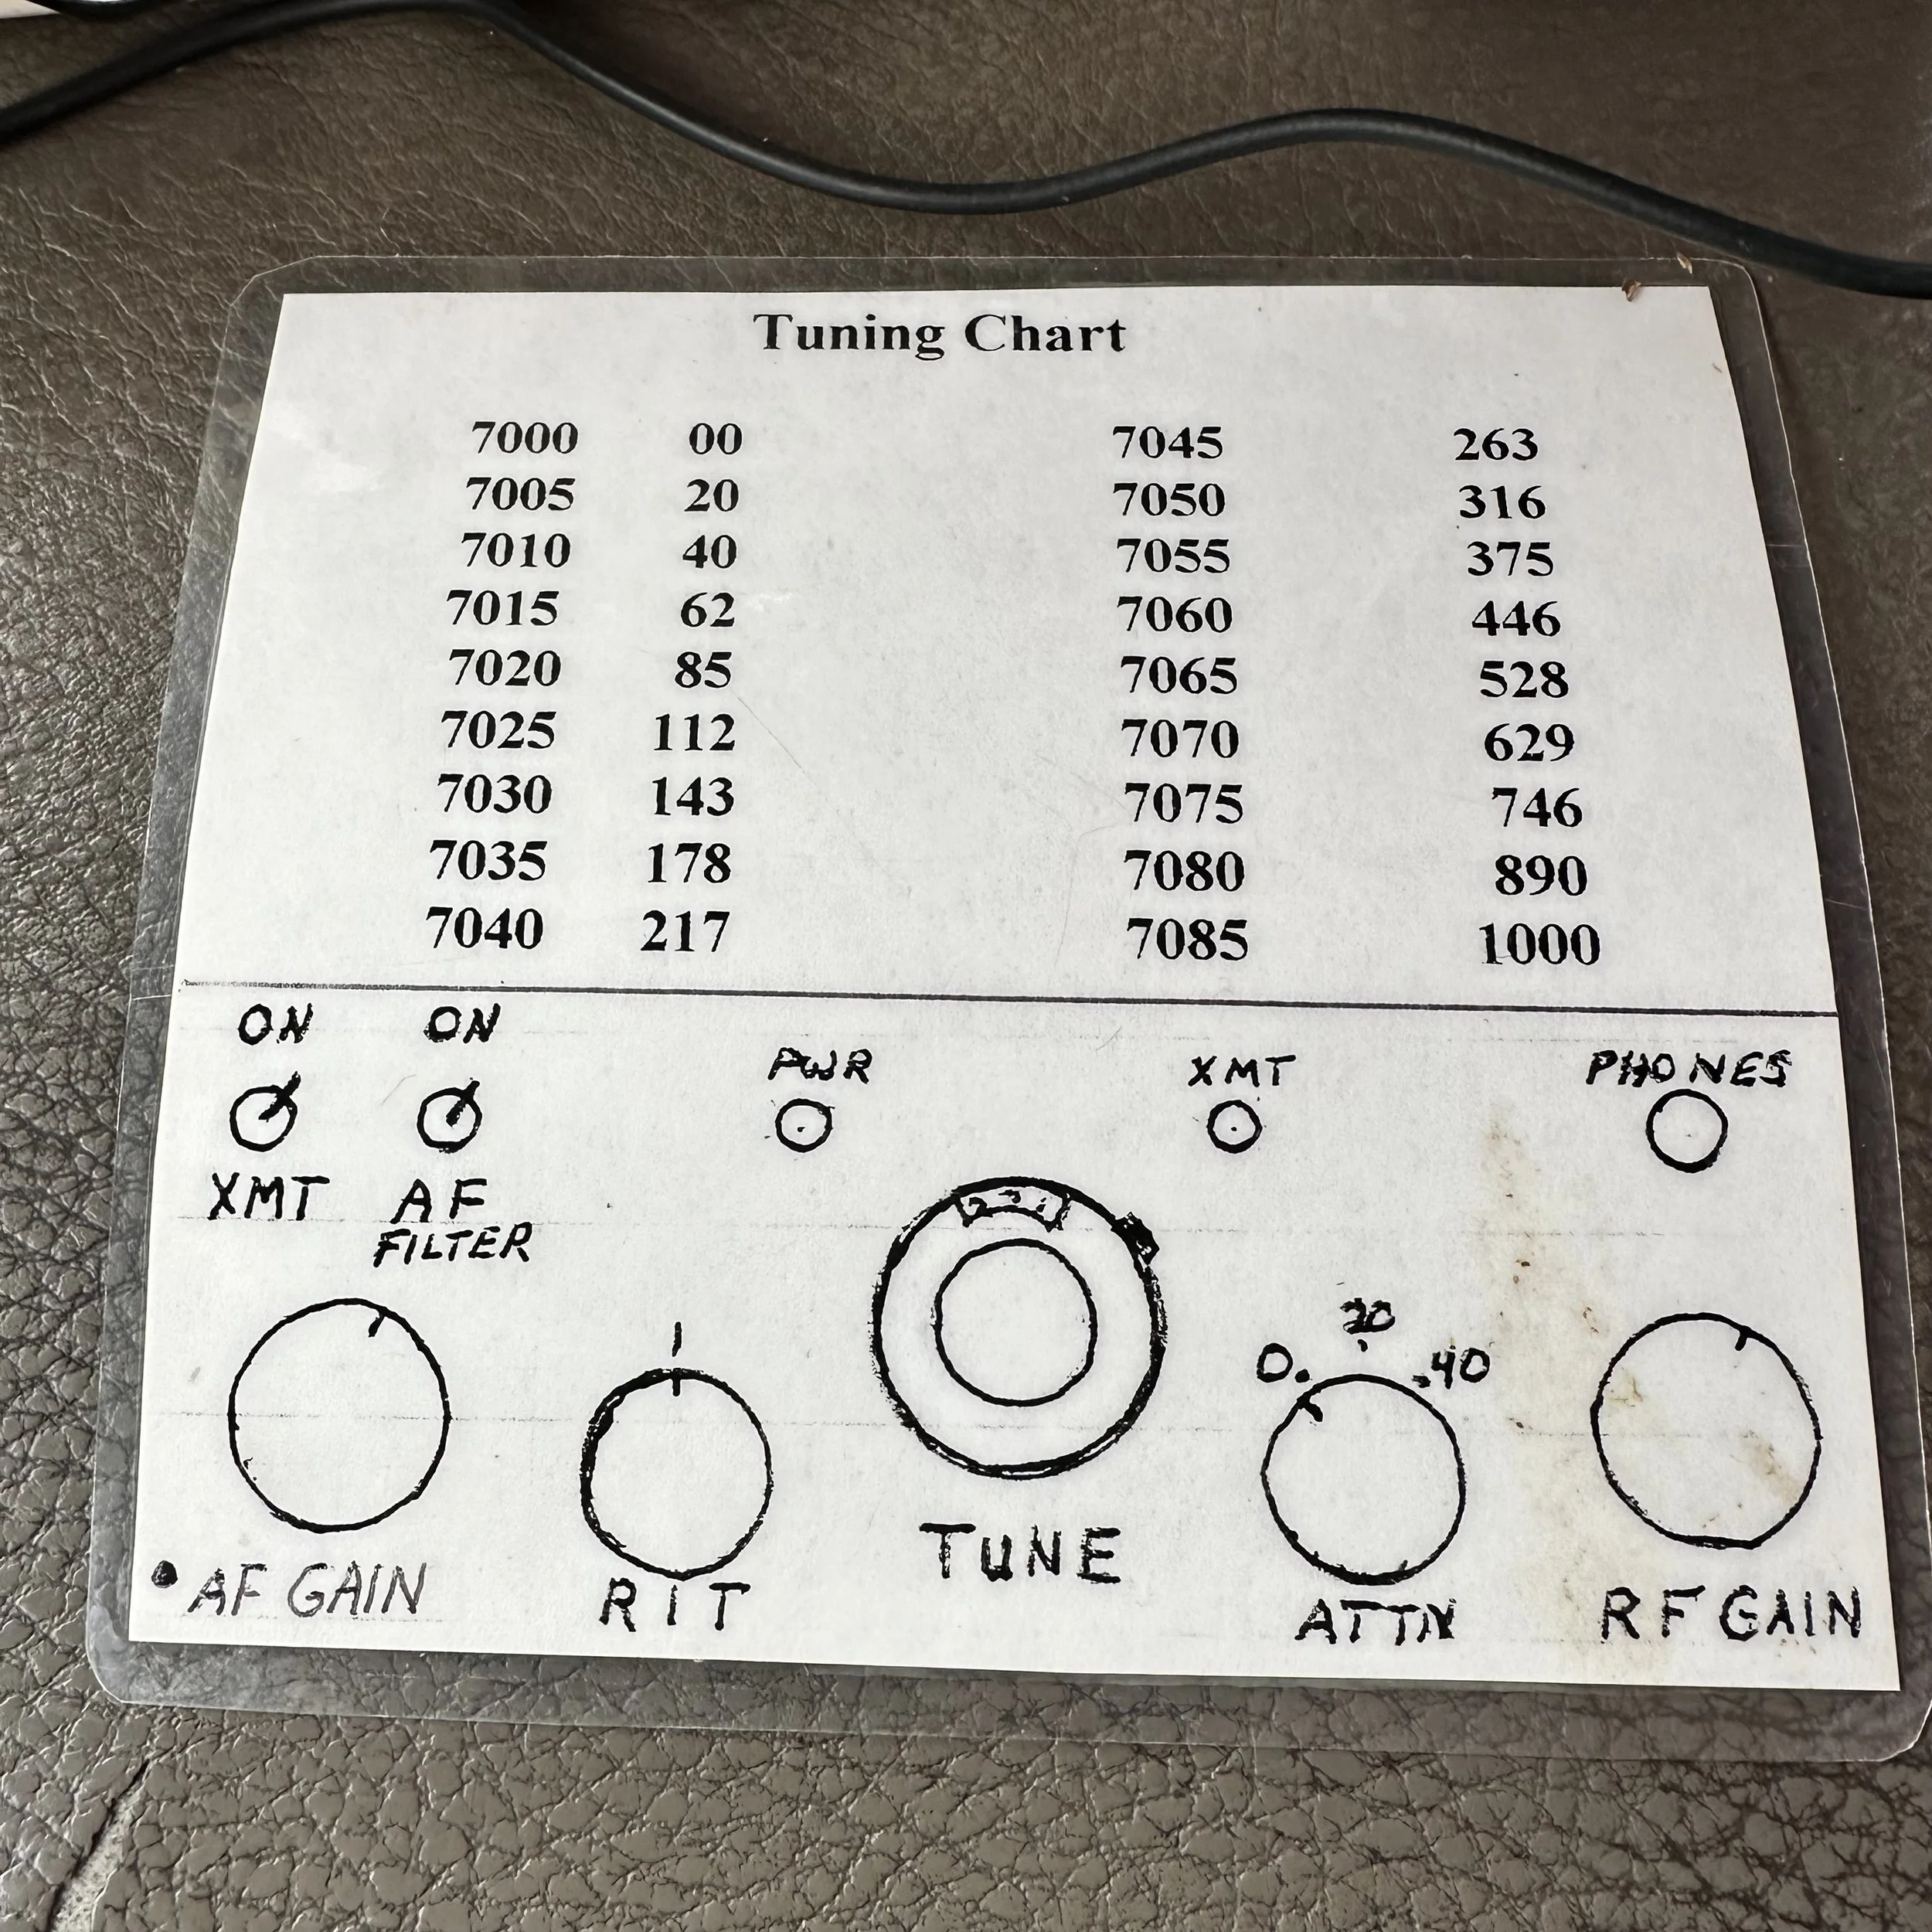
The next thing you will notice about it is that it doesn’t have any labels for the controls. At first I was worried about this, but then the fellow who sold me the radio showed me that there was a legend card included with the radio which has two critical pieces of information on it. The first is the chart that shares the value correlation of the potentiometer with the frequency of the radio output. The next thing it shows is what all the knobs and switches are used for on this little radio.
I decided to use this radio as I had a chance to activate a park earlier than usual today so I grabbed it and headed over to US-2169 (no longer K-2169 since the POTA people had to update all the parks due to the increase in activity and such with the program.) Heading over to the park I also took the Argonaut 5 kit as it has some keying gear in it I wanted to use. This turned out to be a good call as I could not get the SWR to pull down on the antenna today and I ended up adding the tuner that is also in this kit. This allowed me to add some inductance and get the antenna system to a nominal 50 ohm impedance match to the transceiver output as well as pull it to the center of the smith chart for an almost purely resistive load as well. The nanoVNA is invaluable for seeing things like this and it is why I like having it in the field.
Once at the park, I went to my usual spot at the frisbee golf course parking lot and proceeded to set up the system.

As you can see from the photo, it was really crowded today and I had trouble getting around all the people to setup my antenna system… lol. Only one park ranger and one truck passed through the lot during my whole activation, I was a little surprised by this as the weather was nice and there was a bunch of people down at the canyon, so I figured there would be a bunch playing frisbee golf too, but there wasn’t.
I have had trouble with my 40 meter hamstick the whole time I have owned it. This problem comes in the form of high SWR and I can only surmise it to be because there is not enough counter poise. I put out what I though to be enough radials and checked it and found the SWR to be 2.5:1 which is outside my personal limit of 2:1 so I added another radial from my kit that is usually for another band and checked it and it was a little better, but not great…maybe 2.1:1 or something like that.
So then I thought I would do something out of the ordinary and took my 17 meter radial set (it is one wire but it has a tap in the center with a STA-KON connector to attach it to my antenna mount). This in itself is not unusual, but the way I deployed it was. I figured I would make a single LONG radial out of it instead and see what would happen. Wouldn’t you know it, it helped ALOT!

You are seeing that right, it has a clove hitch tying it to the tree branch. Maybe that helped a little, I don’t know at this point. But I decided at this point to do some experimenting where I remembered in the past something about curtain dipoles and how you could drop a line down from the horizontal and it would change the antenna. I had some little gator clip leads in my nanoVNA kit so I grabbed one of these and clipped it to the STA-KON in the middle of the line and it made a difference too! Nothing extraordinary, but it did help so I left it. Checking the nanoVNA on the smith chart showed I had a good 50 ohm impedance to the antenna but the system was capacitive so I added the tuner so I could balance this out and get a clean load presented to the radio as I don’t want to burn this little guy up on the first outing. I ended up with a total of 5 radials put out to get the antenna and radio happy today and it looked ODD to say the least. I normally will run one or two at the most, so this looked like a spider web… lol.

I had intended to setup on the bed cover today as the weather rwas pretty nice to start with, but by the time I got to the park the wind had picked up to the point it was out of the question to try to hear CW with the radio fighting wind noise too. Because of this I setup inside the truck again and this made it easier too as I could just plug into the truck and go. So the station look like what you see below today. The N3ZN key and the Hamgadgets keyer into the W9SR 40 meter monoband CW transceiver and out of it into my little MFJ antenna tuner I keep with my Ten Tec Argonaut 5 transceiver kit.

Now, something about this little radio that is cool and most new comers to the CW corner of ham radio wont know about. This radio has relay keying. And the relay is kinda loud. It is almost comical with today’s diode switched radios that are silent and FAST. This little radio is far from a full QSK machine, but it works well none the less. I only missed a letter a couple of times and had to get a repeat to confirm it. Not bad for a radio that is probably built in the 1970s if I had to guess.
Another thing I have noticed about me lately is that I am drawn to this kind of radio more than the big box machines. I have owned some impressive radios in my day to include a Kenwood TS-950 SD, Ten Ten Omni 6+, as well as a Ten Tec Omni 7 and anybody who knows CW rigs, will know that these are all stellar CW machines of the highest order. These radios work so well that to work stations becomes almost no challenge at all. I have easily worked a metric ton of ops over the years on these radios and have loved doing it, but in the end, QRP really brings a challenge to the table that these machines cant. I know I could simply turn down the power of the bigger rig and sometimes I do, but these don’t travel well and besides it is just fun to use the tiny little machines.

Here are a few more photos of note about this radio before i I close out the showcase. It came in this ballistic nylon rigid pouch that holds it perfectly. Also I changed the ancient Molex connector over to power poles as I could not find a molex to fit it and it even how a 9 volt socket on the back that I am guessing is for some sort of accessory that is no longer needed… maybe a keyer like the Ten Tec keyers or something like that possibly? Who knows, but it is a great little radio.


As for the activation itself, I never have a bad outing, either it is good or better. Today was a good day. Any day I can make contacts is a good day to me. I made 13 contacts kind late in the day for 40 meters to be honest and to also only be using 3 1/2 watts too also made it a lot more sporty. There was a good bit of band noise today so most signals were weaker than usual, the radio did well though in that I could pick out even the weakest signals and was able to work them. I was impressed to say the least. I will be using this radio more if for no other reason than nostalgia. I love it and if you are into CW, you probably would too.

Thanks for following along today and I hope this blog post inspries you to get out and setup a radio. Until next week, 72 and GUD DX
WK4DS