WK4DS Amateur Radio Blog
Search Posts
UPDATE - sBitx V3 with Firmware version 5.4

So the dev team working on the sBitx software suite (unpaid I might add so I suggest you drop in on them and give them a donation for all this time and enegry they have put into this for the community) has dropped ther latest version of the sBitx SDR firmware and it is version 5.4 and let me tell you, this is incredible!
Highlights of the new firmware for the sBitx Software Defined Radio
This is taken directly from the drexjj GitHub repo page so I dont get something wrong. Goto this link to see more about this project and to help support the team.
Here is the list for JUST THIS RELEASE!
v5.4
New Features:
sBitx IQ improvements
enhanced VFO, complex mixing and down-converting
improved processing of I and Q data in the sBitx receiving pipeline
AGC function and AM detector changes to work in updated pipeline
FM Mode and Squelch
Added FM mode and squelch control for use on 10M and transnverters
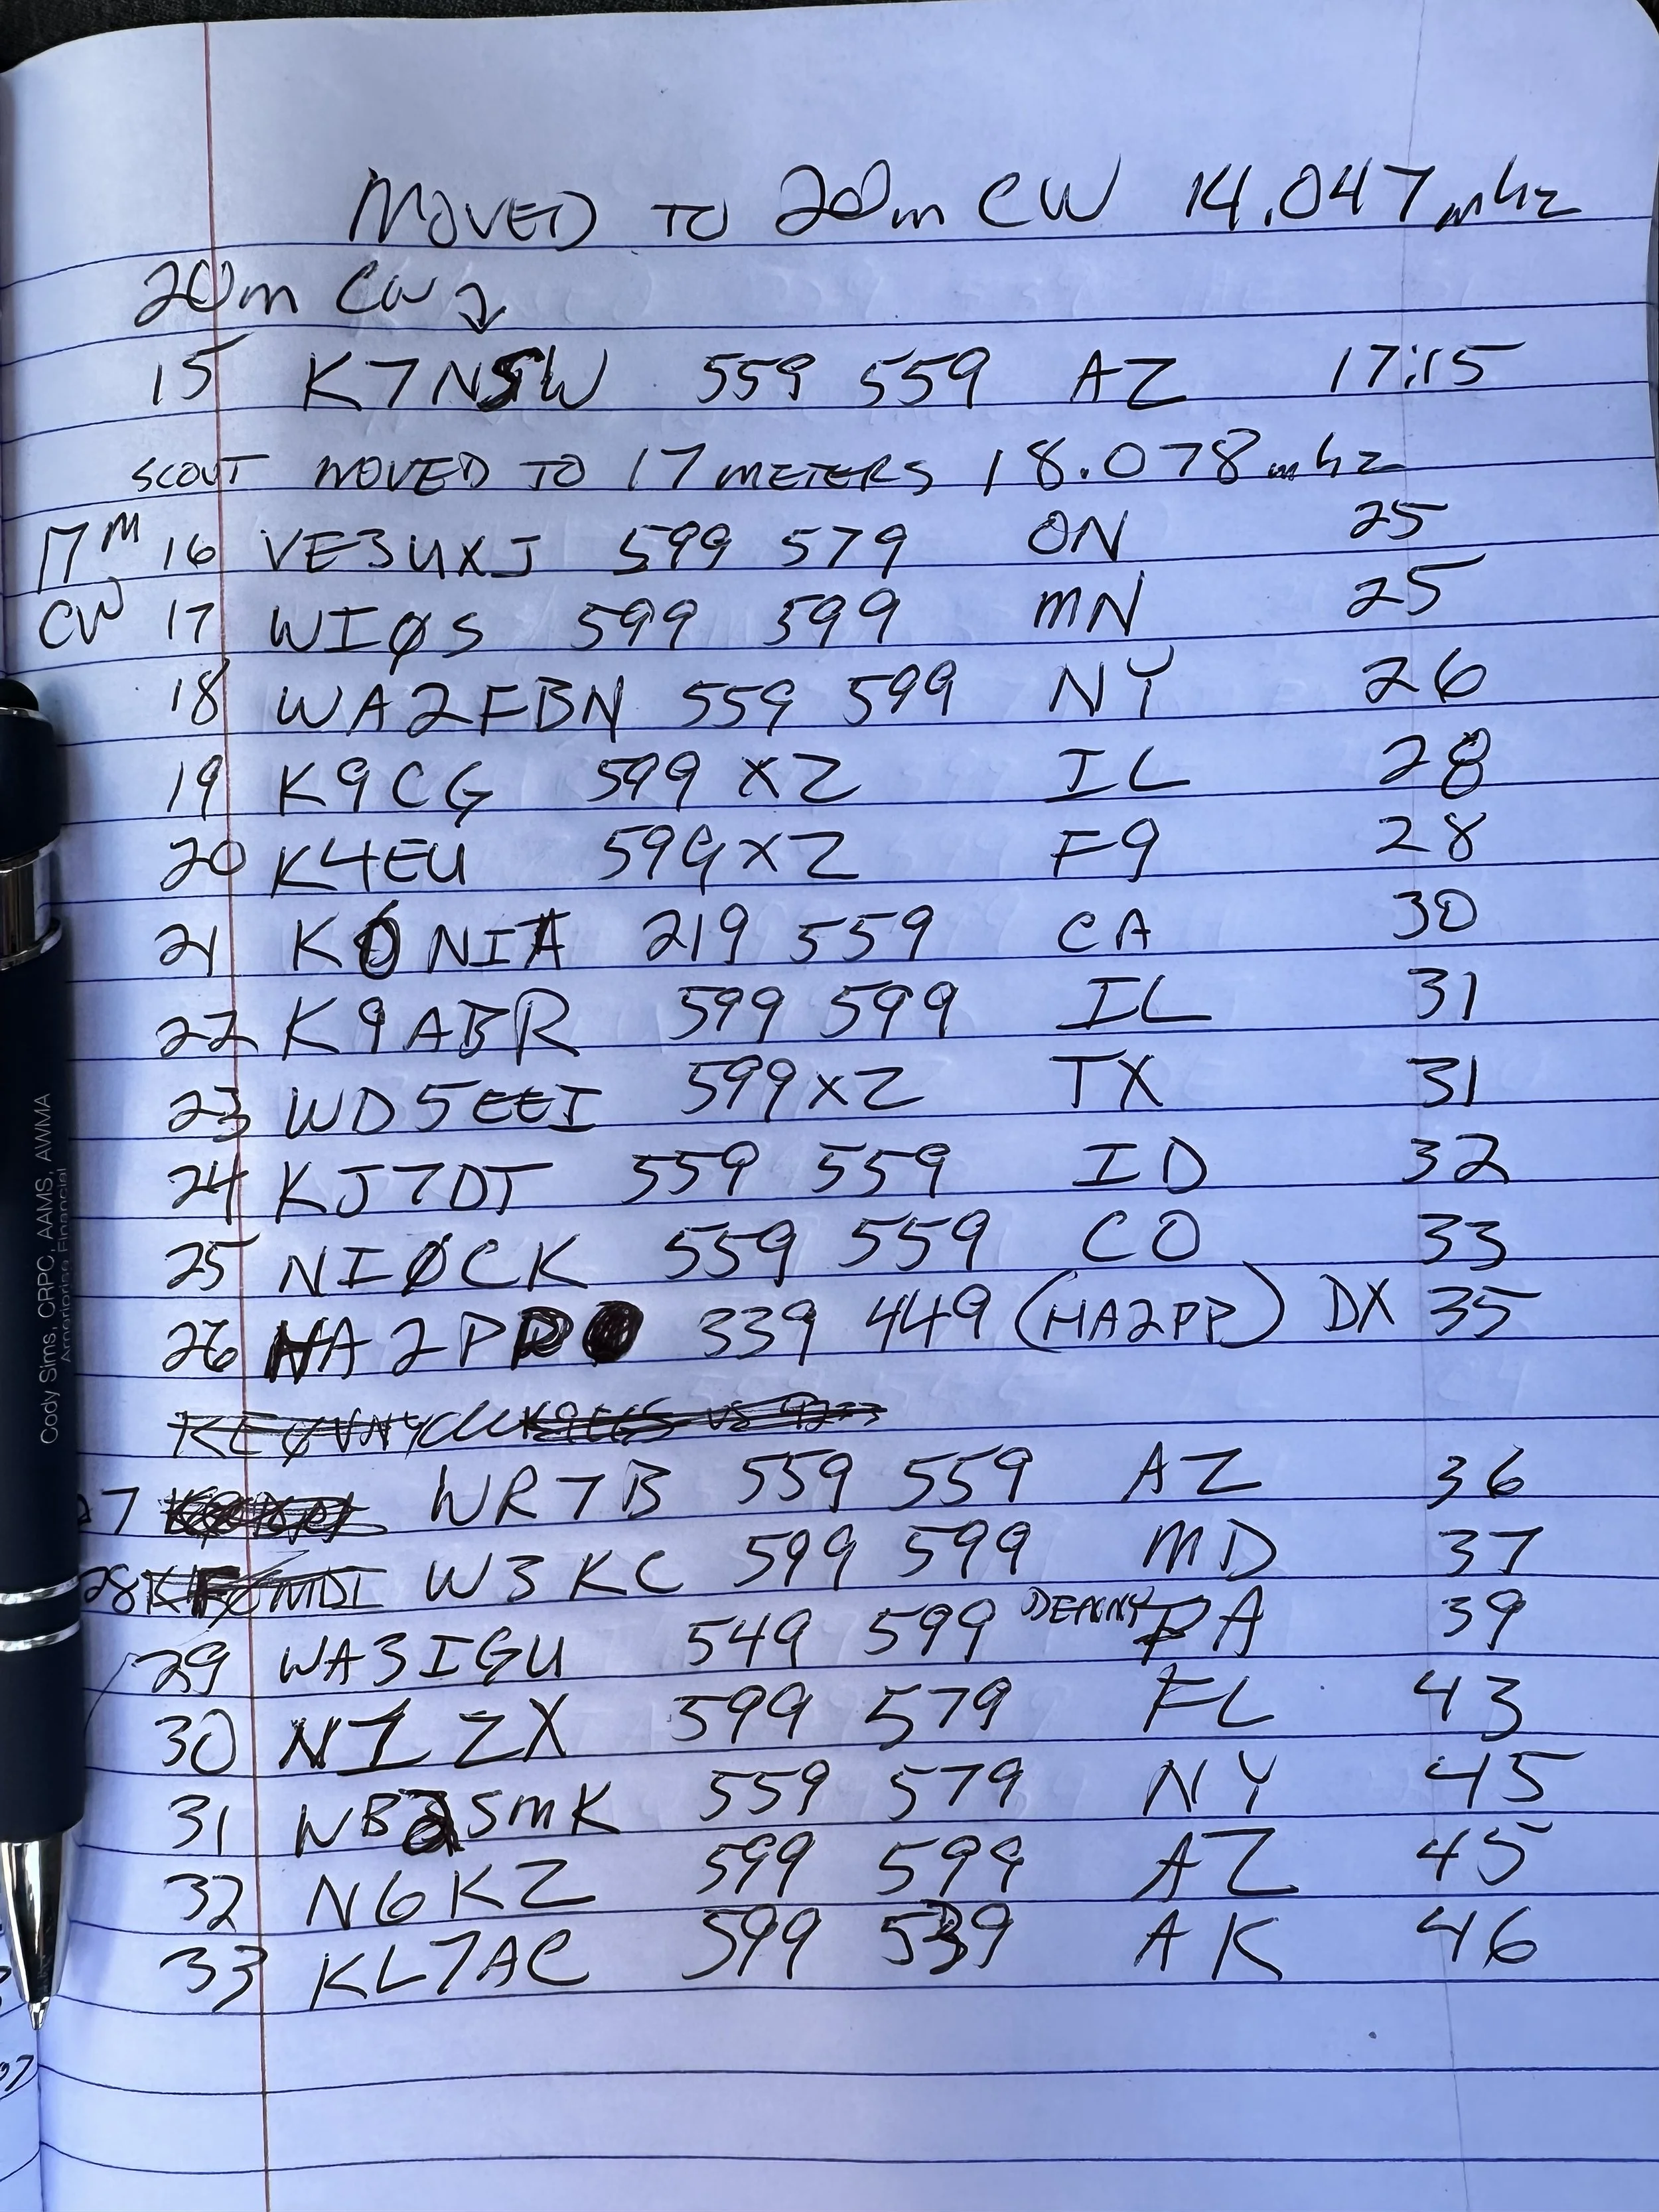
Text console can scroll back to view and work with up to 500 lines of history, in all modes
Added support for Touch Display 2 and larger displays
Makes it easier to touch and see the buttons on a Touch Display 2 or external display
New file is read upon sbitx startup called display_settings.ini where you can set the display type or resolution
display_type=1 is for the original, older 7 inch touch display
display_type=2 is for the newer 7 inch touch display
ui_scale can be changed for use with a larger display
Added styles option to customize the sBitx application.
Text size, font, color, and types are now supported.
Styles templates are stored in the data folder as tpl files.
If there is a file named user_style.tpl in the sbitx data folder, then it will load it on sbitx startup.
If the user_style.tpl file is not found then it will load default_style.tpl if it is present.
If none of these files are located, then it will load the factory style we are all used to.
There are sample styles in the data folder that can be loaded. Just have to rename one of them to user_style.tpl
Added mode_bal to hw_settings.ini to balance LSB and CWR to USB and CW.
0.8 is a reasonable value.
Also harmonized filter band edges.
removed old ssb_val
Controlled Envelope Single Sideband (CESSB)
enable via the button in menu 1 or the 'cessb on' command
Added Tune function to FTx modes
Added NBFM mode with CTCSS and Squelch
Added squelch control to AM mode
Added option to use USB audio devices for sound routing (speaker/phones and mic input)
The options are in the Set dialog box in Menu 1
Added Out-Of-Band and license class indicators
Shows color strips or shading for bands edges and US license class
Each file can be customized outside the USA
More details and instructions in the oob_limits files in the data folder
Added ALC power limits by band, if RF power exceeds limit it is folded back to limit
Default is off until a limit is set in hw_settings.ini by adding line max_watts=nn to band data after f_stop
When activated message is given in spectrum between Power and VSWR
Power reduction is released when RF power drops below bamd limit
Added swrsweep
usage: select a band then either
enter cmd swrsweep n, n where n is the number of sample frequencies or
in menu 1 set SWRSTEP to the number of samples and click on SWRSWP
uses TNPWR to sample vswr at the n sample points evenly spaced between band limits
displays results in console
esc key cancels sweep
Added time out feature to SWR alert
SWR alert ends after 10 seconds without needing to first transmit with SWR less than max_vswr
Added HPSDR 'Protocol 1' support to provide sbitx I and Q data to external SDR apps over WiFi or ethernet
Starts when sbitx starts, console will show "hpsdr: streaming STARTED" when SDR app discovers and connects
Good support for SDR app receiver functions
XMIT not yet supported, will require CAT/Hamlib connection
Changes:
GUI
Moved Direct Frequency Keypad to a new button called PAD and added quick buttons
Swapped button placement on main display
Moved eptt & vfolock to menu 2
Menu 1 is reserved for mostly audio related controls
CW Decoder
Fixed colors of sent and received text on console, use new lines when doing T/R switch
Only displays cw stats (WPM, dot/dash ratio) when they are meaningful
Less garbage ouput when only noise is present
Replace sliding window in denoise function with EMA filter
Improved accuracy with better weak signal performance
Replaced viterbi with simpler classifier
Simplified code of own TX decode process
Set BW to 50 when using decoder is recommended
Web interface
Added more controls
Gridmap new options: Square or round Grid dots; Seen Grids; Unlogged Grids;
Power and VSWR readings updated more often, from every second to every 1/2 second
Updates are now as fast as bridge reads allow
Minimum power for VSWR calculation increased to help eliminate invalid reads at very low powers
Fixes:
APF init Bug
Fixed a bug where APF would not initialize properly
Audio Cleanup
Made a small change to cleanup the static between TX to RX
APM sampling improved for better regularity
VSWR initialization when user disabled fixed
max_vswr=0 now restored as no max vswr protection at startup
Fixed scope intensity where it now loads and restores previous setting
Fixed Macro loading and F1-F8 buttons when changing modes
Web Gridmap red Grid dots now shown when QSO is logged
Fixed expansion of SENTRSTCUT in macros
Downloading and burning an image to your microSD card
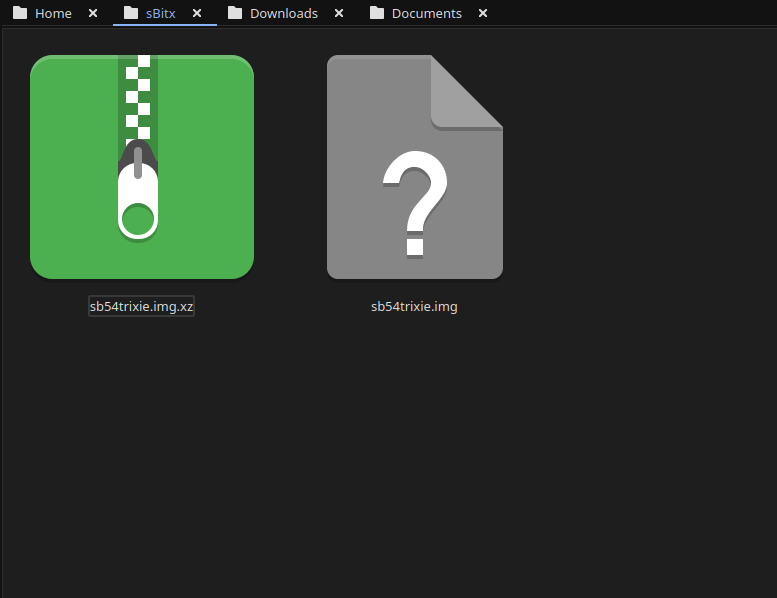
Firs thing you need to do is go download the new image. The new image is a zip file so you have to extract it and then you can move on to step 2… This is where you use a tool like Balena Etcher to write the disk image to a micro SD card. I use 32GB cards since it is what the radio started out with. They seem to work just fine to be honest. I did have to write the image twice for some reason. The first time the image would not boot past the splash screen so I re-burned it and then it worked fine. Balena Etcher is an easy to learn tool that makes this process pretty simple to be honest. If your using Linux it might take a little to get it running, but google will tell you what to do here as well. I ended up running it in my terminal so I could shutoff the sand box feature. I know this is probably a bad idea to remove the sandbox but I have confidence in Etcher so I am good with it. Launching it from the terminal, you are presented with this panel. The first one is where you choose the disk image you want to burn, the second one chooses the media (hard drive, memory card or the like) and then you click flash and wait… It will take a few minutes and you are presented with a ready to use version of the sBitx software ver. 5.4. You still need to copy a couple of files from your existing version of the sBitx you are using. It is not a big deal to do this as you just need to copy them to a USB memory stick so you can later put the back when you swap micro SD cards in the radio.

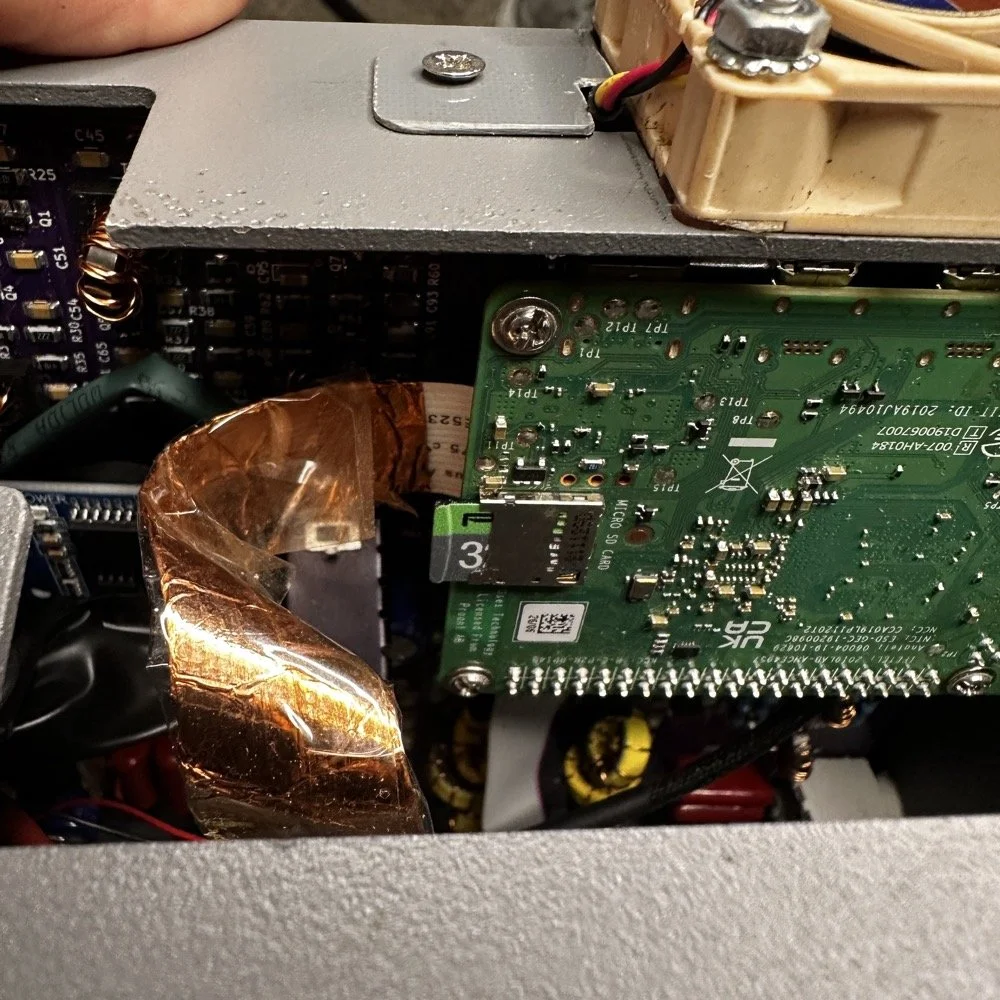
The next step for me, involved me taking my radio apart some what. I use the on board Raspberry Pi micro SD card slot on the Pi. This means I have to take the front of the radio loose from the chassis and open the radio enough to be able to swap out the two sd cards. Dont make my mistake and use the same card for both images. Make sure you use a new card for the new image and save the old one in case something goes wrong so you can go back to the working version while you solve the problem. This is pretty easy and only requires you to remove 4 screws to succeed. Once the new card is installed, you are off to the races! Just power up the radio as normal, being sure to have either a dummy load or a tuned antenna attached as it will auto launch the radio app and if it is on FT8 it just might start answering a CQ if your not ready! HaHa! The card really is easy to reach, just be careful to not unplug anything like the video cable you see right next to the card. I have my cable wrapped in copper tape and grounded to help reduce RF hash from the Pi, this is a hack that actually works really well. This cable is one of the prime culprits of rf hash in this radio so just doing this one mod will improve your experience a lot.
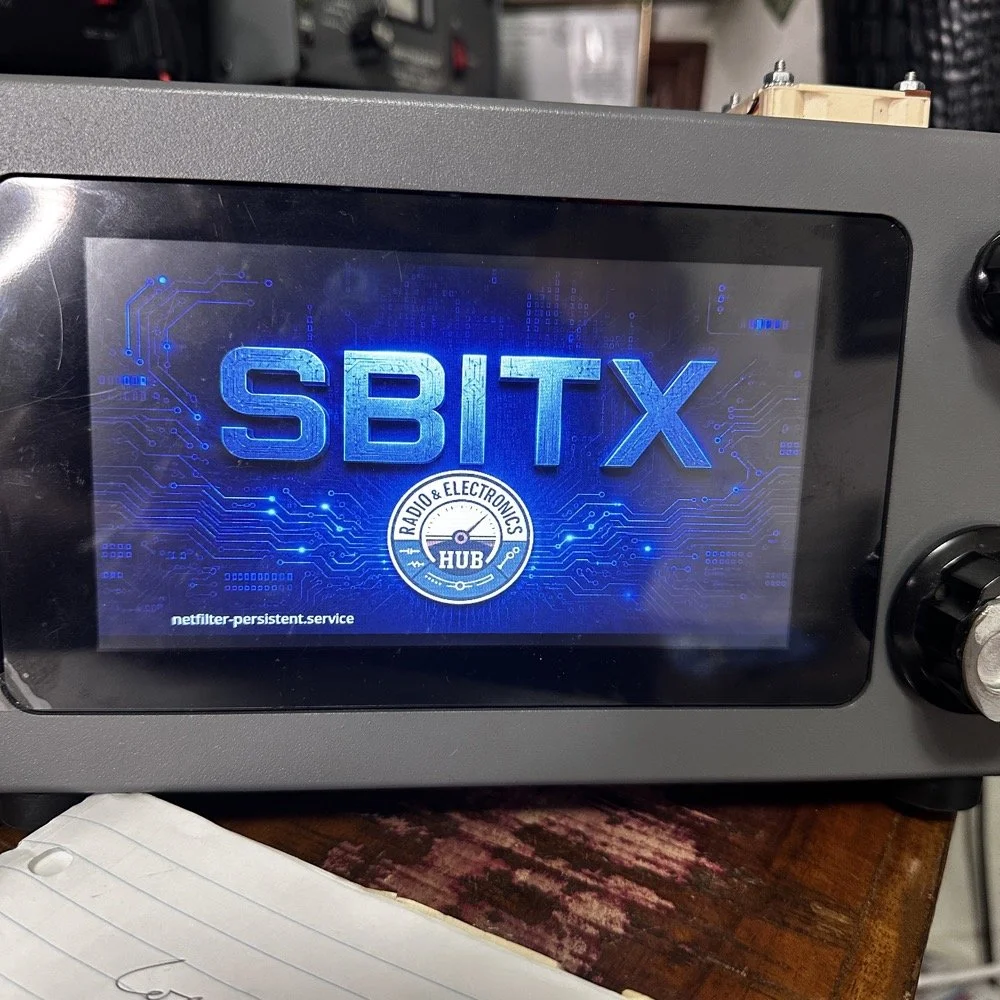
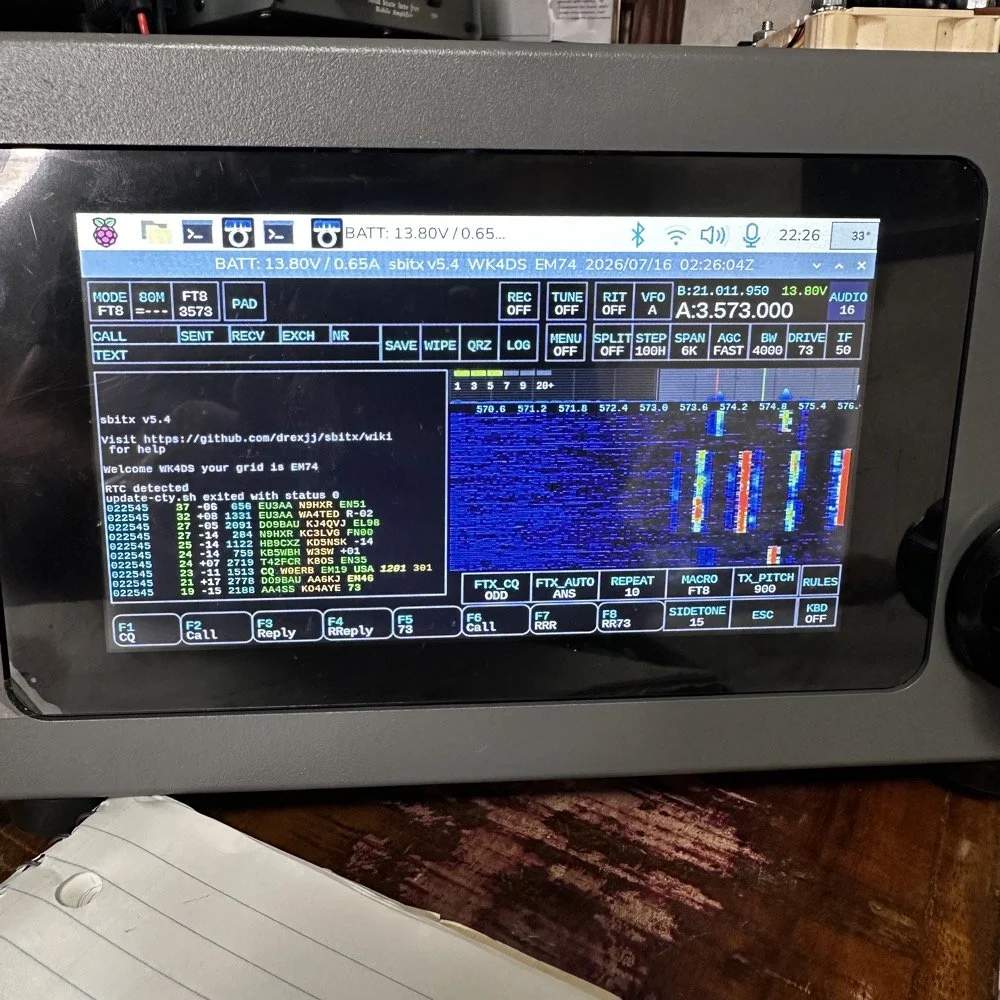
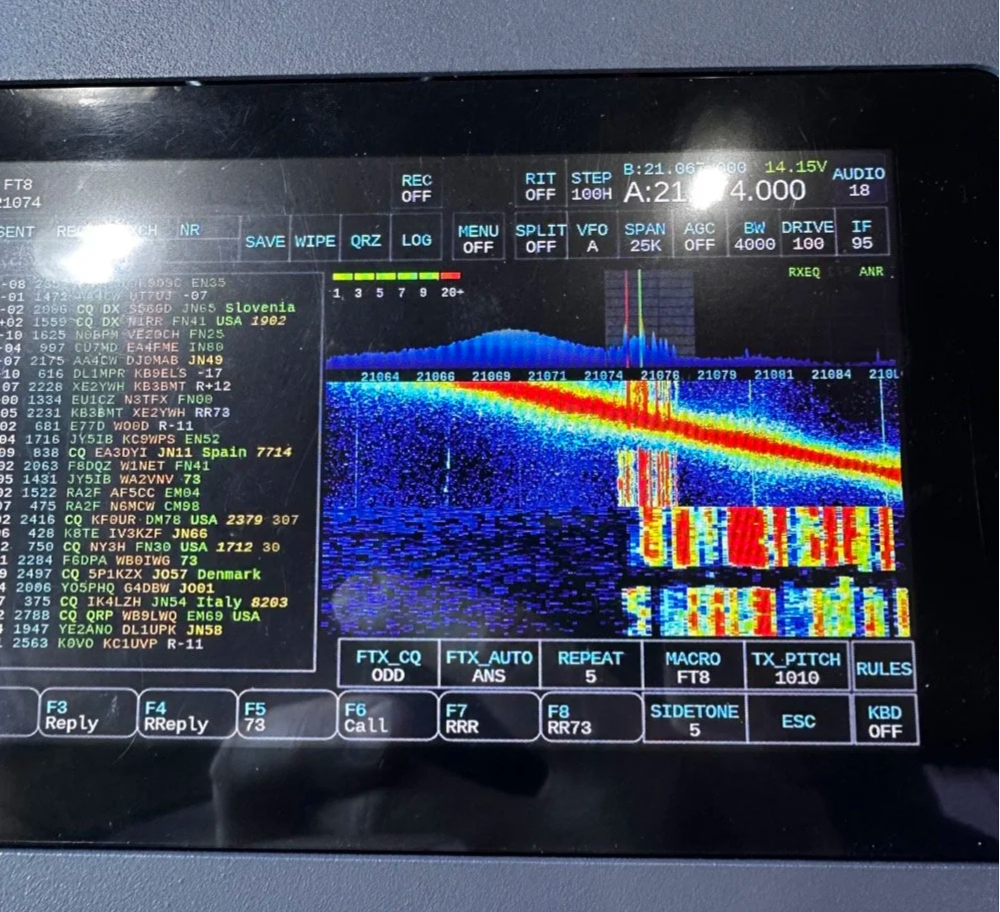
This is the new splash screen that you are greeted with while the software package loads everything. I really like this new look the dev team brought to this release. Once the software loads, it will auto launch the sBitx radio app and you will have the view below. It is in FT8 mode here since I was last using this mode and band. There are some things you need to do before you start using the radio, such as entering into Menu 1, then touching the “Set” button and in here you will enter your callsign and grid locator you are currently operating in. This is used for logging and digital modes. But it helps to do this first thing so you dont forget. I also keep a note about this in my case so I dont forget to do this step when I am out traveling and activating POTA parks with this radio.
Personal thoughts about the HF Signals sBitx SDR radio
I only use my sBitx for a couple of modes. FT8, FT4 and CW. I rarely use SSB or any other voice mode for that matter. I just prefer CW to be honest. That being said, I tested out the keying on the current release and it works perfectly for me. I normally dont run over about 22WPM though so if you work faster than me, just know I wont be speeding up with this radio…lol. I can get decent code out of it at 25WPM, but now we are getting into the realm of my skills not being up to the task too… sooooooo. I dont know which is to blame past this point.. HAHA!
I like FT8 as it will work when the bands seem to be closed for even CW. That is nice if you are activating a POTA park and the band closes on CW with 8 calls in your log. This way I can hop over on to FT8 and more often than not, I will get those needed calls in the log and probably more, in spite of the fact that the output power on a band like 15 meters will only be about 12 to 15 watts depending on battery level. I can get a lot more output power on the low bands but on the higher bands I will not get a lot of power out. This just further solidifies my stance on using FT8 in poor band conditions and the ability to make contacts with it natively in the radio. I would like to say something else about this radio. I really like the community around it. Sure there will be the occasional disagreement here and there. It is a group of humans after all… But for the most part, it is a group of experimenters and coders and general operators that love to tinker with their machines as much as operate them.
Speaking of images on disks. Over the last few years I have amassed a small collection of different images. You might think this is silly, but there is a method to this madness. You see, for one, I have a full collection of images starting with the factory shipped version that came with the radio. The factory version is the one with 381 written on it, as this is the serial number of my radio. I have a copy of the Field Day release and the first 64 bit release. As time passed and new versions were released, I get them and burn them to a new card and save the old one. I can install any one of these cards and it will instantly become that version radio again. That is pretty cool. Honestly though, the other reason I keep them all is that there is logbook data stored on them as well as the later versions all have my config files on them that I can get to should the card in the radio die for some odd reason.
Another really good idea for a person getting one of these radios is to use the disk copier app and make a backup of your image on a new micro SD card. This way should the one in the radio die, you can simply replace it and keep going…right after you make a new back up. The reason I keep circling back to this is that these card are not the most reliable on earth. All of mine have worked well, but there has been some people that have had their card get corrupted and dont have a backup. That is tough spot to be in to be honest. Anyway, I thought I would share a little about one of my favorite radios and what is going on with it.
You can help support this channel by using these Amazon Affiliate Links as well:
QRP/Portable Radios:
Antennas & Tuning:
CW Equipment:
Power & Accessories:
Organization & Transport:
BONUS ITEMS (Optional 16-20):
73
WK4DS - David
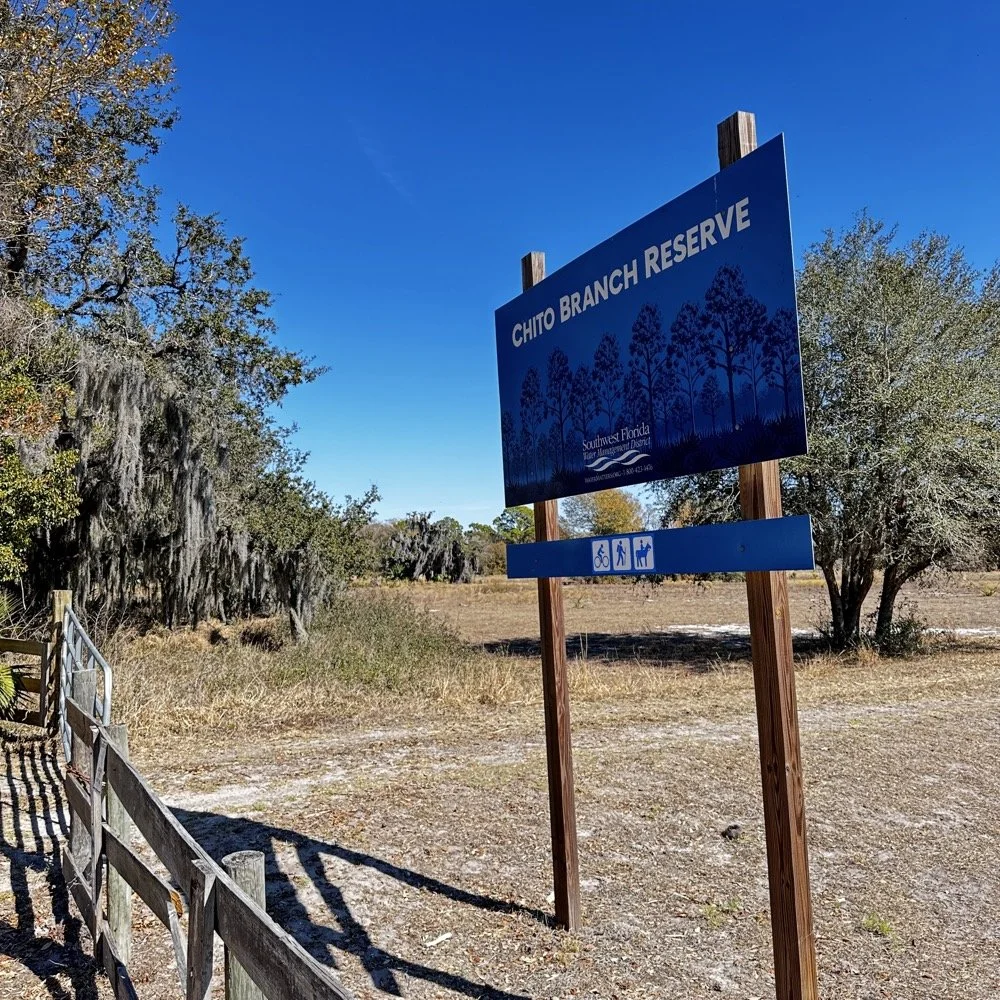
Chito Branch Reserve: First FT4 Contacts, Meeting a Fellow Park Hunter, and the Quest for 1000
Doug's been activating Chito Branch quite a bit lately, and if I'm being honest, we seem to be in a friendly race to see who hits 1000 contacts from this park first. Spoiler alert: he's winning. But it was great to finally shake hands with someone who understands the appeal of spending beautiful Florida mornings in a park with Spanish moss hanging from the trees, headphones on, working the world.
February 10, 2026 • US-5524
Sometimes the best part of a POTA activation isn't the DX you work or the pile-ups you run! it's meeting another operator face-to-face who's been chasing the same goals you have. Today at Chito Branch Reserve, I finally got to meet Doug, KQ4SXW, in person.
I finally got to meet Doug, KQ4SXW
Doug's been activating Chito Branch quite a bit lately, and if I'm being honest, we seem to be in a friendly race to see who hits 1000 contacts from this park first (well, between us at least). Spoiler alert: he's winning. But it was great to finally shake hands with someone who understands the appeal of spending beautiful Florida mornings in a park with Spanish moss hanging from the trees, headphones on, working the world.
The Setup
I rolled into Chito Branch mid-morning with my usual portable arsenal. The park is close to where I'm staying in Tampa, which makes it an easy choice for activations, and I've been systematically building toward that 1000-contact milestone. As of today, I'm sitting at 769 QSOs logged from US-5524, so I'm getting close.
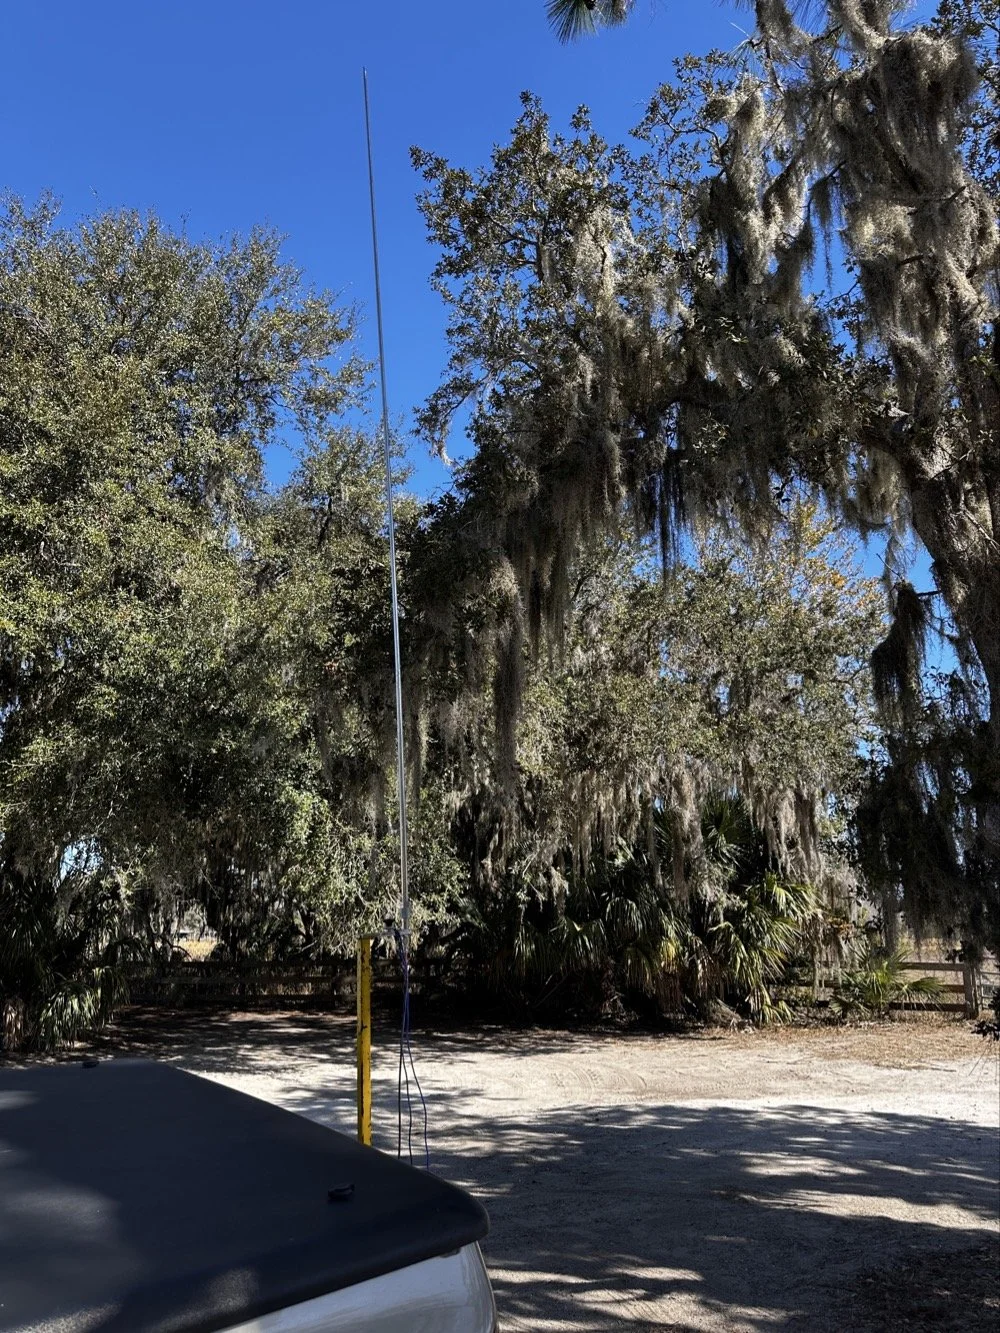
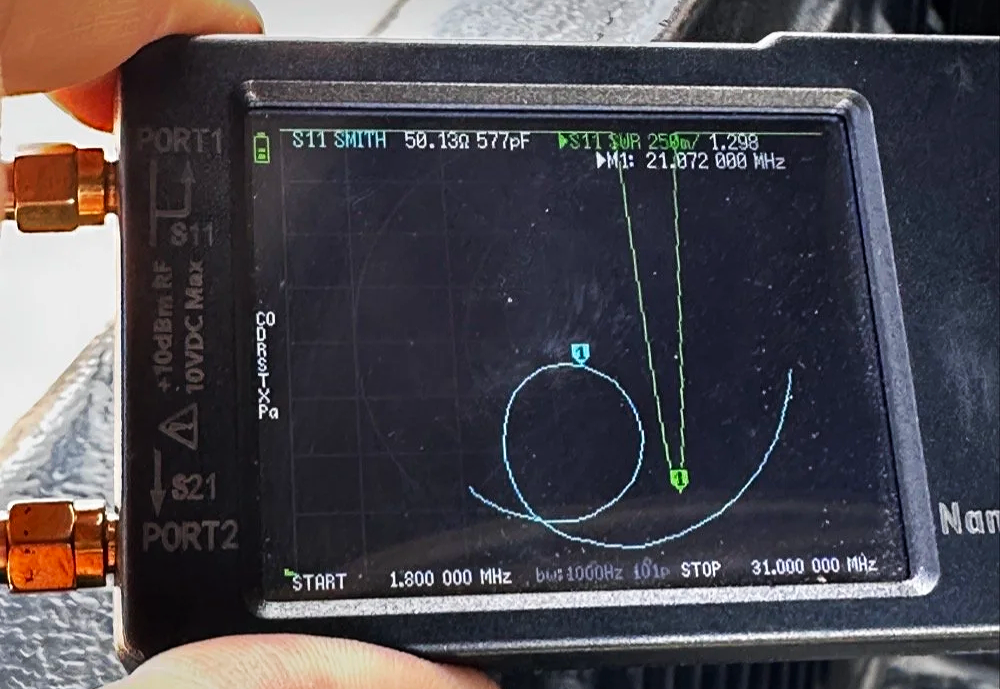
For antennas, I ran my 1/4-wave vertical with two counterpoise wires, tuned for each band. Simple, effective, and quick to deploy. I use the nanoVNA to utne the antenna with. As you can see in the plot above, I get it to something less than 1.5:1 SWR and call it good, I have found that if I get it to that level that I dont have any trouble making contacts at all. I have done OK with the SWR higher in the past…much higher actually, but it is a lot tougher to make contacts like that.
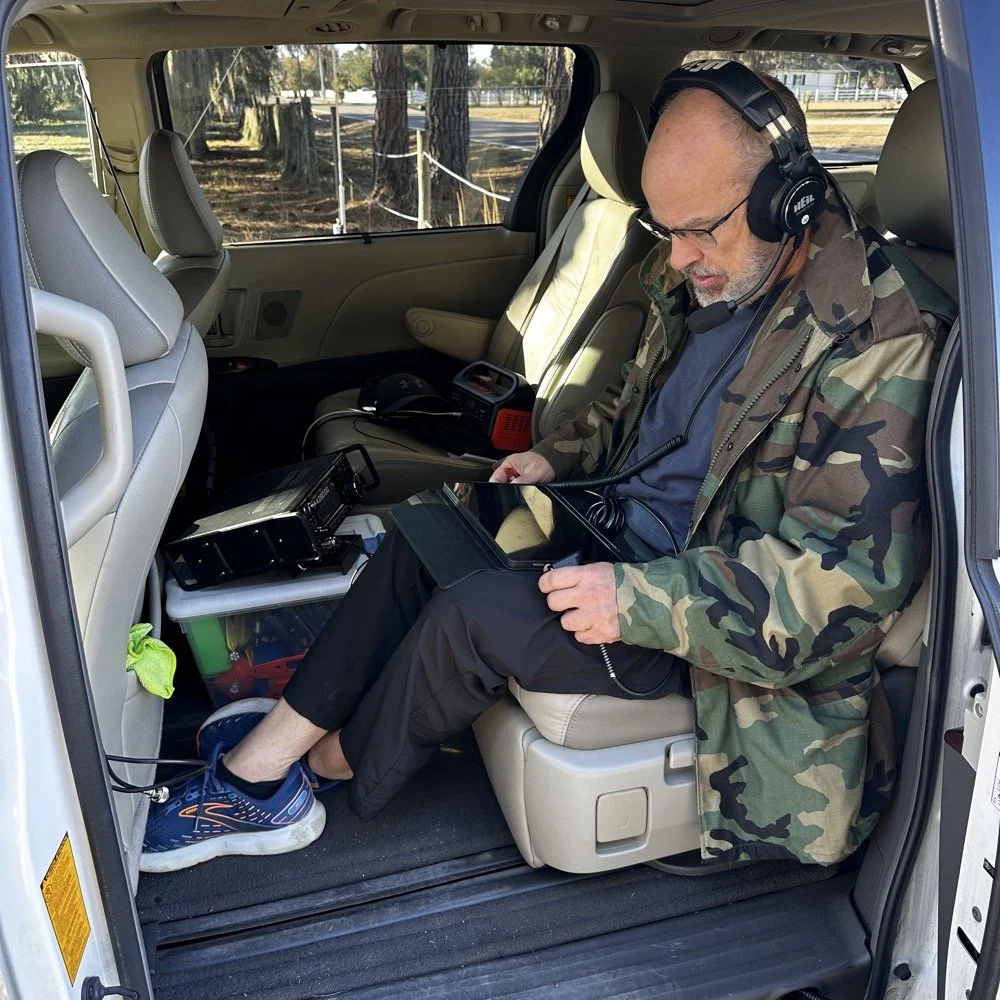
The main rig was the sBitx V3 from HF Signals for digital modes, and I brought along the Ten-Tec Scout 555 for some 15-meter CW work since the bands were looking promising.
Speaking of which… let me tell you about my grid square insurance policy.
A Sticky-Note Solution to a Real Problem
If you operate FT8 or FT4, you know that your grid square locator needs to be correct. It matters for awards, for logging accuracy, and frankly, for not looking like you don't know what you're doing. Recently, I completed an entire activation with the wrong grid square set in the software.
Not ideal.
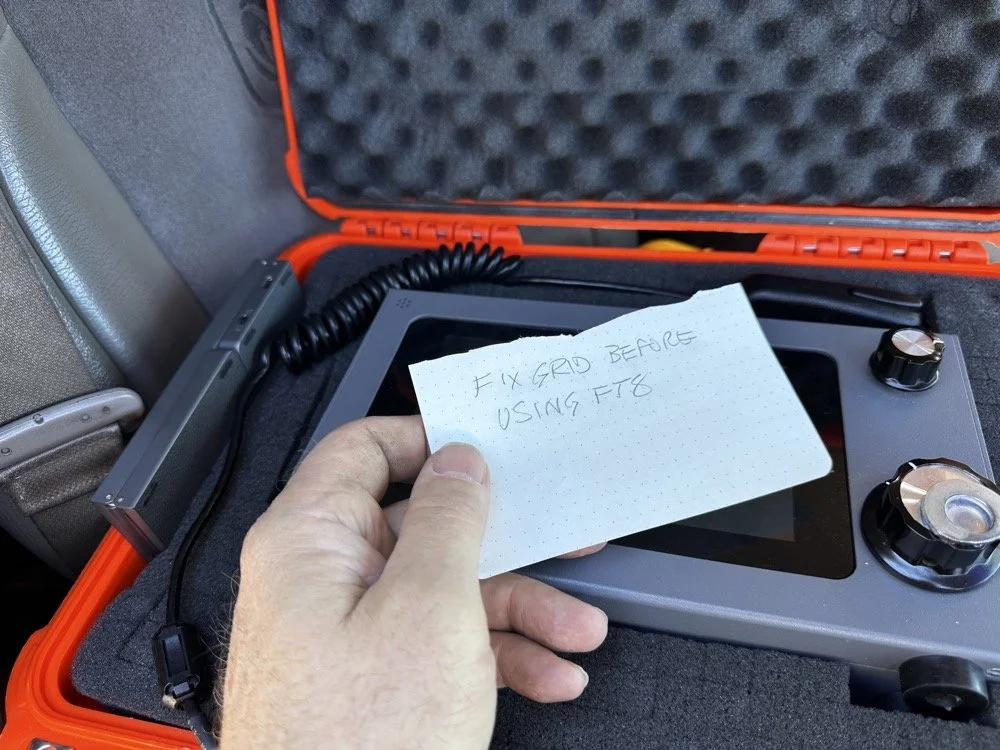
Sometimes the best solutions require the simplest answers…
So I came up with a foolproof solution: I now keep a note in my radio case that says "FIX GRID BEFORE USING FT8." It sits right on top of the sBitx when I open the case, impossible to miss. I also store the Bluetooth keyboard in the case with the radio so I can easily update the grid square in the field without fumbling around with the tiny on-screen controls.
Is it a high-tech solution? No. Does it work? Absolutely. Sometimes the best fixes are the simplest ones.
Starting with FT8 on 20 Meters
After getting the sBitx fired up…with the correct grid square, thank you very much… I started the activation with FT8 on 20 meters. I spotted myself on POTA and the responses started rolling in. There's something satisfying about watching those waterfalls fill up with decodes and seeing callsigns appear in the queue.
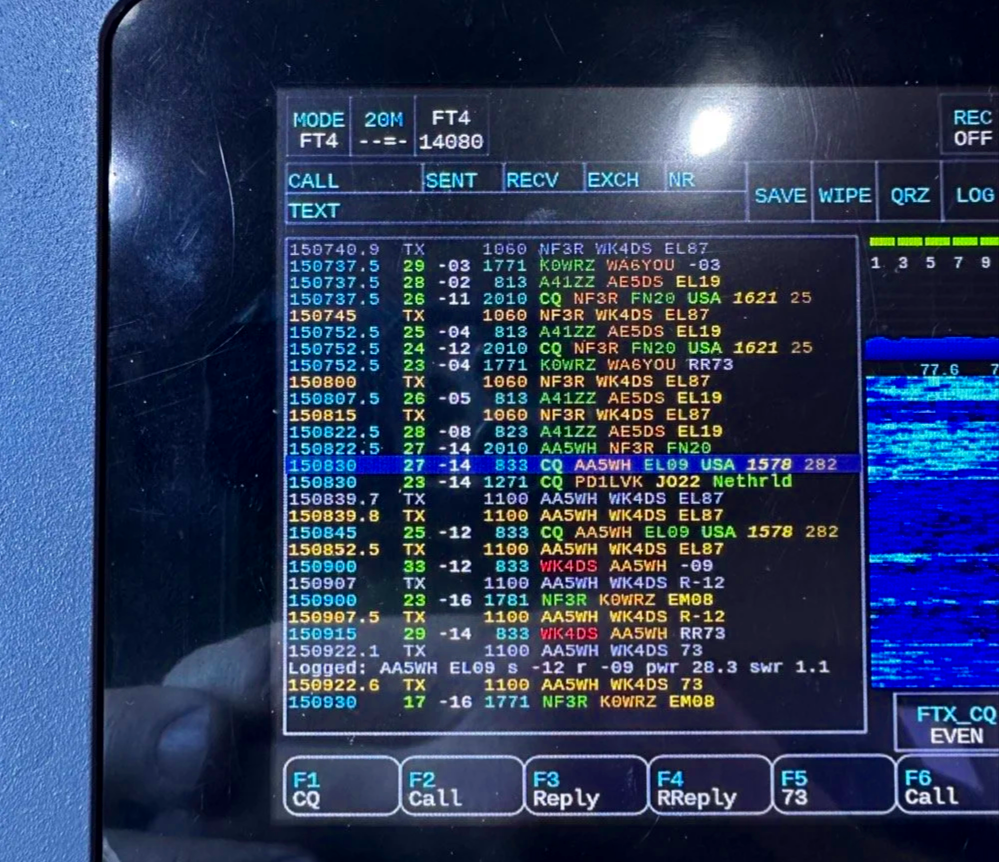
My very 1st FT4 QSO with the sBitx!
I worked through a solid session and logged about 18 contacts on 20-meter FT8. The band was cooperative, signals were good, and the activation was off to a strong start. Something to note about my sBitx V3 is that it has developed a sort of internal noise on 20 meters that lingers in the CW portion of the band. It goes down in frequency as the radio warms up so I have to figure out what is causing this problem when I get home the next time. I have it on the list right next to fixing my microphone pre-amp circuit for proper operation as well.
First FT4 Contacts at a POTA Park
After the FT8 run, I decided to try something new: FT4. I've run plenty of FT8 from parks, but FT4 was uncharted territory for me in the field.
FT4 is faster than FT8, cycling every 7.5 seconds instead of 15, which makes it great for contesting or when you just want to move quickly through a pile-up. I updated my spot on POTA again and started calling CQ. To be honest, I had used it a little in the shack before with no luck so I didn’t hold my breath today, To me utter surprise, I saw a QSO forming in the call feed on the left! Then it finished and logged it! I hurriedly got out my phone and snapped a quick photo to share with you guys…
First contact: AA5WH on 20 meters. Clean decode, solid signal, contact in the log. Then I switched to 15 meters and worked N1KLF. Two FT4 contacts, my first ever from a park, and honestly? I was pretty stoked. There's something satisfying about trying a new mode and having it just work.
15 Meters CW Was Alive
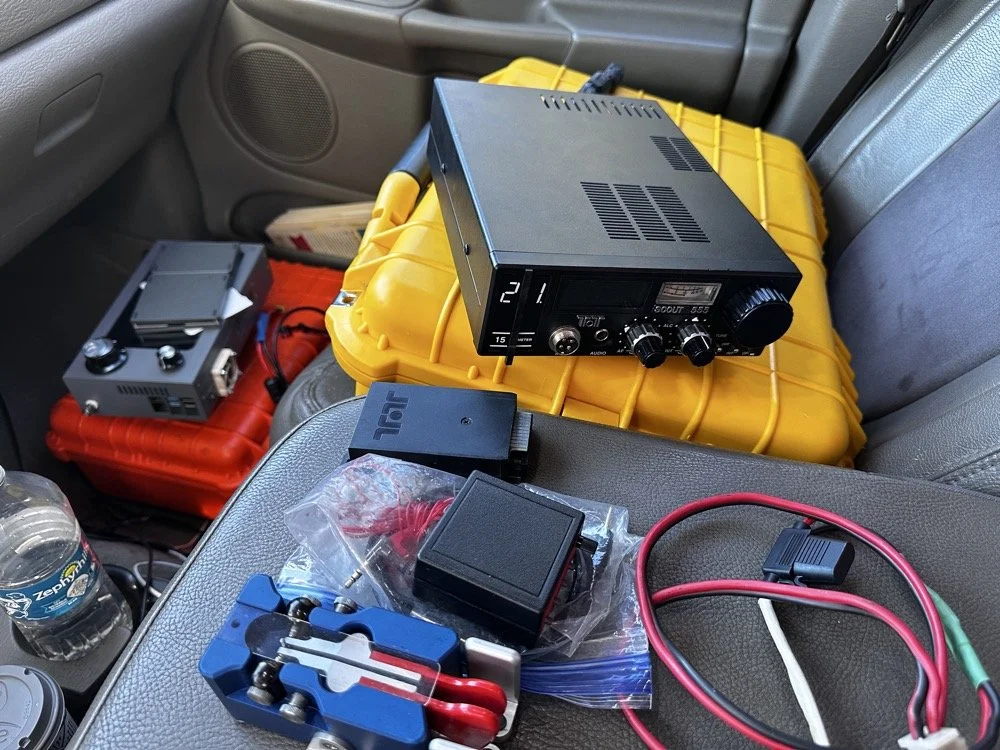
The TenTec Scout 55 is pictured with the HF Signals sBitx V3 where I was changing over to CW after working 2 digital modes today.
After the FT4 session, I switched gears completely. I packed up the sBitx and pulled out the Ten-Tec Scout 555 for some CW on 15 meters. The band was in great shape, though there was a bit of QSB rolling through. I got the radio all connected up to the keyer and then plugged in the Travler. My Begali Traveler key has become one of my favorites—smooth action, compact enough for portable ops, and it just feels good. It is sensitive, but that is how I use my keys, I prefer a light action myself and that is why I made my own paddles back in the day. N3ZN (Tony) and I2RTF(Pietro) make some of the nicest keys around at the moment and I am glad I have one from each.
DX Contacts That Made It Worthwhile
Right out of the gate, I snagged some DX that made the whole activation worthwhile:
EA4MZ in Spain
DD1LD in Germany
YV1GIY in Venezuela
PY5XT in Brazil
Four different countries, all on 15-meter CW with 40 watts and a telescoping 1/4 wave vertical, what more can you ask for? Days like this remind me why I love this hobby. Some of them were a little on the weak side but the Jones filter in the Scout actually helps if you open it up instead of closing it down. This seems counter intuitive, but opening the filter up just ever so slightly will let a lot more of the other operators signal though and just a little of the background noise, it is almost like having them turn their power up 50% or something, if you have not tried it with your Scout 555, I suggest you find a signal you can barely hear and give it a shot.
43 QSOs and Counting
By the time I packed up, I had 44 contacts in the log, though one turned out to be a duplicate, so 43 that counted. Not a huge number, but solid for a few hours of casual operating across three modes (FT8, FT4, and CW) and two bands.
Meeting Doug in person was the cherry on top. It's always good to connect with like-minded people in the hobby, especially when you're both chasing the same quirky goals. A thousand contacts from one park? Yeah, it's a bit obsessive. But things like that are what makes it fun.
SIDE QUEST TIME:
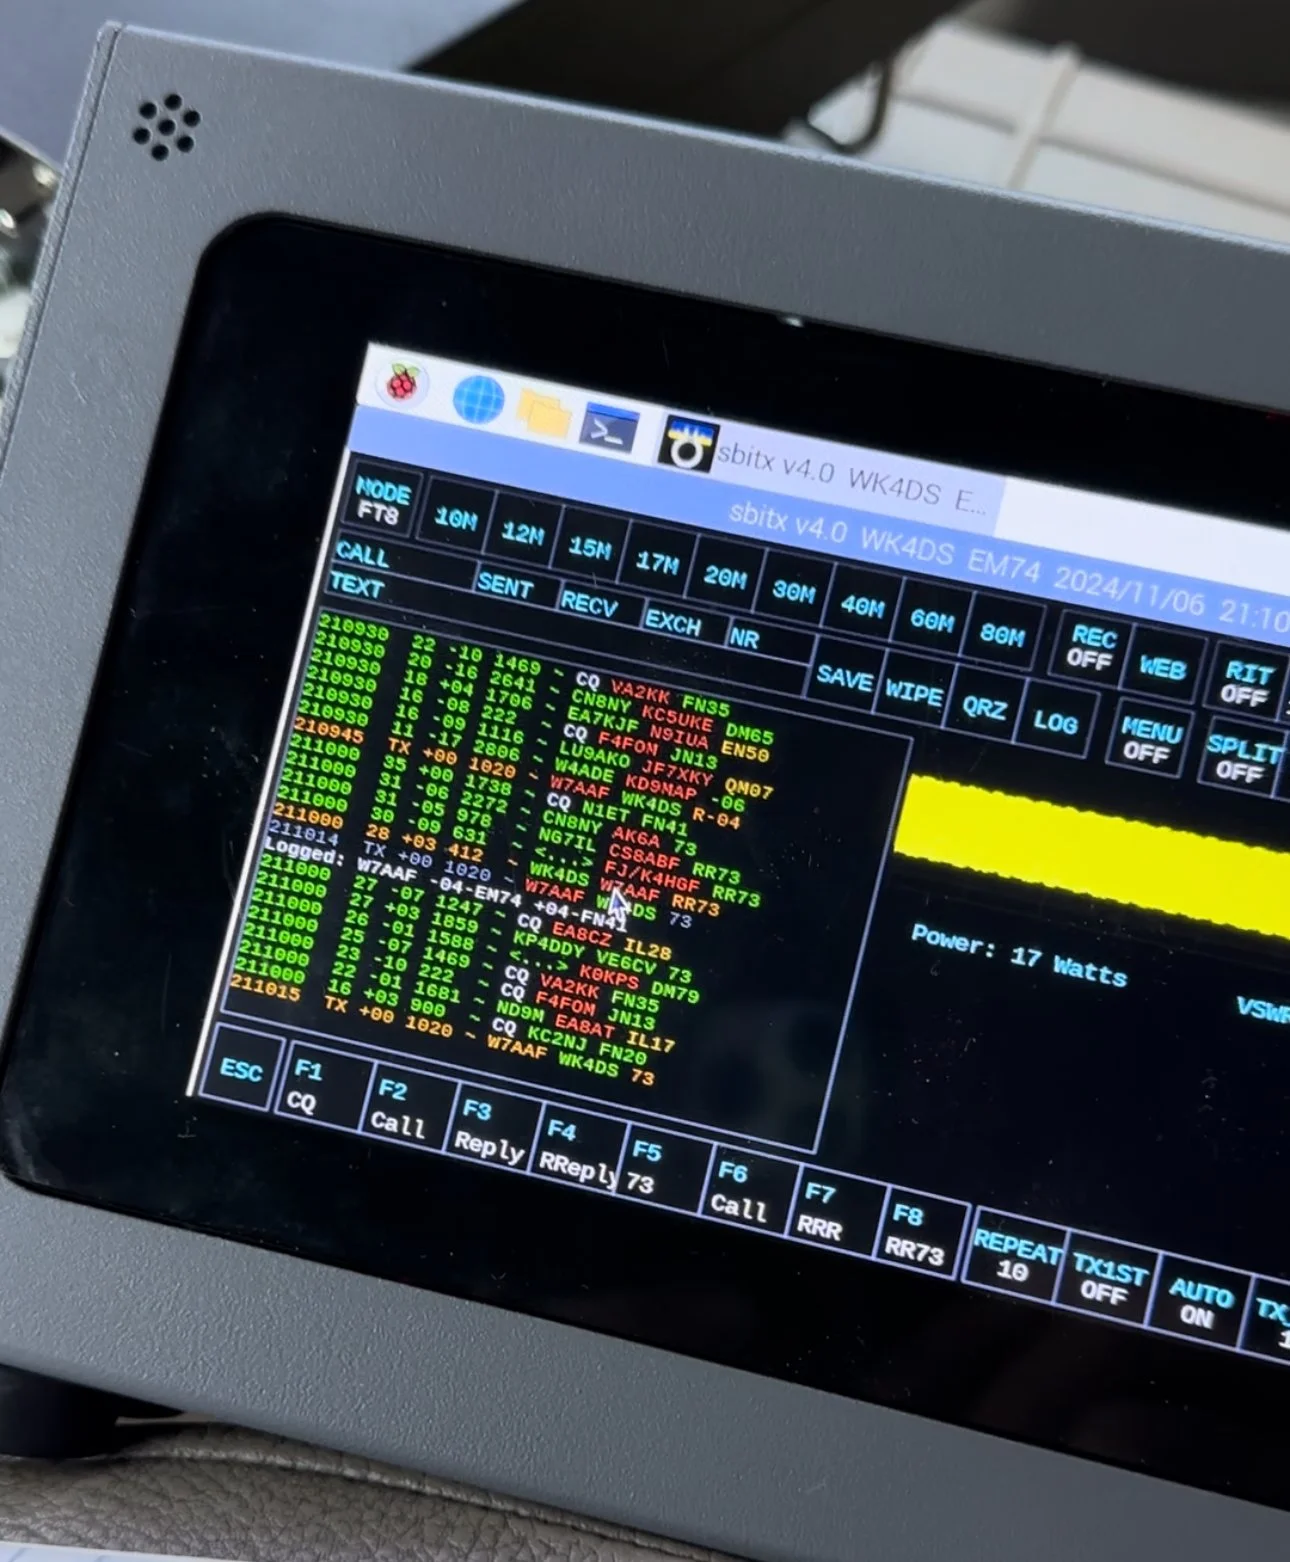
I ran into a unique problem today that is worth mentioning here. I was charging my computer with an inverter that I have wired into the cab of my truck. I was also running the truck so I could power the inverter and charge the computer as well as the sBitx V3 at the time. Well it turn out that I have some issues with this inverter that need resolving. The next few photos show the RF hash that this inverter is producing when under load! It is unreal how bad it was, I couldn’t believe all I had to do was simply shut off the engine and unplug the power cord from the logging computer and it went completely away…
The above photo shows the hash of running both devices on the inverter with the engine running on the truck.
The next photo shows what happened when I shut off the truck and unplugged the computer.
The last photo shows what the band looked like once I went around to the other side of the truck and powered off the inverter completely. This goes to show that you need to check these things if you plan to use RF devices like radios in the presence of RF trash generating devices like this inverter… Better inverter coming up!
END SIDE QUEST
Hit me up!
231 contacts to go until I hit the big 1000 from Chito Branch. At this rate, it'll take a few more activations, but I'm not in a hurry. Well, maybe a little… Doug's still ahead of me.
If you're in the Tampa area and see someone set up at Chito Branch Reserve with a vertical antenna and a tablet running digital modes, stop by and say hello. Chances are it's either me or Doug, and either way, you'll be in good company.
**Gear Used This Activation:**
- **Radios:** HF Signals sBitx V3, Ten-Tec Scout 555
- **Antenna:** 1/4-wave vertical with dual counterpoise wires
- **Key:** Begali Traveler
- **Digital Mode Software:** JJ and the sBitx 64 bit Development team version 5.301 (FT8/FT4)
- **Computer:** Dell Inspiron with Linux and HAMRS
- **Accessories:** NanoVNA for antenna tuning
Have you tried FT4 for POTA activations? What's your go-to mode for portable operations? Drop a comment below or find me on Facebook or shoot me an email on here.
What is FT4 and how is it different from FT8? FT4 is a digital mode similar to FT8 but with a faster cycle time (7.5 seconds vs 15 seconds), making it better suited for contests and quick pile-ups.
What equipment do I need for POTA FT4 activations? You need an HF transceiver capable of digital modes, a computer or tablet running WSJT-X software, an interface between your radio and computer, and a suitable antenna for your chosen bands.
Where is Chito Branch Reserve located? Chito Branch Reserve (US-5524) is located in the Tampa Bay area of Florida and is part of the Southwest Florida Water Management District.
How many contacts do you need for a valid POTA activation? You need a minimum of 10 QSOs to qualify for a valid POTA activation.
You can help support this website by using these Amazon Affiliate Links:
QRP/Portable Radios:
Antennas & Tuning:
CW Equipment:
Power & Accessories:
Organization & Transport:
BONUS ITEMS
73,
David WK4DS
sBitx V2/V3 CW Problems: Why I Switched to Ten-Tec and Penntek for POTA Operations
When I first got this radio, I found it had some keying problems on CW but I just adapted to them and used it anyway. These problems are in how the software monitors the CW circuit and keys the radio and such. Turns out that as the radio heats up, the problem tends to get worse causing me to have to slow down the keyer to be able to send accurate code. Even with these tactics, I still send many mistakes towards the end of an activation due to the lag in the keyer.
I have an interesting relationship with this radio…

When I first got this radio, I found it had some keying problems on CW but I just adapted to them and used it anyway. These problems are in how the software monitors the CW circuit and keys the radio and such. Turns out that as the radio heats up, the problem tends to get worse causing me to have to slow down the keyer to be able to send accurate code. Even with these tactics, I still send many mistakes towards the end of an activation due to the lag in the keyer.

The reason I currently dont use it for SSB is the audio is terrible and I need to trouble shoot that on the bench to see what is going on there. At first it had a weak microphone element so I made a preamp to correct for this but it still doesn’t seem to work all thatwell. Based on all this, I have not used SSB. (I do plan to revisit the SSB circuit to see if I can get it right)
As I also own several portable Ten Tec and Penntek radios that work wonderfully for SSB and CW, I threw in the towel and just started carrying one of those as well as the sBitx. It doesn’t take long to change out the radios since they are so small and light and I really like the break in on Ten Tec radios (the Penntek has wonderful break in too). Another huge plus is that the filtering on the Ten Tec radios is much better than the sbitx in my opinion. Now to be fair, the sBitx filtering is good, but the Ten Tec radios are just better. The Penntek TR-35 suffers the same problems that the sBitx suffers from. Strong, nearby stations will dull the receiver sensitivity.

What I have found that helps in the scenarios is to simply move. There is nothing an overloaded front end can do to help this problem. I do like the features that are available in CW on the sBitx though. Things like the memories and how easy they are to employ is awesome. Another thing is the waterfall is real nice that runs right alongside the CW decoder which has helped me a couple of times. I dont watch the decoder much, but it is nice to be able to see it match what I copied at times for call signs and such. Another great thing about the sBitx is the touchscreen. Not needing buttons is real nice. The only part of the experience that is honestly lacking in CW is the keying problem. Once someone solves this problem, this will be a game changer for a radio. I am still experimenting with different cooling solutions to keep the machine cooler to see if I can get the keyer to work better.

As you can see, this machine makes for a great FT8 field radio. The lack of a need for an external computer is a huge benefit when it comes to this. I just wished the dev team could sort of the CW keying problem this radio has that makes it less than ideal for this application at this time. One thing I plan to do soon is to set it up and see how running QRP power only helps alleviate the heat problem by not running 20 watts on 15 meters and building up the extra heat. This may solve most of my problems but the radio is designed for more transmitter power so I want to access that power.. Another option is to use a keyboard to send the code as it generates the code internally in software instead of polling the IO architecture to get the keying input. This is fun to me too but a nice key is also fun to use. So till the dev team does come up with a solve for the CW keying problem, I will relegate this radio to keyboard CW and FT8 (and maybe even SSB once I address the audio problem again)… But the main reason I wanted the radio to start with was the built in FT8 function that it has, so in that regard I have a great radio that I love to deploy!
If you are considering getting one of these radios, just be aware that it is far from perfect and it is literally made for experimentation. As long as you keep your expectations in reasonable bounds, this radio can be a lot of fun.
You can help support this website by using these Amazon Affiliate Links:
QRP/Portable Radios:
Antennas & Tuning:
CW Equipment:
Power & Accessories:
Organization & Transport:
BONUS ITEMS

Multi-Band POTA Strategy: Ten-Tec Scout 555 + sBitx FT8 on 15m/17m/20m/40m
The location is all too familiar, but I set out to do a sort of special operation today. I wanted to complete a POTA activation using two radios, 3 modes and 4 bands in one sitting. This doesn’t sound like a tall order but since I am operating inside the truck cab, this does involve a little logistics to not just have stuff piled everywhere while I am operating. As you will see in the photos below, I still ran into this problem somewhat, but it was manageable.
Today was a fun day…

The location is all too familiar, but I set out to do a sort of special operation today. I wanted to complete a POTA activation using two radios, 3 modes and 4 bands in one sitting. This doesn’t sound like a tall order but since I am operating inside the truck cab, this does involve a little logistics to not just have stuff piled everywhere while I am operating. As you will see in the photos below, I still ran into this problem somewhat, but it was manageable.
I setup at the disc golf parking lot again, but this time there were quite a few people there and some of them actually quizzed me about what I was doing. One gentleman, Jerry as noted in my log, actually chatted for a good bit about how he has been looking to get into ham radio but the Atlanta area is kinda tough on locating local hams for some reason. I gave him a card and told him to email me and I would give him as much info on it as I could find to get him on the right path…
As you can see in the photos, I set up ham sticks and this time I started on 40 meters FT8. I wanted to get the FT8 portion of my “sprint” if sorts out of the way first as the other two modes were going to be on the Ten Tec Scout 555. I had recently activated with it and it was acting up with chirping on CW and reports of RF noise on my audio on SSB. I attributed this to poor connection of the 20 meter band module as it was fine on 15 meters. Armed with this knowledge, before I left out for the park, I took the radio to the shop and use the Deoxit for gold contacts and a tooth brush to clean the contacts on the band modules. I even wetted one module pretty good and used it to “clean the contacts in the radio by plugging and unplgging the module a bunch of times.
This improvised procedure worked as I got good reports and the CW ran flawlessly as you will see later. Deoxit is magical stuff, if you dont have any, it is work your investment to grab a small can of it.


I really enjoy using this radio for my FT8 operating and with the upgraded finals and RF deck, it runs flawlessly now with SWRs in the 2:1 and even slightly higher range without problem. Today saw SWR levels on transmit of about 1.7:1 and it happily skipped right along making several contacts in a row at one point.
After completing 6 QSOs on FT8 I figured it was time to get the Ten Tec Scout 555 out of the case and see what I could scare up on CW.
The 40m Ham stick that I have must have a really high Q as it is very narrow banded. So I have it tuned for the CW portion of the band and the SWR in the SSB area can be quite bad at times. For this reason, I chose not to hunt any SSB contacts on 40 meters today. Once on CW (this was about 1/2 hour later as this is when I talked to Jerry) the band must have been closing or the band noise was getting so bad that I could not hear many stations. I was able to work Alabama and Tennessee before the call signs faded into the noise. That is something you will learn pretty quick about HF radio propagation, if you want to work closer in stations, use the lower bands, but if you want to reach the west coast from Georgia on a ham stick, use the higher bands like 15 and 20 meters. When 10 meters is open I have worked other continents with ease… Don’t discount those higher bands, they are truly magical.

In the above photo I have the CW key and keyer staged but not connected. The mouse is actually driving the FT8 machine and makes working FT8 so much easier to be honest.

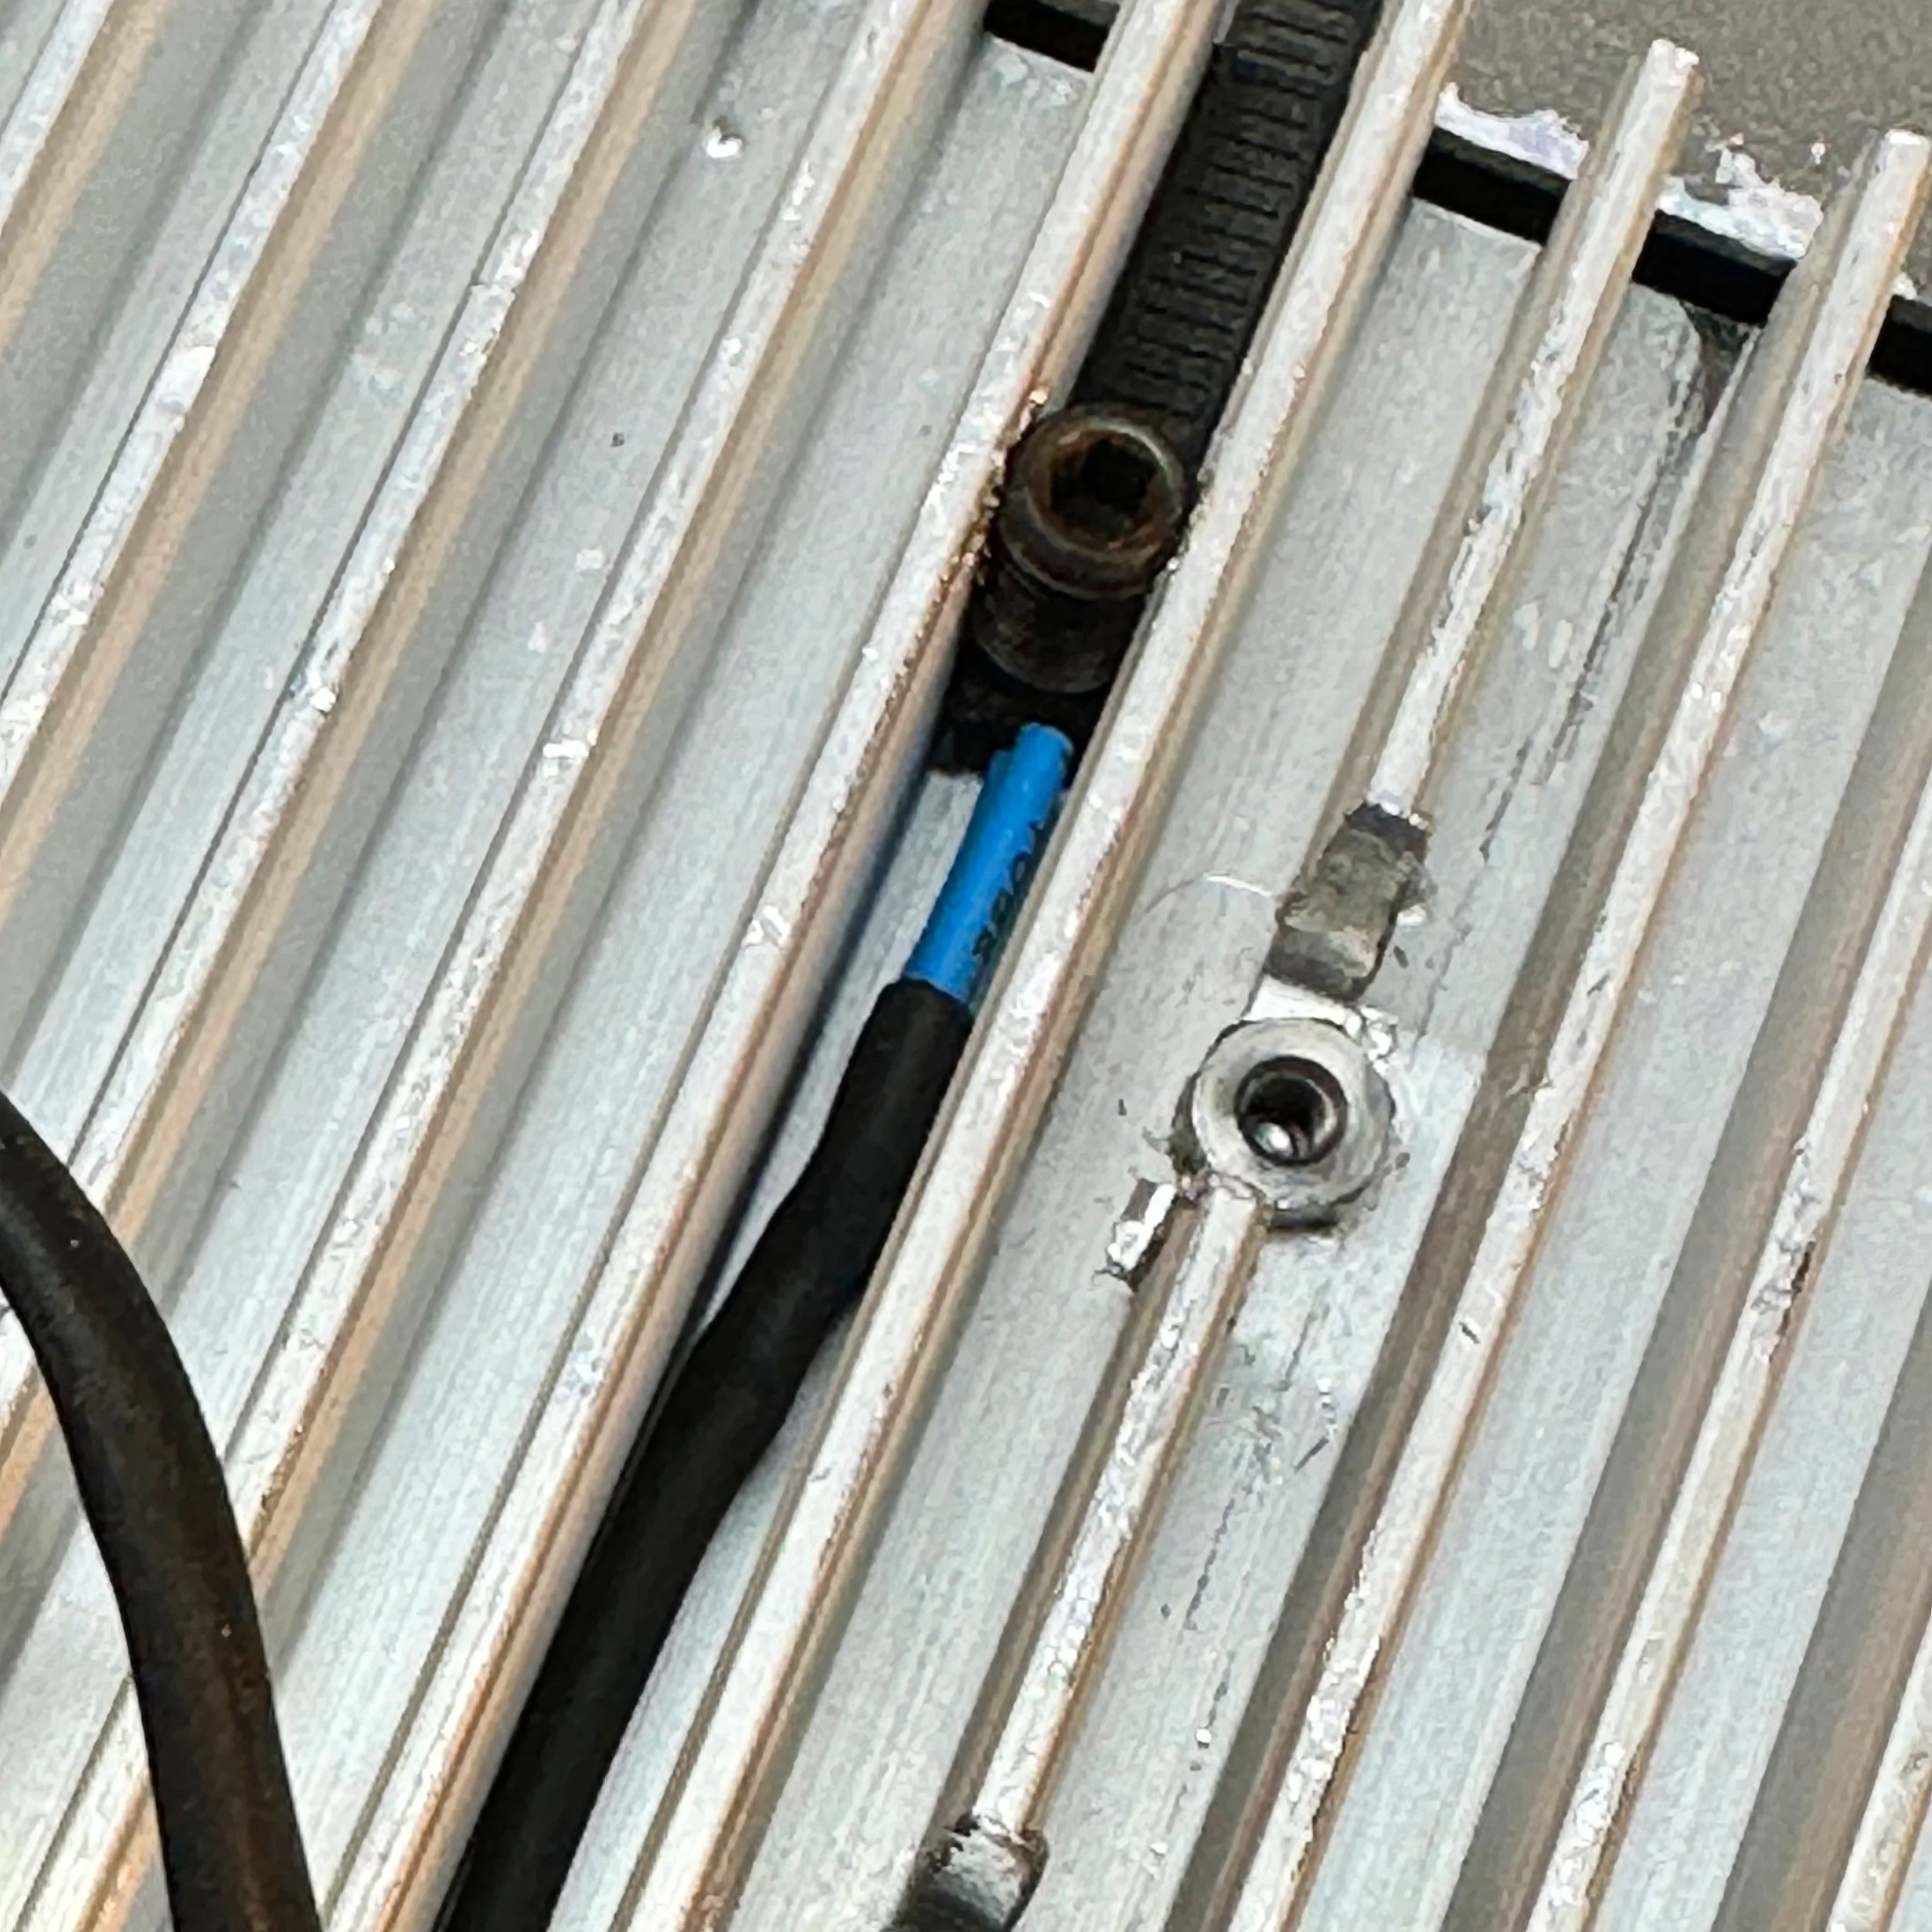
In these two photos you can see what you have to work on constantly. The above photo shows the cable that came with my Ten Tec Scout 555 when I bought it. This is a common issue you will find with home shop made cables. These were stripped back way too far and as I used the cable, the conductors started breaking and I was beginning to worry about blowing fuses.
I happen to own a tool that is designed to remove these pins from the connector, so I am able to dismantle this connector properly. I dismantled it, then took it apart and cleaned it up, properly stripped and re-soldered the pins, then put heat shrink tubing on it all to insulated and protect it better. Now I am not so worried about it either shorting and melting the wire or blowing the fuses and shutting down the activation over something as simple as a cable…


Once I finished on 40 meters and had two modes in the bag on one band, I switched over to 15 meters CW to see what was happening there. There was a contest going on so it was a little crowded and I didn’t understand the exchange so I didn’t jump into the contest, but rather setup on a clear spot and calledCQ and worked a couple of stations there, one station of which is DX!!!
At this point. I got a phone call from KG4WBI about a completely unrelated matter, which we discussed and I told him to fire up his HF rig and we would see if ground wave would make the trip to his house from the park so I could get Georgia in the log as well as a 2nd mode on 15 meters! Well, it worked just fine and we had a great QSO on 15 meters SSB before he had to sign off and go run errands. So having confidence that SSB was going to work better I started calling CQ on SSB.
I got literally zero replies to my calls… so I went hunting instead. I found two more ops that could hear me and I was able to bag a couple more QSOs and these were Park to Park contacts to boot!


These three photo show me installing the band module into the Ten Tec Scout 555 transceiver. It really is that simple to change bands on this radio. Now to be fair, this is not as simple as just turning a knob, but it really isn’t that bad.
To remove the module you pull out the bottom of the little lever on the front of the module and it will pop out enough to be able to slip it out, then you grab a different one off of the pile and stick it back in the slot in the radio. Push it to seat it and then your ready to go.
At this point, I switched over to 20 meters and since the PTO (notice it is not a VFO) was still up in the SSB area, I decided to see if I could hunt some contacts with that mode. I landed one contact in SSB on 20 meters and was happy to get them in the log.
After working the one lonely SSB contact on 20 meters, I decided to give CW a try as well… Remember me mentioning a contest? Well, it was here too. It was going strong as well and because of this I was only able to work one contact on CW as well. If nothing else it netted me another band!

My last stop of the day was 17 meters. The 17 meter band is a WARC band and therefore it is off limits to contesting. Now, to be fair, POTA has been called contesting of sorts, but as of right now it is not considered a contest but is more in the spirit of something similar to a rare DX station activating on the same band and developing a huge pileup there. So I proceeded to hunt me an empty spot (18.078mhz) and started calling CQ.
This is when things literally took off! I netted a whole page of contacts in about a 1/2 hour span of time! What a day! 4th band in the books and I was stoked!!! 17 meters must have been where all the POTA ops had went due to the contest and I didn’t get the memo…lol. The Scout worked flawlessly after the cleaning and I cant be happier now with the old girl.

One of the great things about 17 meters is the propagation is really anybodys call. I worked Hungary at one point as well as California, Alaska and Idaho, then there is a ton of east coast stations too, it was everywhere today on 17 meters. Ham radio is so cool…


Before closing today I wanted to mention that Aaron KV9L and I have a youtube channel and we just hit 2000 subscribers (as of this writing)! If you are into ham radio and watching videos about it, then we would love for you to come over! I am currently doing a series of short form videos that are teaching CW one letter per day. There is no limit to the number ofd times you can watch them so I am hoping these become long term training aids for people.
Once I get the letters, numbers and punctuation done, I am going to start doing words next. After words will come sentences so we will see how it goes. Anyway, I just wanted to thank the 2000 people that made us as successful as we are!
You can help support this website by using these Amazon Affiliate Links:
QRP/Portable Radios:
Antennas & Tuning:
CW Equipment:
Power & Accessories:
Organization & Transport:
BONUS ITEMS
73
David -WK4DS
Activating a park in bad conditions
POTA activating in bad conditions can be challenging… for some modes. Seems that FT8 doesn’t really care if the bands are crappy and will gleefully allow you to play radio anyway.
This was an experiment to see if the sBitx amateur radio could work in terrible space weather like you see below in the report.


The above and below photo show how fast the band conditions changed on me while activating on this day. The band noise could be seen on the display “walking” across the band segment at times. This band noise would pretty much wipe out what you could hear on the band, but the radio could still decode the FT8 signals so I was able to work almost 20 stations in about an hour even with this sort of noise coming into and out of the band.
I normally dont bother activating in bad band conditions, but this day I really wanted to see just how good FT8 was at extracting signals from the noise. I can honestly say that I was impressed by the performance of this mode. Digital modes have their place and this is very much one of those places. Weak signal in poor band conditions shows just how important it is to use all the modes available to the amateur radio operator. I was once a die hard CW only op and to be honest, it is still one of my favorite modes, but of late I have started getting into SSB more and now I am also dipping my toe into digital modes more and more and I am really liking it. Dont limit yourself out of a stigma like I did, you might just like what you find.

Below is a photo of the display that shows something that i had never seen before and that is the pulsing band noise. That was a new one for me. It too would come in waves and these would last much longer it seemed. The sBitx just kept chugging along though, I would sometimes pick calls and sometimes answer calls and this is what makes FT8 awesome. I couldn’t have possibly made SSB contacts in these conditions…


Here you can see the operating position for the day. Perfect blue skies and nice temps makes for a great day on the air at a park. I had to goto this spot as the lower lot was completely full since the weather was so nice, it was fall and a Saturday. Sometimes going to this spot has it’s perks like lower band noise from the campground inverters and such so I dont really mind it.
I had planned on using a battery and setting up on the picnic table I usually occupy down next to the canyon rim, but there just wasn’t anywhere to park and I didn’t want to wait on someone to leave just so I could park.


This radial is on it’s last leg. I have twisted this broken radial back together for months now and on top of that, the connector on the other end has also broken off. This is almost comical as this is the best performing radial in my set! That is why I am reluctant to repair it at this point…lol. It just works and if it ain’t broke (figuratively) then dont fix it.
I dont know when this bug (I think it is a jumping spider) decided to join in on the fun but here he was playing on the antenna mount. By the time I finished the activation, this little guy was long gone. Kinda fun to notice the little things like this when you are out in the park.


By the end of the activation, I had worked 18 unique contacts and garnered one dupe because I didn’t read my logbook very carefully and called one ham two times…then I decided to attempt to work some CW. This was pretty futile though as I only worked one contact out of about 15 minutes of calling as this is abysmal for me when I work CW. I can usually work about one call per minute even when I am running QRP power levels. So when I only work one…that is bad band conditions. The stations would literally just disappear then reappear and it was impossible to get complete calls so I called it quits after one.
All in all, it was still a great day in the field. Hope to work you soon!
WK4DS
POTA at US-0716 with only Digital Modes...
My plan was to only use FT8 and get the activation as quickly as possible, but in the end it ended up a little differently. This POTA park is a national military park commemorating the battle of Chickamauga during the US Civil War in the late 19th century. It is now a recreational hot spot along with a tourist destination so they have all the trappings of a outdoor recreational area along with the monuments about the war. This trail head was across the street from where I parked the truck today.

Another reason for the singular mode was that it would only require the use on a single radio this time since I am currently using the Ten Tec Scout along with the sBitx SDR for my POTA activities. I only deployed the sBitx SDR today so I could stay inside the truck and run the air conditioner as well since I didnt need to hear as well as I would if I were doing CW or SSB.
By only using one radio the rain that moved through the area didn’t hamper my activity at all. I was able to get setup quickly enough that I beat the rain and was on the air before it started to fall.


I like this location on sunny days since it is in the shade, but today it was overcast and rainy and this didn’t really matter. I did like it because it is “RF Quiet” and there is little to no RF noise except when certain cars drive by that are a little noisy.

I used my field expedient sealing technique again today, I know this is not a real seal but it will shed water long enough for me to complete my activation and then I can break it down and stow it in the truck easily enough. Long term would be a different story, but it works well for me like this for simple short time frames like a POTA activation.
This time since I was going to stay on 20 meters, I simply deployed the two radials that are associated with that band and I ran them at right angles just to see how it would perform, it looked great on the nanoVNA with the SWR running about 1.2:1 across the digital portion of the band.


I meant to get a photo of the waterfall and somehow ended up with an image of the transmit signal and associated info…figures. The point was going to be that the 20 meter section of FT8 was filled with ops today. So much so that is was hard to find a spot to send from. The band segment was that tightly packed today. I had to frequently move as I would go for several cycles with out so much as a hint of someone answering me only to find out that a strong station had setup on top of me and was sending over my little 20 watts. Get a contact, listen to the band a minute and find a new clear spot and repeat. This was the modus operandi for the day. I considered at one point of moving up to 15 meters just so I could more easily find band space, but talked myself out of it since I didn’t want to get out in the rain and change antennas and then worry with the tune of the radials and such.
After getting my minimum of ten contacts on FT8 thereby securing the activation, I wanted one more just so I could have a little buffer if one was a pirate of some such. Turned out that this was a huge problem as it took me a long time to get that last QSO in the log, I even went over to CW thinking it would be easier (which it was not) and finally got that last station… The QSB (signal fading in an out) was so bad that I could almost not hear strong stations that were normally easy to copy, but I did get the one I wanted before going QRT for the day. I grabbed the photo below to show the band fade and it is kinda visible in the signal on the lower edge of the waterfall, but it would go from what I would call S9 to nothing in literally 5 seconds, they signal would just vanish. I was blown away with how bad it was and then I checked the space weather and saw why, there is a ton of solar activity causing terrible band conditions right now…figures.


11 contacts in almost an hour is not a great hit rate for me where I am used to working about 1 CW contact a minute and a FT8 every two to 3 minutes, but it was fun none the less. Any day I can get out and do POTA is a good day. Until next week…
73
WK4DS

How well does 17 meters work?
I see a lot of people on 20 meters, but what about 17 meters? I take the sBitx v3 to Cloudland Canyon State Park (K-2169) for a little fun on 17 meters today… The combination of going to a park with your amateur radio gear and setting up an HF radio in a state park to activate as a POTA operator is a lot of fun.
I see a lot of people on 20 meters, but what about 17 meters? I take the sBitx v3 to Cloudland Canyon State Park (K-2169) for a little fun on 17 meters today… The combination of going to a park with your amateur radio gear and setting up an HF radio in a state park to activate as a POTA operator is a lot of fun.

sBitx V3 running FT8 natively on 17 meters.
What is the 17 meter band in ham radio?
The WARC (World Amateur Radio Conference) bands are nestled between the typical bands and everyone knows what they are because it is on the license tests. The ones I am referring to, in case you forgot for some reason, are 30 meters, 17 meters and 12 meters.
What the license test doesn’t teach though is that each band has unique characteristics that make it fun to use…at least that is how I see it. Since each of these WARC bands are stuffed between other typical ham bands, they seem to take on the characteristics of the two bands they sit between. Take 30 meters for instance, it will act like 40 meters with NVIS propagation on my hamstick to work hams just a couple hundred miles away and then I will work the west coast on the very next contact as if it were also a 20 meter contact.
Well, the higher the bands get the further they tend to reach more distant stations for me. I don’t have giant towers that have huge Yagi antennas on them for say 40 meters so my results are more of the typical ham who might have a dipole that is technically too low to the ground for textbook operation or a vertical with a couple of radials…you get the idea.
The 17 meter band has the same characteristics as 20 meters as well as 15 meters a lot of the time. For me the higher the band, the better the DX usually. I guess it has to do with the fact that the higher the frequency, the smaller the antenna and with a smaller antenna, the lower it can be to the ground and still have proper performance. Armed with this VERY basic knowledge of antenna theory, I usually expect some cool European stations on 15, 12 and 10 with the occasional DX on 17 meters, but today the sky was alive! Well, it would fade in and out and you can see it in my logbook reports. The signals reports over the time period of the activation go from 599 both ways to dismal 529 and 229 reports within an hour. This has been the norm as of late too, a lot of my activations lately have had events that would be described as cyclic in nature. I would hear a station call and reply to them with a 599 because they were booming in and then when I turn it over to them to reply, they will be a lot weaker and then you can literally hear them fade out while you watch and then fade back in by the time they turn it back over to me. It is really odd to hear that in real time for some reason.
17 meters covers a fairly small portion of band space as well with it only being from 18.068mhz to 18.168mhz. This is only 100khz of bandspace and yet there is room for a plethora of modes and operators. 18.100mhz is the watering hole for FT8 on the band and CW runs from the bottom of the band to about 18.090mhz for the most part. Voice operations will be above 18.100 usually and I have not made many contacts with SSB on 17 meters…

The POTA Activation on 17 meters
When I got to the spot I wanted to use for the activation, I was the only one there. So I setup in my usual spot and figured I would start on 17 meters to see how things were and if it wasn’t really happening, I could move down to 20 meters and get the activation easily there. I should have known things were going to be good when my first station of the day was VK3AWA!
Now you need to know something about me here. I thought this was a Canadian station since the call started with a “V”. I work so many Canadians that I have become accustomed to hearing the V callsigns and happily add them to the log. It wasn’t till I checked the QSO map that I realized that he was actually in Australia!!! They (it is an Australian club call) must have had a Yagi antenna pointed at me or something, along with a path opening as the signal reports were really good for a 12 watt transmitter running into a ham stick antenna on the back of a pickup truck. This contact was on FT8 and FT8 reads the signal strength in dB with the software to get the most accurate reading possible to send back. So it isn’t quite as subjective as something like CW where a lot of people (me included) will send signal reports based on how the op sounds to them and never reference a meter one time… So for my little radio to get a -8dB report from Australia had to have help from the atmosphere and probably a very good antenna on their end.

FT8 is a relatively new mode for me. I have normally not done anything other than the two original modes of CW and voice. For me to reach out into a new mode is a pretty big deal and this one works really well, which is why I like it. I am also looking to start messing around with PSK 31 some as well as possibly RTTY if I can figure out how to get the little radio to do it. I think PSK 31 will be pretty easy to master, so I will tackle it first.

What makes 17 meters so special?
The above map shows the performance you can normally expect from a band like 17 meters. Notice there is practically no contacts inside of about 600 miles other than two oddities here in Georgia? That is because of the antenna and the ability of 17 meters to have a pretty decent take off angle and also to reflect off the ionosphere easily. This garnered me a ton of contacts in the pacific northwest as well as the Atlantic north east and a scattering around the country to include Utah and southern California. Then there is the EU… I made several contacts with France and Germany today. That has been a little unusual lately for me and my system to be honest so I was stoked to see them in the log.
But this trip did something that I had not done before that I can remember… It netted 7 Canadian QSOs alone, combined with the other DX calls I technically activated today with only the DX contacts! That has to be a personal first.


I started with a DX call and finished with a DX call. How cool is that? It was a great day for radio and I really enjoyed using the sBitx with the new V3 firmware. The radio works so much better than the previous firmware and the FT8 is a breeze in the native radio setup. It you are into smaller radios and smaller companies and the idea of help from a collective of literal geniuses that willingly share their information with you, then this just might be a radio you will like. It is for me, I have had so much fun with it that it is hard to understand how I got along without it before…and the people over at HFSignals dont even know who I am…haha.
You can help support this website by using these Amazon Affiliate Links:
QRP/Portable Radios:
Antennas & Tuning:
CW Equipment:
Power & Accessories:
Organization & Transport:
BONUS ITEMS (Optional 16-20):
Hope you enjoyed this little diversion into the 17 meter band and inspires you to go out and setup your radio in a POTA park at some point!
73
David - WK4DS
sBitx V2 Amateur Transceiver Mods for POTA Use
My newest radio, the HF Signals sBitx v2, is an HF radio with so many features that you just need to follow this link over to their website to see what it is capable of. Once you have finished going down that rabbit hole, come back over here to see what mods I have done to mine already for my POTA stuff. I want to say this right away, this radio is kind of in Beta, so if you don’t like to open up the radio and tinker with it in both the software as well as the hardware, this probably isn’t the radio for you. With that out of the way, let’s get started!

I decided to get in on this idea of a open source architecture radio design. I found this company, HFSignals, and they make several radios with their latest model being the sBitx V2. This is a touch screen radio with a huge screen and it is powered by a Raspberry Pi SBC. Using a legit computer to power the radio unlocks so many things that this radio can do that other radios can not do. For one, it will do FT8 IN THE RADIO! Yeah, no external computer needed at all, that in itself is a gamechanger and don’t be surprised if you see the big names in the industry doing this in the near future because of it. By using a Raspberry Pi SBC for the brains, this little machine is just chocked full of goodies that those other radios cant do.

FT8 is native inside the radio on the sBitx v2.
You heard that right, as I type this blog post it is on the bench next to me finishing a QSO with I1RJP, and when it does it will automatically put the QSO in my log for me. How awesome is that? Did I mention it is open source? Yeah, both the software AND the hardware are open source and it is encouraged to take your radio apart and tinker with it. Shoot, it even shipped to me with a spare set of output transistors in the accessory bag. These are well thought out but they are still rather simple overall designs with features like they are passively cooled radios and use a crystal filter network. Another thing about being passively cooled is that it means there is no fan noise to deal with at all this way, since there are no fans.
Well… I used it on a POTA activation and the little radio got HOT. Really hot to be honest. So I decided that since this radio is designed from the outset to be open source and to be tinkered with by the end user and I wanted to use it for POTA activations, that I would add some fans to cool the little machine on activations.
The first thing I wanted to tackle was the power amplifier heat sink. It is a great heat sink and does a wonderful job as it became really hot during the activation. I first started looking for a suitable fan in my junk box and found the perfect fan in an old computer power supply that I have cut apart for another project. The fan was still mounted in the sheet metal case which also happened to fit perfectly over the outer edges of the heatsink. All I needed to do was trim the sides down so it sat next to the heatsink and add some screw holes to attach it with.

Once I had it mounted with a couple of self threading screws, it was time to get it running. I went inside the radio and started looking for a suitable place to tap power out to it and found the incoming source point was the best, but the fan would run all the time if I used this spot…

Enter a simple electronic circuit that could be used for any temperature of fan control and could even be adjustable with a potentiometer if you were so inclined. This circuit is a simple power transistor rated for 6 amps of max draw (I used this so it could handle the 300mA of draw from the fan and not need a heat sink and they are still really cheap too). You simple have a voltage divider network for the base of the transistor where you have a fixed resistance between the base and ground and you add a thermistor (a temperature reactive resistor) between the voltage source and the base.

I chose a 10K ohm negative coefficient thermistor for my needs as this design has the resistance go down as the temperature goes up. The fan is simply wired in series with the transistor’s collector and the voltage source and the transistor is basically used as a electronic relay in the simplest form. I know the MOSFETS are more efficient, but this works and I had all of these parts (except the thermistor) on hand so I used these instead.

What happens during operation is that when powered up, the thermistor has so much resistance at a lower temperature that the base voltage is less than the .7 VDC required to bias the transistor since the fixed resistance of the base to emitter side of the voltage divider is calculated for the desired temperature. The thermistors have a chart showing the resistance at different temperatures so you can make these calculations fairly easily. Mine worked out to 270 ohms for the fixed resistance between the base and emitter. So you can imagine that with 10,000 ohms (at 77 degrees) on the other half of the voltage divider you only get .363 VDC on the base of the transistor and the transistor stays “OFF”…

I found the above chart online for 10k ohm thermistors and grabbed it for reference only. This may not be the right chart for your thermistor as they have different resistance curves so check with your brand of device and make sure you have the right chart for your device. Back to the story in progress…
Well knowing this, as per the chart above when the temp rises to about 107 degrees then the resistance drops in the thermistor to about 4980 ohms and this now allows about .7 VDC to develop across the base of the transistor, forward biasing it. Notice how I made the contact with the hear sink. I soldered on a pair of wires and put heat shrink tubing on them to insulate the connections then I ran a 1/4-28 tap down into the space between two fins cutting something resembling threads into the fins. Then I took a piece of a zip tie and put it on the thermistor and ran a setscrew down against the ziptie/thermistor stack to hold the thermistor against the heat sink it works really well too. The ziptie is only there to do two things, to prevent me from cracking the outer shell of the thermistor and to insulate the thermistor from the setscrew so the setscrew wont bleed off heat, I am not certain it helps, but it sounded good in my head at the time. LOL. I located it near the transistors so it will pick up the heat faster. I also changed the mica thermal spacers out for aluminum ceramic instead as those are supposed to conduct heat significantly better between the power transistors and the heatsink.

The fan control circuit can be seen on the perf board next to it in this photo.
Then once things heat up the fan spools up and blows on the heat sink, in turn cooling it down to the point where the temperature on the thermistor drops enough to raise the resistance back up and shut off the transistor again. This worked like a charm at the last activation I used the sBitx v2 on. The fan doesn’t even come on to drain the battery until the heat sink warms up enough to need it, so if your simply listening around or hunting activators and doing search and pounce, then the fan will not cycle on very often at all… if ever. I do understand that there is some current flowing through the resistor network all the time though as well, but it is low and I am not really worried about 3mAs of current anyway. I have really large batteries in the grand scheme of things and if I am going to hike with a radio it will be the Penntek TR-35 anyway…

The next “upgrade” I did to mine was to add a heat sink and fan module to my Raspberry Pi 4 SBC (single board computer) that is the heart of the sBitx radio. The original configuration has the SBC mounted right on the RF board with very little space between the two for airflow and no room at all for a fan of any kind as you can see above in the photo with the side radio cover removed. I did some experiments with positioning fans above the heat vent opening above the Pi and could feel that the air I was pulling out was quite warm. This led me to the assumption that the SBC would run smoother (and probably last longer) if it had a proper heat sink installed on it. You see as my unit would run, with time, it would start to lag a little from information input, like adjusting the VFO would result in the numbers jumping on the display instead of a smooth change as the knob is turned. I noticed when the fan was pulling air across it that this would be reduced significantly if not eliminated. So the mission became “how do I get a fan on this thing to cool it properly”
So I start looking at adding an external fan but ultimately that didn’t look really feasible as I wanted to pull the heat off of the Pi properly and not with just slight air movement. A case fan would only help a little and I am pretty sure at this point that the SBC needs a little more help than that. Enter a riser kit from amazon and a heat sink assembly with fans from one of those Raspberry Pi bundles that comes with the pi, a small case and a heat sink with fans. I measure every thing and come up with a height to elevate the SBC and check the cabinet and sure enough, there is plenty of room to add it. So I get it all together and when you get the riser kit from amazon, you get the little screw-in standoffs as well as the header socket extender to extend the pins up to the Pi once installed. If you will look closely in the photo below, you can see one of the fans and the heat sink fins for the SBC heat sink that I added to the Raspberry Pi SBC to help cool it.


In the above photo you can see the pin extender i also had to add so the Pi would plug in once elevated for the heat sink module. This worked wonderfully for fitment and I was stoked to have the heat sink on the SBC finally, but I still had to connect the fans to power to get them to run. Instead of putting them on a heat sensor, like the power amp fan, I chose to wire these straight to the main power switch on the sBitx so that when you turn it on, they spool up and run the whole time. My reasoning is that the computer will be working the whole time as the radio is in constant “refresh” mode so to speak as the sBitx software package has to keep everything up to date in real time on the display, then there is the background applications that are also running like the telnet server and dx cluster stuff and the other applications should they be active. Logically the SBC will be running nonstop, so lets just run the fans all the time…
This is where I run into a problem…
Did you notice where I drew power to run the fans? That seems completely reasonable for someone who just successfully wired up a fan on a temperature sensing circuit for the power amplifier. Well, it turns out that the fans for a Raspberry Pi are not 13.8VDC fans but rather 5VDC fans as they are designed to be plugged into the SBC IO header bus and not driven from a 13.8 VDC source. Let me tell you something, when you run a 5 volt fan on nearly 14 volts it sounds like a jet engine preparing for take off! On top of that, I had a pair of them!
I had brought the radio to the house and connected it to power to play with it and hunt some POTA activators and the whole time I am thinking to myself… “Man, these tiny little 25mm fans sure are loud…” but after about 10 minutes (yes, they lasted that long and in fact lasted much longer) I started to smell hot plastic… I shut down the radio and took it apart to find the fans incredibly hot and seriously, “soft” to the touch.
Back to the workshop and I figured out what I had done. So I start working on a way to lower the voltage that would not cause RF hash inside the radio cabinet. Those little buck converters from amazon are notorious for causing RF hash so that was out. This simplest thing to do was to put a big resistor in series with the fans. I had put them on a 5 VDC supply in the shop and measured the current draw so it was a simple matter to do a little ohms law and come up with about 50 ohms of resistance to mitigate the excess voltage from the supply. Also these fans pull very little current and I am running them at 4 VDC instead of the full 5 volts as they are rated to run from 3.3 to 5 VDC. This way they will be a little quieter too or at least that is my thinking and it gives me a little leeway should the voltage go down lower or even a little higher.

Inside this heatshrink is (4) 200 ohm 5 watt resistors soldered in parallel so make a 50 ohm 20 watt resistor.
Well the brute force approach worked and the (4) 200 ohm, 5 watt resistors in parallel dropped the voltage down to a very workable level. The resistors dissipate about 1/2 of a watt of heat total so I put them out of the way from everything else and it works, it just works. Maybe later I will add some sort of active voltage regulator and do it so that I don’t have to just burn off the excess power nonstop to keep the fans at the right speed. Maybe something like a 555 timer biasing a mosfet for pulse width modulation to keep the power draw down and keep fan speed at a constant level. I don’t know, I will look at that later, for now, the brute force resistor idea is working just fine.
Once I got the fans turned back on, I found “I had a rod knocking” in one of the fans… figures that if you run them at almost 3 times the rated voltage that something like a bearing fails in the fan… well I just ordered another set from amazon and swapped them a couple of days later and now we are all set. So it would seem at least as when I went to reassemble the radio I found that my USB and Ethernet ports no longer lined up with the openings in the side plate for the radio.

Turns out that if you have a fully equipped machine shop, this isn’t a real problem though. It could have been solved with a good file and probably a half hour of work, but who wants to do that if you have a CNC milling machine at your disposal? So I put it in the milling machine and manually open up the exiting holes to allow use of the ports and by default I also created air vents for the Pi to get fresh air to it much easier now. This also seems to work really well for the time being. Better air flow, adding a heat sink and FANS!!! The Pi runs cool now.

I also did a couple capacitor mods that I found on YouTube as well. A fellow on the interwebs had done these same capacitor mods and they made sense to me so I went ahead and added them as well. The following video describing these mods and why.

To summarize his video, he added decoupling capacitors to the three jacks on the side of the radio to drain off stray RF. He also adds one across the incoming supply lines to kill transients and possible RF on the power. Please note that in the photo below I have the plus side marked on the capacitor, this is incorrect as the board is marked erroneously and I translated that error to my cap as you can see in the photo. Check the supply on your radio with a meter before installing caps that can not be reverse biased. We all know how that would end…


One last thing I also did was to add some heatsinks (also per the video above) to the power devices inside the radio to help them survive use during digital modes. They worked just fine when I ran them with CW but when operating digital, the duty cycle is a lot higher so I didn’t want to risk thermal failure because of something as simple as adding a heat sink. This also comes from the above video and just made sense to me too, so I added them. The radio operates great and I really like using it for FT8 when calling CQ (more on this later) as well as for CW. I have some other mods planned for the future so another blog post describing these mods will be in order at some point. Till then, thanks for your time and attention and I hope this helps someone out there with their radio.
WK4DS
72