WK4DS Amateur Radio Blog
Search Posts
K-2169 POTA Activation at the very foot of a MOUNTAIN - AAR

So the last two days have been really strange. I tried to activate K-2169 last night to see if I could pull off a late shift activation and it was a miserable failure, zero contacts in 30 minutes straight of sending CQ, literally no replies at all.

The night before when I literally got zero contacts.
I actually swapped out the radio for a spare (the IC-705), it showed activity in the waterfall but no one was able to hear me. I was on top of the mountain at this point too. So I packed up and came back home having had zero luck. You win some, you lose some…
The next day was different though. I only had about an hour to setup, activate and breakdown as we had “family activities” to do later. So I figured this was the chance to test another location I had been looking at for awhile now. The Sitton’s Gulch Trail Head is at the bottom of the canyon and the parking lot is literally buttressed against the bottom of the mountain proper.
To compound the problems, I didn’t want to put my radials out in the way of others if they wanted to park next to me as this lot tends to fill up pretty quick in nice weather. So I ran them both off to the drivers side of the truck to keep them out of the way.

Welcome to the literal foot of Lookout mountain.

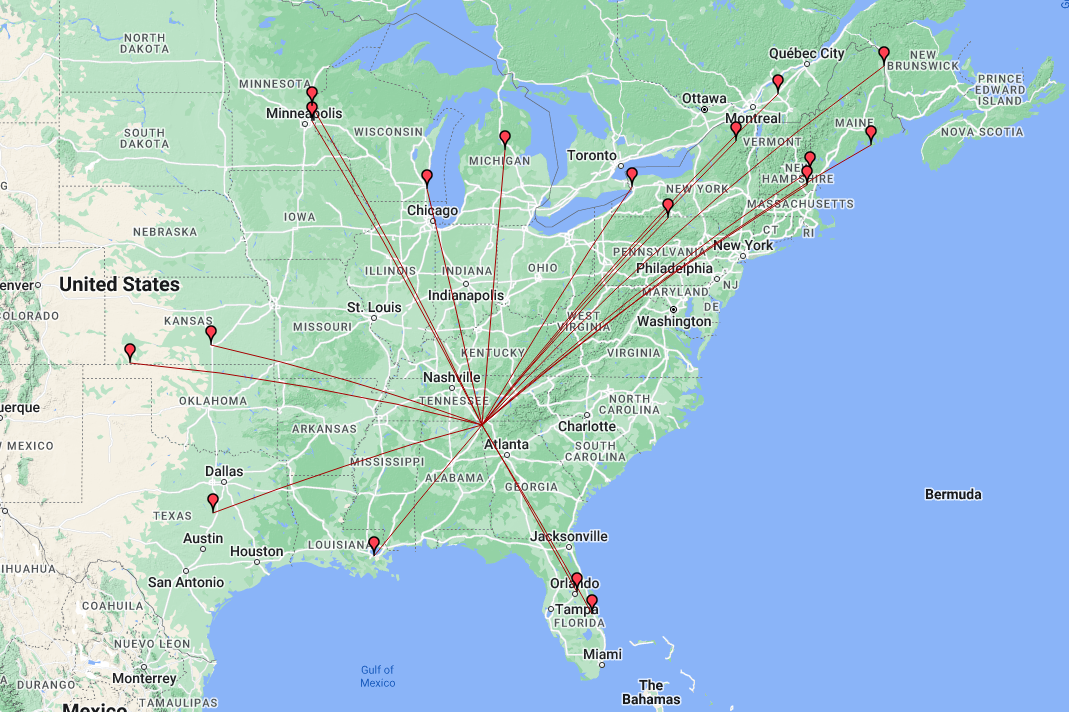
One of the counter poise radials is actually draped over the corner of the truck but it didn’t seem to cause a problem with propagation from what I can tell. The mountain is on the south side of the parking lot proper so I figured I wouldn’t hear anything to the south at all, but I was surprised to see the map showing some stations on the dark side of the operation position, these guys must have incredible stations to hear my QRP signal into a compromised antenna with a literal mountain blocking our signals! My hat goes off to these guys!
The bulk of the contacts are from a predictable direction though, since Lookout mtn is part of the Appalachian mountain chain, most of the contacts are to the north east which is the direction that is clear of the mountain. It has a decent clearing to the west as well from this location as Sand mtn is about 2 miles away and it is fairly short too, only about 700 feet tall, so I was able to get out to Kansas and Minnesota pretty easy too. As you can see in the photos, I am in the forest surrounded by trees too, so I am happy with my little activation considering all the limitations imposed on it today.
The radio for today’s adventure is the Penntek TR-35 and the more I use it, the better I like it. The RIT is for CW sidetone adjustment. This was a trick I found in a forum post and thought it was really clever. If the other station is low on tone, turn the RIT down till they sound like you want, if they are high turn it up till they sound good to you, it works REALLY well and I wished I could remember the HAM that gave me this idea as I would credit them with it…if they do I will edit the post and add it here. I am running 5 watts on 20 meters today because I am using the “Truck-tenna” for the sake of time.
When I got on the air to start with, I was the only POTA station on 20 meters, and there was only one other when I went QRT an half hour later. The band was open too as the RBN (Reverse Beacon Network) was spotting me regularly.


Those are not outhouses in the photo. This area is home to a local cave system called Case Cave and those are changing rooms for the cavers when they come out of the cave. It is a really huge cave system and if you want to explore it, you need to contact the park and line up a time when someone with the key, will meet you and open it for you, it is locked to protect the uninitiated from getting themselves killed…
I am pretty sure I have not shown the counter poise weights on the wires really well yet. This is a simple system that works super well for keeping the radials extended and not having to drive in stakes to do it, I simply straighten the wire at the end when it is taught and walk away, it is that simple, the wire keeper is simply a piece of plastic with three holes drilled in it to thread the speaker wire through, it doesn’t slip at all. The weights run about 2 pounds or so and that seems to be plenty to keep a 16’ radial in place so far. I have not tried heavy winds yet, so the jury is out on that one.


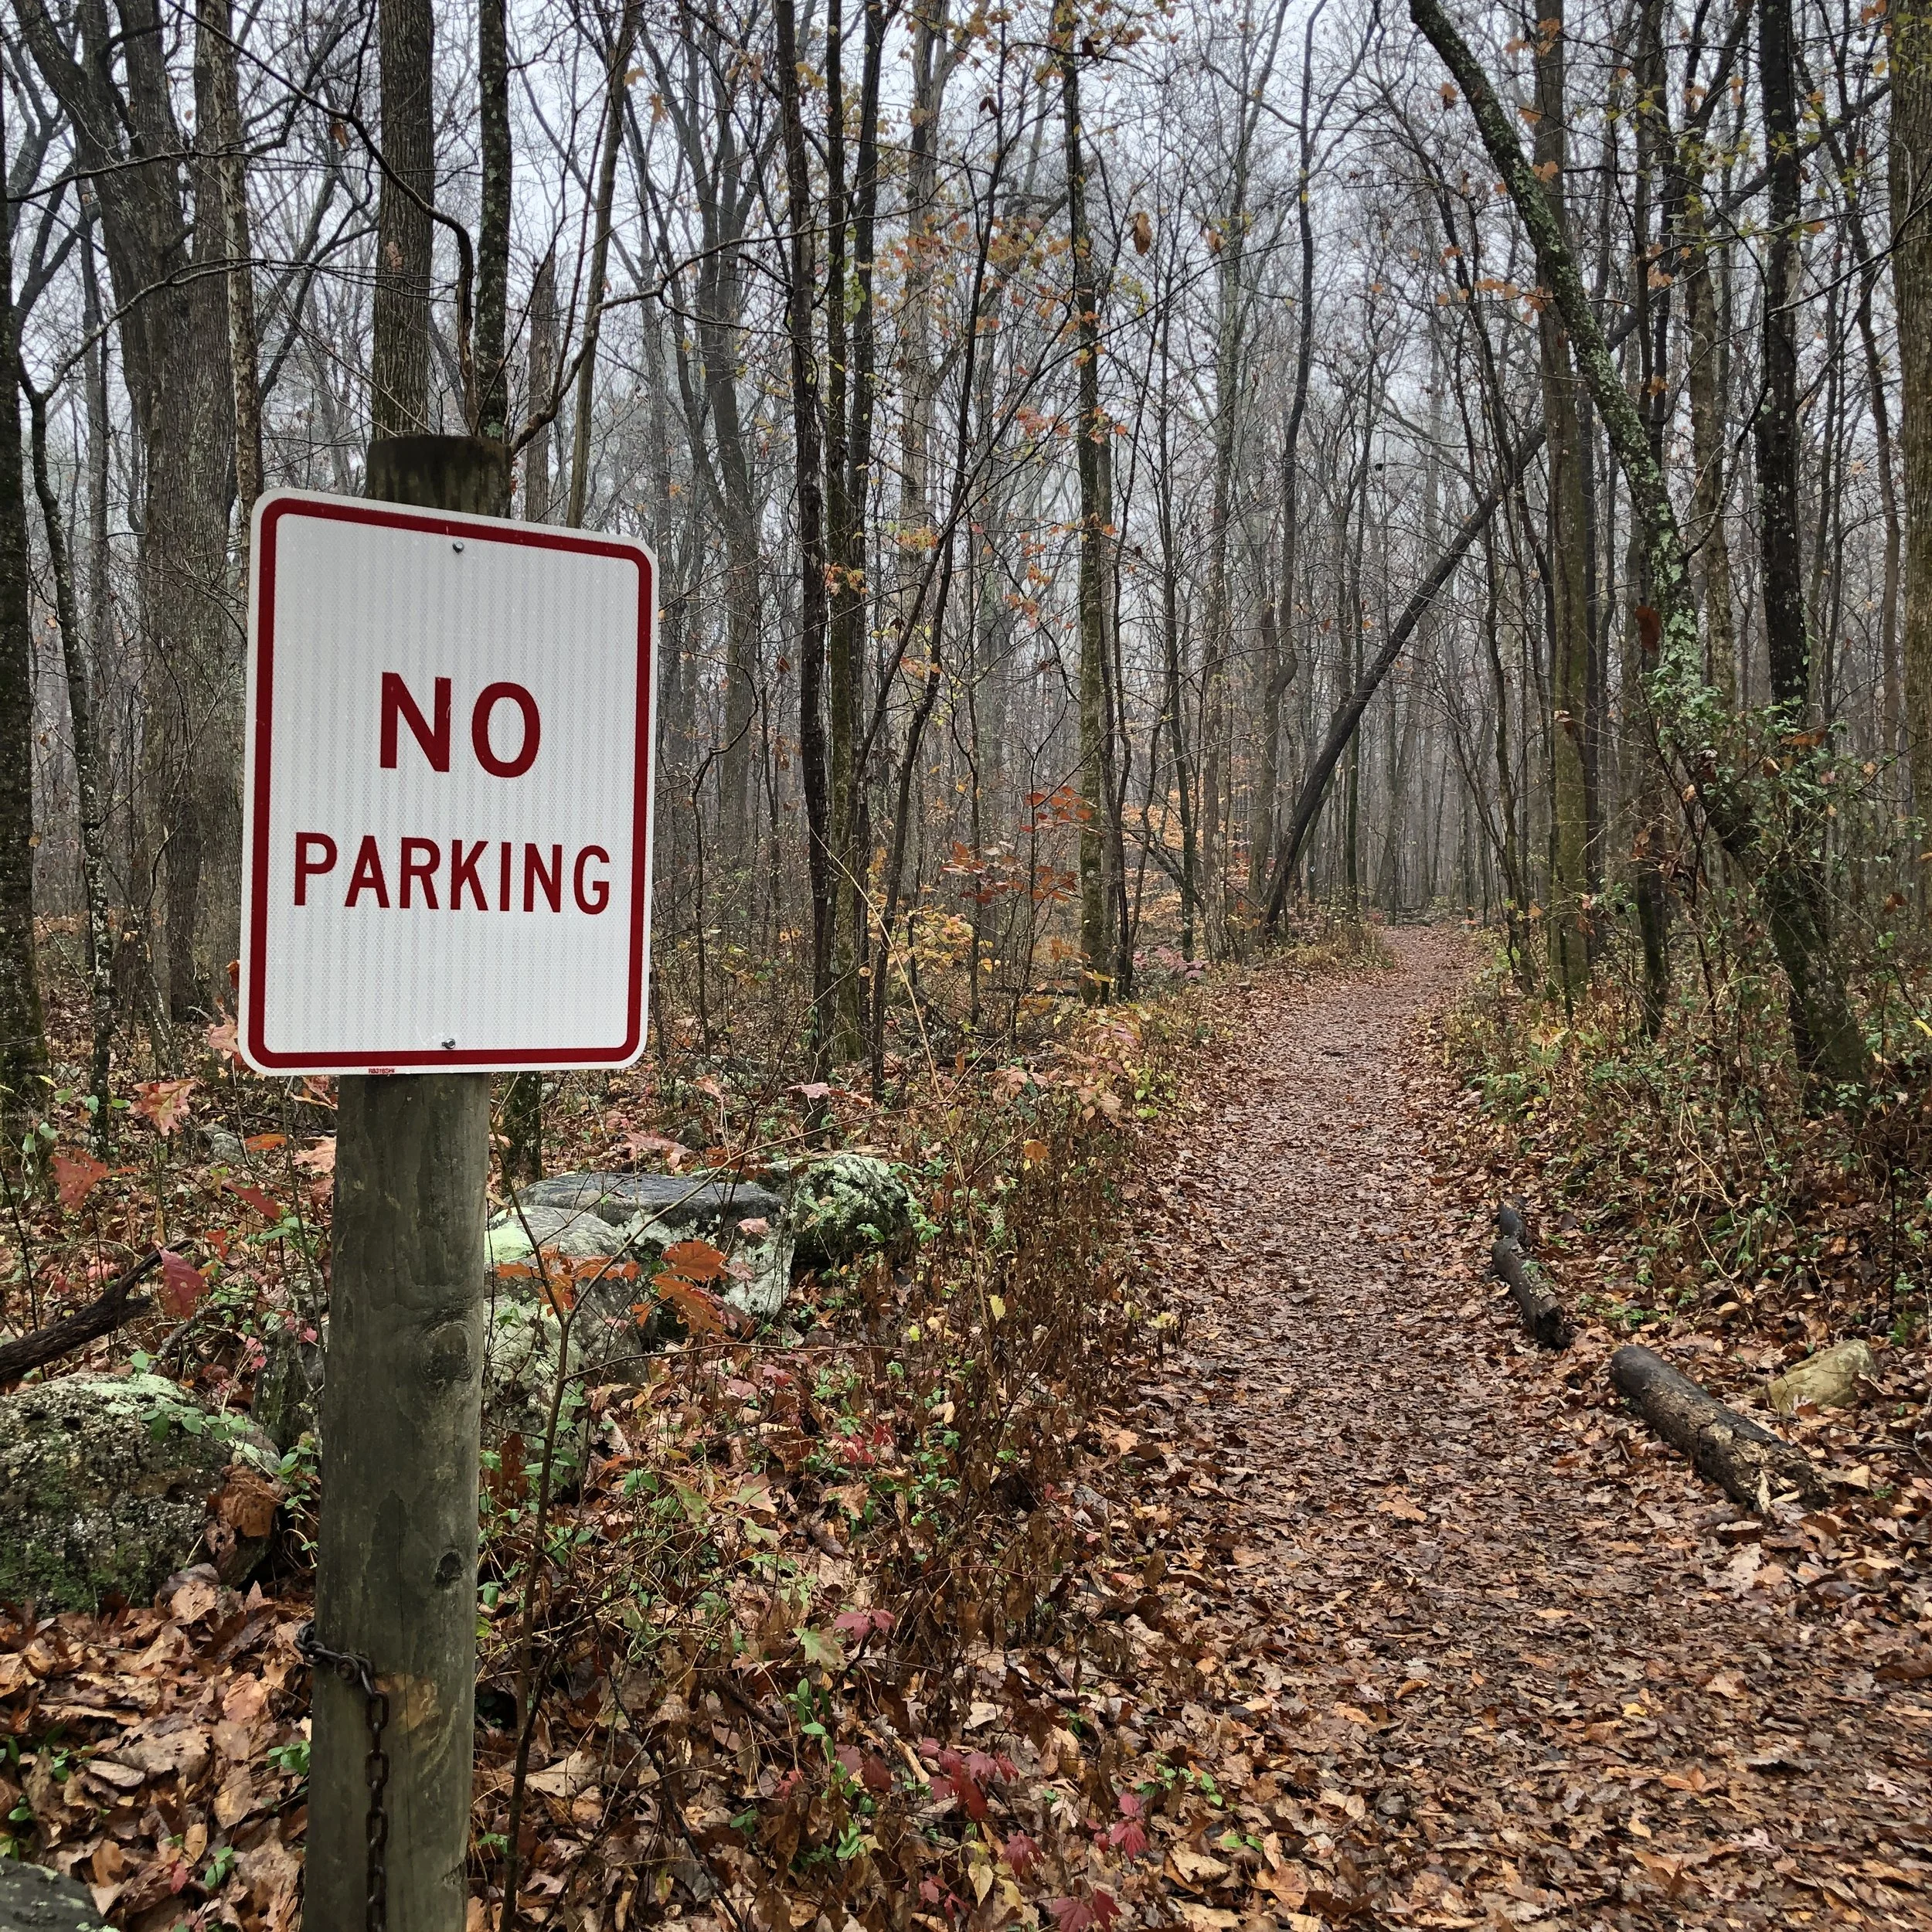
Not sure what is going on here, this is the hiking trail and just below the camera is a huge gate across the road… lol. I thought it was funny with the irony of it being in a spot where you literally cant park. Maybe it is from a time when you could drive up the trail to the cave? I don’t know…
If you enjoy the blog I would appreciate a like and a comment if you have one. Thank you for your time and get out there and warm up the ionosphere!
72
David
WK4DS
My new travel CW key failed on its third POTA outing...

This key was supposed to be my solution to poor performing keys…well, today I was 16 QSOs into a POTA activation and the little key suddenly started “ditting” nonstop. I power down the rig, take a look at the key and find the “dit” lever is pushed over against the contact arm on the key.
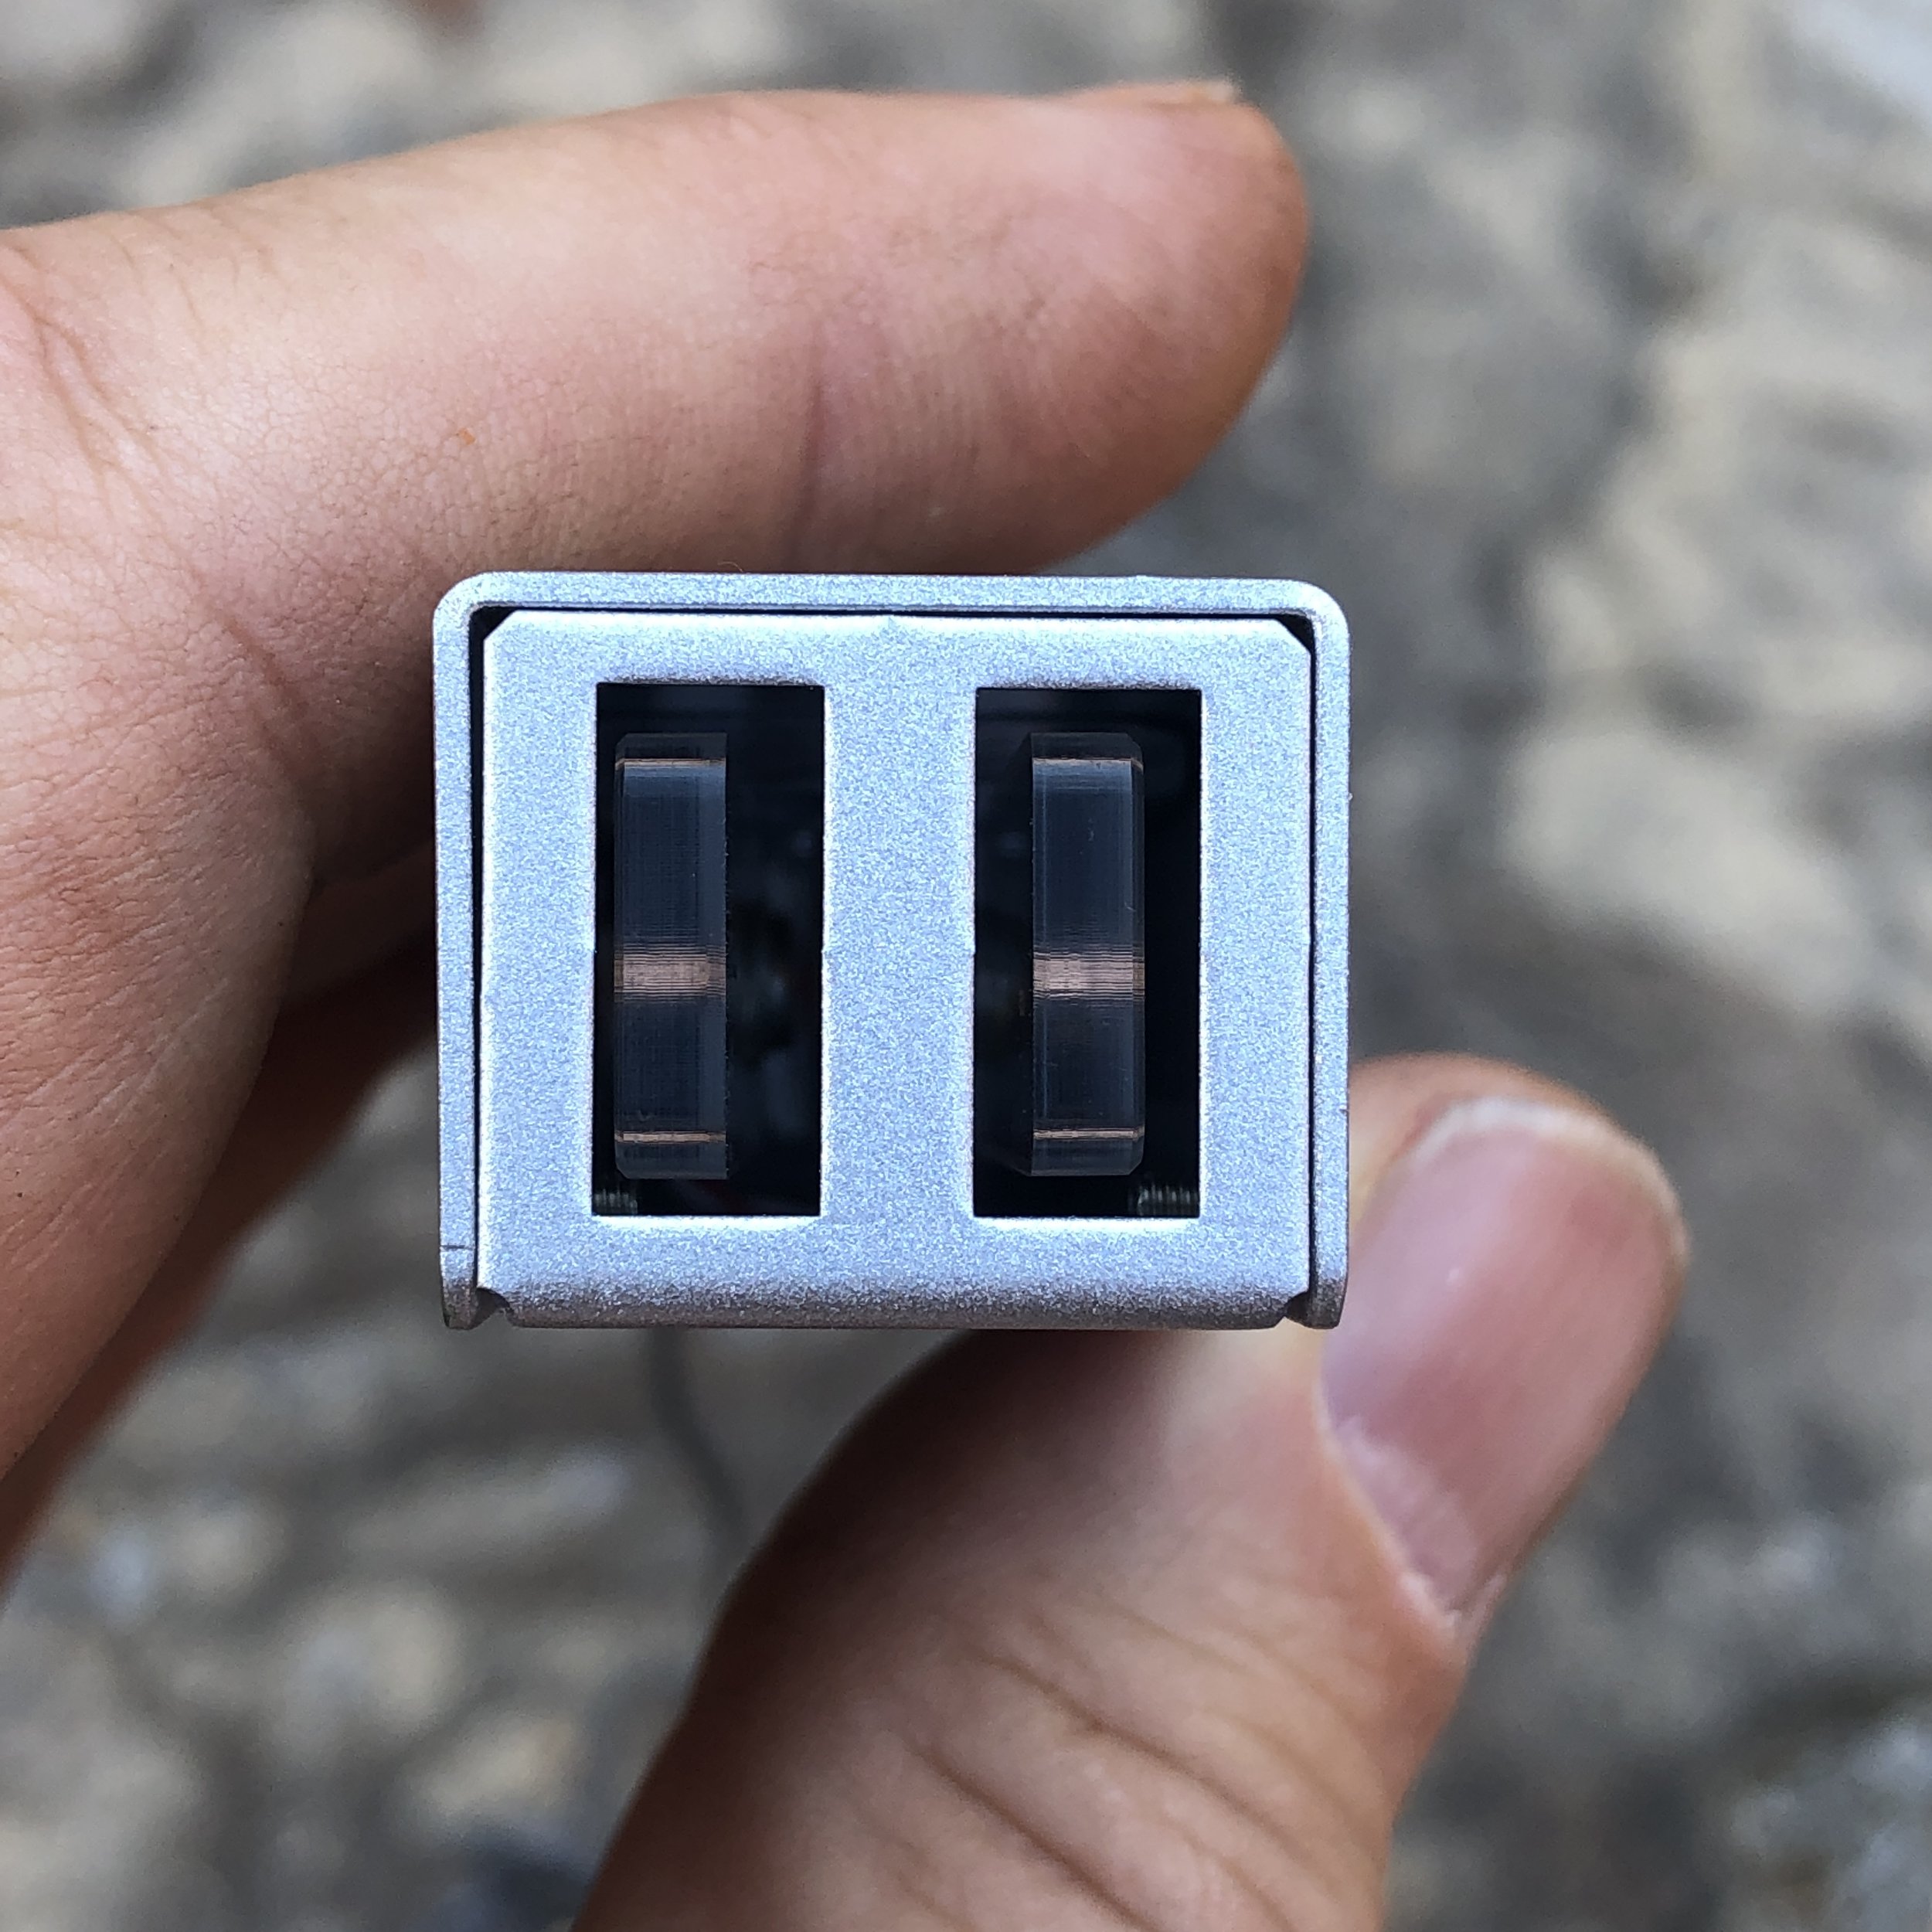
In this photo you can see the “dit” lever shifted to the center.
As you can see below, somehow the lever is off center and not returning anymore. so I shut down the op and packed up to go home and see what happened. I needed to do some other chores as well so I made the decision to take the key home to where I had a better assortment of tools to be able to repair it…if possible.
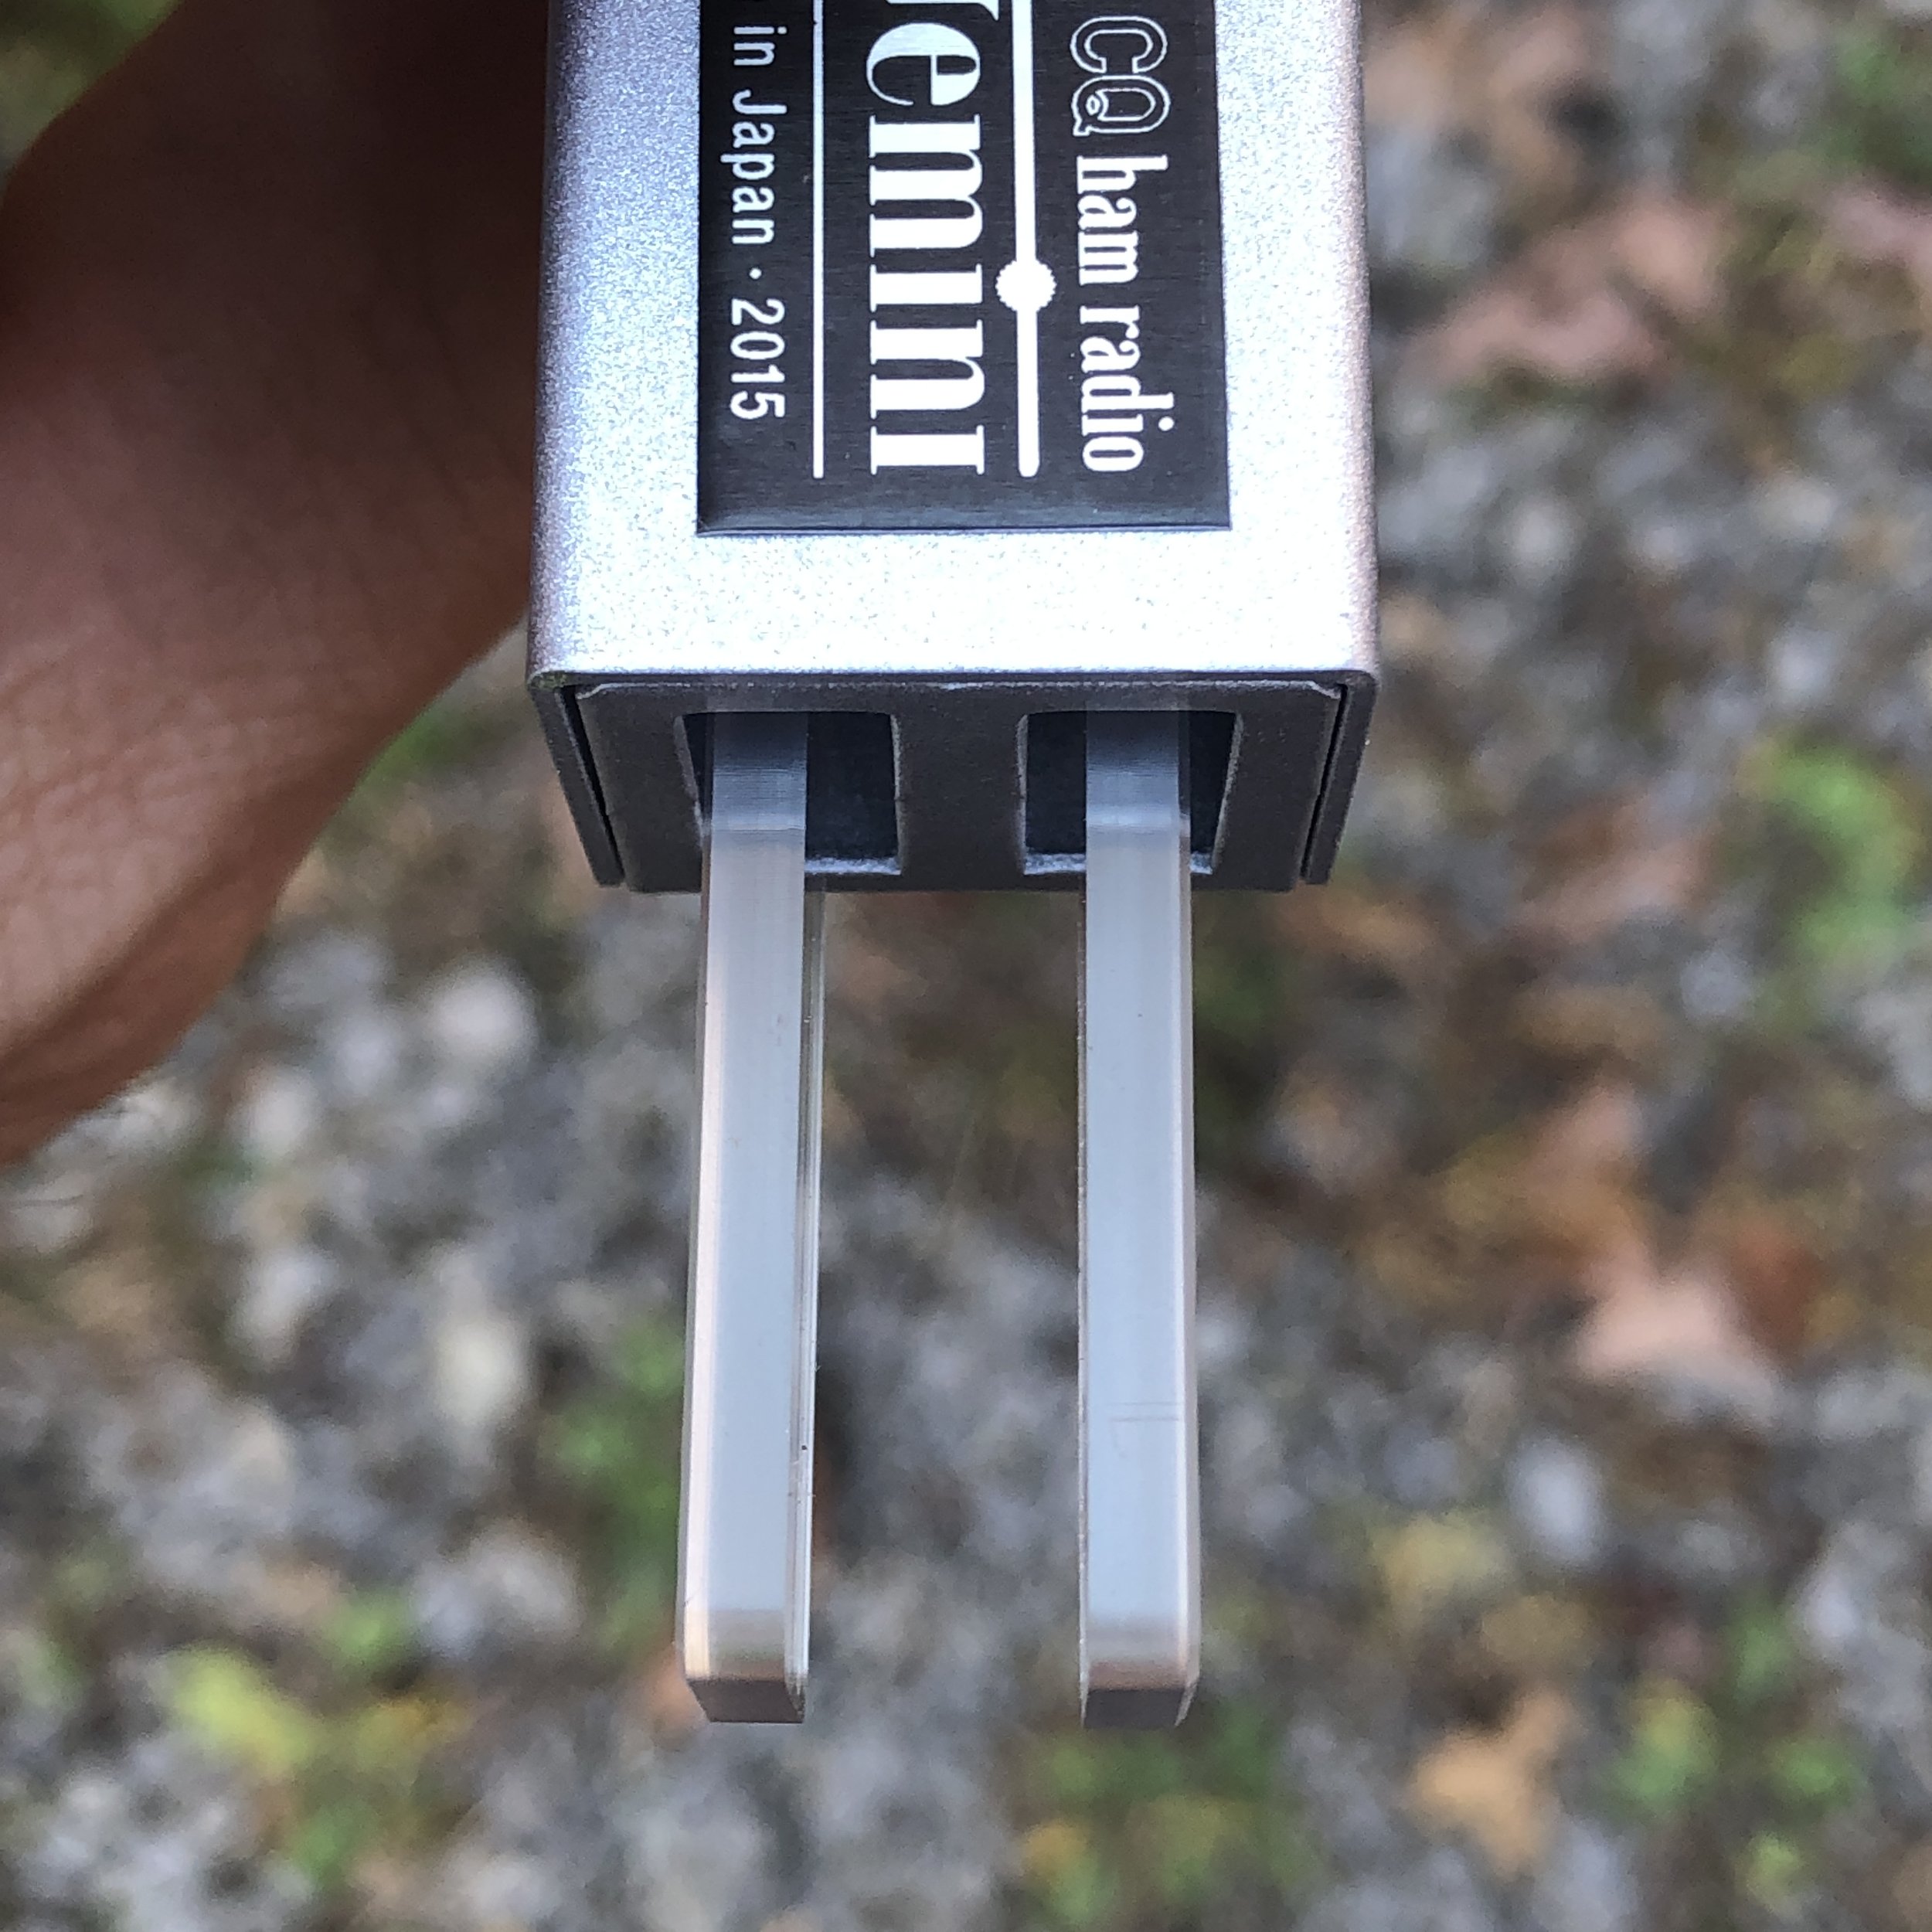
Once home I took the key down to my workshop and removed the cover assembly to reveal how the key is made. I found a ultra simple design that is efficient and minimalist in nature. This also makes for a clean layout and an easy to trouble shoot system. The lever arms dont have any springs of any kind, but rather the lever arms have been thinned just ahead of the mounting block enough to allow them to flex easily over to the contact arm. Simple and elegant.

Below I am pointing out the contact that is shorted. The key is upside down here, but you can see the contact pad touching the center column. This doesn’t make sense as the arm is not broken nor is anything seemingly out of alignment.. The key worked perfectly up till this point too, so I looked very closely for a crack in the arm, but it isn’t broken at all, in fact it looks perfect.

What I found upon closer inspection is these screws I am pointing out below are in oversized holes drilled in the block. It appears this is done on purpose to allow for centering of the lever arms in the housing once assembled. Simply loosen these two screw and turn the block till both levers are equally spaced from the center contact arm, then retighten the screws and your good to go.

Here is my conclusion. I must have bumped the end of the lever I am pointing at in the photo below, as this is the only way to shift the block off it’s axis. By hitting the end of the paddle arm I could feasibly transfer enough energy to the block to shift it. By just pushing the levers in the normal travel directions it cant do that as the frame has hard stops in place to prevent it from over travailing. So at some point I shifted my key in my hand or bumped it into something in the truck to cause this failure. In other words, I did something to it, I really don’t know what I did, but I must have hit it on something. I works perfectly now as I took it to the QTH and got on the air with it this evening and worked several POTA contacts and I plan to redeploy it on the next outing. Time will tell if I am too rough handed or if this key will become my defacto travel key.


So if you get one of the CQ Gemini keys, just keep in mind that it is a great key and wonderful to use, just be sure to protect the end of the paddle arms from bumping into stuff and it will work for a long time. When stored, this is a non-issue as the paddle is completely inside of the metal housing and cant run into anything. I can still recommend this key for a travel key, I just learned something about it today that I wanted to share with all of ya’ll.
Like and comment on here and let me know that you like my blog posts, it goes along way towards growth of my website and I really apprecitae it.
72
David
WK4DS