WK4DS Amateur Radio Blog
Search Posts
60m Band Module Part 5: SSB Operation
Getting SSB to work on a converted band module for 60 meters is tougher than I thought. It takes mods in the radio too…or it is not possible at all. One or the other is the fate of this TenTec Scout 555 HF radio and the 60 meter band module project.
If this is your first time seeing this project, please go back and take a look at the full series so you will be up to speed on this project.
- Part 1: Initial Conversion and Filter Design
- Part 2: Crystal Selection and Mixer Circuits
- Part 3: Field Testing and Troubleshooting
The Single Side Band Problem
Today, we are taking a look at the TenTec Scout 555 60m band module that we built and figure out how to make it work on single side band properly. This band module was created by using a donor 80 m band module and from there things were changed and re-tuned to make it work on the 60 m amateur radio band.
One thing that has turned up though is that the 80 m band module operates on lower side band. To get the side band correctly oriented for the 60 m band I need it to transmit on the upper side band. This is not the normal convention for amateur radio operation though. The normal convention is as follows; bands 30 meters and lower, such as 40, 80, 160 and so on, will use lower side band. All bands 20 meters and above use upper side band instead. Someone a long time ago decided this was how we will do things going forward and here we are. Well for some reason, the 60 meter band is not like the other lower bands. It is using upper side band so I have to figure this out. The next step I have to do is figure out how the radio determines what band module is installed, and which side band it chooses. The radio automatically chooses either upper or lower side band, depending on the band module in use. So something is either telling the radio to monitor the actual frequency or it is looking at the band modules themselves and it is determining it that way somehow. All we have to do is figure out how it’s determining it and tell it to choose something different. Simple enough.
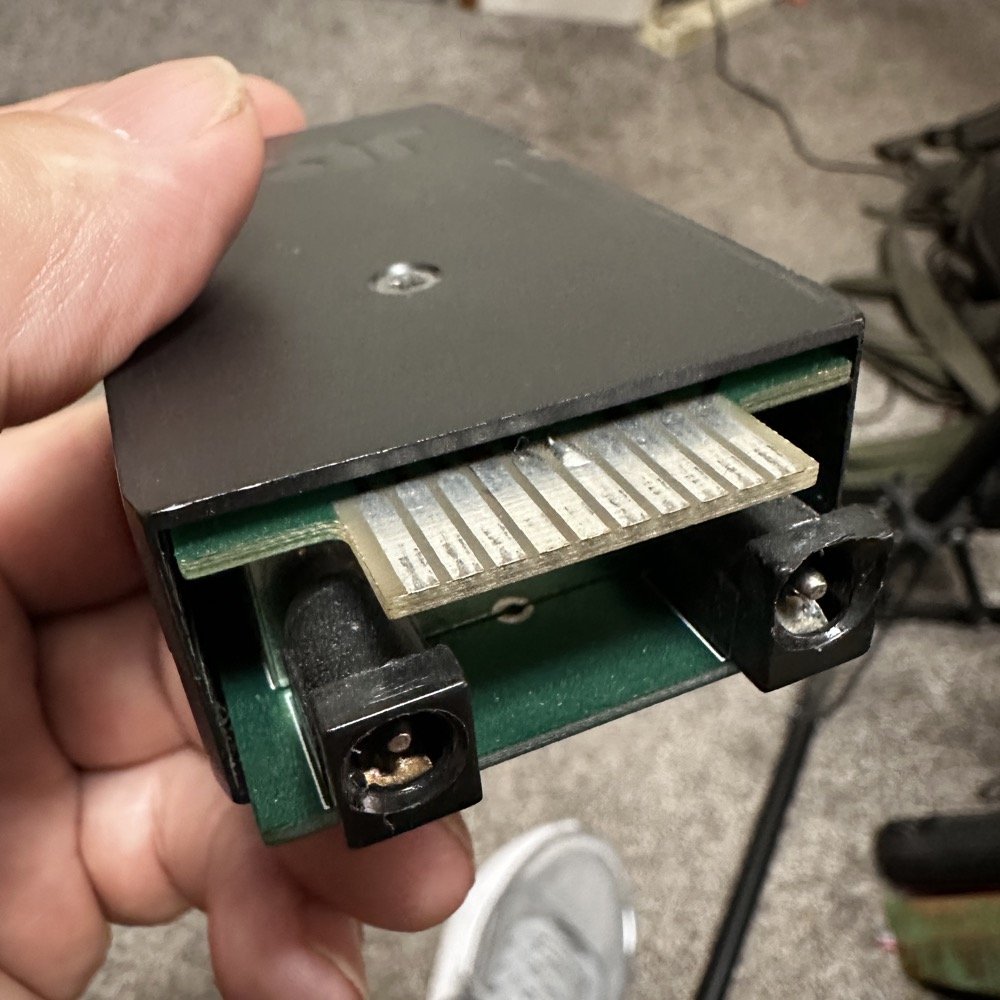
40 meter band module showing the soldered in ground jumper installed on pin 6.
Finding what triggers the shift from upper to lower side band
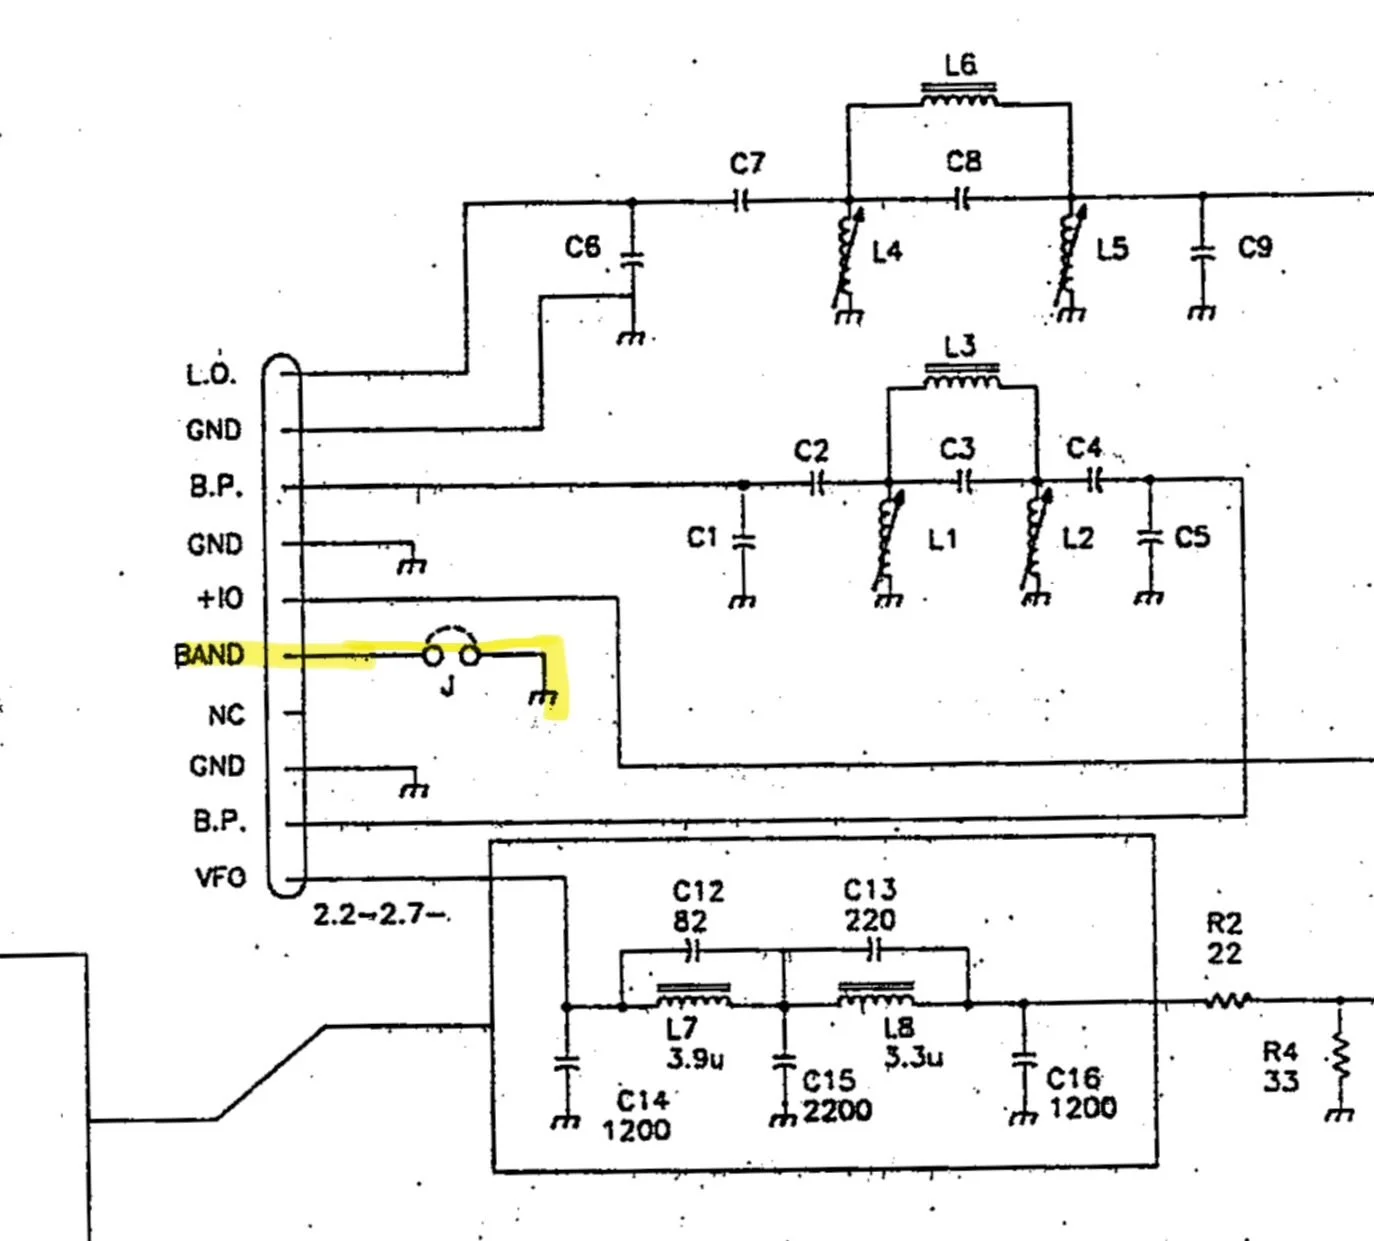
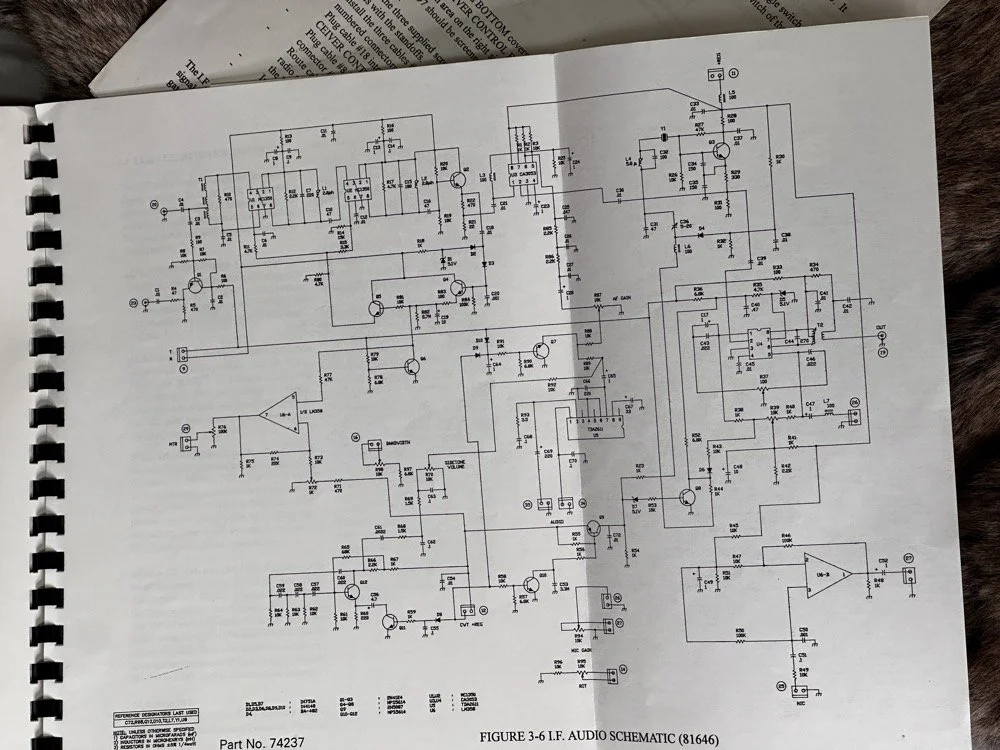
Everything we need to figure this out is in the TenTec Scout 555 owners manual. The manual has an complete set of schematic diagrams on the radio inside. I first start by looking at the band module schematic itself and found that there is a pin marked “band” with a jumper shown on it. This is a very suspicious connection and has me very interested in this particular pin. So this is where I’m going to start my journey since this sounds like it is what tells the radio which band the it is operating on. The next thing I had to do was figure out where it went in the radio, so I dig out the prints and found what follows…
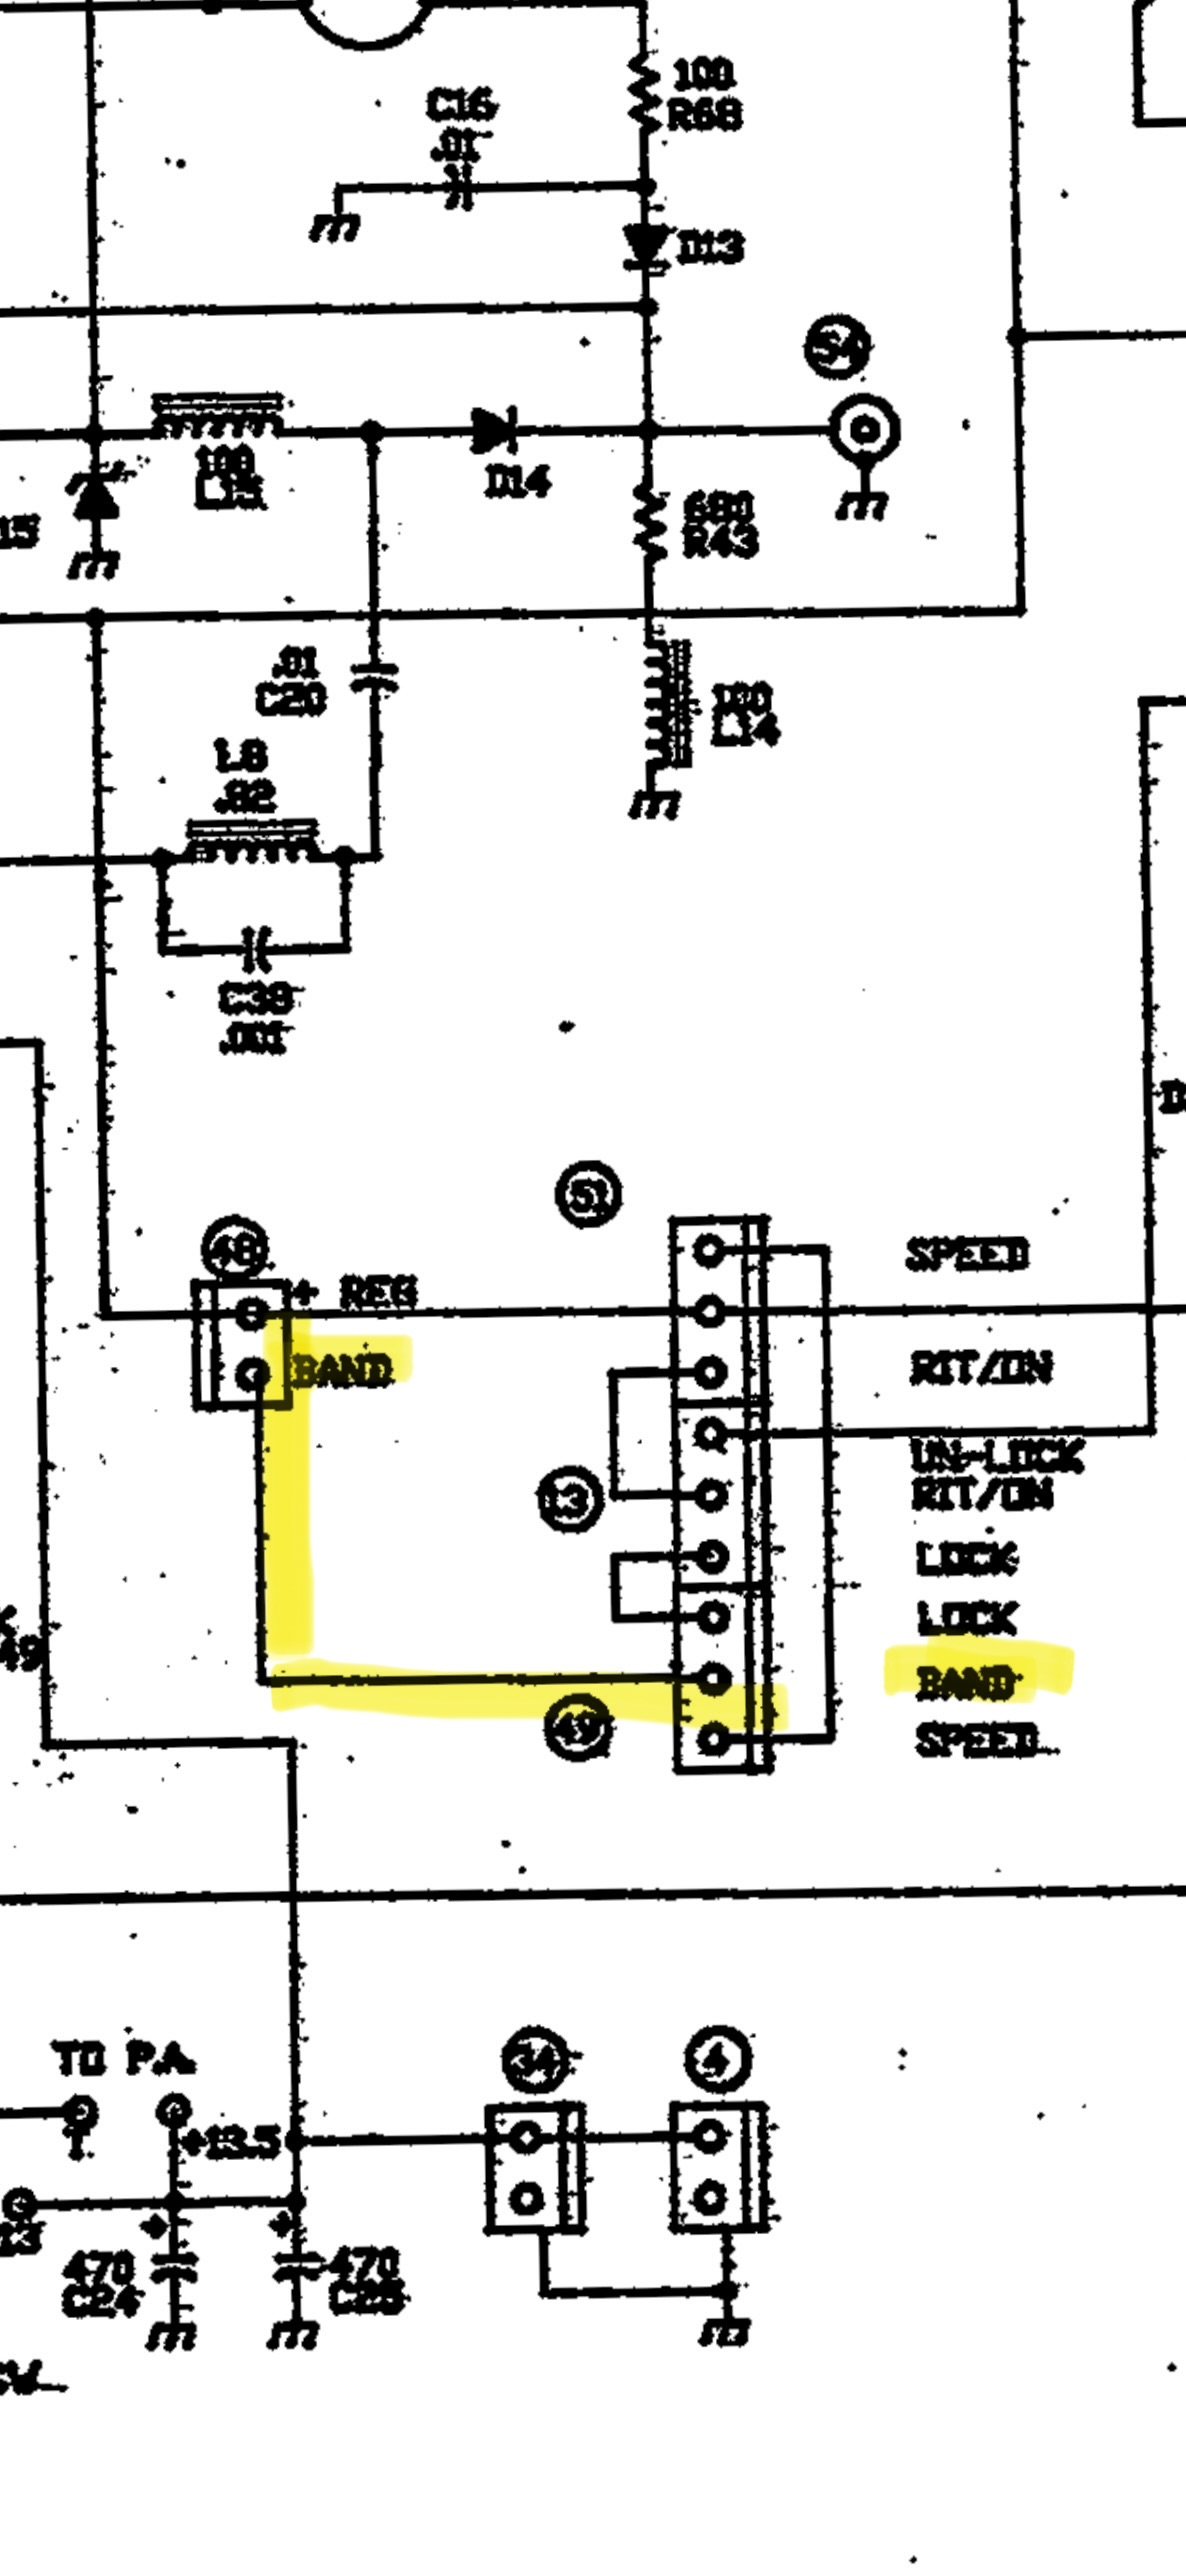
The first image is an exert from the schematic of the band module itself showing pin 6 “band” being grounded with an optional jumper.
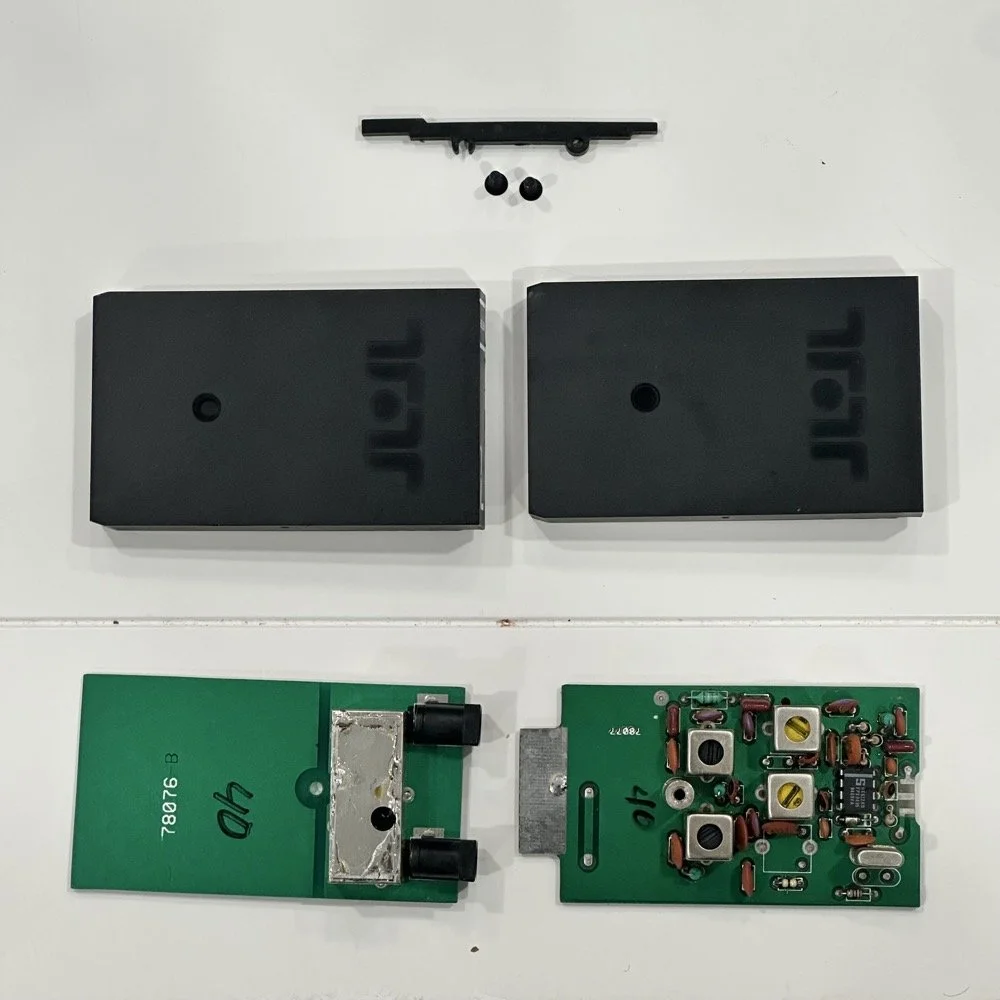
Band Module Edge Connector Pinout showing Pin 6 as the “Band” pin.
The next stop for this circuit is the Low Level driver board and it lands on a pin on connector 48.
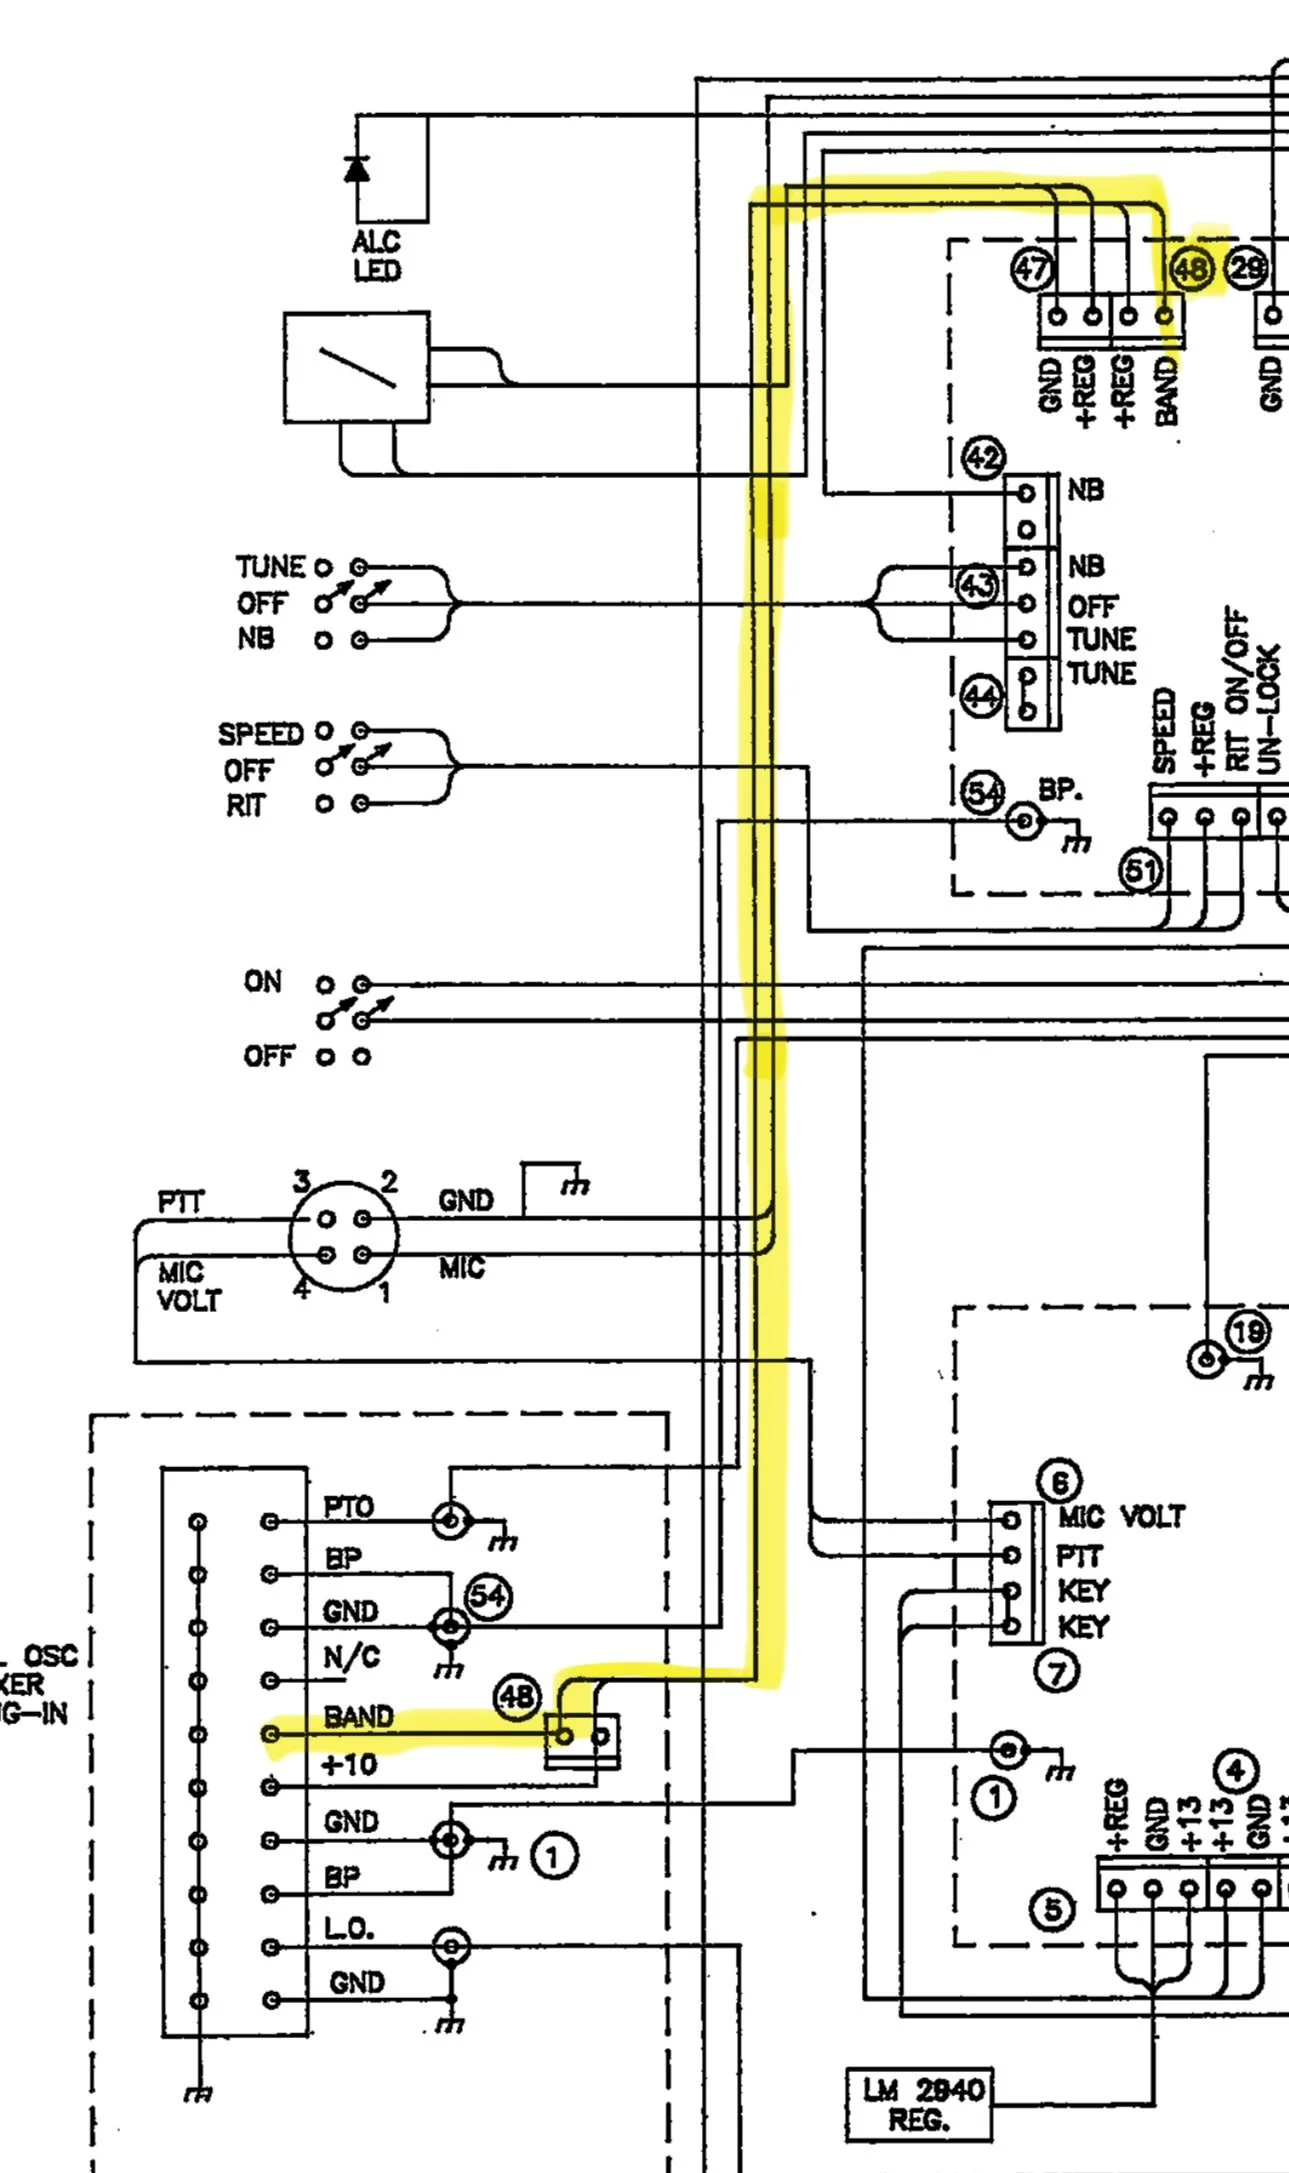
Section of the Low Level Driver Board Schematic showing the path from the “band” pin on the module edge connector up to a pin on cable 48.
It then travels along cable 48 over to the Low Level Driver board.
Low Level Driver board wiring showing connector 48 and 49 for the “band” selector.
The next place it went was from connector 48 to connector 49 on the low level driver board where it exited the low level driver board. I am going to be honest here, this wiring makes no sense other than to add two points of corrosion with bayonet connectors that are not needed. There was no reason to goto the LLD board just to exit the board without doing any work with this signal from the band module. Yet, so is life…
It leaves connector 49 on the low-level driver board and goes to the Logic board. Once on the logic board, it goes to pin 10 on the PIC16C57 controller Chip. This chip is probably being used to control all sorts of stuff, but this pin is being pulled low when the band module is grounded and it is being pulled high through R14 (4.7K ohm) resistor when the band module is not jumped to ground.
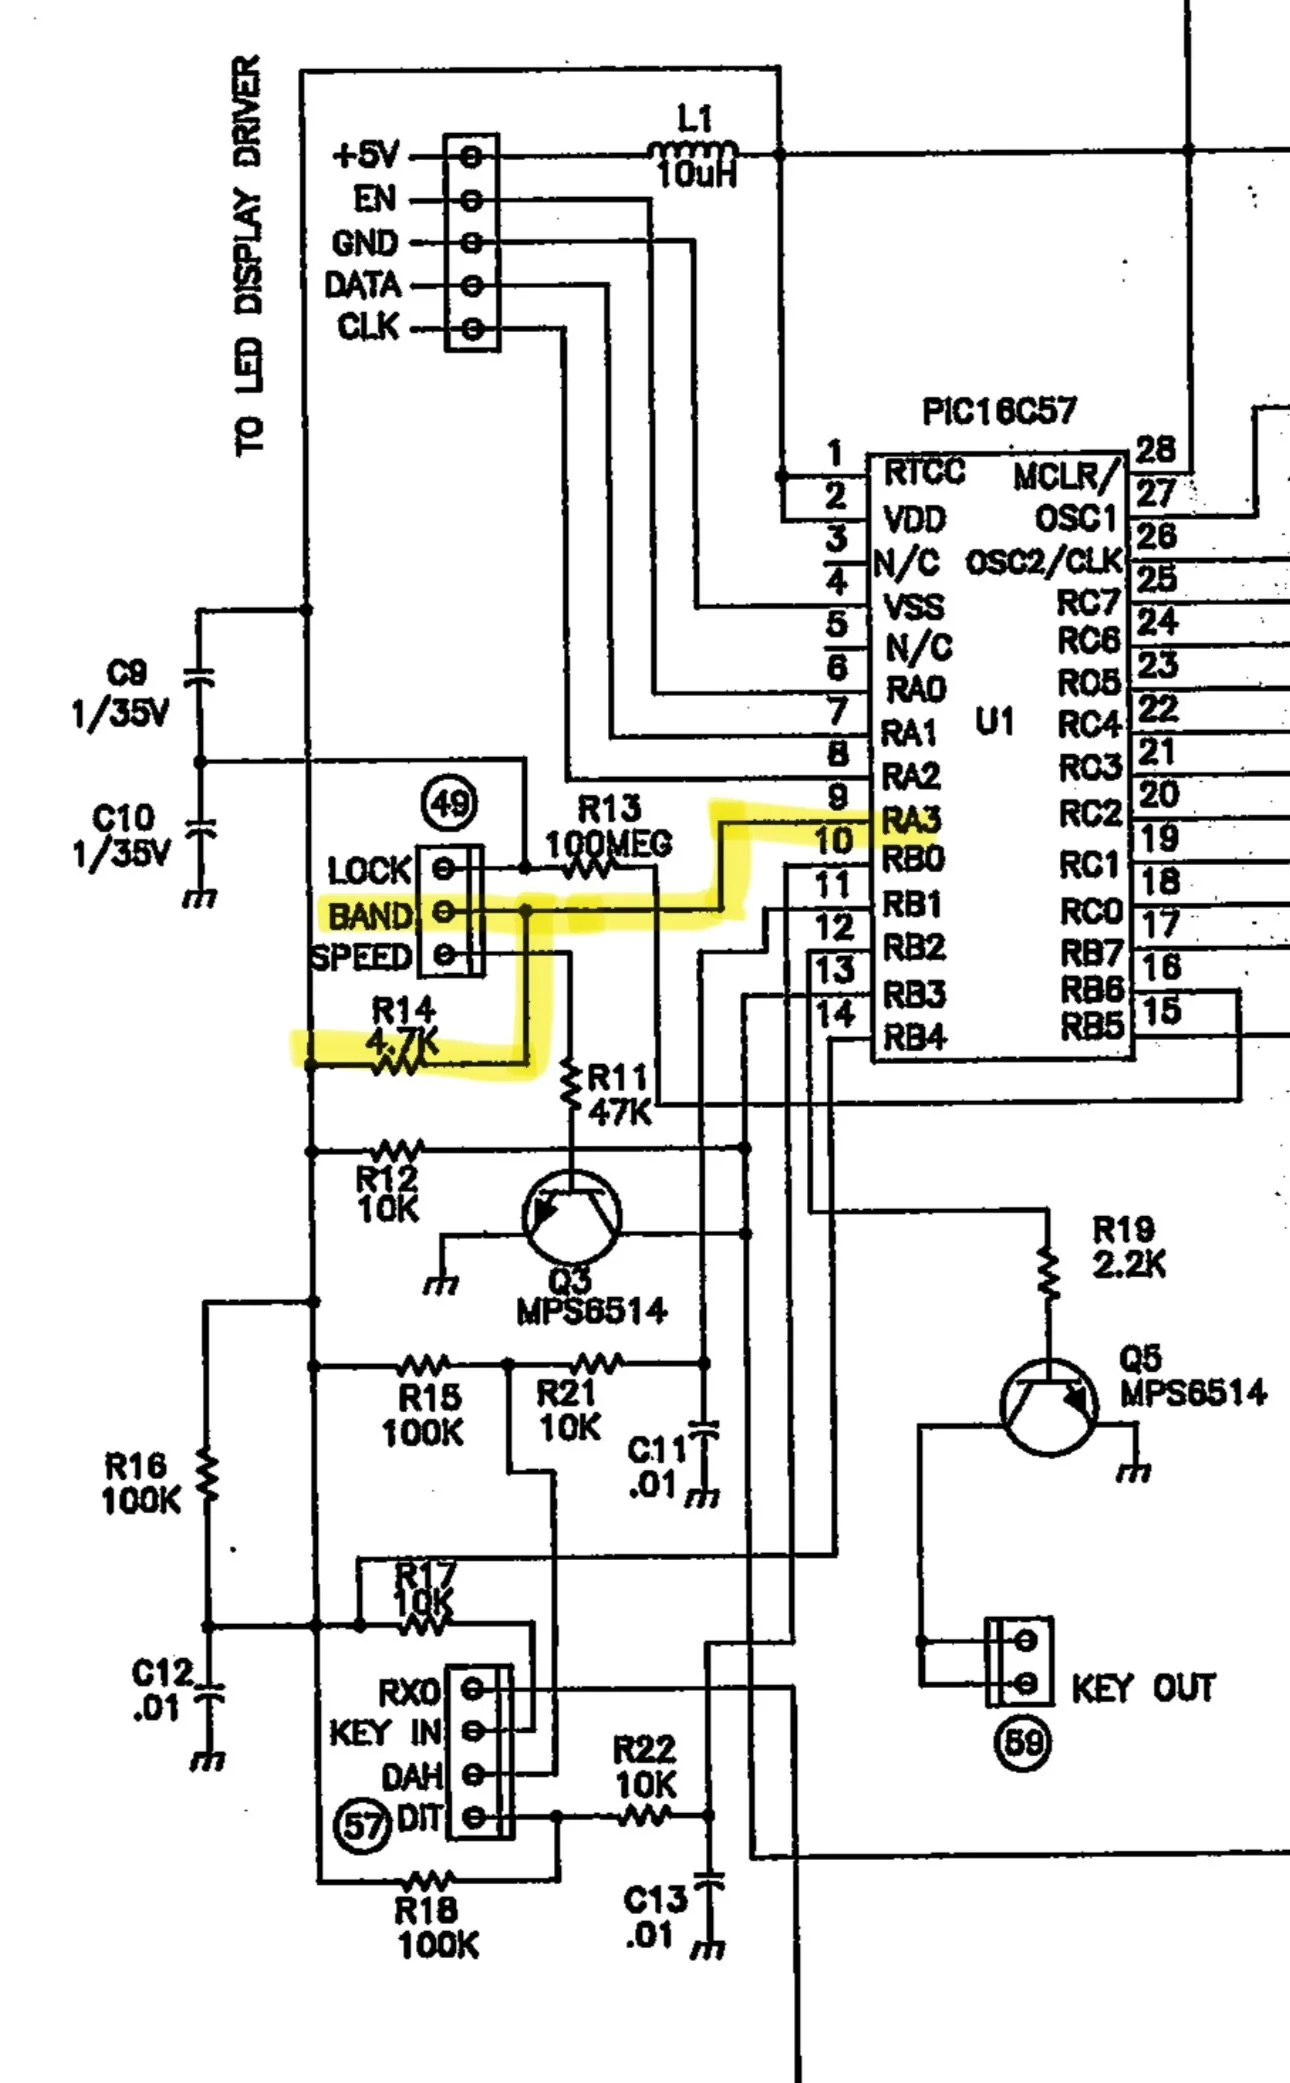
After tracking it down to the PIC controller, I have come to the conclusion that if you pull this line low (tied to ground), it determines one side band mode and if it is left ungrounded, it is pulled high by a pull up resistor to set another side band mode. So I went and retrieved my multi-meter and checked a full set of band modules to see and this is what I found:
10m - open
12m - open
15m - open
20m - open
30m - shorted
40m - shorted
80m - shorted
160m - shorted
60m Single Side Band on a TenTec Scout 555 is hard!
Once I saw this pattern I knew that this was how it knew what each mode needed to be. It had no way of knowing which band, but it knew which side band mode…or so I thought… As fate would have it, I learned something else today. I took my 60m band module to the workbench and de-soldered this ground contact so it would transmit on upper side band. Knowing that I didn’t touch any of the other stuff in the module I merrily trotted back to the shack to test it out.
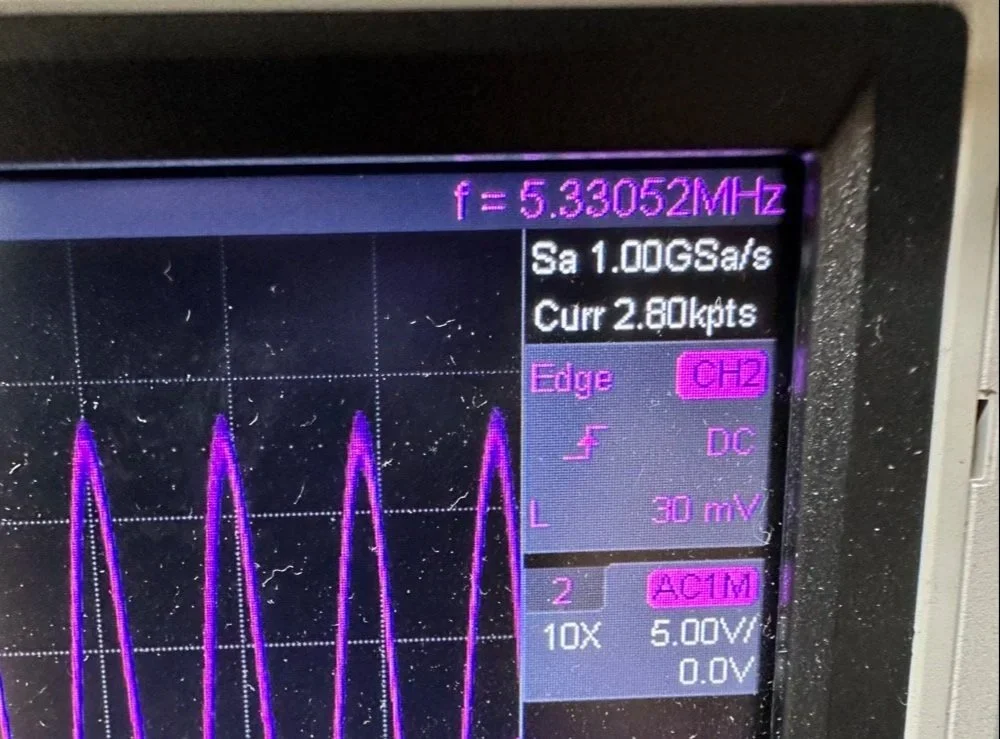
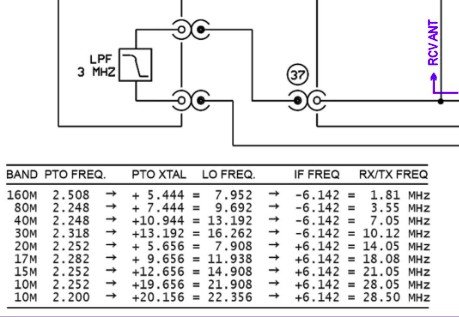
Turns out more happens with the radio than just choosing the side band… Turns out there is a second thing that happens when you cut this trace. You see when you look at the chart of the frequency path on the NA5M website, you see that 30 meters and below, the 6.142mhz IF is subtracted from the Local Oscillator sum and 20 meters and above it is added. So when I cut the trace, the radio now transmitted on 17.616mhz and not 5.332mhz! Yeah, sure, now I had upper side band but now I was on the other end of the world from where I needed to be… Little good having upper side band does me if I am off frequency by over 10mhz!!!
I figured out the following:
The band module has a pin on the edge connector that when grounded, makes the radio operate on lower side band and it subtracts the 6.142mhz IF from the signal. When it is open, the exact opposite happens. So what I need is for the radio to be like a “low band” module for the mixer, but use upper side band for the voice and some of the data modes. This is the problem I need to solve and the answer was on YouTube. After looking at the problem for a while and understanding how the two sidebands are literal mirror images of each other spaced out from the center frequency. I finally found a fellow ham from Australia that had the answer. Simply flip the audio frequencies only and adjust the radio as if it were lower side band. This sounds silly till you see his video. I currently have center tapped audio transformers on the way so I can build a circuit that mixes a 2500hz tone with the audio stream as the audio passes through a diode ring mixer. This will invert the frequencies when it does this. If his video is not fake, I will have solved the SSB problem on the Scout 60 module. Sure it will take an homebrew external converter module, but at least it will work! I have to invert the audio on both transmit and receive so I have to control the microphone input as well as the speaker output. The speaker is easy as I can simple grab the headphone jack audio and process it to a set of headphones or external speaker, but I will have to put microphone connectors on the unit as well so I can intercept the audio from the microphone as well as have it trip a relay when you press the “push to talk” button. All of this should be pretty easy to accomplish so I am confident this will work.
So here is the plan, I want to use that pin right beside the “band” pin on the module edge connector to ground it. Then I can route that to a new plug on the back of the radio to allow me to control a relay with it. This will “enable” the reversing circuit to get the audio corrected for use with this module. Since all the other band modules don’t use this pin, it will only work with the 60 meter module. This is if I have to build the circuit outside of the radio too. If I can get it to fit inside the radio, then I can make the whole thing look original and not need a small adapter to correct the sound and microphone audio. Other wise, I will be piping it through a converter box with the ring mixer in it and a relay to switch the path from transmit to receiver.
The TenTec Scout 555 owners manual has a lot of the information that I need to make this happen, but it doesn’t tell you everything. It mostly describes circuits so you understand what your adjusting it, to trim it back in and get it running right.This means you have to figure out what is going on with the circuits so you can understand how to modify them. This is the hard part for me. For now, at least, the SSB problem remains. I hope to be able to solve it, but right now it looks a little unlikely…unless you know something that I dont and see it in the photo of the schematic above.. haha. If you see a possible solve, please email me or leave a comment and lets talk about it, I am really enjoying this project and would love to get that one last mode to work right.
You can help support this channel by using these Amazon Affiliate Links as well:
QRP/Portable Radios:
Antennas & Tuning:
CW Equipment:
Power & Accessories:
Organization & Transport:
BONUS ITEMS (Optional 16-20):
73
WK4DS - David
![Converting Ten-Tec Scout 555 to 60 Meters: Complete Band Module Modification Guide [Part 1]](https://images.squarespace-cdn.com/content/v1/5d17806ce65eba00011667cb/18e0d4d9-ed31-466a-884c-4a94776d9a58/IMG_1197.jpg)
Converting Ten-Tec Scout 555 to 60 Meters: Complete Band Module Modification Guide [Part 1]
You see it was starting to look pretty daunting since I didn’t understand what the reason for the odd frequency crystal was and that there were 4 tuned filters in each band module. Also the crystal value just didn’t make sense on the surface.
When I first decided I wanted to make a band module for the Ten Tec Scout 555 that was able to get on 60 meters, I had no idea what really was involved.
A little backstory here is kinda needed, you see the Ten Tec Scout 555 has become one of my favorite radios for POTA operations and I even find myself setting one up in the shack to tinker with from time to time. I own 3 Scouts and 2 Argos at the time of this writing if that tells you anything. I don’t know if it is the simple elegance of the radio or the fact that it can operate on almost all of the HF bands in such a small form factor, but I love it. Well there are a few things for sure that draw me to this radio like the fact that these radios have the now infamous Ten Tec full QSK (full break in) keying. This keying works flawlessly too by the way. Another reason for such love for these radios is the amazing receive they have even for such a compromise design. With headphones (or even those little earbuds), it is pretty easy to hear stations in the edge of the noise floor and make contact with them.
Well, if you noticed I said… almost… all the HF bands… This is because we have been granted, by the IARU, some space in the 60 meter band as secondary users.
Some of this band space is open to use with power levels up to 100 watts too. (There has been a recent change that modifies the allocation to allow a bandwidth section that is non-channelized but limits the power to 9.5 watts ERP so play in this area carefully. Basically this new region is a QRP only region for now.) Aside from that though, the Ten Tec Scout 555 can operate quite legally in the other 4 sections… or it could if… there was a 60 meter band module… You see this 60 meter band allocation happened after the Scout 555 production run had ended, so Ten Tec never made a factory band module for the 60 meter band that I am aware of.
I started this journey by digging through the owners manual for the Scout as Ten Tec always shipped complete schematic diagrams with their radios. Sometimes there would be missing insignificant data, but you could trouble shoot the radio just fine with them. Once the radio diagrams were located, I started looking at how the band modules made it change bands.This turned out to really be quite simple but I was missing one or two critical values. You see the Ten Tec Scout 555 band modules have a crystal in them and the frequency on the crystal didn’t make sense…at first.
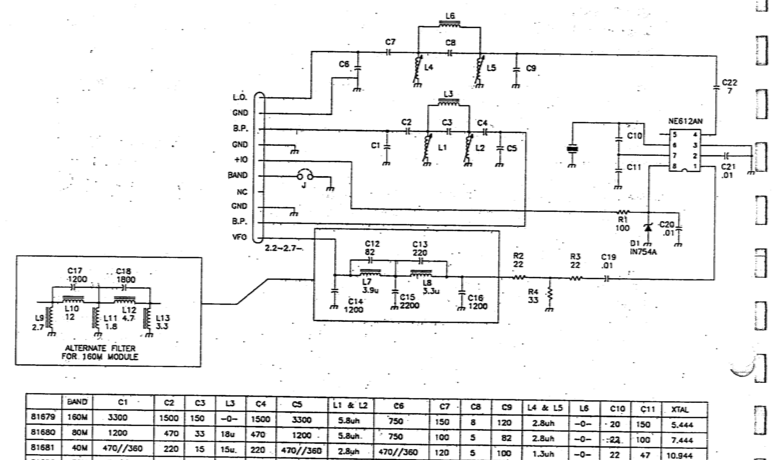
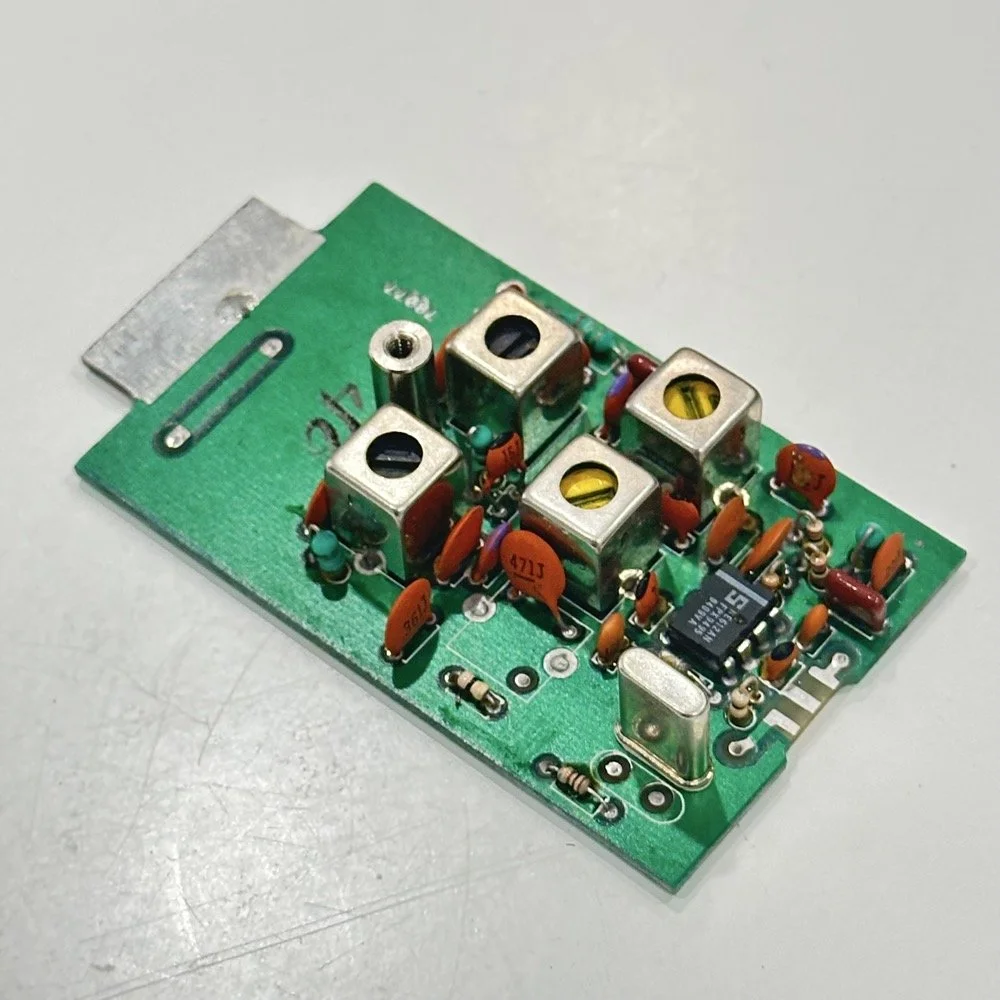
Above is the schematic and a photo of the board that goes with it showing the crystal that I couldn’t understand. This is what tells the radio what band it is on. Looks pretty straight forward at a glance, doesn’t it? Well look at that XTAL value at the end of the chart for 80 meters. Yeah, it takes a 7.444 mhz XTAL to get to the 80 meter band. So I figure the PTO is something like 3.0 mhz so it can get the first negative harmonic when mixed or something like that…nope…turns out I was totally wrong…
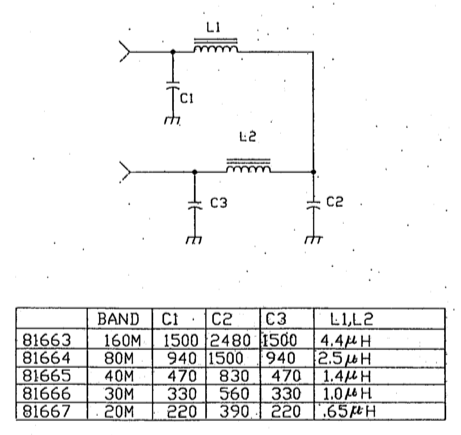
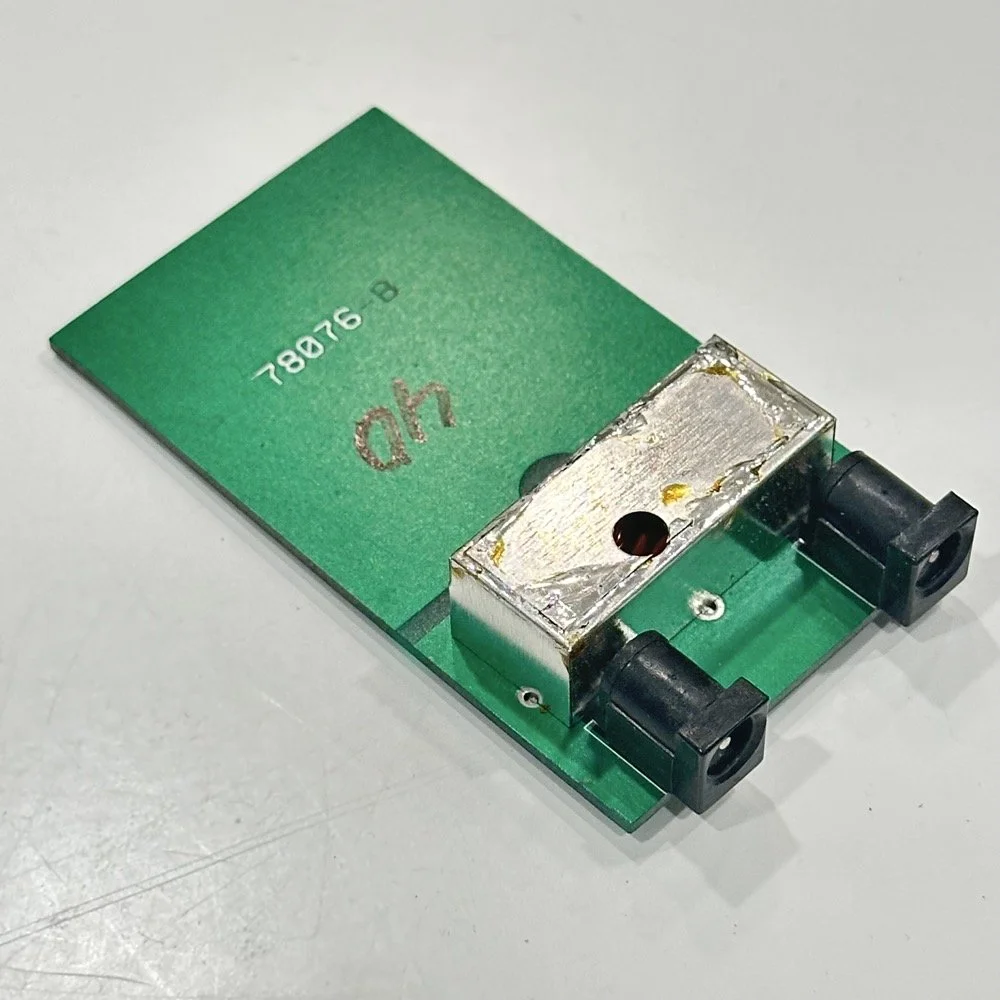
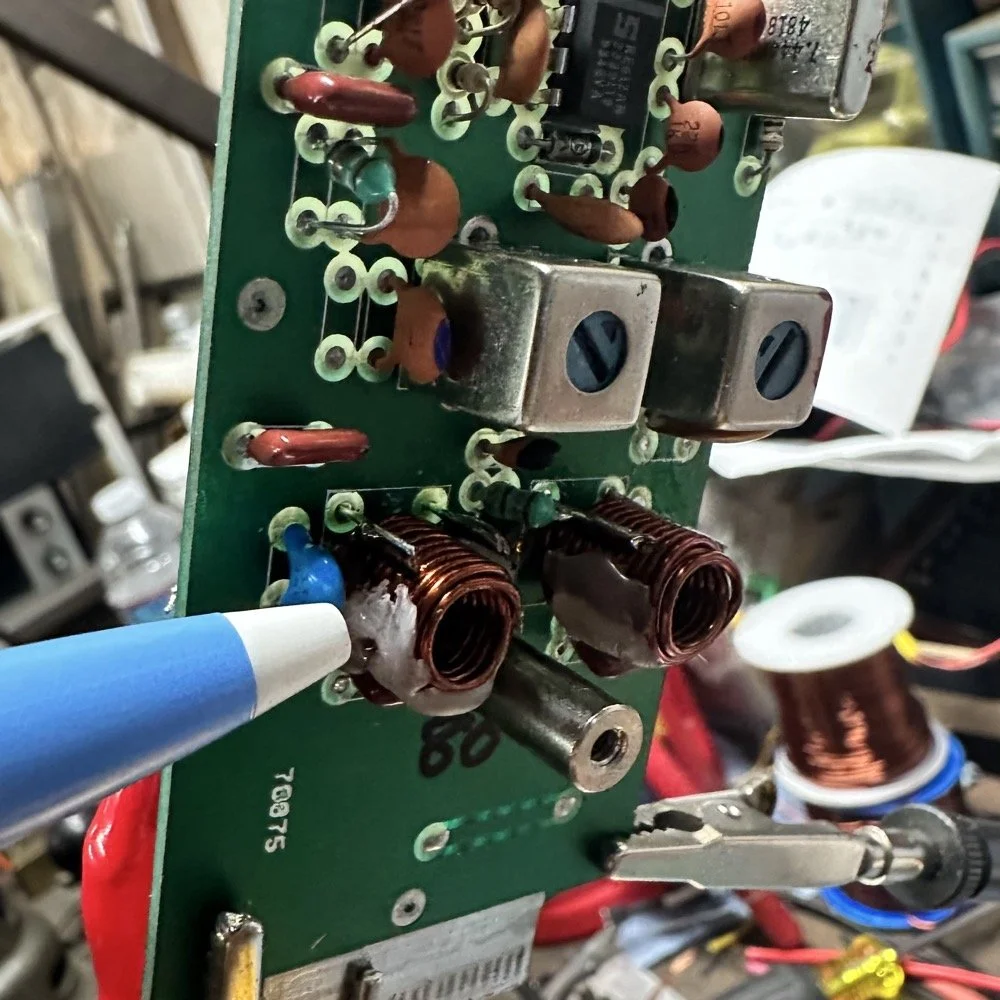
This is the other half of the band module. A classic low pass LC filter and that’s all. This is the output filter that the 50 power amp sends the RF to before it goes to the antenna. Below is what this part of the module looks like. These inductors and capacitors are shielded as they are delivering and filtering considerable power and could interfere with the small voltage levels on the other board that sits right beside it if they were not in the “can” or otherwise known as a ground shield. I don’t know why there is a hole in the shielding either as there is no adjustable parts inside the “can”. I chose this particular 80 meter band module for another reason as well. I have been inside this filter circuit before. When I acquired this module, the fellow I got it from told me it was dead and gave it to me. Turned out to be a broken lead on one of the inductors in this can. It took me a while to desolder this monstrosity to be able to access the parts inside of it. But persistence paid off as I was able to get it repaired and back in operation. I took a lead cut from a transistor and soldered it to the wire on the inductor and simply re-soldered it to the board and it came right back to life. So if you have a module that just stops transmitting all together, I recommend you pull the lid here and look at the inductors to see if one is broken free from the board, that might be all that is wrong with it. I also hot glued the toroids in place to help prevent this from happening again. Anyway, back to the project at hand…
I also looked inside several band modules to see what the differences were and I found some interesting things when I did. For starters, the 10 and 12 meter band modules both use the same circuit boards. They just leave out the second crystal and the switch parts for the second crystal and put a crystal in it for the 12 meter band only when configured for 12 meters. I guess, to be fair, I should have also figured out how the PTO worked as well then I could have figured out the reason for the odd crystal values, but here we are…
Another thing I found was that the engineers at Ten Tec used whatever circuit board blanks that they had on hand to build the band modules apparently. I say this because I found 10m circuit boards (the ones meant for two crystals and the switch) fleshed out with parts to make them into 40 m band modules. (Like the one in the photo above) They apparently just used whichever ones they had on hand at the time. Needless to say, what I thought was going to be simple was starting to turn into a pretty major endeavor.
You see it was starting to look pretty daunting since I didn’t understand what the reason for the odd frequency crystal was and that there were 4 tuned filters in each band module. Also the crystal value just didn’t make sense on the surface. The values were all over the place. I was about to throw in the towel calling it just too complicated, even though the parts count in a band module is really low…till I found two things. One was I looked up what the “555 timer” on the board actually was (Here is a hint, it aint no timer) and the other was NA5N’s website.
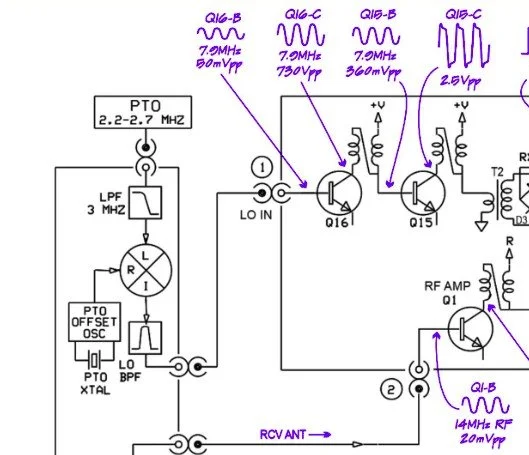
Excerpt from NA5N’s website showing the level of detail these drawings contain.
NA5N’s Scout 555 page is a figurative gold mine of information with just plain cash money piled on top of it, (just to drive this point home take a look at the piece above I grabbed for reference). I can not thank him enough for this information as without it I would not have been able to get this project working as quickly as I did. He also has some really interesting mods he has done to his own radio as well. If you want to perform his mods on your Scout, he gives you detailed information on what is done and literally how to do it…step by step almost. The greatest part of his page though is his info graphics he has built and placed there. These graphics show all sorts of information that the radio schematics leave out.
This and MUCH more is available on the NA5N website.
Things like the frequency path (pictured above) through the radio in a chart so you can understand how the engineers at Ten Tec arrived at each band frequency with these plug in modules and a PTO. Complete with oscilloscope test point and what you should be seeing at these points! Like I said, a gold mine buried in cash money…
Based on his chart I went through the band module and looked at the filters for the various circuits and decided (more like assumed based on the values of the parts) that I could simply re-tune an 80 meter module and “push” it up to 5.3305 mhz easily enough and without too much fuss…nothing could have been further from the truth.
So I start tinkering with the filters and piping them through the nanoVNA into the s21 input so I can see the filter shape and all is well from what I can see. Turns out the low pass 80 meter band module filter cut off frequency was about 5.5 mhz or so to start the rolloff so the 60 meter band was still in the pass band! One down three to go! Next I figured out that the PTO is the same for every module since it is part of the radio and not in any of the modules so that filter also didn’t need any mods. This left two filters to re-tune, just so happens it is the two with the adjustable inductors in them. So I start with the LO BPF (Local Oscillator Band Pass Filter) that filters the signal passing through the radio from the antenna. Why they call it the same thing as the LO BPF that is in the output of the mixer chip is beyond me, but here we are… This didn’t go well as I was not able to get enough adjustment out of the inductor slugs to get the passband up to 5.350 mhz, shoot I couldn’t get it to tune up past 4.5mhz if memory serves me. It was far enough that I couldn’t get it work so I looked at what I had and decided to wind some air-core inductors to a lower value and see what I could do like that.
Well, to be honest, I don’t know how I was so successful here. Maybe it was the sheer audacity in the fact that I was woefully unskilled in building filters for HF or the mind boggling lack of knowledge of how filters work and how to make them, but I got it almost perfect on the first try! I made a couple different inductors by winding magnet wire on a 1/4-28 bolt (that’s a little over a 6mm bolt for the rest of the world) and the threads made getting good tight coil layers easy. I borrowed my friend’s LCR meter and measured them and blissfully declared them good to go at 2.0uH each. Did I mention this is a budget LCR meter and I have no way of knowing what the level of calibration is for this part of the meter? I also learned later that I can measure my inductors with a signal generator and a oscilloscope. Guess who now owns a signal generator as well as an oscilloscope...
Once wound and “measured” in the board they went! I then tinkered with the capacitors till the pass-band looked close to what I thought it should look like. (I had also learned from the wonderful world of youtube that I should see less than 1dB of loss in the pass-band and the 3dB cutoff point is where the filter technically is measured..typically.) As I mention in a bit, I used the wrong kind of capacitors (the little blue ones) to start with, although the module did work like this, I updated it with NPO capacitors ultimately as well.
I went down a long path of learning on this project, if you haven’t already noticed from the inserted comments in the story. I have very little formal training in Electrical Engineering, you see I went to a two year trade school back in the 1980s and basically got the “intro to electronics” that EE’s would get before learning things like matching the impedance of the filter to the next stage and to use temperature stabilized capacitors in RF filters so they don’t move the pass-band around when they get warm. NPO capacitors have become my best friends here…lol. A hint for my peeps who also didn’t study RF in college, look at the circuit board above that has the crystal on it. You will see the little capacitors on that board and some have little painted tops on them. This indicates NPO capacitors when the letter designation will not fit. I have now purchased a lifetime supply of these caps off of eBay…haha.
Anyway, now the pre-amp band-pass filter was functioning like it should. One to go…
Tune in for part two where we get into the problems I had to solve to get this module working and how well it works now that I have figured out my mistakes.
Continue reading the series:
- Part 1: Initial Conversion and Filter Design
- Part 2: Crystal Selection and Mixer Circuits
You can help support this website by using these Amazon Affiliate Links:
QRP/Portable Radios:
Antennas & Tuning:
CW Equipment:
Power & Accessories:
Organization & Transport:
BONUS ITEMS
73
WK4DS - David
![Multi-Mode POTA Activation: Penntek TR-35 CW & HT FM on 4 Bands at Sitton Gulch [K-2169]](https://images.squarespace-cdn.com/content/v1/5d17806ce65eba00011667cb/19188a17-7511-4f72-9997-c058e4aec3ea/IMG_7809.jpg)
Multi-Mode POTA Activation: Penntek TR-35 CW & HT FM on 4 Bands at Sitton Gulch [K-2169]
I made over 20 contacts in short order with the Penntek TR-35 radio in bare bones configuration today so that I could get it up and running faster. This radio is a gem to use like this with a simple set of headphones and I dont mind operating like this one bit. This actually makes it easier for me to hear the calls to be honest about it.
Today I wanted to work an activation but I also wanted to grab a couple more bands as well so I hatched a plan to grab some VHF and UHF bands on FM Simplex if my friend KG4WBI happened to be home.
Today was also cold, which you can not see in the photos, but trust me…it was pretty cold. Since it was so cold, I opted to operate from inside the truck and setup a hamstick on 20 meters (I was being lazy today and didn’t explore the other bands) as I wanted to get the activation completed in about an hour since I had to be in Chattanooga for lunch. The 20 meter band will usually guarantee that to happen for me on CW, so I started there.
I noted in the below photo that the one shorter radial had to be pulled taught and the this is where the counter weight was at that held it in position. This is of little consequence other than I am starting to wonder how much capacitance I am getting at the end of the radial from these stainless steel weights at the end of each radial? They are not connected physically to the conductor but are probably capacitive to it through the wire insulation. I used speaker wire for these radials and it has worked really well over the years. I think the next deployment is going to have a smith chart plot where I take the weight off and just tie it off to a stake of some sort. Maybe a chop stick since there is really no tension on these radials. That way I can see just how much capacitance these weights are adding and I can also see if it is helping or hindering performance.


In these two photos I tried to capture something that was of interest to me, today the 20 meter hamstick seemed to tune much better with one of the radials drooped down to the ground and not outstretched like the other one. The one that is pulled taught is the one that is shorter due to the wire breaking over the years and me twisting it back together by hand so I could use it. With this setup, the nanoVNA said the SWR plot was 1.1:1 and it sounded like it on the air! The stations were booming in! I was getting reports back from many stations of 599 with my little Penntek TR-35 radio too!

Once I got everything setup and tuned, I hopped on 20 meters CW to see what I could scare up. Well that turned out to be a great idea as i quickly had a good pileup going and had great fun working through it.
I made over 20 contacts in short order with the Penntek TR-35 radio in bare bones configuration today so that I could get it up and running faster. This radio is a gem to use like this with a simple set of headphones and I dont mind operating like this one bit. This actually makes it easier for me to hear the calls to be honest about it.
Being cold like it was today, I decided to operate in the truck so I could stay warm and could feel the key in my hand unlike the trip to DeSoto Falls state park recently…lol.

Once I was finished with activating on 20 meters CW, I thought I would try to work my friend KG4WBI who lives a few miles away from this location. I knew he had the ability to work me on all three VHF and UHF bands that my HT can transmit on, so I hopped on my trusty HT and gave him a yell on his repeater the KG4WBI/R 1.25meter machine.
He was, in fact, home and he was more than happy to hop on simplex for a few peer to peer FM QSOs so I could add a few more contacts to the log as well as a couple of new bands as well. In the above photo, I had walked across the parking lot to the building in the background that you can see in the photo above. It is behind the white truck in the antenna photo. This spot gets most of the stuff out of the way so I had the best chance at a contact with a HT. Turns out it worked great on 2 meter and 1.25 meter, but 70cm just would not work from here with all the trees in between us. So I gave up on that band and went back to the truck to pack up and head on to a lunch date I needed to be at.
On my way to the truck I had an epiphany. I could just drive down to the lower lot and walk out to the northern most viewpoint on the canyon edge and it should give me clear enough line of sight to make the contact! I would still be WELL within the park bounds and it was the same UTC day. So I packed up the HF gear and headed down to the canyon rim. Called Roger on the repeater again and informed him of my plan, which he agreed to merrily. So we switched over to simplex again and I put in the 70cm call frequency then called Roger’s callsign and he immediately came back with a 59 signal report! Success!!! 4 bands again!!! Woohoo!
The lower photo is me down by the canyon rim where I made the 70cm contact. Don’t I look happy… lol.

I wanted to share this activation with everyone as it highlights a part of POTA that alot of people overlook. Well, actually two parts… one is that it extends to ALL hambands and the second is that you can absolutely use your HT to make short range contacts on FM and they count just as much as those great distance HF contacts. Dont discount 2 meter SSB either. There is plenty of people there too.
Anyway, it was a great day for radio and I appreciate yall coming along for the ride.
You can help support this website by using these Amazon Affiliate Links:
QRP/Portable Radios:
Antennas & Tuning:
CW Equipment:
Power & Accessories:
Organization & Transport:
BONUS ITEMS

Multi-Band POTA Strategy: Ten-Tec Scout 555 + sBitx FT8 on 15m/17m/20m/40m
The location is all too familiar, but I set out to do a sort of special operation today. I wanted to complete a POTA activation using two radios, 3 modes and 4 bands in one sitting. This doesn’t sound like a tall order but since I am operating inside the truck cab, this does involve a little logistics to not just have stuff piled everywhere while I am operating. As you will see in the photos below, I still ran into this problem somewhat, but it was manageable.
Today was a fun day…

The location is all too familiar, but I set out to do a sort of special operation today. I wanted to complete a POTA activation using two radios, 3 modes and 4 bands in one sitting. This doesn’t sound like a tall order but since I am operating inside the truck cab, this does involve a little logistics to not just have stuff piled everywhere while I am operating. As you will see in the photos below, I still ran into this problem somewhat, but it was manageable.
I setup at the disc golf parking lot again, but this time there were quite a few people there and some of them actually quizzed me about what I was doing. One gentleman, Jerry as noted in my log, actually chatted for a good bit about how he has been looking to get into ham radio but the Atlanta area is kinda tough on locating local hams for some reason. I gave him a card and told him to email me and I would give him as much info on it as I could find to get him on the right path…
As you can see in the photos, I set up ham sticks and this time I started on 40 meters FT8. I wanted to get the FT8 portion of my “sprint” if sorts out of the way first as the other two modes were going to be on the Ten Tec Scout 555. I had recently activated with it and it was acting up with chirping on CW and reports of RF noise on my audio on SSB. I attributed this to poor connection of the 20 meter band module as it was fine on 15 meters. Armed with this knowledge, before I left out for the park, I took the radio to the shop and use the Deoxit for gold contacts and a tooth brush to clean the contacts on the band modules. I even wetted one module pretty good and used it to “clean the contacts in the radio by plugging and unplgging the module a bunch of times.
This improvised procedure worked as I got good reports and the CW ran flawlessly as you will see later. Deoxit is magical stuff, if you dont have any, it is work your investment to grab a small can of it.


I really enjoy using this radio for my FT8 operating and with the upgraded finals and RF deck, it runs flawlessly now with SWRs in the 2:1 and even slightly higher range without problem. Today saw SWR levels on transmit of about 1.7:1 and it happily skipped right along making several contacts in a row at one point.
After completing 6 QSOs on FT8 I figured it was time to get the Ten Tec Scout 555 out of the case and see what I could scare up on CW.
The 40m Ham stick that I have must have a really high Q as it is very narrow banded. So I have it tuned for the CW portion of the band and the SWR in the SSB area can be quite bad at times. For this reason, I chose not to hunt any SSB contacts on 40 meters today. Once on CW (this was about 1/2 hour later as this is when I talked to Jerry) the band must have been closing or the band noise was getting so bad that I could not hear many stations. I was able to work Alabama and Tennessee before the call signs faded into the noise. That is something you will learn pretty quick about HF radio propagation, if you want to work closer in stations, use the lower bands, but if you want to reach the west coast from Georgia on a ham stick, use the higher bands like 15 and 20 meters. When 10 meters is open I have worked other continents with ease… Don’t discount those higher bands, they are truly magical.

In the above photo I have the CW key and keyer staged but not connected. The mouse is actually driving the FT8 machine and makes working FT8 so much easier to be honest.

In these two photos you can see what you have to work on constantly. The above photo shows the cable that came with my Ten Tec Scout 555 when I bought it. This is a common issue you will find with home shop made cables. These were stripped back way too far and as I used the cable, the conductors started breaking and I was beginning to worry about blowing fuses.
I happen to own a tool that is designed to remove these pins from the connector, so I am able to dismantle this connector properly. I dismantled it, then took it apart and cleaned it up, properly stripped and re-soldered the pins, then put heat shrink tubing on it all to insulated and protect it better. Now I am not so worried about it either shorting and melting the wire or blowing the fuses and shutting down the activation over something as simple as a cable…


Once I finished on 40 meters and had two modes in the bag on one band, I switched over to 15 meters CW to see what was happening there. There was a contest going on so it was a little crowded and I didn’t understand the exchange so I didn’t jump into the contest, but rather setup on a clear spot and calledCQ and worked a couple of stations there, one station of which is DX!!!
At this point. I got a phone call from KG4WBI about a completely unrelated matter, which we discussed and I told him to fire up his HF rig and we would see if ground wave would make the trip to his house from the park so I could get Georgia in the log as well as a 2nd mode on 15 meters! Well, it worked just fine and we had a great QSO on 15 meters SSB before he had to sign off and go run errands. So having confidence that SSB was going to work better I started calling CQ on SSB.
I got literally zero replies to my calls… so I went hunting instead. I found two more ops that could hear me and I was able to bag a couple more QSOs and these were Park to Park contacts to boot!


These three photo show me installing the band module into the Ten Tec Scout 555 transceiver. It really is that simple to change bands on this radio. Now to be fair, this is not as simple as just turning a knob, but it really isn’t that bad.
To remove the module you pull out the bottom of the little lever on the front of the module and it will pop out enough to be able to slip it out, then you grab a different one off of the pile and stick it back in the slot in the radio. Push it to seat it and then your ready to go.
At this point, I switched over to 20 meters and since the PTO (notice it is not a VFO) was still up in the SSB area, I decided to see if I could hunt some contacts with that mode. I landed one contact in SSB on 20 meters and was happy to get them in the log.
After working the one lonely SSB contact on 20 meters, I decided to give CW a try as well… Remember me mentioning a contest? Well, it was here too. It was going strong as well and because of this I was only able to work one contact on CW as well. If nothing else it netted me another band!

My last stop of the day was 17 meters. The 17 meter band is a WARC band and therefore it is off limits to contesting. Now, to be fair, POTA has been called contesting of sorts, but as of right now it is not considered a contest but is more in the spirit of something similar to a rare DX station activating on the same band and developing a huge pileup there. So I proceeded to hunt me an empty spot (18.078mhz) and started calling CQ.
This is when things literally took off! I netted a whole page of contacts in about a 1/2 hour span of time! What a day! 4th band in the books and I was stoked!!! 17 meters must have been where all the POTA ops had went due to the contest and I didn’t get the memo…lol. The Scout worked flawlessly after the cleaning and I cant be happier now with the old girl.

One of the great things about 17 meters is the propagation is really anybodys call. I worked Hungary at one point as well as California, Alaska and Idaho, then there is a ton of east coast stations too, it was everywhere today on 17 meters. Ham radio is so cool…


Before closing today I wanted to mention that Aaron KV9L and I have a youtube channel and we just hit 2000 subscribers (as of this writing)! If you are into ham radio and watching videos about it, then we would love for you to come over! I am currently doing a series of short form videos that are teaching CW one letter per day. There is no limit to the number ofd times you can watch them so I am hoping these become long term training aids for people.
Once I get the letters, numbers and punctuation done, I am going to start doing words next. After words will come sentences so we will see how it goes. Anyway, I just wanted to thank the 2000 people that made us as successful as we are!
You can help support this website by using these Amazon Affiliate Links:
QRP/Portable Radios:
Antennas & Tuning:
CW Equipment:
Power & Accessories:
Organization & Transport:
BONUS ITEMS
73
David -WK4DS
POTA AAR using 3 modes on the sBitx transceiver
Today marks the second deployment of the sBitx and me using it on three different modes.

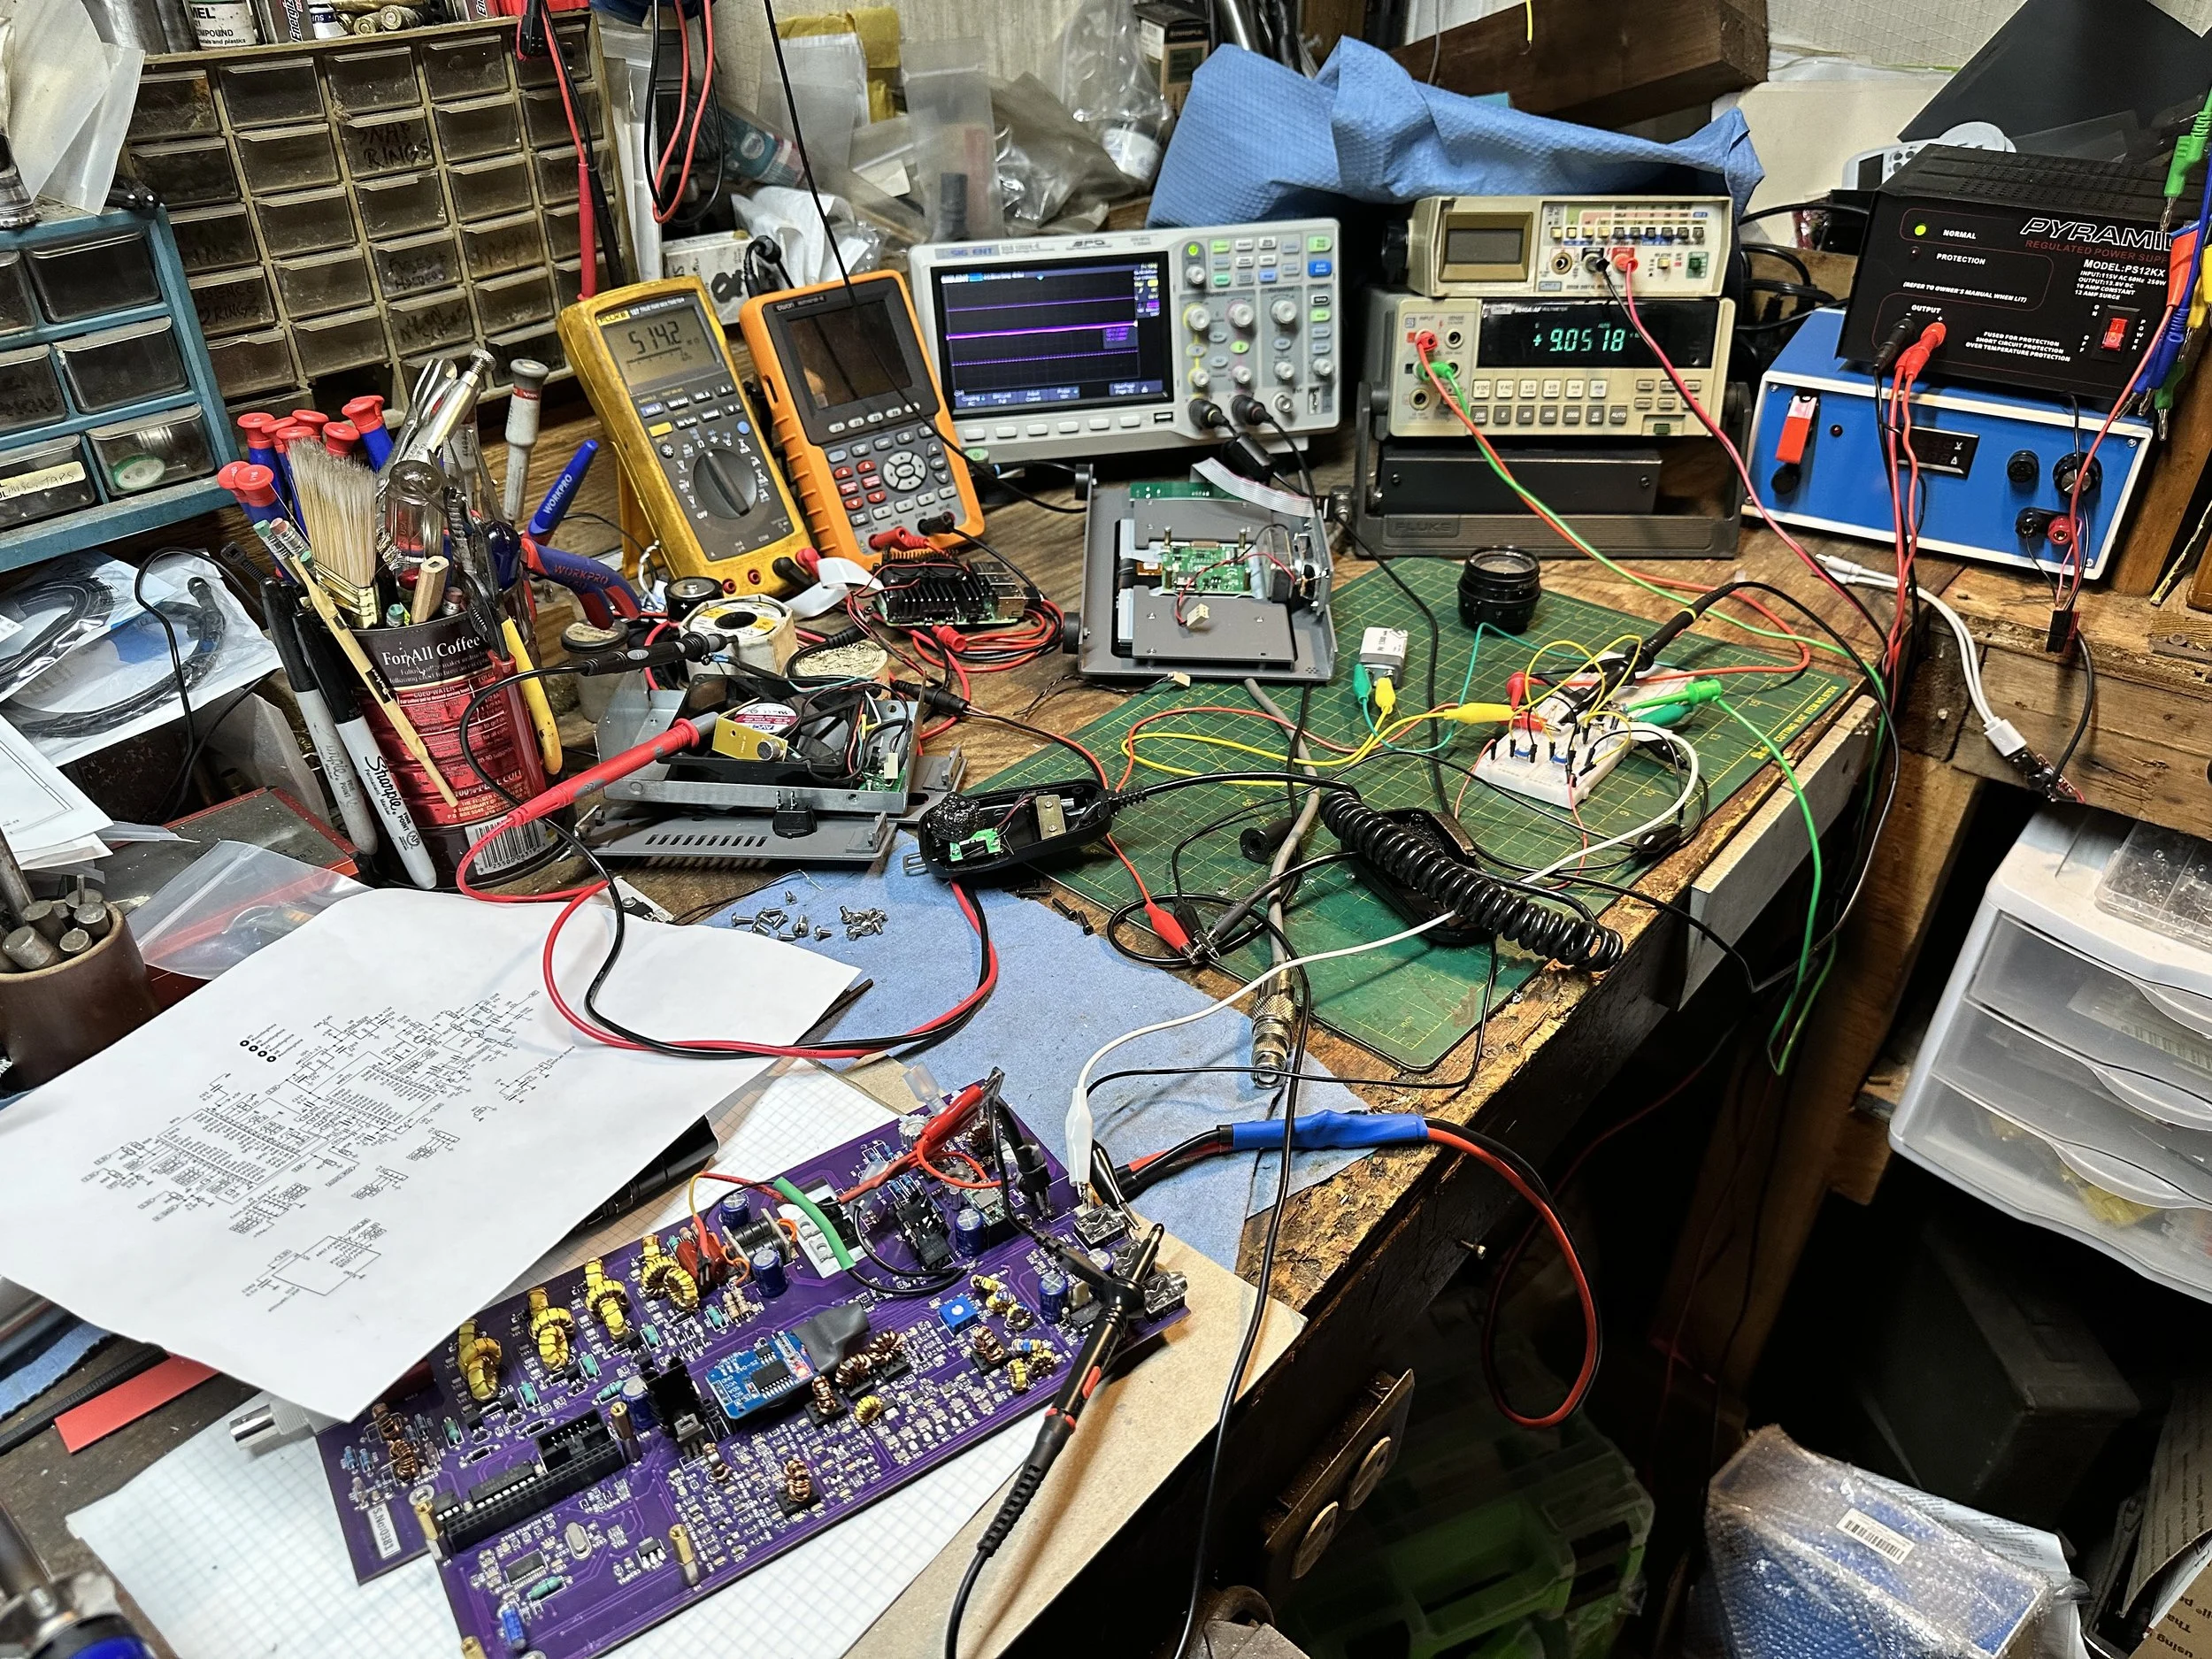
You see, I spent a good bit of time recently solving the weak audio problem with the SSB mode in this radio. I found the microphone input level is really weak and there was a common solve by installing a more powerful microphone element in the hand mc. I tried this approach and it really didn’t help much for me. l was essentially still yelling at the radio to get it to work. Pictured below is what my radio looked like on the work bench as I worked on the audio level for the microphone input.
I ended up building a pre-amp circuit to boost the audio several dB and this fixed my weak audio problem. I wrote about it in the blog and recently published that post as well if you would like to know more.

Back to the activation, it was a beautiful day and wasn’t really all that hot either. This is a nice departure from the July temperatures I had been dealing with recently.
I setup in my usual place but indexed the truck about 90 degrees so the sun wouldn’t shine directly in my open door. This allowed me to leave it open for the most part. I get so much more aurflow with the door open as opposed to just rolling down the window.
I also ran my 20 meter ham stick on the truck hitch mount I made and just deployed the two radials I tuned for 20 meters. I planned on this activation being kinda short so I didn’t setup for any other band since 20 meters is so active I should easily get my activation locked in on just that band.

I do have some future plans for the antenna mount though. One of thise is to incorporate multiple ham stick mounts (2 specifically) to allow for band hopping without having to get out of the truck. This way if I am setup on a rainy day, I can go ahead and setup two bands at the beginning and then just stay in the truck.
I am beginning to think I want to install a screwdriver antenna again like a Tarheel or something like that and just use that for the quicky ones. I have heard good things about Tarheel antennas and it would make a bunch of my activations so much faster.

I use these CB antenna mounts you get from the truck stops for my base connections. It is an easy way to build an antenna mount from scratch as it has everything you need to attach the antenna to the base.

Something else I like about the sBitx is that even though it is a touch screen design, it can also be mouse operated. This makes using the radio about 100 times easier as some of the touch functions can be fickle. Like picking a station to call on FT8 from the list. It isn’t super hard to do by hand but it is MUCH easier to do with a mouse. Because of this, I have started bringing a USB mouse with me on my activations.
Yet another reason I like this radio… lol. It can also use a USB keyboard as well and you can “type” CW with it if you want but I dont worry with that as I really dont have the room for the keyboard at this time. Maybe at some future point I will add a shelf for those items. Haha.


All in all it was a great activation and I really enjoyed the time at the park as well. It was really cool to be able to use SSB with this radio! That alone made this particular trip unique. I think prior to this that I had made just one SSB contacts total! ONE! Now that mode is going to be showing up in the logs more and more and I can’t wait to share those trips with you one here.
73
WK4DS
15 meters was on FIRE TODAY!
I don’t normally chase DX…

But today it wasn’t really an option to do anything else at one point. I had been wanting to use FT8 on the higher bands but had not had much of an opportunity lately. I got a day off and the bands were on fire so I figured it was as good a time as any to setup a POTA operation and see what I could do. As you can see in the above photo, it went splendidly well.

This was the operation position today. The cab of the truck has become a familiar place recently what with the temps being so low. (I really should get the armrest recovered at some point.) The difference was today is that I was just lazy and didn’t want to setup away from the truck. So I used the hamstick antennas and just sat in the truck to operate. It really is a convenient location to setup a POTA activation to be honest. Today also saw the use of my new Christmas present, a small writing table that hangs on the steering wheel. This is handy once you get it setup properly. I was able to log while operating and even was able to do some call sign searches on QRZ.com at the same time.
Above shows another milestone as well, I finally worked my friend KV9L on FT8! He is the person that got me into digital modes to start with and it took me months to finally get on the bands at the same time as him and then find a band that would support our QSO, turned out to be 30 meters today was that band. I worked a bunch of 20 meters FT8 before I moved and tried to find him on 30 meters though, but the antenna I was using has the wrong take off angle to be able to hear him on 20, so that is why we moved to 30. Once on 30 meters, and after our SKED (of sorts) I worked a few more ops there before getting my “chip in the big game” and moving up to 15 meters. Boy did it pay off too! My very first contact on 15 meters was Russia! Then it was DX station after DX station for the next hour, with one lone US operator hopping in as well. I would have to reposition my transmit frequency from time to time due to band crowding and such but the QSOs were steady. People will transmit right on top of you and if you don’t have any power…like me… you move somewhere else. Well with that kind of luck, I figured I would hop on CW and work a ton of CW contacts too…
Didn’t happen like that at all. I worked two ops on 15 meters CW, there just wasn’t anyone on the band and it was fading pretty hard for CW to hold up. I did get one DX station and Paul (KJ7DT) from Idaho so the mileage was still working great, just wasn’t many ops down there at this point. One of the reasons that I think the band held up so well for me today was the nanoVNA. As you can see below, the SWR plot shows that I had the radials positioned perfectly for a broad-banded usage potential on 15 meters, I thought for a minute about hoping on SSB and see what I could do, but really wanted those 20 meter contacts more… lol. With things this good I had to get on FT8 a while and this is where I got all that DX. When the conditions are right, you just get in the groove and have a wonderful time.


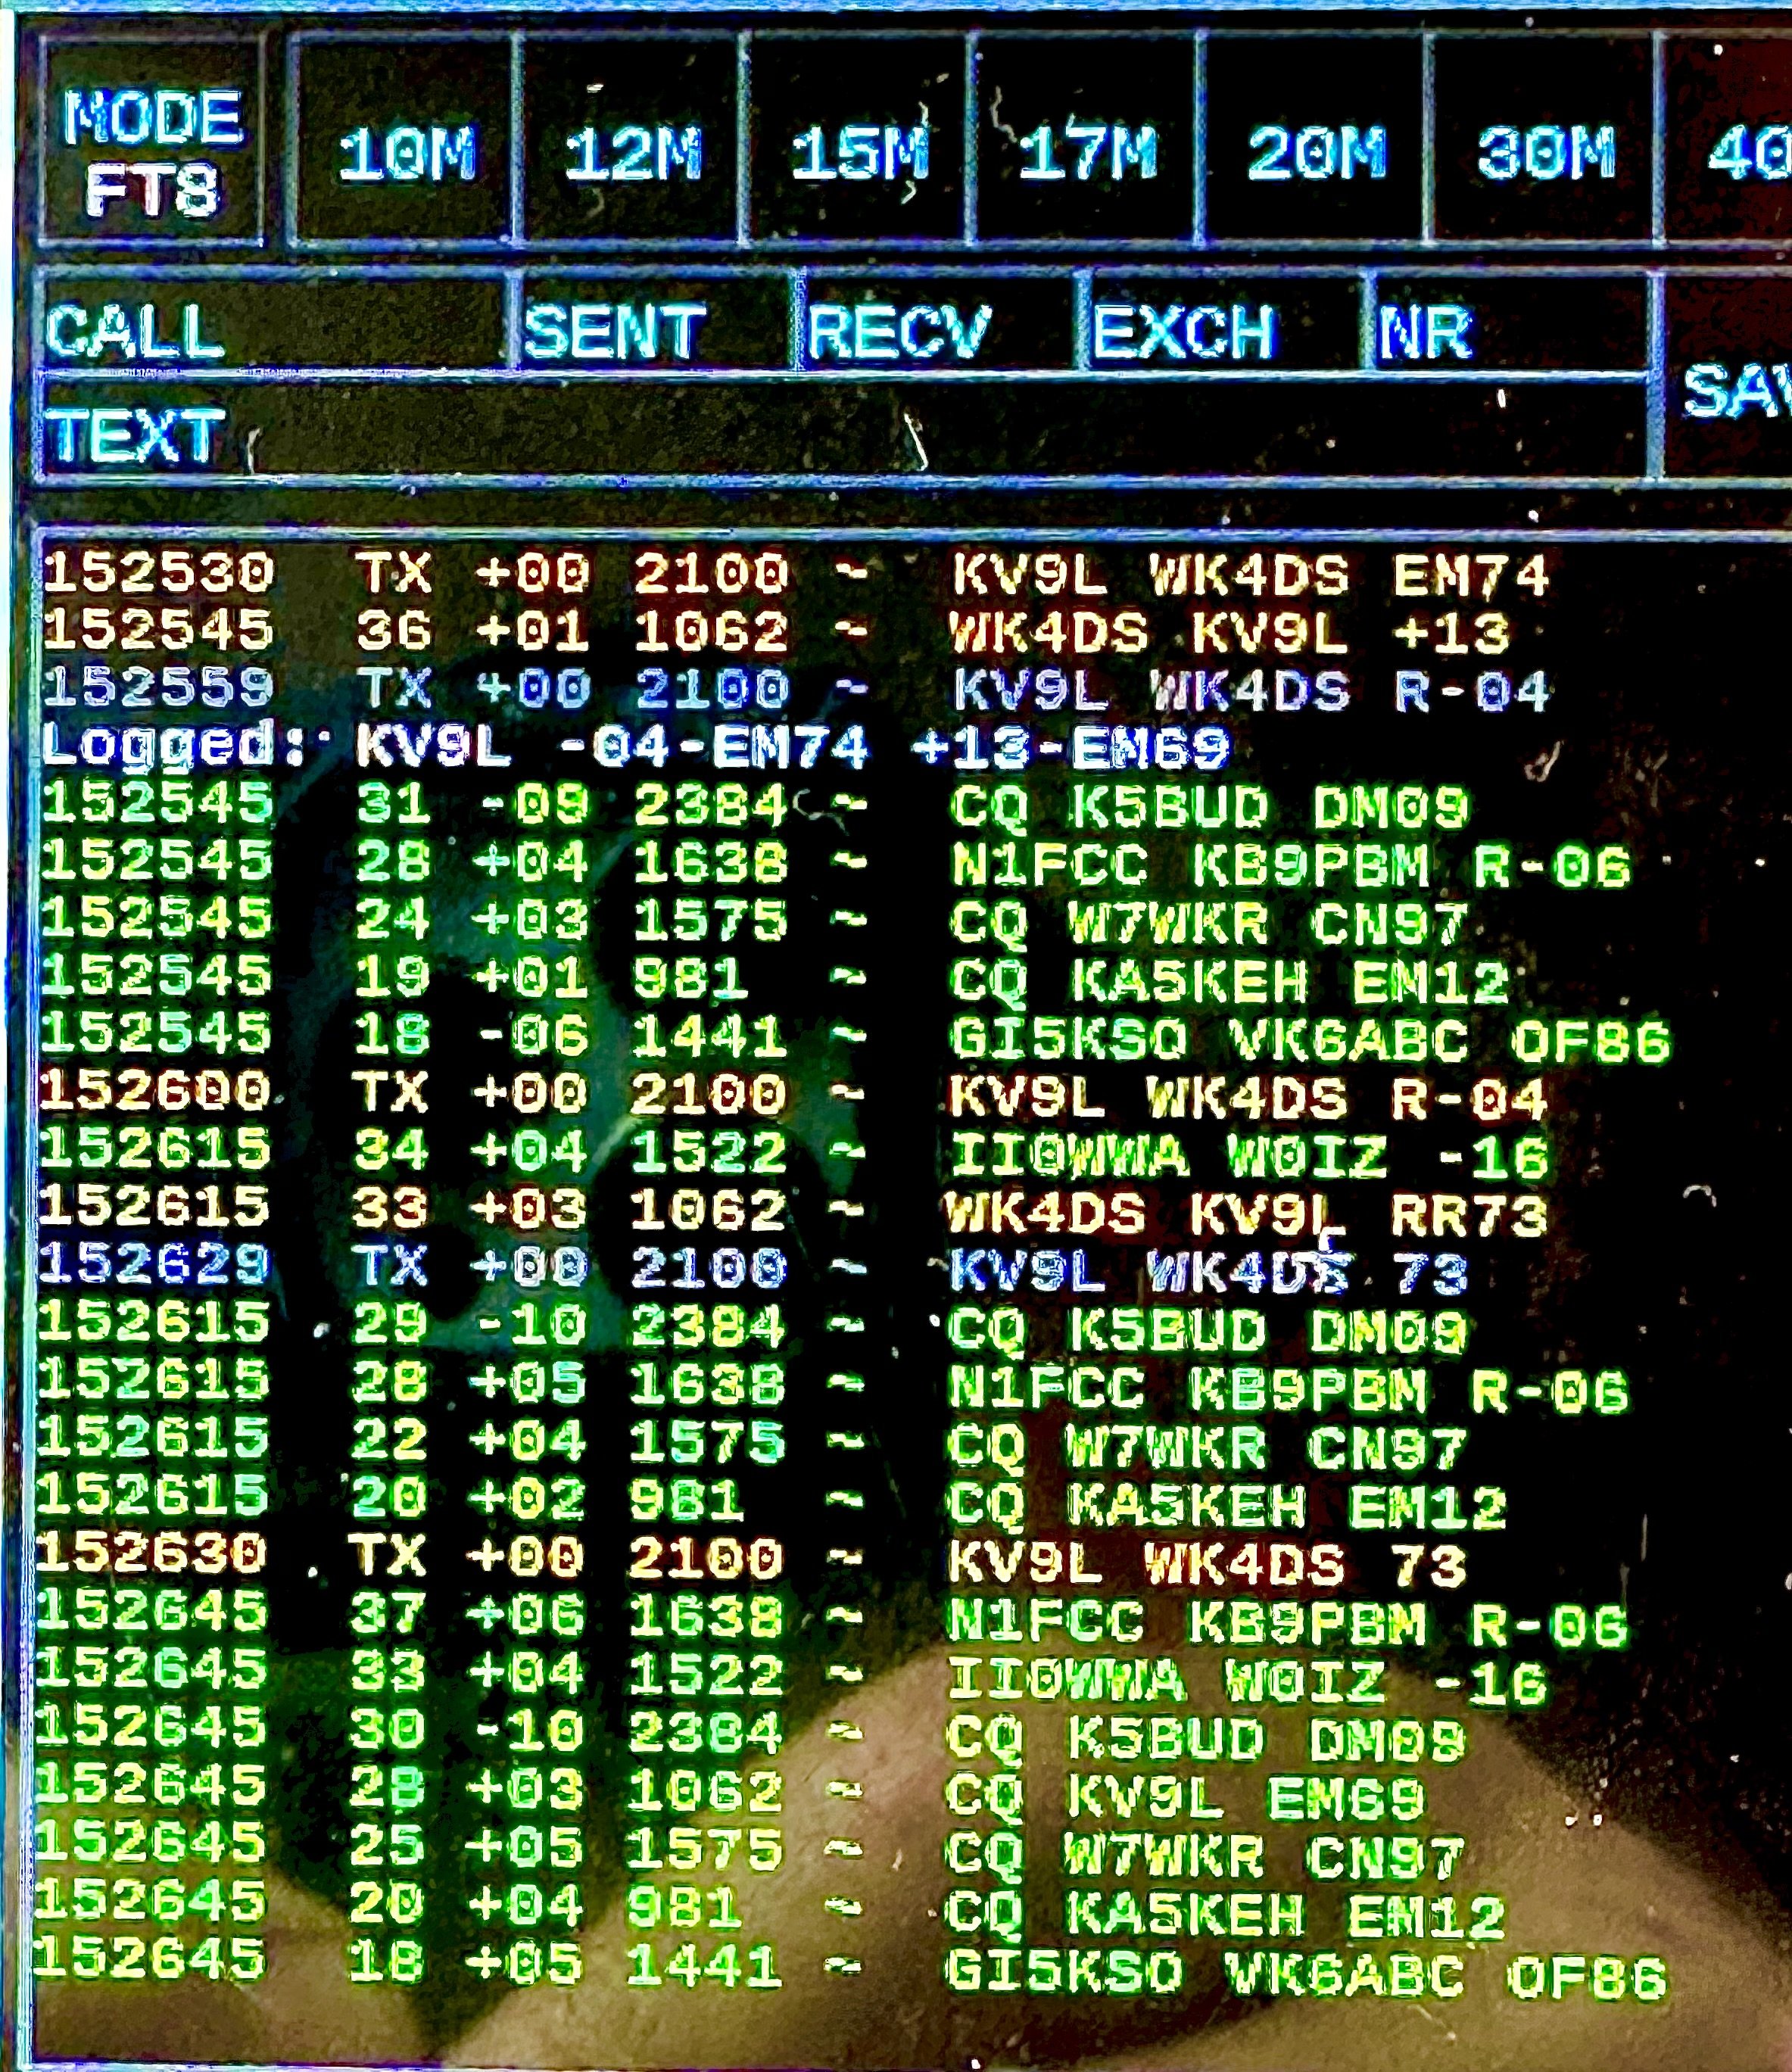
As you can see above, I was using the sBitx V3 with the native FT8 software today. It is functional and efficient, but it is the only one I know how to use at this time. Maybe at some point I will get FT4 going too. But for right now I am happy to be making FT8 contacts on this little radio.
Once I got finished tinkering around on 15 meters CW I decided to see what I could do on 20 meters CW. I moved down, which involved an antenna change… This means getting out of the truck, going around back and switching the ham sticks out, then if I have not done it yet for the new band, I have to install the radials. Fortunately the 20 meter radials were already setup so it was just the vertical and back inside the truck to check the antenna prior to putting RF on it and then setup the radio on 14.063mhz and started calling CQ. Well it didn’t take long and the calls started coming in from all over the USA. I had wonderful propagation today to all corners of the Untied States and the logbook reflects this as well. I even worked a VE7 call that was in Arizona! Everywhere from Washington state to Mississippi was there today, it was awesome!


This QSO map says it all, The 15 meter band was a great long distance band on this day. Just look at all those pins in Europe and Russia! If you don’t normally venture far from 20 and 40 meters, I would highly suggest giving the higher bands a shot sometime, you just might be pleasantly surprised at what you find! KV9L said that 10 meters was just as good if not better!


I hope this story inspires you to get on the air and try something new.
73

How well does 17 meters work?
I see a lot of people on 20 meters, but what about 17 meters? I take the sBitx v3 to Cloudland Canyon State Park (K-2169) for a little fun on 17 meters today… The combination of going to a park with your amateur radio gear and setting up an HF radio in a state park to activate as a POTA operator is a lot of fun.
I see a lot of people on 20 meters, but what about 17 meters? I take the sBitx v3 to Cloudland Canyon State Park (K-2169) for a little fun on 17 meters today… The combination of going to a park with your amateur radio gear and setting up an HF radio in a state park to activate as a POTA operator is a lot of fun.

sBitx V3 running FT8 natively on 17 meters.
What is the 17 meter band in ham radio?
The WARC (World Amateur Radio Conference) bands are nestled between the typical bands and everyone knows what they are because it is on the license tests. The ones I am referring to, in case you forgot for some reason, are 30 meters, 17 meters and 12 meters.
What the license test doesn’t teach though is that each band has unique characteristics that make it fun to use…at least that is how I see it. Since each of these WARC bands are stuffed between other typical ham bands, they seem to take on the characteristics of the two bands they sit between. Take 30 meters for instance, it will act like 40 meters with NVIS propagation on my hamstick to work hams just a couple hundred miles away and then I will work the west coast on the very next contact as if it were also a 20 meter contact.
Well, the higher the bands get the further they tend to reach more distant stations for me. I don’t have giant towers that have huge Yagi antennas on them for say 40 meters so my results are more of the typical ham who might have a dipole that is technically too low to the ground for textbook operation or a vertical with a couple of radials…you get the idea.
The 17 meter band has the same characteristics as 20 meters as well as 15 meters a lot of the time. For me the higher the band, the better the DX usually. I guess it has to do with the fact that the higher the frequency, the smaller the antenna and with a smaller antenna, the lower it can be to the ground and still have proper performance. Armed with this VERY basic knowledge of antenna theory, I usually expect some cool European stations on 15, 12 and 10 with the occasional DX on 17 meters, but today the sky was alive! Well, it would fade in and out and you can see it in my logbook reports. The signals reports over the time period of the activation go from 599 both ways to dismal 529 and 229 reports within an hour. This has been the norm as of late too, a lot of my activations lately have had events that would be described as cyclic in nature. I would hear a station call and reply to them with a 599 because they were booming in and then when I turn it over to them to reply, they will be a lot weaker and then you can literally hear them fade out while you watch and then fade back in by the time they turn it back over to me. It is really odd to hear that in real time for some reason.
17 meters covers a fairly small portion of band space as well with it only being from 18.068mhz to 18.168mhz. This is only 100khz of bandspace and yet there is room for a plethora of modes and operators. 18.100mhz is the watering hole for FT8 on the band and CW runs from the bottom of the band to about 18.090mhz for the most part. Voice operations will be above 18.100 usually and I have not made many contacts with SSB on 17 meters…

The POTA Activation on 17 meters
When I got to the spot I wanted to use for the activation, I was the only one there. So I setup in my usual spot and figured I would start on 17 meters to see how things were and if it wasn’t really happening, I could move down to 20 meters and get the activation easily there. I should have known things were going to be good when my first station of the day was VK3AWA!
Now you need to know something about me here. I thought this was a Canadian station since the call started with a “V”. I work so many Canadians that I have become accustomed to hearing the V callsigns and happily add them to the log. It wasn’t till I checked the QSO map that I realized that he was actually in Australia!!! They (it is an Australian club call) must have had a Yagi antenna pointed at me or something, along with a path opening as the signal reports were really good for a 12 watt transmitter running into a ham stick antenna on the back of a pickup truck. This contact was on FT8 and FT8 reads the signal strength in dB with the software to get the most accurate reading possible to send back. So it isn’t quite as subjective as something like CW where a lot of people (me included) will send signal reports based on how the op sounds to them and never reference a meter one time… So for my little radio to get a -8dB report from Australia had to have help from the atmosphere and probably a very good antenna on their end.

FT8 is a relatively new mode for me. I have normally not done anything other than the two original modes of CW and voice. For me to reach out into a new mode is a pretty big deal and this one works really well, which is why I like it. I am also looking to start messing around with PSK 31 some as well as possibly RTTY if I can figure out how to get the little radio to do it. I think PSK 31 will be pretty easy to master, so I will tackle it first.

What makes 17 meters so special?
The above map shows the performance you can normally expect from a band like 17 meters. Notice there is practically no contacts inside of about 600 miles other than two oddities here in Georgia? That is because of the antenna and the ability of 17 meters to have a pretty decent take off angle and also to reflect off the ionosphere easily. This garnered me a ton of contacts in the pacific northwest as well as the Atlantic north east and a scattering around the country to include Utah and southern California. Then there is the EU… I made several contacts with France and Germany today. That has been a little unusual lately for me and my system to be honest so I was stoked to see them in the log.
But this trip did something that I had not done before that I can remember… It netted 7 Canadian QSOs alone, combined with the other DX calls I technically activated today with only the DX contacts! That has to be a personal first.


I started with a DX call and finished with a DX call. How cool is that? It was a great day for radio and I really enjoyed using the sBitx with the new V3 firmware. The radio works so much better than the previous firmware and the FT8 is a breeze in the native radio setup. It you are into smaller radios and smaller companies and the idea of help from a collective of literal geniuses that willingly share their information with you, then this just might be a radio you will like. It is for me, I have had so much fun with it that it is hard to understand how I got along without it before…and the people over at HFSignals dont even know who I am…haha.
You can help support this website by using these Amazon Affiliate Links:
QRP/Portable Radios:
Antennas & Tuning:
CW Equipment:
Power & Accessories:
Organization & Transport:
BONUS ITEMS (Optional 16-20):
Hope you enjoyed this little diversion into the 17 meter band and inspires you to go out and setup your radio in a POTA park at some point!
73
David - WK4DS
Monte Sano State Park POTA Activation AAR with a 20m Hamstick
Well, I finally activated a park in a new state… Alabama. You might think this is normal, till you google my address and see that I live on the Alabama state line in Georgia! I am literally two minutes by car from the state line and it took me several months to activate a park in Alabama… Anyway, I decided to activate the [sarcasm]remote and rarely visited[/sarcasm] Monte Sano State Park K-1048!!! Woohoo! Well. it is neither rare nor remote actually being literally minutes outside of Huntsville AL. It was new for me so I packed up the TR-35 and the new 20m Hamstick setup and struck out for Huntsville.
As fate would have it, I had business meetings that were on a time table so I didnt have a long time to stay, I thought once again that if I get my ten contacts I will be happy, well…I got more.

This is the QSO map from this trip. The VERY FIRST contact was with France!!! I thought, this is going to be a good day. Any day that my 5 watts reaches across the Atlantic Ocean, is a good day for me. It is obvious that the band and take off angle of my antenna dictate a certain “minimum” distance that people can hear me. A quick look at the map shows this, but just outside of this region and all bets are off! They piled in and in just over an hour I had 43 contacts in the log, with one being a dupe… It never ceases to amaze me at how well these little radios can perform with some thought and patience, but today the whole patience thing was out the window!!! I just kept getting calls! It was a QRP dream activation, I just wished I had been able to stay longer to see how many more I could have worked… Seems here lately, I am only able to stay and hour or two at best, I hope to remedy this soon, but for now, I will take that!!!


I also worked CU3AA in the Azores and VE2WLD (who also performed double duty as a Park to Park as well) for three DX stations on this trip alone! That is awesome and makes the whole activation just that much more special to me. If you have not ever tried POTA, I would recommend it at least once, it might not be for you, but if you enjoy setting up for field day, then you will probably like this. It is similar, but much more relaxed and lower key… At least that is how I see it. I find myself getting on the air more as a hunter and as an activation now that I have activated. It is just plain fun to go to a park and operated with a battery for a while and answer the passerby question from time to time. Once again, you can see the band opening and closing like waves on the ocean (maybe more like the tide coming in as it is slower than waves breaking on the beach) in the signal reports in the log. I even had a couple of people tell me they had problems with QSB (fading of the signal) towards the end of the activation.
Also of note is that this park has a day use fee (see below), be prepared for it when you get there, they have an attendant at the entrance to collect this fee before you enter the park. Parks seem to have a lot of lattitube in how they collect these fees, I have seen honor system pay boxes as well as no fees at all (Booker T Washington in Chattanooga TN has no fee) and then places like Monte Sano where they collect the fee at the entrance to the park. Cloudland has the honor system boxes as well as a attendant that works at the entrance part time, so you might find a person at the entrance and you might not, it is kind of a crap shoot with this one. You just never know… What I do know is the fee structure is normally really reasonable and to be honest…cheap for what you get. I bought my Georgia park pass back after my first activation and now that I am 47 activations in, that cost average is almost down to 1$ per visit. Once I break 50 it will be less than 1$ per trip. That is a smokin deal if you will be doing POTA ops regulaly at your local state parks (and they offer an annual pass like this one in Georgia). I plan to get over 100 activations at Cloudland before I have to renew my pass next May so then the daily cost should hit 50 cents per visit. Where else can you get a deal that good?

This is the only thing I brought back from that trip aside from my logbook, I don’t know how I forgot to get photos of the setup for you guys…I straight dropped the ball on that one. I guess it means I get to go back at some point so I can properly photograph it. LOL
The Penntek TR-35 is really starting to grow on me. This little radio just plain works. It doesn’t have things like a waterfall display or QSO recording like my IC-705 but what is does have is pretty much CW perfection. I have every control I normally use when doing an activation, at my fingertips and not buried in a sub menu or an alternate function for commonly used features…like CW speed control is a dedicated knob, this is super handy as POTA hunters vary in speed a good bit so being able to slow down on the fly for a slower op and then speed back up for a faster one is really handy. It is being tested out for a potential trip to Central America in a few months so I hope to keep up on using it and to prove it out as a capable machine while I am south of the border.

All in all it was a great trip and I finally got to activate Alabama too! If you have not used CW and want to, there are lots of ways to learn this historical mode fairly easily. It isn’t for everyone, just like SSTV isn’t for everyone, so if you don’t like CW it is all good, that is why we have different modes, at least in my mind it is, lol. If you have not done it yet, please like this blog and subscribe for future posts, Till next time, get your radio out and make some contacts!