This 21-Year-Old Nikon's Colors (Straight Out of Camera) Will Surprise You
Here is the scene… I'm standing in downtown Chattanooga with a camera that's older than some of the people that are reading this blog post. The Nikon D200 was introduced in 2005, which makes it 21 years old this year. And you know what? The colors coming straight out of this CCD sensor camera are better than what I get from most modern cameras without heavy editing.
Here is the scene… I'm standing in downtown Chattanooga with a camera that's older than some of the people that are reading this blog post. The Nikon D200 was introduced in 2005, which makes it 21 years old this year. And you know what? The colors coming straight out of this CCD sensor that is in this camera are better than what I get from most modern cameras without heavy editing.
The richness of the Nikon D200 CCD Sensor color science is hard to dispute when the SOOC photos look like this.
Today I'm taking you on a photowalk through downtown Chattanooga to show you what this vintage DSLR can do, and more importantly, why CCD sensor cameras still have a magic that modern CMOS sensors just can't quite replicate.
The Setup: Simple and Effective
For this photowalk, I'm keeping everything as simple as possible:
Camera: Nikon D200 (CCD sensor, 10.2 megapixels) Lens: Nikon 35mm f/1.8 DX Settings: Aperture priority, ISO 640 fixed Focus: Back button focus, AF-C (continuous autofocus)
Why ISO 640? Because it's daytime, it's sunny, and with a CCD sensor, you want to keep that ISO low to get the best color rendition. The result? My shutter speed stays nice and high, and the colors are just incredible right out of camera.
The 35mm f/1.8 DX lens is compact, sharp, and on this DX body it gives me a perfect walk around focal length. This combination is light, fast, and honestly? It just feels right since it simulates 50mm on a full frame sensor
The Photowalk: Downtown Chattanooga
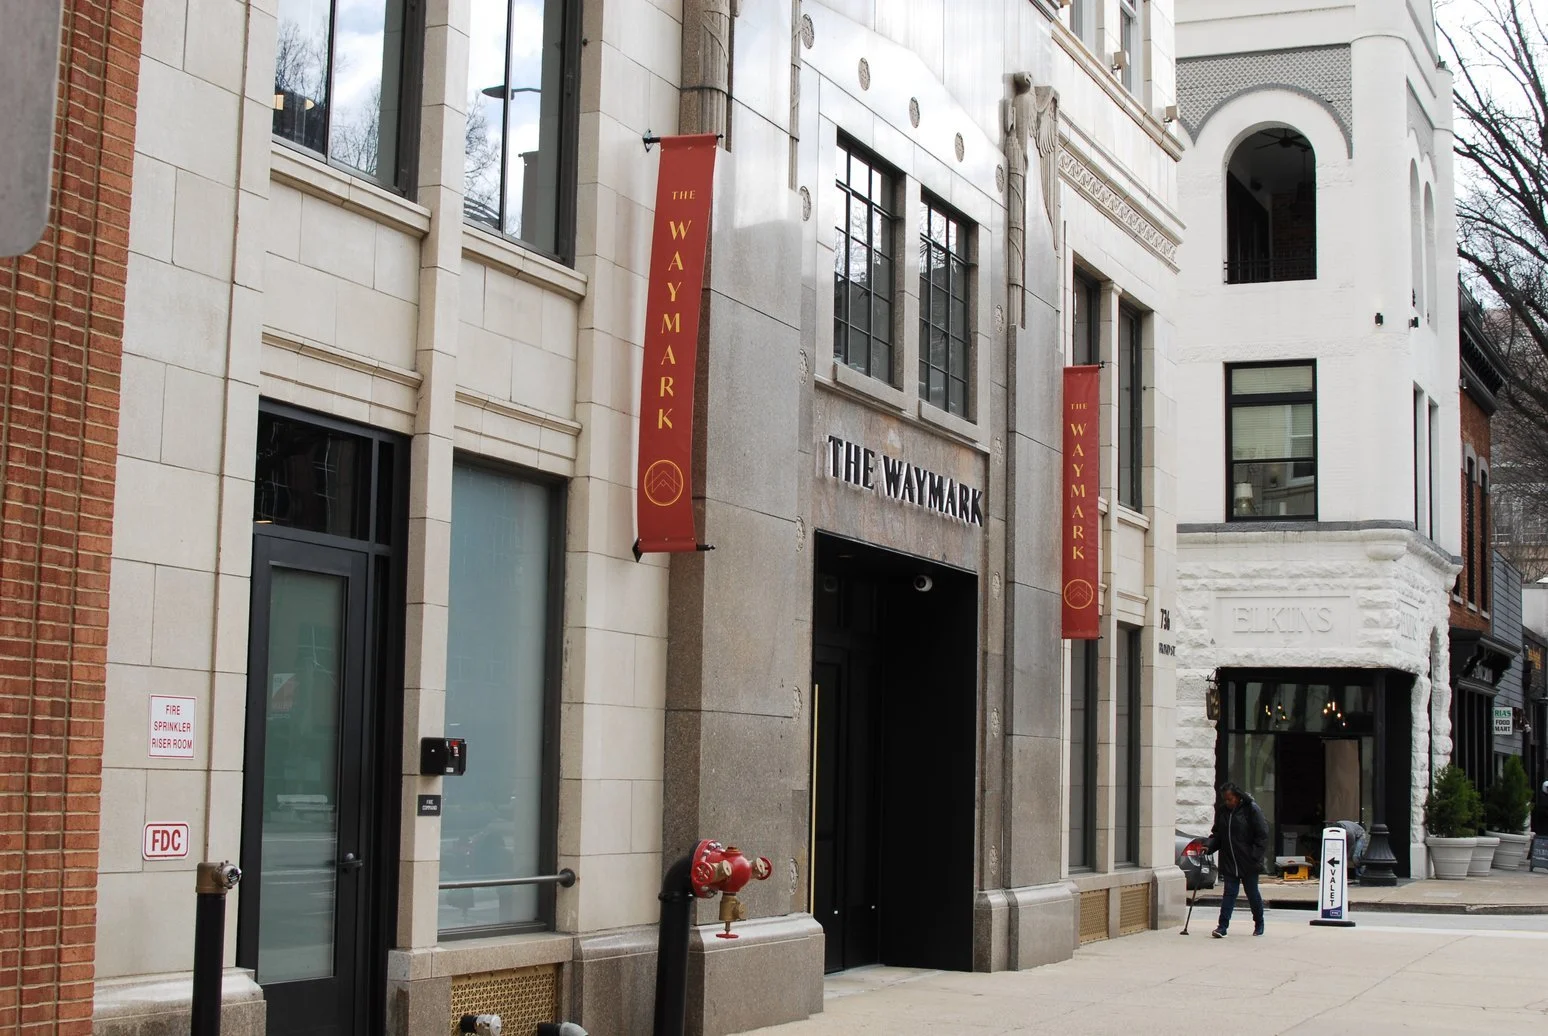
The vibrant colors coming out the Nikon D200 show up in SOOC images like this photo of the entrance to the newly opened Waymark Hotel.
I parked near the Waymark hotel (the old Chattanooga Bank building) and immediately noticed it's finished! When I left for Florida a while back, it was still under construction. Now it's open for business, people are working inside, and I walked through the lobby to check it out.
It's neat, though personally I think it's a little crowded with all the walls, partitions, and conference rooms they've put in. Looks like they're putting a restaurant in the corner where the old jewelry store used to be, but that piece isn't finished yet. Got a couple of photos of the outside with the D200, and the colors on that old brick and the new signage? Perfect straight out of camera.
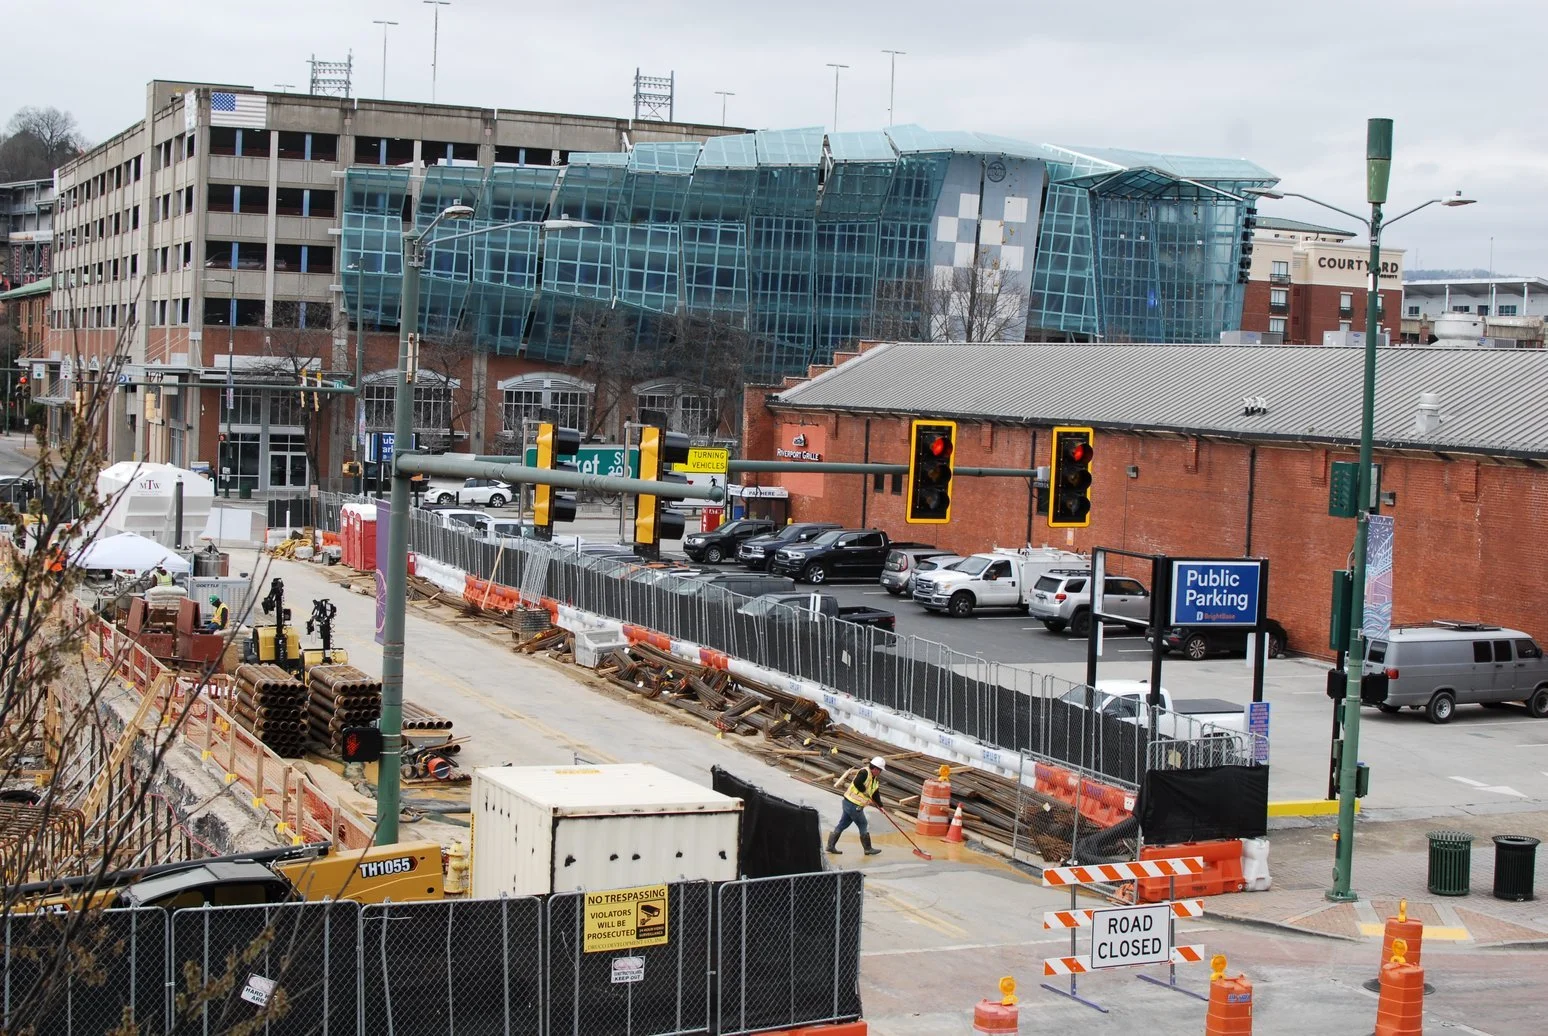
The Trolley Barn Construction
Across the street from my vantage point, they're completely changing the landscape over where the trolley barn once stood. I mean, it's a canyon! They have completely removed the old structure and are drilling these massive holes in the ground for something. At first I thought they were drilling a well, that is what it looks like, but I'm pretty sure they're just putting in pylons to stabilize the soil or set up a foundation. Whatever they're building is going to have a serious basement for this new hotel!

The nikon D200 is quite possibly the perfect camera for outings such as this where you have no idea what you will encounter. Like this construction site!
I grabbed a couple of shots of the construction site. Now, construction photography isn't the most glamorous subject, but the way the D200 renders the earth tones, the machinery, the shadows in that hole...errr...basement area...haha. Well, you just don't get that from modern sensors without a lot of post-processing work. Hold that thought (like Hugh Brownstone would say)...
Walking Broad Street and Main
I made my way down Broad Street to the “Southside”, crossed around 13th or so, and headed down to Main. Between the TVA building and that stretch, it's kind of sameness honestly. Not a lot to photograph in that particular section, but I did graba shot of the TVA complex as it looked sort of like a liminal space or something.
Urban outdoor liminal spaces are kinda hard to find, but I think this one fits. Shot on the Nikon D200 camera.
But once I got down to Main, things picked up. I stopped at an open-air building that was once a bank. The corner has the original bank logo still on it, and inside there's Blue Orleans restaurant, a barber shop, and a tattoo place down at the end of the hall.
The interesting thing about this building is it's open all the time. They can close the windows, but mostly it's just open to the street. It's got this great natural light coming through, and the D200 loves that kind of light. The dynamic range isn't huge on this old sensor, but when you expose it right? The colors are just gorgeous. Knowing that, you start looking for scenes that work for it.
The First Time for Everything
On my way back to Main street, I had a first. Usually when I hear sirens in downtown Chattanooga, it's a fire truck or an ambulance. But this time, it was something different, a police car came screaming through with lights and sirens going full tilt right by me. That was a first! He was in a huge hurry, wherever he was going.
I didn't get a photo of that moment, but I did get a good laugh out of it. If you watch my youtube video, you will see what I am talking about here...it never fails...lol.
Why CCD Sensors Are Special
Here's the thing people don't understand about CCD sensors: it's not about resolution or ISO performance or even sharpness. Modern CMOS sensors beat CCD in all those technical metrics.
But color? Color science? That's where CCD sensors and the supporting algorithm shine.
The way a CCD sensor renders color in the older Nikon cameras, especially in good light, is just different. It's smoother, more film-like, with better color separation. Reds are red, blues are blue, and skin tones are just beautiful without having to mess with them in post. Seriously, I rarely edit my D200 images at all, maybe the exposure is a little off for some reason and I need to correct that, but all the other stuff I never touch.
You don't need to do the "film look" editing dance that everyone does with modern cameras. You just shoot it, and the colors are already there. Straight out of camera.
The Colors That Made Me Fall in Love
When I get these files home and look at them on the computer, I'm always surprised by how good they look right out of the camera. The JPEGs from the D200 are perfectly usable for most things.
That brick red from old buildings. The warm tones in afternoon light. The way it handles shadows without turning them muddy. The color separation between similar tones. This is what I'm talking about when I say CCD magic.

Construction in progress on the Tivoli theater shot with the Nikon D200 camera.
Modern cameras give you more megapixels, better high ISO, faster autofocus, and video capabilities. But they don't give you these colors straight out of camera. You have to work for them in post-processing. Nikon knew something back in the day that they are not talking about now or have lost. The old engineers knew film, color film like Kodachrome and knew what people liked when it came to these film stocks so they built their color science around it. Now the new generation of photographers are wanting that color pallette again and this is pretty much the only place to find it.
The Reality Check: What This Camera Can't Do
Let me be honest about the limitations here, because I'm not going to pretend this is the perfect camera for everything:
High ISO is rough. Above ISO 800, you're going to see noise. A lot of noise. This is a camera for good light.
Autofocus is slow by modern standards. It works fine for my street photography and static subjects, but don't expect to track a bird in flight. That is a total no go with this machine… or your some sort of super human tracking machine, because the camera aint gonna do it!
10.2 megapixels is limiting if you need to crop heavily. Plan your compositions in-camera.
No video capabilities. This is a stills-only camera as it comes from the era when a camera like this was for photos and video cameras looked very different.
The LCD screen is tiny and low-resolution by today's standards. You're basically shooting and hoping until you get home to the computer. It is so low resolution that I use it to confirm the composition was right when I shot the image, but checking focus is laughable at best.
But you know what? None of that matters for what I was doing today(I didn’t even look at the screen on the back except to set the time. Walking around downtown Chattanooga, shooting architecture and street scenes in good light, this camera is more than enough. Actually, it's better than enough. It's perfect for this...for me.
The Shutter Count Question
When I got back to the truck, I mentioned I wanted to figure out how many shutter clicks this camera has on it. I've put several thousand on it since I've owned it, and I'm curious what the total count is. The D200 has a shutter rated for 100,000 actuations, and mechanically, this camera is in great shape. The count is a little over 33,000, which means this machine is essentially like new mechanically. The shutter still sounds crisp, the mirror slap is confident, and everything just works. They don't make them like this anymore, and I mean that literally. The build quality on the D200 is tank-like compared to most modern cameras.
Why I Keep Coming Back to This Camera
I own modern cameras. I've got mirrorless options. I've got cameras with better specs in every measurable way, some of which are quite costly.
But I keep coming back to the D200 for photowalks because of the experience. The colors are part of it, sure. But it's also the simplicity. The lack of distractions. The feeling of a real camera in your hands with real buttons and real dials.
When I'm shooting with the D200, I'm not checking the histogram every shot. I'm not chimping on the back screen. I'm not worried about whether I got the shot or not. I'm just shooting and trusting the camera to do what it does.
And what it does is give me beautiful photos with rich colors straight out of camera.

Ellis Resturant sign has become a local icon in the city of Chattanooga, shot with the Nikon D200 camera.
The Lesson: You Don't Need New Gear
Here's what I want you to take away from this: You can get really good photos from a camera with a CCD sensor, or to put it another way, a really old camera. They haven't made CCD sensors for new cameras in like 20 years!
If you've got an old DSLR sitting in a drawer somewhere (a Nikon D200, D2X, D70, Canon 5D, 20D, whatever), pull it out. Charge the battery (or order a new one from Amazon if your current battery is toast). Put a simple prime lens on it and go take some pictures.
I think you're going to be surprised by what you see. Especially the colors.
The camera companies want you to believe you need the latest and greatest gear to take good photos. But that's just not true. A 21-year-old camera can still produce images that will surprise you, especially if you're used to the over-processed, over-sharpened look of modern cameras “in camera” processing to get you the “straight out of camera” images. (iPhone I am looking at you...)
Final Thoughts
Market and MAin streets in Chattanooga Tn, shot with the Nikon D200 camera
This photowalk reminded me why I love photography in the first place. Not because of the gear, but because of the process. Walking around my city, seeing familiar places with fresh eyes, capturing moments and light and color.
The Nikon D200 helped me do that without getting in the way. The colors it gave me straight out of camera made editing basically unnecessary. And at the end of the day, I walked away with photos I'm proud of from a camera that's old enough to buy its own beer.
Well, if cameras could buy beer. You get what I mean...lol.
Thank you for coming along on this photowalk with me. If you've got an old camera sitting around, I challenge you to pull it out and give it a try. You might just fall in love with photography all over again.
Until next time, get your camera out and go take a picture with it!
Camera and Lens Details
Camera: Nikon D200
Released: 2005
Sensor: CCD, 10.2 megapixels, APS-C (DX format)
ISO Range: 100-1600 (extended to 3200)
Shutter: Rated for 100,000 actuations
Build: Professional magnesium alloy body
Current used price: $50-150 depending on condition
Lens: Nikon 35mm f/1.8G AF-S DX
Released: 2009
Focal length equivalent: 52.5mm on DX
Aperture: f/1.8-22
Weight: 7 oz (200g)
Current used price: $100-150
Settings Used:
Mode: Aperture priority (A)
ISO: 640 (fixed)
Focus: Back button focus, AF-C (continuous)
White balance: Auto (CCD sensors handle this well!)
Support this website by using these affiliate links to shop on Amazon:
Leica M11 Digital Rangefinder Camera
Nikon AF-S FX NIKKOR 105mm f/1.4E ED Lens
Voigtlander Nokton 35mm f/1.4 II
Sandisk 128GB Extreme Pro memory cards
Nikon 50mm f1.8 S Lens for Z mount
All photos in this post were shot with the Nikon D200 and 35mm f/1.8 DX lens. Colors are straight out of camera with minimal editing.
Testing the Nikon ZF for Wildlife Photography: Can a Retro Camera Shoot Birds?
I took the Nikon ZF (a retro-styled street photography camera) and tried to use it for serious bird photography in Florida. Does it work? The results surprised me!
Hey y'all! So I did something kind of crazy. I took the Nikon Zf (you know, that retro-styled full-frame camera that's basically designed for street photography) and tried to use it as a serious wildlife camera. And before you say "David, what are you thinking?" just hear me out because the results actually surprised me!
I was down in sunny Florida even though it was like 48 degrees (yeah, go figure with Florida weather, lol). I headed out to Chito Branch Reserve, which is a Wildlife Management Area, to see if this camera could really handle bird photography. The question I wanted to answer: can a retro-style camera meant for the street photographer and general photography market actually compete with dedicated wildlife cameras?
The Setup: 700mm of Adapted Legos
Here's what I put together and honestly it's kind of a Frankenstein setup but it works! I've got the Nikon Zf (24 megapixel full-frame sensor) adapted with the FTZ2, the TC-14E III teleconverter, and the 500mm f/4 PF Fresnel F-mount lens. This gives me about 700mm of focal length which should be plenty for birds, right?
The complete Nikon ZF wildlife photography kit: camera body, FTZ2 adapter, TC-14E III teleconverter, and 500mm f/4 PF Fresnel F-mount lens. This stack of "Legos" gives me 700mm of effective focal length with IBIS and lens VR working together for handheld shooting. It's an unconventional setup for a retro-styled camera, but it works surprisingly well!
Now why this combination? Well, if you look at the most popular camera for wildlife photography that was ever really made, it was the D500 and that was only like 20.8 megapixel (just shy of 21). The Nikon Zf is 24 megapixels! Plus it has IBIS (in-body image stabilization), and this lens has image stabilization as well, so I'm pretty sure they work together. This combination should produce some pretty stunning wildlife photos, at least in theory!
I actually took it for a test drive the day before in a neighborhood I'm staying in that has wild peacocks roaming around. The animal eye detect in the Zf works stunningly well on those peacocks! So I was feeling pretty optimistic about this Wildlife Management Area shoot.
The Reality of Wildlife Photography (It's Harder Than It Looks!)
Okay, I've got two things to say right off the bat. One is Adrian Alford makes this look so much easier than it is! I don't know if it's just me or if I'm too late in the morning, because Phil Thach will typically quit shooting after it hits a certain point in the morning. But Adrian goes out and photographs like dozens and dozens and dozens of beautiful colorful birds, and of course I don't know, maybe he's been doing it longer than me or maybe he knows the inside track that I don't know. And Phil comes away with a lot of photos too!
But man, this is kind of tough. When I first walked into the tree line (about 200 yards from the road), I heard tons of birds out by the road, but the road was real noisy and annoying. So I wanted to come back into the wildlife management area proper. Then? Nothing. Complete silence. I think I flushed all the wildlife out of the area when I first entered it.
Here's a little tidbit I learned from deer hunting with my dad when I was young: you'll spook the wildlife out of the area when you first enter it, but if you'll sit still and just sit there and be quiet, they'll kind of come back in. So that's what I did. I posted up, stayed still, and sure enough after about 5 minutes the birds started coming back into the trees around me!
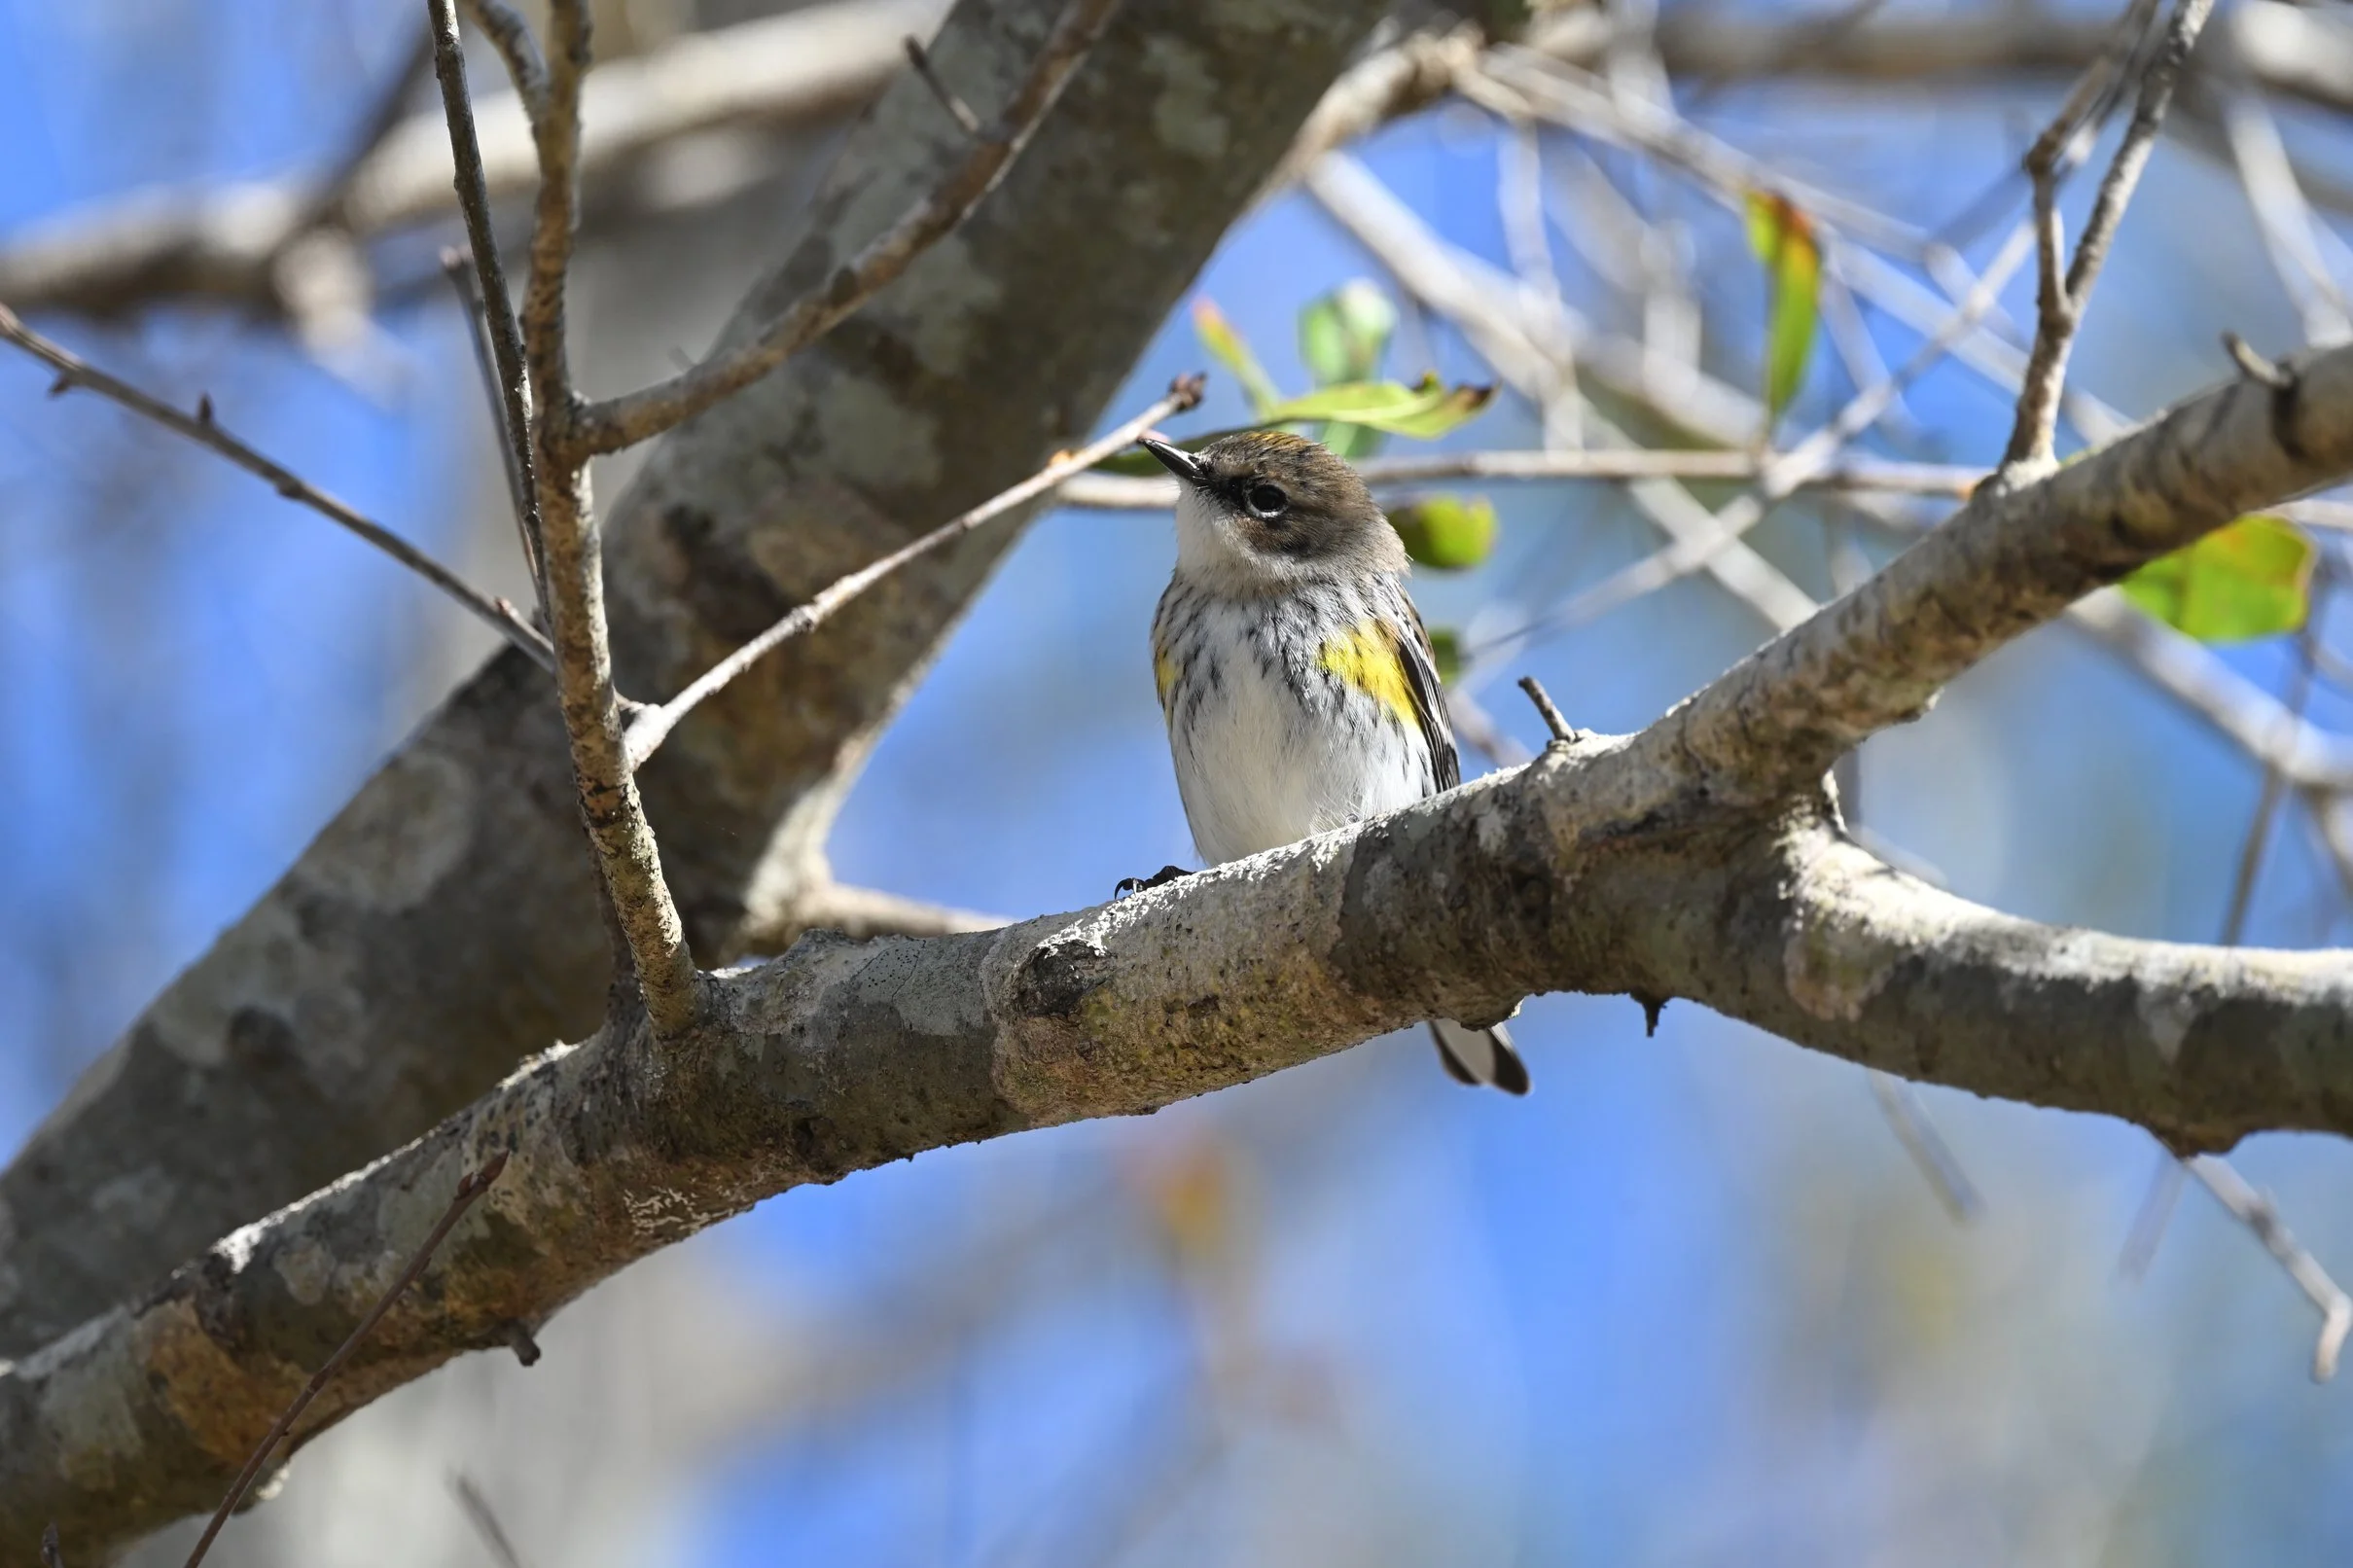
One of the songbirds I photographed at Chito Branch Reserve after posting up and waiting patiently for the birds to return. This is what 700mm gets you at about 25 feet away - the bird fills a decent portion of the frame without excessive cropping. The Nikon ZF's animal eye detection locked onto the eye perfectly once I manually got the focus close!
Sun Position Matters (A Lot!)
Walking with my back to the sun helped tremendously! I was able to get a lot more keepers that way. For the first half of my walk, I had the sun kind of in my face, and trying to balance the light was really hard. All I was getting were backlit shots where you couldn't really see the bird's colors properly.
But when I turned around and walked back toward the truck with the sun to my back? That's when things started clicking! The color of the bird would show up way better instead of all these backlit silhouettes I'd been getting. That's a definite trick you should employ if you're going to try bird photography!
I think if I'd have essentially hurried out to the end of this road before it got so late in the morning (it was 10am by the time I was really shooting), I could have made a lot better progress. The early bird gets the worm, as they say, and apparently the early photographer gets the good bird photos, lol.

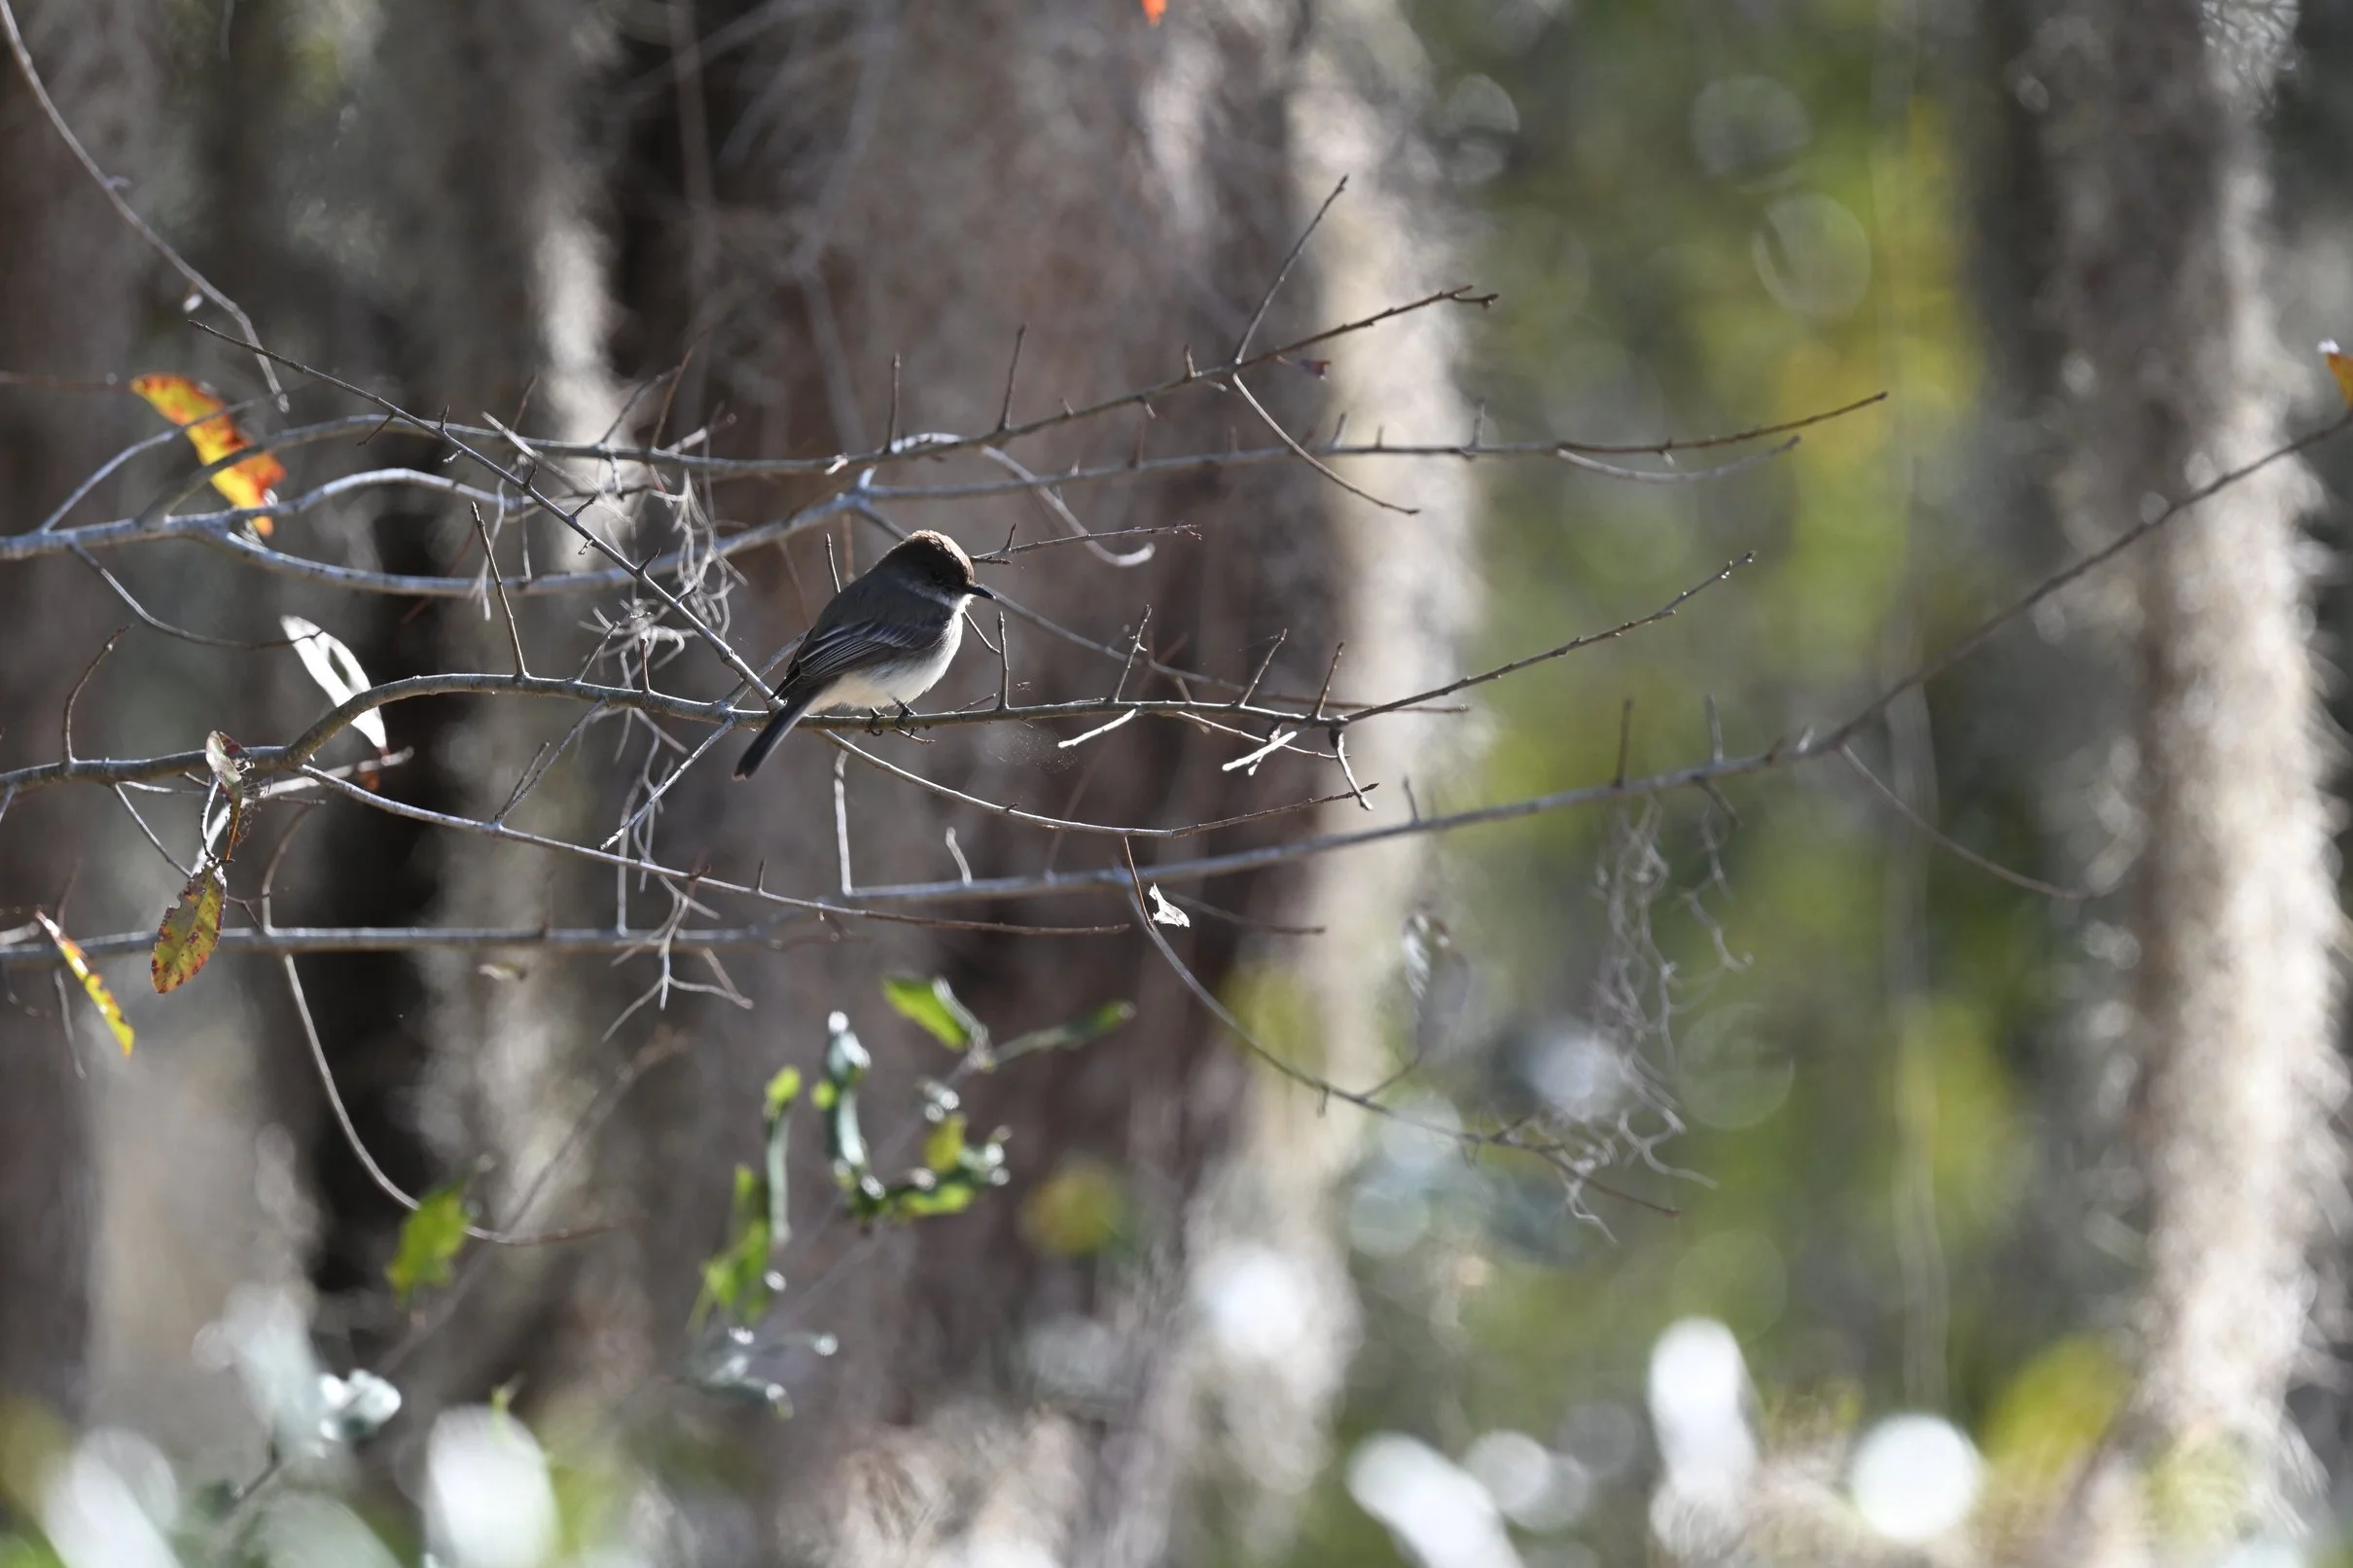
This is what happens when you get the sun behind you instead of in your face! With front lighting, you can actually see the bird's colors and details instead of just a backlit silhouette. Walking with my back to the sun dramatically improved my keeper rate during this shoot. Such a simple technique but it makes a massive difference in bird photography!
How the Autofocus Performed (Surprisingly Well!)
Here's the interesting part about using the Nikon Zf for this. The autofocus system struggled when birds were deep in the bushes or in amongst the branches on a tree. So what I would do is manually drive the focus back and forth until the bird was semi-in-focus, and then I could fire the shutter (I haven't divorced my shutter from my focus yet, so half-press still focuses for me).
But once I would get it relatively in focus (just the shape of the bird in general), it would immediately focus in and lock on the eye! So if it was anywhere close at all, it would jump right to it and nail the focus. Now if the whole thing's just straight blurry and you hit the shutter, the first thing it found is what it would focus on. But if you gave it even a little help? It worked surprisingly well!
The animal eye detection really does work stunningly well on this camera. When the bird was somewhat in focus and the camera could actually see it, boom, instant eye detection and perfect focus. Pretty impressive for a camera that's marketed as a retro street photography body!
The Nikon fF's animal eye detection in action - look at that sharp eye! Once I manually got the bird roughly in focus, the camera immediately locked onto the eye and tracked it perfectly. This is a 100% crop showing the detail you can get with 24 megapixels when you nail the focus. The combination of IBIS in the camera and VR in the lens allowed me to shoot this handheld at 700mm with no tripod needed.
The Reality of Focal Length and Sensor Resolution
Now bear this in mind (and this is important): if you're going to photograph songbird-sized birds (you know, little little ones) with this lens setup at 700mm, you need to be within about 20 to 30 feet. Anything further than that and they're so small in frame, it's kind of pointless. It's just a little speck in the frame!
But if they're inside of that range, you can get a decent photo and it'll look good. The thing is, I'm only working with 24 megapixels here. So yeah, cropping latitude is limited compared to the 45 or 60 megapixel cameras that some wildlife shooters are using these days.
With just the 500mm (without the teleconverter), they would need to be even closer, or you'd need to be photographing larger game. That's the gist of it. The TC-14E III teleconverter is what makes this setup actually viable for small birds because that extra reach really matters!
I did see quite a few different birds during the walk. Lots of little songbirds, some big white long-legged bird that I shot in the air (to be determined what it actually is, probably some kind of heron), and a whole bunch of vultures that were circling the area. At one point the vultures started slowly closing in on me and one flew right above me. I wonder if that means something, lol.
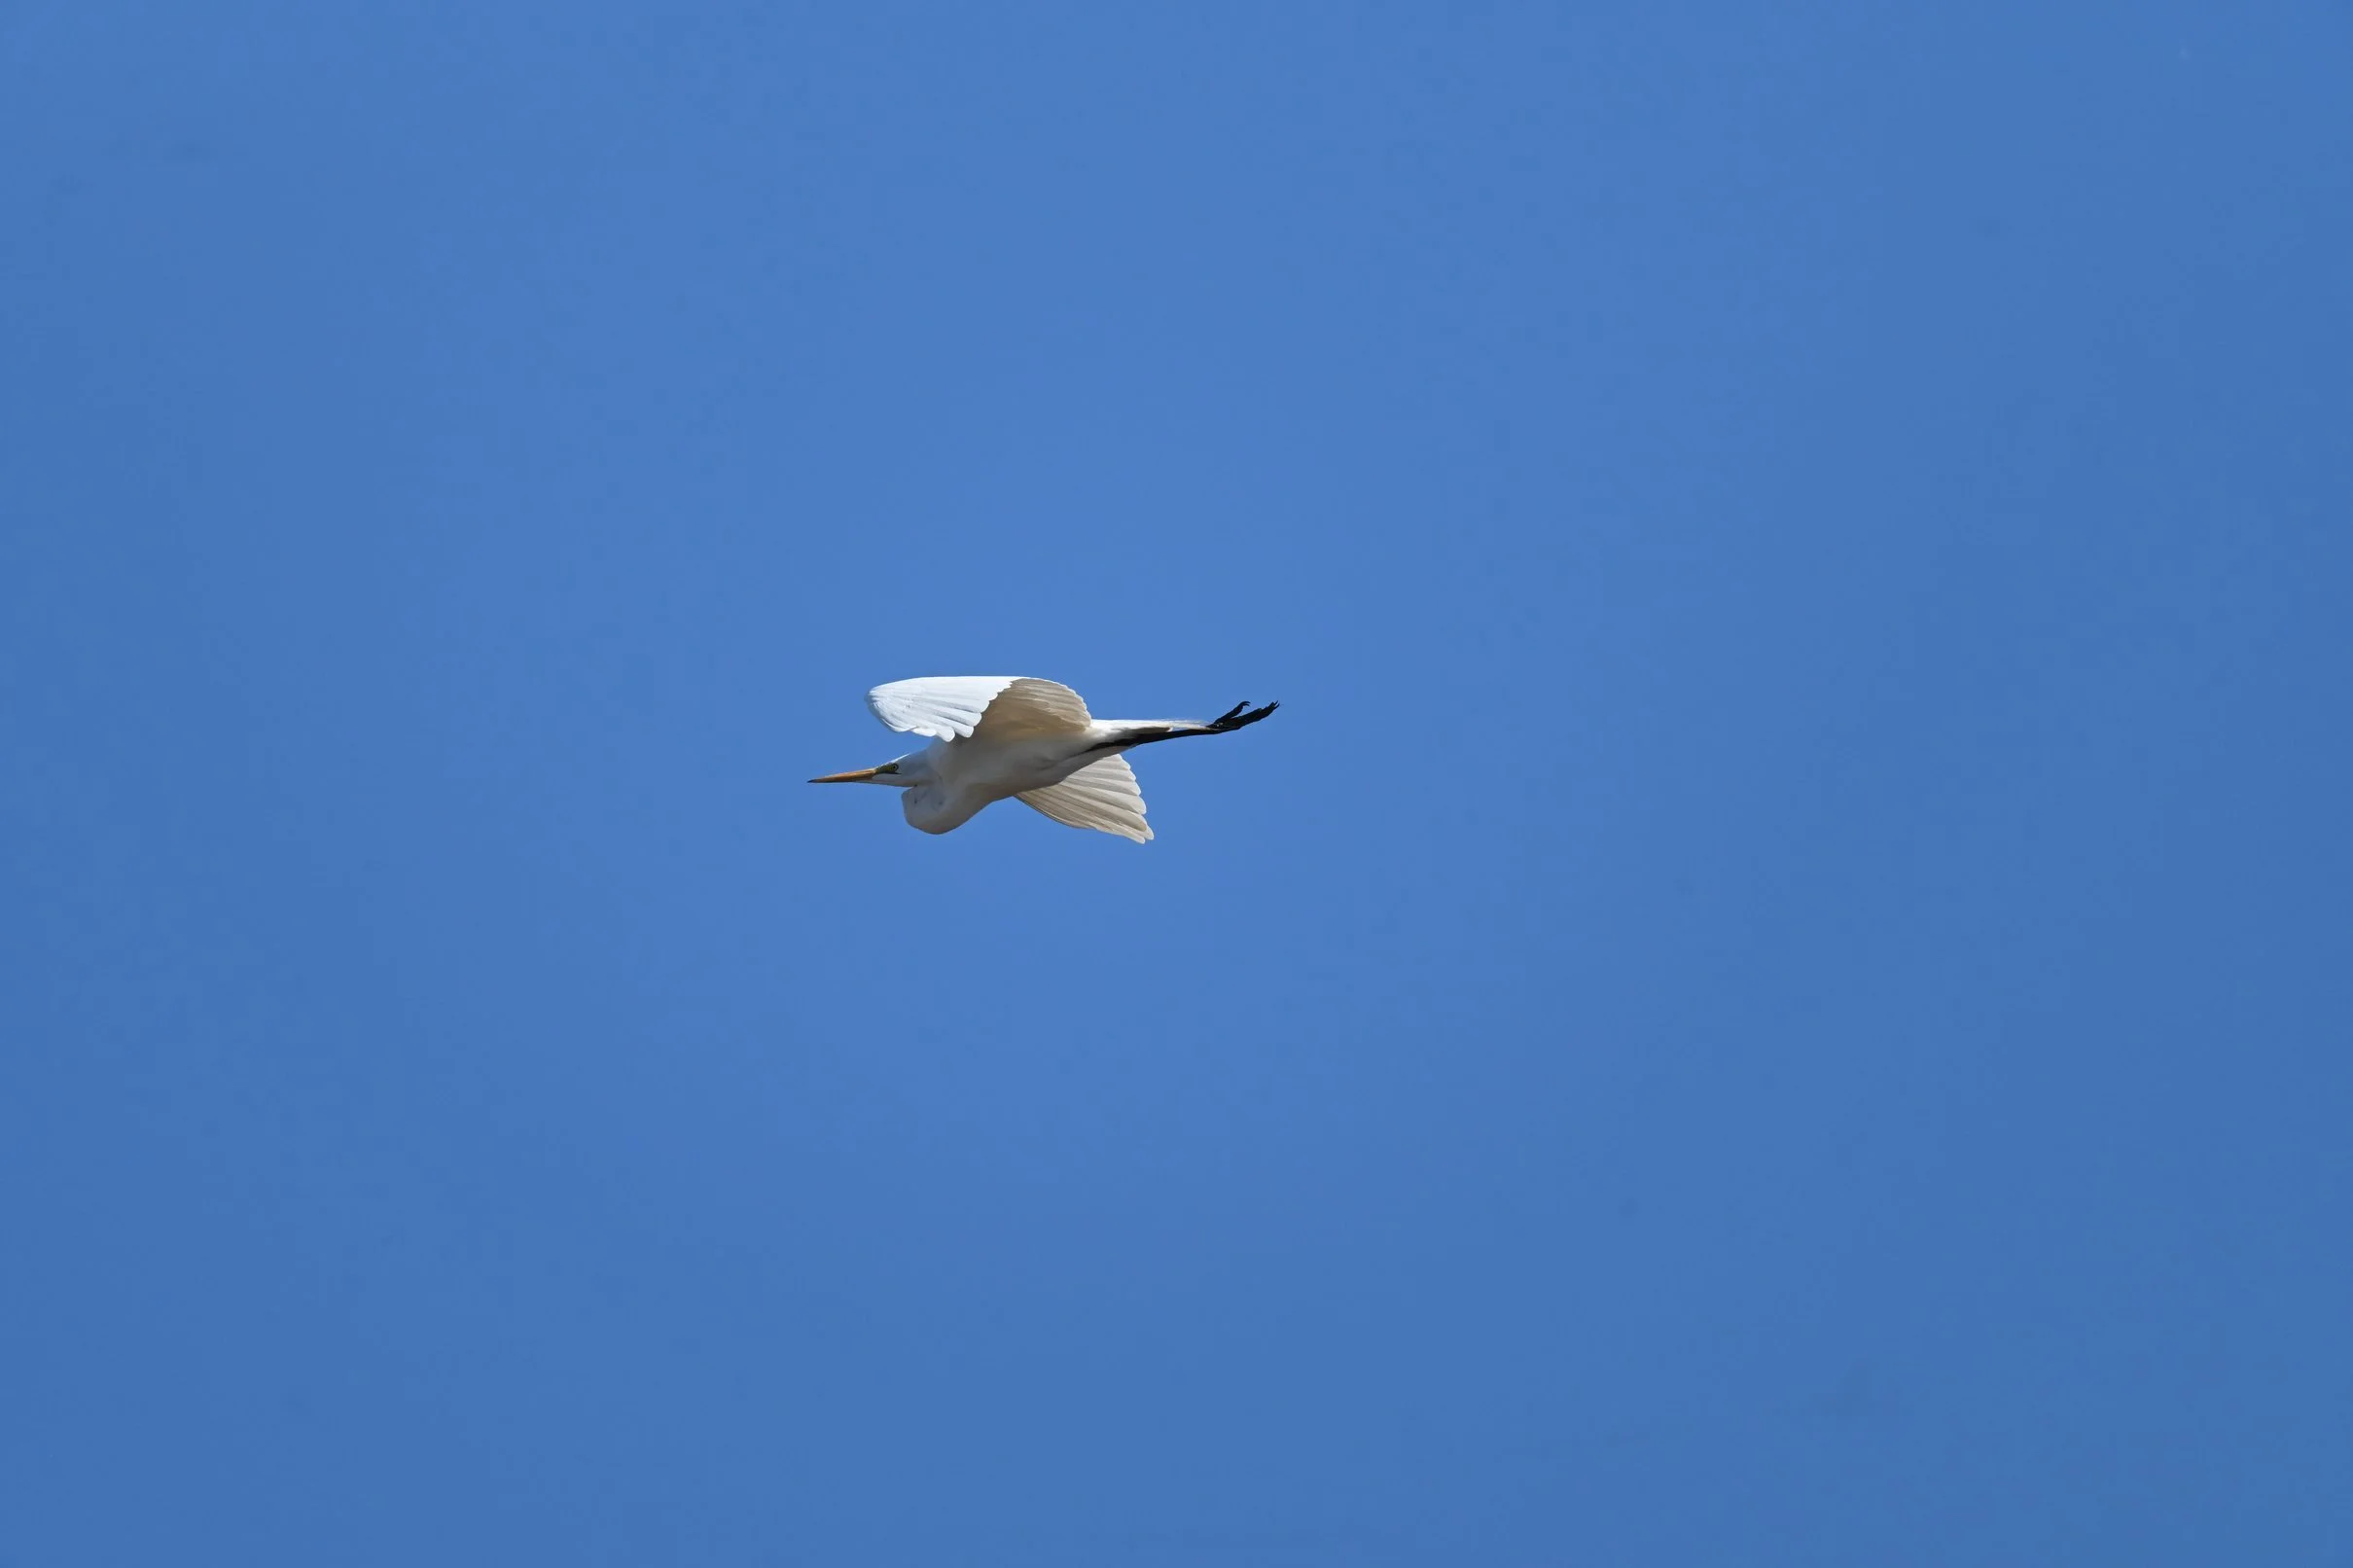
One of the Great Egret’s that I saw at Chito Branch Reserve during my shoot. Photographing birds in flight is challenging with any setup, but the Zf's continuous autofocus and animal detection made it possible to track and capture this shot. You definitely need fast shutter speeds for flight shots, I was shooting at 1/2000th or faster to freeze the wing movement!
Shooting Technique Tips I Learned
A lot of the birds I photographed were up higher in the trees, so I was shooting almost straight up into the branches. Occasionally one would land almost eye level with me and I could get a side shot, but most of the time I'm shooting up at them. It's obvious that there are techniques to this that I'm still learning!
The standing still and waiting technique really did work though. I finally stopped at a point where there were quite a few birds in the surrounding area and I just stood there for about 5 minutes. They started coming into the trees and I got all these photos, and some of them are actually pretty cool! Some of them are kind of meh (shooting straight up into trees isn't ideal), but I got enough keepers to call it a success.
The Verdict: This Camera and Lens Combination Works!
So after spending a morning at Chito Branch Reserve trying to make the Nikon Zf work as a wildlife camera, here's my conclusion: this camera and lens combination seems to perform shockingly well!
Is it perfect? No. The autofocus needs help finding birds in busy backgrounds. The 24 megapixels limits your cropping ability compared to higher resolution bodies. And you really do need to get close to small birds (20-30 feet range).
But does it work? Absolutely! The animal eye detection is fantastic once it acquires the subject. The IBIS combined with the lens VR means you can shoot handheld at 700mm and get sharp results. The image quality is excellent. And honestly, this is producing really interesting results that I'm happy with!
This is actually a pretty viable kit for wildlife photography if you're willing to work within its limitations. With the TC-14E III teleconverter, I'm able to get the Nikon Zf and the 500mm PF Fresnel F-mount lens to actually do some good work on birds. And like I said, I'm shooting all of this mounted together with the FTZ2, so I've got a pretty good kit of Legos going here on this camera!
If you want to see all of this in action, check out the video I shot during this session (link to YouTube video). You can see the actual bird photos I got, watch me stumbling around trying to find subjects, and hear me ramble about vultures circling overhead, lol.
So with that, I appreciate y'all! And until next time, get your camera out and go take a picture with it!
Camera Gear Used
Camera: Nikon Zf (24MP full-frame) Lens: Nikon 500mm f/4 PF Fresnel F-mount Teleconverter: TC-14E III (1.4x) Adapter: FTZ2 Effective Focal Length: ~700mm Location: Chito Branch Reserve, Florida (Wildlife Management Area)
Watch the full video:David Saylors YouTube Video Link
Other wildlife photography posts:Cataloochee Elk Photography Blog Post
Frequently Asked Questions About Using the Nikon ZF for Wildlife Photography
Can you really use the Nikon Zf for wildlife photography?
Yes, absolutely! And honestly, it surprised me how well it works. The Nikon ZF is marketed as a retro-styled camera for street photographers and general photography, but it's got some serious specs that make it viable for wildlife. It's got a 24 megapixel full-frame sensor (which is actually more than the legendary D500 had at 20.8MP), it's got IBIS (in-body image stabilization), and the animal eye detection works stunningly well once it locks onto a subject. Is it perfect? No. But does it work? Absolutely! I spent a morning at Chito Branch Reserve in Florida photographing birds and came away with some really good keepers. The key is understanding the limitations and working within them, which I'll talk about in the other questions here.
What focal length do you need for bird photography with the Nikon Zf?
For songbird-sized birds (the little ones), you need serious reach! I was using 700mm of effective focal length (500mm PF lens + TC-14E III 1.4x teleconverter on the full-frame ZF), and you need to be within about 20 to 30 feet of the birds to get a decent shot. Anything further than that and they're so small in frame, it's kind of pointless. It's just a little speck! Now if you're photographing larger birds like herons, egrets, or hawks, you can get away with less reach. But for little songbirds? 700mm and get close, or you're going to be cropping like crazy. And with only 24 megapixels, your cropping latitude is limited compared to those 45 or 60 megapixel bodies that some wildlife shooters are using.
Does the Nikon Zf autofocus work well for bird photography?
It works surprisingly well, but with some caveats! When birds are deep in the bushes or in amongst the branches on a tree, the autofocus struggles to find them. What I would do is manually drive the focus back and forth until the bird was semi-in-focus, and then the camera would immediately lock on and grab the eye! The animal eye detection is fantastic once it can actually see the bird. So if you give it even a little help by getting it close to focus, boom, it jumps right to the eye and nails it. But if the whole thing's just straight blurry and you hit the shutter, it'll focus on the first thing it finds (usually a branch, lol). The trick is getting it close, then letting the eye detect take over!
What time of day is best for wildlife photography?
Early morning! I learned this the hard way, haha. I was shooting around 10am and it was already kind of late. Phil Thach will typically quit shooting after it hits a certain point in the morning because the light gets harsh and the birds are less active. Adrian Alford makes this look so easy with dozens and dozens of beautiful bird photos, but I think he's out there at the crack of dawn getting the good light and active birds! If I'd have hurried out to the end of that road before it got so late in the morning, I could have made a lot better progress. The early bird gets the worm, and apparently the early photographer gets the good bird photos too!
Why does sun position matter for bird photography?
Oh man, this makes a huge difference! For the first half of my walk, I had the sun kind of in my face, and all I was getting were backlit shots where you couldn't see the bird's colors at all. Just silhouettes basically. But when I turned around and walked back with the sun to my back? That's when things started clicking! The color of the bird would show up way better, the details were visible, and the photos just looked so much better. Walking with my back to the sun helped tremendously and I was able to get a lot more keepers that way. That's a definite trick you should employ for bird photography!
How does the FTZ2 adapter affect autofocus performance?
The FTZ2 adapter works really well! I'm using it to mount the F-mount 500mm PF lens on the Z-mount ZF body, and honestly I didn't notice any autofocus lag or issues that were caused by the adapter itself. The struggles I had finding birds in busy backgrounds would have happened with a native Z-mount lens too because that's more about the camera's detection system than the adapter. The adapter just passes through the focus commands and it does it quickly. So if you've got good F-mount glass like the 500mm PF, don't hesitate to use it on the ZF with the FTZ2!
What's the advantage of using a teleconverter vs cropping in post?
Great question! The TC-14E III teleconverter gives me 1.4x more reach (500mm becomes 700mm), which means the bird is actually larger in the frame to begin with. When you crop in post, you're throwing away pixels and reducing your final resolution. With only 24 megapixels to start with, I don't have a ton of cropping room! The teleconverter gives me more reach optically, so the bird fills more of the frame, and I keep all my pixels. The downside? You lose some light (about 1 stop with a 1.4x converter) and maybe a tiny bit of sharpness. But for small birds, that extra reach is absolutely worth it!
How do you keep birds from being spooked when you walk into an area?
Another trick I learned from deer hunting with my dad when I was young: you'll spook the wildlife out of the area when you first enter it, but if you'll sit still and just be quiet, they'll kind of come back in! When I first walked into the tree line at Chito Branch Reserve, I heard tons of birds, but then complete silence after I got about 200 yards in. I think I flushed them all out. So I posted up, stayed still for about 5 minutes, and sure enough the birds started coming back into the trees around me! Patience is key. Don't just walk through constantly, stop and let the wildlife settle down and they'll resume their normal behavior.
Is 24 megapixels enough for wildlife photography?
It depends on what you're doing with the photos! For web use, social media, and even moderate-sized prints, 24 megapixels is plenty. The legendary D500 was only 20.8 megapixels and wildlife photographers loved that camera! The limitation comes when you need to crop heavily or make really large prints. With 24MP, you don't have as much cropping latitude as you would with a 45 or 60 megapixel body. But here's the thing: if you get close enough to your subject and compose well in-camera, 24 megapixels is absolutely fine! The image quality from the Zf is excellent, and that's what really matters.
What mistakes did you make that beginners should avoid?
Oh man, where do I start, lol! First, I started too late in the morning (get out at dawn!). Second, I initially walked with the sun in my face instead of behind me (back-lit birds don't show color well!). Third, I kept the camera powered on while walking and it kept taking photos of the sky when I bumped the shutter (turn it off while walking!). Fourth, I tried to shoot birds that were too far away (get within 20-30 feet for songbirds!). And fifth, I expected the autofocus to find birds in super busy backgrounds without any help (manually get it close first, then let eye detect take over!). Learn from my mistakes and you'll have better success!
BONUS QUESTION: Is the Nikon Zf + 500mm PF + TC-14E III a good wildlife kit?
This is actually a pretty viable kit for wildlife photography if you're willing to work within its limitations! The combination gives you 700mm of reach, excellent image quality, IBIS + lens VR for sharp handheld shots, and fantastic animal eye detection. It's not as specialized as a D500 or Z9, but it absolutely works! I came away with some really good bird photos that I'm happy with. The camera and lens combination seems to perform shockingly well considering the ZF wasn't designed for this purpose. So if you've got a ZF and you want to try bird photography? Go for it! Just get the TC-14E III teleconverter to give you more reach, get out early in the morning, keep the sun behind you, and have fun with it!
Support this website by using these affiliate links to shop on Amazon:
Leica M11 Digital Rangefinder Camera
Nikon AF-S FX NIKKOR 105mm f/1.4E ED Lens
Voigtlander Nokton 35mm f/1.4 II
Sandisk 128GB Extreme Pro memory cards
Doosan Lynx CNC Memory Battery Failure: How a DIY Monitor Circuit Caught It
Finally saw this project in action! Today the battery monitor circuit did it’s job and alerted us to a low battery voltage condition on the memory batteries on Lynx 2. The machinist powered up the machine and this came on a few seconds later. What happens internally is as follows. The machine is powered on, then a 2 second times runs out to allow all the voltages to stabilize. Once the timer ends, there is a comparator circuit that compares the battery voltage level to the LM7805 5 volt regulator in a logic NAND gate.
Losing machine parameters on a CNC turning center means hours of downtime and a painful parameter recovery process, assuming you even have a backup. On our Doosan Lynx #2 (in our shop we have two of these machines), we had already lost parameters once before I built and installed a homebrew low voltage monitor circuit on the memory battery bank. Today that circuit did exactly what it was designed to do, and we caught a failing battery before it became a crisis. Here is what triggered the alarm and what I found when I pulled the batteries for testing.
Doosan Lynx memory battery issue…
Today saw this project in action! Today the Doosan Lynx battery monitor circuit did it’s job and alerted us to a low battery voltage condition on the memory batteries on Lynx 2. The machinist powered up the machine and this came on a few seconds later. What happens internally is as follows. The machine is powered on, then a 2 second times runs out to allow all the voltages to stabilize. Once the timer ends, there is a comparator circuit that compares the battery voltage level to the volt regulator in a logic NAND gate. If either input goes low, it will trigger the illuminated sign you see in this photo. After the gate decides the lamp needs to turn on, it fires a opto-isolator which in turn fires an SCR that feeds 12 volts to the LED bank. I chose an SCR because of the “latching” feature it exhibits when powered with DC voltage. All of this is explained in much better detail in the blog post here where I build and install it.

Voltage monitor circuit in “trip” mode showing that the battery bank needs attention.
The next three photos show what each battery measured when out of the machine. You read that right, the FIRST THREE batteries measured these values. This adds up to 3.8011 volts DC for these three batteries. The one that measured .9839 is odd to me as it discharged much faster than the other three batteries. But then again the 4th battery is probably the worst problem to solve. This battery is strange as you will see.
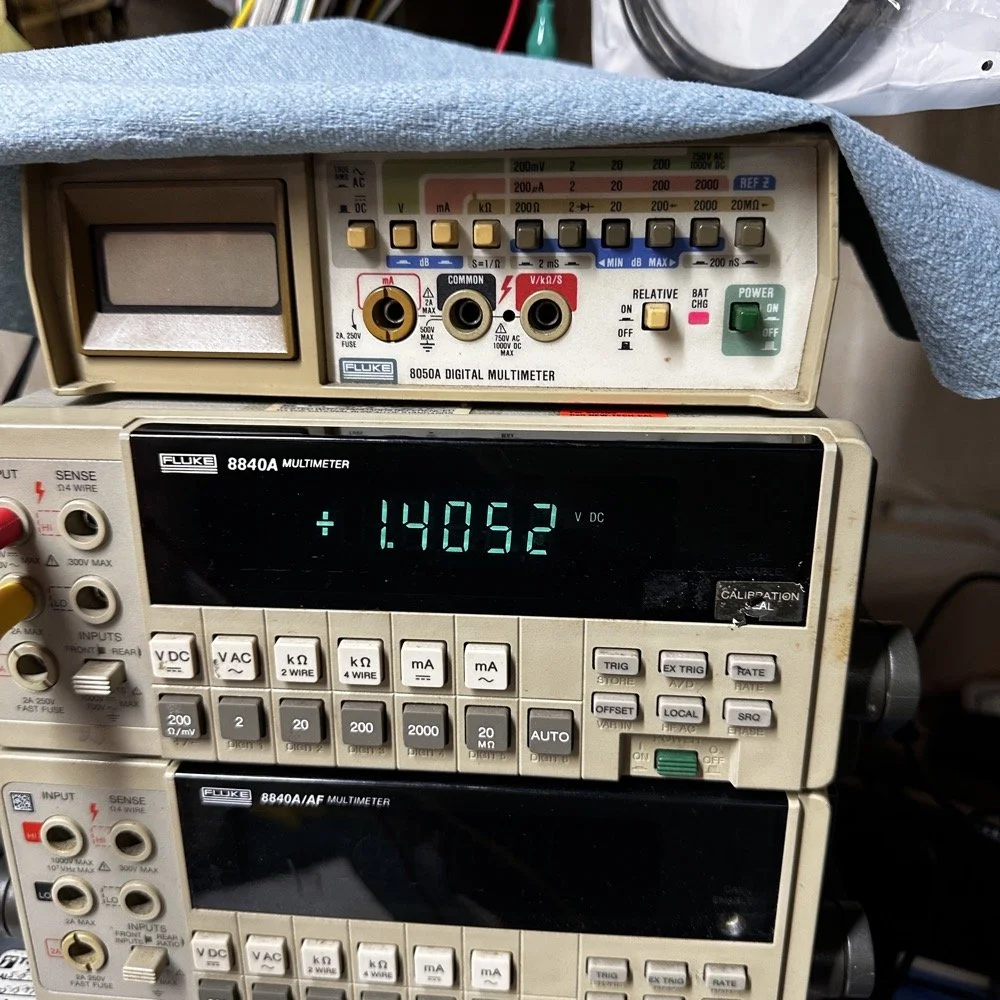
Fluke 8840 precision bench multi-meter showing voltage measurement for the 1st battery.
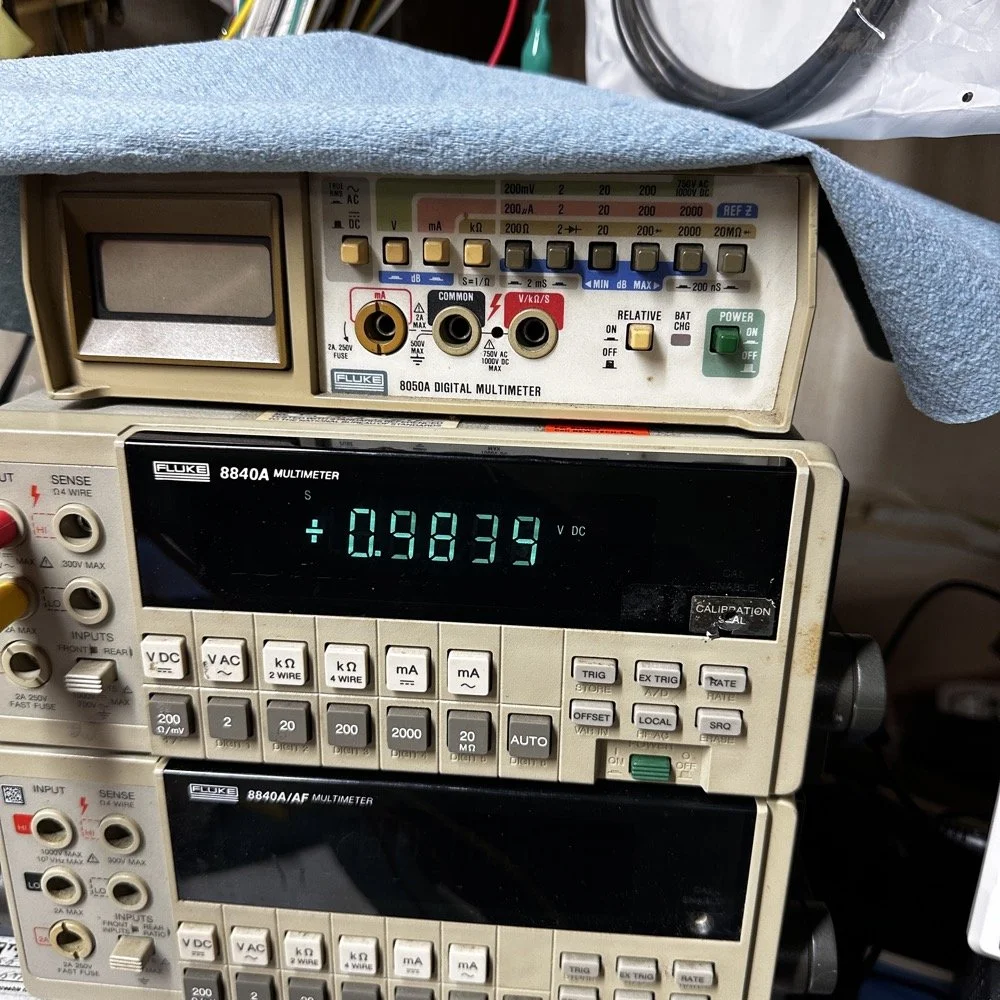
Fluke 8840 precision bench multi-meter showing voltage measurement for the 2nd battery.
Fluke 8840 precision bench multi-meter showing voltage measurement for the 3rd battery.
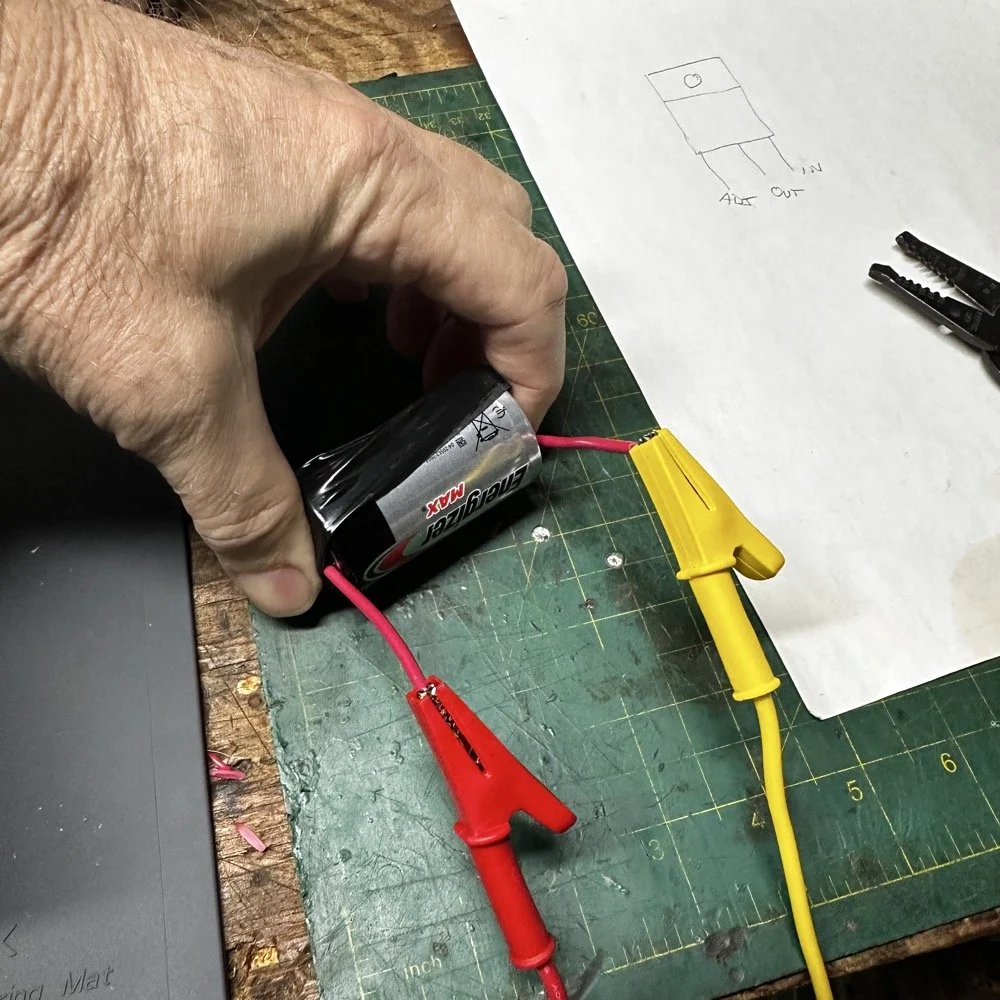
Failing Alkaline Battery and Testing to find the Fault
The first photo below is of me applying pressure to the battery. I found that I could apply pressure to the battery diagonally in one direction and get the measurement you see below on the Fluke 8840A Bench Multi-meter. .9878 doesn’t seem all that odd at first, but what it would do is as follows. I could hold this pressure and the longer I held it the lower the voltage went, eventually getting down to .3357 volts. Now, comes the odd part, I could apply pressure diagonally in the opposite direction and the voltage would lock in at the lower value of 1.4055 VDC.
I am fairly certain that this battery was most likely operating at the 1.4055 level when it was installed and when the other one dropped to less than 1 volt, this brought the supply to 5.2066VDC. I had adjusted the level to trip right around 5.3 VDC if memory serves me. It might be between 5.3 VDC and 5.4VDC come to think of it as the adjustment was kind of touchy to be honest. Either way, I think this faulty battery dropped today after power up due to a bad connection INSIDE the battery and this is what triggered the alarm. Crisis averted and the system I put in place to watch these batteries worked exactly as it should and warned us before we lost the machine parameters…again.
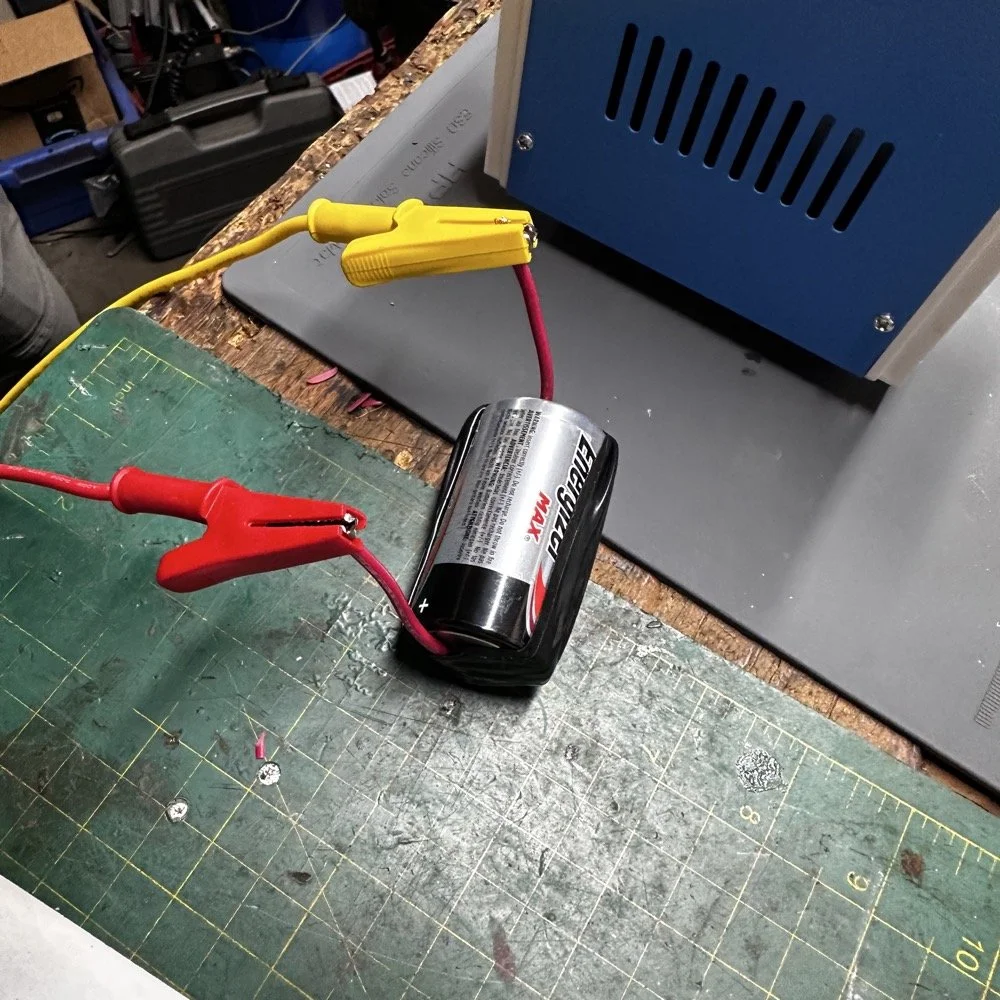
Energizer battery under test in the home lab after the voltage monitor circuit found the battery bank output low.
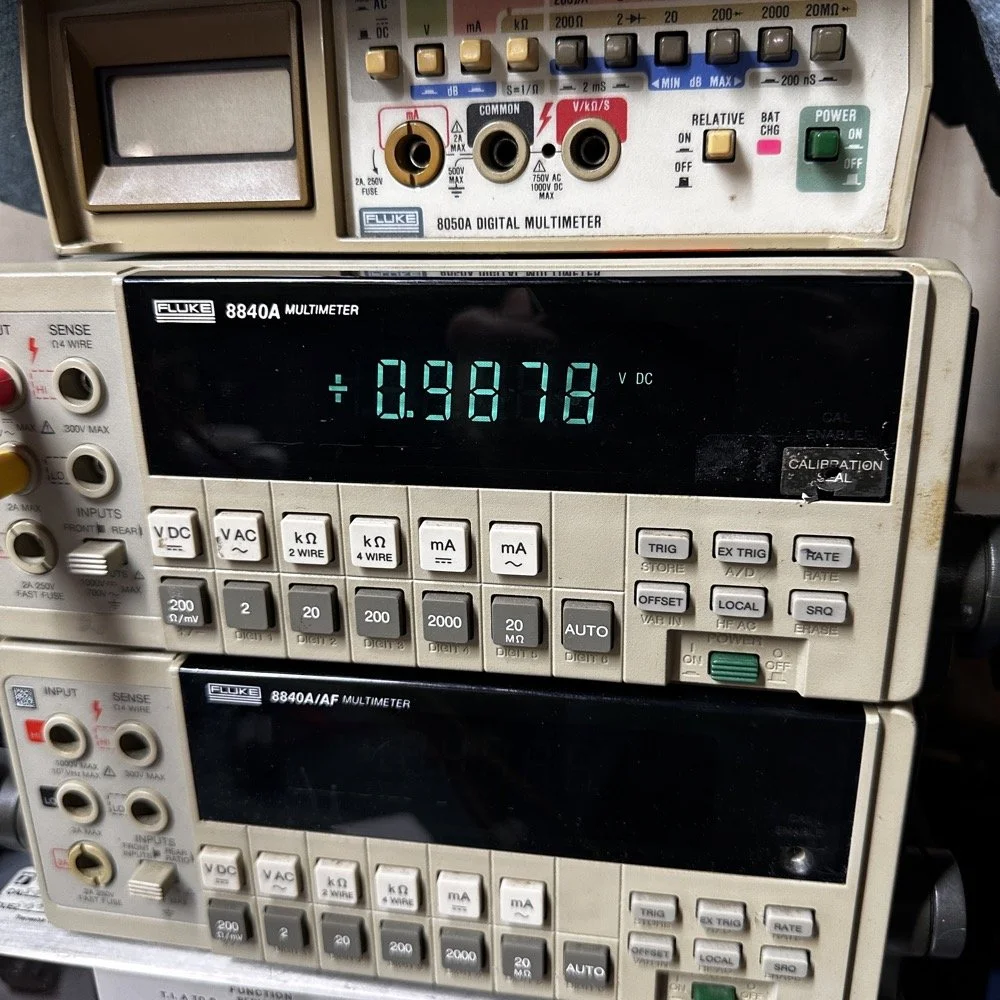
Fluke 8840 precision bench multi-meter showing the measured voltage on the bad cell with the loose connection in the first direction.
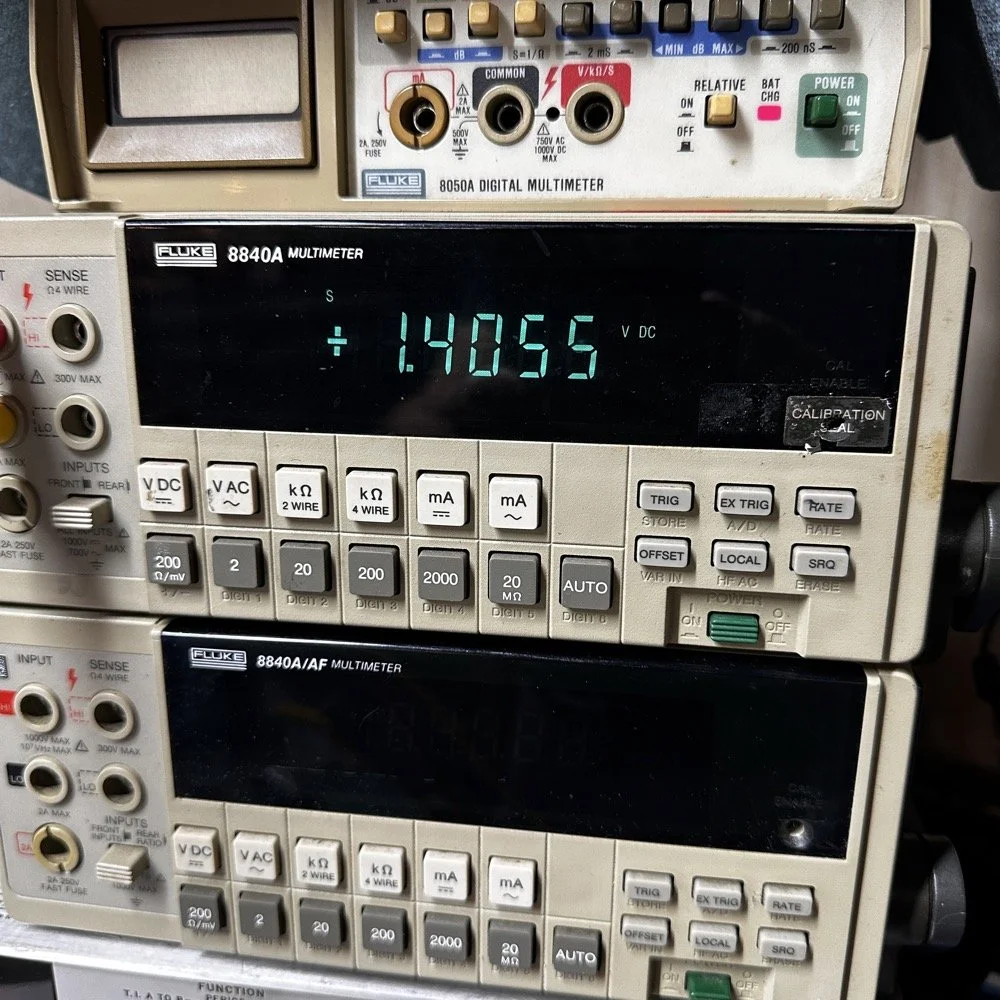
Fluke 8840 precision bench multi-meter showing the measured voltage on the bad cell with the loose connection in the opposite direction.
Battery Monitor proves itself Wrap Up
Apparently the brand or type of battery makes little difference when it comes to these applications. One had a high discharge rate and one had a loose internal connection out of 4 batteries! I guess it goes to show that even the best brands have an off day every once in a while. In closing, I am really happy with how this battery monitor circuit turned out even though I chose a different path to detect the voltage with than the usual Zener diode means and it still worked like I wanted. This also allowed me to work with some simple logic gates as well to see how they can perform in discreet component and well as analog projects too. The blending of digital and analog projects is a lot of fun and a great way to learn more about electronics. Also, these kinds of parts are fairly inexpensive too so you can afford to do some experimenting along the way.
Help support this website by following these affiliate links when you shop at Amazon:
HDS272S Oscilloscope (My Favorite Portable Scope-Meter)
KAIWEETS Smart Multimeter (My meter I keep in the truck)
Kaisi Extra Large Soldering Mat
No Clean Soldering Flux (All flux needs to be cleaned off but I like this best)
See you soon! ~David
Street Photography with a 105mm Lens: Breaking All the Rules (and Loving It)
Recently I went to downtown Tampa Florida to shoot some street photography but ended up taking the wrong camera with me. Instead of my Leica CL and the 35mm TTartisan lens, I had taken the Nikon Zf with the Nikkor 105mm f1.4 F mount prime lens instead. At the end of the day, all went really well with the equipment supplied, but it did prove challenging at times.
Is 105mm too long for street photography? I used to think so. But after taking my Nikon Zf and 105mm f1.4 lens to the streets of Tampa, I discovered that telephoto street photography offers unique advantages that traditional 35mm and 50mm lenses can't match. Here's everything I learned about using a 105mm lens for street photography.
The 105mm f1.4's compression effect isolates subjects beautifully in busy urban environments
If you've spent any time reading about street photography online, you've probably been told a thousand times that you need a 35mm or 50mm lens. Maybe a 28mm if you're feeling adventurous. The "experts" will tell you that anything longer is impractical, that you can't capture the decisive moment with a telephoto, that you'll be too far from your subject to get that authentic street vibe. Well… here I am doing the exact opposite with my Nikon Zf and 105mm f1.4 lens, and honestly, I'm having more fun than I've had with street photography in years.
How I Got Here (Or: My Descent Into Madness)
Let me back up a bit. I've been shooting street for a while now, mostly with the conventional focal lengths everyone recommends. My Leica glass, vintage manual focus lenses, the whole kit that's supposedly "right" for street work. And don't get me wrong, those setups work great. But lately I've been noticing something… I was shooting the same kinds of shots, standing at the same distances, looking for the same moments. It had become, should I say it… predictable.
Then I picked up the 105mm f1.4 for the Nikon Zf. I had initially bought it to photograph Sacred Harp singings only, but it is too nice to just leave it put away in the cabinet till just those events happen. This lens is an absolute monster in every sense of the word. It's heavy, it's expensive, and according to conventional wisdom, it has absolutely no business being on a camera for street photography. The focal length is "too long", the lens is "too conspicuous", and you'll "never be able to react fast enough." I heard all of these things in my head as I mounted it on the camera for the first time.
You know what happened? I completely ignored all that advice and took it out to Tampa anyway.
At f1.4, the 105mm creates layers of depth impossible with wider lenses
The Reality of 105mm Street Photography: Compression and Perspective
Here's the thing that nobody tells you about shooting street with a longer lens… it fundamentally changes how you see. With a 35mm or 50mm, you're looking at scenes, at environments, at people in context. With the 105mm, you're hunting for moments, for expressions, for layers of depth that compress into each other in ways that wider lenses simply can't achieve. Unlike traditional street photography lenses like 35mm or 50mm, the 105mm focal length has a very unique look to it.
Walking around Tampa (which if you haven't been here, has some fantastic street photography opportunities between Ybor City, downtown Tampa, and the waterfront (just to name the obvious), I found myself looking at the city completely differently. I wasn't trying to capture the whole scene anymore. I was looking for isolated moments… the way sunlight catches someone's face three blocks away(yeah this is an exaggeration, but you get the point haha), the compression of people at different distances along a sidewalk, the details that you'd never notice with a wider view.
Now, to be completely transparent about it, there are some real challenges here. The 105mm f1.4 is not a small lens. You're not being subtle when you raise this thing to your eye. I've sort of made peace with this though. Over the years I have come to realize that most people just don't care if you're taking photos in public spaces. The ones that do care will let you know and I just delete their image anyway as I don't want photos of someone who isn't happy with me taking their photo. Win-win in my book.
Nikon 105mm f1.4 Settings for Street Photography (Because We Can't Ignore It)
Let's talk about the practical stuff for a minute. At 105mm, your depth of field is razor thin, especially at f1.4. This means two things:
My street photography setup: Nikon Zf with Nikkor 105mm f1.4E ED
You need to be absolutely nailing your focus. With the Nikon Zf's excellent eye-detect AF, this is actually less of a problem than you'd think. The camera does most of the heavy lifting here.
The background separation is absolutely incredible. I mean, as Thomas Heaton would put it “Absolutely stunning”. You can shoot a photo of someone on a busy street and the background melts into this beautiful blur that makes your subject pop in ways that are impossible with wider apertures on shorter lenses.
For more information about the 105mm f1.4 F mount Nikkor lens, you can find it on the Nikon Official website here.
The compression effect at 105mm creates visual layers that draw the eye through the frame
The compression effect is the other huge technical advantage. When you're shooting down a street, people at different distances compress together in the frame, creating layers that add so much visual interest. It's like… have you ever noticed how in a good photo there's often this sense of depth, of things happening at multiple distances? The 105mm makes that almost automatic if you position yourself right.
Distance estimation becomes important though. At 105mm, you're often 20-30 feet or more from your subject. This actually works in your favor in some ways. People are less likely to notice you, and even if they do, you're far enough away that it doesn't feel as invasive. But you also need to be thinking about your working distance. I've learned to scan ahead as I walk, looking for potential shots that are developing 20-40 feet in front of me rather than right in my face. It also works really well for the wide city avenues you tend to find in major city downtown areas. You can shoot photos across the street and it looks good.

What I've Learned About Light
The f1.4 aperture is a godsend for street photography. Tampa's got some interesting lighting situations… bright sun one minute, then you duck under an awning or into a covered walkway and suddenly you're down 3 stops. With this lens wide open, I can keep shooting in conditions where my other lenses would be struggling.
Dark shade really is about 3 stops lower than direct sun, and I'm constantly making that mental calculation as I move through the city. The beauty of shooting with such a fast lens is that I can stay at f1.4 and just adjust my shutter speed for most situations. I've got my Zf set up with a couple of user profiles… one for bright sun at f5.6 or f8, and another for low light wide open. Takes literally two seconds to switch between them. If I particularly lazy, I will just throw the camera into Aperture Priority and let it set the shutter speed for me, with f1.4 and ISO 640 it will ALWAYS freeze the action whether in the shade or the sun…
This makes the Nikon 105mm f1.4 ideal for low-light street photography situations that would challenge slower lenses.
Why Telephoto Lenses Work for Street Photography
Look, I'm not saying everyone should go out and buy a 105mm f1.4 for street photography (though if you have one, you absolutely should try it). What I am saying is that sometimes the conventional wisdom in photography is… well, it's just conventional. It's not wrong, but it's also not the only way.
There's something liberating about shooting street with a lens that you're "not supposed to" use. It forces you to slow down, to really look at what you're doing, to be more intentional about your compositions. You can't just spray and pray at 105mm (well, you can but it probably isnt going to do you much good…haha). You have to wait for the moment, anticipate where your subject is going to be, think about your background and foreground elements a little and so fourth.
When researching the best focal length for street photography, you'll rarely see telephoto lenses recommended. But 105mm street photography offers a completely different perspective that can set your work apart.
In a weird way, it's brought me back to what I loved about manual focus vintage lenses. It's engaging. Every shot requires thought and intention. And honestly, that makes the keepers so much more satisfying when you nail one just to be honest about it.
The Setup
Since people always ask… here's what I'm working with:
Nikon Zf (which I absolutely love for this kind of work)
Nikon 105mm f1.4E ED
Usually shooting in aperture priority, Auto ISO (today all were at f1.4)
Focus mode: AF-C with eye detection
RAW + JPEG (though I rarely use the RAWs these days)
User profiles saved for different lighting conditions
The Zf is perfect for this because it's not overly large, has excellent AF, and the files are just gorgeous. The vintage-inspired controls mean I'm always aware of my settings without taking the camera from my eye.
See my complete photography gear setup here.
Frequently Asked Questions About 105mm Street Photography
Is 105mm too long for street photography?
No, 105mm is not too long for street photography. While unconventional compared to the traditional 35mm or 50mm focal lengths, the 105mm lens offers unique advantages that can actually improve your street photography. The longer focal length provides exceptional compression effects, beautiful subject isolation through shallow depth of field, and the ability to capture genuine candid moments from a comfortable distance without disturbing your subjects. I've found that shooting with the Nikon 105mm f1.4 in Tampa has completely changed how I see and compose street scenes.
What are the best camera settings for 105mm street photography?
For the Nikon 105mm f1.4 on my Nikon Zf, I typically use these settings:
Aperture: f1.4 for maximum bokeh and low-light performance (or f5.6-f8 in bright sun)
ISO: Auto ISO ranging from 640 to 6400
Shutter Speed: 1/250s minimum to freeze motion (Aperture Priority handles this)
Focus Mode: AF-C (continuous autofocus) with eye detection enabled
File Format: RAW + JPEG (though I mostly use the JPEGs)
The fast f1.4 aperture is crucial - it allows you to maintain fast shutter speeds even when you duck under awnings or into shaded areas where the light can drop by 3 stops.
Can you use a telephoto lens for street photography?
Absolutely! Telephoto lenses like the 105mm, 85mm, or even 135mm can be excellent choices for street photography. They offer a different creative approach compared to wide-angle lenses. With a telephoto lens, you can:
Compress perspective to create layered compositions
Isolate subjects with beautiful background blur
Shoot from 20-40 feet away, making candid photography easier
Capture details and expressions that wider lenses would miss
The key is understanding that telephoto street photography requires a different technique - you need to anticipate moments, work with compression effects, and be comfortable with your working distance.
What is the best lens for street photography?
There's no single "best" lens for street photography - it depends on your style and what excites you to shoot. Traditional wisdom says 35mm or 50mm, and those are fantastic choices. However, the Nikon 105mm f1.4E ED excels for street photography when you want:
Exceptional bokeh and subject isolation
The ability to shoot from a distance
Compressed perspective for unique compositions
Outstanding low-light performance (f1.4 aperture)
The best lens is the one that makes you want to go out and shoot. For me right now, that's the 105mm. It might not be forever, but it's teaching me to see the streets of Tampa in completely new ways.
How far should you stand from your subject with a 105mm lens?
With the 105mm lens, I typically position myself 20-40 feet from my subject for street photography. This distance works well because:
People are less likely to notice you or feel self-conscious
You have time to anticipate and compose as subjects approach
The compression effect at this distance creates beautiful layered compositions
It doesn't feel invasive, even in public spaces
Compare this to a 35mm lens where you might need to be 5-10 feet away. The 105mm gives you breathing room while still capturing intimate moments.
Does the Nikon 105mm f1.4 work well in low light for street photography?
Yes, the Nikon 105mm f1.4 is exceptional for low-light street photography. Tampa has very dynamic lighting - bright sun one moment, then you're under a covered walkway and the light drops 3 stops. The f1.4 aperture is a godsend in these situations. I can keep the lens wide open and simply adjust my shutter speed, or let Aperture Priority mode handle it. Even in challenging light, the combination of f1.4 and the Nikon Zf's excellent high-ISO performance means I can keep shooting without worrying about motion blur or underexposure.
Recommended Gear for 105mm Street Photography
Support this website by using these affiliate links to shop on Amazon:
Nikon AF-S FX NIKKOR 105mm f/1.4E ED Lens
Voigtlander Nokton 35mm f/1.4 II
Sandisk 128GB Extreme Pro memory cards
Final Thoughts
I went through this whole evolution as a photographer where I thought I needed to follow all the rules, use all the "right" gear for each type of photography, and do things the way everyone said they should be done. At some point I simply stopped buying into that and started shooting what felt right to me.
If there's one thing I've learned from all my years doing this, it's that the best camera is the one that makes you want to go out and shoot. The best lens is the one that helps you see things in new ways. And the best focal length for street photography? It's the one that excites you enough to actually do street photography. For more technical background on compression effects, Ken Rockwell has an excellent explanation here.
I will tell you what feels right to me right now, it's 105mm. It's probably not forever… I still love my 50mm and I'm definitely not getting rid of my wider lenses. But for this moment in my photographic journey, this "wrong" setup is teaching me to see the streets of Tampa in completely new ways.
Maybe that's worth breaking a few rules for.
Support this website by using these affiliate links to shop on Amazon:
Leica M11 Digital Rangefinder Camera
Nikon AF-S FX NIKKOR 105mm f/1.4E ED Lens
Voigtlander Nokton 35mm f/1.4 II
Sandisk 128GB Extreme Pro memory cards
Nikon 50mm f1.8 S Lens for Z mount
What unconventional gear choices have you made that actually worked out? I'd love to hear about them in the comments. And if you're in the Tampa area and want to grab a photo walk sometime (while I am in the area), hit me up. Just don't judge me for showing up with this giant telephoto lens. Haha.

DIY Low Battery Alarm Circuit: Discrete Component Design with SCR Latch & LED Display
You see, I love discreet component projects and the use of transistors in those builds. No this is not to say that I am against things like Arduinos and Raspberry Pi SBCs. Quite the opposite in fact, I love them when the application can actually benefit from one of those devices being employed. This project could have used one of these, to be fair, but it would have been grotesque overkill to use an SBC on a project like this. (An “SBC” is a Single Board Computer and is essentially the whole system, albeit a little weaker than bigger machines, on a single circuit board)
I had a problem to solve. The VERY crudly drawn schematic I made in KiCad is how I solved it.

You see, I love discreet component projects and the use of transistors in those builds. No this is not to say that I am against things like Arduinos and Raspberry Pi SBCs. Quite the opposite in fact, I love them when the application can actually benefit from one of those devices being employed. This project could have used one of these, to be fair, but it would have been grotesque overkill to use an SBC on a project like this. (An “SBC” is a Single Board Computer and is essentially the whole system, albeit a little weaker than bigger machines, on a single circuit board)
I opted to see if I could come up with a way to use discreet components to build something that fit the following criteria:
simple design
small footprint
no programming required
doesn’t drain the batteries excessively
works on 12 vdc power
can detect when a 4 D cell array weakens to 5.4vdc
fires an alarm that latches on when triggered
is noticable and easy to notice when triggered
Some of these parameters came about after the fact as I would build something on the bread board and try it and then figure out that I needed something else to make it work like I wanted it to.
All good things start with a great power source. This is no different, this is a adjustable 12 vdc power supply. These are super stable and relatively cheap too. I don’t remember the price for this one, but it was very reasonable. This is also severely overkill for this project too. This whole project only draws about an amp max. Probably closer to 1/2 amp to be honest with the lion’s share of that being the LED display draw which is a little over 300mA of the whole thing. Regardless, this is what I bought so I used them. At least I have some room should I want to add something else later that uses 12vdc power…After making a few mistakes in getting some measurements by using one of my bench supplies, I realized I could simply power this one up and use it to do the tuning and then simply install it in the machine and use it to power the circuit too, this way there was no discrepancy in voltage and it worked like a charm.
Below is not the circuit I made for this project from but another one that I will be writing about. The point of this photo is to show you what I use to get my ideas out of my head. 1/4” grid graph paper is my favorite for this kind of work. It allows me to draw to scale (if I want) and it is easy on my eyes for some reason too. Can you figure out what the chip is that is in the below circuit by just looking at the surrounding circuitry? I bet you can if you do much discreet component building.
A quick disclaimer here, I use the term discreet component build pretty loosely here. The definition technically doesn’t involve integrated circuits, but I include any device that doesn’t require a program to make it work… That is why this project, in my opinion, is a discreet build even though it has a quad NAND gate chip in the middle of it as well as an opto-isolator package…
With that out of the way, let’s get to the theory of operation and why I did it like I did.

As you can see the board below, it meets the first two criteria right away. It is small and simple. The third criteria of no programming is not immediately evident since it has a DIP package chip on the board, but upon simple inspection this is also evident. The other criteria comes from the design itself and it will show up a little later.
Lets just go through how it works right quick.
The voltage regulator is obvious, I am using it to make the 5VDC refernce voltage for input A as well as the Vcc for the gate chip.
To get the “trip” effect out of the gate, I make one input high all the time and the other is watching for the input to go low. I chose a NAND gate which is a AND logic function with an inverter on the output to simply reverse the state of the output. This is because, I need to see when the voltage goes low and not high. A NAND gate will give a low output when both inputs are high and a high output in the rest of the possible conditions.
When the voltage of the batteries go down to 90%, the voltage is 5.4VDC and with the voltage divider, the gate gets 2.08 volts at this point. This is the trigger point for the gate, anything less than this number and the input flips to low.
When this happens, the output of the gate goes high (5VDC) and then flows to the base of the NPN transistor to bias it, but there is a little trick here too. I added a 100K ohm resistor and a 100uF capacitor to this circuit to add a time delay to the base being biased on. What this does is allows the circuit time to power up and all the voltages to stabilize before this transistor is triggered, preventing false high outputs upon power up.
The transistor fires the photo diode side of the opto-isolator with a couple of resistors to control current and drop some of the voltage from the power rail since this is on the 12VDC part of the circuit.
The output of the opto-isolator is wired to the gate of the SCR package through a voltage dropping resistor with a small cap to absorb any voltage spikes that might come down this line.
The SCR is simply wired in series with the LEDs and acts as a simple latching relay in this application. This insures that if the battery voltage dips below the set point at any time during the work day, the display will turn on and stay on till the batteries are replaced and the machine is powered off…at least that is how the machine should be responded to when this condition exists…
i could have probably left the opto-isolator out and just used the transistor to directly control the SCR, but I wanted to play with the opto-isolator to be honest and see if I could make it work. HaHa.

I really love using perf board to build my projects. It is the lazy mans way of making a PCB and it is also the impatient man’s way as well. There is no waiting to get to see my project come to life when I use perf board on the contray should I have designed my circuit board in KiCad and sent off the gerber files to make them. First I would have to finish learning how to make the designs in KiCad, then I would have to wait to get the boards in… Plus I only need two of these boards as well, so I didn’t have to do all that design work for a circuit board for just two units… The perf board can be had from Amazon for very reasonable money and it comes with header pins as well as the screw terminals you see on this board for making outside connections to the circuit. That is the exact place I bought these boards from, they come in a kit of stuff for about 20$ if memory serves me on this.
Another tip I am giving away for free is below. I draw isometric views of some of the parts for reference when assebling them. This keeps me from wiring them up backwards…most of the time… I got one of these SCRs backwards out of the gate for some reason and the leakage current make the LEDs glow dimly but I could tell something was off so I checked and sure enough, the anode and cathode were backwards… So yeah, it can help to have that 3D view when wiring it up if the lead arrangement is odd like it is here. You can also see where I drew the layout of the opto-isolator as well with the components physical layout next to the pins for reference. This really helps with DIP packages…

I started out using a transistor to fire the LED array to signal the battery was low, but this turned out to be unreliable to start with. The LEDs would not latch on and could turn back off with a transistor controlling them. This is why I opted to use a SCR as once it is fired “on”, it will stay in the “on” condition till you power down the device. This did exactly what I wanted since it allowed me to pick up the signal immediately and on the first time it happens and it latches on so you cant miss it.
I next chose all the components based on their ability to operate on 12vdc power. This allowed me to use a simple 12 volt power supply to drive the circuit. To get the required trigger voltage for the NAND gate logic, I simply added a LM317 voltage regulator and tuned it to 5 volts (yes, I could have used a fixed 5 volt regulator, but I had 317s on hand so I used those instead.) Anyway, I needed the 5 volt power for the NAND gate as it can be run in three power modes and if you apply 12 volts to it then the trigger voltage could be greater than 6 volts which would make my whole project nullified from the outset. So running it at 5 volts means there is a tipping point when the input goes from being high to low and this turns out to be right at 2.080vdc. When the voltage goes below this value, the gate trips. This is where I would operate my battery detector then…but wait, my battery is 4 alkaline cells totaling 6.4vdc when fully charged, so how do I come up with 2.080volts? Well I thought about it for a while and settled on a simple resistive voltage divider. The trick is that the gate is looking for voltage and not much current at all. So I could used very high resistances and it would work fine. Values like 1.68 megaohms and 1.1 megaohms were what I initially came up with. this sum totaled a constant drain of 3.2 microamps. yeah…microamps… I couldn’t even measure it with my big fancy Fluke bench meters and had to resort to the Fluke 187 which has a micro amp selection on it to do this task. You would think something like the 8840 would also have it but it does not…
I wound up changing the circuit to include a 1 megaohm resistor and a 1 megaohm potientiometer in series for an adjustable trip point voltage divider instead of the 1.68M resistor. This worked really well and made setup so much easier. I was able to adjust the trip point to almost exactly 5.4 volts by doing this.
To put this kind of constant energy drain into perspective, if these batteries were to be drawn down as 1 watt continuously for a whole day, the comparison energy draw is 27 micro watts… yeah that is .000027 watts of draw. The ratio in time is this. 1 day at 1 watt is equal to 37,037 days to .000027watts to get the same energy transfer! That is over 101 YEARS to use ONE WATT of constant energy drain! I think I am good…

This Fluke 187 has a bad battery compartment due to corrosion, so I made up a simple voltage regulator circuit and cord for it and soldered this to the battery terminals so that it is now a bench meter and has worked in this role for years now flawlessly. Sometimes you have to make lemonade… Today that lemonade came in the form of a micro amp meter since my other two precision meters dont go that low on amp draw.
I made the display out of a project box and 30 LED diodes. A simple program for my CNC milling machine and I had the hole pattern for the LEDs located and ready to load out. I used the blue LEDs as they are brighter and trigger better than red in my experience with this project. I don’t think the color makes a difference since if this display comes on at all, it indicates it is time to replace the batteries before powering the machine down. I also decided to change the current draw on each one to half normal draw to about 10mA instead of the usual 20mA. I did this to lower heating of the display and to hopefully make the diodes last longer as I don’t want them to burn out if they are on for a few hours while we goto the store to get batteries. Also as you can see in the photo below, when you combine 30 LEDs into a small area, they cumulatively get bright anyway so it still shows up great.
Below is what the back of the LED readout looks like. I simply soldered all the current limiting resistors to the LEDs and then put heat shrink tubing on them to insulate them from one another. I checked the power dissipation for the resistors and they are all at 50% of rated capacity or less so I didn’t worry about the heat shrink insulating them thermally and just went with it.

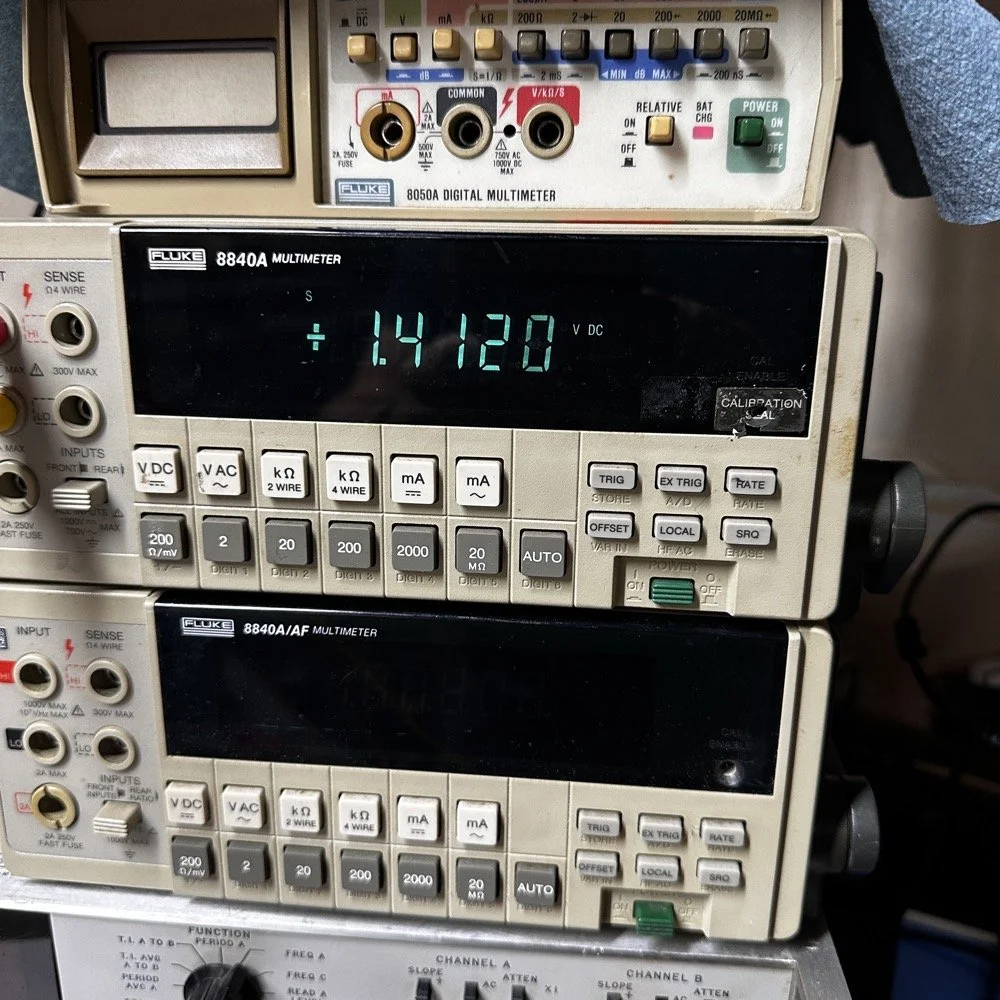
When I started filling out my tinkering bench I wanted some really nice multi-meters to use on it. I started with the Fluke 8050A as I have always been intrigued by the push button design and the layout has this futuristic kind of look to it as well. Oh! …and they are quite accurate too…haha. Then the bug got me and I started looking on eBay at the 8840 meters. I stumbled upon someone who had a few of these surplus and I got it for reasonable money. This is the military variant as it is the 8840 A/AF (which just means it has specific things the military wanted in the spec sheet) but it is VERY accurate and does 4 wire ohm readings for low resistance circuits. I love these meters tremendously and use them all the time.
Also, you no longer have to worry about the display in the 8840 family getting dim either. People make new LED replacements that are plug n play and work great. They are on ebay and I play to pick one up for when my display starts getting a little dim as well.


Here is what the system looks like installed on the turning center. I mounted every thing out of the way of the main equipment and still had it located near the battery compartment for an easy reference. The circuit board s mounted with one screw and the screw is held in place with two nuts. One nut is tightened against the cabinet wall than the other is tightened against the back of the circuit board to make it a defacto standoff. Worked really well. I simply drilled a hole through part of the board that has no electrical parts on it and all was good.


The photo a few panels up shows the proximity to the battery compartment. I wanted it here so it would be a geo-physical alert as well. The batteries you have to replace are directly about the illuminated sign. It is not possible to power down the machine and miss this. They are right next to each other. You see, the way Fanuc controls of this era are built, they will not lose their memory as long as power is applied. So you simply replace the batteries before powering down the machine and you are good…as long as the power company doesn’t drop the ball right at that moment…haha
Help support this website by following these affiliate links when you shop at Amazon:
HDS272S Oscilloscope (My Favorite Portable Scope-Meter)
KAIWEETS Smart Multimeter (My meter I keep in the truck)
Kaisi Extra Large Soldering Mat
No Clean Soldering Flux (All flux needs to be cleaned off but I like this best)
I hope you enjoyed this little project and I will have more coming in the future!

Nikon Zf Review: Why I Switched from Leica CL for Travel Photography
When I got into the Leica cameras I use, I had built a kit around street photography, urban photography, urbex photography, and travel photography. The next thing I started doing was adapting vintage lenses to them. Then I started using TTArtisan glass on the Leica CL and loved it! My Leica SL2 now carries the 50mm APO Summicron L pretty much all the time as well. I love the SL2, but for a backpacking trip, it is probably not the best choice.
After years of using the Leica CL for travel photography, I finally switched to the Nikon Zf—and I should have done it sooner. The breaking point? Getting caught in English rain on the Pilgrims Way with my non-weather-sealed Leica CL. In this Nikon Zf review, I'll explain why I chose this retro-styled mirrorless camera over the Leica CL for hiking trips and travel photography, covering weather sealing, IBIS, battery life, and real-world performance.
Why I Needed a Weather Sealed Travel Camera
When I got into the Leica cameras I use, I had built a kit around street photography, urban photography, urbex photography, and travel photography. The next thing I started doing was adapting vintage lenses to them. Then I started using TTArtisan glass on the Leica CL and loved it! My Leica SL2 now carries the 50mm APO Summicron L pretty much all the time as well. I love the SL2, but for a backpacking trip, it is probably not the best choice.
That experience changed everything for me. I realized I was babying my camera instead of using it. Every time clouds rolled in, I'd pack it away. Every time I saw a stunning scene but it was drizzling, I'd pass on the shot. That's not why I bought a camera—I bought it to use it, to capture moments, to not miss opportunities because I'm worried about weather. That's when I knew I needed weather sealing as a non-negotiable feature in my next travel camera.

The Leica CL served me well for years, but lack of weather sealing was a deal-breaker for hiking trips in unpredictable weather.
Why the Leica CL Didn't Work for Hiking Trips
The Leica CL, while perfect in size for travel, is not weather sealed… I came to this realization while hiking the Pilgrims Way in England a while back. (I did a small series of videos on this trip if you are interested) and this is when I came to realize that while the Leica CL is really small and lightweight, it is also not my favorite for hiking trip travel. Rain is a real threat in England and I was fortunate that my camera did not get caught in a cloud burst.
So knowing all of this, I started down the path of finding a new travel camera to shoot with…
My Requirements for the Perfect Travel Photography Camera
So knowing all of this, I started down the path of finding a new travel camera to shoot with. I looked at several factors to guide my choice:
The first was it had to be weather sealed or it was a no go for me.
The next is it had to have IBIS as I love shooting with vintage glass and this allows me to shoot at much slower shutter speeds while handheld.
I also wanted a full frame, 24MP sensor if possible as these (in 2024) have much better low light performance due to the larger photo sites on the sensor.
It also needed good battery life as these Leica mirrorless cameras just don't have great battery life for me.
These weren't just nice-to-have features. These were requirements based on real frustrations I'd experienced in the field. Weather sealing because of England. IBIS because I shoot vintage glass and hate carrying a tripod on hikes. Full-frame 24MP for those low-light church interiors and evening shots. Battery life because running out of power halfway through a hiking day is unacceptable.
Nikon Zf Features That Changed My Travel Photography
After searching for a year or so with no luck, Nikon drops a bomb on me with the launch of the Nikon Zf retro styled camera. You could have just as easily called it the "Nikon Special Custom Built Camera For Dave" and the name would have been accurate. HaHa!
I immediately fell in love with it…before I even laid eyes on one in person. When I see a new camera that I am interested in, I will search all about it that I can and see if it will fit my needs and do that at a price point that I am comfortable with.
The Nikon Zf mirrorless camera is a camera that checks all those boxes and more. You see I am in love with the retro-style camera design aesthetic like the Fujifilm XT-3 and now the Nikon Zf (as well as to a lesser degree the Nikon Zfc too). I owned the Fujifilm XT-3 for several years and it had two main shortcomings that made me want to move away from it over the years.
The crop sensor had pretty bad low light performance (it was 26 mega pixels so it was doing a lot of work to get it all in there) and the lack of IBIS in a mirrorless camera. Cameras at this time were coming standard with IBIS (In Body Image Stabilization) and I felt this was a huge misstep for Fujifilm on this camera. I, none the less, used it for several years anyway and to great effect too, but the lack of these two features was a nagging thought at the back of my mind the whole time.
Then Nikon came out with the Zfc and I initially was in love with it, but upon closer inspection, it was simply an XT-3 in a Nikon shell. Yeah, it had a few things that were newer and (debatably) better, but it still lacked certain things I wanted. I had resigned myself at this point to wait for a replacement to the Nikon Df or maybe something by Leica that was closer to what I was wanting. Well as fate would have it, Nikon saw the demand for the retro camera design and came out with the Zf—a full frame, IBIS, 24 megapixel, mirrorless camera loaded with all the magic that they could cram into the beautiful Nikon retro shell.
Nikon Zf vs Leica CL: Key Differences for Travel Photography
Let me break down the key differences between these two cameras for anyone facing the same decision I did:
Weather Sealing: The Nikon Zf is fully weather sealed; the Leica CL is not. This was the deal-breaker for me. If you're hiking in unpredictable weather or traveling to places with rain, dust, or humidity, the Nikon Zf gives you peace of mind. The Leica CL requires constant babying in anything but perfect conditions.
IBIS: The Nikon Zf has 5-axis in-body image stabilization; the Leica CL does not. This makes a massive difference when shooting with vintage manual focus lenses or in low light. I can handhold shots at 1/15th second with the Nikon Zf that would be impossible with the Leica CL. For travel photography where you can't always use a tripod, IBIS is a game-changer.
Sensor Size: The Nikon Zf has a full-frame 24MP sensor; the Leica CL has an APS-C crop sensor. The full-frame sensor gives you better low-light performance (larger photosites), shallower depth of field control, and generally more flexibility. The crop sensor on the Leica CL is excellent, but the full-frame advantage is real when you're shooting in challenging light.
Battery Life: The Nikon Zf's battery lasts significantly longer than the Leica CL. With the Leica CL, I'd carry 3-4 batteries and still worry about running out. With the Nikon Zf, two batteries get me through a full day of shooting with power to spare.
Size and Weight: This is where the Leica CL wins. It's noticeably smaller and lighter, which matters on long hikes. The Nikon Zf is not a huge camera, but it's definitely more substantial. For me, the practical advantages of the Nikon Zf outweigh the size disadvantage, but this is a personal choice.
Price: The Leica CL (when it was still in production) was more expensive than the Nikon Zf. Now that it's discontinued, you'd be buying used. The Nikon Zf offers better value for the features you get.
The Nikon Zf's weather-sealed body and IBIS make it ideal for unpredictable travel conditions and hiking with vintage lenses.
Real World Nikon Zf Performance: Travel and Hiking
So to be honest, I was still skeptical that this would be the next camera for me. I have gotten really comfortable using my Leica cameras and the thought of learning a new camera was really not that appealing to me. But the more reviews I watched on YouTube and the more I just looked at the camera in general, the more I liked it.
Since getting the Nikon Zf, I've put it through its paces on several trips, and it's delivered every time. The weather sealing proved itself on a rainy morning shoot where I would have packed the Leica CL away. The IBIS let me shoot handheld in a dimly lit museum with a vintage 50mm f/1.4 lens at 1/15th second and still get sharp images. The battery lasted an entire day of hiking without needing the spare.
The retro physical dials are more than just aesthetic—they're genuinely useful in the field. Being able to glance down and see my shutter speed and ISO without turning on the screen saves battery and makes adjustments faster. On a hike, every second counts when you're trying to catch changing light or a fleeting moment.
The full-frame sensor's low-light performance is noticeably better than the Leica CL's crop sensor. I can comfortably shoot at ISO 3200 or even 6400 when needed, and the files are clean. With the Leica CL, I tried to stay under ISO 1600 whenever possible. That flexibility matters when you're traveling and can't always control the light.
So for now, this is my new travel/street machine. It has wonderful rendition and is a joy to shoot with. I look forward to taking it on outings now and I have the 50mm f1.8 S lens if I want auto focus and to be able to access all the special features that have to do with the auto focus system. So going forward, there will be more about this machine as well as the two Leica camras I use as well. You see, those two machines are also wonderful cameras and I still enjoy using them too, I use them for certain things as I have found. But I still love getting them out and using them.
Nikon Zf vs Leica CL: Which Should You Choose?
Choose the Nikon Zf if:
You need weather sealing for hiking, travel, or unpredictable conditions
You shoot with vintage manual focus lenses and want IBIS
You value battery life and don't want to carry multiple batteries
You want better low-light performance (full-frame advantage)
You're comfortable with a slightly larger/heavier camera for the features
Choose the Leica CL if:
Size and weight are your absolute top priorities
You primarily shoot in good weather or controlled conditions
You're already invested in the Leica L-mount ecosystem
You prefer the Leica color science and rendering
You can find one used at a good price (it's discontinued)
For me, the practical advantages of the Nikon Zf outweigh the size advantage of the Leica CL. But I still appreciate what the Leica CL offers for lightweight urban photography.
Recommended Gear for Travel Photography
Support this website by using these affiliate links to shop on Amazon:
Leica M11 Digital Rangefinder Camera because the Leica CL is out of production now.
Nikon AF-S FX NIKKOR 105mm f/1.4E ED Lens
Voigtlander Nokton 35mm f/1.4 II
Sandisk 128GB Extreme Pro memory cards
Nikon 50mm f1.8 S Lens for Z mount
Frequently Asked Questions About the Nikon Zf for Travel Photography
Is the Nikon Zf good for travel photography?
Yes, the Nikon Zf is excellent for travel photography. After switching from the Leica CL, I've found the Nikon Zf addresses all the key requirements for serious travel work: weather sealing protects it in rain and dust, IBIS (In-Body Image Stabilization) allows handheld shooting with vintage lenses and in low light, the full-frame 24MP sensor delivers outstanding image quality even at high ISOs, and the battery life is significantly better than my Leica mirrorless cameras. The retro design with physical dials makes it quick to adjust settings on the fly, which is crucial when you're hiking and need to shoot fast.
How does the Nikon Zf compare to the Leica CL for travel?
The Nikon Zf and Leica CL serve different needs. The Leica CL is smaller and lighter (perfect for ultralight backpacking), but lacks weather sealing and IBIS, which are deal-breakers for hiking trips where rain is a possibility. The Nikon Zf is heavier but offers weather sealing, IBIS, a full-frame sensor with better low-light performance, and much longer battery life. I switched from Leica CL to Nikon Zf specifically because I got caught in English rain on the Pilgrims Way and realized I needed weather protection. If you're doing casual city travel, the Leica CL's compact size is nice. For serious hiking and unpredictable weather, the Nikon Zf is the better choice.
Is the Nikon Zf weather sealed?
Yes, the Nikon Zf is weather sealed. This was one of my primary requirements when searching for a travel camera to replace the Leica CL. The weather sealing on the Nikon Zf protects against rain, dust, and moisture - essential for hiking trips and travel photography where you can't always control the conditions. After hiking the Pilgrims Way in England with my non-weather-sealed Leica CL and worrying about rain the entire time, having weather sealing gives me peace of mind to shoot in any conditions.
Does the Nikon Zf have IBIS?
Yes, the Nikon Zf has 5-axis In-Body Image Stabilization (IBIS). This was another critical requirement for me. IBIS allows me to shoot with vintage manual focus lenses at slower shutter speeds while still getting sharp handheld images. It's also invaluable for travel photography when you're shooting in low-light situations like churches, museums, or evening street scenes where you can't use a tripod. The Leica CL lacks IBIS, which was one of the main reasons I switched to the Nikon Zf.
What is the battery life like on the Nikon Zf?
The Nikon Zf has significantly better battery life than my Leica mirrorless cameras. While Leica mirrorless cameras have notoriously short battery life (I always carried 3-4 batteries), the Nikon Zf's EN-EL15c battery provides enough power for a full day of travel photography on a single charge. This is a huge advantage for hiking trips where you might not have access to power for recharging. I typically carry two batteries for the Nikon Zf and rarely need the second one, whereas with the Leica CL I'd go through multiple batteries in a day.
Can you use vintage lenses on the Nikon Zf?
Absolutely! The Nikon Zf is fantastic for vintage lenses, which is one reason I love it. With the FTZ II adapter, you can use Nikon F-mount lenses, and with various adapters you can mount Leica M, M42, Canon FD, and many other vintage lenses. The combination of focus peaking, IBIS, and the high-resolution EVF makes manual focusing a joy. I regularly shoot with vintage glass on my Nikon Zf when traveling, and the IBIS compensates for the lack of optical stabilization in older lenses. This was impossible with the Leica CL which lacks IBIS.
Is the Nikon Zf worth it over the Leica CL?
It depends on your priorities. The Nikon Zf is worth it if you need weather sealing, IBIS, better low-light performance (full-frame vs crop sensor), and longer battery life. These were all critical requirements for my hiking and travel photography. The Leica CL is worth considering if you prioritize extreme portability, the Leica color science, and compact size above all else. For me, the practical advantages of the Nikon Zf (weather sealing especially) outweighed the Leica CL's size advantage. After nearly losing my Leica CL to rain in England, the choice became clear.
What focal lengths work best for travel photography on the Nikon Zf?
For travel photography on the Nikon Zf, I primarily use the Nikon 50mm f/1.8 S lens because it's lightweight, sharp, and versatile. The full-frame sensor means you get the classic 50mm field of view, which works for everything from street scenes to portraits. I also adapt vintage lenses, particularly 35mm focal lengths, when I want a wider perspective for landscapes or architecture. The beauty of the Nikon Zf's IBIS is that I can handhold even at slower shutter speeds, so I'm not limited by the lack of stabilization in vintage glass. For hiking trips, I keep my kit minimal - usually just the 50mm f/1.8 S and maybe one adapted vintage lens.
So for now, this is my new travel and street machine. It has wonderful rendition and is a joy to shoot with. I look forward to taking it on outings now and I have the 50mm f1.8 S lens if I want auto focus and to be able to access all the special features that have to do with the auto focus system.
Going forward, there will be more about this machine as well as the two Leica cameras I use. You see, those two machines are also wonderful cameras and I still enjoy using them too—I use them for certain things as I have found. The Leica CL still comes with me on city trips where weight matters. The Leica SL2 is my studio and portrait camera. But for travel photography where weather and versatility matter? The Nikon Zf is now my go-to.
Are you considering the Nikon Zf for travel photography? Or have you made a similar switch from one camera system to another? I'd love to hear about your experiences in the comments below!
Want more honest camera reviews and travel photography tips? Subscribe to my photography blog for weekly posts about real-world gear testing, not just spec sheets and studio tests.
Support this website by using these affiliate links to shop on Amazon:
Leica M11 Digital Rangefinder Camera
Nikon AF-S FX NIKKOR 105mm f/1.4E ED Lens
Voigtlander Nokton 35mm f/1.4 II
Sandisk 128GB Extreme Pro memory cards
Solo Photography: Why I Prefer Shooting Alone for Street and Travel Photography
I do enjoy both types of trips, I am just more inclined to solo trips over trips involving others. I don't know if this is a desire to enjoy the freedom associated with solo travel, if it is some sort of childhood learned behavior, or that it might just be therapeutic. Whatever it is, I just love solo photography.
When I think about my most favorite photography themed trips, I only have two categories. Solo trips and collaborations are my main two categories here.
Of those two categories though, solo trips are my favorite.
I do enjoy both types of trips, I am just more inclined to solo trips over trips involving others. I don't know if this is a desire to enjoy the freedom associated with solo travel, if it is some sort of childhood learned behavior, or that it might just be therapeutic. Whatever it is, I just love solo photography.

Why Solo Photography Works for Me
In fact I love it so much that I almost never collaborate with others on any sort of project whether it be a video or photo shoot or even to just hang out as they say. This is partly because I grew up pretty much by myself and learned to enjoy solitude instead of hating it.
When you spend enough time alone, you come to learn the freedom it provides and you actually crave it. So for me, I will operate alone for the most part.
There's something about being out with just my Leica CL and a lens that just works. No one to wait for, no one to compromise with on where to go next, and no one to apologize to when I want to stand on a corner for 20 minutes watching light change on a building. If I see something interesting down a side alley, I can just go. No group discussion required.
The Leica CL is practically invisible anyway. The small form factor means I can blend into crowds at markets or slip into doorways without drawing attention. Try doing that with a group of photographers bristling with tripods and camera bags - you'll clear the street in seconds.
Show Image

The Freedom to Move at Your Own Pace
The standard recipe for success is pretty simple. Don't tell anyone you're going out shooting and then go. Lol… I was only half joking here, if you're serious then you will just go.
Another thing that is special about solo photography is that you can explore at a pace that is inconceivable by others. You can go as slow or as fast as you want and can even get into areas where multiple people just would not be feasible.
I've had photowalks where I covered 10 miles in an afternoon because I was following interesting scenes from neighborhood to neighborhood. I've also had sessions where I spent three hours within a two-block radius because the light was just right. Both were equally rewarding, and both would have been impossible if I'd been trying to coordinate with someone else's schedule or energy level.
When I'm alone with my camera, time sort of disappears. I'm not thinking about whether my companion is getting bored or hungry or tired. I'm just in the flow of observation and capture. That's when the best images happen - when you're not trying to make them happen, they just unfold in front of you.
The Drawbacks (Because There Are Some)
Now this is not without its pitfalls either. You see, when you don't collaborate with others your projects typically won't grow past a certain point. If you are the kind of person who has big ambitions for your projects, then operating like me is probably not the best idea.
To be fair though, it is not without its pitfalls too. For some people, being alone with your thoughts is actually terrifying. So if you need interaction with others, then what I am doing here is not for you.
I'm not going to lie and say solo photography is for everyone. Missing out on collaboration means missing out on second perspectives, on someone to watch your back, on bouncing ideas around. If your camera fails, you're on your own. If you get a flat tire on the way home, there's no one to help. And yeah, your channel or your business or your Instagram probably won't grow as fast without the networking and collaboration that comes from working with others.
But here's the thing - I'm okay with that. My photography isn't about building an empire or going viral. It's about the process, the meditation, the simple act of seeing and capturing. And that works best for me when it's just me and the camera.

Gear Considerations for Solo Shooting
Over the years I've learned that when you're shooting alone, your gear choices matter even more. You can't hand off a second camera body to someone else. You can't ask your buddy to carry the extra lens. Everything you bring, you carry.
This is why the Leica CL has become my go-to for solo work. One body, usually just one lens - typically my Voigtlander 35mm Nokton or the TTArtisan 35mm f1.4. A spare battery in my pocket. That's it. I've done full day photowalks with nothing more than that.
The SL2 with the APO Summicron is amazing, don't get me wrong, but that package is heavy and conspicuous. Great for certain kinds of work, but not ideal for wandering around a city for hours. When you're alone, you feel the weight of every piece of gear, and you notice when people notice you.
Minimal gear also means minimal decisions. I'm not standing there switching lenses and missing moments. I know what my 35mm can do. I know where I need to be standing to get the shot I want. It becomes instinctive. Photographer Eric Kim has written extensively about the benefits of minimal gear for street photography, and I've found his approach aligns well with solo work.
Safety and Awareness
Here's something nobody really talks about - shooting alone requires a different level of awareness. You don't have someone watching your back while you're looking through the viewfinder. You're responsible for noticing your surroundings, keeping track of your gear, and making smart decisions about where you go and when.
The Digital Photography School has good guidelines on staying safe as a photographer, which become even more important when shooting alone."
I stick to populated areas during daylight hours. I stay aware of who's around me. If something feels off, I move on. My wife usually knows where I am and when I expect to be back. These aren't revolutionary safety practices, but they matter more when you're solo.
The flip side is that this constant awareness makes you a better photographer. You're tuned in to everything happening around you. You notice details. You see patterns. You sense when something interesting is about to happen. That heightened awareness feeds directly into better images.

Finding Your Zone
When I wander the streets with my camera, I am at peace. No one to make sure you're not leaving behind or holding back. No judgement about equipment, it is just the process. If you have not found your zen activity then I recommend you start looking at what makes you really happy and focus on that.
This took me years if not decades to truly figure out. Looking back, things could have gone a very different way had I followed what worked for me instead of what other people said I should be doing.
For a while there I thought I needed to be out shooting with wide glass, getting close to people, being all up in the action like you see in classic street photography. That works for some people. Not me. I have a real problem invading personal space. It's a hard boundary for me, and trying to force myself past it just made photography stressful instead of enjoyable.
So I adapted. I shoot longer focal lengths (that 35mm on the crop sensor CL gives me a 50mm equivalent field of view). I find my scenes from a respectful distance. I wait for moments to develop instead of forcing them. And you know what? The images are better because I'm comfortable, I'm in my element, and I'm enjoying the process. Not everyone needs to shoot like Henri Cartier-Bresson to do great street photography - finding what works for you is what matters.
How to Get Started with Solo Photography
If you're thinking about trying solo photography, here's my advice: just start. Don't overthink it.
Grab your camera, one lens, and head out somewhere familiar. Your own neighborhood is fine. Walk around for an hour. See what you notice. Don't put pressure on yourself to come back with amazing images - just get comfortable being out there alone with your camera.
Once you're comfortable close to home, expand your range. Try a different neighborhood. Head downtown. Visit a park. Each time you go out, you'll build more confidence and develop your own rhythm.
The first few times might feel weird. You might be self-conscious. You might wonder what you're doing wandering around by yourself with a camera. That's normal. It passes. Eventually you stop thinking about yourself and start noticing everything else.
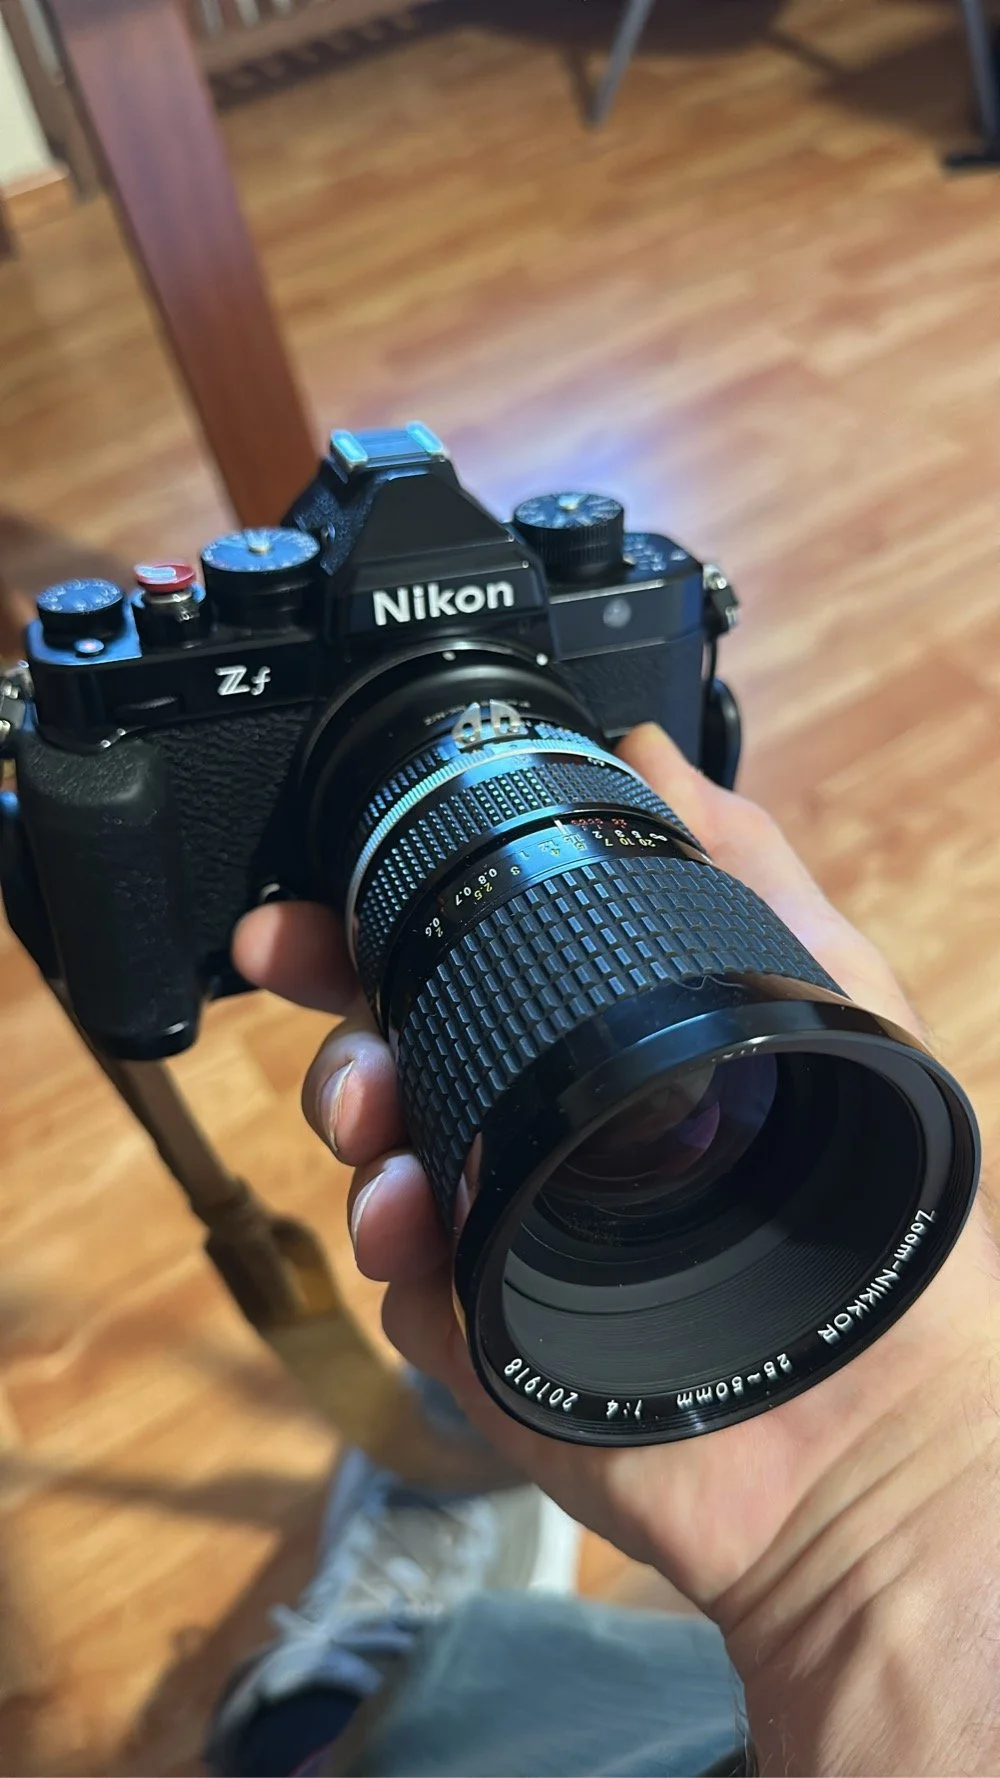
Solo Doesn't Mean Isolated
Here's the thing people sometimes misunderstand - shooting solo doesn't mean you're antisocial or that you hate people. It just means you prefer the creative process to be solitary.
I still enjoy talking with other photographers. I still like sharing images and getting feedback. I still appreciate seeing what others are creating. I just don't want to coordinate schedules or compromise vision when I'm actually out shooting.
Some of my best photo conversations happen after the fact - showing someone what I found, talking through why I framed something a certain way, learning what others are working on. The difference is the actual capture happens on my terms, at my pace, following my instincts.
The Bottom Line
Solo photography isn't the only way or even the best way - it's just the way that works for me. Your mileage may vary. Some people thrive in collaborative environments. Some people need that external motivation to get out and shoot. Some people genuinely enjoy the social aspect of group photowalks.
Me? I enjoy the silence, the solitude, and the freedom to follow wherever my eye leads me. I love knowing that if I want to spend an hour photographing rust patterns on a fence, nobody's going to roll their eyes or check their watch. And when I get home and look through what I captured, those images feel entirely mine - for better or worse.
If you're wired like I am, give solo shooting a try. Start small, build confidence, find your rhythm. And if you discover it's not for you? That's fine too. The goal isn't to shoot alone - the goal is to shoot in whatever way brings you joy and produces images you're proud of.
Is solo photography safe? Solo photography can be safe with proper precautions. Stay aware of your surroundings, stick to well-lit public areas, let someone know your plans, and trust your instincts. The National Press Photographers Association offers additional safety resources for photographers working alone."
What gear do I need for solo photography? Keep it minimal - one camera body, 1-2 versatile lenses, spare battery, and memory cards. The lighter your kit, the more freedom you have to move and explore.
How do I get comfortable shooting alone? Start in familiar areas close to home. Build confidence gradually, practice being aware of your surroundings, and focus on the creative process rather than self-consciousness.
Is solo photography better than shooting with others? Neither is inherently better - they serve different purposes. Solo shooting offers freedom and personal creative flow, while group shoots provide collaboration and different perspectives.
Thanks for following along on my ramblings here. Check out my street photography portfolio to see what solo shooting produces, and I hope to hear from you soon!"
Other related posts and subjects
Recommended Gear for Solo Street Photography
Support this website by using these affiliate links to shop on Amazon:
Leica M11 Digital Rangfinder Camera
Voigtlander Nokton 35mm f/1.4 II
Sandisk 128GB Extreme Pro memory cards

Solo Street Photography with Leica CL: Finding Joy Shooting Alone (Not Following the Rules)
I really like the 50mm perspective of these lenses on a crop sensor camera like my Leica CL. If I use a full frame machine then Iwill usually opt for something in the 50 to 58mm range as well.
After years of feeling pressure to do street photography "the right way," I finally figured something out: solo street photography photowalks with my Leica CL and a 50mm lens bring me more joy than following anyone else's rules. This is the story of how I stopped trying to shoot like Peter McKinnon, quit worrying about YouTube success, and rediscovered why I fell in love with photography in the first place—just grabbing my camera and hitting the streets alone.

My go-to setup: Leica CL with Voigtlander 35mm Nokton—this gives me a 50mm perspective on the crop sensor.
Why I Love Solo Street Photography (And You Might Too)
There's something incredibly freeing about solo photowalks that I didn't appreciate until I tried them consistently. When you're alone, there's no one to impress, no one waiting on you, and no one questioning why you're standing in the same spot for ten minutes watching the light change. You can be completely present with your camera and your surroundings without any social pressure.
I'll admit, at first the idea of walking around with a camera alone felt a bit weird. But then I realized—nobody cares. People are absorbed in their own lives, and you're just another person walking down the street. The freedom this brings is immense. If I see something interesting, I can stop and shoot it from ten different angles without feeling like I'm holding anyone up. If nothing inspires me, I can just enjoy the walk. There's zero pressure to "perform" or justify your creative choices to anyone.
My Leica CL Street Photography Setup: 50mm Perspective on Crop Sensor
It is just plain fun to grab a camera, a spare battery and hit the streets to see what I can find to photograph. My weapon of choice is the Leica CL mirrorless camera with one of several lenses. Usually though, my Leica CL is wearing a Voigtlander 35mm Nokton or a TTArtisan 35mm f/1.4, you never know which.
I really like the 50mm perspective of these lenses on a crop sensor camera like my Leica CL. The 1.5x crop factor means that 35mm lens gives me a 52.5mm field of view—basically a classic 50mm perspective. This is perfect for my shooting style because it gives me comfortable working distance from my subjects while still creating nice compression and subject isolation. If I use a full frame machine then I will usually opt for something in the 50 to 58mm range as well.
The Leica CL itself is the perfect camera for solo photowalks. It's small enough to not be intimidating, quiet enough to be discreet, and produces image quality that rivals cameras three times its size. The electronic viewfinder is bright and clear, the controls are simple and intuitive, and the whole package fits easily in my hand or jacket pocket. I can carry it all day without fatigue, and more importantly, I can carry it without thinking about it—which means I'm thinking about photography instead of gear.
I will take my 28mm lenses for the occasional stroll, but my staples are the 50mm lenses. Shoot, I even have the Leica APO Summicron SL 50mm for my Leica SL2 mirrorless camera as well because I like them so much. That is an insane package to be just strolling around town with slung around your neck…as well as heavy. Haha.
Breaking the Street Photography Rules: Why 50mm Works Better for Me Than 28mm
This literally took me years if not decades to truly figure it out. That is a hard pill to swallow at times too. Looking back, things could have gone a very different way had I followed my real passion instead of thinking I could be like Peter McKinnon… Live and learn I guess.
Before Pete came along and made me think I could be this ultra successful YouTube personality, I did things that other people said were what you should do. Like do street photography with wide glass and get close to people and stuff like that. That works for some people, but not me, I seem to have a real problem getting close to other people. Invading their personal space is such a red flag for me that I will just let the photo go before I attempt something like that.
Here's what nobody tells you about the "get close with a wide lens" approach: it's not just about technical skill, it's about personality. Some photographers are naturally extroverted, comfortable in stranger's personal space, and can pull off that close-up street style. I'm not one of those people. And you know what? That's completely okay. Using a 50mm or even longer lets me capture authentic moments from a respectful distance where neither I nor my subject feels uncomfortable. The photos are different than 28mm shots, but they're not worse—they're just mine.
This made for some truly terrible photos just to be honest about it. Mostly, it made me not want to go out and shoot though… so my very first Nikon DSLR would sit in the closet for months at a time with me not so much as looking at it. Who wants to go to a job and be stressed about that all day THEN make your hobby about "getting out of your comfort zone" and being stressed about that too?!? I almost gave up photography at one point because of this to be honest.
A typical scene from my solo photowalks—natural moments, comfortable distance
I have spent so long making YouTube content that I had actually forgotten how much fun it was to just go shoot. I will now get my camera and a battery or two and just hit the bricks. What I had to learn to do was to make a video about one every so often to share what I am doing with the viewers. I took a “sabbatical” the last two years in the first part of the year so I could do this. It helped dramatically too with my well being and my creativity.


Simple gear for photowalks: one camera, one lens, spare batteries. That's all I need.
From YouTube Pressure to Photography Joy: My Personal Journey
I finally found some joy when my daughter began competing in rock climbing. She joined a team and they would go all over for these events and I got my camera out and started photographing these gatherings and realized that there was more to this hobby than just what others said is good photography. I found a lot of joy in capturing interesting angles of the climbers and going to the trouble of sharing the photos with the team when done. It was really rewarding to be honest.
Then I broke my ankle and at about the same time, Sierra "aged out" of the team and stopped attending the events as life got in the way. Well, I needed a new avenue to focus on and found it in my YouTube channel. I learned over the years that a good YouTube content creator is not a good photographer—they are two very different things and I wandered down that rabbit hole for a while before realizing that it wasn't going to work for me.
The YouTube algorithm rewards consistency, spectacle, and engagement over artistry. It wants you to post weekly, chase trends, and create content that keeps people watching. That's fine if you want to be a content creator, but it's exhausting if you just want to be a photographer. I found myself thinking more about thumbnails and titles than I did about light and composition. I was shooting for the camera review, not for the creative satisfaction. That's when I knew something had to change.
The Joy of Street Photography Photowalks Without Pressure
This is where I am at now… just a guy with a camera out taking some pictures. No YouTube schedule to maintain, no algorithm to please, no gear to review, no style to emulate. Just me, my Leica CL, and whatever catches my eye. Some days that's dramatic light on a building. Other days it's a person waiting for the bus. Sometimes it's nothing at all, and that's fine too.
I have spent so long making YouTube content that I had actually forgotten how much fun it was to just go shoot. I will now get my camera and a battery or two and just hit the bricks. What I had to learn to do was to make a video about one every so often to share what I am doing with the viewers. I took a "sabbatical" the last two years in the first part of the year so I could do this. It helped dramatically too with my wellbeing and my creativity.
The biggest lesson? Photography should add to your life, not drain it. If your hobby is causing you stress instead of joy, you're doing it wrong—not because you're a bad photographer, but because you're following someone else's path instead of your own. Give yourself permission to shoot what you love, how you love, with whatever equipment makes you happy. That's where the good work lives.
Solo Street Photography Tips: Finding Your Own Style
Ultimately I found that I loved to go on photowalks and simply take pictures around me. Here's what I've learned about making solo photowalks work:
Keep your gear simple. I bring one camera, one lens, and two batteries. That's it. No bag, no accessories, nothing to fidget with or second-guess. This simplicity forces you to work within constraints, which actually makes you more creative, not less.
Shoot for yourself first. I used to think about how a photo would perform on Instagram or YouTube before I even took it. Now I shoot what interests me in the moment. Some of my favorite images would probably get three likes on social media, and I don't care. They're mine.
Walk the same routes sometimes. There's this idea that you need exotic locations for good street photography. I've learned more shooting the same three-mile radius around my house than I did traveling to "photogenic" cities. Familiarity breeds understanding. When you know a place well, you start to see the light differently, notice the rhythm of the day, and find moments you'd miss as a tourist rushing through.
Don't force it. Some walks I come home with fifty keepers. Other times I get nothing. Both are valuable. The walks where I don't press the shutter much are still feeding my creative eye, teaching me to see, and giving me time to think. Photography is as much about observation as it is about capture.
Frequently Asked Questions About Solo Street Photography
Is it okay to do street photography alone?
Absolutely! Solo street photography is not just okay—it's often the best way to shoot. When you're alone, you move at your own pace, follow your creative instincts without compromise, and blend into the environment more naturally. I've found that shooting solo actually reduces pressure because there's no one watching, judging, or waiting for you. You can spend five minutes on one corner if that's what feels right, or walk five miles following the light. Some of my best work happens when I'm alone with my camera and my thoughts.
What focal length is best for street photography?
There's no "best" focal length—only what works for your personality and shooting style. The conventional wisdom says 28mm or 35mm, but I prefer 50mm equivalent (which is a 35mm lens on my Leica CL crop sensor). The 50mm perspective gives me comfortable distance from my subjects, creates nice compression, and doesn't make me feel like I'm invading anyone's personal space. If you're uncomfortable getting close to strangers, telephoto focal lengths like 50mm, 85mm, or even 105mm can work beautifully. Don't let anyone tell you there's only one "right" way to do street photography.
How long should a street photography photowalk be?
Your photowalk should be exactly as long as it needs to be. Sometimes I'm out for 30 minutes and come home with great shots. Other times I'll wander for three hours and barely press the shutter. I've learned to follow my energy and creative flow rather than forcing a specific duration. Start with 30-60 minutes if you're new to photowalks, and let it evolve naturally. The goal is joy and creativity, not checking off a time requirement.
Can you do street photography with a Leica CL?
The Leica CL is fantastic for street photography! It's compact, discreet, produces excellent image quality, and the crop sensor actually gives you a nice 50mm perspective with a 35mm lens (or 75mm with a 50mm lens). The quiet shutter, simple controls, and build quality make it perfect for solo photowalks. I love that it doesn't scream "expensive camera" like a big DSLR or even a Leica M, so I can blend in while still getting Leica color and image quality. It's honestly my favorite camera for just grabbing and hitting the streets.
Do I need to follow street photography "rules"?
No! This is the most important thing I've learned: there are no rules, only guidelines that work for some people. You don't have to shoot wide angle, you don't have to get close to strangers, you don't have to shoot in black and white, and you certainly don't have to make yourself uncomfortable to get "good" street photography. Find what brings you joy and shoot that way. The best street photography comes from authentic vision, not from following someone else's rules. If 85mm or 105mm feels right, use it. If you prefer color, shoot color. Make your own rules.
What should I bring on a solo street photography walk?
Keep it simple—that's the beauty of solo photowalks. I typically bring just my Leica CL with one lens (usually my Voigtlander 35mm Nokton or TTArtisan 35mm f/1.4), and one or two spare batteries. That's it. No camera bag, no lens changes, no complicated gear setup. The simplicity is liberating. You can add a small water bottle and maybe your phone for emergencies, but resist the urge to pack heavy. The lighter you travel, the longer you'll walk and the more you'll enjoy it. Less gear equals more photography.
Support this website by using these affiliate links to shop on Amazon:
Leica M11 Digital Rangefinder Camera
Nikon AF-S FX NIKKOR 105mm f/1.4E ED Lens
Voigtlander Nokton 35mm f/1.4 II
Sandisk 128GB Extreme Pro memory cards
Nikon 50mm f1.8 S Lens for Z mount
Thanks for following along on my ramblings here. If you're feeling the same pressure I felt—to shoot a certain way, use specific focal lengths, or build a YouTube following—I hope this gives you permission to just grab your camera and go shoot for the joy of it.
Are you doing solo photowalks? I'd love to hear about your experiences in the comments below. What focal length do you prefer? Do you follow the "rules" or have you found your own path?
Want more honest photography content without the pressure? Subscribe to my photography blog for weekly posts about real creative journeys, not just gear reviews and pixel-peeping.

My Photography Journey: From Nikon D7000 Beginner to Leica Minimalist
Back in the dark ages, it was common to buy actual books on a subject of photography as YouTube was still sort of in its infancy. You could find information on the web but it was still really limited. Today we are literally bombarded with a constant stream of information that is dizzying.
Introduction (Keep your opening, add this after the first image):
When I started on my photo knowledge journey, I went by all the usual things associated with doing a self-taught skillset.
Back in the dark ages, it was common to buy actual books on a subject of photography as YouTube was still sort of in its infancy. You could find information on the web but it was still really limited. Today we are literally bombarded with a constant stream of information that is dizzying.

The author on the streets of Chattanooga taking photos with his Nikon D7000 camera.
Starting My Photography Journey with the Nikon D7000
I chose my camera based on information from one of the OGs of the photography space on the web… Ken Rockwell. Now hear me out before you throw your computer across the room.
It is no secret that Ken has a love affair with Nikon and it shows through on his site. So many well worded reviews to choose from made starting my journey with photography a Nikon based one. It is cemented so well that I have never even tried to shoot Canon on my own volition. Nikon should be giving Ken royalties to be honest about it. His reviews are fair (from what I can tell) and well worded and very technical. He has other brands on his site these days too, but back in the day, it was a wealth of Nikon information. For more of my photography philosophy and techniques, browse through my photography blog archive.
When I did jump in, it was with a D7000 DSLR. This was the most technologically advanced of the DX format models at the time. The camera included things such as the focus motor for the older screw drive focus lenses as well as sporting several other features not available on the lesser models of the period. I loved that camera and shot on it for several years while learning the rudiments of the craft.
Looking back, the Nikon D7000 was an excellent choice for a beginner. The DX sensor gave me reach for wildlife and sports, the built-in focus motor meant I could use affordable older lenses, and the 16-megapixel sensor was more than enough for learning composition and exposure. If you're considering a used D7000 today, it's still a capable camera for learning photography fundamentals.
Learning the Rules (And Eventually Breaking Them)
During this period I learned all the cliche things about shooting "better" photos and some of those old rules still linger today in my composition techniques. Fortunately I have since learned that some things are not actually set in stone and you can bend and even break the rules if done right and the images will be great anyway.
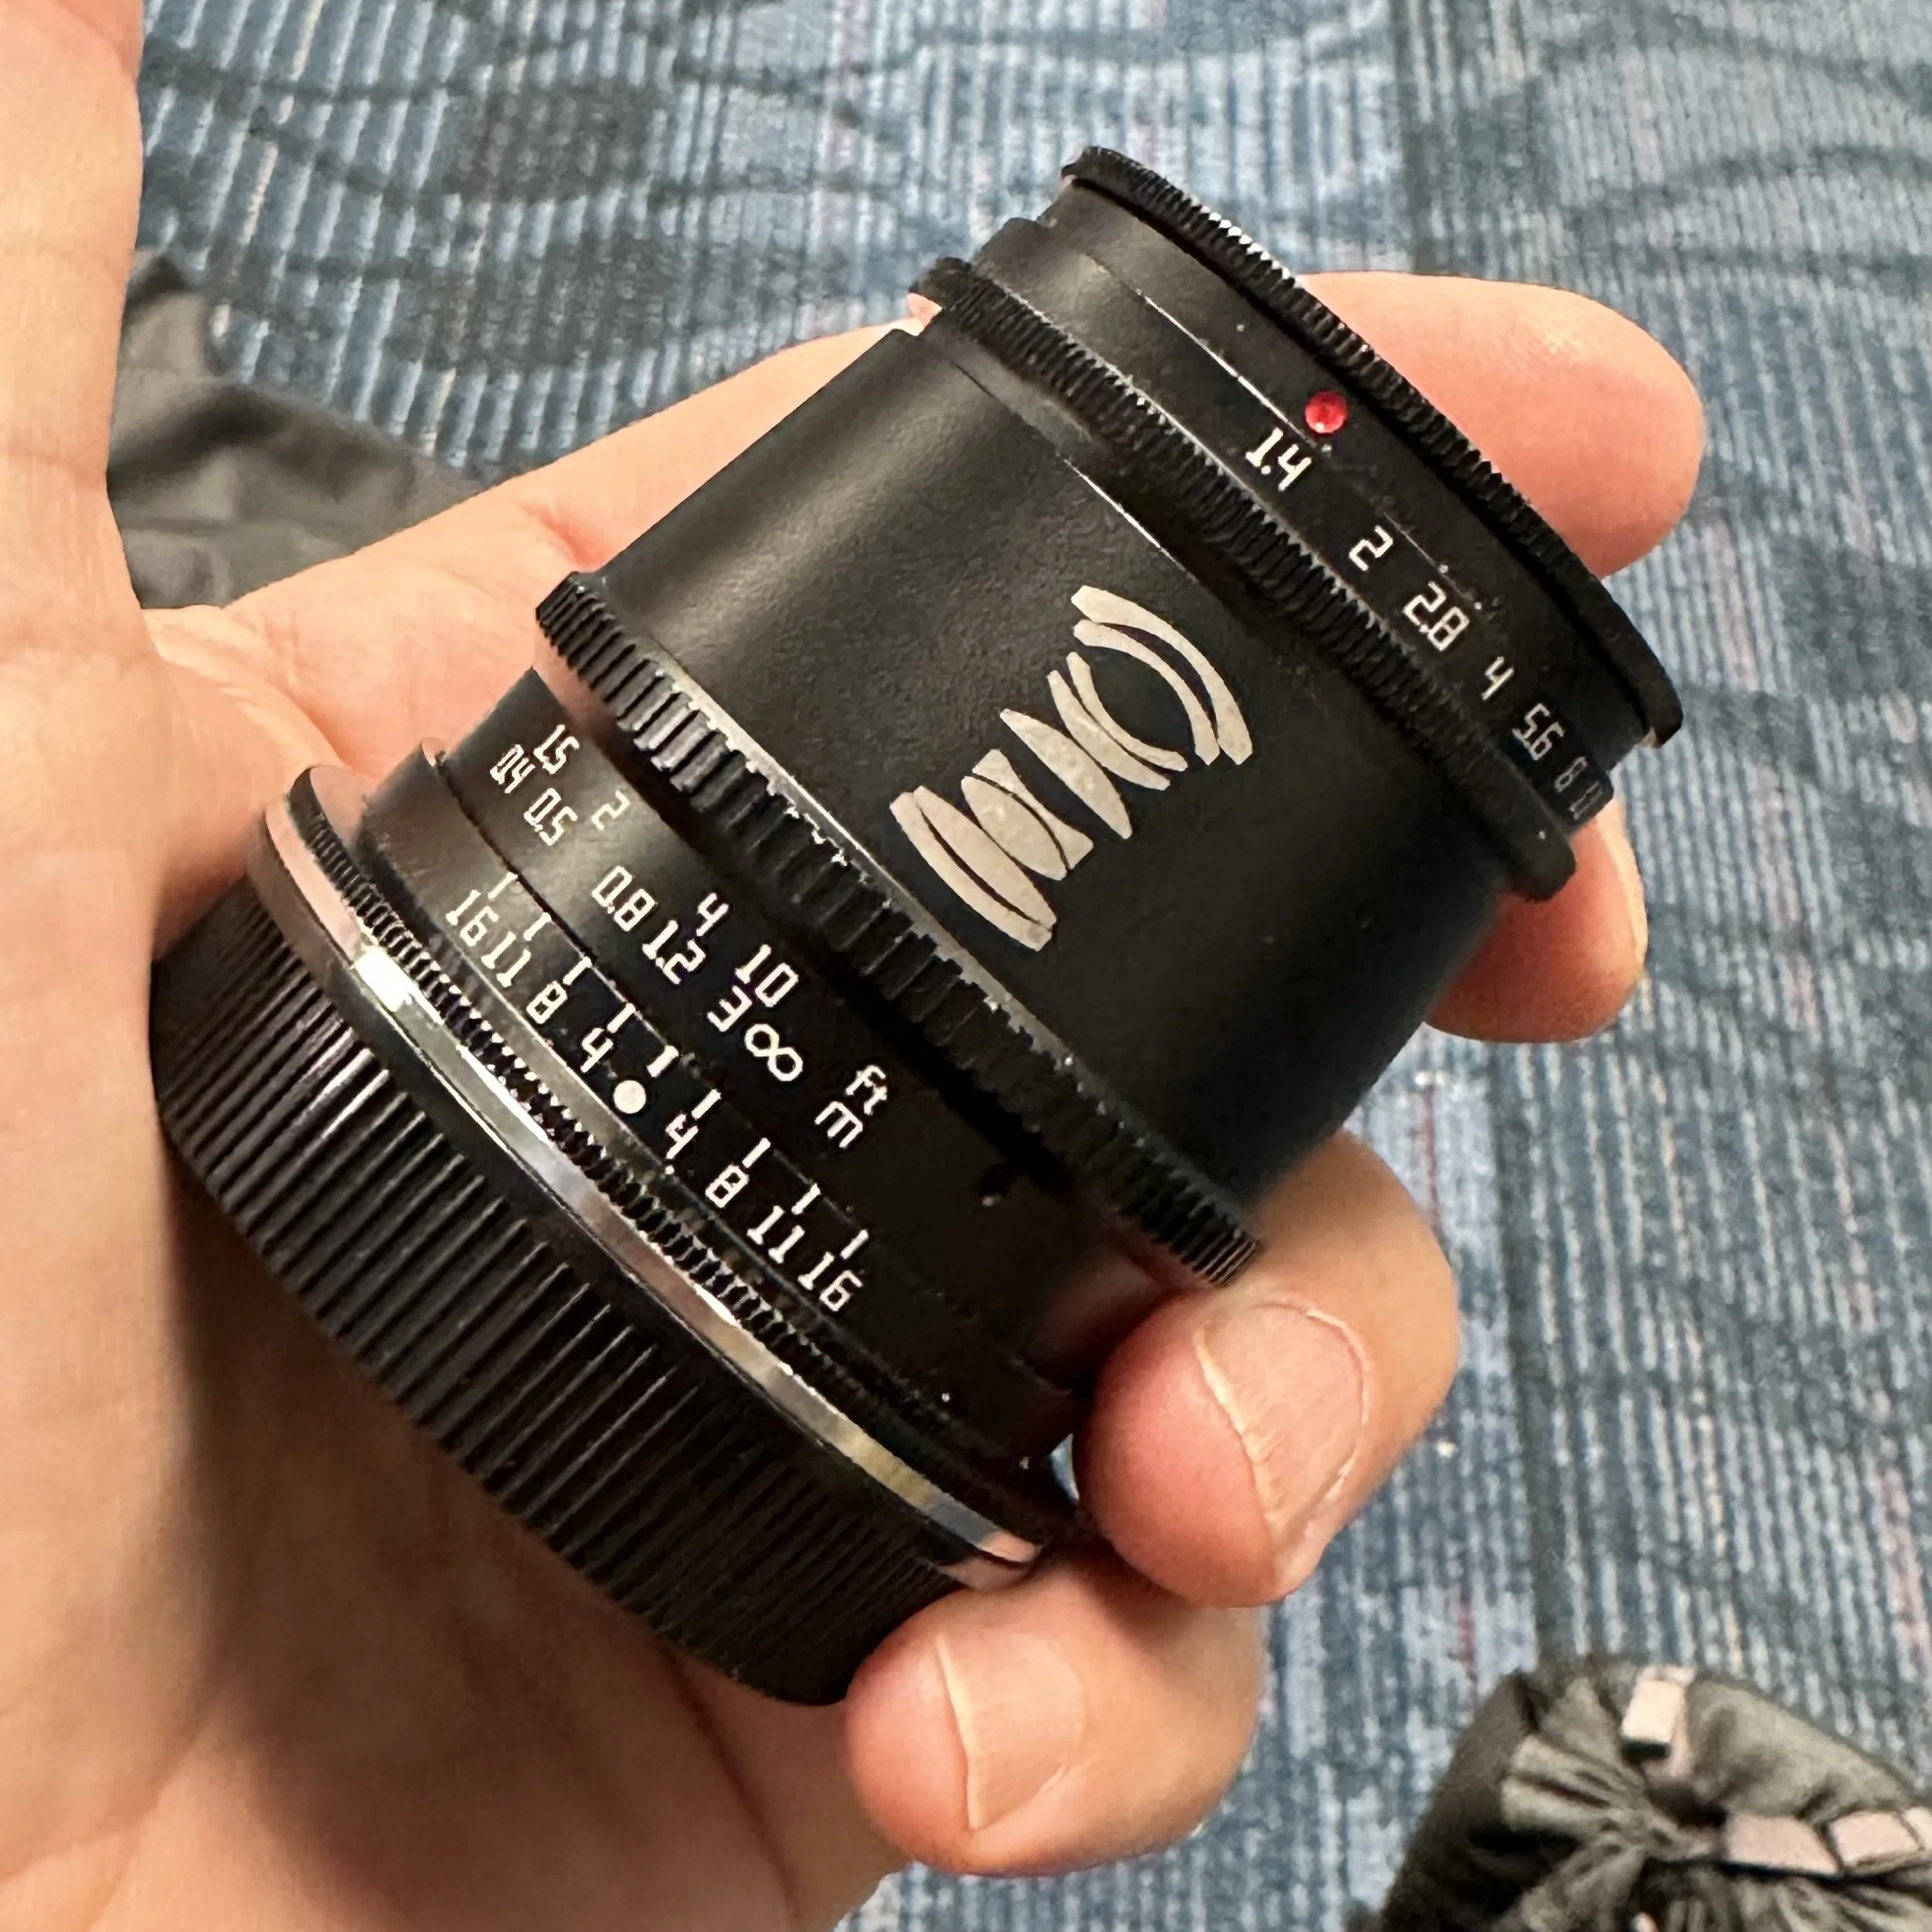
My vintage lens collection - living proof that GAS recovery is an ongoing journey!
Back then I took the idea of mounting one lens and using it for a period of time. Sometimes these periods of time could be quite long. I remember mounting the 35mm f1.8 and leaving it on the camera for months at one point. This is probably why I have gravitated back to that field of view today. Once you use a certain focal length a while, you will get comfortable with what that lens can do for you and you know what to expect. It is like asking an old friend for advice… you just know it is going to be good.
This "one lens" approach taught me more about photography than any gear upgrade ever could. By limiting my options, I learned to see in 35mm. I learned to move my feet instead of twisting a zoom ring. I started anticipating shots instead of reacting to them. This was my first step toward minimalism, though I didn't realize it at the time.

Early street photography from my Nikon D7000 learning phase - exploring light and composition
[Image placement here]
The Gear Acquisition Syndrome Phase
At some point I bought a big fast aperture zoom (the 70-200mm if memory serves me) and thought I was in hog heaven. Well, if you dont need a big expensive zoom lens, then why did you buy one? G.A.S. Is the usual culprit here and I am guilty of having this disorder of photography. I am recovering at this point though and at some point I simply stopped buying the latest camera because it was better than the last one or what ever. I still to this day cant seem to stop buying vintage lenses though so I am a work in progress… lol.
Every photographer goes through the GAS phase. We convince ourselves that the next lens, the next camera body, or the next upgrade will unlock our creative potential. The truth? It rarely does. That 70-200mm f/2.8 was an incredible lens, but I found myself leaving it at home more often than not because of the weight and bulk.
I have since figured out that with my photography, I dont need zoom lenses very often at all. I have figured out that I can have more fun with a nice prime lens and not worry too much about missing some special photo or some such. I have learned to just let some photos go and be more in the moment instead. You dont always have to get every single photo possible.
Prime Lenses vs Zoom Lenses: What I Learned
Prime lenses changed everything for me. Here's what I discovered:
Lighter kit = more shooting: A 35mm prime weighs a fraction of a 70-200mm zoom
Better low-light performance: Fast primes (f/1.8, f/1.4) let me shoot in conditions where zooms struggled
Creative limitations = creative growth: Fixed focal lengths forced me to think differently
Better image quality: Even affordable primes often outperform expensive zooms
The 35mm focal length became my signature. On DX format (Nikon D7000), this gave me roughly a 52mm equivalent field of view—perfect for street photography, environmental portraits, and everyday shooting. If you're looking for more on my current gear choices, check out my gear page.
Living Through the Viewfinder vs Living in the Moment
I went through this phase too. Living life through the camera viewfinder… this isn't really living but rather documenting and is not the same thing. This is why I now travel with a very light camera kit if I am going on a trip to do something other than photography for the primary focus of the trip. I feel it is more important to live in the moment than to worry incessantly on getting the best angle or exposure or whatever.
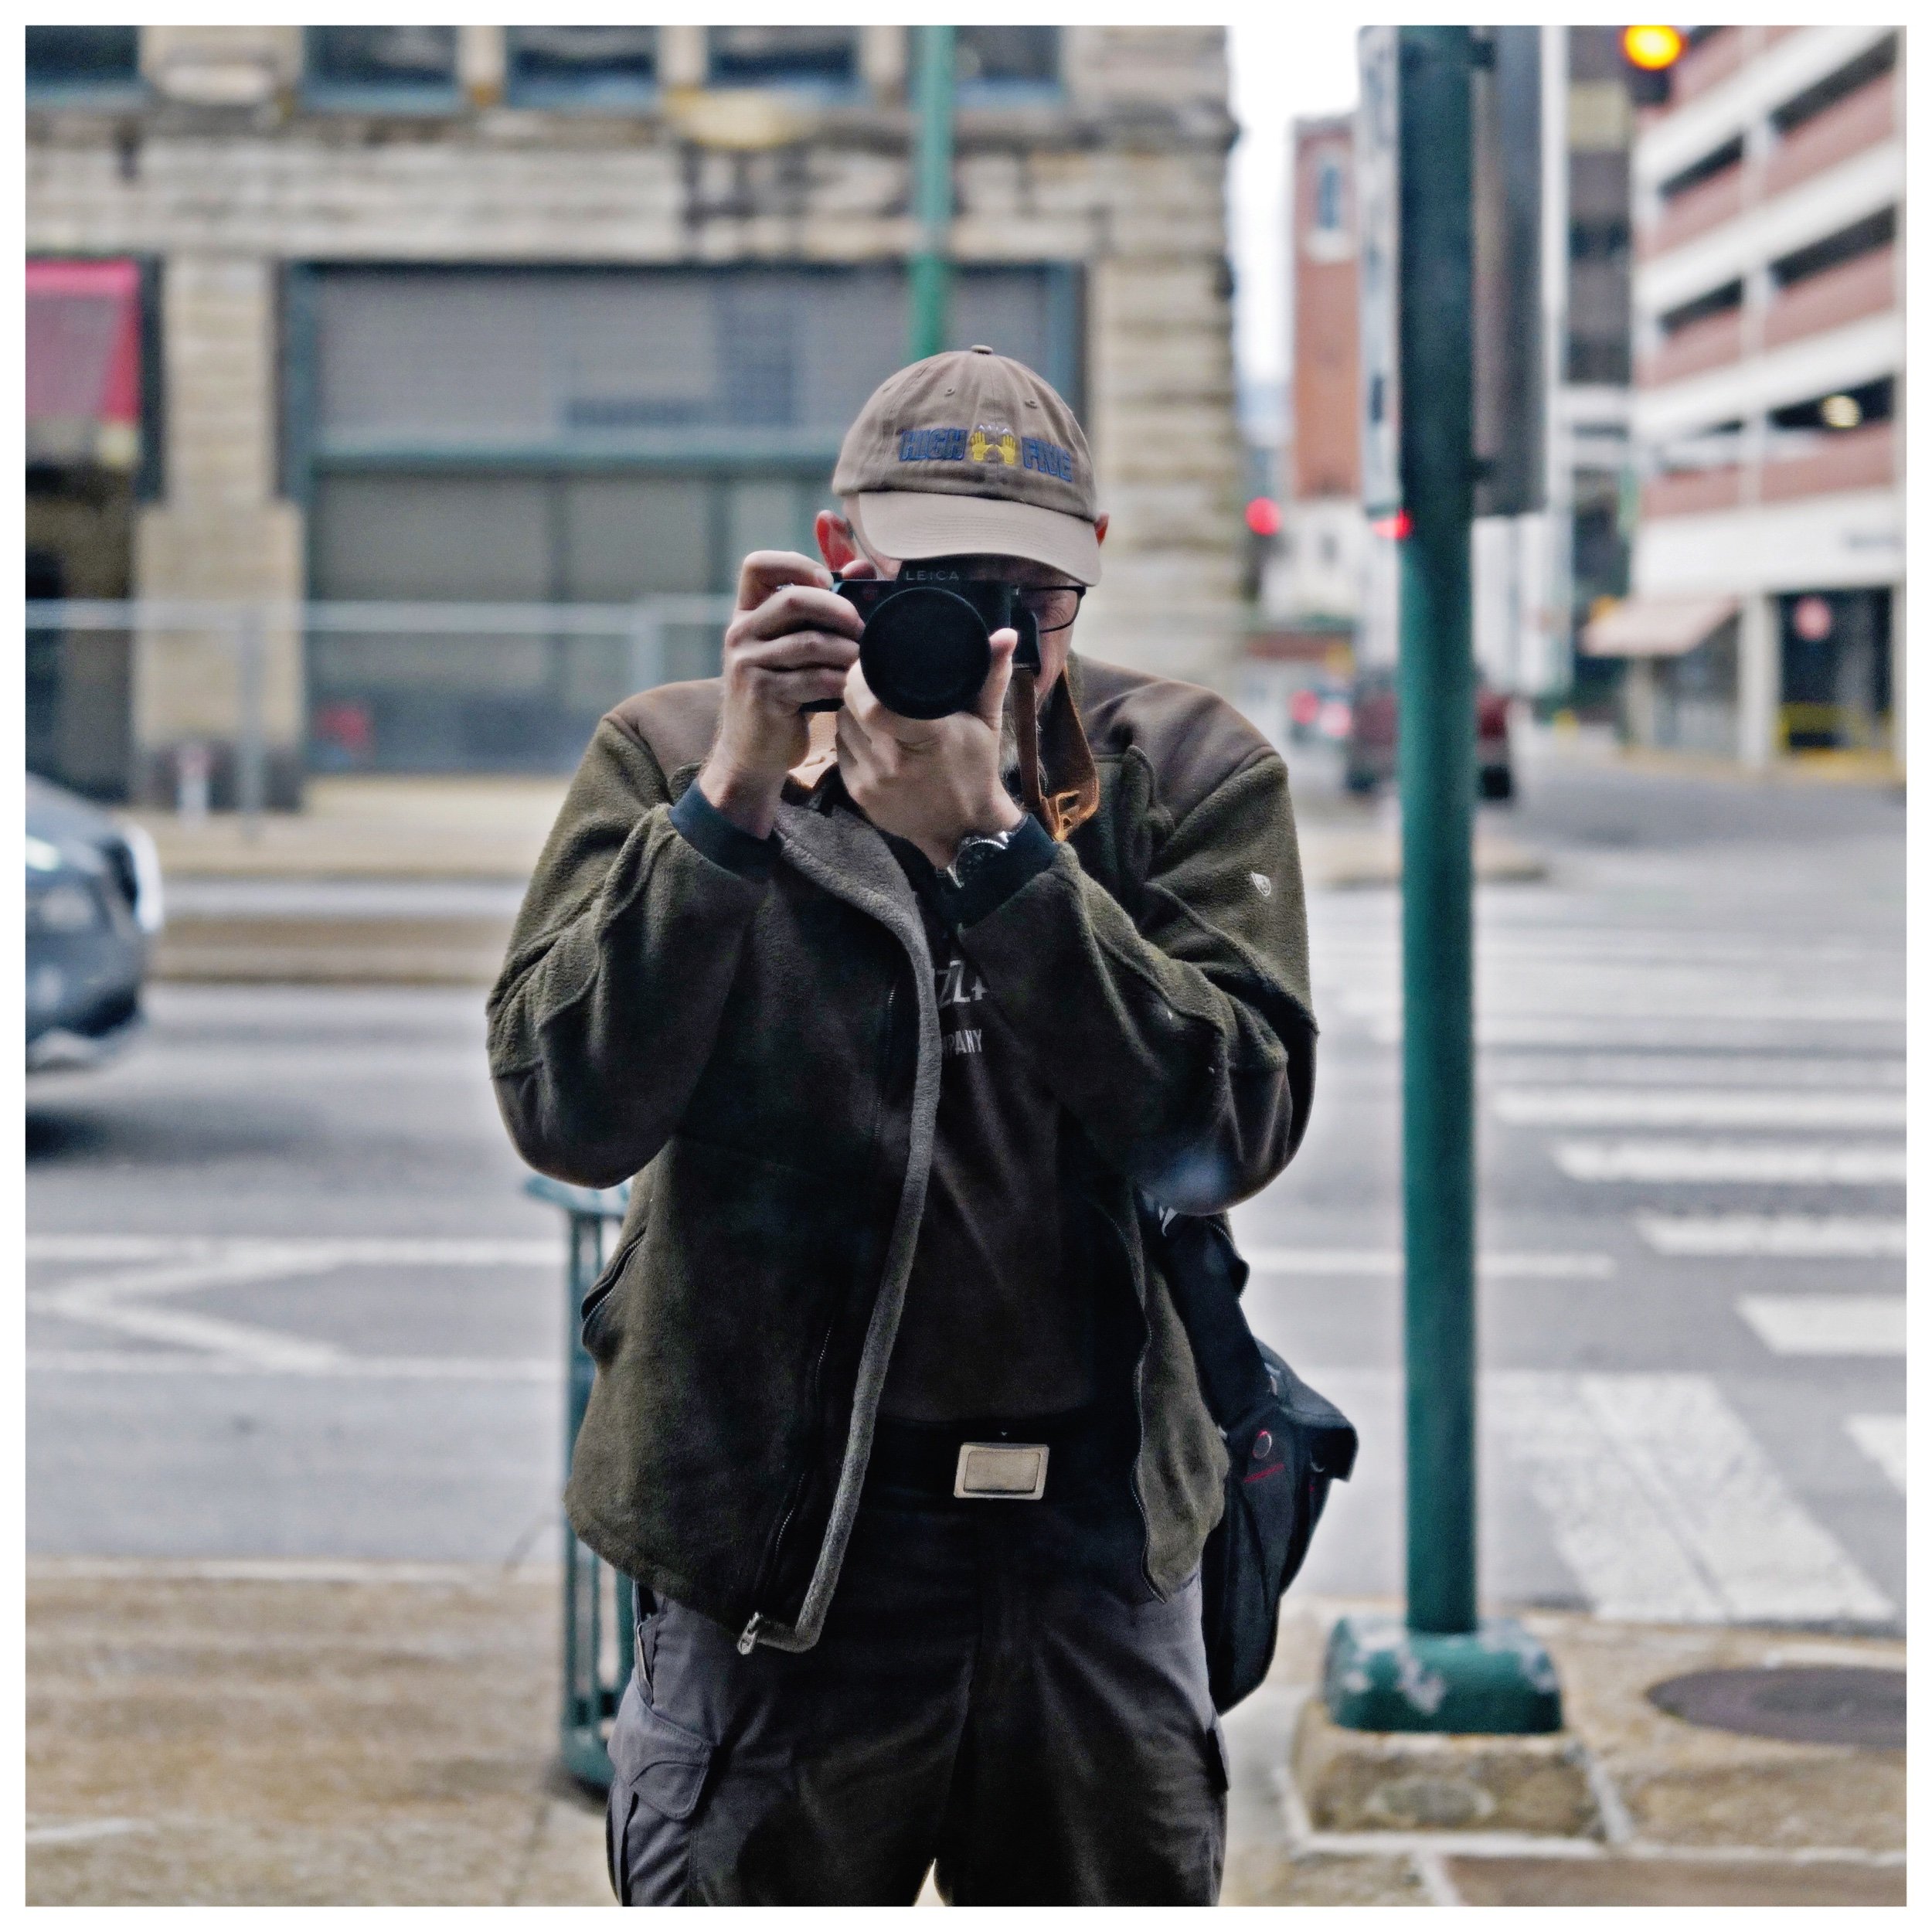
Early street photography from my Nikon D7000 learning phase - exploring light and composition
This realization was profound. I was so focused on capturing every moment that I wasn't actually experiencing the moments I was capturing. Family vacations became photo assignments. Dinners with friends became lighting challenges. I was missing the point entirely.
It is this last part that has taught me that I have evolved as a photographer. I no longer need to photograph everything possible and spend countless hours editing in lightroom to be happy. To be completely transparent about it, I only edit a very select few images in Lightroom these days just to get the "one" I want. I still shoot in raw plus jpeg to give me that choice but I rarely use the raw files.
My current approach: I shoot RAW+JPEG but use the JPEGs 95% of the time. The camera's built-in processing is usually good enough, and accepting that has freed me from spending hours at the computer. When I do edit, it's intentional—one or two photos from a day that really speak to me.
You can see this philosophy in action in my post about solo street photography with the Leica CL, where I discuss finding joy in the process rather than the pursuit of perfection.
My Photography Evolution: From Technical to Intentional
Looking back at your photography journey, have you progressed in a positive way?
For me, the answer is absolutely yes—but not in the way I expected. I haven't progressed by acquiring better gear or mastering more advanced techniques. I've progressed by:
Simplifying my kit - From a bag full of zooms to a single prime lens
Reducing post-processing - From hours in Lightroom to accepting JPEGs
Being more selective - From shooting hundreds of frames to choosing moments intentionally
Enjoying the process - From chasing the perfect shot to experiencing life with a camera in hand
My journey from the Nikon D7000 to my current Leica setup isn't about having better equipment—it's about understanding what I actually need and what brings me joy. The D7000 taught me the fundamentals. The prime lenses taught me to see. The GAS phase taught me what I don't need. And minimalism taught me what photography is really about.
You can see this philosophy in action in my post about solo street photography with the Leica CL , where I discuss finding joy in the process rather than the pursuit of perfection.
Frequently Asked Questions
Is the Nikon D7000 still good in 2024?
Yes, the Nikon D7000 is still an excellent camera for learning photography. While it lacks modern features like 4K video or advanced autofocus, its 16-megapixel sensor, built-in focus motor, and solid build quality make it perfect for beginners. You can find used D7000 bodies for under $300, making it an incredible value for learning the craft.
Should beginner photographers use prime lenses or zoom lenses?
I recommend starting with a prime lens, specifically a 35mm or 50mm. While zoom lenses offer versatility, prime lenses force you to move, think about composition, and really learn to see. They're also typically sharper, faster (better in low light), and more affordable than equivalent zoom lenses. Once you master a prime, you'll know if you actually need a zoom.
How do you overcome Gear Acquisition Syndrome (GAS)?
The best cure for GAS is to pick one camera and one lens and commit to using only that setup for 3-6 months. You'll quickly learn what you actually need versus what you think you need. I also recommend asking yourself: "Will this new gear let me take photos I literally cannot take with my current setup?" If the answer is no, don't buy it.
What focal length is best for street photography?
I prefer 35mm (on full frame) or 23mm on APS-C, which gives you a similar field of view. This focal length is wide enough to capture context but not so wide that it distorts subjects. The 50mm equivalent focal length is also popular and works beautifully—it's really about personal preference. Try both if you can. See examples in my street photography portfolio</a> to see how I use these focal lengths in practice.
Do you need to shoot RAW or is JPEG okay?
For most photography, especially if you're still learning, JPEG is perfectly fine. Modern cameras have excellent JPEG processing. I shoot RAW+JPEG and use the JPEGs 95% of the time. Only shoot RAW if you know you'll be doing significant post-processing or if you're shooting in challenging lighting conditions where you'll need maximum flexibility.

Support this website by using these affiliate links to shop on Amazon:
Leica M11 Digital Rangefinder Camera
Nikon AF-S FX NIKKOR 105mm f/1.4E ED Lens
Voigtlander Nokton 35mm f/1.4 II
Sandisk 128GB Extreme Pro memory cards
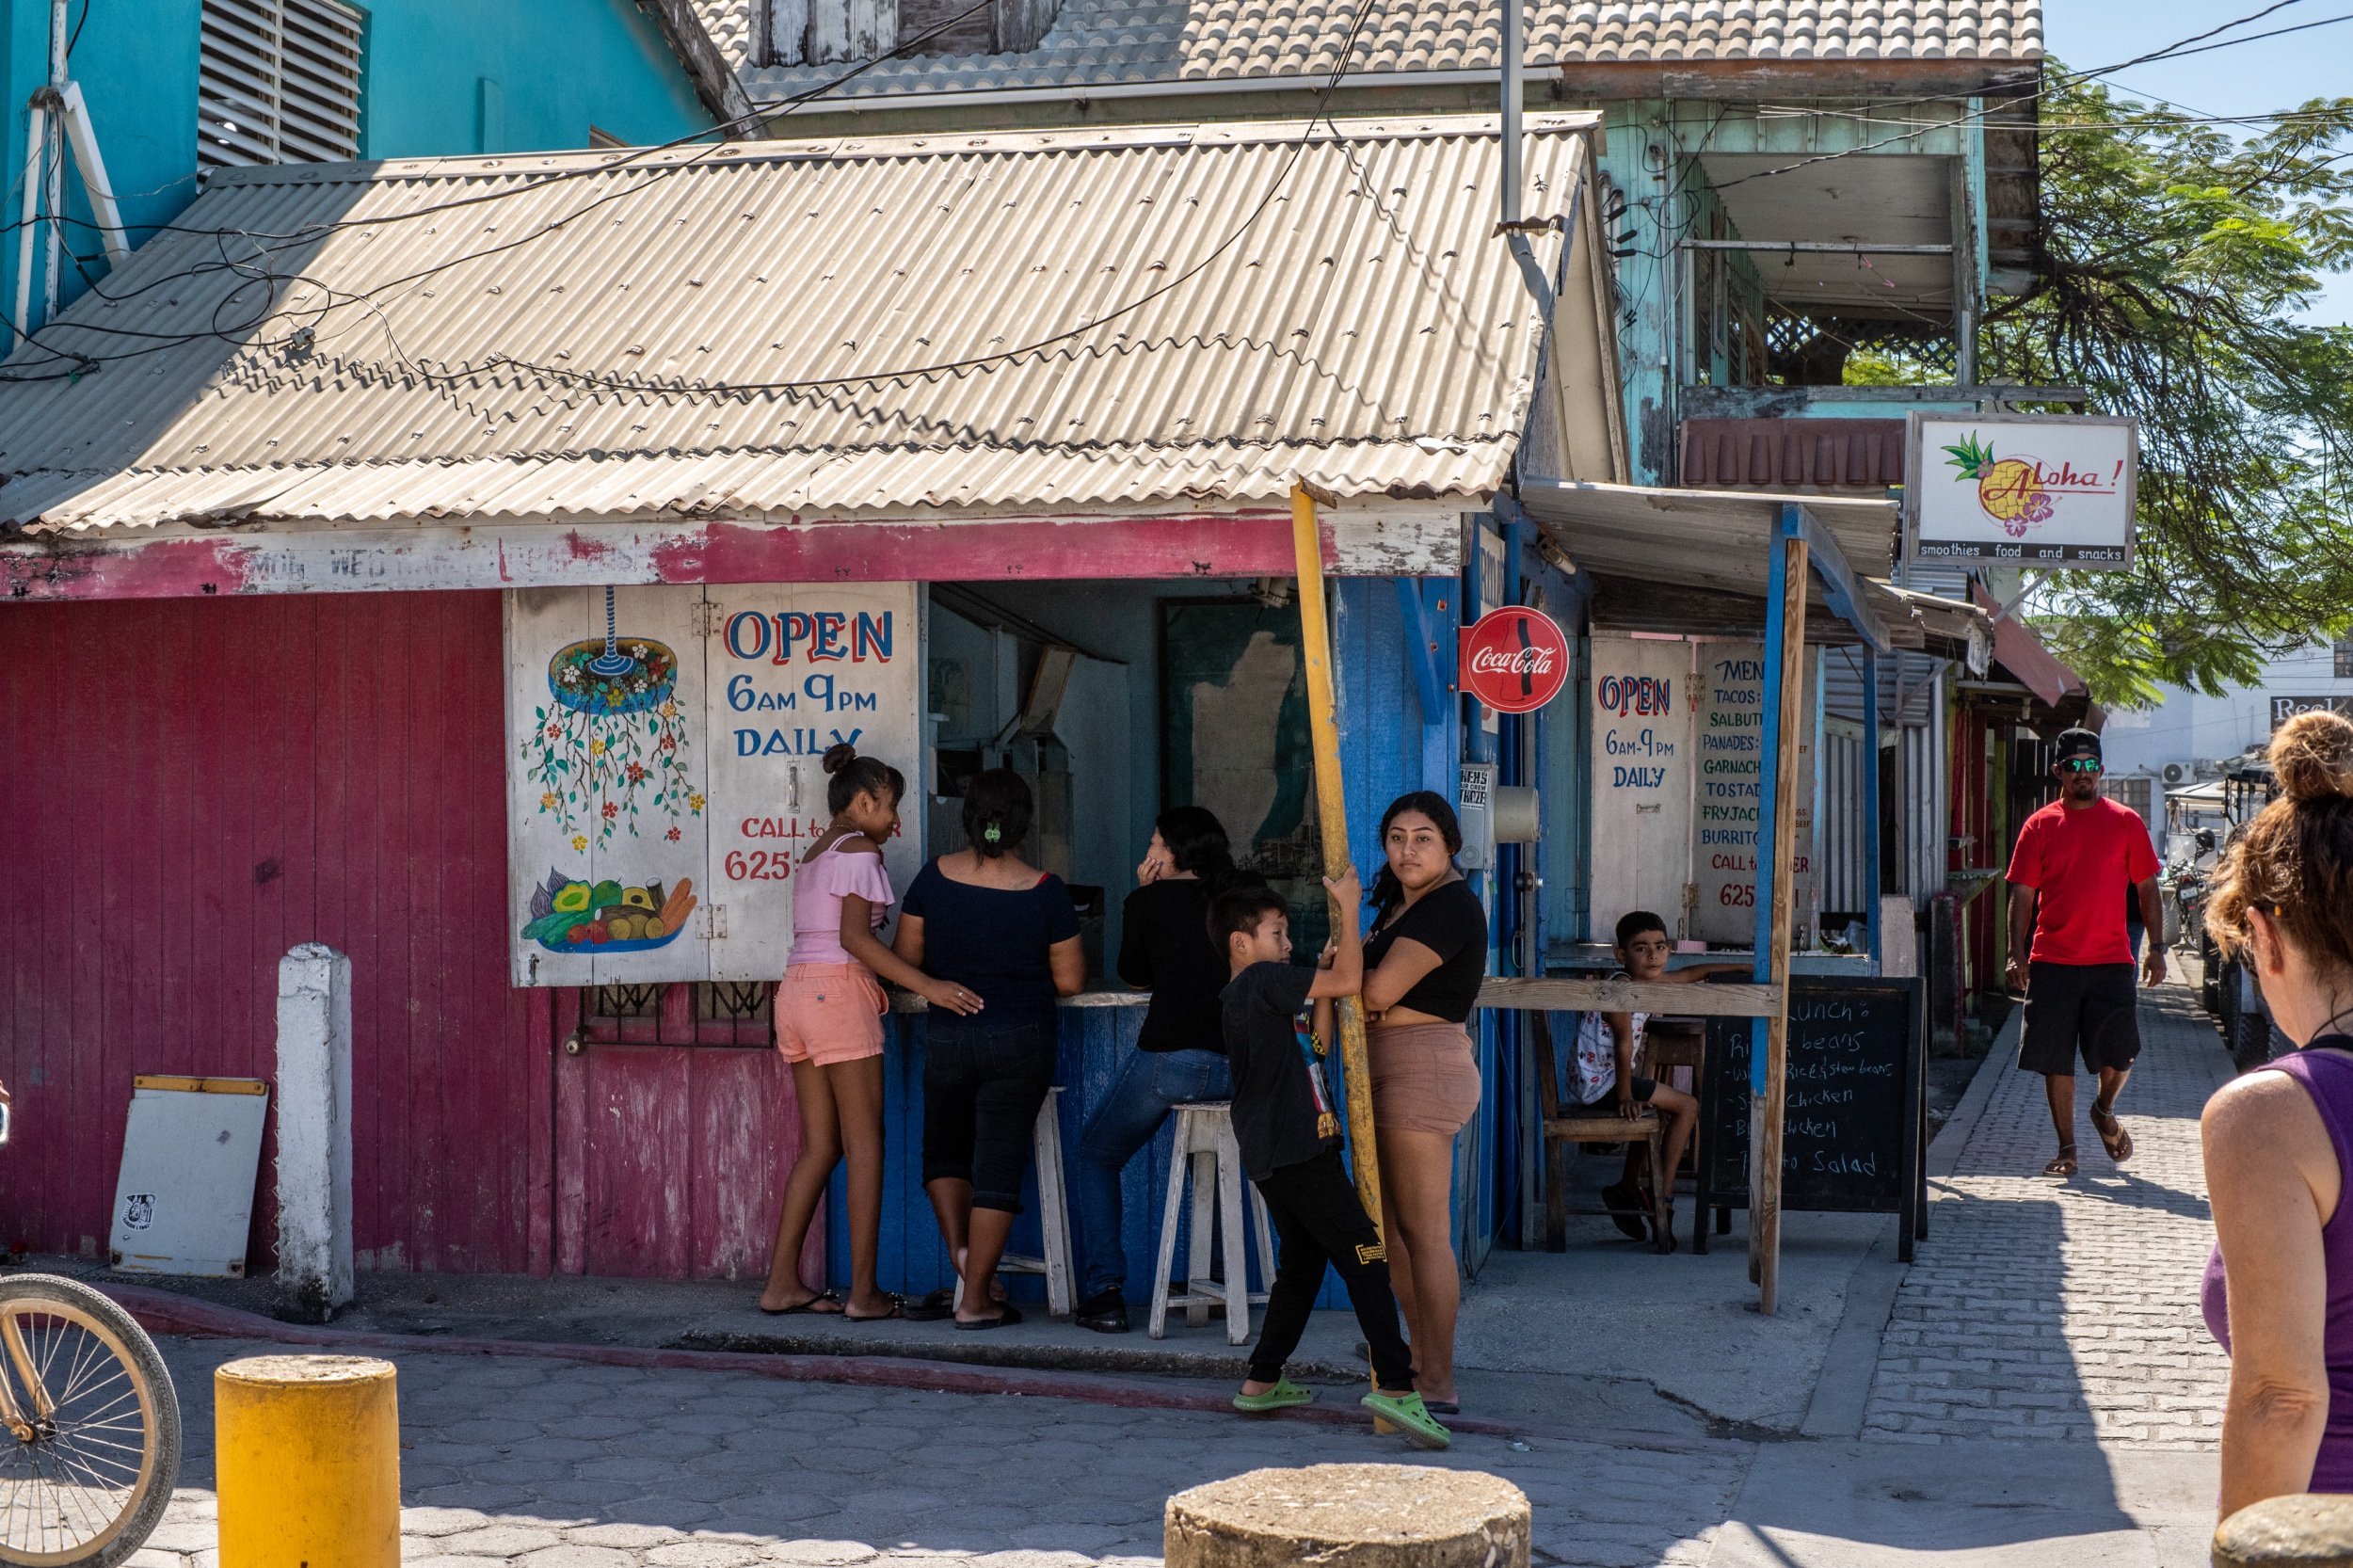
Photographing Belize: Nim Li Punit Mayan Ruins, San Pedro Street Photography, and Local Culture
To get a feel for a country, you have to step away from the glitz and glamour of the tourist areas (isn't that true for all tourist destinations though). In some places this can be life threatening but in others it can be very rewarding. Belize seems to be a lot like Costa Rica in this regard. Just about anywhere you go the people are nice and helpful from what I have seen.
To get a feel for a country, you have to step away from the glitz and glamour of the tourist areas (isn't that true for all tourist destinations though). In some places this can be life threatening but in others it can be very rewarding. Belize seems to be a lot like Costa Rica in this regard. Just about anywhere you go the people are nice and helpful from what I have seen.
This is part 2 of my Belize photography journey. If you missed part 1, read about my minimalist camera gear setup and travel philosophy first.
Exploring Rural Belize: The Journey to Nim Li Punit

Rural southern Belize - traditional homes and local life on the way to Nim Li Punit ruins
We saddled up and headed first to the Mayan ruins (it is an active archaeological site) and we got a wonderful "tour" of the rural part of southern Belize on the way over including things like the main modes of transportation being motorcycles and buses as well as seeing many traditional homes made with thatch roof construction. Many of these homes had no electricity or water service to them that I could see while others did. It is always interesting to learn how other parts of the world live.
Why photographing rural areas matters: The journey to the ruins showed me more about Belizean life than any resort could. This is where real documentary photography happens—not in the polished tourist zones, but in the authentic spaces between destinations. Motorcycles and buses dominate the roads. Thatch-roof homes mix with more modern construction. It's this contrast that makes travel photography compelling.
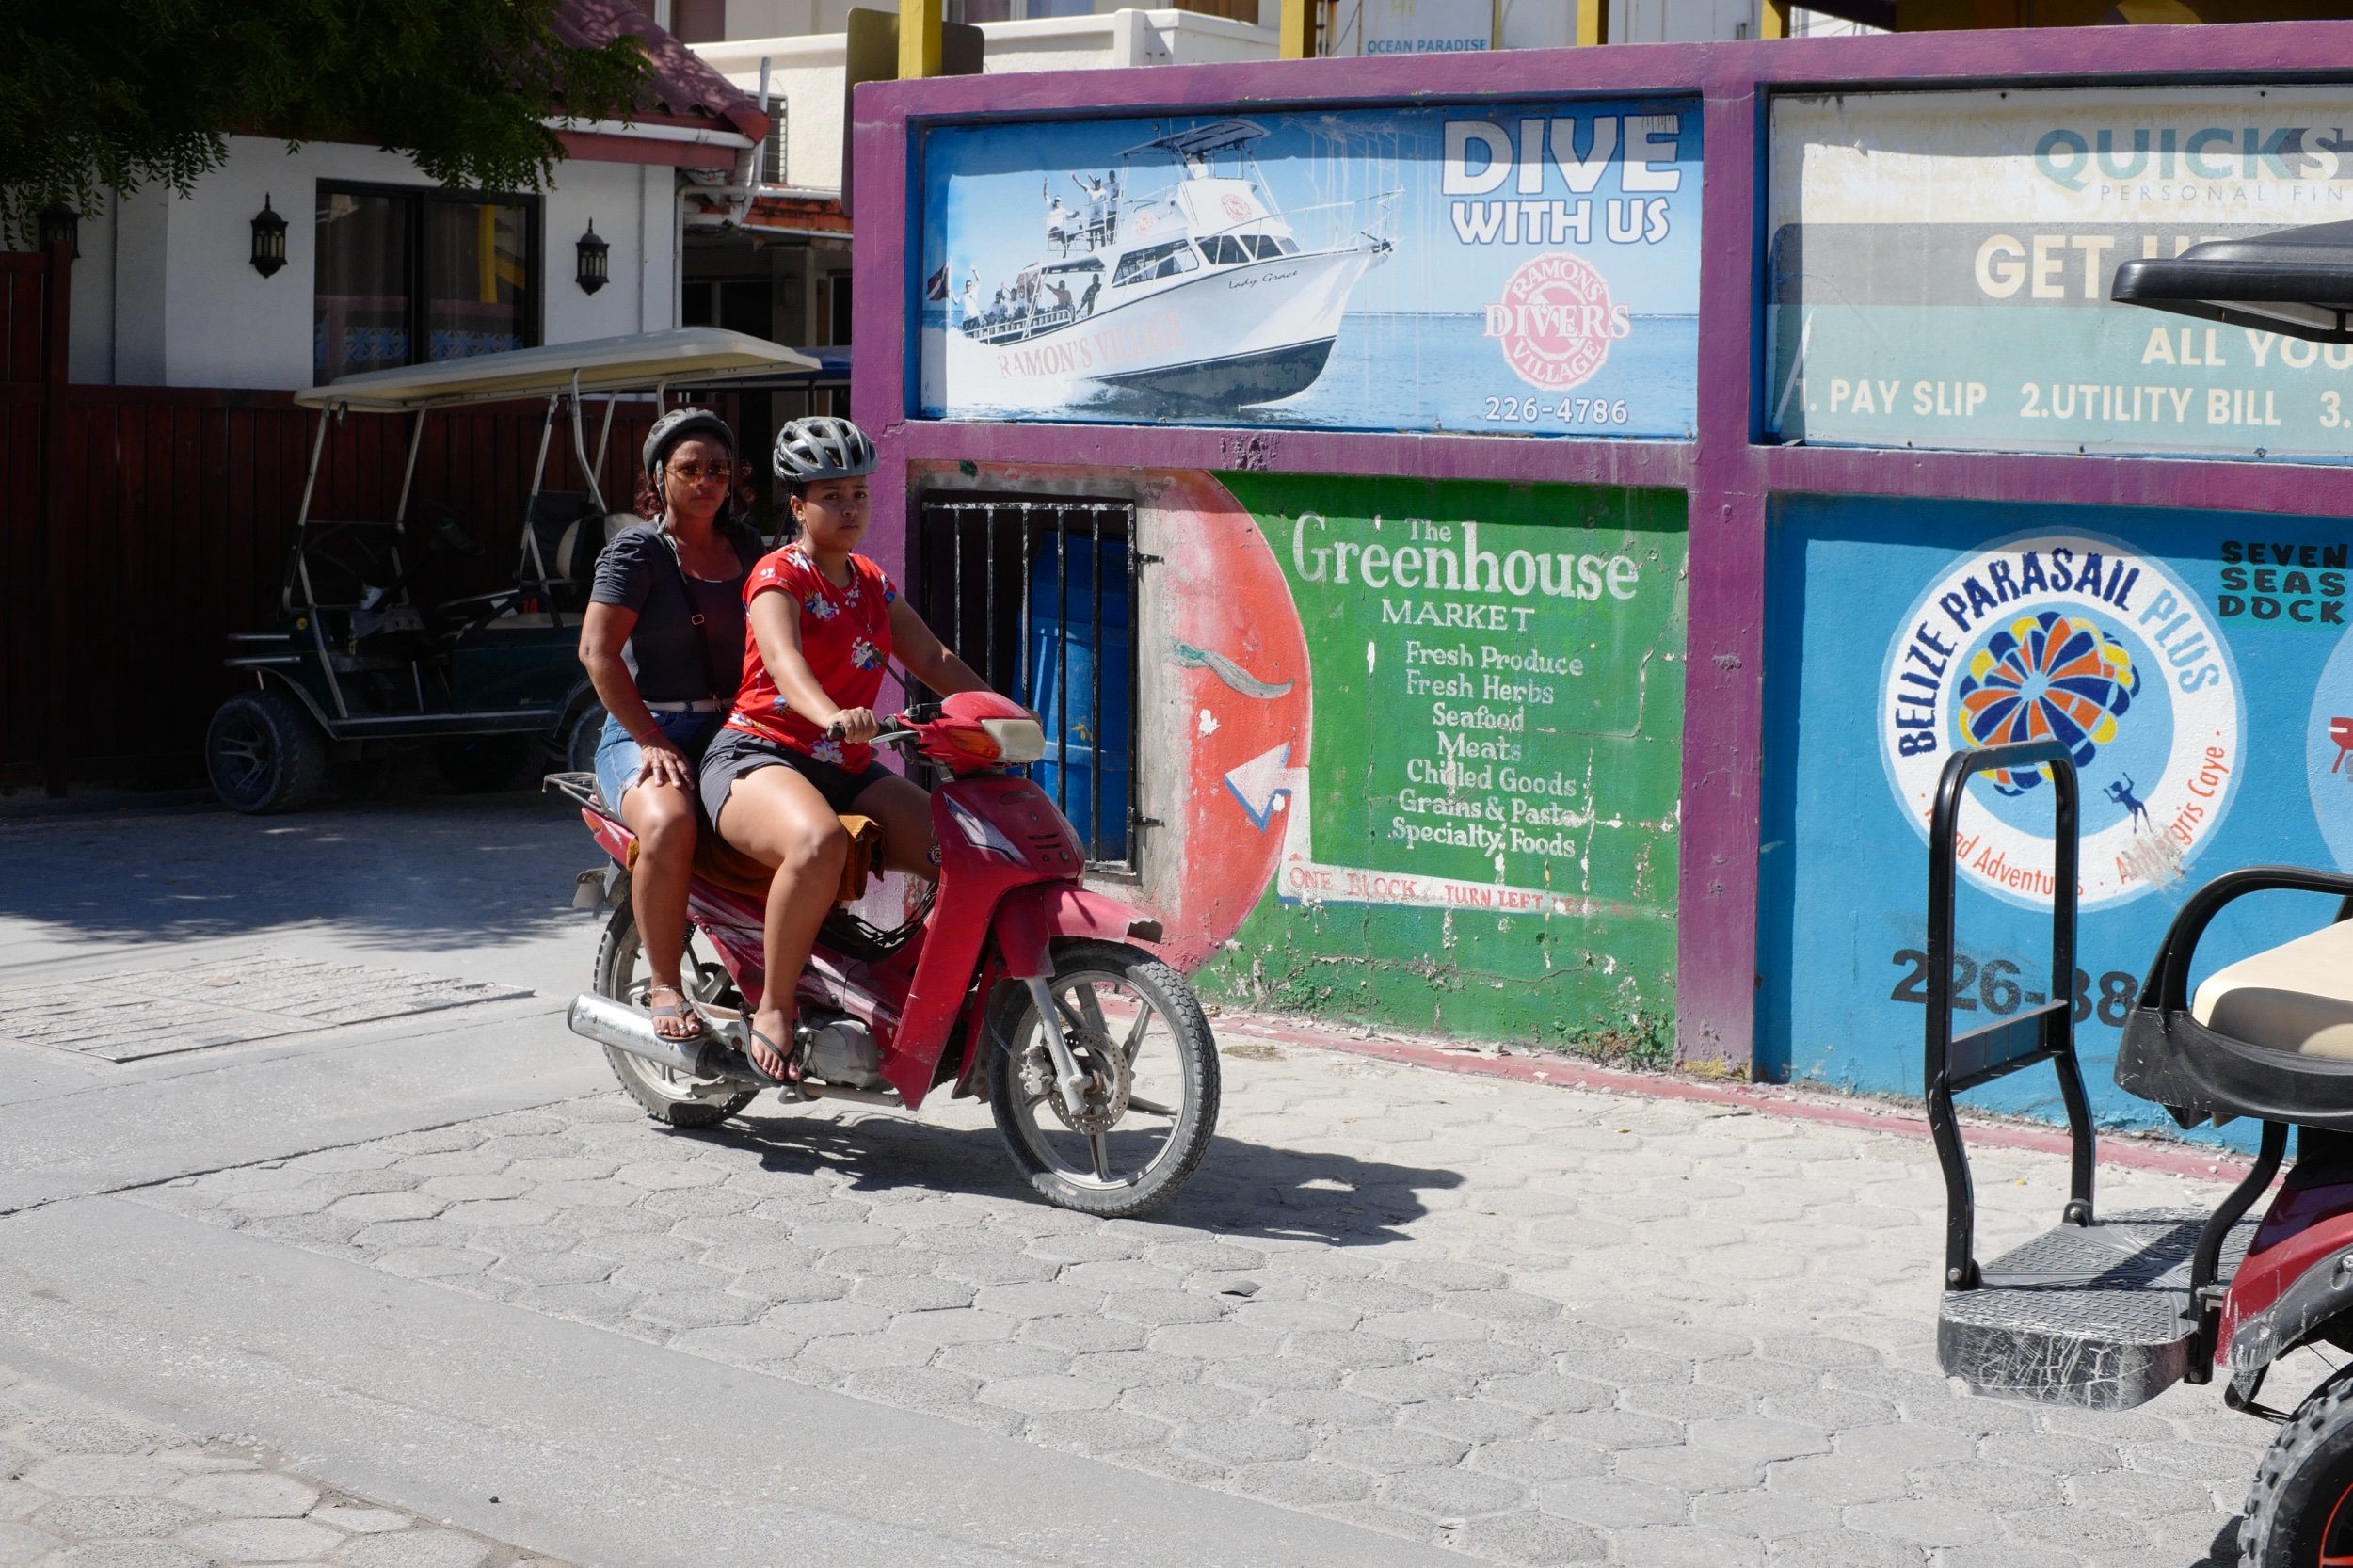
Motorcycles and buses dominate rural Belize transportation - a different world from the tourist zones
Nim Li Punit Mayan Ruins: A Photographer's Hidden Gem
We arrived at the ***Nim Li Punit*** site and get a class on decoding some of the Mayan glyphs that were carved into several stela that were found on the site. We learned how they counted and their numbering systems and how they marked their calendars as well. It was really awesome to see how all this worked on an actual artifact that you can touch.
This site is a smaller site that is easier to access with less crowds and therefore more freedom to navigate yourself without the pressures of large tour groups moving through. There were some tour groups but they were much smaller and didn't choke off the entire area while there.
Why Nim Li Punit beats the famous ruins for photography: Unlike Tikal or Chichen Itza, Nim Li Punit is uncrowded. You can take your time composing shots without tourists walking through your frame. You can touch the actual stelae. Small tour groups mean you can shoot freely without feeling rushed. For travel photographers who want authentic archaeological site photos without the crowds, this is a secret weapon.
I am not sure if the remains that were intact were original or if they were reconstructed for tourism, but it was really interesting to see it nonetheless. I know some was reconstructed as there was mortar in places holding a couple of stones together but the bulk looked original so I let my mind play that game.

Nim Li Punit - an uncrowded Mayan ruins site perfect for photographers who want freedom to shoot
Photography tip for ruins: Look for the details. The carved glyphs on the stelae tell stories. The weathered stone textures. The jungle encroaching on ancient structures. These details make compelling photographs that wide shots of the whole site can't capture.
The Spice Farm: Unexpected Photography Opportunities
On the return trip we stopped for lunch at a spice farm and toured the farm. It was incredibly interesting to see how many different spices they had at one place. Another thing that was interesting was seeing the spices in their natural form in nature. Things like black pepper vines and vanilla as well as other spices I had never heard of before. It was really informative as well as entertaining. After that it was a fairly long drive back to the accommodations for supper and a nap. Haha.

Spice farm tour - seeing vanilla, black pepper, and other spices in their natural form
Pseudo macro photography without a macro lens: The spice farm was perfect for close-up photography, and I only had my 17mm and 35mm primes. The lesson? You don't need specialized gear for every situation. Getting close and using creative framing can produce compelling images even with "normal" lenses.
Moving to San Pedro: A Different Side of Belize
After our stay in Placencia we traveled to another small community called San Pedro on an island. You can get there by plane or ferry.
Flying Tropic Air between Belizean destinations - 10-12 passenger planes flying at low altitude
We flew Tropic Air which uses this fleet of 10 or 12 passenger planes as seen in the photo above. Every plane they have is this particular make and model as well as their competitor, Mayan Air. It is kinda neat to do low altitude flights from town to town. You can see a lot of things normally not within your view. I also pack my camera gear in my pack for travel and stow all of it except my action camera in my pack for safe keeping. This way I don't leave something behind when changing locations. Another side effect though is that I get no high quality photos when the gear is in this condition so it isn't a perfect system by no means… Once on the ground in San Pedro, I will recover it for the evening. I have high hopes that San Pedro will have more photography opportunities than where we stayed in Placencia. Actually, there was a ton of things I wanted to photograph but didn't have time due to the schedule being so full. Lol.
San Pedro Reality Check: Tourist Trap or Photography Paradise?

San Pedro's tourist-focused atmosphere - beautiful but heavily commercialized
Well, I really dont care for San Pedro to be perfectly honest about it. The whole atmosphere is geared towards liberating money from tourist's wallets… this is not enjoyable at all to me. I dont mind paying a fair price for things that cost money but if you are not very careful, you will overpay significantly for the same activities offered just a few hundred meters away. I just want to be left alone to enjoy my time in peace. I really don't know how I feel about this yet to be honest… one thing is I am here in their country kind of in the way and on the other hand the infrastructure is literally being built to support that attendance… tough call to be honest.
Honest travel photography truth: Not every destination lives up to expectations. San Pedro is heavily commercialized, which can be frustrating if you're looking for authentic experiences. But this tension—between tourism infrastructure and local life—is itself worth documenting. The photography opportunities exist, but you have to work harder to find them.
Finding Authentic San Pedro: Early Morning Photography Walk
The first day we went into town for coffee as our villa doesn't have any means to make coffee in it…(not cool)… but it did afford us an opportunity to see some stuff in the early morning that we would not normally see. Like the "Central Park" of San Pedro which is where they put up all the big Christmas and New Year's decorations. It also has the giant sign at this park as well. It is common in Central American culture to have this kind of sign in each city for some reason. I kinda like it though as it is a cool photo opportunity.

San Pedro's Central Park - the classic Central American city sign photo opportunity
Best time for travel photography: Early morning. Before the tourist crowds. Before the heat. When locals are going about their daily routines. This is when you'll find the authentic moments worth photographing.
The sheer number of golf carts on this island is staggering to say the least. Golf carts are the primary means of transportation here and really are convenient to be honest about it. We have a golf cart too so l can't complain but wow, there are a lot of them. There are enough that they become a focal point of some photos.

Golf cart culture in San Pedro - they're everywhere and they're the main way to get around
Street Photography in San Pedro: Capturing Local Life
It was fairly interesting to me to see the Belizean people in their day to day lives more than to see all the tourists two streets over. I found them to be wonderful subjects for simple street photography and I saw several more that would have been great photos if I had been able to spend more time out with my camera.

Street life in San Pedro - shot at f/11 with zone focusing for fast, decisive moments

Street life in San Pedro - shot at f/11 with zone focusing for fast, decisive moments

Street life in San Pedro - shot at f/11 with zone focusing for fast, decisive moments
My street photography approach in San Pedro: I shot at f/11 with zone focusing. This means I pre-focused the lens at a certain distance, stopped down for depth of field, and simply composed and shot. Fast. Decisive. No chimping. This technique is perfect for street photography when you want to capture fleeting moments without missing the shot while fiddling with autofocus.
Above are some photos from our 3 mile photowalk that I was able to capture. The locals are so much more interesting to me than the tourists for some reason. Almost the whole photowalk was shot at f11 and range focus so I simply composed the photo and pressed the shutter. This makes for fast photos if you are attempting to capture a fleeting moment.
Another thing you will notice is how a lot of them are looking at me. This is the reason I don't do more street photography in Chattanooga, I stick out like a sore thumb due to my physical stature. Here though, I play the tourist card and get away with it. I just photograph all the things and sort it out later since my time here is limited.
Why manual focus beats autofocus for street photography: With zone focusing at f/11, everything from about 5 feet to infinity is sharp. No focus hunting. No missed moments. Just composition and timing. This is how street photographers worked for decades before autofocus existed, and it still works brilliantly today. For more on my street photography philosophy, check out my post on solo street photography with the Leica CL.
Night Photography in San Pedro: Central Park After Dark
Central Park at night - the decorations stayed up longer than they would in the US
This was taken in Central Park at night…obviously, but it was neat to find these displays still setup and under power a week later. Lots of municipalities in the USA would already be taking all this down.
Below is a photo I captured while waiting on supper to come out of the kitchen at a beachside restaurant. I simply sat the camera on a rock wall and leveled it with my iPhone under one corner since it is a 20 second exposure. My goal here was to get ocean smoothed out some for a cool foreground element. I also had to level the image a little and also set it to 16:9 crop as there was a lot of black sky above the buildings. Would it be better at blue hour? Only if you wanted some color in the sky. I like what I got and I was there at this time too so it worked out well for me.

20-second exposure improvised with rock wall as tripod - sometimes you make do with what you have
Long exposure without a tripod: Sometimes you make do with what you have. A rock wall, an iPhone as a shim for leveling, and a 20-second exposure. This is the kind of creative problem-solving that travel photography demands when you're traveling light without a tripod.
Construction and Culture: Documenting Belizean Building Methods
On our last day we just rode around and looked at the island in general and I found many things that were really interesting to me. The first photo below was interesting to me since I am American and in the USA you would never see this on an official construction site. These poles are locally cut sapling trees and they are holding up the concrete forms for the second floor of this building that is under construction. It was crazy, just how many poles were inside this building like this.

Belizean construction methods - using local saplings as supports, something you'd never see in US construction
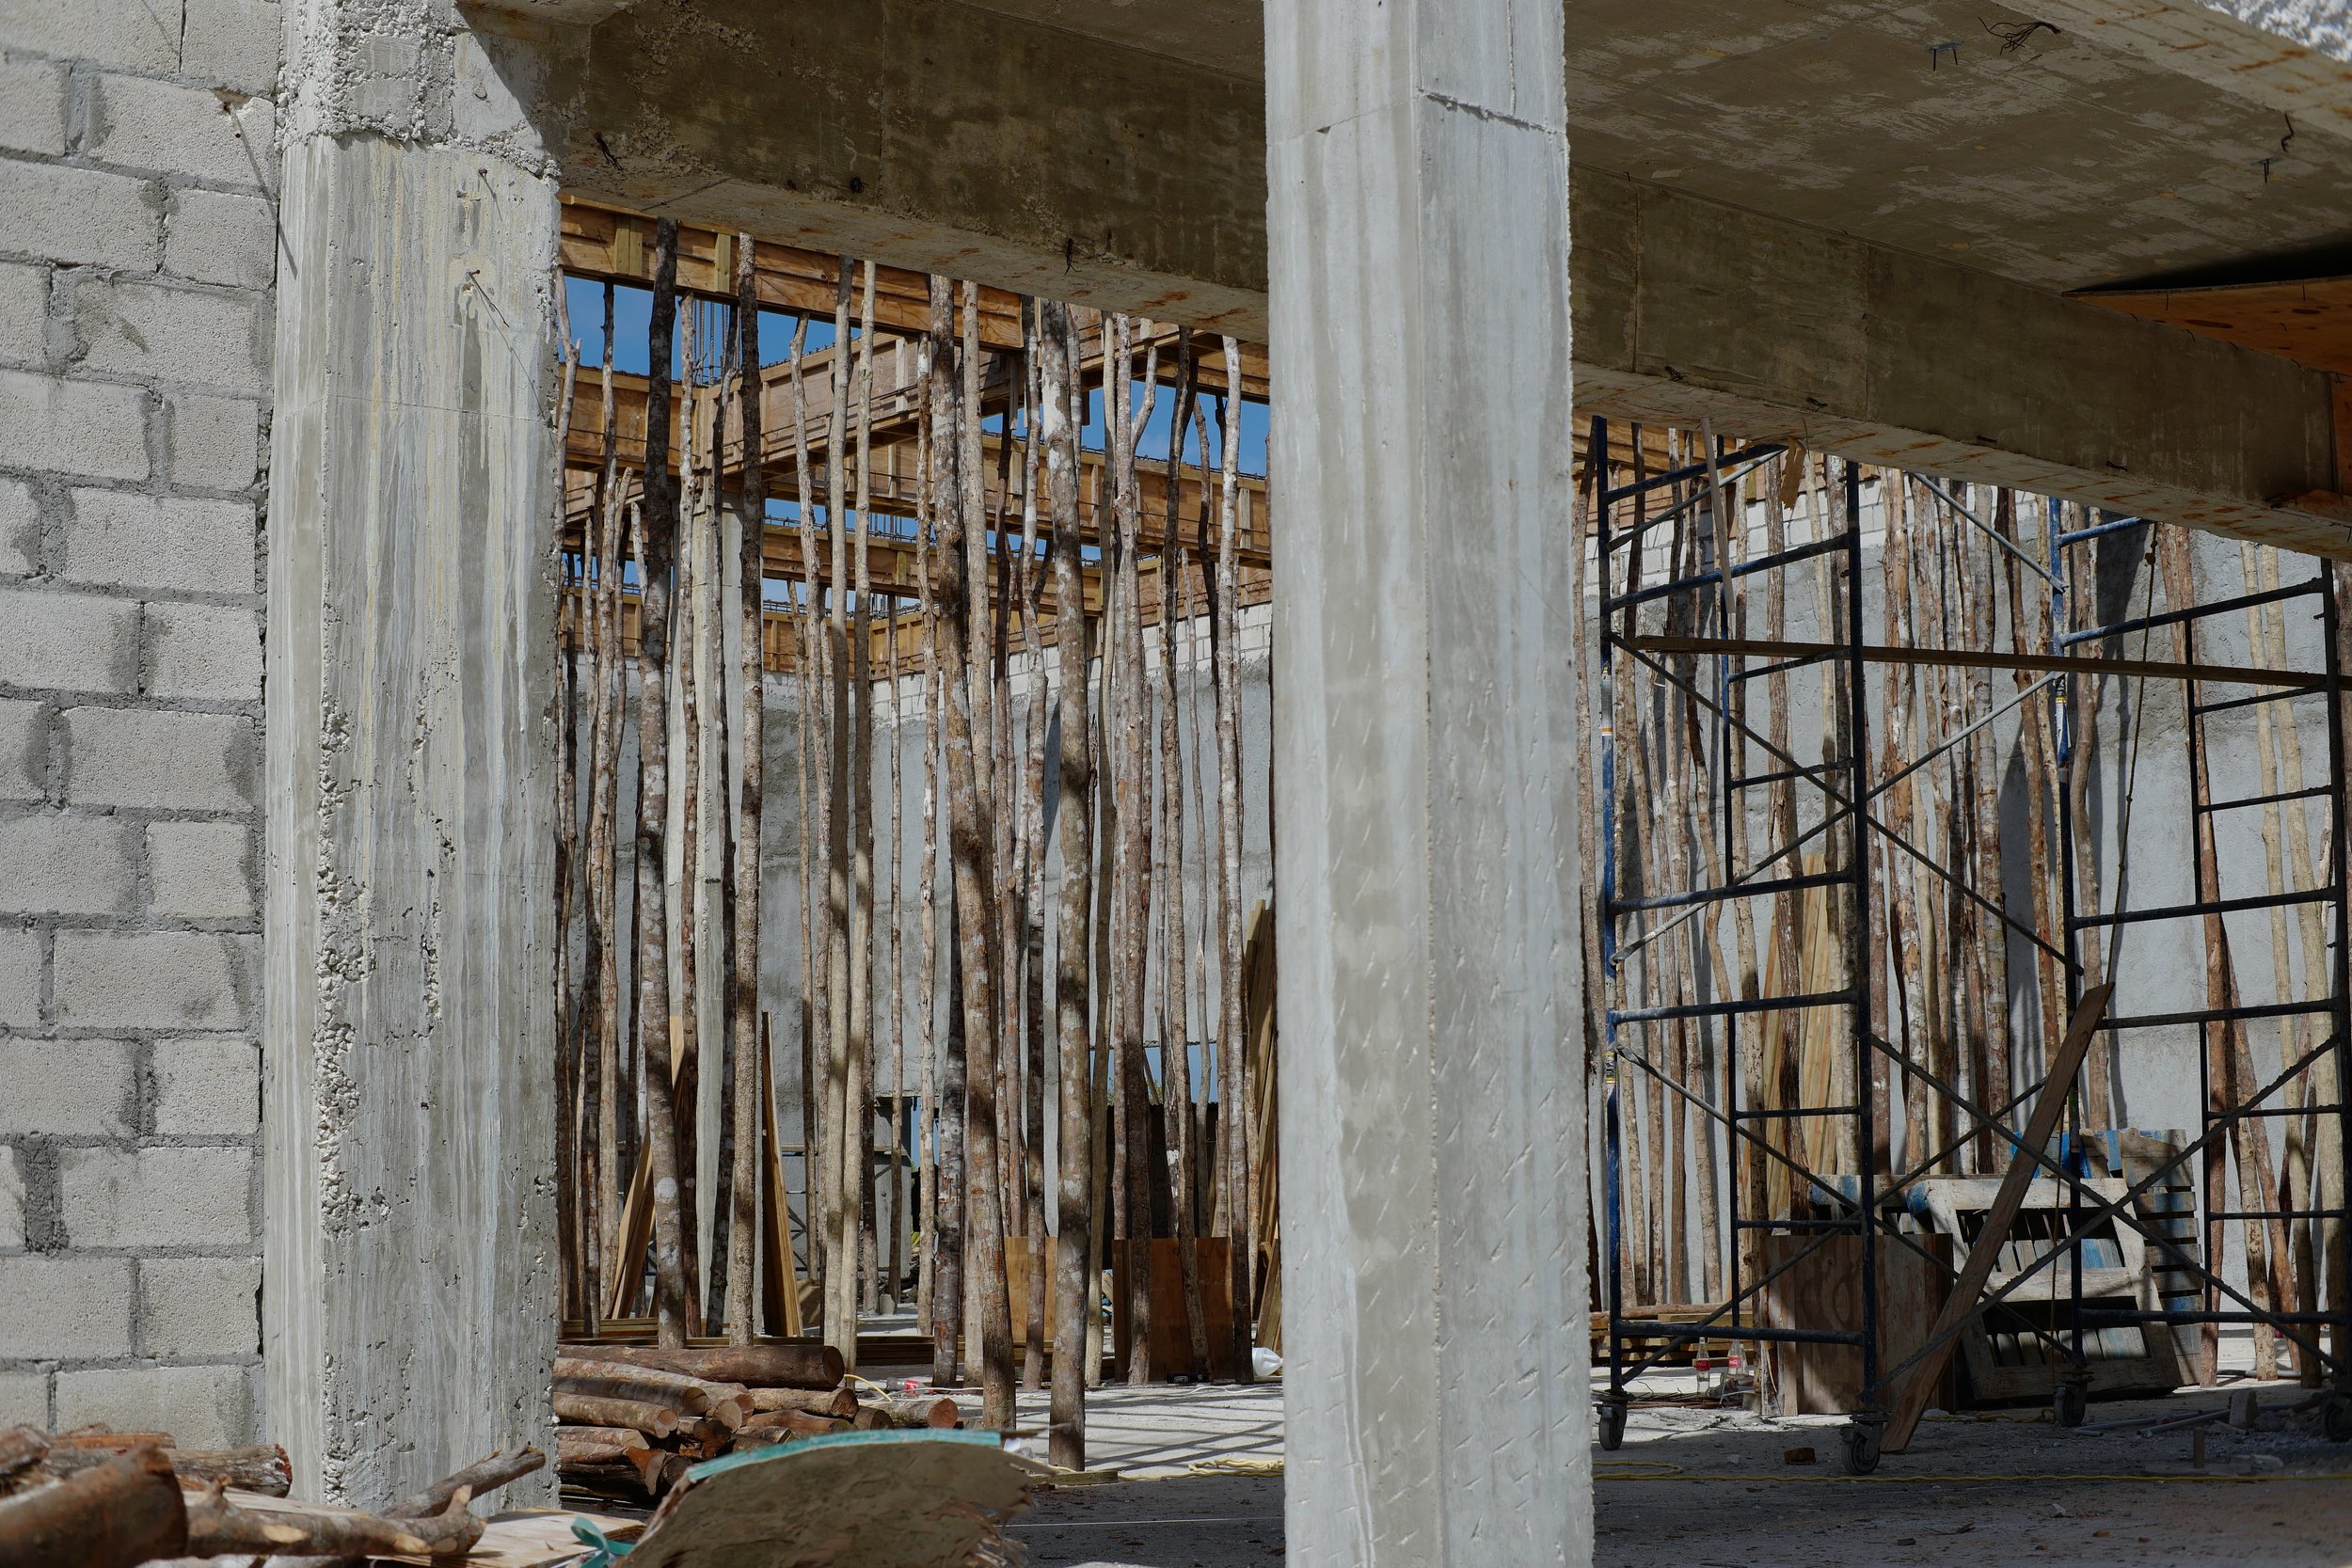
Belizean construction methods - using local saplings as supports, something you'd never see in US construction

Belizean construction methods - using local saplings as supports, something you'd never see in US construction
Documentary photography gold: This construction site shows how different building methods can be from country to country. In the US, this would never pass inspection. In Belize, it's standard practice. These cultural differences are exactly what makes travel photography compelling—you're documenting not just places, but different ways of living and working.
Final Thoughts: Real Talk About Belize Travel Photography
Thanks for tagging along here and I hope to share something new with you soon. Until then, get your camera out and take a picture with it.
Was Belize worth it for photography? Absolutely. But it's important to set realistic expectations. Placencia offered more authentic experiences than San Pedro. The ruins at Nim Li Punit were a highlight precisely because they were uncrowded. The street photography opportunities existed, but required effort to find them away from the tourist strips.
The gear worked perfectly. My minimalist Leica CL setup with just two prime lenses covered everything I needed. The 17mm for landscapes and architecture, the 35mm for street photography and portraits. Zone focusing at f/11 made street photography fast and reliable. Traveling with only a backpack eliminated stress and gave me freedom to move quickly.
Would I go back? Yes, but I'd skip San Pedro and spend more time in the rural areas and smaller sites like Nim Li Punit. The best photography in Belize happens away from the tourist infrastructure.
For more details on the camera gear I used on this trip, check out my minimalist Belize packing guide or see my current gear on my gear page
Frequently Asked Questions
Where are the best places to photograph in Belize?
The best Belize photography locations are Nim Li Punit Mayan ruins (uncrowded, accessible), rural areas between major destinations (authentic local life), early morning in San Pedro's Central Park (before tourist crowds), and Placencia (more laid-back than San Pedro). Skip the heavily touristy areas of San Pedro unless you're documenting commercialized travel culture.
What camera settings work best for street photography in Belize?
For Belize street photography, I used f/11 with zone focusing on my Leica CL and 35mm lens. This technique gives you 5 feet to infinity in sharp focus, eliminating autofocus lag. Pre-focus, compose quickly, and shoot. It's faster than autofocus for candid street moments and works in variable lighting without constant adjustment.
Is San Pedro Belize worth visiting for photographers?
San Pedro is heavily commercialized and tourist-focused, which can be frustrating if you want authentic experiences. The best photography happens early morning before crowds arrive, or by seeking out local neighborhoods away from the main tourist strips. Placencia offers better opportunities for authentic Belizean culture photography. If you do visit San Pedro, lower your expectations and focus on the contrast between tourism and local life.
How do you photograph Mayan ruins without crowds?
Visit lesser-known sites like Nim Li Punit instead of famous ruins like Tikal. Arrive early morning or late afternoon when tour groups are fewer. Nim Li Punit allows you to touch the actual stelae and photograph without constant interruptions. The trade-off is less dramatic architecture, but for photographers, the freedom and access more than compensate.
What's the best lens for travel photography in Central America?
For Belize and Central America, I recommend two focal lengths: a wide lens (17-24mm equivalent) for architecture, landscapes and environmental portraits, and a normal lens (35-50mm equivalent) for street photography and people. My Leica CL with 17mm f/1.4 and 35mm f/0.95 covered 95% of situations. Skip the zoom lenses—prime lenses are lighter, sharper, and force you to think more carefully about composition.
Can you do street photography in Belize safely?
Yes, Belize is generally safe for street photography. The locals in Placencia and San Pedro are accustomed to tourists with cameras. I photographed openly and never had issues. The "tourist card" works here—people expect tourists to take photos. That said, use common sense: avoid photographing in sketchy areas, ask permission when possible, and be respectful. Early morning photography sessions feel safer than late night.
Support this website by using these affiliate links to shop on Amazon:
Leica M11 Digital Rangefinder Camera
Nikon AF-S FX NIKKOR 105mm f/1.4E ED Lens
Voigtlander Nokton 35mm f/1.4 II
Sandisk 128GB Extreme Pro memory cards

Final street scene from San Pedro - capturing authentic moments before departure

Belize Travel Photography Guide: Minimalist Camera Gear and Packing Tips
Something we learned from the trip to England last year that was a basic revelation to us was that we don't need as much stuff as we think we do. This was because we had decided to hike the Canterbury trail in England. This forced us to leave everything behind that wasn't essential for the hike since we had to carry everything we wanted in our backpack.
When I started planning my Belize trip, I knew one thing for certain: I wasn't going to make the same mistake I'd made on countless other trips. No massive camera bag. No roller suitcase full of gear I'd never touch. This time, I was going minimalist.
This is a trip log of sorts, but it's also a lesson in how traveling light with your camera gear can actually improve your photography experience.
The Minimalist Travel Photography Philosophy
Something we learned from the trip to England last year that was a basic revelation to us was that we don't need as much stuff as we think we do. This was because we had decided to hike the Canterbury trail in England. This forced us to leave everything behind that wasn't essential for the hike since we had to carry everything we wanted in our backpack. Let me tell you, you can get brutally honest with yourself when it comes to hiking and weight in your pack. To the point of removing packaging from items to simply cull the dead weight.
This led me to also take a very hard look at my camera kit. I normally would take all sorts of lenses in the off chance I would get to do this or that kind of photography. I learned over the years though that I would end up carrying all this gear and never touch it.
The hard truth about travel photography gear: Most of what we think we "need" stays in the bag. Every extra lens is dead weight. Every "just in case" accessory is a burden you'll resent carrying. The Canterbury trail taught me this lesson through physical pain and exhaustion.
My Belize Camera Kit: Leica CL + Two Prime Lenses
Well, I looked at what we would be doing and what I figured I wanted to capture and I took just one camera and two small prime lenses. A crop sensor camera and a 17mm along with a 35mm lens is all I needed. This would cover 99% of what I would be shooting and I would be able to carry it easily in my backpack.
Now, I am on another trip out of the country and I am applying the same principle again. The kit is just as small as last time but with less charging gear. I only brought chargers for USB only this time. This may prove to have been a mistake but we will see. I am also carrying only the back pack again as well.
My complete Belize camera kit:
- Leica CL (crop sensor camera body)
- 17mm f/1.4 lens (for landscapes and general photography)
- 35mm f/0.95 lens (for street photography and low light)
- 3 spare batteries (I usually only use two per day)
- One USB charger and cable (works for both camera and action cam)
- DJI Osmo Action (for video/vlogging)
- Lume Cube Panel Mini (portable fill light)
- No lens cloths, no rocket air, no card wallet, no spare lens caps, no tripod
That's it. Everything fits in a small belt dump pouch that serves as my camera "bag." What doesn't fit goes in a ziplock bag. Total weight? Maybe 3-4 pounds including the action camera and accessories.

The complete Travel photography Camera Kit in one photo!
Why Backpack-Only Travel Changed Everything
The reason I like to travel with a backpack now is that there is no baggage to check or pickup…or lose, since I have it with me at all times. Plus the airport maneuverings is also much easier too. Much easier since you just go in and get your boarding passes (we still haven't transitioned to using our phones yet), pass through security (which you still do even if you check a bag) and go straight to your gate. Easy. Not to mention that I dont have to drag my roller bag around with me AND both of my hands are free as well.
Benefits of backpack-only travel photography:
- No checked baggage fees
- No waiting at baggage claim
- Zero risk of lost luggage with your expensive camera gear
- Both hands free for navigating airports
- Faster through security checkpoints
- More mobility when shooting on location
- Forces you to be selective about what you really need
You see, I despise airports and air travel to be quite honest about it. That is a blog post all it's own though... Haha.
The Journey: Chattanooga to Belize via Small Planes
Day 1 - We wake up at 4:30 and get ready to leave and pack the last few items we think we will need and head off to the airport.
Flying out of Chattanooga is also better to me since it is a smaller airport, the whole vibe is just lower key. This also gets me past the long lines at the big airports at check in as well as the long lines at the TSA checkpoint too. I don't normally bother with photos at the airport like others do but here are a couple for fun. All photos of travel are taken with my phone so I don't have to break out the camera. The below photo is of note though, this is what overcast skies looks like from the other side of the clouds. Looks almost looks like a desert somewhere, doesn't it?

Flying above the clouds - it almost looks like a desert from up here
Why I love small regional airports for travel photography: Chattanooga's airport lets you move through the whole process in minutes, not hours. Less stress means you arrive at your destination with more creative energy for photography. For more on my travel photography philosophy, check out my other photography insights on the blog.
The camera kit is shown below. I didn't bother with lots of items I normally carry to the point of probably a fault. Lol. No lens cloths, no rocket air, no card wallet, no spare lens caps, no tripod plates (or tripods either for that matter), not even a camera bag… officially. The bag you see is actually a lens "dump pouch" that goes on your belt. It happens to be big enough to hold almost all of the camera equipment I brought. What doesn't fit is in a ziplock bag, like the battery charger and cable and the DJI Osmo Action that I usually vlog with. I didn't even bring all of my spare batteries as I only used two a day at the most so I brought three. Lol…couldn't help myself.
My entire Belize camera kit - Leica CL, 17mm f/1.4, 35mm f/0.95, and minimal accessories
I didn't bother with a spare battery for the Osmo as I never ran one down on my normal days anyways and it USB charges so the same cable will charge the action camera as my camera charger.
The inventory is longer than I had originally planned with me adding the DJI Osmo Action and the Lume Cube Panel Mini (fill light) was a couple of luxuries I really wanted for vlogging but fit in the pack easily enough. I have almost decided that I can vlog on my phone just about as good as the Osmo Action…almost.
Arriving in Belize: First Impressions and the Small Plane Experience
Once on the ground in Belize we pass through customs and then board a smaller plane to Placencia where we will be staying for a couple of days.

Flying Tropic Air's small planes down to Placencia - a completely different experience from commercial jets
You can also tell that they play by different rules in Belize. Notice how there is no copilot, I wonder what the protocol is for a incapacitated pilot? Makes you wonder… anyway, he did just fine and we arrived in fine order. It was actually kind of nice to take the little plane down to Placencia as it flies at a much lower altitude and I could see the towns along the way really well.

Notice something missing? No copilot. Welcome to small plane travel in Central America.
I also noticed that our plane had a copy of Microsoft Flight Simulator installed…haha. It is actually neat how technical the instruments have become but still display like the old ones did. It displayed EXACTLY like the old instruments but just on a digital display. I just thought it was really neat to see that.
The instruments look like Microsoft Flight Simulator - modern digital displays mimicking traditional gauges
Small plane photography tip: These low-altitude flights offer incredible aerial photography opportunities. Keep your phone or camera ready for unique perspectives of coastlines and villages you can't get from commercial jets at 30,000 feet.
First Day in Placencia: Testing the 17mm f/1.4
After we arrived and got settled in, we went to the beach and walked in the ocean. It was really surreal to wake up and the outside temperature be 29 degrees and that evening it be almost 80 degrees.

First evening in Placencia - from 29°F at home to nearly 80°F at the beach
Once settled in, we went to the beach for a bit to relax a little and for this I took my 17mm f1.4 lens on the Leica CL. This is a great focal length for general photography as well as some landscapes. After our beach excursion it was time for some great food and fellowship.

First dinner in Belize - incredible local food and fellowship

Testing the 17mm f/1.4 at the beach - perfect focal length for landscapes and environmental shots
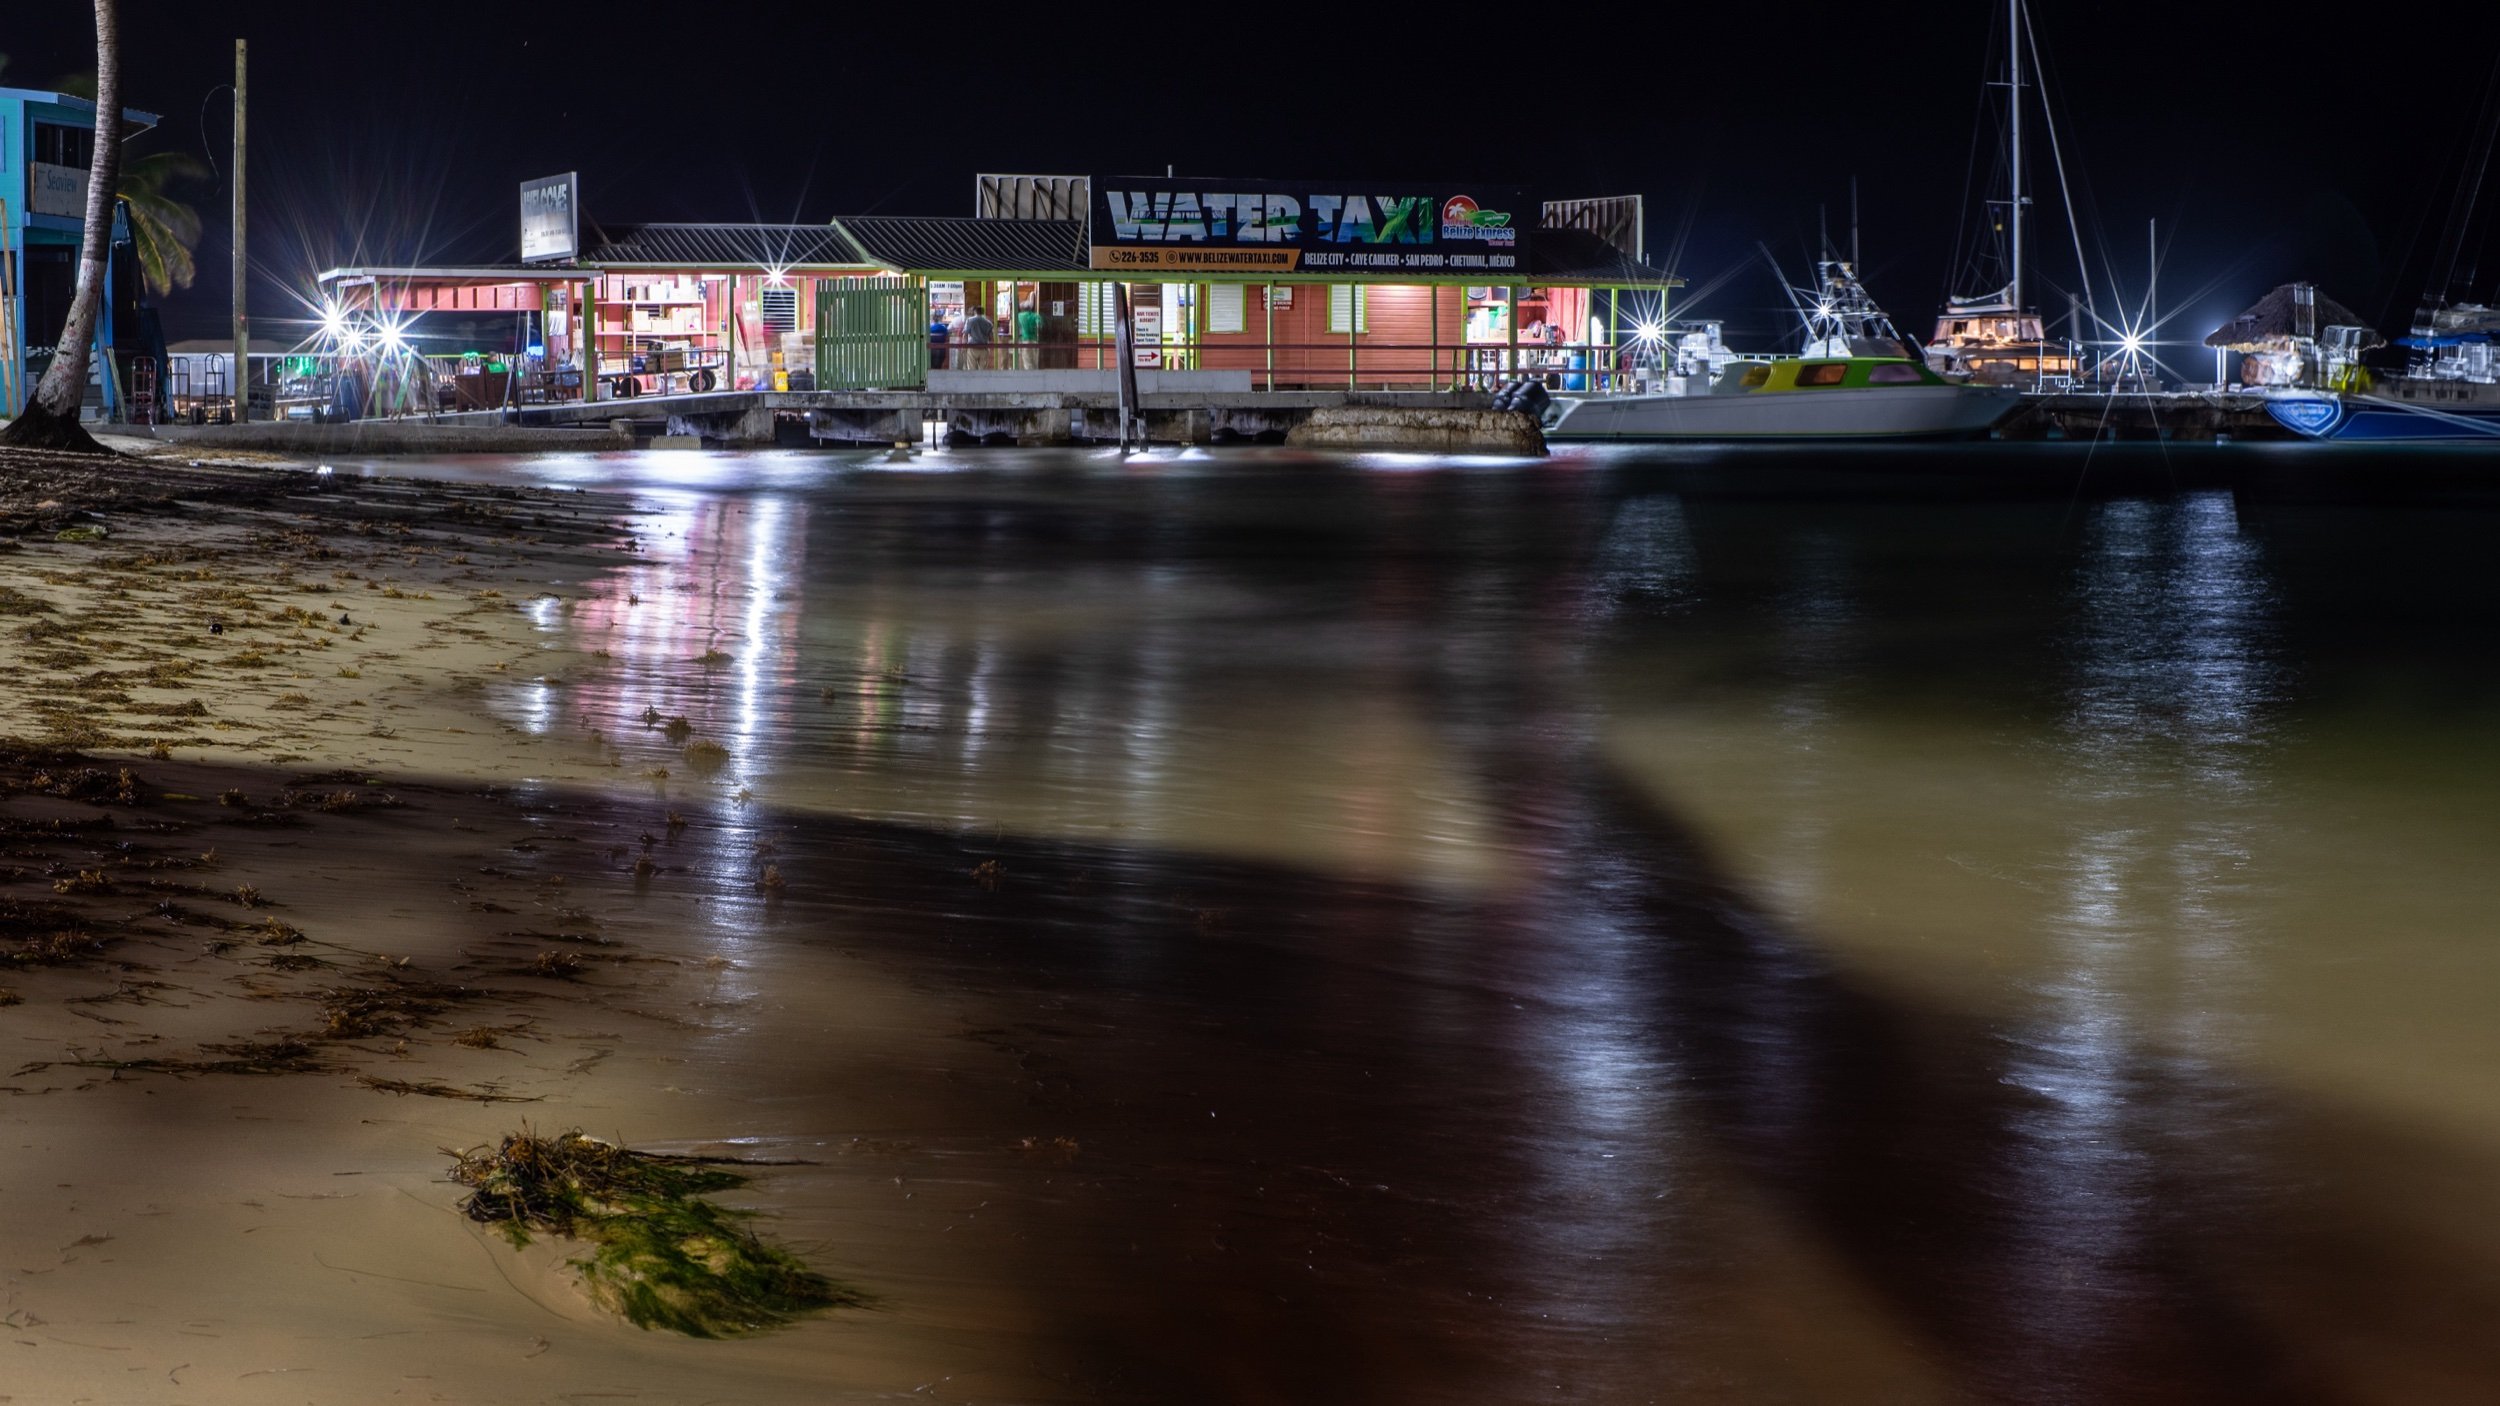
Successfully shooting at f/0.95 - the 35mm lens proved its worth in low light
We ate a wonderful meal for supper and hung out a while then it was off to bed. I used the 35mm at f0.95 for a change just to see if I could get some photos in focus at f0.95 and it was a success!
Shooting wide open at f/0.95: This was a test to see if I could nail focus at such a shallow depth of field while traveling. The answer? Yes. The Leica CL's focus peaking and magnification made it possible even in low light situations. This is why I love shooting with manual lenses—you stay engaged with every shot.
Living in the Moment: Day 2 Without a Camera
Day 2 was an off day from photo and video collection as I wanted to just be in the moment. This meant no camera gear of any kind. It was really nice to "unplug" for a while.
The best travel photography advice I can give: Not every day needs to be a photo day. Some experiences are better lived through your eyes instead of your viewfinder. This is something I learned through my photography evolution from gear-obsessed to minimalist, and it's transformed how I travel.
Next installment will be the "ruins"…I DID take my camera this time. Continue reading about my Belize photography adventures at Mayan ruins and San Pedro.
Frequently Asked Questions
What camera gear should I bring to Belize?
For Belize travel photography, I recommend a lightweight setup: one camera body and two prime lenses. A wide lens (17-24mm equivalent) for landscapes and beach scenes, and a normal to short telephoto (35-50mm equivalent) for street photography and portraits. The Leica CL with 17mm and 35mm lenses covered everything I needed. Skip the zoom lenses—the weight isn't worth it.
Is it safe to travel to Belize with expensive camera gear?
Yes, but be smart about it. I kept my Leica CL in a nondescript belt pouch rather than an obvious camera bag. In tourist areas like Placencia and San Pedro, camera gear is common and generally safe. Away from resorts, I was more discreet. The bigger risk is losing checked luggage—this is why I travel backpack-only with all my gear as carry-on.
Can you really travel with just a backpack for photography trips?
Absolutely. I did a week in Belize with just a backpack containing all my clothes and camera gear. The key is choosing versatile, lightweight equipment. My entire Leica CL kit (camera + 2 lenses + accessories) weighed less than 4 pounds. This left plenty of room for clothes and toiletries in a standard backpack. See my complete packing list in [my gear page](/my-gear-page).
What's the best focal length for travel photography?
For travel photography, I prefer two focal lengths: a wide lens (17-24mm equivalent) for environmental shots and landscapes, and a normal lens (35-50mm equivalent) for people and street scenes. This combination covers about 95% of travel situations. On my Belize trip, I used a 17mm f/1.4 and 35mm f/0.95 on a crop sensor camera, which gave me roughly 25mm and 52mm equivalent fields of view.
How do you pack camera gear for international travel?
Always pack your camera gear in carry-on luggage—never check it. I use a small belt dump pouch that fits my Leica CL and two lenses. It's nondescript and doesn't scream "expensive camera." Everything else (chargers, batteries, cables) goes in ziplock bags inside my backpack. This system has worked flawlessly for multiple international trips. The key is limiting yourself to what truly fits in a carry-on while staying under airline weight limits.
Support this website by using these affiliate links to shop on Amazon:
Leica M11 Digital Rangefinder Camera
Nikon AF-S FX NIKKOR 105mm f/1.4E ED Lens
Voigtlander Nokton 35mm f/1.4 II
Sandisk 128GB Extreme Pro memory cards

Micro Nikkor 55mm f/3.5 Review: The Best $50 Vintage Lens for Leica SL2
What if one of the sharpest lenses you could put on your Leica SL2 cost less than $50 and was made in 1976? That's exactly what I discovered when I adapted a vintage Micro Nikkor 55mm f/3.5 to my Leica SL2—and the results genuinely surprised me. This isn't just a macro lens review. It's the story of how a nearly 50-year-old Nikon F-mount lens became one of my favorite walkaround lenses on one of the best modern mirrorless cameras available.
What if one of the sharpest lenses you could put on your Leica SL2 cost less than $50 and was made in 1976? That's exactly what I discovered when I adapted a vintage Micro Nikkor 55mm f/3.5 to my Leica SL2—and the results genuinely surprised me. This isn't just a macro lens review. It's the story of how a nearly 50-year-old Nikon F-mount lens became one of my favorite walkaround lenses on one of the best modern mirrorless cameras available.

The Micro Nikkor 55mm f/3.5 AI variant on the Leica SL2 via F-to-L adapter — an unlikely but exceptional pairing.
Micro Nikkor 55mm f/3.5: What Makes This Vintage Lens Special
I have found over the years that there are a couple of Nikkor lenses in this family that work really well for the task of general purpose photography and this is one of them. This particular copy is an AI variant made somewhere in the late 1976 to early 1977 time frame, so this lens is almost 50 years old—and just look at the image quality it produces. Lens manufacturers were on their A game at this point and Nikon was a force to be reckoned with in this area. This lens isn't even their best macro lens either, which is something that to this day surprises me a little.
What makes the Micro Nikkor special compared to other vintage 50mm lenses is that it was designed for exacting scientific and reproduction photography. That design intent required flat-field sharpness, minimal distortion, and consistent performance from close focus all the way out to infinity. Most vintage 50mm lenses were optimized for portrait distances and can get a little soft or lose contrast at other distances. The Micro Nikkor doesn't play that game—it's sharp everywhere.
It has an external aperture ring that is detented in whole stops, except the very first one where it goes from f/3.5 to f/4 for some reason. Who knows why Nikon did this, but they did, so it is there if you want to use it.
Adapting Nikon F-Mount Lenses to the Leica SL2
Before we get into performance, a quick word on adapting this lens. The Leica SL2 uses the L-mount, and to run Nikon F-mount glass on it you need an F-to-L adapter. I use the Urth version and it works well for fully manual lenses like this one—there's nothing electronic to pass through, so any mechanically precise adapter will do the job. If you want to get fancy, Novoflex makes precision German-engineered adapters that are the gold standard, but they cost considerably more than the budget options and for a manual vintage lens, the results are essentially identical.
What makes the Leica SL2 particularly great for adapted vintage glass is the combination of focus peaking and magnified live view in the EVF. You can dial in focus with real confidence even at close distances, and the IBIS works completely independently of the lens—the camera has no idea what glass is mounted and compensates for shake regardless. This makes lenses that might have been borderline usable in low light suddenly practical for handheld shooting. More on that in a moment.

The external aperture ring with whole-stop detents — classic 1970s Nikon build quality.
Minimum focus distance is a surprising 9 1/2” from the image plane. So this is right at 4.25 inches in front of the lens when mounted on my Leica SL2 camera. This also gives you a reproduction ratio of 1:2 on the image sensor, that is to say that if you have an object that is 1 inch across in reality, it will be 1/2 inch across the sensor. To get to 1:1 reproduction ratio you need help… The PK-3 extension ring will get you half that distance and to the true 1:1 reproduction ratio at minimum focus distance. All of this is conveniently engraved on the lens barrel for you should you need to look it up in the field… Also notice in these two images that the lens “pumps” air which means it has external focus movement, the lens grows and shrinks when you adjust focus, it is common belief that this is where dust gets into the lens from, when you open the lens fully to minimum focus distance the lens intakes a full charge of air and doesn’t have dust seals to prevent dust from entering the lens mechanism, so you get a little internal dust…
The lens 'pumps' air as it extends to close focus — a common trait of this era of optics.
One last thing to note about this focus mechanism is that the reason I like using these lenses for general purpose photography like travel and such is that as you can see in the above photo, the focus throw from infinity to less than 1 meter is short, so focus is fast with this lens. It also has a range focus scale, but since it is 55mm, the scale is rather small and not easy to use, it will give you rough numbers to work with but that is all.
Enough with all this tech talk, let’s take it for a spin and see what the photos look like on my Leica SL2 mirrorless camera since it has IBIS on the sensor and I can hand hold photos at unheard of shutter speeds with it.
First thing I notice when using this lens is how good it feels in the hand. The location and feel of the controls are literally in the perfect location.
Another thing I noticed was that it is sharp, like incredibly sharp. To this point, it makes sense that it would be this good due to the design intent of the lens but it has a really nice general purpose focus throw too. This lends itself to being a wonderful walk about lens. The following photos were shot on my Leica SL2 using this lens as a walkable lens. I have used another Nikon macro lens before in this same capacity, the 60mm Micro Nikkor once lived on my D810 as a general purpose lens. It works flawlessly in this capacity.
Using the Micro Nikkor 55mm as a Walkaround Lens on Leica SL2
The following photos were shot on my Leica SL2 using this lens as a walkable lens. I have used another Nikon macro lens before in this same capacity—the 60mm Micro Nikkor once lived on my D810 as a general purpose lens and it works flawlessly in that role. The 55mm is similar in character.
For street photography and travel, the 55mm field of view on full frame is about as classic as it gets. You're not cramped like you can be with a 35mm in tight spaces, and you're not zooming in on subjects from far away like you would with 85mm or 105mm. It sits right in the middle of the world as you see it, which makes composition intuitive. The short focus throw means you can adjust focus quickly as subjects move, which is more important for this kind of use than it would be in a controlled macro environment.
Where it struggles a bit is in low light. The f/3.5 maximum aperture isn't going to win any awards for low-light capability compared to fast primes. But combined with the Leica SL2's excellent high-ISO performance and the IBIS, you can push it further than you'd expect—as you'll see in the next section.
Shot handheld at 1/30 second — the Leica SL2's IBIS makes this kind of exposure possible with a vintage manual focus lens.
In the above photo you can see what I love about a camera with stabilization in it. The camera sensor is rock steady so I can capture shutter speeds like in the photo above where I was running something like 1/30 second and some of my water blur shots were 1/4 second!!! Like the one below is a 1/4 second handheld exposure and if you will look, the rocks are crisp and the water has a really nice blur to it. This is at f32 as well so there will be some diffraction in the image from that but all in all, it looks really nice.

Shot handheld at 1/30 second — the Leica SL2's IBIS makes this kind of exposure possible with a vintage manual focus lens.
1/4 second handheld at f/32 — diffraction softens things slightly but the IBIS still produces usable results.
Below is a crop from this image. As you can see, the spider webs are even visible and this is handheld no less! As long as you have some decent light this combination is really nice. When you move to a mirrorless camera body that has IBIS on the sensor, it unlocks so many possibilities with lens / camera combinations. I dont know why hobbyists dont see this sooner but a lot dont.

100% crop showing spider web detail — handheld with IBIS. This lens resolves more than you'd expect for its age and price."
Leica SL2 IBIS + Vintage Glass: A Game-Changing Combination
In the above photo you can see what I love about a camera with stabilization in it. The camera sensor is rock steady so I can capture shutter speeds like in the photo above where I was running something like 1/30 second, and some of my water blur shots were at 1/4 second! The one below is a 1/4 second handheld exposure and if you look, the rocks are crisp and the water has a really nice blur to it. This is at f/32 as well, so there will be some diffraction in the image from that, but all in all it looks really nice.
I don't know why hobbyist photographers don't recognize this sooner, but when you move to a mirrorless camera body that has IBIS on the sensor, it unlocks so many possibilities with vintage lens combinations. You're essentially giving a 50-year-old lens a set of capabilities it was never designed to have. Nikon didn't design this lens to be hand-holdable at 1/4 second—but the Leica SL2 makes it so.
Think about what this means practically. That f/3.5 maximum aperture that looks modest on paper suddenly becomes much more workable. Instead of needing a tripod for anything in shade or indoors, you can hand-hold at much slower shutter speeds and let the IBIS do the work. In a museum, a church, a dimly lit market—anywhere a tripod isn't practical—this combination keeps you shooting. It's the kind of capability that used to require carrying a tripod and a fast prime. Now you can do it with a $50 vintage lens and good technique.
Image Quality: What to Expect from a 50-Year-Old Lens
Below is a crop from one of my sample images. As you can see, the spider webs are even visible and this was handheld. As long as you have some decent light, this combination is really nice.
Let me put some numbers to what you're seeing. The Leica SL2 has a 47 megapixel sensor—a genuinely demanding sensor that will expose any lens weakness. Lesser vintage glass can look acceptable at web resolution but fall apart when you pixel-peep on a sensor this resolute. The Micro Nikkor 55mm f/3.5 doesn't fall apart. Center sharpness is exceptional at every aperture, and corner performance is very good stopped down. The color rendering has that warm, slightly organic character that vintage Nikon glass is known for, which pairs nicely with Leica's color science.
The one area where you see the lens's age is bokeh at close focus distances. When shooting macro-close, out-of-focus areas can look a bit busy—it's not the smooth, creamy blur you'd get from a modern lens optimized for portrait work. But for general photography at normal distances, the rendering is pleasant and natural, never clinical or harsh.
Who Should Buy the Micro Nikkor 55mm f/3.5 for Leica SL2?"
This lens is a fantastic choice for:
The budget-conscious Leica shooter. Leica glass is expensive—there's no way around that. The Micro Nikkor 55mm f/3.5 gives you exceptional optical performance for a fraction of the cost of any L-mount prime. If you're building a kit and want quality glass that doesn't break the bank, vintage adapted lenses like this one are the answer.
Travel photographers who want a dual-purpose lens. One lens that handles landscapes, street photography, and close-up detail shots? That's what this is. Pack light and still have versatility.
Vintage lens enthusiasts. If you enjoy the tactile experience of manual focus and appreciate the history of classic glass, this lens is deeply satisfying to use. It's mechanically solid, beautifully made, and feels like a precision instrument.
Anyone curious about adapted lenses on the SL2. If you haven't explored the world of adapted vintage glass on your Leica SL2, this lens is an inexpensive, low-risk way to discover what IBIS + manual focus vintage glass can do. You might find, as I did, that you love it.
Frequently Asked Questions About the Micro Nikkor 55mm f/3.5
Is the Micro Nikkor 55mm f/3.5 good for general photography (not just macro)?
Yes — and this is the thing most people don't realize about this lens. While it was designed as a macro lens, the Micro Nikkor 55mm f/3.5 is an outstanding general-purpose walkaround lens. The focus throw from infinity to under one meter is short and smooth, making it fast to use in the field. The 55mm focal length gives you a classic "normal" field of view, and the sharpness holds up beautifully at all distances — not just close focus. I've used mine for street photography, travel, landscapes, and waterfall shots, and it handles all of them with ease. The f/3.5 maximum aperture is slower than dedicated portrait lenses, but for anything in decent light, this lens is genuinely excellent.
Can you adapt Nikon F-mount lenses to the Leica SL2?
Yes, and it works very well. The Leica SL2 uses the L-mount, and with an F-to-L mount adapter you can use almost any Nikon F-mount lens on the camera. Since the Micro Nikkor 55mm f/3.5 is a fully manual lens with an external aperture ring, you control the aperture on the lens itself and the camera handles exposure metering in aperture-priority mode. The Leica SL2's focus peaking and magnified live view make manual focusing accurate and enjoyable. There are no electronic connections needed for this vintage lens — it's a fully mechanical pairing that works remarkably well.
Does Leica SL2 IBIS work with adapted vintage lenses?
Yes, and it's one of the best reasons to use vintage glass on the Leica SL2. The 5-axis IBIS works independently of the lens — the camera compensates for camera shake regardless of whether the lens communicates electronically. With the Micro Nikkor 55mm f/3.5, I've successfully hand-held shots at 1/30 second and even 1/4 second, which would be nearly impossible without stabilization. This opens up a whole new world for vintage lens shooters — lenses that were borderline impractical in low light suddenly become viable handheld options. The combination of Leica SL2 IBIS and vintage Nikon glass is genuinely one of my favorite pairings in photography.
What adapter do I need to use Nikon F lenses on the Leica SL2?
You need a Nikon F to Leica L-mount adapter (sometimes listed as "F to L" or "Nikon F to L-mount"). Several brands make these including Urth, K&F Concept, and Novoflex (premium option). For fully manual vintage lenses like the Micro Nikkor 55mm f/3.5, an inexpensive adapter works perfectly well since there are no electronic connections to pass through — you just need a mechanically precise fit. Novoflex is the gold standard for precision, but budget options from Urth or K&F Concept work fine for manual glass.
How sharp is the Micro Nikkor 55mm f/3.5 on a modern mirrorless camera?
Extremely sharp — almost surprisingly so given the lens is nearly 50 years old. The Micro Nikkor 55mm f/3.5 was designed for close-focus scientific and reproduction photography, which required exceptional flat-field sharpness and minimal distortion. Those same qualities make it outstanding on a modern high-resolution sensor like the Leica SL2's 47MP chip. At middle apertures (f/5.6 to f/11) this lens is genuinely difficult to fault. Wide open at f/3.5 it's already very good, and the sharpness only improves as you stop down. The one caveat is that at f/32 you'll see diffraction softening, but that applies to any lens at very small apertures.
What is the PK-3 extension ring for the Micro Nikkor 55mm f/3.5?
The PK-3 extension ring is a Nikon accessory that mounts between the lens and camera body, moving the lens further from the sensor and allowing it to achieve true 1:1 macro magnification. Without the PK-3, the Micro Nikkor 55mm f/3.5 reaches a 1:2 reproduction ratio at minimum focus — meaning a 1-inch subject appears as half an inch on the sensor. With the PK-3 ring, you get 1:1 reproduction, where a 1-inch subject fills 1 inch of sensor. If you need true life-size macro shots, the PK-3 is the answer. Without it, the lens is still excellent for general macro work like flowers, insects, and small objects — just not true 1:1.
Recommended Gear for Adapting Vintage Lenses to Leica SL2
Support this website by shopping through these affiliate links:
Leica M11 Digital Rangefinder Camera
Nikon AF-S FX NIKKOR 105mm f/1.4E ED Lens
Voigtlander Nokton 35mm f/1.4 II
Sandisk 128GB Extreme Pro memory cards
Nikon 50mm f1.8 S Lens for Z mount
So in conclusion...
The Micro Nikkor 55mm f/3.5 is genuinely one of the best bang-for-buck vintage lenses you can adapt to the Leica SL2. For under $50 on the used market, you get a lens that handles macro work beautifully, doubles as a sharp general-purpose walkaround, and—paired with the SL2's IBIS—lets you hand-hold exposures that should be impossible.
Is it perfect? No. The f/3.5 maximum aperture limits your low-light shooting compared to faster primes, and you won't get smooth, creamy bokeh at close focus distances. But for sharpness, color rendering, close-focus capability, and sheer character? This nearly 50-year-old lens punches well above its weight class on a modern mirrorless body.
Get out there and grab one. You won't regret it.
Have you tried adapting vintage Nikon lenses to your mirrorless camera? Drop your experiences in the comments below—I'd love to hear what combinations you're running.
Want more vintage lens reviews and Leica SL2 content? Subscribe to my photography blog for honest, real-world gear testing without the fluff.

It is the holiday season again!
In the above photo, I was attempting to capture blue hour in downtown with a 25mm and this shows what I am talking about a little better. The wider angle allows me to get more of a scene and tell more of a story that a tighter lens like the 50mm or 75mm would do. I would have to back up a lot more if I wanted to include all of this in a 50mm lens photo as the field of view is a great deal narrower. Another thing that comes with longer focal lengths is a phenomenon called “compression”. This is where things in the background tend to look closer together than they are in reality from the effect the lens has on the subject. The photo below shows what I am talking about with compression…
When you live in the United States, you get to celebrate certain holidays and they seem to come once a month… In the winters we have Halloween, then a month later you have November and with it comes Thanksgiving where everyone literally over eats on one day and then eats the same meal everyday for the next week at lunch. HaHa.
It also brings colder weather so the photography is different too. I have, of late, been using my 28mm more than anything else it seems. The wider angle giving me more of a ”scene” than a specific subject. It also gives me a lot more depth of field so getting focus is a lot easier too. You see, I tend to shoot these days with vintage manual focus lenses more often than not. I do love my modern lenses with their aftofucus and light weight construction producing wonderful images, but sometimes I just want to use something from a simpler time. I have also found the lenses that work best for me applications too. Mostly Nikkor and Asahi Optical(Pentax) lenses with a sprinkling of some others like Voigtlander and Leica just to name a few.
I will also use these lenses for things like photo walks as well as general photography.
In the above photo, I was attempting to capture blue hour in downtown with a 25mm and this shows what I am talking about a little better. The wider angle allows me to get more of a scene and tell more of a story that a tighter lens like the 50mm or 75mm would do. I would have to back up a lot more if I wanted to include all of this in a 50mm lens photo as the field of view is a great deal narrower. Another thing that comes with longer focal lengths is a phenomenon called “compression”. This is where things in the background tend to look closer together than they are in reality from the effect the lens has on the subject. The photo below shows what I am talking about with compression…

Learning how to use these effects to your own personal advantage will open up so many possibilities for you. You couldn’t get this photo on a 20mm lens, it just wont work, you need the compression of a telephoto lens to be able to “stack” all those light displays together like that. This is why it is important to get out and shoot with different focal lengths at different times of day and also in different places, it is almost impossible to learn well without “doing”…
All this to say, the holidays as a wonderful time of the year to get out and practice your photography.

The Hanimex 28mm f2.8 lens is a really interesting little lens...
Sometimes I just throw the dice on a vintage lens and occasionally it comes out really good and sometimes it is a dud. The Hanimex 28mm f/2.8 I picked up for $20 at Ball Photo in Asheville? This time it's a winner.
Sometimes I just throw the dice on a vintage lens and occasionally it comes out really good and sometimes it is a dud. The Hanimex 28mm f/2.8 I picked up for $20 at Ball Photo in Asheville? This time it's a winner.
I paid something like $20 for this lens at Ball Photo. Twenty bucks. For that price, even if it turned out to be terrible, who cares? You're not risking much. But when it turns out to be actually good — sharp, solid build, nice colors, usable on a modern camera — that's when you feel like you found a hidden gem sitting in a used lens bin.
This is why I love digging through vintage gear at camera shops. Most people walk right past this stuff looking for autofocus lenses or the latest Sigma Art prime or whatever. Meanwhile there's a perfectly good 28mm sitting there for the price of lunch. Sure, it's got quirks (the sun flare is real), but it's also got character and it actually works. Can't beat that value.

The Hanimex 28mm f/2.8 on my Leica SL2 — not the prettiest combo, but it works.
Hunting for Glass at Ball Photo in Asheville
I went to Ashville NC on a small trip recently and on this trip I was doing photography. Well, when it is a photography trip I always make it a point to go to Ball Photo and just “go shopping” for something interesting. They have SO much vintage gear to choose from that it is almost overwhelming to be honest. It is not for the feint of heart to be honest about it. But today found me at Ball Photo and while there I started looking for some glass to pick out… Well I found some.
All-metal construction with nice silver accent rings. Built like lenses used to be built.
We all know how much I love to shoot with vintage glass and I am always on the hunt for a new lens to play with. I have Leica glass for the Leica SL2 and use it quite often but I still really enjoy adapting some older lens to the camera and then seeing what I can get with this lens and camera combination when I go out with it. It is almost a challenge to see if I can come away with something good using this old lens… What generally happens is that I slowly build a collection of lenses that I REALLY love to use and I am starting to collect a full set of these lenses. Some examples would be the 28mm f3.5 Asahi Optical M42 mount lens that I keep in the camera bag, this lens is literally one of my favorite lenses of all time for some reason. I just love the results I get with it on the Leica SL2 camera. Well today finds me using a lens that is 2/3 of s top faster and a little bigger too.
What Makes the Hanimex 28mm f/2.8 Special
The Hanimex 28mm f2.8 is a well made lens with the whole thing made of metal (probably brass from the way it feels but it could be anodized aluminum too I really am not sure) and has some really nice accents like the little silver bands around the focus ring which also has a faux leather appearance but I am almost certain is rubber. The range focus scale is graduated for every aperture marked (sans f4 for some reason) on the aperture ring, which is a nice touch for street photography. The detent clicks on the aperture ring are nice and pronounced as well as solid, no mushy aperture detents on this lens! All in all, it is a great little lens by design engineering standards. It is even a well designed attachment scheme as well with the M42 mount as it is easily adapted to about all mirrorless cameras on the market.

The M42 mount adapter — see those three tiny set screws? That's how you time the lens if you care about that kind of thing.
Adjusting M42 Adapters (If You Care About That Sort of Thing)
Many people also don’t realize that the M42 adapter can be adjusted to get the lens top dead center of the adapter too. There are three tiny set screws on the adapter that hold the threaded ring in place on the lens adapter to adjust this. To make this adjustment is simple, just screw the lens into the mount till it seats and snug it well so it wont work loose while in use. Next get the Allen key that came with the adapter and loosen the three set screws till the lens can spin in the mount and simply turn the lens till the center mark is top dead center of the adapter and then push in on the mount while tightening the set screws back down to make it hold the ring again and your done. It is that simple. Mine is slightly off center here and I have simple been too lazy to adjust it as it is close enough for me to be able to get out and shoot anyway. I don’t normally worry about it too much as once you set the adapter once, then all the lenses will time up and you don’t have to mess with it again. Installing lenses over the years on this adapter and tightening them has slipped the timing a little and this is why it is slightly off center. Once again, it is no big deal to me and i just go out and shoot…
Look, I know there are "better" lens mounts out there. But M42 is just so easy to adapt to basically anything. You can throw these lenses on Leica, Sony, Fuji, whatever — and they cost pennies compared to native glass. Plus there's something satisfying about the all-manual experience. No electronics, no autofocus hunting, just you and the glass trying to get the shot. It's photography the way it used to be, which sounds pretentious when I say it like that, but honestly it's just fun. There's a directness to it that I appreciate.
And here's the thing: M42 lenses were made by so many different manufacturers over the years that there are hundreds of options out there. Some are great, some are terrible, and part of the fun is just digging through used lens bins at places like Ball Photo to see what you find. It's like thrift shopping for camera gear.
First outing at Hamilton Place Mall in Chattanooga on Black Friday. The Hanimex handled it just fine.
Taking It to the Mall on Black Friday (Because Why Not)
So the first official outing with this lens was to go to the mall in Chattanooga TN with it and capture some Christmas spirit with it…on black Friday no less.
Well to be quite honest, it performed wonderfully. Now to be fair, the camera does have IBIS in it and this allows me to shoot at pretty slow shutter speeds without the need for a tripod. As long as you go into the camera settings and tell the camera it is a 28mm lens, the camera can compensate for movement really well allowing for incredibly slow shutter speeds like the last photo in this string from the mall where it was 1/10 of a second…hand held. Most of the other photos are shot at 1/250 second to freeze the people so that I can show the current clothing styles as well as the general appearance of the mall in 2023.
The Leica SL2's IBIS is genuinely a game-changer for vintage glass. Without it, that 1/10 second handheld shot at the mall would've been a blurry mess — the old "reciprocal rule" says you need at least 1/30 second for a 28mm lens, and that's being optimistic. But with IBIS doing its thing, I can get away with shutter speeds that should be impossible with a manual lens.
This is why I keep coming back to the SL2 for adapted lenses. It makes old glass way more usable than it has any right to be. You're essentially taking a lens from the 1960s or 70s and giving it capabilities it was never designed to have. Nikon didn't build this Hanimex thinking someone would hand-hold it at 1/10 second in a mall forty years later.

1/250 second to freeze the people and capture 2023 fashion in all its glory.
The Christmas decorations at the mall — shot handheld at 1/10 second thanks to the SL2's IBIS.
1/250 second to freeze the people and capture 2023 fashion in all its glory.
The Christmas decorations at the mall — shot handheld at 1/10 second thanks to the SL2's IBIS.

1/250 second to freeze the people and capture 2023 fashion in all its glory.
The Christmas decorations at the mall — shot handheld at 1/10 second thanks to the SL2's IBIS.

1/250 second to freeze the people and capture 2023 fashion in all its glory.
The Christmas decorations at the mall — shot handheld at 1/10 second thanks to the SL2's IBIS.
All in all, the Hanimex performed extremely well in this role. The images are sharp and the colors are easily adjusted in post processing to give any look you want. It also doesn’t hurt to have that Leica “look” from the camera processing the colors before saving the RAW file too, Leica does something special with their processing to give the colors a look that is unique to Leica cameras. It is hard to explain, but it is a thing.
The Sun Flare Problem — Yeah, It's Bad
In the next photos I didn’t show all the images as they just reflect what it is like to shoot indoors where there is controlled light and no sun to deal with. The following photos show what happens when you have the sun shining on the front element.

Same shot as the next one but the lens is shaded from the sun — clean and sharp.
Above is the same photo as the one right under this text except that I shaded the lens from the sun. This lens cant handle the sun shining on it from any angle without showing you that it was happening with some sort of sun flare in the image. In the below image there is geometric artifacts as well as a overall glare from the sun.

What happens when the sun hits the front element. Vintage lenses and coatings don't play nice with direct sunlight.
In the below photo you can also see the geometric glare in the center of frame, this could be used to your advantage in some applications like vintage style portraits where you position the subject to where the flare adds to the aesthetic of the image. Here the flare doesn’t do that though and is more of a nuisance that anything else. So this is something to keep in mind when using vintage glass, you will run into these kinds of problems from time to time like the older generation has to do…lol.

That geometric glare in the center? Classic vintage lens behavior. Could be useful for portraits if you position it right.
Can You Shoot Portraits with a 28mm? Actually, Yes
Lastly, can you make portraits with the 28mm lens? The answer is yes, you can as long as you are careful with the composition and keep the subject centered like I did here. The 28mm lens can distort toward the edges so it is imperative to keep the person in the center of the photo as much as humanly possible if you want the image to turn out like anything you want at all. Maria was gracious and allowed me to make her portrait at the mall using one of the advertising lights as a “studio light” to give us nice diffused side light and I think the image turned out really well for a 60 year old lens with improvised lighting.

Maria at the mall using an advertising light as improvised diffused side lighting. Not bad for a 60-year-old lens.
Now, shooting portraits with a 28mm isn't what most people would recommend. The conventional wisdom is 50mm or 85mm for portraits, and there's good reason for that — longer focal lengths are more flattering and don't distort faces. But if you keep your subject centered and don't get too close, a 28mm can work. The key is composition and knowing the lens's limitations.
Maria's portrait here is proof that it's doable. I kept her in the center of the frame where distortion is minimal, used the advertising light for nice diffused side lighting, and shot from a reasonable distance. If I'd moved her to the edge of the frame or gotten right up in her face, it would've looked weird. But treated carefully, a 28mm can give you a portrait with some environmental context in the background, which can be a nice look.
Just know what you're getting into. This isn't a portrait lens. But it can make portraits if you're intentional about it.
As well as this blog post, I also have a video sharing some of these points and showing more of the old Sitton’s mill location should you want to go check that out at the link below.
Thanks and if you are into vintage glass, this is a keeper in my book — and for pennies too. Twenty bucks for a solid 28mm that actually performs? I'll take that deal every time. Sure it doesn't like the sun and you probably won't shoot portraits with it every day, but as a walkaround lens for street photography or just messing around? It's great.
So with that, get your camera out and go take a picture with it. Maybe even throw the dice on some weird vintage lens you've never heard of. You might just find a winner.
Questions People Ask About the Hanimex 28mm f/2.8
Is the Hanimex 28mm f/2.8 any good?
Yeah, it's actually pretty good for the price. Sharp in the center, solid build quality, and it handles well on modern mirrorless cameras with IBIS. The biggest issue is sun flare — this lens does NOT like having the sun anywhere near the front element. You'll get geometric artifacts and overall loss of contrast if you're shooting with the sun in or near the frame. But for $20-30, it's absolutely worth picking up if you see one. I mean, at that price, even if it's just okay, who cares? But when it turns out to be actually good, you feel like you found a hidden gem.
What mount is the Hanimex 28mm f/2.8?
M42 screw mount, which is great because you can adapt it to basically any mirrorless camera. I use it on my Leica SL2 with an M42-to-L adapter, but it works just as well on Sony E-mount, Fuji X-mount, Canon RF, whatever you've got. M42 is one of those universal old-school mounts that just adapts to everything. Plus the adapters are cheap and plentiful, so you're not spending a fortune to use these lenses on modern cameras.
Can you use vintage lenses on the Leica SL2?
Absolutely. The Leica SL2's IBIS makes vintage glass way more usable than it used to be. You can hand-hold at slower shutter speeds that would normally require a tripod, and the camera's focus peaking makes manual focusing pretty straightforward once you get used to it. Plus the L-mount has a short flange distance so you can adapt almost anything — M42, Nikon F, Canon FD, Leica M, you name it. I actually prefer shooting with adapted vintage lenses on the SL2 sometimes because it's just more fun than using modern autofocus glass.
How do you deal with sun flare on vintage lenses?
Use a lens hood or just shade the lens with your hand when the sun is hitting the front element. Vintage lens coatings from the 60s and 70s aren't anywhere near as good as modern multi-coatings, so direct sunlight will give you all kinds of flare, ghost images, and loss of contrast. If you're shooting into the sun or with bright light hitting the lens at an angle, expect problems. It's just how old glass behaves. Sometimes you can use it creatively for that vintage look, but most of the time it's just annoying. I literally had to shade the lens with my hand at Sitton's Mill to get clean shots.
Is 28mm good for street photography?
It's a little wider than the classic 35mm or 50mm focal lengths most people use for street, but yeah, it works. You get more context in the frame, which is good for environmental portraits or showing a whole scene instead of isolating subjects. The trade-off is that 28mm has more distortion at the edges, so you need to be careful about composition. Keep important stuff — especially people's faces — toward the center of the frame. I shot a portrait of Maria at the mall with this lens and it turned out great, but I made sure to keep her centered. If I'd put her at the edge of the frame, her face would've looked stretched and weird.
Where can I buy a Hanimex 28mm f/2.8?
I got mine at Ball Photo in Asheville, North Carolina for about $20. They have an absolutely overwhelming amount of vintage gear if you're ever in the area. Otherwise, check eBay, KEH Camera, or local camera shops that carry used gear. These lenses aren't rare or collectible, so they're usually pretty cheap when you find them. Don't overpay — if someone's asking more than $30-40 for one, keep looking. There are plenty of them out there.
Support this website by using these affiliate links to shop on Amazon:
Leica SL2 Mirrorless Camera Body
K&F Concept Lens Mount Adapter M42-L Manual Focus
Actual Lens Adapter in this Blog Post
One of my favorite camera straps
Sandisk 128GB Extreme Pro memory cards
Nikon 50mm f1.8 S Lens for Z mount
Have you shot with the Hanimex 28mm or other obscure vintage glass? Drop a comment below — I'd love to hear what hidden gems you've found digging through used lens bins.
Chattanooga Photowalk: Leica SL2 + Yashica 28mm Street Photography
Chattanooga's Rossville Avenue is one of those streets most people drive past without a second thought. But stop and look closer—you'll find pre-WWII architecture, a century-old cafe that's about to close forever, and urban decay that looks like a movie set. That's exactly what I did with my Leica SL2 and a vintage Yashica 28mm f/2.8 lens: parked for one hour of street photography and came away with something worth sharing.
Chattanooga's Rossville Avenue is one of those streets most people drive past without a second thought. But stop and look closer—you'll find pre-WWII architecture, a century-old cafe that's about to close forever, and urban decay that looks like a movie set. That's exactly what I did with my Leica SL2 and a vintage Yashica 28mm f/2.8 lens: parked for one hour of street photography and came away with something worth sharing.
Hamilton Parts Distributors: Pre-War Architecture in Chattanooga
Today we find me in Chattanooga yet again and this time I am setup on a side street off of Main street called Rossville Avenue and this road has some really neat old buildings on it, some of which I have photographed in the past but I like to get photos of them as I go along to show how they change with time. I get parked and pay for one hour of parking so I have to make it count. Putting a little pressure on myself to come away with SOMETHING of value in this time allotment.,,

Rossville Avenue in Chattanooga—one of those streets you drive past but never really see. Time to change that.
My first stop is the Hamilton Parts Distributors building that has been NOT a parts distributor for quite some time as of this point…2023. The building is really starting to show its age too with numerous windows bricked up on the sides as well as the front giving it a sort of dystopian imbalanced look. This could be a set right out of a movie or something. I took several photos from different angles today and some look better than others. I really like the front door and the corner that I get today for some reason… Here they are, what do you think?
I love how the building still has remnants of the signage that was painted on it some time in the past. Also look at the foundation material—today it's all either poured concrete or cement blocks and has been for many decades. So I'm going to speculate this is pre-war construction, meaning before World War II, based on these limestone foundation stones.
These stones look like they were repurposed from another construction site that existed before this building did. I've seen evidence of these cut stones going back to the mid-19th century in Chattanooga, so I know these are probably something left over either from a fire or were just cast off when another building was demolished. The people who built this building saw a chance to save a few dollars on this part of the construction.
Also notice that they didn't think these stones were very appealing—they hid them behind a mortar stucco finish as you can see in the front door photo. Practical, but not pretty.
What I really love about locations like this is that they tell stories about how Chattanooga was built. This isn't some sterile modern construction—this is history you can see and photograph. The bricked-up windows, the deteriorating facade, the repurposed foundation stones—it all adds up to a building that looks like it could be a set piece in a dystopian film. And it's just sitting here on Rossville Avenue where most people never even glance at it.

The corner angle showing all those bricked-up windows. Dystopian and unbalanced—looks like a movie set.

The front entrance of the old Hamilton Parts Distributors building. Notice the limestone foundation stones—likely pre-WWII construction repurposed from an earlier building.
Zarzours Cafe: 100 Years of Chattanooga History (Closing Soon)
My next stop was right next door at Zarzours Cafe.

Zarzours Cafe—over 100 years in business and closing in less than a month. I'll be eating there before they close. How could I not?
This cafe has been in business for over 100 years. Yeah, you read that right—a century, as you can see on their sign. And it's closing in less than a month from when I took these photos.
I'd never eaten there before this photowalk, which honestly is a little embarrassing considering how long they've been around. But I made a promise to myself right then: I'm going to sit at their cafe and enjoy the fine cuisine they've been serving for a century before they close their doors for good. How could I let that slide? A business that survives 100 years in Chattanooga—through the Great Depression, World War II, economic changes, everything—deserves to be experienced and remembered.
This is what urban photography is really about for me. Sure, you can go shoot pretty buildings and interesting light, and that's fine. But when you're documenting places like Zarzours that are about to disappear, you're preserving Chattanooga history. These photos matter in a way that just "pretty pictures" don't. In ten years, twenty years, someone's going to search for Zarzours Cafe and these images will be part of the record of what it looked like before it closed.
Back to the walk at hand. I took a couple of photos of the restaurant and parking area and headed on down the street.

Another angle of Zarzours. A century of Chattanooga history about to become just a memory.
Koch Foods and Lookout Mountain: Iconic Chattanooga Skyline
The next stop was at the Koch Foods Processing plant. This is one of two processing plants inside the city that I am aware of. These have been here for decades too so they are pretty much fixtures of the city at this point. One is on Broad street and the other is here on Rossville Ave. It being such an iconic location coupled with the skyline containing Lookout Mtn as well makes for a cool photo to me.

Koch Foods processing plant with Lookout Mountain in the background—an iconic Chattanooga skyline view that's been here for decades.
Main Street Chattanooga: Urban Photography in Action
After the chicken plant, I made my way over to Main street and did a little photography on Main as well. Main usually has something really colorful as well as interesting too, this is why I usually always make my way over and look around for a little while at a minimum…

Same spot, faster shutter speed to freeze the construction scene. Main Street always has something interesting going on.
Leica SL2 + Yashica 28mm: Why This Combo Works for Street Photography
These two photos just go to show what all can be found on Main street even when it is not having some sort of special event. All it takes is a little creativity and time of your part to come away with some interesting photos. Now you might be thinking these are not interesting photos, and you will be right as the photo interest rate will vary from person to person, but I found that these to be quite interesting so I am sharing them with you…lol. The difference between the two photo primarily is the shutter speed as one is really slow to blur the truck and the other is faster so it will capture the whole construction scene with out any motion blur on my part.
Main Street with a slow shutter to blur the truck. The Leica SL2's IBIS makes this kind of handheld shot possible.
Leica SL2 + Yashica 28mm: Why This Combo Works for Street Photography
The Yashica 28mm f/2.8 is one of those vintage lenses that just works. It's not fancy, it's not expensive, and it doesn't have modern coatings or any electronic connections. But for street and urban photography like this Chattanooga photowalk, it's exactly what I need.
The 28mm focal length gives you enough width to capture environmental context—like the whole Hamilton Parts building facade or the Koch Foods plant with Lookout Mountain in the background—without getting into ultra-wide territory where everything starts looking distorted. It's the kind of focal length where you can work close to your subject or step back and get the whole scene, and either way, the composition feels natural.
Paired with the Leica SL2, this combination is almost perfect for what I'm doing. The SL2's IBIS (in-body image stabilization) means I can hand-hold at slower shutter speeds than I could with any other camera. That Main Street shot where I blurred the truck? That's 1/15 second or slower, handheld, with a manual focus lens. Without IBIS, that would be a blurry mess. With the SL2 compensating for camera shake, it's clean and usable.
The focus peaking on the SL2 makes manual focusing with the Yashica fast and accurate. I set focus peaking to show me exactly where sharp focus is, and between that and the bright EVF, I can nail focus even in challenging light. It's honestly more enjoyable to shoot with than autofocus sometimes—you're more engaged with the process, more intentional about what you're focusing on.
And here's the best part: the Yashica 28mm cost me a fraction of what a native L-mount lens would cost. I get great image quality, I enjoy the process, and I'm not worried about damaging an expensive modern lens while walking around industrial areas of Chattanooga photographing old buildings. It's the perfect urban photography setup.
IBIS and Adapted Lenses: Technical Advantages of the Leica SL2
One thing I want to emphasize about shooting adapted vintage lenses on the Leica SL2 is how much the IBIS changes what's possible. In-body image stabilization isn't just a convenience feature—it fundamentally changes how you can use manual focus lenses in real-world shooting.
With older cameras, the rule of thumb was that your minimum handheld shutter speed should be roughly 1/focal length. For a 28mm lens, that means 1/30 second or faster. Slower than that and you'd get camera shake blur unless you had very steady hands or were bracing against something.
The SL2's IBIS throws that old rule out the window. I regularly shoot at 1/15 second, 1/8 second, sometimes even slower if I'm careful. The sensor is compensating for my hand movement in real-time, which means I can use lower ISOs for better image quality, or shoot in lower light conditions without needing a tripod.
For street and urban photography where you're often in shaded areas or shooting late in the day, this is huge. The Yashica 28mm has a maximum aperture of f/2.8, which is good but not super fast. In dimmer light, without IBIS, I'd be pushing ISO up to 1600 or 3200 to maintain usable shutter speeds. With IBIS, I can stay at ISO 400 or 800 and let the shutter speed drop, knowing the stabilization will keep things sharp.
It's one of those features that doesn't seem like a big deal until you actually use it in the field, and then you wonder how you ever shot without it. Vintage glass on a modern mirrorless body with IBIS is genuinely the best of both worlds.
Some are asking…
Best Time to Shoot Rossville Avenue: Morning light is good for the Hamilton Parts building facade. Late afternoon gives you nice side light on Zarzours and the other buildings along the street. Main Street is active all day, but I prefer shooting there in the afternoon or early evening when the light gets more interesting.
Parking and Logistics: Like I mentioned, metered parking is available right on Rossville Avenue. One hour was enough time for me to hit Hamilton Parts, Zarzours, Koch Foods, and make my way to Main Street. If you want to spend more time, pay for two hours to give yourself breathing room.
Safety: This isn't the touristy part of Chattanooga (it is more for the local crowd in this area) so just be aware of your surroundings. It borders an industrial area, not dangerous, but use common sense. Don't leave gear visible in your car, keep your camera bag close, and stay alert. I've never had any issues, but it's always smart to be aware when you're photographing in less-traveled parts of town.
Support this website by using these affiliate links to shop on Amazon:
Leica M11 Digital Rangefinder Camera
Nikon AF-S FX NIKKOR 105mm f/1.4E ED Lens
Voigtlander Nokton 35mm f/1.4 II
Sandisk 128GB Extreme Pro memory cards
Nikon 50mm f1.8 S Lens for Z mount
Frequently Asked Questions About Chattanooga Photography
Where is the best street photography in Chattanooga?
Main Street and Rossville Avenue are excellent for urban and street photography. Main Street is more polished with events, murals, and restaurants—it's the tourist-friendly side of downtown. Rossville Avenue offers grittier architecture and history. The area around the old Hamilton Parts Distributors building has pre-WWII structures that make for compelling photography if you're into urban decay and architectural history.
For skyline shots, look for locations where you can frame Lookout Mountain in the background—it's iconic Chattanooga and makes for instantly recognizable compositions. The Koch Foods plant area on Rossville gives you that view. Also worth checking: the riverfront, the Walnut Street Bridge, and the side streets off Main where you'll find older buildings and interesting character that don't make it into the tourist brochures.
Is Zarzours Cafe still open in Chattanooga?
As of when I took these photos in late 2023, Zarzours Cafe was preparing to close after over 100 years in business. This century-old Chattanooga institution on Rossville Avenue was a landmark, and I made it a point to photograph it—and eat there—before it closed forever. If you're reading this after 2023, it's likely already closed, which makes these photos even more valuable as historical documentation of Chattanooga's changing landscape.
It's one of those things that makes urban photography meaningful to me. You're not just capturing pretty pictures—you're documenting history before it disappears. Businesses that survive 100 years deserve to be remembered, and photography is how we do that.
Can you use vintage lenses for street photography?
Absolutely. I shot this entire Chattanooga photowalk with a Yashica 28mm f/2.8—a vintage adapted lens on my Leica SL2. The 28mm focal length is great for street photography because it captures environmental context without being too wide or distorted. You get the subject plus the surrounding architecture and scene, which tells a more complete story.
The Leica SL2's IBIS and focus peaking make manual focusing with vintage glass practical and enjoyable even in fast-moving street situations. Plus, vintage lenses have character and cost a fraction of modern glass. For street photography where you're often shooting at f/5.6 to f/8 anyway, vintage lenses perform beautifully. The Yashica 28mm is sharp, handles well, and cost me way less than any modern L-mount 28mm would.
What camera settings work best for urban photography?
For urban photography like this Chattanooga photowalk, I typically shoot in aperture priority mode at f/5.6 to f/8. This gives you good depth of field to keep both foreground and background reasonably sharp while keeping shutter speeds manageable in changing light conditions.
The Leica SL2's IBIS lets me hand-hold at slower speeds than I could with other cameras—like that Main Street shot with the motion-blurred truck. I set a minimum ISO (usually 100-400 depending on available light) and let the camera adjust shutter speed based on the scene. For adapted manual lenses like the Yashica 28mm, I use focus peaking to nail focus quickly and confidently.
If you're shooting architecture specifically, sometimes I'll stop down to f/11 or f/16 for maximum sharpness corner-to-corner, but for general street photography, f/5.6 to f/8 is the sweet spot.
Where can I park for photography on Rossville Avenue in Chattanooga?
There's metered street parking along Rossville Avenue. I paid for one hour of parking which gave me enough time to walk and photograph the Hamilton Parts building, Zarzours Cafe, Koch Foods, and make my way over to Main Street. The parking is affordable and convenient, and the walk between all these locations is pretty short—maybe a quarter mile total if you're hitting everything.
Just be aware of your surroundings. This area is more industrial and local than touristy, so stay alert when you're setting up shots and wandering around. It's not dangerous, but it's also not the Walnut Street Bridge where there are tourists everywhere. Just use common sense like you would in any urban environment.
How do you photograph closing businesses before they're gone?
When I heard Zarzours Cafe was closing after 100 years, I made it a priority to photograph it while I still could. These historical documentation shots become more valuable over time as the city changes. My advice: shoot multiple angles, capture signage clearly, and include contextual details like the parking lot, neighboring buildings, and street views that show where it sits in the neighborhood.
Take both "beauty shots" and straightforward documentary photos. You're not just making art—you're preserving Chattanooga history. The signage, the facade, the surrounding context—all of it matters for the historical record.
And if you can, patronize the business before it closes. I planned to eat at Zarzours before they shut down for good. If something is worth photographing because it's historically significant, it's worth supporting while you still can.
That's one hour of parking on Rossville Avenue in Chattanooga—from pre-WWII architecture at Hamilton Parts Distributors to a century-old cafe about to close forever, to the iconic skyline view at Koch Foods with Lookout Mountain in the background. Not bad for a quick urban photowalk with a Leica SL2 and a vintage 28mm lens.
Chattanooga has so much history hiding in plain sight. You just have to park, get out, and look. Next time you're driving through, skip Main Street for a minute and explore Rossville Avenue. You'll find stories in every building.
Have you photographed Chattanooga or documented historic locations before they're gone? Drop a comment—I'd love to hear about your urban photography spots.
Want more Chattanooga photography and Leica SL2 content? Check out my other photowalks and vintage lens reviews on the blog.

What Should You Photograph? A Documentary Photographer's Philosophy
Ok, this is going to be a short and sweet kind of post. I normally make YouTube videos about things that involve lots of images playing past the viewer and just lay some music over it to more or less inspire the viewer to do what I say at the end…”Get your camera out and go take a picture with it”
Ok, this is going to be a short and sweet kind of post. I normally make YouTube videos about things that involve lots of images playing past the viewer and just lay some music over it to more or less inspire the viewer to do what I say at the end…”Get your camera out and go take a picture with it”
What Do You Really Like to Photograph?

A couple painting down by the Tennessee River in Chattanooga, using iPhone light as the sun sets. The light was just too good to pass up. This is what I mean by chasing interesting light!
Never before has this been a truer statement than today. But we need to ask ourselves an important question…what do we like to shoot?
With world events being what they are and how the physical world around us is changing constantly as time goes on, I am not ready to just let it pass me by without documenting some of it as I go. Armed with this knowledge, I look for two things to photograph, things that will be gone soon or interesting light. That is what drew me to the photo above of the couple painting down by the river by iPhone light. The light was just too good to pass up.
Documentary Photography vs. Art Photography
Look, I need to be honest about something. I'm not trying to make art. I'm trying to make a record. There's a difference, and it took me a long time to be okay with that difference!
Art photography is about creating something beautiful or meaningful that didn't exist before. It's intentional, it's creative, it's about YOUR vision and YOUR interpretation. And that's great! The world needs art photographers.
Documentary photography is different. It's about capturing what IS, not what could be. It's about preservation, about creating a historical record, about showing things that will be gone tomorrow or next week or next year. When I photograph a building that's about to be demolished, I'm not trying to make it beautiful (though sometimes it is). I'm trying to make sure someone, somewhere, sometime in the future can see what it looked like before it disappeared.
Think about old photos from the 1800s or early 1900s. We don't look at those and judge them as "good photography" or "bad photography." We look at them as historical documents. They show us what streets looked like, what people wore, how buildings were constructed. That's what I'm doing, just with better cameras!
The Kinley hotel construction series below? That's not art. That's documentation. But in 50 years, someone researching Chattanooga's development will be glad those photos exist. The ADAMS sign preservation story? Someone doing historical research will use those images. That's the value of documentary photography, and it's a value I'm proud to contribute to my community.
You see, I am not what I would call an artist. I don’t think my photography is that noteworthy. Once I am gone, maybe someone will find these hard drives and then will think they are filled with the coolest photos and video the world has ever seen, just not today. That being said, I do think that I am a decent documentary photographer and that as time goes on I get better with it.
Things I normally photograph will be buildings that are gone now, that I could tell somehow that were probably headed for the wrecking ball or like the series below where I photo-documented the construction of the Kinley hotel and how there is a Coca-cola sign that is now hidden from view between the buildings because of the hotel. For me this is the sort of thing that is simply fascinating for some reason.
The Two Things I Photograph (And Why)
After years of shooting and trying different subjects and styles, I've boiled down what I actually photograph to TWO core things:
1. Things that will be gone soon This includes buildings scheduled for demolition, businesses that are closing, signs that are coming down, and landscapes that are about to change. The world changes fast, especially in cities. If I don't photograph it now, nobody will, and it'll just be gone forever!
The Kinley hotel construction? I knew that Coca-Cola sign would be hidden forever once the hotel went up. So I documented it. The old buildings on Rossville Avenue? Many of them won't be here in 10 years. I'm making sure we have a record of what they looked like.
2. Interesting light Sometimes the light is just too good to pass up. That couple painting by the river using iPhone light? The light was perfect. The sunset reflecting on the river with street lights spilling across the water? Had to stop and capture it. Night scenes with lit marquees and neon signs? Yeah, that's interesting light right there!
Here's the thing: these two categories overlap more than you'd think. Interesting light often happens during times of change. Dawn, dusk, construction lights at night, the golden hour before a storm. Light and change go together in photography!
How to find YOUR two things: Ask yourself: what do I keep photographing over and over? Not what you WANT to photograph or what you think you SHOULD photograph. What do you ACTUALLY photograph when you just go out with your camera for fun?
Look through your last 100 photos. What patterns do you see? For me, it was always buildings and light. For you, it might be people's faces, or textures, or motion, or something I'd never think of. The point is to be honest about what actually draws your attention in the field!
Documenting Chattanooga's Changing Landscape

The Coca-Cola sign that was visible downtown before the Kinley hotel construction. Once the hotel went up, this sign was hidden forever between buildings. This is exactly why I photograph things that will be gone soon!
The Kinley Hotel Construction Series: A Photography Case Study

The Kinley hotel coming out of the ground. I documented this entire construction project knowing it would change the downtown Chattanooga skyline permanently.

Mid-construction on the Kinley. The building taking shape and starting to hide the Coca-Cola sign that was behind it.

The Kinley with its distinctive blue exterior starting to appear. Each stage of construction tells part of the story of how Chattanooga is changing.

Later stage construction showing the ADAMS building sign across the street. Notice how the sign appears in these later photos once I thought to cross the street for a wider angle. That sign has its own story!
The ADAMS Sign: Hidden History Preserved
As an added bonus in these photos there is also another piece of history that undergoes a change as well. If you will notice that the sign on the corner for the ADAMS building appears in the last 4 photos where I thought to go across the street and get the image. This sign survives into the renovation and it is restored and back in place at the end. The ADAMS building no longer exists but the sign somehow survives into the current day…

The ADAMS building sign in its original weathered condition. The ADAMS building itself no longer exists, but somehow this sign survived into the renovation.
Chattanooga is going through massive change right now, and has been for the past 10-15 years. The downtown area is being redeveloped, new hotels are going up, old buildings are being renovated or torn down, and the whole character of certain neighborhoods is shifting.
This makes it perfect for documentary photography! There's always something changing, always some building in transition, always some piece of history that's about to disappear or transform.
The Kinley hotel construction is just one example. That entire block looked completely different five years ago. The Coca-Cola sign that's now hidden between buildings? That was a prominent downtown landmark for decades. Now you can only see it from certain angles, and soon it'll probably be gone entirely when the building it's painted on gets renovated or demolished.
The ADAMS building sign surviving the renovation? That's actually unusual! Most old signs don't make it through development. The fact that someone cared enough to preserve and restore that sign says something about Chattanooga's relationship with its history. That story is worth documenting!
Other Chattanooga locations I've documented that are now gone or changed: the old Terminal Station before its renovation, several restaurants and businesses that closed during COVID, vintage signage that's been removed or painted over, and entire blocks that look nothing like they did five years ago.
If you live in any city or town that's growing or changing, you have the same opportunity. Start photographing what's there NOW, because it won't be there forever. Future historians and your community will thank you!

The same ADAMS sign after restoration. They actually cared enough to preserve and restore it! This is unusual. Most old signs don't survive development.
Chasing Light: Night Photography in Small Towns
Another aspect of my photography is more artistic where I will shoot at night to capture interesting light in different areas of the city, where ever that might be. I have began to look for movie marques in the town square of small towns and get them lit up at night.

The Marietta Square Theatre at night in August 2023. I've started looking for movie marquees in small town squares and photographing them lit up at night. There's something special about these historic theaters!
But the real thing I have started to do it just take photos. Things that happen around me like the photo here of the smoke from local wildfires because it hasn’t rained in something like 2 or 3 months at this point.

Smoke from local wildfires during a 2-3 month drought. Sometimes documentary photography is just capturing what's happening around you, even if it's not pretty. This is what November 2023 looked like in our region.
These next two photos were not taken on the same night, but were captured about 1/4 mile of each other. One is the river front and I just liked the way the light fell that night on the water as well as the light spill from the street lights across the river and the color of the sunset all just came together for a great photo. The next one is simply a photo of a couple of buildings on Market and 5th street. The signage and the lights just made for a cool photo to me so I stopped for a second and grabbed a few images of it at varying exposure levels so I could get the lit signs to expose properly as well as the rest of the stuff. It is just a cool photo to me.
Night Photography Settings and Approach"
Since a lot of what I shoot involves low light and night photography, let me give you the practical details of how I actually do this.
Camera Settings: For night photography like the movie marquee shot, I'm typically shooting at ISO 400-800, aperture around f/2.8 to f/4, and shutter speeds ranging from 1/30 second to several seconds depending on the scene. The key is having a camera with good high ISO performance (my Leica SL2 handles this well) and either using a tripod or bracing against something solid.
For the river reflection shot, I used a longer exposure (probably 2-3 seconds) to smooth out the water and capture the light trails. This means a tripod is basically required unless you want blur!
Equipment: You don't need fancy gear for night photography, but you do need:
A camera that can handle high ISO without too much noise (or just be willing to make really long exposures to make up for it)
A fast lens (f/2.8 or wider is ideal)
A tripod or something to brace against
Patience to let your eyes adjust and find the light
I shoot with the Leica SL2 and various vintage lenses, often wide open or close to it. The in-body stabilization helps for handheld shots at slower shutter speeds.
Finding the Light: The best night photography happens during blue hour (the 20-30 minutes after sunset before it's fully dark). You get ambient light from the sky plus artificial lights from buildings and streets. This creates depth and color that pure darkness doesn't give you.
Also, look for lit signage! Movie marquees, neon signs, storefronts with their lights on. These create natural focal points and add color to night scenes.

The riverfront at sunset with street lights reflecting across the water. Sometimes all the light just comes together. The sunset color, the street light spill, the reflections. This is why I chase the light!

Buildings on Market and 5th Street in Chattanooga. The lit signage and building lights just made for a cool photo that night. I stopped and grabbed a few images at varying exposure levels to get everything exposed properly.
If you have not figured it out yet, I want you to start taking a long hard look at what it is that you enjoy photographing. i mean REALLY boil it down to the simplest components. For me it was the two things I just mentioned, for you it might be saturated colors or people waving at you or blur in your photo. The point is, don’t just generalize your answer, the only person you hurt in this event is yourself if you are not 100% truthful.
If you like to watch videos too, here is the video I did on the same subject.
Your Style Will Evolve (And That's Good)
Here's something important I want you to understand: your photography style WILL change over time, and that's not just okay, it's actually good!
I started out obsessed with urban decay. Abandoned buildings, peeling paint, broken windows, industrial ruins. I thought that's what I wanted to photograph forever. And you know what? It was a good starting point! It got me out shooting, it taught me about light and composition, and it connected me with other photographers who liked the same aesthetic.
But over time, I realized urban decay wasn't the root of what I liked. It was just a symptom of something deeper: I was drawn to things that were disappearing, to the passage of time, to change and transformation. Urban decay just made that visible in an obvious way!
Once I understood that pattern, my photography opened up. Now I photograph construction (the opposite of decay!), historic signs being preserved, changing skylines, and light at different times of day. All of these connect to that same root interest in time and change.
The lesson: Start with what attracts you right now, but stay open to discovering the deeper pattern underneath. Don't lock yourself into "I'm an urban decay photographer" or "I only shoot landscapes" or whatever. Let your interests evolve!
Ask yourself every six months: what am I actually photographing these days? What patterns do I see? What keeps drawing my attention? Your answers might surprise you, and that's when the most interesting growth happens.
For you, it might not be about time and change at all. Maybe you'll discover you're really interested in human connection, or geometric patterns, or the way weather affects a scene. The point is to keep asking the question and being honest about the answer!
So ask yourself what it is that you like and then go out and make photos of that AND don’t let yourself fall into the trap of not being able to change this with time. I started out wanting to shoot urban decay only, but it turned out that was not the root of what I like to shoot, but it led me to it. Anyway, with that said, get your camera out and go take a picture with it!
If you're struggling to figure out what YOU actually like to photograph, here are some questions that helped me:
1. What photos do you KEEP coming back to look at? Not the ones you think you should like, but the ones you actually open and view again. Those reveal something about your real interests.
2. What do you photograph when nobody's watching or judging? Forget Instagram, forget what's popular, forget what other photographers are doing. What do YOU photograph just because you want to?
3. What makes you stop and say "I need to capture this"? Pay attention to that impulse! What triggers it? Light? A specific subject? A moment in time? That's your style trying to tell you something.
4. What do you get excited to show people? When you're showing photos to friends or family, which ones do you genuinely want them to see? Not the "best" technically, but the ones you're proud of or excited about?
5. If you could only photograph ONE thing for the rest of your life, what would it be? This is a hard question, but it forces you to identify what really matters to you in photography.
For me, the answers kept pointing to documentation, preservation, and light. Your answers will point somewhere else, and that's your path forward!
Support this website by using these affiliate links to shop on Amazon:
Leica M11 Digital Rangefinder Camera
Nikon AF-S FX NIKKOR 105mm f/1.4E ED Lens
Voigtlander Nokton 35mm f/1.4 II
Sandisk 128GB Extreme Pro memory cards
Nikon 50mm f1.8 S Lens for Z mount
Frequently Asked Questions About Finding Your Photography Style
How do I find my photography style?
Start by being brutally honest about what you actually photograph, not what you think you should photograph. Look through your last 100 photos and identify patterns. What subjects keep appearing? What situations make you stop and take photos? For me, it was always buildings that were changing or disappearing, plus interesting light conditions. Your patterns will be different! The key is honest self-reflection, not copying what popular photographers are doing. Your style is already there in your work. You just need to identify it and lean into it intentionally.
What is documentary photography?
Documentary photography is about creating a historical record, not about creating art (though it can be both!). When I photograph a building before it's demolished or document a construction project, I'm preserving something for the future. Documentary photography captures what IS, not what you wish it was or what you imagine it could be. Think about old photographs from the 1800s. We value those not as art but as historical documents. That's documentary photography. It serves your community by preserving visual history that will matter to future generations.
What should I photograph as a beginner?
Photograph whatever genuinely interests you right now, even if it seems boring or obvious. Don't worry about finding your "style" immediately. Just shoot! I started photographing urban decay because that's what looked cool to me at the time. Years later, I realized the deeper pattern (things disappearing, interesting light), but I couldn't have discovered that without first spending time shooting what initially attracted me. Start with what interests you, shoot a LOT, and let your patterns emerge naturally over time.
How do you photograph at night without a tripod?
You need a camera with good high ISO performance and the fastest lens you can get (f/2.8 or wider is ideal). I typically shoot at ISO 400-800 for night photography, sometimes higher if needed. Use a wide aperture (f/2.8 or f/4) to let in more light, and brace yourself against something solid like a wall or pole. The Leica SL2's in-body stabilization helps me handhold at slower shutter speeds than I could with other cameras. That said, a tripod is still better for really dark scenes or long exposures! Don't be afraid to carry a small travel tripod.
Can your photography style change over time?
Yes, and it should! My photography style has evolved significantly. I started obsessed with urban decay, then realized I was really interested in things that were disappearing or transforming. That deeper understanding opened up new subjects: construction photography, historic sign preservation, changing skylines. Don't lock yourself into one style forever. Every six months, ask yourself: what am I actually photographing these days? What patterns do I see? Let your style evolve as you grow and learn more about what really interests you.
What makes Chattanooga good for documentary photography?
Chattanooga is going through massive urban development right now. New hotels, renovated buildings, changing neighborhoods, businesses closing and opening. This constant change makes it perfect for documentary photography! There's always something disappearing or transforming. The Kinley hotel covering the old Coca-Cola sign, the ADAMS sign surviving a building renovation, old businesses on Rossville Avenue. These changes are worth documenting because future generations will want to see what Chattanooga looked like during this transformation period. Your town probably has similar changes happening!
How do I know if I'm a documentary photographer or an art photographer?
Ask yourself: when you take a photo, are you trying to capture what's really there, or are you trying to create something new? Documentary photography is about preservation and record-keeping. Art photography is about personal vision and creative expression. Many photographers do both! I'm primarily documentary focused because I care more about preserving history than making beautiful images (though sometimes they're both). There's no wrong answer here. It's just about understanding your own motivations and leaning into what actually drives you to pick up a camera.
What camera do I need for documentary photography?
Any camera works for documentary photography! Documentary is about subject and intention, not gear. That said, certain features help: good low light performance (for night photography), ability to shoot in challenging conditions, and reliability. I use a Leica SL2 with vintage lenses, but I've done documentary photography with everything from DSLRs to smartphones. The best camera for documentary photography is the one you'll actually carry with you when the moment happens. Don't let gear be an excuse for not starting!

Tennessee Fall Color Photography: Finding Colors During Drought
Looking up at the yellow canopy at North Chickamauga Creek WMA, Tennessee. The overcast sky created beautiful soft light filtering through the leaves without harsh shadows. This perspective shows how dense the fall color was in areas where the trees had access to groundwater from the creek.
Well, it sure took long enough, but I finally found a place local to me that had some beautiful fall color photo opportunities.

Looking up at the yellow canopy at North Chickamauga Creek WMA, Tennessee. The overcast sky created beautiful soft light filtering through the leaves without harsh shadows. This perspective shows how dense the fall color was in areas where the trees had access to groundwater from the creek. Just a few hundred yards away from the water, everything was brown and crispy from the drought. The lesson? In dry years, forget the open fields and exposed ridges. Find the water and you'll find the colors! Leica SL2 + Nikkor 28mm f/2.8 AiS handheld.
Tennessee Weather - Fall Color Photography
This is not something I normally have when it is as dry as it has been recently. Let me explain…
I am no scientist but I have stayed in a Holiday Inn before, so here goes. From what I have seen, there are three different scenarios that usually unfold around here in the fall.
The first event is like this, we get plenty of rain in the spring, it dries out a little in the mid summer months and then it starts to rain in late September or early October. This is actually the best possible scenario from what I can tell…
The second scenario is the same as the first one except the rain turns into a thunderstorm storm with heavy rain and usually high winds during peak color season, knocking all the leaves off of the trees.
Then there is option three, this one is where there is rain in the spring but then it is dry for the entirety of summer and fall. This is the type of season we are in now. There has not been enough rain to matter in two months…maybe more. It is so little water that the creek next to my house has no surface water in it as of this writing.
Of the three events, the first one is the preferred for fall color photos as there is sufficient water for the trees to transition normally to their dormant winter state and you get this incredible color display in the fall. This year though, we have event three where everything is a huge tinderbox and the leaves are simply drying out and turning brown then falling off of the trees without passing through their color phase at all…except…in the few places where there is still ground water to water the trees.
Understanding Tennessee's Three Fall Color Scenarios
I mentioned the three fall scenarios briefly, but let me break them down in more detail since understanding these patterns will help you plan your fall photography:
Scenario 1: The Perfect Year (RARE)
What happens:
Spring rains (March-May) give trees plenty of water to grow
Summer (June-August) dries out a little but not too much
Rain returns in late September or early October
Trees get signal to prepare for winter dormancy
Beautiful color transition over 2-3 weeks
Leaves stay on trees long enough to photograph
Photography result:
Incredible color displays everywhere
Colors last for weeks, not days
Can shoot anywhere, not just near water
This is what you see in all the fall color guides!
We get this maybe 1 out of every 4-5 years
Scenario 2: The Stormy Year (FRUSTRATING)
What happens:
Same as Scenario 1 through summer
Rain returns in late September (good!)
But it comes as thunderstorms with heavy rain and high winds
Leaves start to change color (exciting!)
Then a big storm blows through (devastating!)
All the leaves get knocked off before peak color
Photography result:
You get maybe 3-5 days of good color before the storm
Have to act fast when colors appear
After the storm, just bare trees and leaves on the ground
Extremely frustrating if you had plans for the weekend!
This happens maybe 1 out of every 3-4 years
Scenario 3: The Drought Year (CHALLENGING)
What happens:
Rain in spring (so far so good)
Then dry for entire summer and fall (uh oh)
No rain in September or October
Trees are stressed and trying to survive
Leaves dry out and turn brown without color phase
Everything becomes a tinderbox
Exception: Places with groundwater still have colors!
Photography result:
Most locations are brown and crispy, no color
Have to find water sources (creeks, rivers, springs)
Limited locations but concentrated color where water exists
Requires more scouting and research
This is what we had this year (2023)
How to adapt:
Scenario 1: Shoot anywhere, you can't go wrong!
Scenario 2: Have a plan ready, shoot as soon as colors appear
Scenario 3: Follow the water (like I did at North Chickamauga Creek)
The key is recognizing which scenario you're in and adjusting your strategy accordingly. Don't wait for "perfect conditions" that might not come!

A red maple tree standing out in a sea of yellow at North Chickamauga Creek WMA near Soddy Daisy, Tennessee. This was the first scene that greeted me when I started looking for fall colors! After weeks of drought with everything turning brown, finding this color contrast felt like discovering gold. The key during dry years? Follow the water. This gorge has a creek running through it (barely flowing, but still there!), which gave the trees enough water to transition to their fall colors normally. Shot handheld with Leica SL2 + Nikkor 28mm f/2.8 AiS. The overcast light saturated the colors without creating harsh shadows!
Fall Color Photography Secret… Follow the Water
Enter North Chickamauga Creek WMA near Soddy Daisy Tennessee. This is a small WMA (Wildlife Management Area) situated in a gorge next to Mowbray mountain and is a popular spot for the locals to cool off in the summertime in the river. Well, the river is just a brook at this point and is barely moving at all, BUT it is there! If you watch my YouTube video on it you will see what I mean. Even so, there is still enough water to feed the trees so they had a fall color change.
Since I found some colors this year, I now had to figure out what I wanted to use to capture all this color with. I finally settled on my camera being the Leica SL2 as it has a high resolution sensor and several other features that lend itself to being a wonderful landscape photography camera. You see the Leica SL2 is a mirrorless camera so it can be adapted to various vintage lenses really easily and we all know how I love using vintage lenses! So today’s lens of choice for the Leica is the Nikkor 28mm f2.8 AiS. This is one of Nikon’s crowning achievements in lens design as it was as close to optical perfection as they had ever gotten to that point. So naturally I used this lens.
The magic of the Leica SL2 as well is that it has IBIS on the sensor. This basically turns all my vintage lenses into stabilized lenses. I know there are a ton of other cameras that also have these same features but I just like the Leica SL2 for some reason.
Now that the camera setup is settled, next is finding the photo I want. I started out looking for macro level images, vistas and scenes, then I moved in closer to get more detailed image ideas. The first one is shown above of the red maple tree in a sea of yellow. Then I moved to the river bed and found some wonderful colors out in the open.
Looking upstream at North Chickamauga Creek near Soddy Daisy, Tennessee. This is literally what greeted me when I entered the river bottom. Not much water (you can see how low the creek was during this drought!), but the color splash from the trees was incredible! The boulders in the creek bed created great foreground interest, and the overcast sky provided soft, even light that made the colors pop without blown highlights. Shot handheld with Leica SL2 + Nikkor 28mm f/2.8 AiS at f/8. I love the texture and color in this image! So much detail from the rocks to the leaves to the trees. The 28mm wide angle let me include the entire scene from the creek bed up to the canopy. This is why I walked down into the creek rather than shooting from the trail!
This was literally what I was greeted with when I looked upstream from where I entered the river bottom. Not much water, but I got such a color splash from the trees that I didn’t even care. I would have liked for it to not be overcast, but you take what you can get and work with it. I really love this image too, so much texture and color in one image that is is almost overwhelming. I was really starting to embrace the look that the 28mm lens was giving me and then I decided to move upstream to that large boulder you see in the above photo and get a different perspective from that spot.

The valley perspective looking upstream at North Chickamauga Creek WMA, Tennessee. That little smidgen of sky showing the overcast clouds almost makes it otherworldly or something like that! I was blown away with this image when I got it into Lightroom and could see it better. It almost doesn't look real back up in the valley next to the sky. The clouds were epic! Shot handheld from a large boulder I scrambled up to for this perspective. Leica SL2 + Nikkor 28mm f/2.8 AiS, no tripod. The IBIS (in-body image stabilization) let me shoot this at 1/15s handheld and get sharp results. There's something to be said for simplicity - one camera, one lens, no backpack or tripod. Just me and the landscape!
Fall Color Photography and Moody Skies
The little smidgen of sky showing the over cast clouds almost makes it otherworldly or something like that. I was blown away with this image when I got it into Lightroom and was able to see it better. It almost doesn’t look real back up in the valley next to the sky. The clouds were epic! This is also shot hand held with the 28mm lens. What is nice is that it allowed me to be very agile and not have the burden of the back pack and a tripod with me at all. There is something to be said for simplicity…
Frequently Asked Questions About Fall Color Photography in Tennessee
When is peak fall color season in Tennessee?
It depends on where you are in the state! In East Tennessee (mountains), peak fall colors usually hit mid-to-late October. In Middle Tennessee (Chattanooga area and surrounding), you're looking at late October into early November. But here's the thing that most people don't realize: the actual timing depends more on rainfall and temperature than it does on the calendar! If we get a drought like we had this year, the trees just skip the color phase entirely and go straight to brown. If we get too much rain with high winds during peak season, all the leaves get knocked off before you can shoot them. The "perfect" fall color year requires rain in spring, a slightly dry summer, then rain returning in late September or early October. That's when you get the incredible color display that lasts for a couple weeks!
Why do some years have better fall colors than others?
Water! It all comes down to water and how the trees are stressed. I'm no scientist, but I have stayed in a Holiday Inn before, so here goes, lol. Trees need sufficient water to transition normally to their dormant winter state. When they have the right amount of water, they go through that beautiful color change we all love photographing. But when it's too dry (like this year with two months or more of no rain), the leaves just dry out and turn brown without passing through the color phase at all. It's basically a huge tinderbox and the trees are just trying to survive, not put on a show for photographers! That's why you need to find the water sources during dry years. Wherever there's still groundwater feeding the trees (creeks, rivers, springs), those trees will still change color even when everything else is brown.
Where can you find fall colors in Tennessee during a drought?
Follow the water! During dry years like this one, you need to find places where there's still water feeding the trees. Creek beds, river gorges, wildlife management areas near water sources, anywhere with groundwater. For me, North Chickamauga Creek WMA near Soddy Daisy Tennessee saved the day! The creek was barely flowing (just a brook at that point), but there was enough water to keep the trees happy. They had a beautiful fall color change while everything else around the area was brown and crispy. Other good bets: Ocoee River area, any of the gorges in the Cumberland Plateau, state parks with creeks or waterfalls, and anywhere in the Smoky Mountains (they usually have better water retention). Just look for blue on the map and you'll probably find color!
What camera settings work best for fall color photography?
I shot this whole session handheld with the Leica SL2 and Nikkor 28mm f/2.8 AiS lens, so here's what worked for me: aperture priority mode (let the camera pick the shutter speed), probably f/5.6 to f/11 for landscape depth of field, ISO auto (camera adjusted based on light), and I relied heavily on IBIS (in-body image stabilization) since I wasn't using a tripod. For fall colors specifically, you don't want to overexpose or you'll blow out the bright yellows and reds. I tend to expose for the highlights and let the shadows fall where they may, then I can lift them a bit in Lightroom if needed. Shoot RAW so you have flexibility with white balance (overcast days can look weird if you don't adjust). And honestly? Just set it and forget it so you can focus on composition rather than fiddling with settings!
Do you need a tripod for fall color photography?
Not if you have IBIS! I deliberately left the tripod and backpack at the truck because I wanted to be agile and explore without the burden of extra gear. The Leica SL2 has in-body image stabilization which basically turns all my vintage lenses into stabilized lenses. This means I can shoot handheld at slower shutter speeds without camera shake. There's something to be said for simplicity, especially when you're walking a creek bed or scrambling around on boulders like I was doing. That said, if you don't have IBIS or you're shooting in really low light, a tripod will give you sharper images. But for bright overcast days like this? Handheld is totally fine and way more enjoyable!
What's the best lens for fall color photography?
Wide angle! I used the Nikkor 28mm f/2.8 AiS for this session and it was perfect. Wide angle lenses (24mm, 28mm, 35mm) let you include the environment and context around the colors. You can get the creek bed, the trees, the sky, the boulders, everything in one frame. Plus, when you're in a gorge or tight space, a wide lens is the only way to get the whole scene. That said, bring a longer lens too if you want to isolate individual trees or compress distant ridgelines. But if I had to pick just one lens for fall color photography? 28mm is my sweet spot. It's wide enough for landscapes but not so wide that you get too much distortion on the edges.
Is vintage lens photography good for landscape work?
Absolutely! The Nikkor 28mm f/2.8 AiS I used is one of Nikon's crowning achievements in lens design. It was as close to optical perfection as they had ever gotten to that point. Vintage lenses often have character that modern lenses lack (slightly warmer rendering, interesting flare characteristics, smooth bokeh), and they're sharp enough for landscape work when you stop them down to f/5.6 or f/8. The best part? They're cheap! You can get incredible vintage glass for $100-300 that would cost you $1,000+ in a modern equivalent. Just make sure your camera can adapt them (the Leica SL2 is perfect for this with its short flange distance), and you're good to go. Oh, and IBIS makes vintage lenses even better since they don't have built-in stabilization!
What time of day is best for shooting fall colors?
Honestly? Overcast days like I had are actually ideal for fall color photography! Direct sunlight creates harsh shadows and blown highlights on the bright leaves. Overcast light is soft, even, and it lets the colors really saturate without fighting crazy contrast. That said, early morning and late afternoon (golden hour) can be magical if you want warm light on the trees. Avoid midday harsh sun if you can. For this shoot, the overcast clouds were epic and made the colors pop without any harsh shadows. It almost looked otherworldly! So don't skip shooting just because it's cloudy. Embrace it!
How do you compose fall color photos without them looking like every other fall photo?
Great question! I try to find specific elements to anchor the composition rather than just pointing at a bunch of colorful trees. For this session, I looked for: (1) the red maple tree in a sea of yellow (color contrast!), (2) the creek bed with boulders as a leading line through the frame, (3) the valley perspective looking upstream with that little smidgen of sky, and (4) textures and layers (water, rocks, leaves, trees, sky). The key is to have a subject or a story, not just "look, it's colorful!" Find a foreground element, use the colors as supporting cast, and compose with intention. Also, get low! I was walking in the creek bed and scrambling on boulders to get different perspectives. Don't just stand on the trail and shoot at eye level like everyone else!
What are the three fall color scenarios in Tennessee?
From what I've seen, there are three different scenarios that usually unfold around here:
Scenario 1 (BEST): Plenty of rain in spring, dries out a little mid-summer, then rain returns in late September or early October. This gives you incredible color displays that last for weeks! The trees have enough water to transition normally to dormancy and you get the full spectrum of reds, oranges, and yellows.
Scenario 2 (WORST): Same as Scenario 1 except the rain turns into thunderstorms with heavy rain and high winds during peak color season. This knocks all the leaves off the trees before you can photograph them. Super frustrating!
Scenario 3 (CHALLENGING): Rain in spring but then dry for the entirety of summer and fall. This is what we had this year. Everything becomes a huge tinderbox and the leaves simply dry out and turn brown without passing through their color phase at all... except in the few places where there's still groundwater to feed the trees. That's when you have to get creative and find the water!
BONUS QUESTION: What's North Chickamauga Creek WMA like for photography?
North Chickamauga Creek WMA near Soddy Daisy Tennessee is a hidden gem! It's a small Wildlife Management Area situated in a gorge next to Mowbray Mountain. Locals use it to cool off in the river during summertime, but in fall it's perfect for photography! The gorge creates interesting light and the creek provides water for the trees even during drought years. When I shot this, the river was barely moving (just a brook, really), but there was still enough water to feed the trees so they had beautiful fall color change. Easy to access, not too crowded, and if you walk the creek bed you'll find tons of compositions. Just be careful on the rocks, they can be slippery! If you watch my YouTube video about it you'll see what I mean.
So in summary, if you want to find fall colors even when it has been really dry, find the water. Where ever there is water, there will be fall colors. At least that is what I have seen, your mileage may vary.
Support this website by using these affiliate links to shop on Amazon:
Leica M11 Digital Rangefinder Camera
Nikon AF-S FX NIKKOR 105mm f/1.4E ED Lens
Voigtlander Nokton 35mm f/1.4 II
Sandisk 128GB Extreme Pro memory cards
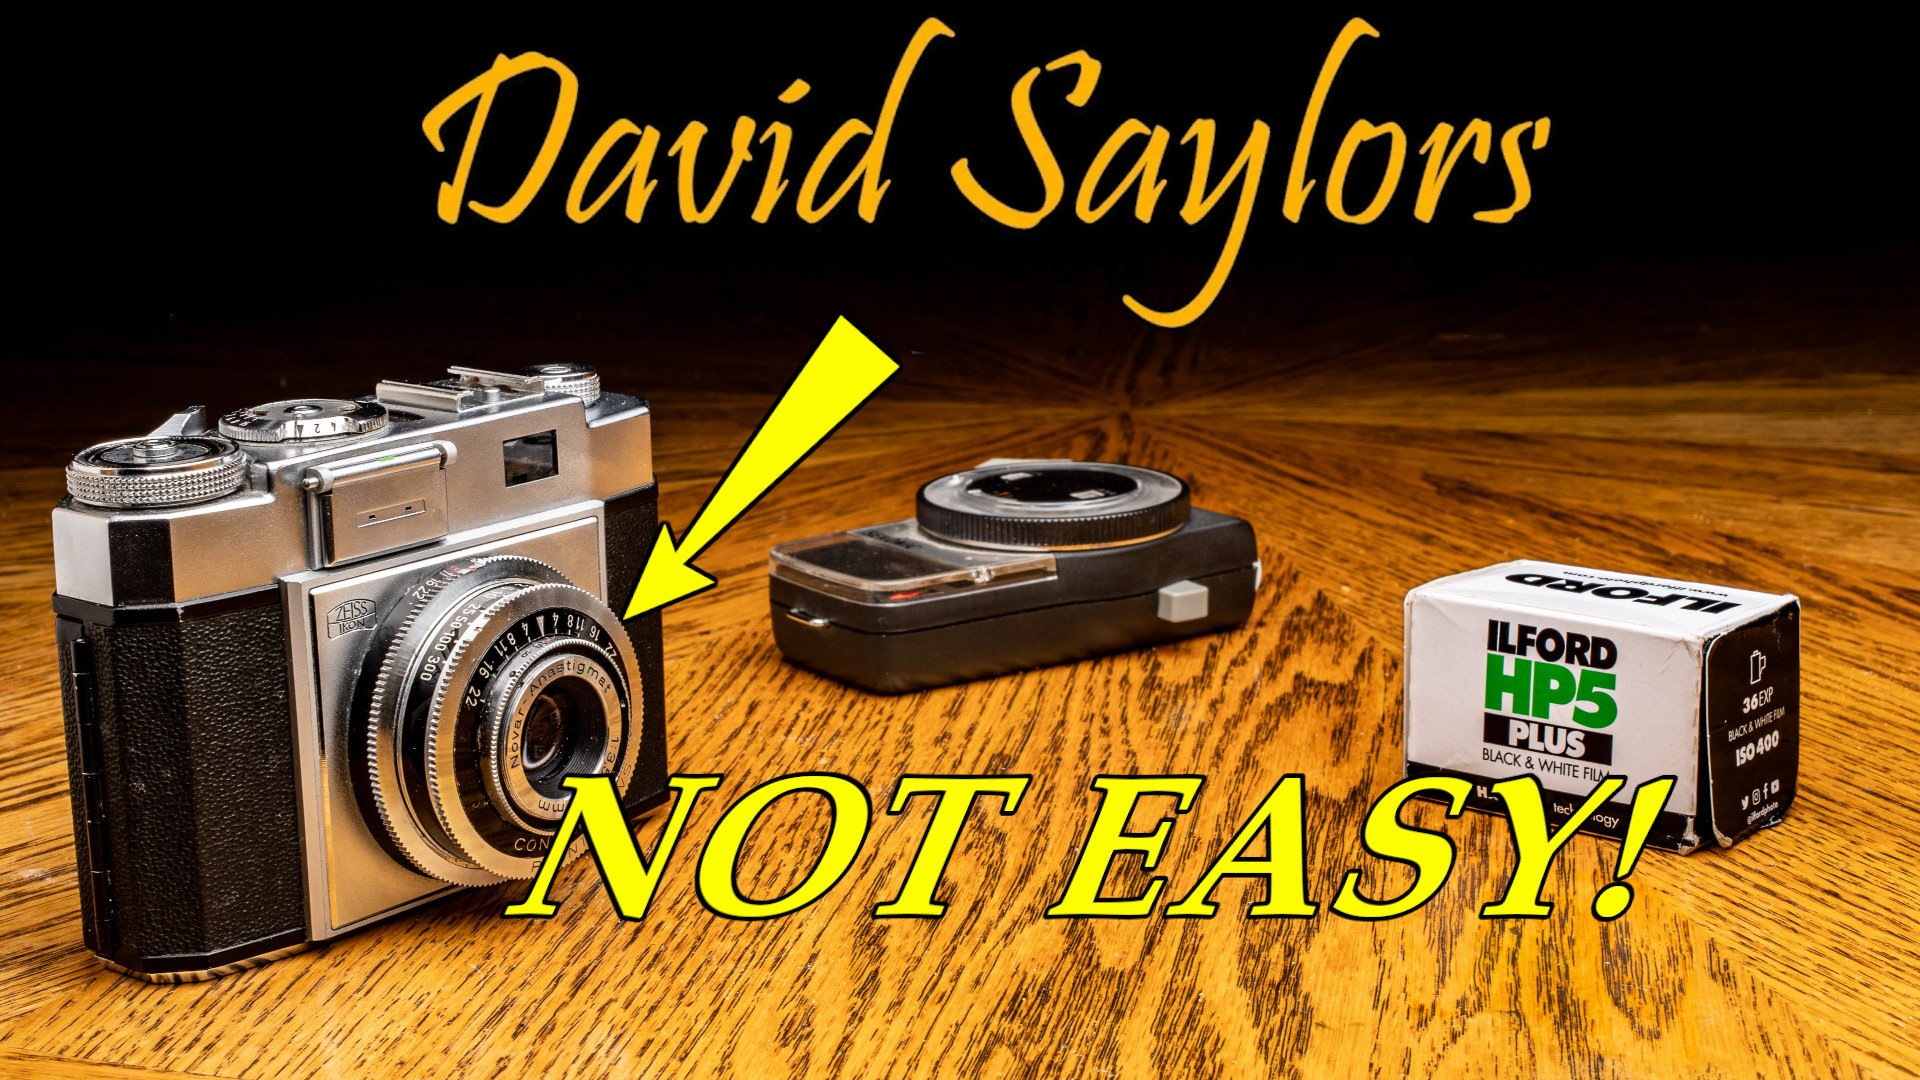
How shooting with Zeiss Ikon Contina made me realize I am spoiled...
When I started out on my own in photography it was already the 90s so I really didn’t know how good things were at the time since I got a second hand Yashica SLR that was manual focus, but had Program mode for exposure control.
My Photography Journey: Starting in the 90s
When I started out on my own in photography it was already the 90s so I really didn’t know how good things were at the time since I got a second hand Yashica SLR that was manual focus, but had Program mode for exposure control.

Once I got that camera it was a whole new world of photography since up to that point I had only owned the little “point and shoot” cameras that you could get for about 40$ at the time. Turns out those simple little cameras were a god send in technology compared to just a couple of decades earlier where we had cameras like the Zeiss Ikon Contina.
The SLR, being semi-automatic in nature, was like giving a driver of race cars his first stick shift car after driving automatics. It was a level of control that was hard to understand at first but soon became something that I looked forward to. This was because the rest of the exposure was being handled by the camera and I could easily confirm focus on the SLR as I was literally looking through the “taking lens” when focusing. All of this and I loved it, it was a very “connected” way to shoot and for the first time, I really wanted to get out and shoot photos. Sometimes it just takes the right tool to get the job done!
Why I Still Shoot Vintage Manual Cameras (Occasionally)
Given everything I've said about how difficult the Contina is to use, you might wonder why I bother at all. Here's the honest answer:
It's Meditative: When I take the Contina out, I'm forcing myself to slow down completely. Every frame requires thought, measurement, estimation, and commitment. There's no rapid-fire shooting, no checking the back screen, no instant gratification. It's almost zen-like in its deliberation.
It Builds Skills: Shooting manual cameras makes you better at photography fundamentals: understanding exposure, reading light, estimating distances, pre-visualizing shots. These skills translate to better photography with ANY camera.
It Creates Appreciation: This is the big one! After shooting the Contina, I pick up my modern cameras and feel genuine gratitude for autofocus, auto exposure, instant feedback, and all the conveniences. Instead of taking these features for granted, I appreciate them.
It's Different: Sometimes you just want a different experience. Shooting digital all the time can feel samey. Film is different. Manual exposure is different. Range focus is VERY different! The variety keeps photography interesting.
The Results Are Unique: The Zeiss Tessar lens renders differently than modern lenses. Film looks different than digital. The whole aesthetic is its own thing. Sometimes you want that look!
BUT (and this is important): I'm not saying everyone should shoot vintage cameras, or that old is better than new, or any of that gatekeeping nonsense. Modern cameras are objectively superior in almost every way! I shoot vintage cameras occasionally because I enjoy the experience, not because I think it makes me a "real" photographer. Use whatever camera makes you happy and helps you make the photos you want to make!

The 8-Step Shooting Process (No Automation!)
You see, the Zeiss Ikon Contina has none of these things. It doesn’t do anything for you automatically…at all. Here is the operational sequence to take a photo…
Find the scene you want to shoot.
Meter the light in the scene with the light meter.
Set the aperture based on film ISO.
Set the shutter speed also based on film ISO.
Guess the focus distance and set it on the lens.
Second guess yourself on focal distance and do it again…
Fire the frame and advance the film.
Repeat…at least once since you probably missed focus…lol.
Notice how you have to guess the focus. That is because there is no way to visually confirm it other than looking at the numeric distance numbers on the lens and hoping you are good at range estimation. You literally have to rely on the range focus system and shoot stopped down if you really need the photo to be in focus, that is the only real way of getting it…well that and a tape measure…
The Contina is NOT a rangefinder! It's a viewfinder camera with range focus. Big difference in usability! A true rangefinder like a Leica M-series or a Canonet makes focusing so much easier because you can actually SEE when you're in focus. With the Contina? You're just guessing and hoping!
Oh and that is a cold shoe on the top, not a coupled hot shoe so you have to use a sync cable that connects to the front of the camera to fire a flash module and I am not sure that is even a thing anymore…

The technology has advanced so much that we are to the point now where the camera has to focus PERFECTLY on the nearest eye of a moving subject…and that subject doesn’t even have to be a human either. On top of that we now expect the CAMERA to follow that subject while it and maybe even ourselves are moving and maintain that perfect focus as well! Isn’t it amazing how far the technology has evolved in less than the period of my mother’s lifetime?
Getting the Contina: Winchester England Story
So when I came into possession of the Contina, I was in Winchester England. We had found it at one of those public junk sales. Back home we call them Flea Markets. You know, where anut Gerty brings our her little figurines and next to her is a guy selling his ratty comic book and then another person is selling home made bread… and so on. It was sitting among several vintage cameras at one fella’s booth and it just caught my eye. It was really reasonably priced…or so I thought, so on my way back through the market, I just paid the guy for it. I didn’t know if it worked properly or not so I sent it home with my daughter as she was traveling home sooner than me. Once back home I proceeded to search out a reputable camera repair shop and sent the machine up to them for a full service. This also took a while as a lot of these shops are now “one man” operations and if they do good work, there is a backlog. So I finally get the camera back and take it out for its maiden voyage to shoot a roll of Ilford HP5 and see what the lens could produce. This was also to test for light leaks to make sure it didn’t need light seals either, so in that vain, I shot the first roll kinda haphazardly and then had it developed and scanned so I could check for light leaks. To be honest, I really liked the scans and that is what I used here and in the video below as well.

Well, I was impressed to be quite honest about it . To lack any semblance of automation, this little camera came away with a surprisingly high number of keepers in my book. Now, I am not talking about Pulitzer prize winning “keepers” but rather properly focused and exposed photos. I did use my handheld Sekonic light meter a lot that day, making adjustments to the camera as I went along to keep the exposure where I hoped it would make good photos.
I did have 400 speed Ilford HP5 in the camera so the maxed out shutter speed of 1/300 second was my only real choice when the sun was out fully. I then ran the aperture all the way down to make up for it so the images would be close to correctly exposed. I figured out once I got the camera back from service that it was designed for film from an era where there was no 400 speed film…yet.
Anyway, after spending the day with this camera I learned what it meant to be spoiled by the technology that we have today. It is akin to them getting this camera back then and the people doing wet plate talking about how good the new people have it. LOL. There really isnt anything new under the sun… Well, I still enjoy the little camera and I take it out on occasion for some “me” time where I will be by myself and just immerse myself into the activity of shooting with little camera.
Camera Specifications
Zeiss Ikon Contina (Type I or II, depending on your model):
Manufactured: 1950s (West Germany)
Lens: Zeiss Tessar 45mm f/2.8 (4-element design, excellent sharpness!)
Shutter: Prontor-SVS or Vario, 1 second to 1/300 second
Focus: Range focus (scale focus), manual distance estimation
Viewfinder: Simple optical viewfinder (not coupled to focus)
Film: 35mm, 24 or 36 exposure
Flash sync: Cold shoe + PC sync port (requires cable)
Exposure: Fully manual (no built-in meter)
Body: Folding design, collapses for compact storage
Weight: Approximately 400-500g depending on model
Current used price: $50-200 (plus CLA service recommended)
Film Used:
Ilford HP5 Plus 400 (black and white)
Would recommend ISO 100 film for better exposure flexibility given the 1/300 max shutter speed
Accessories Needed:
Handheld light meter (essential!)
Film (obviously!)
Flash sync cable if using flash
Patience and good distance estimation skills! lol
Support this website by using these affiliate links to shop on Amazon:
Leica M11 Digital Rangefinder Camera
Nikon AF-S FX NIKKOR 105mm f/1.4E ED Lens
Voigtlander Nokton 35mm f/1.4 II
Sandisk 128GB Extreme Pro memory cards
Nikon 50mm f1.8 S Lens for Z mount
Leica M11 Digital Rangefinder Camera
Nikon AF-S FX NIKKOR 105mm f/1.4E ED Lens
Voigtlander Nokton 35mm f/1.4 II
Sandisk 128GB Extreme Pro memory cards
Nikon 50mm f1.8 S Lens for Z mount
Frequently Asked Questions About Range Focus Cameras and the Zeiss Ikon Contina
What is a range focus camera and how does it work?
A range focus camera (sometimes called scale focus or zone focus) doesn't have any system to visually confirm your focus! You literally have to estimate the distance to your subject and set that number on the lens barrel. The Zeiss Ikon Contina has distance markings on the lens (measured in feet and meters), and you set the focus by guessing how far away your subject is. No rangefinder patch, no split-image focusing screen, no autofocus... just you, your eyes, and hopefully some good distance estimation skills! If you're off by a few feet? Well, your photo might be out of focus. That's why I mentioned using a tape measure in the post... haha. I was only half kidding!
Is the Zeiss Ikon Contina a rangefinder camera?
Nope! This confuses a lot of people. A rangefinder camera (like a Leica M-series) has a coupled rangefinder mechanism where you see two overlapping images in the viewfinder, and when you focus, those images align. The Contina doesn't have this. It's a viewfinder camera with range focus (scale focus). You're just looking through a simple optical viewfinder that shows you the frame, but it doesn't help you focus at all. The viewfinder and the focusing mechanism are completely separate, which makes focusing much harder!
What's the difference between a cold shoe and a hot shoe?
A hot shoe has electrical contacts built in so when you slide a flash onto the camera, it automatically connects and fires when you press the shutter. A cold shoe is just a metal bracket on top of the camera with no electrical connection. The Zeiss Ikon Contina has a cold shoe, which means if you want to use flash, you need a sync cable that plugs into the front of the camera body and connects to your flash unit. This is old-school flash sync from the 1950s! Modern hot shoes are SO much more convenient (and that's an understatement).
Why is the Zeiss Ikon Contina so difficult to use?
Because it doesn't do ANYTHING for you automatically! Let me break it down: (1) You have to meter the light separately with a handheld meter, (2) You have to set both aperture and shutter speed manually based on your meter reading, (3) You have to guess the focus distance and set it manually with no visual confirmation, (4) You have to advance the film manually after each shot, and (5) You have to keep track of how many frames you've shot since there's no fancy frame counter that resets automatically. Modern cameras do ALL of this for you automatically, or at least make it way easier. That's what I mean when I say I'm spoiled!
Can you actually get good photos with the Zeiss Ikon Contina?
Yes! I was honestly surprised by the keeper rate from my first roll. The Zeiss Tessar lens on the Contina is actually really good glass from the 1950s. If you take your time, use a light meter, shoot stopped down a bit (f/5.6 or f/8 helps with focus), and carefully estimate your distances, you can absolutely get sharp, well-exposed photos. The lens renders beautifully on film. BUT, you have to slow down and be deliberate about every single frame. This isn't a camera for street photography or fast-moving subjects unless you're some sort of range-estimation superhuman! For static subjects, architecture, landscapes, and portraits where your subject isn't moving? It works great if you take your time.
What film should I use in the Zeiss Ikon Contina?
I used Ilford HP5 Plus 400, which is a great general-purpose black and white film. However, here's the thing: the Contina's max shutter speed is only 1/300 second, which means it was designed for SLOWER film. Back in the 1950s when this camera was made, ISO 400 film didn't exist yet! Most film was ISO 100 or slower. So with ISO 400 film in bright sunlight, I was constantly maxed out at 1/300 and f/22 (smallest aperture) just to keep from overexposing. For this camera, I'd actually recommend ISO 100 film (like Ilford FP4 or Kodak TMax 100) so you have more flexibility with your exposure settings in bright light. Or just embrace shooting at small apertures... which actually helps with the whole focus guessing problem! lol
How much does a Zeiss Ikon Contina cost?
They're pretty affordable on the used market! You can find them anywhere from $50 to $200 depending on condition and whether they've been serviced. I sent mine out for a full CLA (clean, lubricate, adjust) service, which cost me about $100-150, so factor that into your budget if you buy one that hasn't been serviced recently. These cameras are 70+ years old, so getting them professionally serviced is pretty much essential if you want them to work reliably. The shutter speeds drift over time, the lubricants dry out, and the aperture blades can get sticky. A good CLA makes a huge difference!
Where did you get your Zeiss Ikon Contina serviced?
I sent it to a reputable camera repair shop that specializes in vintage cameras. (I don't remember the exact shop name offhand, but there are several good ones that work on vintage folders and rangefinders.) The CLA took a while, but they did a great job. The shutter speeds are accurate now, the aperture blades work smoothly, and everything functions as it should. If you're looking to get a vintage camera serviced, ask around in the film photography communities on Reddit or the Rangefinder Forum... people there have great recommendations!
Is the Zeiss Ikon Contina good for beginners learning film photography?
Honestly? Probably not as your FIRST film camera! lol. It's too challenging for someone just starting out because of the range focus system and completely manual operation. I'd recommend starting with something that has either (1) a coupled rangefinder for easier focusing (like a Canonet or Olympus 35RC), or (2) an SLR with a viewfinder focusing screen (like a Pentax K1000 or Canon AE-1). Once you're comfortable with manual exposure and film basics, THEN the Contina becomes a fun challenge. It'll teach you to really think about every single frame and appreciate how much modern cameras do for us!
Why do you still shoot with the Zeiss Ikon Contina if it's so difficult?
Great question! Because sometimes I enjoy the challenge and the "me time" aspect of it. When I take the Contina out, I'm forcing myself to slow down, think about every frame, and engage with photography in a more deliberate way. There's no chimping on the back screen, no instant feedback, no spray-and-pray... just careful consideration of each shot. It's almost meditative in a way. Plus, it's fun to use camera gear from a completely different era and appreciate how far technology has come. That said, I'm NOT shooting the Contina exclusively or even regularly! It's an occasional thing when I want that experience. For everything else? I'm absolutely using my modern cameras with autofocus and metering and all the conveniences! haha
BONUS QUESTION: What's the biggest lesson you learned from shooting the Contina?
Appreciation for modern technology! Seriously. After spending a day with this camera, manually setting everything and guessing focus on every single shot, I came home and picked up my Nikon Zf and was like "Holy crap, this thing focuses ITSELF and exposes ITSELF and even follows moving subjects!" We really are spoiled by what modern cameras can do, and that's not a bad thing at all. The Contina taught me that "the good old days" weren't always that good... at least when it came to camera technology! lol

A day out with Aaron in Chattanooga
It was time...
We have not gathered to shoot photos in quite some time now so Aaron found there was a beard competition happening in Chattanooga and decided to make his way down for it.
It was time...
We have not gathered to shoot photos in quite some time now so Aaron found there was a beard competition happening in Chattanooga and decided to make his way down for it.
The Setup: What I Shot With
For this day out with Aaron, I kept my setup simple:
Camera: Leica SL2 (full-frame mirrorless) Lens: Leica 50mm APO-Summicron Mode: Aperture priority with -2/3 exposure compensation ISO: Auto (probably ranged between 200-800) Settings: Wide open or close to it (f/2 to f/4 for subject separation)
Aaron was shooting with his new Nikon Z8, and we kept comparing how our cameras metered the scenes differently. The Leica wanted to overexpose about 2/3 stop compared to his Nikon, which meant I had to dial in negative exposure compensation the whole time. This is something you learn when shooting different camera systems together!
The SL2 is heavy (like really heavy compared to smaller mirrorless cameras or rangefinders), but it makes stunning images and the build quality is tank-like. I don't baby it on the streets, which is exactly how a street camera should be used!

Shot with Leica SL2 and 50mm during our Chattanooga day out with Aaron at the beard competition.
When he arrived we spent the evening playing with stuff (his new Z8 in particular) and catching up. But then it was off to bed so we could get up and start our big day of photography.
The next morning comes around and we down some coffee and make a plan to meet up about lunchtime as I had to go to our Church’s Association as a delegate. Seems I made a mistake and assumed I didn’t need to go… lol, I see what that got me. Anyway, I really enjoy Association so it wasn’t like a chore, it meant changing plans a little from the original plans for the day.
So after I finish with business at association, I head over to the Harley Davidson dealership which is where the beard competition is being held. There I find Aaron is short order and it is really crowded. He basically tells me to get my camera out and take a picture with it so I sheepishly do as I am told.

The beard competition at Harley Davidson in Chattanooga. This event was perfect for breaking down personal barriers to photographing strangers! People were there to be seen and photographed, making it easy practice for someone like me who's normally shy with the camera. Shot with Leica SL2 + 50mm.

This fellow was more than happy to pose for me at the beard competition! Events like this are perfect for overcoming shyness in street photography because people expect cameras and are happy to participate. Shot with Leica SL2 and 50mm. The afternoon light gave great contrast for portraits like this!
The atmosphere at the beard competition was incredible! Crowded but friendly, with people everywhere happy to get their photos taken. Aaron was right when he told me to just get my camera out and shoot. Sometimes you need that push from a friend! Leica SL2 + 50mm, aperture priority mode.

The atmosphere at the beard competition was incredible! Crowded but friendly, with people everywhere happy to get their photos taken. Aaron was right when he told me to just get my camera out and shoot. Sometimes you need that push from a friend! Leica SL2 + 50mm, aperture priority mode.
You see I am not very aggressive with my photography especially when it involves people. I will ask at times but most of the time, this is why I don’t shoot aggressive street stuff. So now I am starting to get some photos and it is exactly as he mentioned. People happy to get their photos captured are everywhere. Like this fellow below, he was more than happy to pose for me. I will be honest, this kind of event is the perfect thing to break down your personal barriers to shooting photos of people you don’t know.

The Leica SL2 with the 50mm APO Summicron is the perfect camera for a beard Competition!

Even the girls got in on the fun at the beard competition! Not everyone there had a beard, lol. Shot with Leica SL2 + 50mm at Harley Davidson in Chattanooga. This is why I love event photography as practice for street work!
Why Events Are Perfect for Shy Street Photographers
I mentioned I'm not very aggressive with my photography, especially when it involves people. This is something a lot of photographers struggle with! We want to capture candid moments and interesting people, but we don't want to be intrusive or make anyone uncomfortable.
Events like the beard competition are the perfect training ground because:
People expect cameras. They're there to be seen and photographed, so you're not the weird person with a camera. You're just another photographer at an event.
Subjects are willing. Most people will happily pose if you ask, and many will even seek you out to get their photo taken. This builds your confidence!
Low stakes. If someone says no or looks uncomfortable, there are dozens of other subjects around. You're not losing a once-in-a-lifetime shot.
Practice makes perfect. The more you shoot people at events, the more comfortable you get approaching strangers in regular street situations.
Aaron's advice was simple: "Get your camera out and take a picture with it." Sounds obvious, but when you're standing there feeling shy, you need someone to tell you it's okay to just shoot!
Start with events. Work up to regular street photography. Your shyness will fade as your confidence grows! Back to the story in progress…
Well the beard competition winds down about 3 or so in the afternoon and we decide to rearrange the rest of the day to shoot some street photography in downtown and also to go have supper at a great Italian restaurant later on.
The streets of Chattanooga were busier than usual with it being a holiday weekend but it still wasnt really bad where we went for our walk.

We found this mural with light reflecting from the building across the alley and it was just something we couldn't pass up! This is what afternoon light does in downtown Chattanooga. The light spill creates scenes you don't get at other times of day. Leica SL2 + 50mm on our photowalk route through Main and Broad Streets.
We started on Main Street and then headed down Market Street to about 7th where we turned over to Broad Street and then back towards Main eventually diverting over to Cowart street before arriving at the truck.
So now you have the route, let see what we got. I kept joking about channeling my inner Eggleston as I would take photos of the mundane. Another thing I have learned is my Leica wants to shoot about 2/3 stop over exposed compared to my friends Nikon cameras. I kept -2/3 stop exposure compensation dialed in the whole time. I did this to keep the sky from being blown out as the shadows would be dark due to the bright afternoon sun. I will dig into the setup on my camera more to see if I can find out why it is doing that.

The Tivoli Theater is an iconic landmark in downtown Chattanooga Tennessee and never disappoints for a photograph.
Along the way we saw a lot of cool stuff to photograph, like in the images below where it is different light so the images come out different from my usual time of day. With the light further over to the west we kept getting these awesome light spill shots like the one below of the old Rone Regency Jewelers location. This location will be sorely missed by me when they finally do something with this building. I love the gritty nature of the old signage and it wasn’t long ago that the windows were not boarded up so you could actually see inside the store. Even so, the black painted plywood makes a nice contrast to the lighter color of the upper section of the building bringing balance to the image.

The old Rone Regency Jewelers location with afternoon light spilling across the facade. This location will be sorely missed by me when they finally do something with this building. I love the gritty nature of the old signage! The black painted plywood makes a nice contrast to the lighter color of the upper section, bringing balance to the image. Shot with Leica SL2 + 50mm Summicron on our downtown Chattanooga photowalk with Aaron.
We also found a few people to photograph as well. It was not quite as busy as I had figured it would be for a holiday weekend in the downtown area, but there were a few people out and about and I was able to grab a few photos of them. The Leica SL2 is a great camera for this kind of photography as it makes stunning portraits as well as makes for a wonderful, albeit heavy, street camera.
Why Afternoon Light Changed Everything
I usually shoot at different times of day (mid-morning usually), so this late afternoon session was different for me. With the sun further over to the west, we kept getting these awesome, direct sun light spill shots that I don't normally see.
What made afternoon light special:
Hard shadows: The bright afternoon sun created strong shadows and high contrast. Great for black and white or dramatic color shots.
Light spill: Buildings reflecting light into alleys and onto other buildings. This is what made the Rone Regency Jewelers shot work so well!
Window light: Storefronts and windows become light sources, creating interesting reflections and secondary lighting.
Challenge mode: Protecting highlights meant I had to underexpose a bit (-2/3 stop), which made shadows darker. This forced me to look for scenes that worked with that contrast.
Different light means different photos. Don't just shoot at the same time every day! Mix it up and see what you discover.
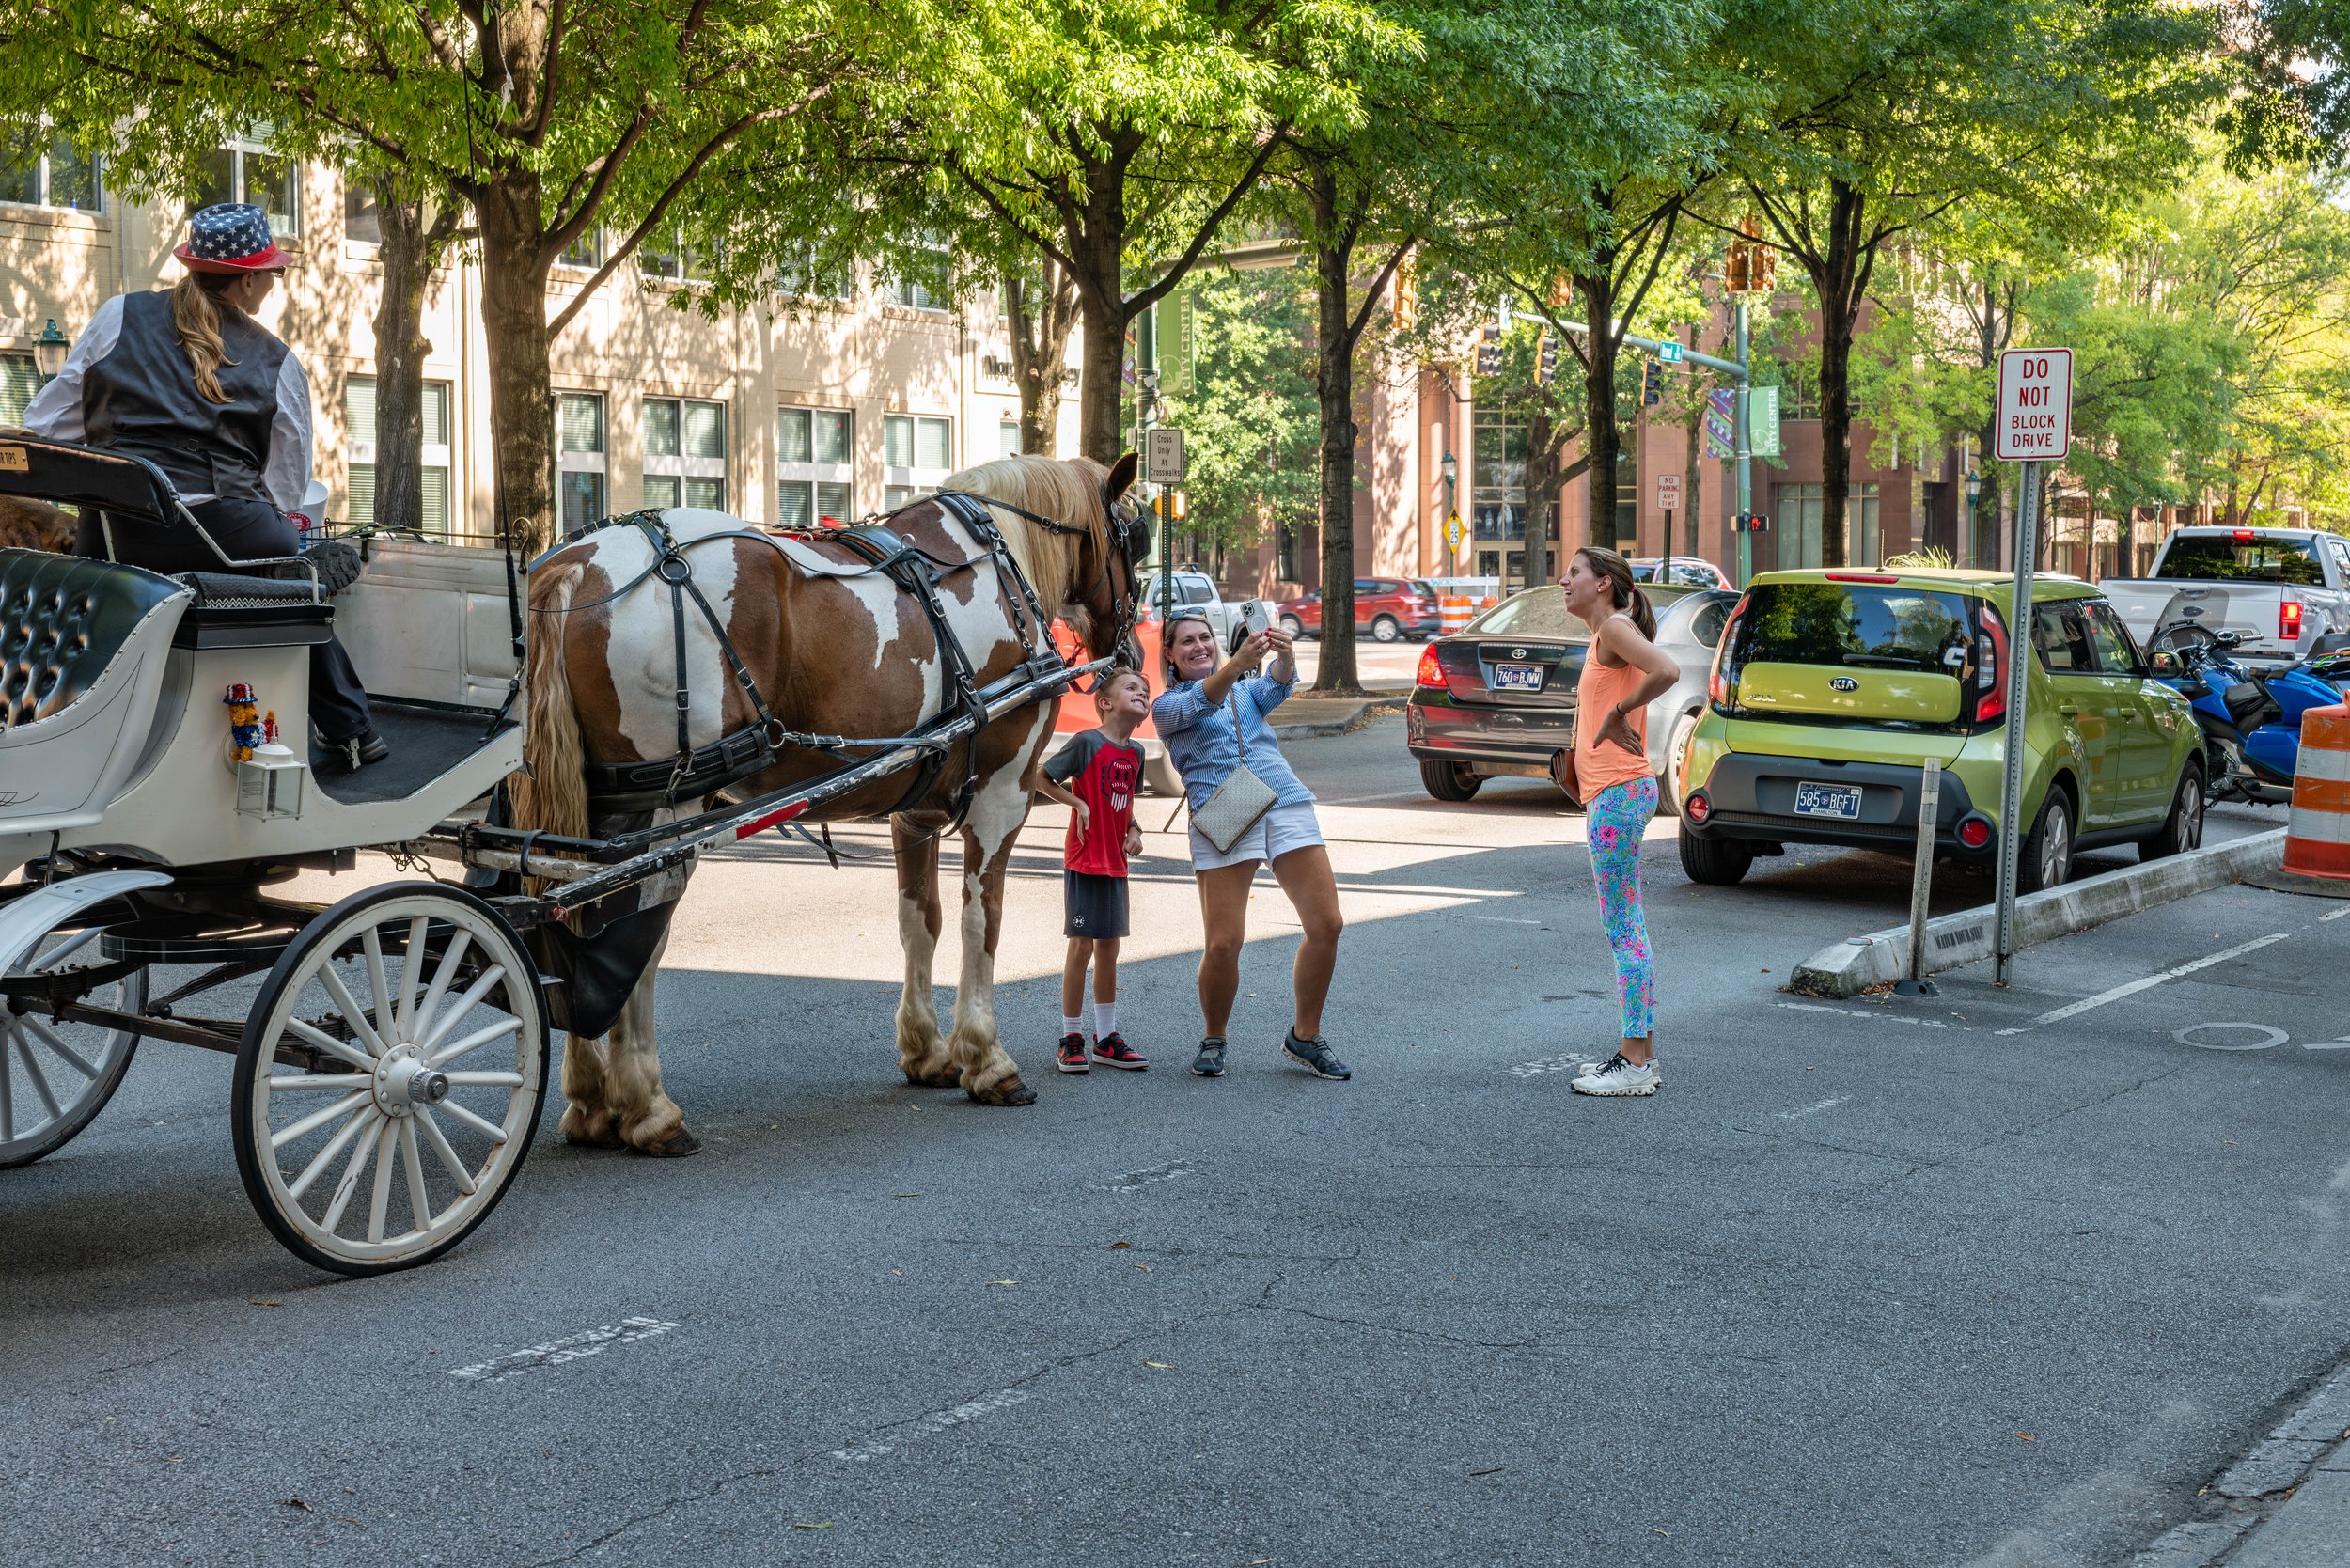
All in all we had a great time and then even got to go eat wonderful Italian cuisine later too. What more could you ask for? Well, there is one more thing I could ask for…
Lightroom Classic… I did it, I went over to the dark side and installed Lightroom back on my system again. It has the power to edit like I need finally and I kept running into problems that Exposure couldn’t easily solve for me so it was time to upgrade…or move over laterally to or what ever you call it…So going forward, I will be learning how to use Lightroom to edit my photos…wish me luck.
If you want to see more abotu this day, I made a vlog cideo about the photowalk portion of the day and it can be watched here.
What I Look For in Street Photography
During the photowalk, Aaron joked about me "channeling my inner Eggleston" as I photographed mundane things. But that's what street photography is about! Here's some of the things that I look for:
Light: Always first. How is the light hitting the subject? Is there interesting shadow play? Is it spilling from one building to another?
Layers: Foreground, midground, background. The best street photos have depth and multiple elements working together.
People: Not always necessary, but human presence adds scale and story. Even just a silhouette or someone walking through the frame.
Color or contrast: Bright colors that pop, or strong black and white contrast. Something that makes the eye stop.
Geometry: Leading lines, patterns, shapes, architecture. The bones of a good composition.
Moments: Candid expressions, interesting gestures, unexpected juxtapositions.
The mundane: Everyday things that become interesting when you isolate them with your camera.
Don't overthink it! Just walk and shoot what catches your eye. You can analyze it later when you're editing. Then you can take inventory of what you shoot the most and see if those images have some meaning or if it is just what you like to shoot…either way, it is good to get out and shoot photos so go have some fun.
Frequently Asked Questions About Street Photography and Chattanooga Photowalks
How do you overcome shyness when photographing strangers?
Honestly, I still struggle with this! I'm not aggressive with my photography, especially when people are involved. I'll ask permission sometimes, but most of the time I just shoot what feels natural without getting in people's faces. What helped at the beard competition was that people were already there to be seen and photographed. They were happy to pose! Events like this are perfect for breaking down those personal barriers to shooting photos of people you don't know. Start with events where people expect cameras, then work your way up to regular street photography. Aaron's advice of "get your camera out and take a picture with it" is the best cure for shyness, even if it feels awkward at first!
What's the best time of day for street photography in downtown Chattanooga?
The afternoon worked great for us! With the sun further over to the west, we kept getting these awesome light spill shots bouncing off buildings. The light was different from my usual shooting times, and it created some really interesting shadows and contrasts. Late afternoon (around 3-5pm) gives you that warm golden light that looks great for both architecture and people. Early morning works too, but afternoons tend to have more people out and about, which is what you want for street photography. Avoid harsh midday sun if you can, unless you're going for high-contrast black and white work!
What's a good street photography route in downtown Chattanooga?
The route Aaron and I took worked really well: Start on Main Street, head down Market Street to about 7th, turn over to Broad Street, then back towards Main, and eventually divert over to Cowart Street. This gives you a good mix of architecture, street scenes, and people. You'll pass old buildings like the Rone Regency Jewelers location (which has great gritty signage), modern storefronts, alleys with interesting light, and public spaces where people gather. The whole loop is maybe 2-3 miles depending on how much you wander, perfect for a couple hours of shooting!
Is the Leica SL2 too heavy for street photography?
Yes and no, lol. The SL2 is definitely heavy compared to smaller mirrorless cameras or rangefinders. But it makes stunning portraits and the image quality is just incredible. I kept it paired with just the 50mm lens to keep things simple. Is it the "ideal" street camera? Probably not if you're walking all day. But does it work? Absolutely! The weight actually helps stabilize handheld shots, and the build quality means I don't baby it. If you've got one, use it for street photography. Don't let the weight stop you. Your shoulders might complain, but the photos will be worth it!
Why was your Leica exposing differently than Aaron's Nikon?
Great question! I noticed my Leica SL2 wants to shoot about 2/3 stop overexposed compared to Aaron's Nikon cameras. I kept -2/3 stop exposure compensation dialed in the whole time to keep the sky from being blown out. The shadows would be dark anyway due to the bright afternoon sun, so I was protecting the highlights. Different camera brands meter scenes differently, and Leica tends to be a bit generous with exposure to preserve shadow detail. This is something you learn when shooting with multiple camera systems. Just dial in the compensation and keep shooting! I need to dig into my camera setup more to see if there's a metering mode that matches my shooting style better.
What camera settings do you use for street photography?
For this photowalk with the Leica SL2, I was shooting mostly in aperture priority mode with the 50mm lens. I kept -2/3 exposure compensation dialed in (as mentioned above). ISO was probably auto, and I let the camera pick the shutter speed. For street photography, I like to shoot wide open or close to it (f/2 to f/4) to get that subject separation, but I'll stop down if I need more depth of field. The key is to keep your settings simple so you're reacting to moments, not fiddling with dials. Set it and forget it, then just focus on composition and timing!
Can you photograph people at public events without permission?
At events like the beard competition where people are specifically there to show off and be seen? Yes! Most people were happy to be photographed and many posed for us. That said, I still try to be respectful. If someone looks uncomfortable or waves me off, I move on. For regular street photography, it's trickier. I generally don't ask permission before shooting (it kills the moment), but if someone objects after I've taken their photo, I delete it. Know your local laws, be respectful, and don't be creepy. Events are the easiest place to start because people expect cameras!
What makes a good subject for street photography?
Honestly? Almost anything! During the photowalk I kept joking about channeling my inner Eggleston as I would take photos of the mundane. Look for interesting light (like that spill on the Rone Regency Jewelers building), patterns, textures, people doing everyday things, architectural details, reflections, shadows... anything that catches your eye. Don't overthink it. I shot everything from bearded bikers to boarded-up buildings to random street corners. The beauty of street photography is finding the interesting in the ordinary. Just walk around and let things reveal themselves to you!
Should I shoot RAW or JPEG for street photography?
I shoot RAW because I like having the flexibility in post-processing. For this shoot, I ended up using Lightroom Classic to edit (I went back to the "dark side" after trying to use Exposure, lol). RAW gives me the power to recover highlights, lift shadows, and adjust colors the way I want them. That said, if you're comfortable with your camera's JPEG processing and you don't want to spend time editing, shoot JPEG! The best format is the one that gets you shooting. Street photography is about being out there capturing moments, not agonizing over file formats!
How do you choose which photos to keep from a street photography session?
I wish I had a good systematic answer for this, lol. Honestly, I just go through them and keep the ones that speak to me. Does the composition work? Is the light interesting? Did I capture a genuine moment or expression? Is there something about the image that makes me want to look at it again? I'm pretty ruthless in culling, especially with street photography where you might shoot hundreds of frames. If it doesn't grab me immediately, it gets deleted. The photos I shared in this post were the ones that stood out when I was editing. Trust your gut, and don't be afraid to delete mediocre shots. Only keep the good stuff!
BONUS QUESTION: What's the best way to learn street photography?
Go out with a friend like Aaron who will tell you to "get your camera out and take a picture with it"! Seriously, having a photography buddy makes a huge difference. You push each other, share ideas, and it's way less awkward than being alone with a camera on the street. Start with events (like the beard competition) where cameras are expected, then work up to regular street shooting. Use a simple setup (one camera, one lens), set your camera to aperture priority or full manual, and just walk. Don't overthink it. The best teacher is just getting out there and shooting. Oh, and watch Aaron's work or other street photographers you admire, but then go do your own thing. Your style will develop over time!
Support this website by using these affiliate links to shop on Amazon:
Leica M11 Digital Rangefinder Camera
Nikon AF-S FX NIKKOR 105mm f/1.4E ED Lens
Voigtlander Nokton 35mm f/1.4 II
Sandisk 128GB Extreme Pro memory cards
Nikon 50mm f1.8 S Lens for Z mount
Thanks for stopping by, now get your camera out and go take a photo or two with it!
Charit Creek Lodge Off Grid Retreat
Charit Creek Lodge Off Grid Retreat

We decided to spend the night at this wonderful little place and this time, we came when it wasn’t scorching hot like last time.
Yes, we have been here before. This is why we like it. The quiet and serenity makes this place wonderful to get away to on occasion. I did charge my phone prior to leaving the parking area (which is a .8 mile hike from the lodge) so I could take pictures and write some thoughts about this article.

The hike into the grounds is a beautiful walk down into a valley…just remember that all things that go down must also go back up…to get to the card.

This was also an exercise in minimalism as I was planning on bringing a bunch of camera gear but then decided that I wanted to see if I could get good photos with only my iPhone.
The iPhone 14 Pro Max is a wonder of modern engineering and has so many capabilities that it will do a great job as a snapshot camera for trips like this.

The normal rig for forays such as this would normally be my Leica CL and the 35mm lens and possibly the 17mm as well to give me two options for field of view. This worked well in England to be quite honest and I really didn’t need any of the hot rod gear like my full frame Leica SL2 or the host of lenses for it. The little Leica CL has a more than capable 24 megapixel sensor that produces wonderful images. The larger Leica SL2 having a 47 megapixel sensor does give you more to work with as well as allowing you to print larger but at the end of the day I had to be honest with myself. I rarely print my photos and when I do they are in a photo book which isn’t more than 12 inches on the longest side. So I have started downsizing my load outs for trips like this.

Here is the hard facts. The iPhone captures snapshots so well with its measly 12 megapixels that you can print 8x10 just fine and no one will ever be the wiser. So this little overnight trip is a chance to test that as I will be stopping by a Walgreens and making some 4x6 prints as well as maybe even some 8x10 prints as well just to test the idea.

Back to Charit Creek a little. It is in Big South Fork Forest. This is either a state or federal forest, I am not sure which, but it is a huge tract of protected land and Charit Creek is in the middle of it. Hence the “unplugged” nature of the operation.

When you get here, you quickly notice the lack of electricity. Even the kitchen that cooks the huge communal meals doesn’t have much more than some solar power. All of the cabins are rustic styled with wood burning stoves for heat and screen windows for AC. They are more akin to bunk houses than cabins actually but they are nice nonetheless.

There is a plethora of games and outside activities to do (even though I wrote this blog using my well charged iPhone)… There are also copious fire rings and PLENTY of firewood is on hand for all the lodges needs. The firewood does cost you money but it isn’t that much and you get way more than you really need for what you pay. For details like that, contact the lodge as I don’t know when you are reading this and prices could have changed between now and your current time. Suffice it to say that prices are not extreme in any way.


There is also a bathhouse with showers should you want to bring shower gear with you. (I didn’t since I will be home tomorrow afternoon and can just bathe when I get home). The main lodge has the dining hall as well as guest rooms on one end and plenty of porch space containing a metric ton of rocking chairs.

The provided meals are supper and breakfast with lunch being left to you to figure out (with a few exceptions). The meals are huge though so you can probably make it from one to the next easily enough. There is a copious amount of hiking around the lodge with one trail going to a waterfall.


Happened to catch Venus the next morning while stoking the campfire.
Another thing the lodge specializes in is accommodating horseback riders. Complete with hitching posts and a horse barn with stables near the lodge. There are numerous horse back riding trails in the surrounding area as well and there is even a sectioned off parking lot just for equestrian rigs where you leave your vehicle while at Charit Creek Lodge.

I do not know the history of the lodge but the whole property makes me think that this was a homestead at some point in the 19th century what with the construction techniques used to build the buildings. I could be wrong and they could be newer but these logs look period correct for the late 1800s.

The buildings make for really interesting photography subject matter so once we got here and stowed our gear, I made my way around and grabbed some photos of everything. The whole time I was doing this, I was attempting to capture the “feel” of the whole place. I have come to do this more and more as time goes on. There is already a metric ton of photos of Charit Creek Lodge floating around on the web, so I need to do something different if I want something unique and interesting that stands out from the ordinary.

Side note: I found out that I really should have brought my camera as I was informed that the milky way has been visible the last few nights…. Lol. You never know what to expect. I don’t regret not bringing my cameras though as it defeats the purpose of traveling light weight. Sometimes you just need to enjoy the event instead of worrying about documenting it for others.
I saw the following tonight:
The Milky Way
The starlink satellite train
Many other satellites
The glow worms in the grass
We heard the great horned owls calling each other
The barn cat (trust me on this one)

I also learned that the iPhone has a low light mode where it will do a long exposure and get great photos in super low light. I was blown away by what it could do when photographing the campfire. Just take a look!


These are 1/5 second exposures! Yeah, that is cool. They are also ISO 10,000 but it does some sort of noise reduction and it looks good.
Sometimes you don’t have to plan out this huge package of gear for a trip to be successful for photography, you just need to be creative with your smartphone and go have a good time. We as photographers want to over complicate what we need to get good photos. Most people don’t even care what camera was used to get the picture or honestly will assume you used your smartphone anyway.


Isn’t it interesting how we will do that? HaHaHa… Anyway, back to Charit Creek Lodge for a little longer. When you leave you have to return back to your car out on the same trail you came in on, the difference this time is that it is uphill almost the entire way so if your fitness level isn’t high I would suggest taking your time so you don’t over exert yourself.

Once back at the truck you can “reconnect” to the internet via cellular data and get back to the world. That is how I am able to share this story with you. Ironic isnt it? I use the internet to communicate how NOT being on the internet is a good thing. Anyway, I hope you enjoyed the photos and the story and if you want to look into Charit Creek Lodge, follow the links provided. Thank you for following along and I hope to see you in the next one.