Testing the Nikon ZF for Wildlife Photography: Can a Retro Camera Shoot Birds?
Hey y'all! So I did something kind of crazy. I took the Nikon Zf (you know, that retro-styled full-frame camera that's basically designed for street photography) and tried to use it as a serious wildlife camera. And before you say "David, what are you thinking?" just hear me out because the results actually surprised me!
I was down in sunny Florida even though it was like 48 degrees (yeah, go figure with Florida weather, lol). I headed out to Chito Branch Reserve, which is a Wildlife Management Area, to see if this camera could really handle bird photography. The question I wanted to answer: can a retro-style camera meant for the street photographer and general photography market actually compete with dedicated wildlife cameras?
The Setup: 700mm of Adapted Legos
Here's what I put together and honestly it's kind of a Frankenstein setup but it works! I've got the Nikon Zf (24 megapixel full-frame sensor) adapted with the FTZ2, the TC-14E III teleconverter, and the 500mm f/4 PF Fresnel F-mount lens. This gives me about 700mm of focal length which should be plenty for birds, right?
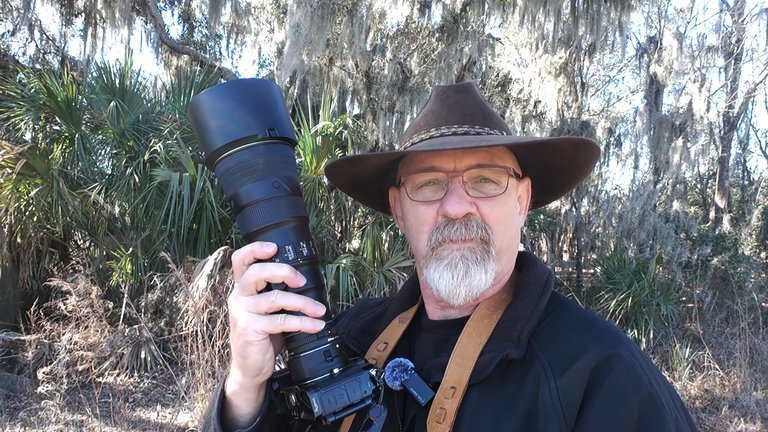
The complete Nikon ZF wildlife photography kit: camera body, FTZ2 adapter, TC-14E III teleconverter, and 500mm f/4 PF Fresnel F-mount lens. This stack of "Legos" gives me 700mm of effective focal length with IBIS and lens VR working together for handheld shooting. It's an unconventional setup for a retro-styled camera, but it works surprisingly well!
Now why this combination? Well, if you look at the most popular camera for wildlife photography that was ever really made, it was the D500 and that was only like 20.8 megapixel (just shy of 21). The Nikon Zf is 24 megapixels! Plus it has IBIS (in-body image stabilization), and this lens has image stabilization as well, so I'm pretty sure they work together. This combination should produce some pretty stunning wildlife photos, at least in theory!
I actually took it for a test drive the day before in a neighborhood I'm staying in that has wild peacocks roaming around. The animal eye detect in the Zf works stunningly well on those peacocks! So I was feeling pretty optimistic about this Wildlife Management Area shoot.
The Reality of Wildlife Photography (It's Harder Than It Looks!)
Okay, I've got two things to say right off the bat. One is Adrian Alford makes this look so much easier than it is! I don't know if it's just me or if I'm too late in the morning, because Phil Thach will typically quit shooting after it hits a certain point in the morning. But Adrian goes out and photographs like dozens and dozens and dozens of beautiful colorful birds, and of course I don't know, maybe he's been doing it longer than me or maybe he knows the inside track that I don't know. And Phil comes away with a lot of photos too!
But man, this is kind of tough. When I first walked into the tree line (about 200 yards from the road), I heard tons of birds out by the road, but the road was real noisy and annoying. So I wanted to come back into the wildlife management area proper. Then? Nothing. Complete silence. I think I flushed all the wildlife out of the area when I first entered it.
Here's a little tidbit I learned from deer hunting with my dad when I was young: you'll spook the wildlife out of the area when you first enter it, but if you'll sit still and just sit there and be quiet, they'll kind of come back in. So that's what I did. I posted up, stayed still, and sure enough after about 5 minutes the birds started coming back into the trees around me!
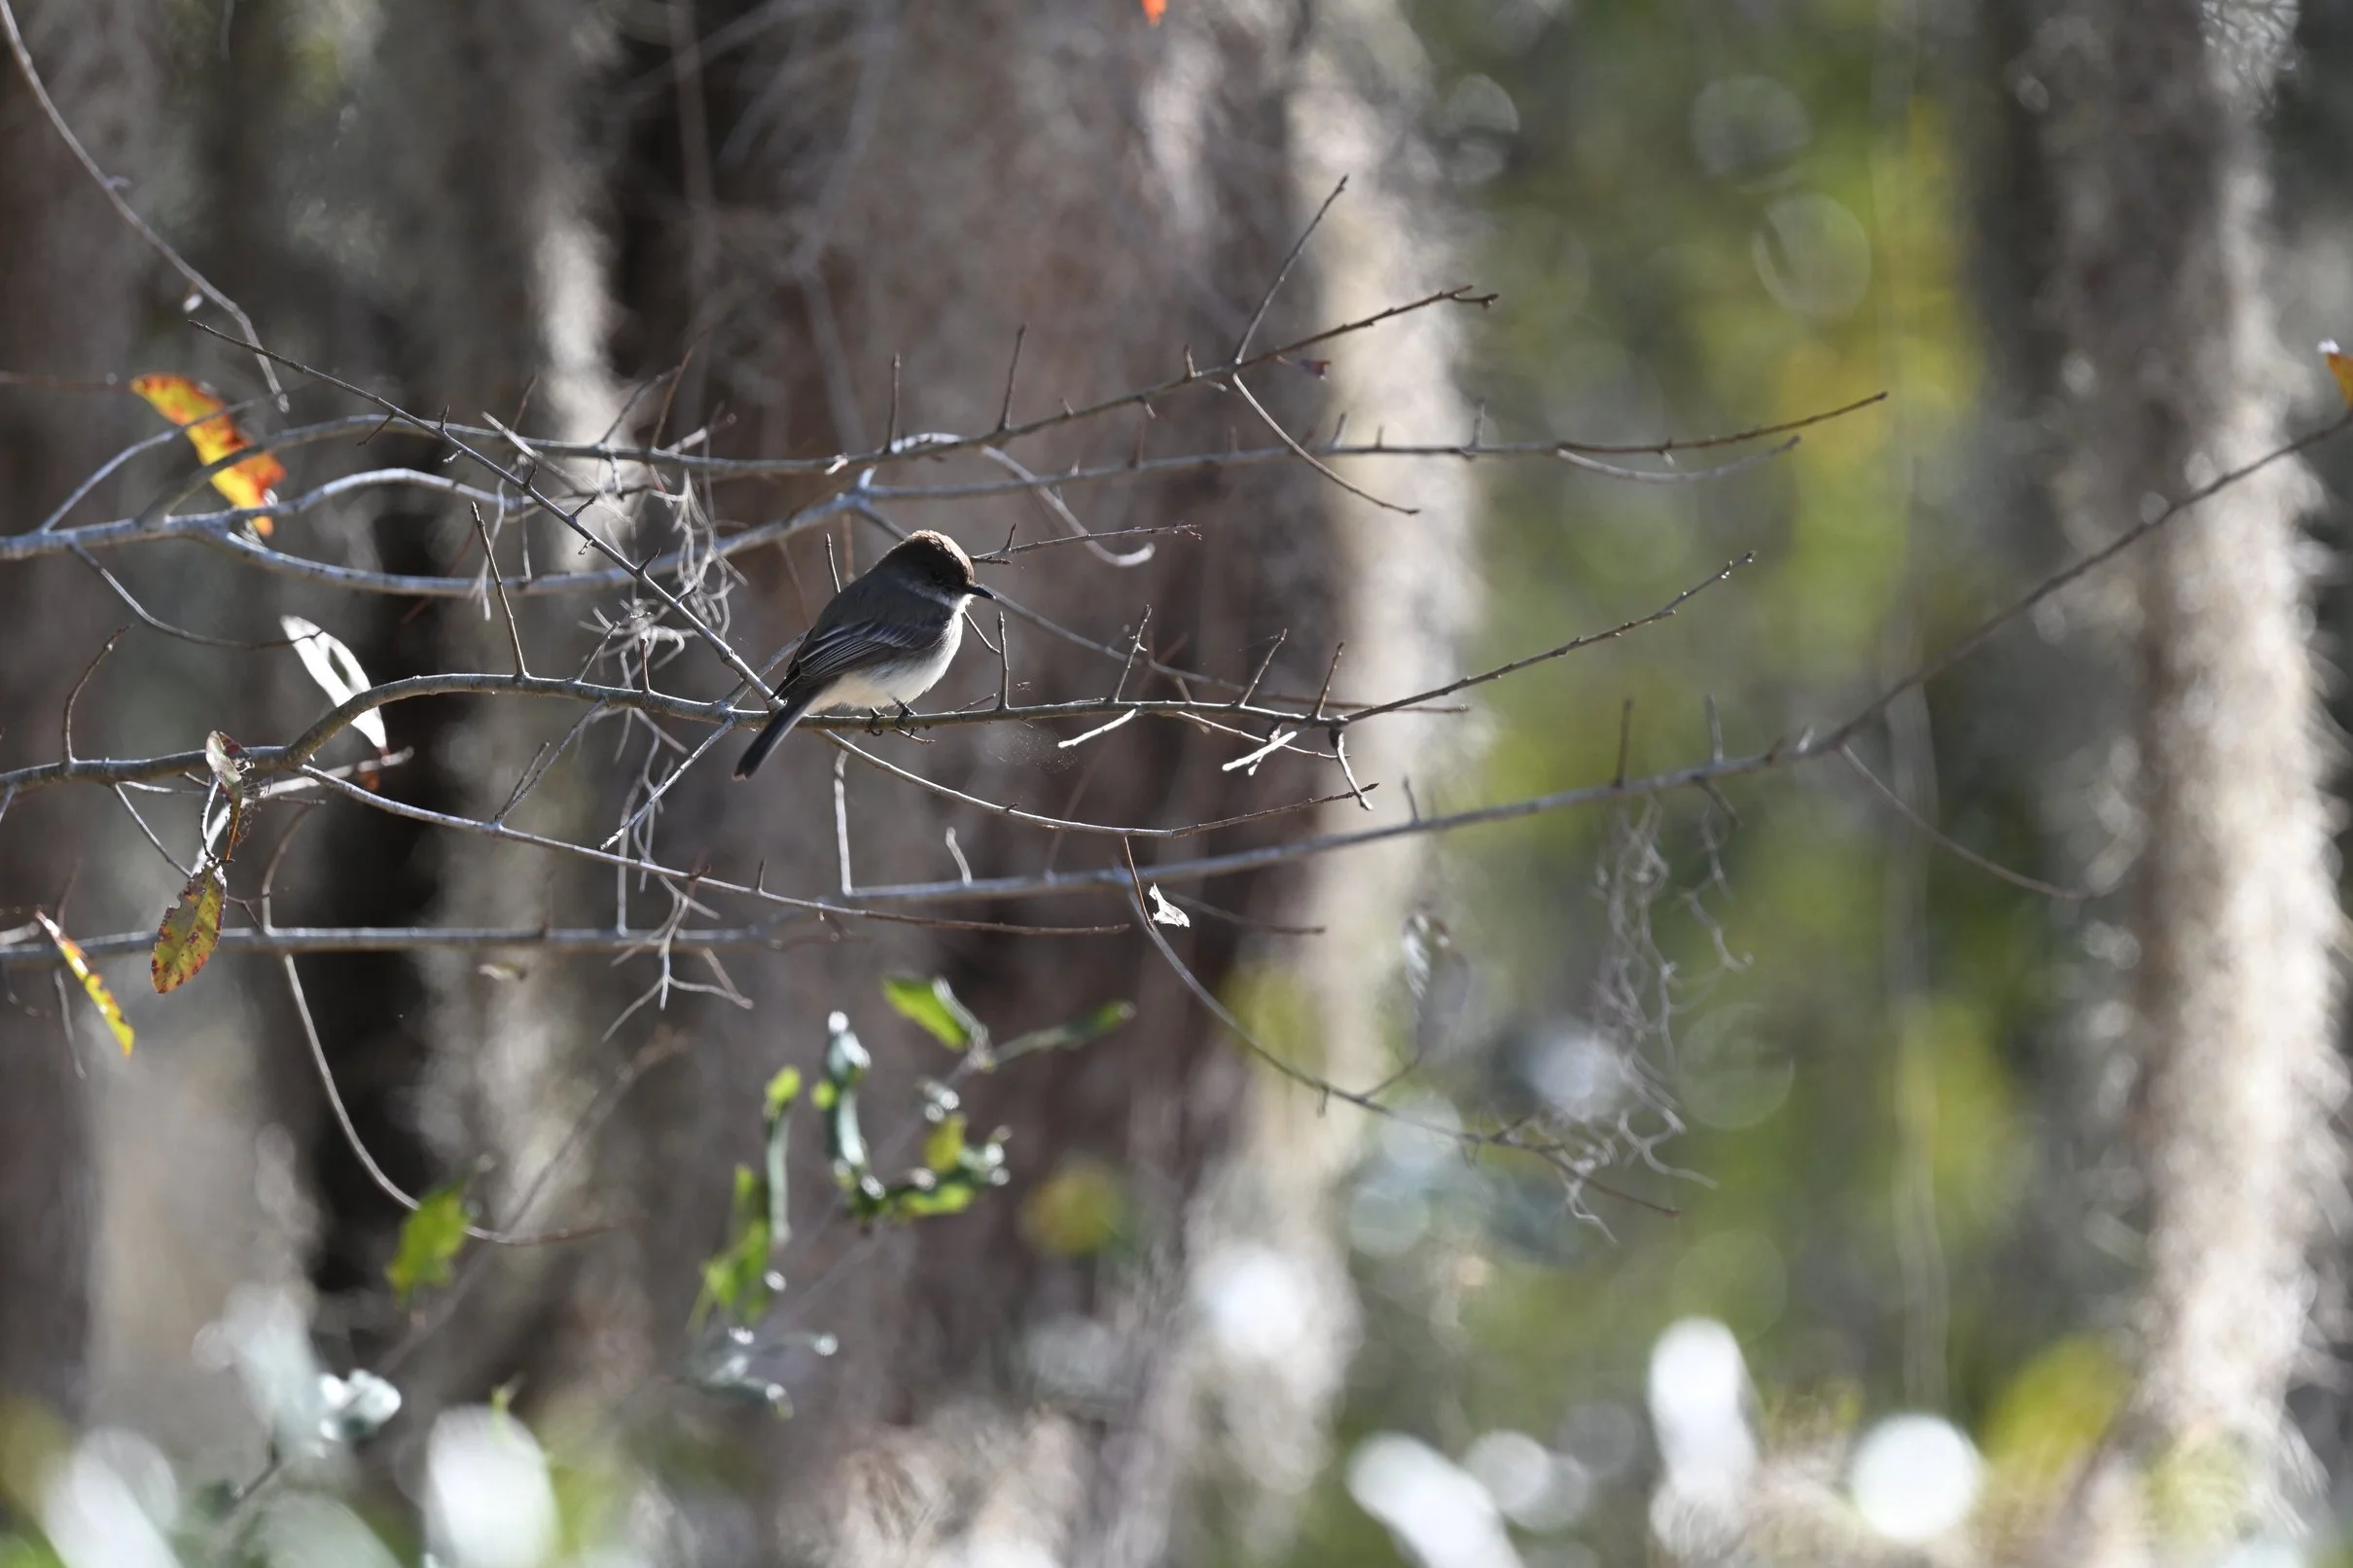
One of the songbirds I photographed at Chito Branch Reserve after posting up and waiting patiently for the birds to return. This is what 700mm gets you at about 25 feet away - the bird fills a decent portion of the frame without excessive cropping. The Nikon ZF's animal eye detection locked onto the eye perfectly once I manually got the focus close!
Sun Position Matters (A Lot!)
Walking with my back to the sun helped tremendously! I was able to get a lot more keepers that way. For the first half of my walk, I had the sun kind of in my face, and trying to balance the light was really hard. All I was getting were backlit shots where you couldn't really see the bird's colors properly.
But when I turned around and walked back toward the truck with the sun to my back? That's when things started clicking! The color of the bird would show up way better instead of all these backlit silhouettes I'd been getting. That's a definite trick you should employ if you're going to try bird photography!
I think if I'd have essentially hurried out to the end of this road before it got so late in the morning (it was 10am by the time I was really shooting), I could have made a lot better progress. The early bird gets the worm, as they say, and apparently the early photographer gets the good bird photos, lol.
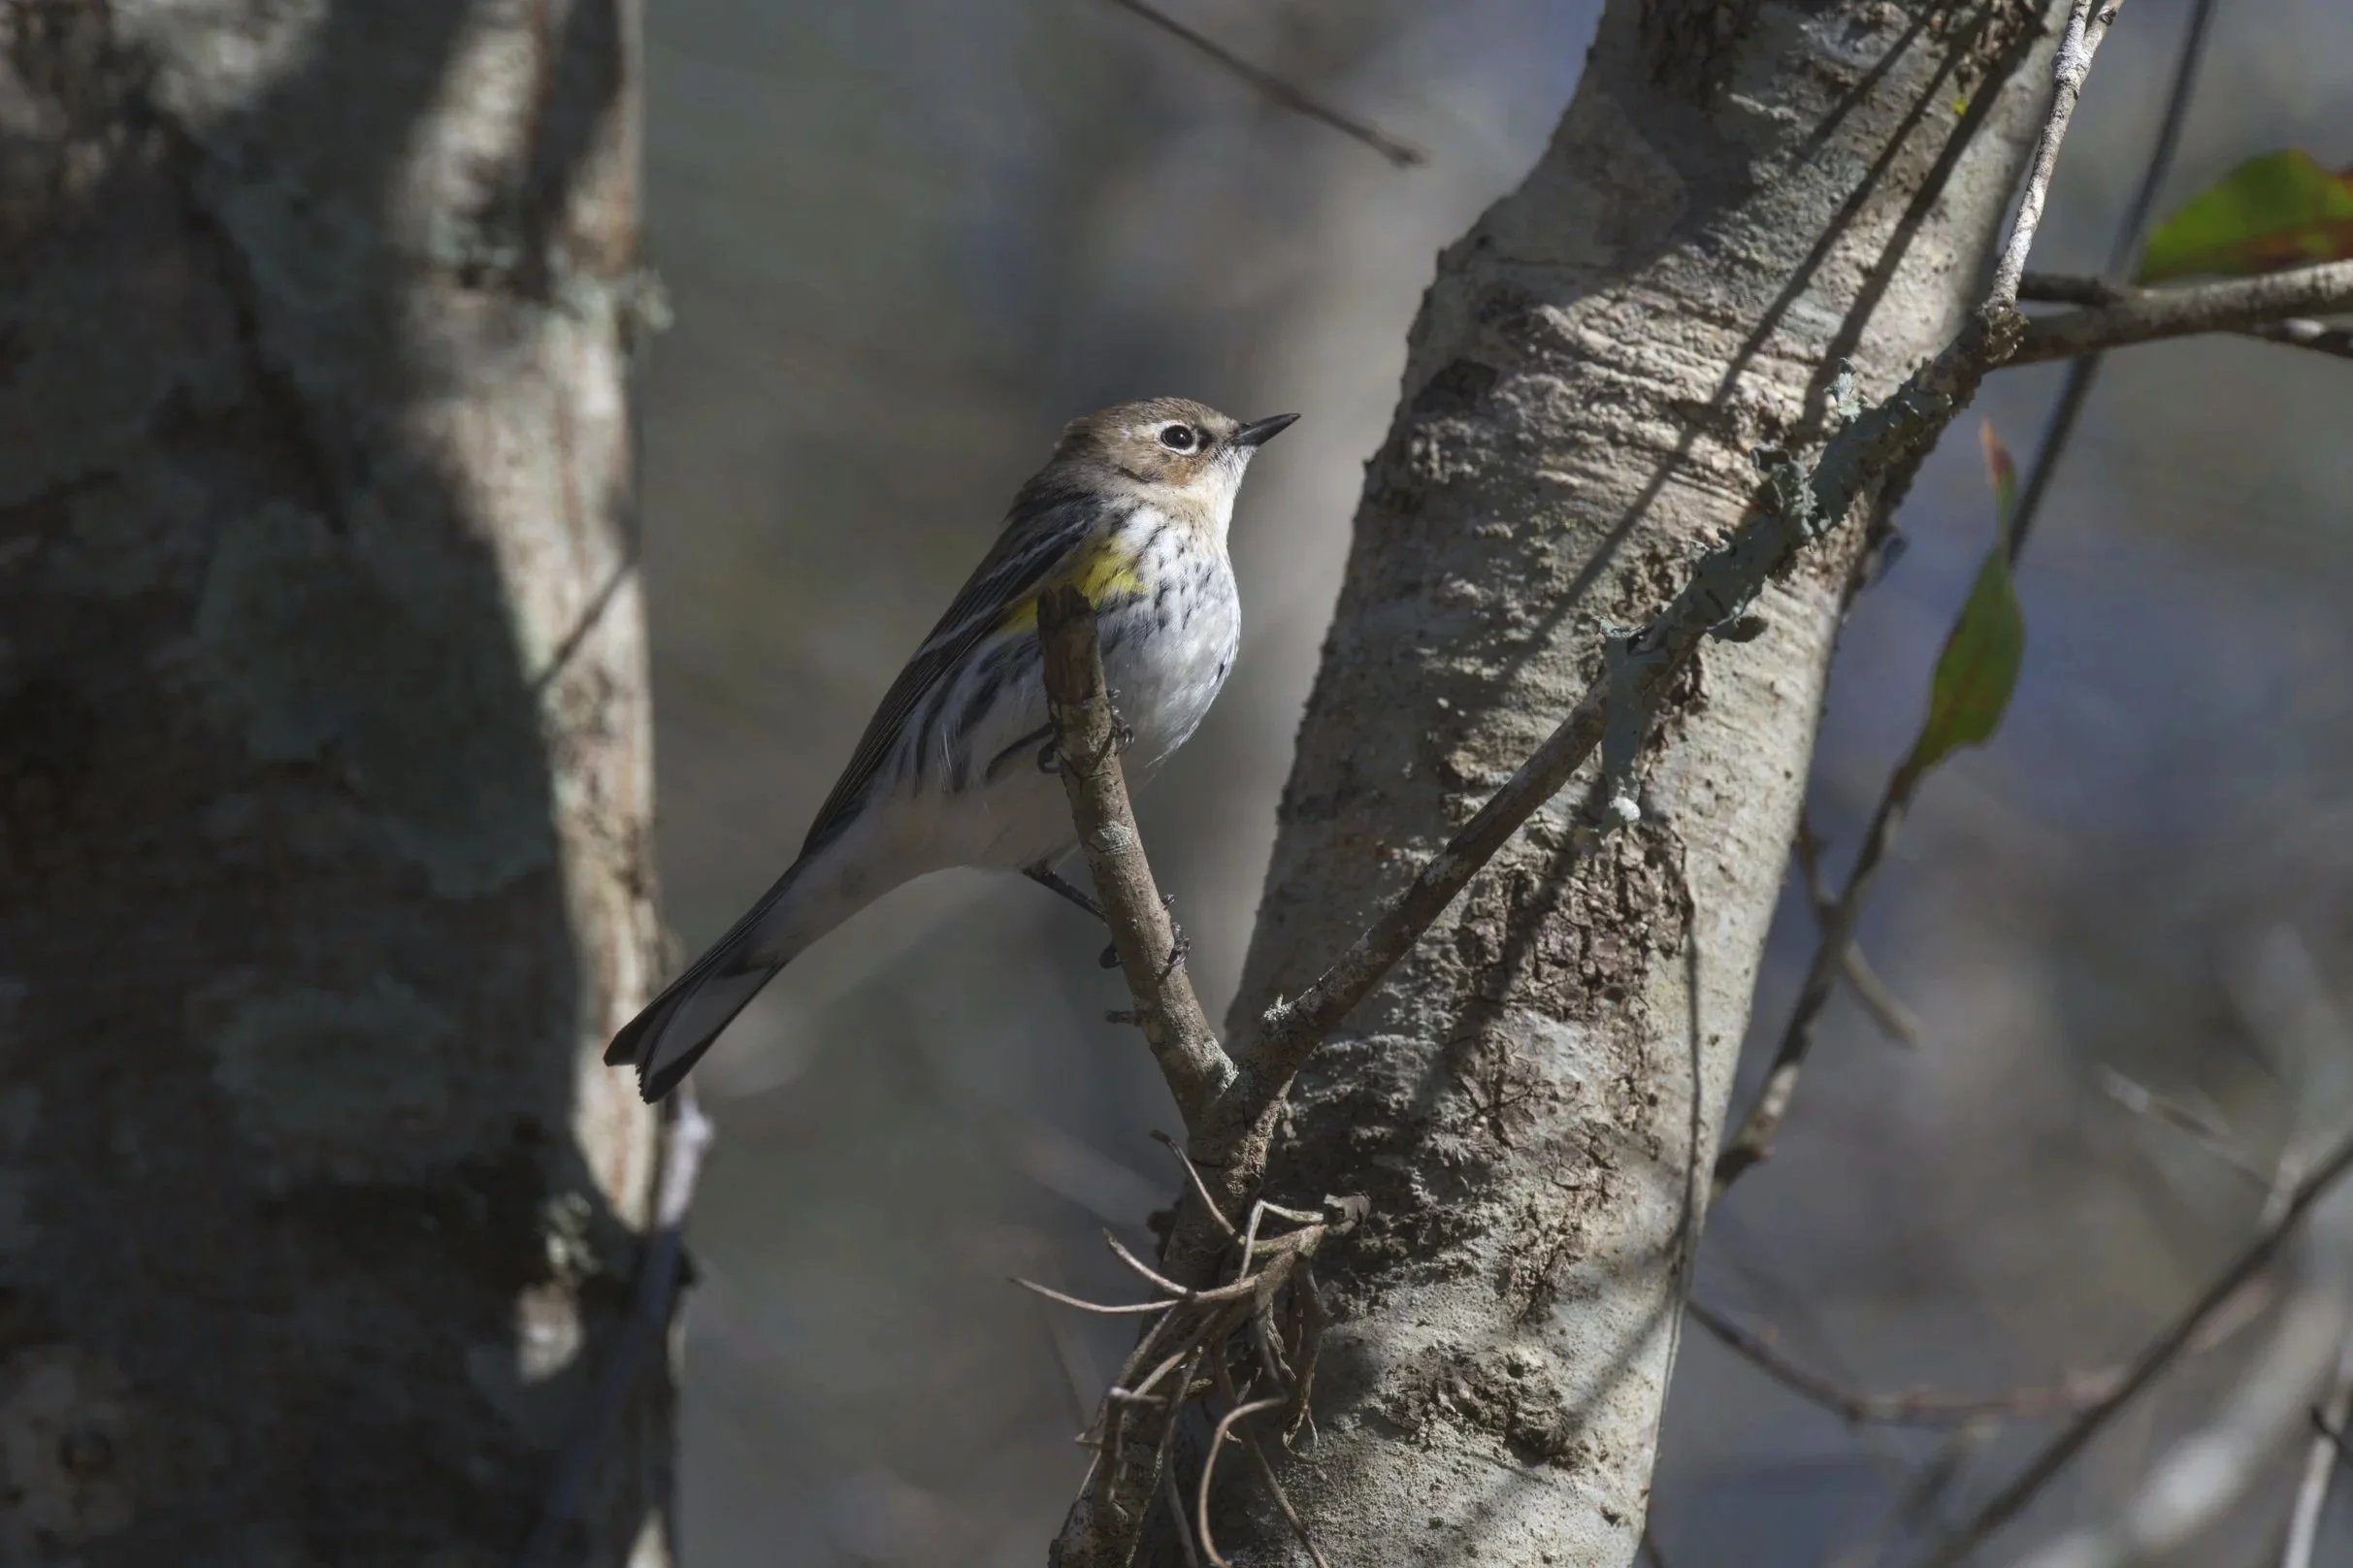
This is what happens when you get the sun behind you instead of in your face! With front lighting, you can actually see the bird's colors and details instead of just a backlit silhouette. Walking with my back to the sun dramatically improved my keeper rate during this shoot. Such a simple technique but it makes a massive difference in bird photography!
How the Autofocus Performed (Surprisingly Well!)
Here's the interesting part about using the Nikon Zf for this. The autofocus system struggled when birds were deep in the bushes or in amongst the branches on a tree. So what I would do is manually drive the focus back and forth until the bird was semi-in-focus, and then I could fire the shutter (I haven't divorced my shutter from my focus yet, so half-press still focuses for me).
But once I would get it relatively in focus (just the shape of the bird in general), it would immediately focus in and lock on the eye! So if it was anywhere close at all, it would jump right to it and nail the focus. Now if the whole thing's just straight blurry and you hit the shutter, the first thing it found is what it would focus on. But if you gave it even a little help? It worked surprisingly well!
The animal eye detection really does work stunningly well on this camera. When the bird was somewhat in focus and the camera could actually see it, boom, instant eye detection and perfect focus. Pretty impressive for a camera that's marketed as a retro street photography body!
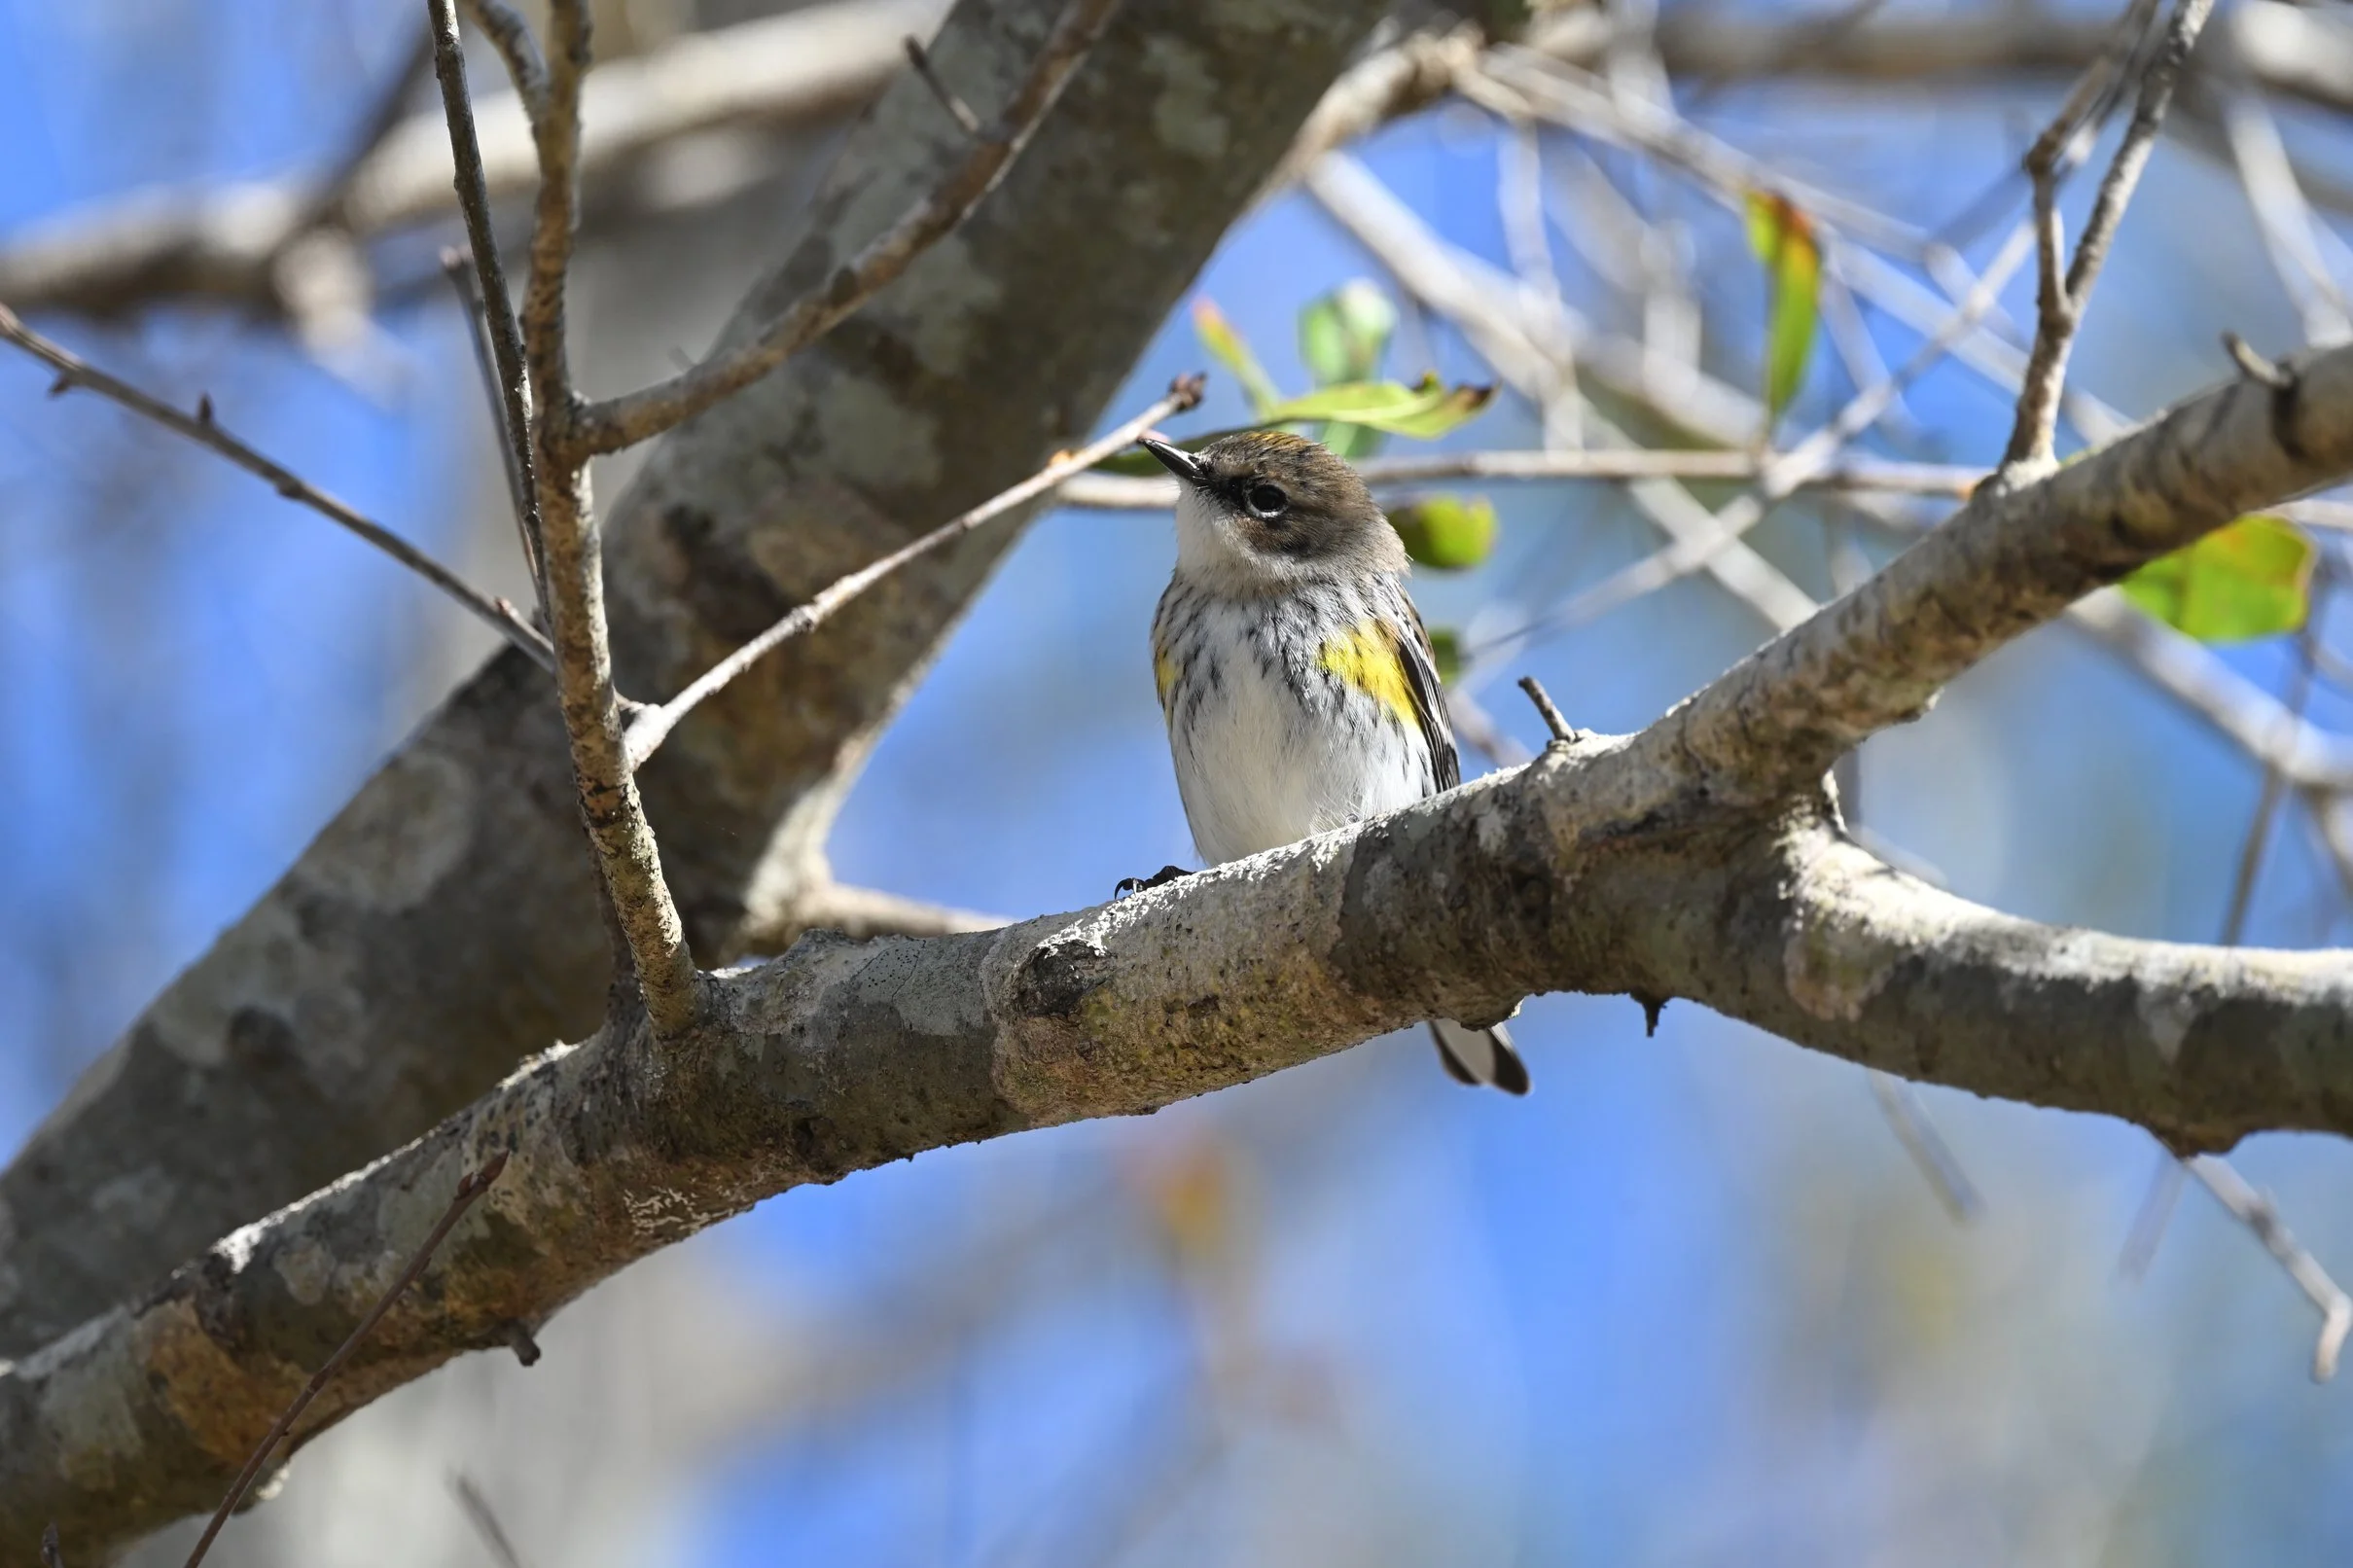
The Nikon fF's animal eye detection in action - look at that sharp eye! Once I manually got the bird roughly in focus, the camera immediately locked onto the eye and tracked it perfectly. This is a 100% crop showing the detail you can get with 24 megapixels when you nail the focus. The combination of IBIS in the camera and VR in the lens allowed me to shoot this handheld at 700mm with no tripod needed.
The Reality of Focal Length and Sensor Resolution
Now bear this in mind (and this is important): if you're going to photograph songbird-sized birds (you know, little little ones) with this lens setup at 700mm, you need to be within about 20 to 30 feet. Anything further than that and they're so small in frame, it's kind of pointless. It's just a little speck in the frame!
But if they're inside of that range, you can get a decent photo and it'll look good. The thing is, I'm only working with 24 megapixels here. So yeah, cropping latitude is limited compared to the 45 or 60 megapixel cameras that some wildlife shooters are using these days.
With just the 500mm (without the teleconverter), they would need to be even closer, or you'd need to be photographing larger game. That's the gist of it. The TC-14E III teleconverter is what makes this setup actually viable for small birds because that extra reach really matters!
I did see quite a few different birds during the walk. Lots of little songbirds, some big white long-legged bird that I shot in the air (to be determined what it actually is, probably some kind of heron), and a whole bunch of vultures that were circling the area. At one point the vultures started slowly closing in on me and one flew right above me. I wonder if that means something, lol.
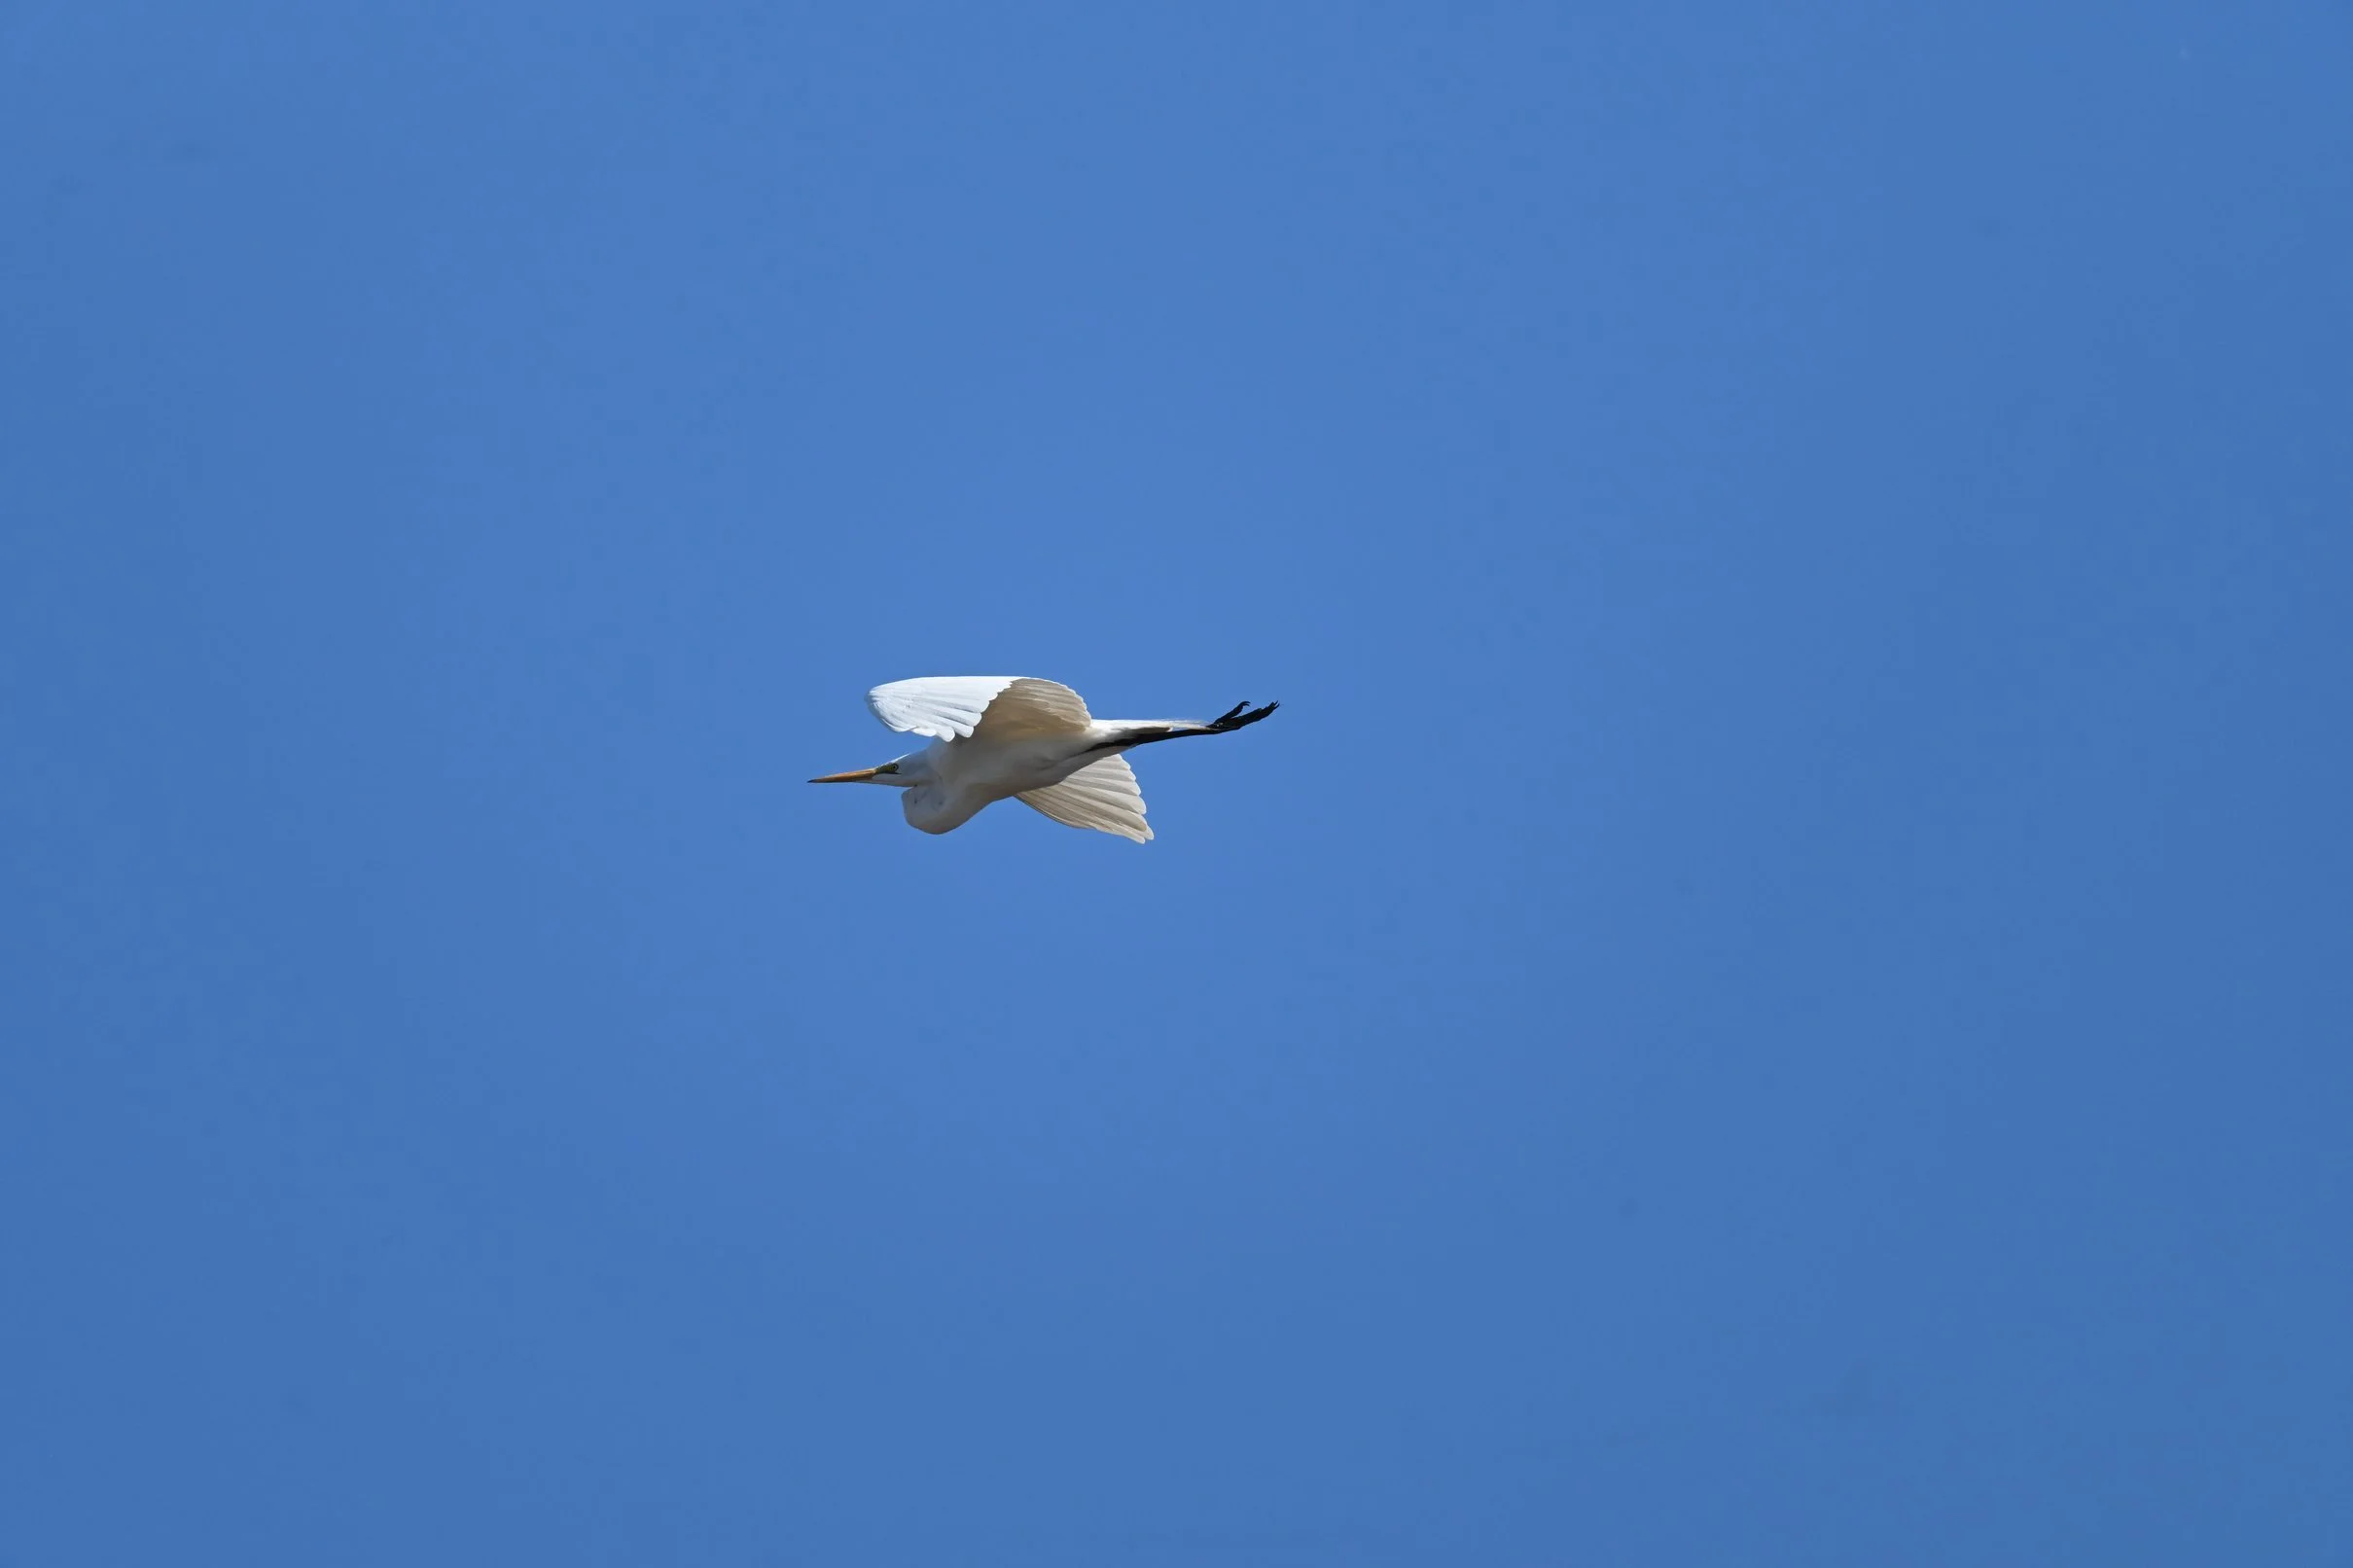
One of the Great Egret’s that I saw at Chito Branch Reserve during my shoot. Photographing birds in flight is challenging with any setup, but the Zf's continuous autofocus and animal detection made it possible to track and capture this shot. You definitely need fast shutter speeds for flight shots, I was shooting at 1/2000th or faster to freeze the wing movement!
Shooting Technique Tips I Learned
A lot of the birds I photographed were up higher in the trees, so I was shooting almost straight up into the branches. Occasionally one would land almost eye level with me and I could get a side shot, but most of the time I'm shooting up at them. It's obvious that there are techniques to this that I'm still learning!
The standing still and waiting technique really did work though. I finally stopped at a point where there were quite a few birds in the surrounding area and I just stood there for about 5 minutes. They started coming into the trees and I got all these photos, and some of them are actually pretty cool! Some of them are kind of meh (shooting straight up into trees isn't ideal), but I got enough keepers to call it a success.
The Verdict: This Camera and Lens Combination Works!
So after spending a morning at Chito Branch Reserve trying to make the Nikon Zf work as a wildlife camera, here's my conclusion: this camera and lens combination seems to perform shockingly well!
Is it perfect? No. The autofocus needs help finding birds in busy backgrounds. The 24 megapixels limits your cropping ability compared to higher resolution bodies. And you really do need to get close to small birds (20-30 feet range).
But does it work? Absolutely! The animal eye detection is fantastic once it acquires the subject. The IBIS combined with the lens VR means you can shoot handheld at 700mm and get sharp results. The image quality is excellent. And honestly, this is producing really interesting results that I'm happy with!
This is actually a pretty viable kit for wildlife photography if you're willing to work within its limitations. With the TC-14E III teleconverter, I'm able to get the Nikon Zf and the 500mm PF Fresnel F-mount lens to actually do some good work on birds. And like I said, I'm shooting all of this mounted together with the FTZ2, so I've got a pretty good kit of Legos going here on this camera!
If you want to see all of this in action, check out the video I shot during this session (link to YouTube video). You can see the actual bird photos I got, watch me stumbling around trying to find subjects, and hear me ramble about vultures circling overhead, lol.
So with that, I appreciate y'all! And until next time, get your camera out and go take a picture with it!
Camera Gear Used
Camera: Nikon Zf (24MP full-frame) Lens: Nikon 500mm f/4 PF Fresnel F-mount Teleconverter: TC-14E III (1.4x) Adapter: FTZ2 Effective Focal Length: ~700mm Location: Chito Branch Reserve, Florida (Wildlife Management Area)
Watch the full video:David Saylors YouTube Video Link
Other wildlife photography posts:Cataloochee Elk Photography Blog Post
Frequently Asked Questions About Using the Nikon ZF for Wildlife Photography
Can you really use the Nikon Zf for wildlife photography?
Yes, absolutely! And honestly, it surprised me how well it works. The Nikon ZF is marketed as a retro-styled camera for street photographers and general photography, but it's got some serious specs that make it viable for wildlife. It's got a 24 megapixel full-frame sensor (which is actually more than the legendary D500 had at 20.8MP), it's got IBIS (in-body image stabilization), and the animal eye detection works stunningly well once it locks onto a subject. Is it perfect? No. But does it work? Absolutely! I spent a morning at Chito Branch Reserve in Florida photographing birds and came away with some really good keepers. The key is understanding the limitations and working within them, which I'll talk about in the other questions here.
What focal length do you need for bird photography with the Nikon Zf?
For songbird-sized birds (the little ones), you need serious reach! I was using 700mm of effective focal length (500mm PF lens + TC-14E III 1.4x teleconverter on the full-frame ZF), and you need to be within about 20 to 30 feet of the birds to get a decent shot. Anything further than that and they're so small in frame, it's kind of pointless. It's just a little speck! Now if you're photographing larger birds like herons, egrets, or hawks, you can get away with less reach. But for little songbirds? 700mm and get close, or you're going to be cropping like crazy. And with only 24 megapixels, your cropping latitude is limited compared to those 45 or 60 megapixel bodies that some wildlife shooters are using.
Does the Nikon Zf autofocus work well for bird photography?
It works surprisingly well, but with some caveats! When birds are deep in the bushes or in amongst the branches on a tree, the autofocus struggles to find them. What I would do is manually drive the focus back and forth until the bird was semi-in-focus, and then the camera would immediately lock on and grab the eye! The animal eye detection is fantastic once it can actually see the bird. So if you give it even a little help by getting it close to focus, boom, it jumps right to the eye and nails it. But if the whole thing's just straight blurry and you hit the shutter, it'll focus on the first thing it finds (usually a branch, lol). The trick is getting it close, then letting the eye detect take over!
What time of day is best for wildlife photography?
Early morning! I learned this the hard way, haha. I was shooting around 10am and it was already kind of late. Phil Thach will typically quit shooting after it hits a certain point in the morning because the light gets harsh and the birds are less active. Adrian Alford makes this look so easy with dozens and dozens of beautiful bird photos, but I think he's out there at the crack of dawn getting the good light and active birds! If I'd have hurried out to the end of that road before it got so late in the morning, I could have made a lot better progress. The early bird gets the worm, and apparently the early photographer gets the good bird photos too!
Why does sun position matter for bird photography?
Oh man, this makes a huge difference! For the first half of my walk, I had the sun kind of in my face, and all I was getting were backlit shots where you couldn't see the bird's colors at all. Just silhouettes basically. But when I turned around and walked back with the sun to my back? That's when things started clicking! The color of the bird would show up way better, the details were visible, and the photos just looked so much better. Walking with my back to the sun helped tremendously and I was able to get a lot more keepers that way. That's a definite trick you should employ for bird photography!
How does the FTZ2 adapter affect autofocus performance?
The FTZ2 adapter works really well! I'm using it to mount the F-mount 500mm PF lens on the Z-mount ZF body, and honestly I didn't notice any autofocus lag or issues that were caused by the adapter itself. The struggles I had finding birds in busy backgrounds would have happened with a native Z-mount lens too because that's more about the camera's detection system than the adapter. The adapter just passes through the focus commands and it does it quickly. So if you've got good F-mount glass like the 500mm PF, don't hesitate to use it on the ZF with the FTZ2!
What's the advantage of using a teleconverter vs cropping in post?
Great question! The TC-14E III teleconverter gives me 1.4x more reach (500mm becomes 700mm), which means the bird is actually larger in the frame to begin with. When you crop in post, you're throwing away pixels and reducing your final resolution. With only 24 megapixels to start with, I don't have a ton of cropping room! The teleconverter gives me more reach optically, so the bird fills more of the frame, and I keep all my pixels. The downside? You lose some light (about 1 stop with a 1.4x converter) and maybe a tiny bit of sharpness. But for small birds, that extra reach is absolutely worth it!
How do you keep birds from being spooked when you walk into an area?
Another trick I learned from deer hunting with my dad when I was young: you'll spook the wildlife out of the area when you first enter it, but if you'll sit still and just be quiet, they'll kind of come back in! When I first walked into the tree line at Chito Branch Reserve, I heard tons of birds, but then complete silence after I got about 200 yards in. I think I flushed them all out. So I posted up, stayed still for about 5 minutes, and sure enough the birds started coming back into the trees around me! Patience is key. Don't just walk through constantly, stop and let the wildlife settle down and they'll resume their normal behavior.
Is 24 megapixels enough for wildlife photography?
It depends on what you're doing with the photos! For web use, social media, and even moderate-sized prints, 24 megapixels is plenty. The legendary D500 was only 20.8 megapixels and wildlife photographers loved that camera! The limitation comes when you need to crop heavily or make really large prints. With 24MP, you don't have as much cropping latitude as you would with a 45 or 60 megapixel body. But here's the thing: if you get close enough to your subject and compose well in-camera, 24 megapixels is absolutely fine! The image quality from the Zf is excellent, and that's what really matters.
What mistakes did you make that beginners should avoid?
Oh man, where do I start, lol! First, I started too late in the morning (get out at dawn!). Second, I initially walked with the sun in my face instead of behind me (back-lit birds don't show color well!). Third, I kept the camera powered on while walking and it kept taking photos of the sky when I bumped the shutter (turn it off while walking!). Fourth, I tried to shoot birds that were too far away (get within 20-30 feet for songbirds!). And fifth, I expected the autofocus to find birds in super busy backgrounds without any help (manually get it close first, then let eye detect take over!). Learn from my mistakes and you'll have better success!
BONUS QUESTION: Is the Nikon Zf + 500mm PF + TC-14E III a good wildlife kit?
This is actually a pretty viable kit for wildlife photography if you're willing to work within its limitations! The combination gives you 700mm of reach, excellent image quality, IBIS + lens VR for sharp handheld shots, and fantastic animal eye detection. It's not as specialized as a D500 or Z9, but it absolutely works! I came away with some really good bird photos that I'm happy with. The camera and lens combination seems to perform shockingly well considering the ZF wasn't designed for this purpose. So if you've got a ZF and you want to try bird photography? Go for it! Just get the TC-14E III teleconverter to give you more reach, get out early in the morning, keep the sun behind you, and have fun with it!
Support this website by using these affiliate links to shop on Amazon:
Leica M11 Digital Rangefinder Camera
Nikon AF-S FX NIKKOR 105mm f/1.4E ED Lens
Voigtlander Nokton 35mm f/1.4 II
Sandisk 128GB Extreme Pro memory cards