WK4DS Amateur Radio Blog
Search Posts
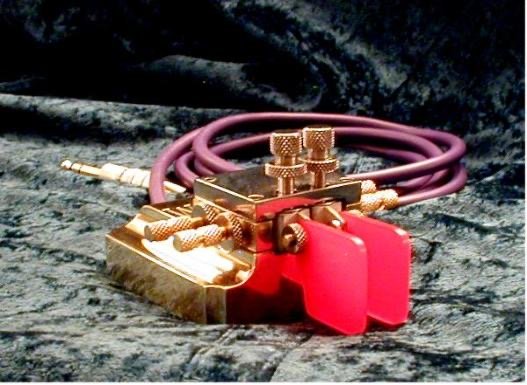
WK4DS CW Keys…and why I stopped making them…
As you can see, when I was building them back in the day, I spent a lot of time on finishing. They were all highly polished…by me… and that isn’t all. I don’t remember the total parts count anymore, but it was over 40 parts to build one key and I made something like 35 of those parts. I bought the cable (of course) and a handful of fasteners to assemble it with and 4 ball bearings and the rest was made by me. Towards the end, I had another master machinist working for me and he helped make a lot of the components as well, but we were just trying to finish out the existing committed orders before shutting down production.
I am not sure how many of you actually know that I am a CW key maker…or was a CW key maker… I built semi-custom, high precision CW keys back about 20 years ago. There are about 20 of them out in the wild at this point and have become quite collectable now. I still have two of them for myself. One was the last key I made, and of course, the first key I made as well.
Archive Photo #1 - WK4DS CW Keys
As you can see, when I was building them back in the day, I spent a lot of time on finishing. They were all highly polished…by me… and that isn’t all. I don’t remember the total parts count anymore, but it was over 40 parts to build one key and I made something like 35 of those parts. I bought the cable (of course) and a handful of fasteners to assemble it with and 4 ball bearings and the rest was made by me. Towards the end, I had another master machinist working for me and he helped make a lot of the components as well, but we were just trying to finish out the existing committed orders before shutting down production.
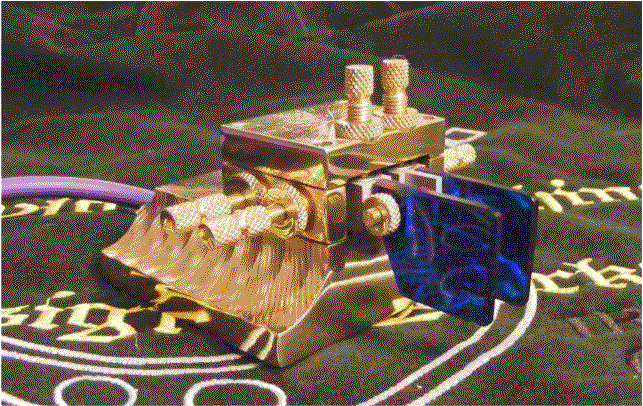
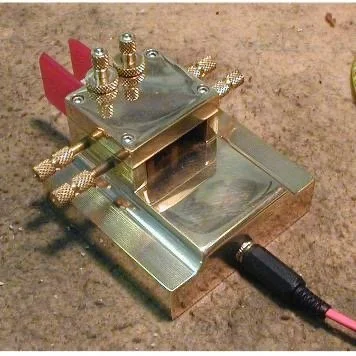
Pictured above is one of the first keys I built. I know because the bearing tension “towers” are not connected to the top plate and later variants had these towers threaded directly into the top plate instead. You can see what became my signature styling, which was the square base with the filleted shelves on the sides. All the keys after the prototype carried some variant of this feature. I set out to make a key I could be proud to own and use. You see, at the time, the March CW key was a bucket list kind of item for me, but I couldn’t easily afford one. What does a skilled machinist do it he can’t have a high end CW paddle? Make it himself out of surplus brass he had in the shop of course! So the prototype doesn’t look exactly like the one above as you can see in the next photo (it is the red handled key on the left). It was hacked out of metal I had and as you can see has a smattering of stainless steel parts mixed in with the brass parts.
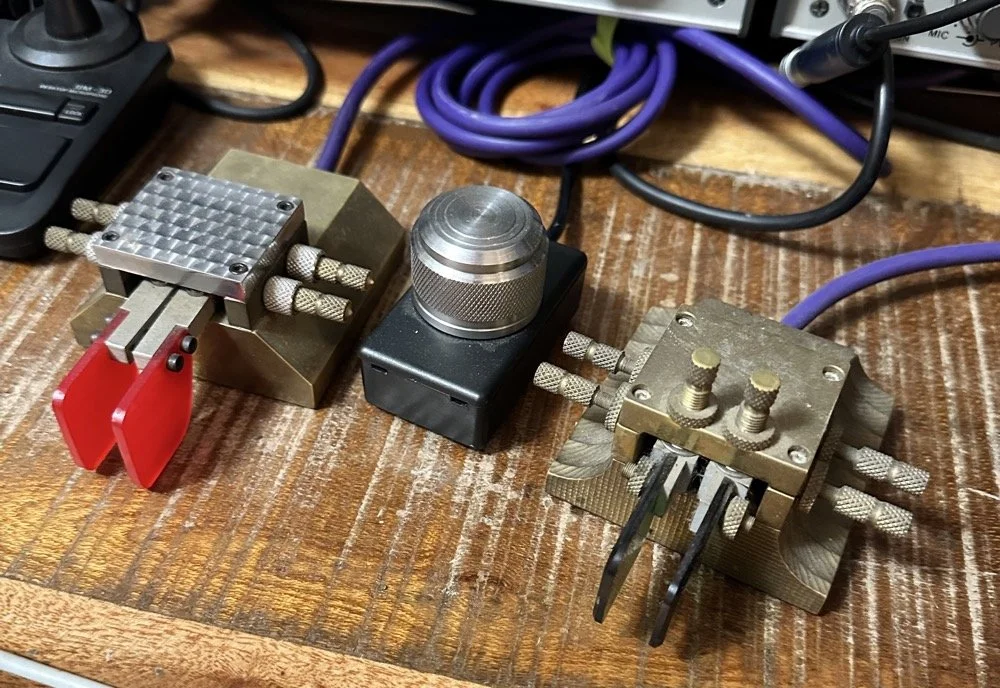
My personal WK4DS CW keys I use on the daily to mostly work POTA activators and occasionally ragchew…
The things I wanted in my key were as follows:
Heavy - you don’t want to be chasing it around on the bench while your in a QSO!
Short lever throw - I looked at the geometry of the lever arms and decided I wanted a 1:! or better throw distance if at all possible. The prototype has a higher lever ratio, but it turns out that it is still usable as I was able to adjust to contact spacing like I wanted anyway and it no longer made it a problem. The key you see opposite of it is the final key I made as I wanted one of the ones like the “production” variants since it had all the revisions. You can see the lever length is much shorter on the green handled paddle as compared to the red one. I shortened the lever arms all the way back to the body and this gave me a 1:! ratio at the end of the paddles to the center axle and from the axle to the contact pads.
Gold contacts - These are not pure gold, but rather gold plated as this provides a much lower contact resistance and reduced corrosion of the contacts so you don’t have to clean them.
Ball bearing pivots - I chose dental drill bearings on the prototype and that was a bad idea as they are actually loose. I guess they tighten up as the drill runs from thermal expansion or something. These are really loose though. You can also see that there is no way to hold tension on the bearings either on the prototype, this turned out the be a bad design flaw, so the production keys cam with bearing tensioners as well. The production keys got larger bearings that were also flanged and this made preloading them much easier too. You can almost see the bearings in the prototype are just under the top plate and they stick out a little on the green key. Same location of the axle which gets the lever as close to the front as possible. This is how I was able to shorten the lever length.
Light weight lever arms - This was done for the high speed CW crowd actually, I don’t go fast enough to need it, but I wanted it anyway. Turns out if you want to go fast, the lever arms need really low mass. I started out with the idea of using pure magnesium lever arms as it is lighter than aluminum (if you can imagine that), but the problems with using pure magnesium far out weighed the weight savings. Magnesium has a terrible propensity to corrode gloriously and aluminum has almost none of these problems. I just milled away every part or the arm that wasn’t needed and the weight was fine. The mass needs to be as little as possible to reduce contact bounce. The lighter the lever the lower the force needed to get it moving and the lower the force to get it to stop. So you can run with a very light touch.
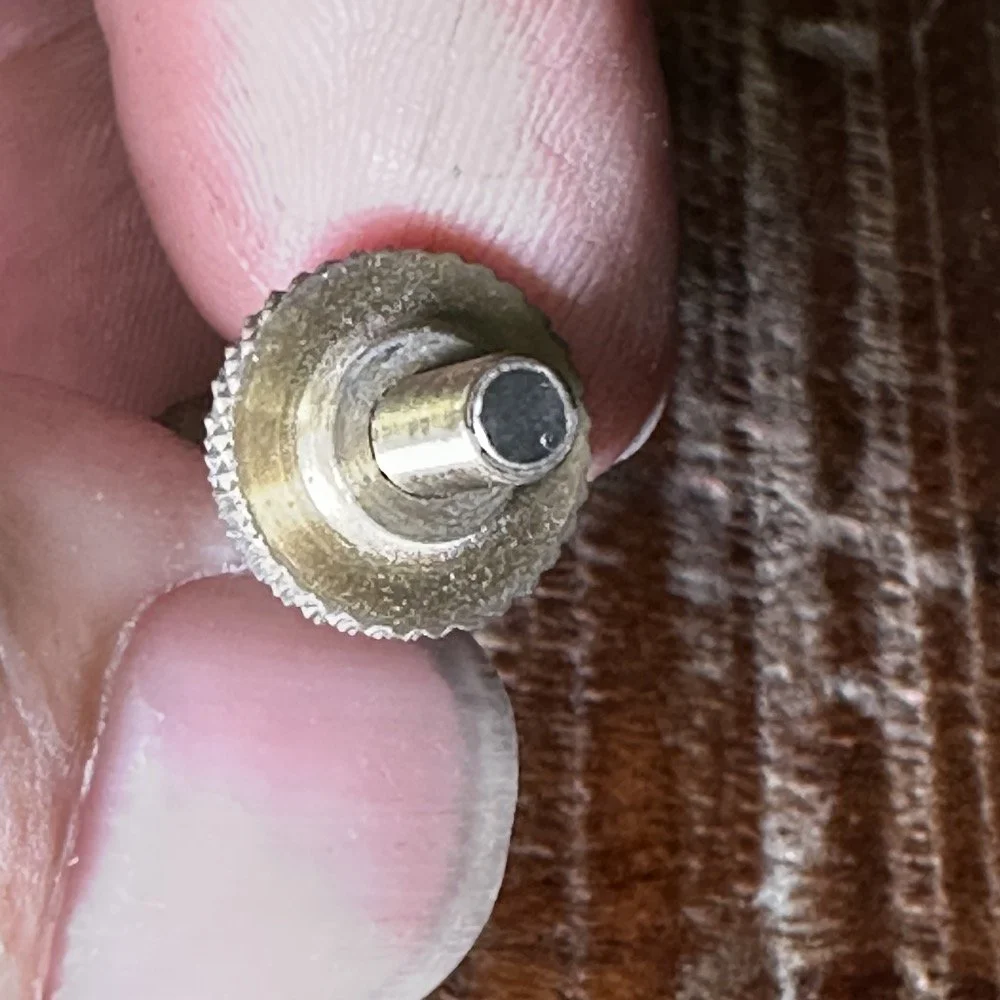
Magnetic springs - I used Neodymium Iron Boron (NdFeB) magnets is opposition as springs as this allows for ZERO friction from the spring, incredible spring force compared to their size and they also allowed my design to be electrically isolated too.
Adjustable bearing tension - This came after I built the first couple of keys, I realize that I wanted to be able to set the bearing preload on the lever bearings as well. This allows the removal of any vertical play in the arms while still allowing free rotation of the bearings. This turns out to be a really nice feature once you have it.
Adjustable spring force - this is a given that even many of the lowest cost keys have in them, but some keys dont have it so I wanted it on mine. The closer the contact spacing the more force you need too. Contact bounce is a real problem at 80WPM
Adjustable contact spacing - All upper echelon cw keys have this feature, but I took mine one step further. Since these keys needed very close contact spacing for really high speed operation, I wanted them to be easily adjusted in something like .001” increments easily. The answer was right there on my lathe too. 72 threads per inch. It was also my mechanical limit at the time too, my lathe would not cut a finer thread without modification… So the Spring screws and the contact screws all got this thread spec applied to them. See the photos below for close up shots of this feature and the magnets embedded in the ends of the screws.
Properly electrically connected - good electrical engineering states that current should never flow through a bearing. It can cause arcing in the bearing which will damage it. So I ran tiny little ground wires from each contact post to the ground cable on every key to eliminate this possibility.
1/4” Stereo plug - I know this is now a dated connector but at the time, (and even to this day) my favorite radios are TenTec and almost all of them use the 1/4” connector.
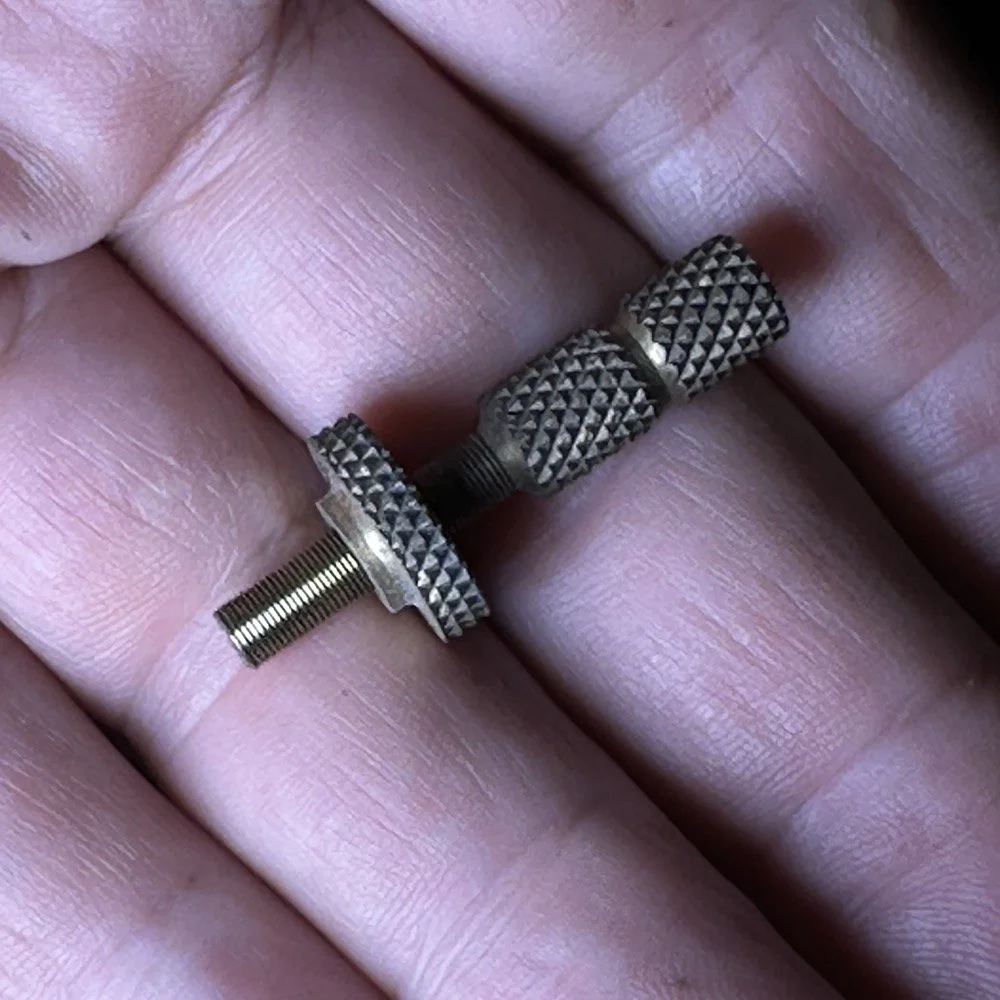
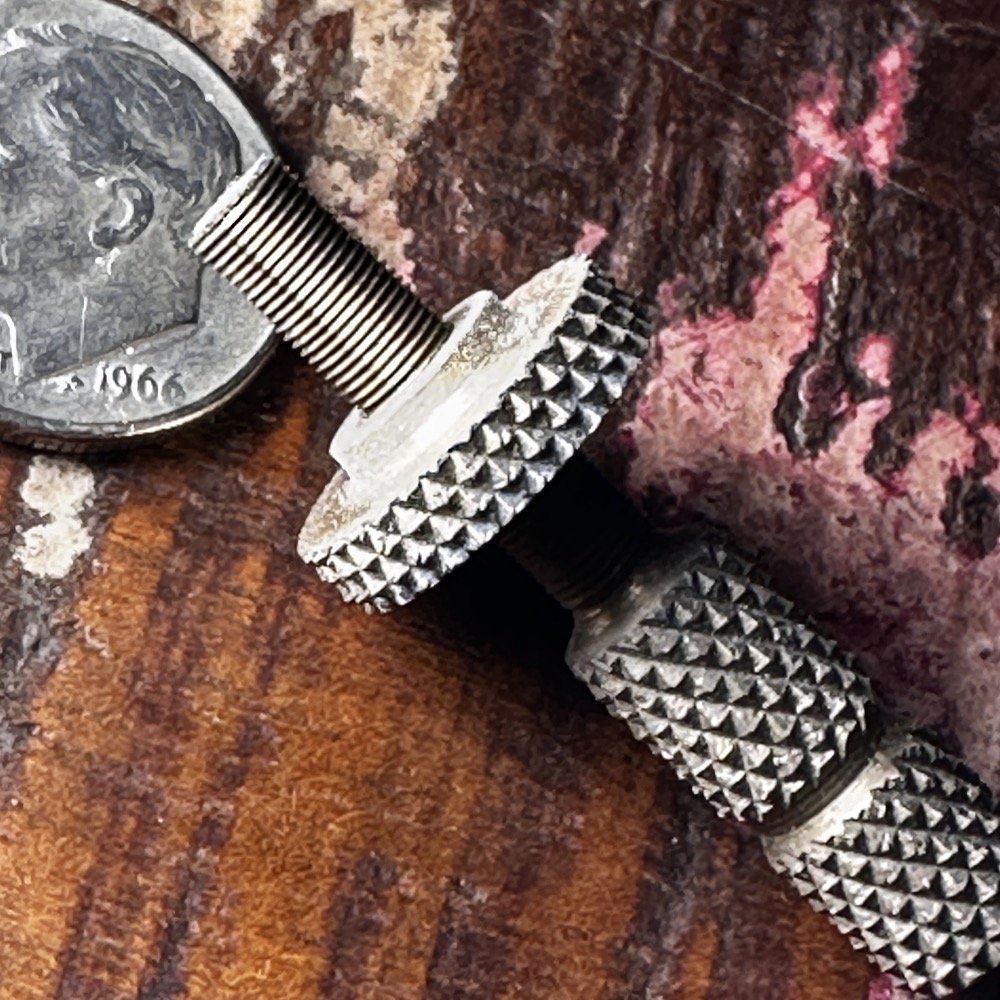
You can see the 72 threads per inch here on this spring adjustment screw. Those threads are just a few thousandths thick. It takes a jeweler’s loupe to even see what I am doing when I cut them in the lathe… I was able to buy taps to cut the internal threads so I would make the lock nuts first and then fit the external threads to them. It worked really well. What this ultimately gives you is a full rotation of the screw will advance it .0139” Essentially 14 thousandths per revolution. That means a quarter turn is only .0035” so it is pretty easy to see that I could make .001” adjustments if I wanted to…maybe less. That was the goal with the high thread count screws. That and the fact that everyone else was using 32TPI screws on their builds…haha.
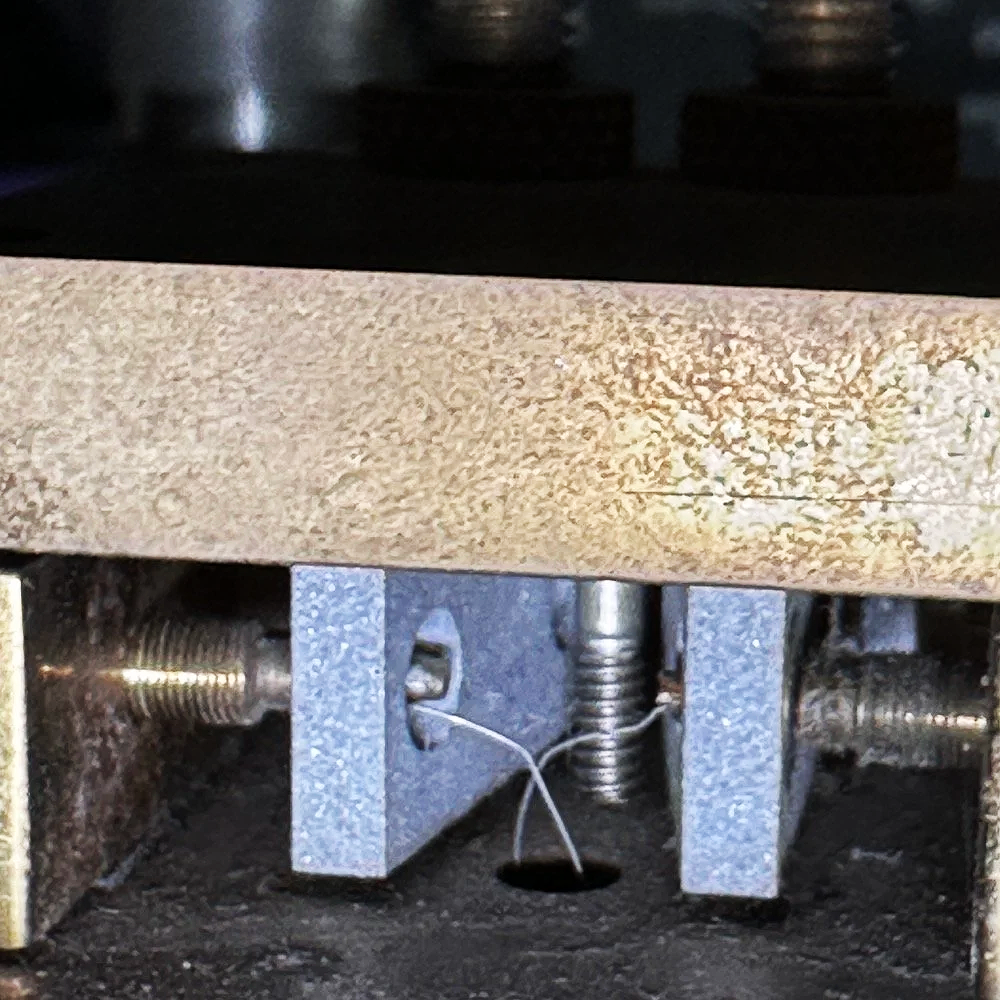
Above is a shot of the two ground wires that tied each arm back to the return lead on the cable so the current, no matter how little it was, had a path that was not through the bearings. This was very important to me as I was not sure what radio these keys would be plugged into and wanted the key to last.
Below shows the magnet that I set in the end of the spring tension screw. Yes, there is literally just enough screw there to drill a hole in the end and glue a magnet into it…barely.
Archive Photo #2 - WK4DS CW Keys
Archive Photo #3 - WK4DS CW Keys
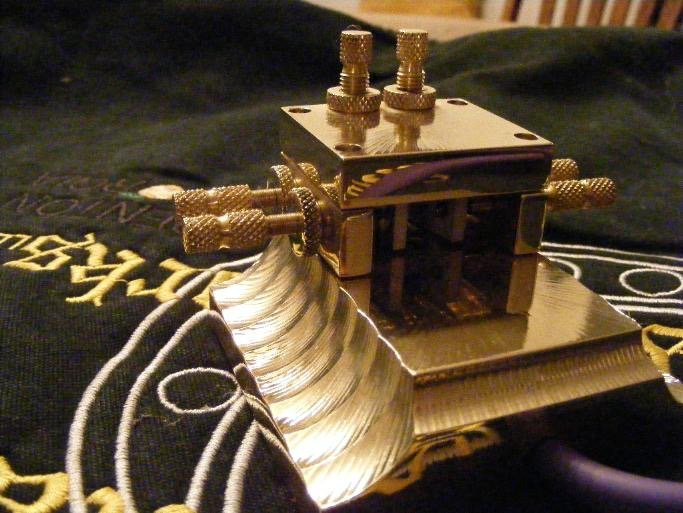
Archive Photo #4 - WK4DS CW Keys
I made each one of these keys a little different from the last one so that each person essentially had a custom key made by me.
As you can see from these old photos, it took a lot of time to make all the parts, finish all the parts and then to assemble and adjust them into a working CW paddle. I had way over 60 hours in each one and that is what ultimately made the whole project untenable. I was spending most of that time doing two things. One was making the ultra fine threaded adjustment screws (one wrong move or a dull tool and you had to scrap the one you was working on and start over) and the other was polishing. If I could eliminate either of these two operations then suddenly the cost to make one was within a reasonable window. The problem was that they looked so good polished that I couldn’t being myself to not do it… As long as it took that long to make them, there was no way anyone would be willing to pay what the price needed to be for me to be compensated properly for my time. I charged 55$ per shop hour back then (and it should have been closer to 75$ but I didn’t have a lot of overhead) so just the shop hours alone made this key cost over 3300$ and we have not added materials or finishing supplies yet. You can see why at 450$, it was crazy how little the shop made on each one. I was doing ultra precision machine work for less than $7 per hour and I still had to take power and supplies out of that… I couldn’t feed my family on that so I had to make the hard decision to stop production till I could figure out a more efficient way to make them. Well, it turns out that was way harder than I thought. I never got back to making them. I have since then done some designs where they are not built like these, but still carried most of the features from the original list. This turns out to be very difficult and to make them to where they can be produced on a turning center. I take my hat off to Tony Baleno (N3ZN) & Piero Begali (I2RTF) for figuring it out and making astonishingly good keys at the same time. Both of these men make fine CW sending instruments and I can recommend them both since I own keys made by both of them.
I have looked at approaching this project again now that I have more modern and capable machines at my disposal. Maybe there is a way that I can make a new key that can be made in a reasonable amount of shop hours and we can come back to market with something new soon. Till then, all that is left are the keys that I have already made…
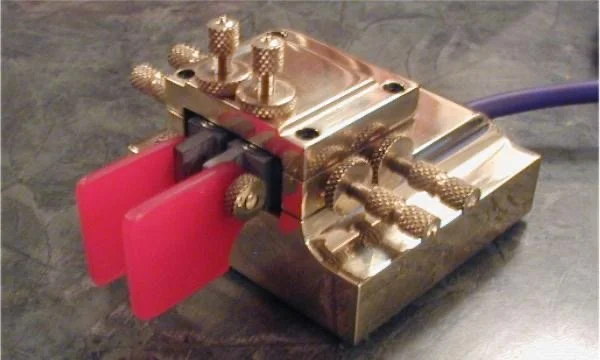
Archive Photo #5 - WK4DS CW Keys
Thanks for taking the time to read about my old keys and what I wanted to do with them.
You can help support this channel by using these Amazon Affiliate Links as well:
QRP/Portable Radios:
Antennas & Tuning:
CW Equipment:
Power & Accessories:
Organization & Transport:
BONUS ITEMS (Optional 16-20):
73
WK4DS - David