WK4DS Amateur Radio Blog
Search Posts
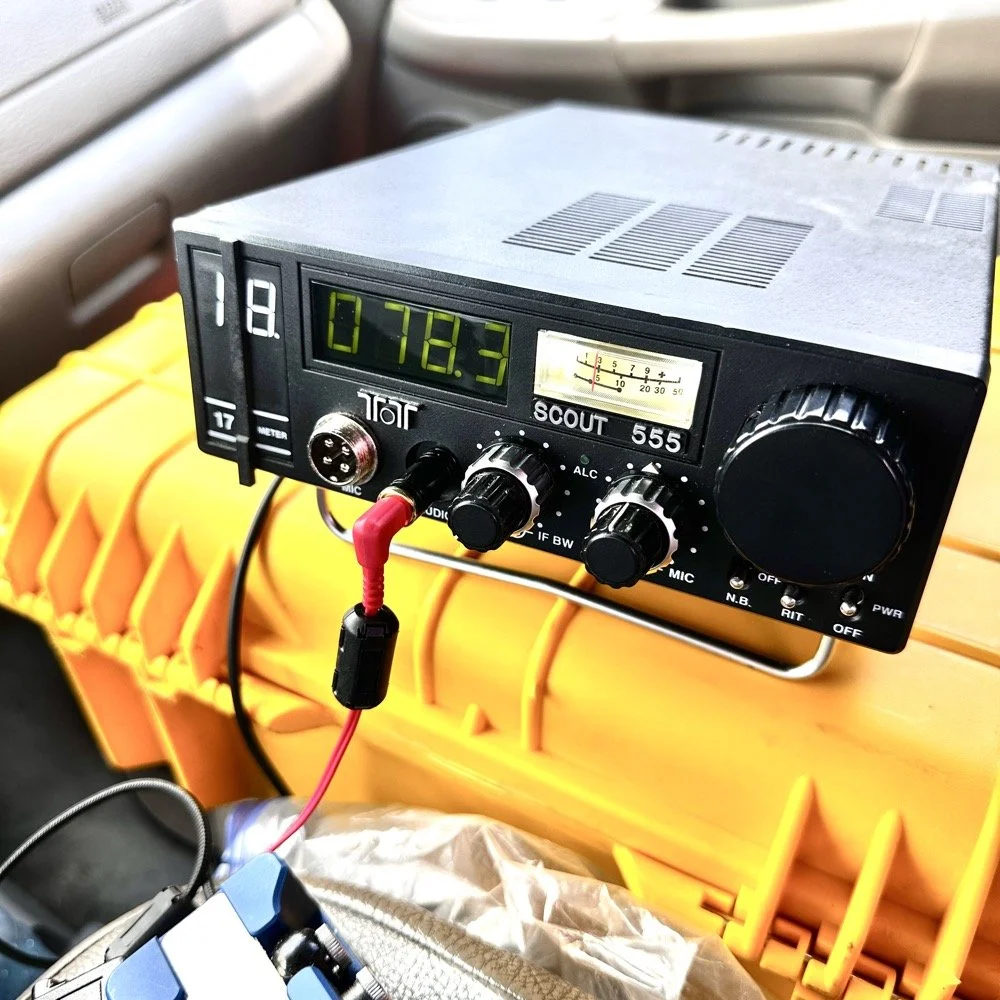
Activating with the TenTec Scout 555 after a 2 month hiatus!
When you love CW, you tend to migrate to certain kinds of radios. I migrated to TenTec and Elecraft rigs mostly, with a few smaller radios thrown in for good measure. I love TenTec radios for CW operation as they seem to have been tailor made for the mode. They work well as SSB machines too, but they REALLY shine on CW. Since we all know this about me, it is a given that if I want to activate with a simple radio that isn’t a lot of fuss, that I will choose the Scout 555 or mt Argonaut 5 over about anything else in the shack.
When you love CW, you tend to migrate to certain kinds of radios. I migrated to TenTec and Elecraft rigs mostly, with a few smaller radios thrown in for good measure. I love TenTec radios for CW operation as they seem to have been tailor made for the mode. They work well as SSB machines too, but they REALLY shine on CW. Since we all know this about me, it is a given that if I want to activate with a simple radio that isn’t a lot of fuss, that I will choose the Scout 555 or mt Argonaut 5 over about anything else in the shack.
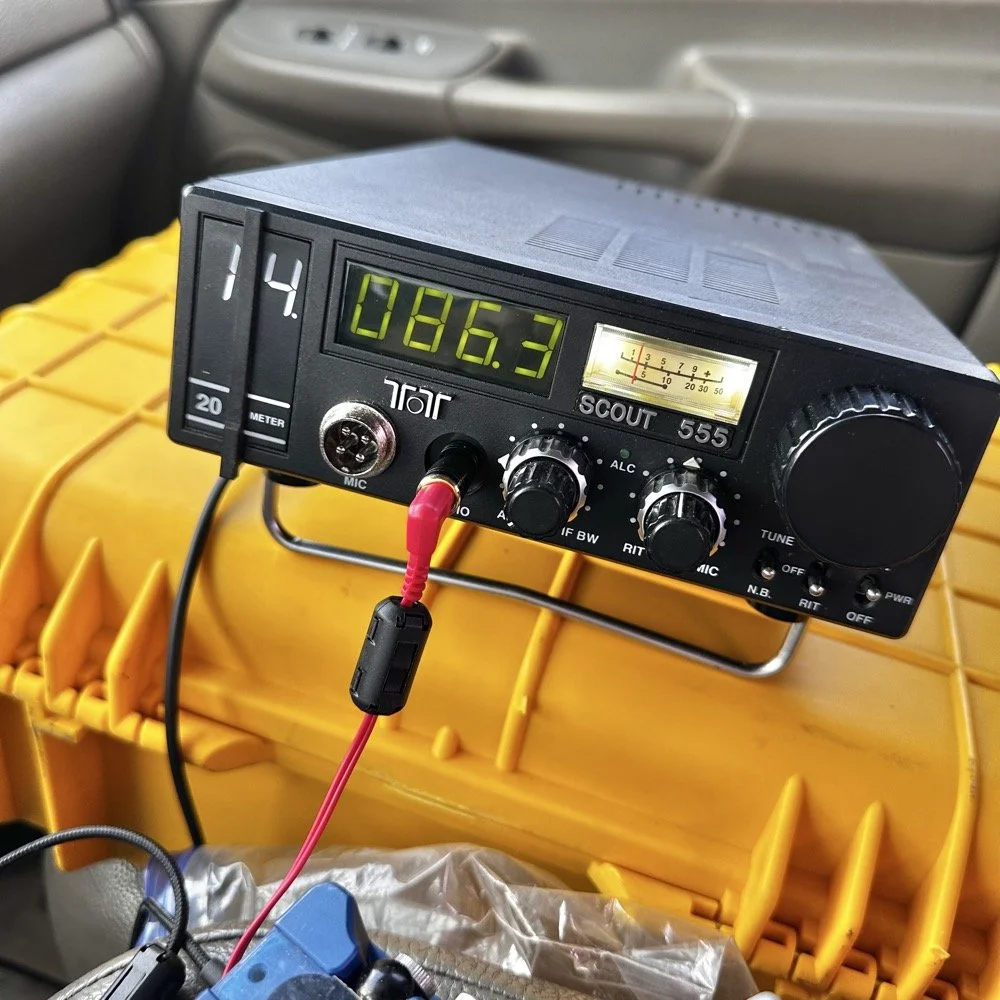
TenTec Scout 555 ham radio running cw on 20 meters
Setting up a POTA station at a local state park
When people start out activating a park in POTA, they tend to want to go to a local park first to get the bugs out of their kit. I am no different here. The only real exception is that I love going back to this park over and over. Back to the subject at hand though, I normally setup in a similar manner every time I go to a park. It usually goes something like this.
Find a spot that I can back into the parking space since my antenna mount is built for my receiver hitch on my truck and I prefer to lay ground radials so I don’t want people running over them when they drive by.
Once backed into the space, I will deploy the antenna first. I do this for a couple of reasons. First is that I want to get it up as fast as possible to avoid rain if it is imminent. Second I will spend some time tinkering with the antenna system to see what it does on the nanoVNA and this is kind of fun to me by itself. Antenna theory is fascinating and I love looking at how these devices work. Once I have the vertical up, radials deployed and the coax ran to the truck cab, I move on to the next step.
Tune the antenna to the band I am going to use. This seems obvious, but I have forgotten to do it in the past and it doesn’t work well unless I do it… I use the nanoVNA and I will usually tune the vertical first by collapsing it till I am close to the desired frequency, then I will move the radials around till I have the best SWR possible with the system I have deployed. Usually this lands me between 1.1 and 1.5:1 SWR at the base of the antenna.
Get out the radio and deploy it in the front passenger seat of the truck like you see in the photo above. I use the storage case for the radio as a table to sit it on. This works really well. I keep the keyer and cables for everything in the case with the radio. This even includes the earbuds I use with it. The only thing not in the case with the radio is the Begali Traveler key as it lives in a case of its own.
Setup the computer to log with (if I brought it) or get out the pens and notebook. Go ahead and write all the pertinent data in the log or computer before I start calling CQ.
Spot my activation on the POTA website before calling CQ as well. This has turned into a mess for me in the past to be honest so I do this step before calling QRL too. I want the whole system to be primed prior to starting the activation proper.
Call QRL and find a clear frequency before launching into calling CQ. This is a big deal to me and a step I make a deliberate effort to do so I don’t walk on someones QSO that I cant hear immediately.
Once all of this is done, which takes only a few minutes in reality, I start calling CQ and get going. Now I also understand that my spot and my actual operating frequency might differ due to people being on a frequency that I chose to start with, but this isnt too big of a problem as the RBN will usually update it pretty quickly once I start calling CQ.
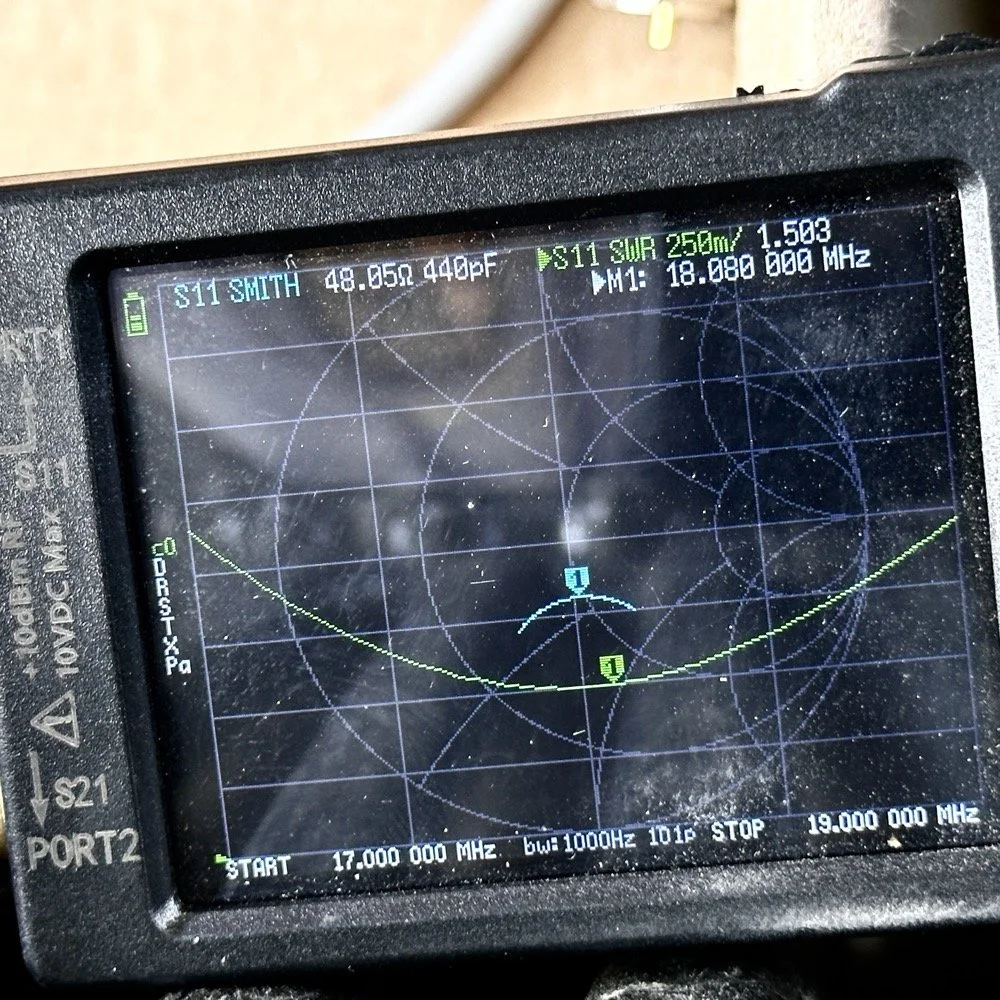
Tuning the antenna for use on a band.
As you can see in the above photo, I have already tuned the antenna for use on the 17 meter band. It is centered on the CW portion of the band and I have also tuned the radials to get the lowest SWR possible with the setup like it is. With it like this, I think I am going to use this plot to figure the inductance and capacitance on the Smith chart to see what it would take to get it to 50 ohms resistive or as close as possible to that. This is why I use the nanoVNA too. You can see the plot of SWR versus time here on a portion of the radio spectrum of my choosing. This time I chose 17mHz to 19mHz and the marker is set to 18.080mHz for my point of reference. With it set like it is, I can also see it is at 48.05 ohms of impedance and it is capacitive 440pF as well. I can take this data directly into the Smith chart and calculate the needed components easily.
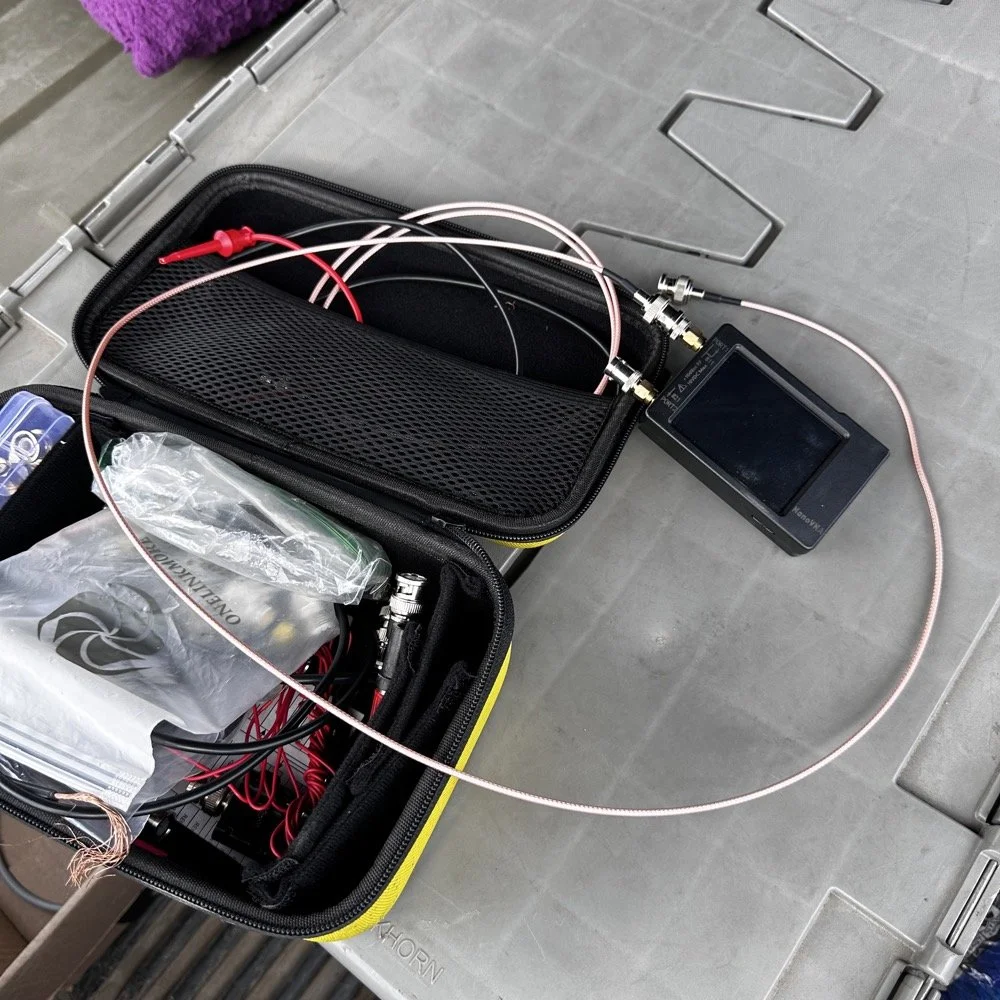
This is the setup I use currently. I find it easier to use this small jumper than trying to read the nanoVNA directly connected to the base of the antenna. The sun makes it very hard to read this device and adding the short jumper allows me to put it in the shade. Also, just look at how small this instrument is compared to regular antenna analyzers… That one thing in itself makes it a winner in my book.
The procedure for tuning goes a little like this. I will first get the antenna put together. This whip is long enough that it will tune to about 12 mHz if fully extended. This is good as it will allow me to shorten it to 20 meters by simply collapsing a few sections. Then when it gets close, I will pull down the bottom section a little at a time till the curve looks like what you see above on t he nanoVNA. I try to get my rough tune by shortening the top first as those sections are smaller in diameter and doing this will allow for the passband to be the widest possible. I can usually get the whole CW portion of the band this way on everything except 80 meters which has a huge area for CW… also this vertical is woefully short for that band anyway…but that is a different conversation.
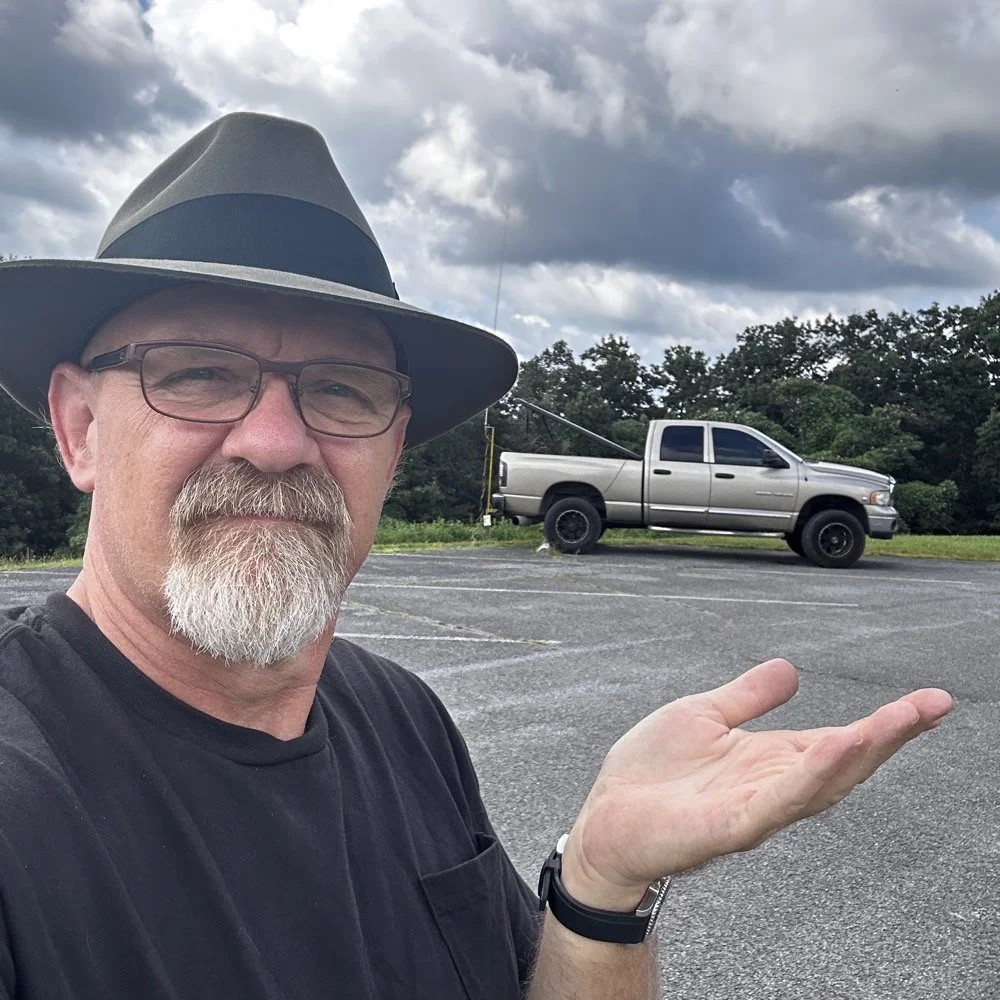
The operating position for POTA
The truck will usually look like this when it is up and operational. I really like operating out of my truck, it is so simple for me now that I have the system dialed in. POTA can look like a lot of things and I find it interesting how each one of us comes up with a unique setup for our uses. I prefer to setup in my truck for a couple of reasons. The main one is that in the summer, I can run the AC and keep cool! The second one is that I can access my truck power as I have a diesel and that means I have two batteries in the truck. I dont run over about 40 watts with any of my POTA rigs so this never depletes the batteries even when I setup for several hours. Plus I can simply crank the truck to recharge the batteries too… win win.
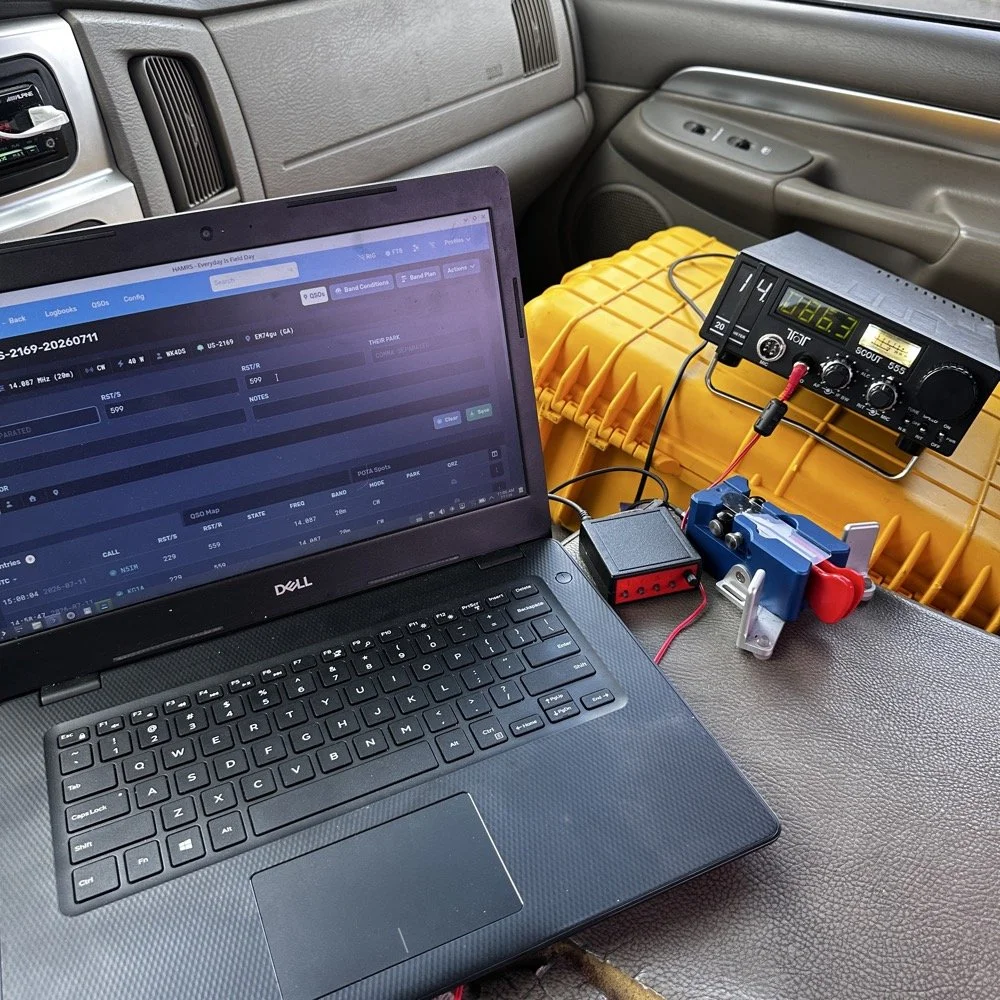
This is the operating position for this day. It looks like this on most days as it is the fastest way for me to get on the air with my POTA rigs. You have the Dell Inspiron computer running Linux Open Mandriva, a Hamgadgets Keyer, the Begali Traveler CW paddle, and the TenTec Scout 555 portable HF radio. This is a solid rig for someone who wants to run SSB or CW and maybe could get this to work with an external sound card for some of the digital modes too. My friend, Roger KG4WHI, has gotten a Scout to do FT8 so i know it is possible.
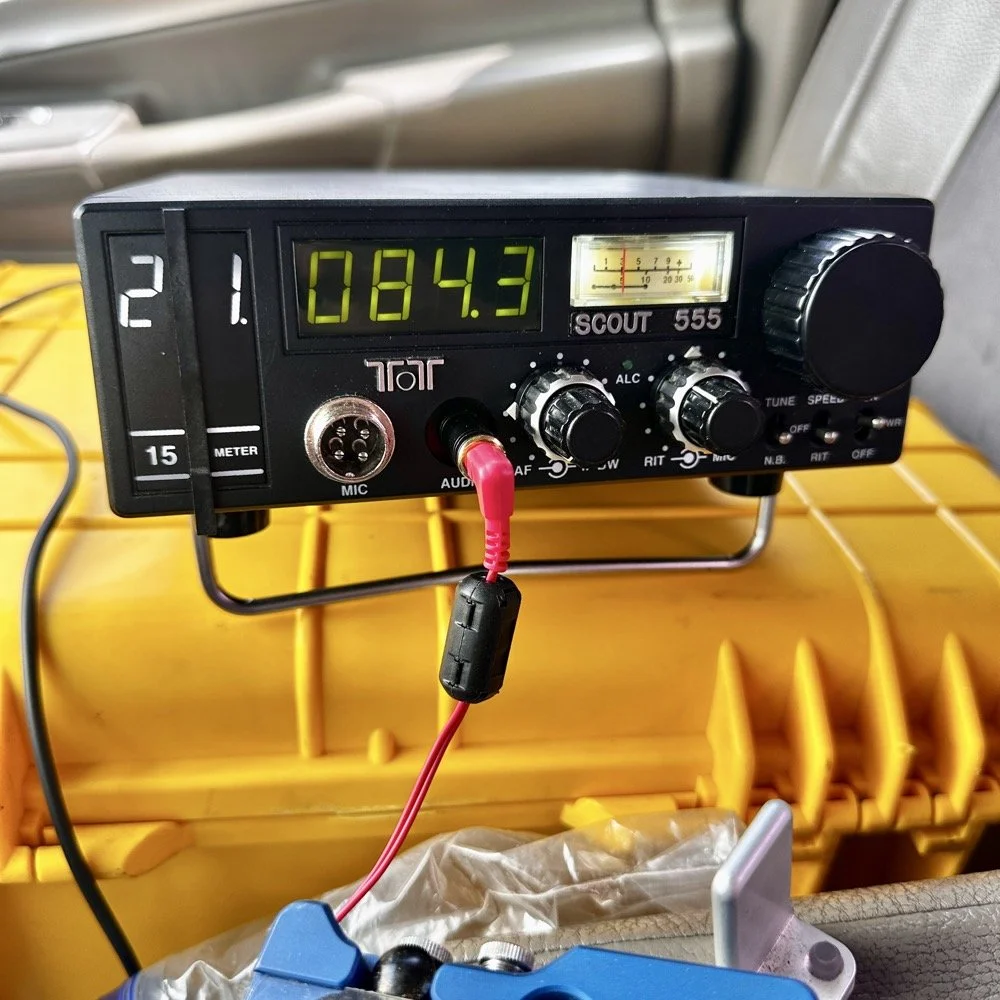
This was the last band I operated on today. I started on 20 meters, made a dozen or so contacts then moved to 17 meters where I made probably 16 more and then I finally finished with me making 2 on 15 meters if memory serves me right. It wasn’t many, but I was able to get a couple in the log on 15 meters as well. Shoot I was even able to get a Spaniard in the log today. They were weak but I was able to get decent copy on them. It is always a good day when you can add DX to the log on a POTA activation in the USA. You can also see something else in this photo. This is how low I hold the volume when I operate a radio on CW. You want the volume just above the noise floor. This allows you to hear stations that would normally be impossible if the volume was turned up just a little more than this. It is a phenomenon that I learned a long time ago and it is real. It works on any radio too.but you have to wear good headphones for it to work.
All in all it was a great day with 30 contacts in the log from all over the country and one from the EU. I decided to break the system down as a storm front started to roll in so I would not have to do it in the rain… haha. This turned out to be accurate as it started raining cats and dogs right after I left the park too. That was a close one…
You can help support this channel by using these Amazon Affiliate Links as well:
QRP/Portable Radios:
Antennas & Tuning:
CW Equipment:
Power & Accessories:
Organization & Transport:
BONUS ITEMS (Optional 16-20):
Till next time, I hope you have favorable conditions and the DX is calling! POTA on and 73!
David
WK4DS

Go bag POTA!
The idea behind building a POTA go bag is simple. You want everything you need in one place, ready to grab and go. No hunting for coax in the garage, no trying to remember which box has the paddle, no scrambling to charge batteries. Just grab the bag, throw it in the truck, and you're ready for a park activation. Or an emergency. That's the whole point!
The idea behind building a POTA go bag is simple. You want everything you need in one place, ready to grab and go. No hunting for coax in the garage, no trying to remember which box has the paddle, no scrambling to charge batteries. Just grab the bag, throw it in the truck, and you're ready for a park activation. Or an emergency. That's the whole point!
Why Build a POTA Go Bag?
Today was about testing my emergency / travel radio kit to see how it actually performs in the field at Eagle's Nest (US-0716). Spoiler: it works better than I expected, even with some equipment drama along the way.

The QRP Guys SWR meter checking the Reliance Antennas 40m EFHW before starting the activation. I wanted to make sure the SWR was acceptable before putting power through it.
Complete Gear Walkthrough: Everything in the Bag
Here's every single item in my POTA go bag with approximate costs. This is everything you need for a complete field station that fits in one bag:
Radio and Accessories:
Penntek TR-35 QRP transceiver: N/A (no longer available… sad radio sounds…)
Xiegu G90 HF Radio Transceiver: 465$ (A great Alternative but not quite as small)
N6ARA CW paddle with case: ~$70
Headphones in ziplock bag: ~$20 (any decent pair works)
QRP Guys SWR meter: ~$20 (for field checks)
Power:
10-cell AA battery holder from Amazon: ~$12
10 rechargeable AA batteries (Eneloop or similar): ~$25
Power cord with Anderson Powerpoles: ~$10
Antenna System:
Reliance Antennas 40m EFHW: ~$60
ABR Industries coax with ferrite choke: ~$70
Backup coax (generic RG-8X): ~$30
Arborist throw line (40 feet): ~$8
Throw weight (1" nut from machine shop): Free!
Accessories:
Nylon tool bag from Amazon: ~$25
Small notebook for logging: ~$3
Pen (main) and pencil (backup): ~$5
Ziplock bags for organization: ~$2
Total Kit Cost: Approximately $825
Now, I know that seems like a lot upfront, but remember this includes the $465 radio. If you already have a QRP rig, you're looking at about $350 for everything else. And this entire kit lives in one bag ready to deploy. No hunting for gear, no forgetting critical pieces. That's worth something!
The beauty of this setup is that it's modular. Start with the basics (radio, antenna, power) and add the nice-to-haves over time. I didn't buy everything at once. I built this kit over about six months as I figured out what I actually needed in the field.
I did the entire activation from Eagle’s Nest in US-0716 with just the “kit” radio that I have put together. I have the QRP Guys SWR meter in the photo here as well (it is in the clear plastic case), but this is because I wanted to check the 40m Endfed Halfwave Antenna from Reliance Antennas to make sure the SWR was ok. He cuts them long so you can tune them once in the field and I have not cut mine yet.
You might be wondering, why go through the trouble of building a dedicated go bag instead of just grabbing gear as needed? Fair question! Here's my thinking:
For POTA operations: Having everything organized in one bag means I can decide to do an activation on a whim. If it's a nice day and I have two free hours, I don't need to spend 30 minutes gathering equipment. Grab the bag, drive to a park, and I'm on the air. This makes POTA way more accessible and way more fun.
For emergency communications: This is the real reason I built it this way. If there's ever a real emergency where I need to set up communications quickly (hurricane, power outage, whatever), I don't want to be hunting through the garage for my radio gear. The go bag concept means I can grab it and have a complete, tested, working field station ready to deploy immediately.
For travel: The bag is small enough to throw in the car for road trips or to check as luggage on a flight. Having everything self-contained makes it easy to operate from anywhere. I don't need to bring my whole shack, just this one bag.
The mindset shift: Building a go bag forces you to think about what you actually need versus what's nice to have. Every item has to justify its space in the bag. This makes you focus on core functionality rather than bringing every gadget you own. It's a good exercise!
The result is a system that's ready when you are, tested and proven in the field, with no excuses for not getting on the air.

One side of the bag showing the Penntek TR-35, the 40m EFHW antenna, power cord with Anderson Powerpoles, and the throw line with weight. Everything organized and ready to deploy.
The Penntek TR-35: Heart of the Go Bag
This particular nylon bag came from Amazon and has two main sides that unzip and lay flat. Inside each side are additional pockets to hold small, thin items as well. I have organized mine to hold the Penntek TR-35 and all the stuff needed to deploy it in the field. Literally everything. Let’s go for a short “walk” through this bag.
In the above photo is the radio, antenna and a power cord with Anderson Powerpoles installed. I also have the battery pack in the zippered pocket (more on that later). As well as a rope and weight for throwing a line up into a tree to haul up the wire antenna with. I just wound off about 40’ or so of arborist throw line for this kit and I have included a huge 1'“ nut from the machine shop for a throw weight, which works perfectly…
The other side contains the coax for the antenna and this is the only thing that I have two of in the kit. Coax has let me down more than once while out at parks so I now carry backup coax. No matter how careful you are with this stuff, it will fail on you. It just ins’t designed for all that movement and eventually you will break the center conductor. This is also why I check my system with the nanoVNA before starting…except today where I used the little SWR meter instead. One of the coaxial cables is the gold colored one made by ABR Industries and it has the ferrite common mode choke built into it. This is really wonderful coax and I wished I had learned how important quality coax was a long time ago…it makes a huge difference.
Also in view in the below photo is the N6ARA CW key in the little storage box it comes in and the headphones are in a ziplock bag to keep dust and dirt out of them. Nestled into the pocket behind the coax is a small notebook for logging. I also have a pen (my preferred tool for logging as I can see it easier than pencil) and a pencil since a pencil never runs dry, it is my long term back up to me pen…lol. I dont really trust pens either…haha.

The other side holds coax (including backup coax, because it will fail on you eventually), the N6ARA CW key in its case, headphones in a ziplock bag, and a notebook with pen and pencil for logging.

The N6ARA CW key comes in this little storage box which fits perfectly in the bag. Headphones stay clean in a ziplock, and the notebook/pen/pencil combo is my preferred logging method in the field.
So here is the station assembled and under power. You would be surprised at how long this radio will run on those AA batteries too. It is really shocking to me how well this little system works. I have yet to have the batteries die during an activation and one of them was three hours long. I need to run them till the radio dies to just see how long they will last at some point, but for now I know I can get at least three hours out of them. Also note that it is 10 AA rechargeable batteries, this gives me almost 14 volts which is what a car battery produces when new.
The station assembled and under power at Eagle's Nest (US-0716). You'd be surprised how long this radio runs on 10 AA batteries. I've never drained them during an activation!

Pointing to how I routed the coax. Started with it in a U-shape and got 2.6:1 SWR. Straightened it out and SWR dropped to 1.7:1, much better! This is why you check things in the field.
Here I am pointing to the coax that I used showing how I laid it out. I started with it in a “U” shape at first but the SWR showed to be 2.6:1 and I did use this for a bit as the TR-35 has final protections that make it pretty much impossible to damage them.
After a few minutes though, I decided to straighten the coax and this moved the SWR down to about 1.7:1 making me much more comfortable. I then checked all the bands that the TR-35 covers and only 30 meters was not usable. So that is why you see contacts on three bands instead of 4 today. Haha

My makeshift antenna support keeping tension on the wire and keeping it off the coax. It worked okay, but next time I want to get the wire higher. 30-40 feet would be better than the 15-20 feet I got here.
This is what I came up with to keep tension on the wire antenna and keep it off of the coax. It worked OK, but it the future, I would prefer to get the antenna higher. I also want to add another piece of cord so I can raise the transformer end of the antenna off the ground too. I think this will also help with radiation angle and pattern. The Reliance Antenna EFHW works really well and I am glad I got one from them. This is one of those items from the “Ham Made Gear” forum on QRZ.com. I have bought a few items from this area and have never been disappointed.
In the below photo, you can see my truck parked where I normally activate from and on the right side of that are a couple of trees that I tied the antenna up into. It is strange looking out on it now that it is cleared compared to just a few weeks ago.

Wide shot showing my truck where I normally park and the trees on the right where I tied up the antenna. This area was just cleared a few weeks ago so it looks different than it used to.

Here's what happens when you short circuit a 10-cell AA battery pack! The springs melted completely through the plastic housing. This is what I get for storing it with the power connector attached. Live and learn!
The Battery Pack Disaster (And What I Learned)
Now I need to tell you about the battery pack disaster, because this is the kind of thing that happens when you're figuring stuff out in amateur radio!
When I pulled the batteries out to charge them before this activation, I noticed the springs were melted completely through the housing. Like, melted through the plastic and everything. It took me a few minutes to figure out what happened, and when I did, I felt pretty dumb.
Here's what went wrong: The power connector barrel plug has the ground connection on the outside ring. When I stored the battery pack in the bag with the power cord attached, that barrel connector must have shifted and contacted one of the metal points along the battery bank on the outside of the holder. This shorted several batteries directly to ground!
Turns out when you short circuit AA batteries, they dump a LOT of current very quickly. Those poor springs turned into heating elements and melted the plastic housing. I'm honestly lucky the whole thing didn't catch fire or rupture the batteries. This could have been way worse!
What I learned (the hard way):
NEVER store the battery pack with the power connector attached. Ever.
A simple inline fuse would have prevented this entirely. I'm adding one.
I stretched out the melted springs and the pack still works, but I'm watching it closely.
I now store the last battery in the bank in a separate ziplock bag so nothing can short across the holder.
This is why we test equipment before we need it in an emergency! If this had been a real emergency situation and my battery pack was dead because of a storage mistake, that would have been a problem. Now I know better, and hopefully you can learn from my mistake without melting your own battery pack.
AA Battery Power: 3+ Hours of Runtime
Let me talk about why I went with AA batteries instead of the fancy LiFePO4 packs everyone recommends. Yeah, LiFePO4 batteries are great. They're lighter, hold more capacity, and last longer. They also cost $100 to $200 for a decent pack!
This 10-cell AA battery holder cost me $12 on Amazon, and a set of 10 Eneloop rechargeable AAs runs about $25. That's $37 total for a power solution that gives me 3+ hours of runtime with the Penntek TR-35. I've done a three hour activation and never came close to draining the pack.
Even better: AA batteries are available everywhere. If I'm traveling and forget to charge my batteries, I can walk into any gas station or convenience store and buy alkaline AAs to get me through an activation. Try that with a LiFePO4 pack!
The 10 cells in series give me about 14 volts when freshly charged (this presents a small problem with Alkaline batteries as the voltage is greater by .3 volts! I guess I need to get two dummy cells so I can “detune the pack for Alkaline batteries), which is perfect for the TR-35. As they discharge, voltage drops to around 12 volts, but the radio still works fine all the way down. I typically recharge them when I get home, even if they're not fully drained, just to keep them ready to go.
Is it the most elegant power solution? No. Is it the lightest? Definitely not. But it's cheap, reliable, and universally available. For a go bag / emergency radio setup, those qualities matter more than saving a few ounces.

Close-up of the melted springs. The barrel connector contacted the battery holder and shorted several cells to ground. Those springs turned into heating elements real fast. I'm lucky it didn't catch fire!

My paper log showing contacts on three bands (20m, 17m, 40m). 30m wouldn't tune because I haven't trimmed the antenna to resonance yet. I still use paper logging as my primary method in the field.

Complete Go Bag Checklist and Cost Breakdown
1. Get the antenna higher I only got the wire up about 15-20 feet using the tree right next to my operating position. This worked fine, but higher is always better for HF propagation. Next time I'm bringing a longer throw line so I can aim for branches 30-40 feet up. The extra height will help with DX contacts and cleaner signal patterns.
2. Add a second cord for the transformer end Right now the EFHW transformer just hangs near the ground. I want to add another piece of cord so I can raise that end off the ground too. This should help with the radiation pattern and might improve performance on the higher bands.
3. Inline fuse for the battery pack Yeah, after the melting springs incident, this is happening. A simple 5-amp inline fuse between the battery pack and the power connector would have saved me a lot of stress. I'll add this before the next activation.
4. Pre-tune the antenna The Reliance Antennas EFHW comes cut long so you can trim it to perfect resonance in the field. I still haven't done this trimming, which is why 40 meters wouldn't tune properly (SWR was a little high). I need to take an hour and actually tune this antenna across all the bands the TR-35 covers. Then I'll know it'll work on 40m,, 20m, and maybe 17m (if I can live with the SWR) without field adjustments. (30 meters never tunes on these antennas so I dont count it.)
5. Add a small groundsheet The bag sits directly on the dirt/grass right now. A small tarp or groundsheet would keep everything cleaner and drier if I'm setting up in damp conditions. Nothing fancy needed, just something to protect the gear.
What's working perfectly:
The bag itself is the right size
Having backup coax has saved me multiple times
Coax with ferrite common mode choke from ABR Industries
The AA battery runtime is more than adequate
The throw weight works great
Everything fits and is organized
Overall, I'm really happy with how this kit performs. These are all minor tweaks, not major problems. The core concept of "everything in one bag" is solid!
Let me give you the actual numbers from this Eagle's Nest activation using just the go bag kit:
Activation Details:
Park: Eagle's Nest, US-0716
Date: November 13, 2024
Equipment: Penntek TR-35 at 5 watts QRP
Antenna: Reliance 40m EFHW at ~15-20 feet
Power: 10 AA rechargeable batteries
Bands: 20m, 17m, 40m (30m wouldn't tune)
Contact Breakdown: I started on 20 meters calling CQ and had a good little run of contacts. After working through the initial pile-up, I switched to hunting for other POTA activators on the band. Then I moved to 17 meters (one of my favorite bands these days!) for a few more contacts before finishing up on 40 meters.
Total activation time was probably 90 minutes, and the batteries still had plenty of charge left. I didn't drain them even close to empty. This confirms what I've seen before with this setup: you can easily get 3+ hours of field time on a single charge of AAs.
The go bag concept worked exactly as intended. I grabbed the bag from my truck, walked about 50 feet to my operating spot, threw the wire up in a tree, and was on the air in maybe 15 minutes. When I was done, everything packed back into the bag just as quickly. No loose gear rolling around in the truck, no forgetting pieces of equipment. It all stays together!
72