Sometimes, when I go for a photowalk, I don’t want to be a loner…
When I go out to shoot photos I normally go alone as it fits my time table perfectly and I dont have to do any coordination with anyone else. I just grab my kit and go. Well, today is different.

So on this day I linked up with Tim Childers at Mean Mug coffee on Main street in Chattanooga TN and started out with a cup of coffee and some chatting about our youtube channels. Then it was off to find interesting photos and explore some of the old industrial part of the city.
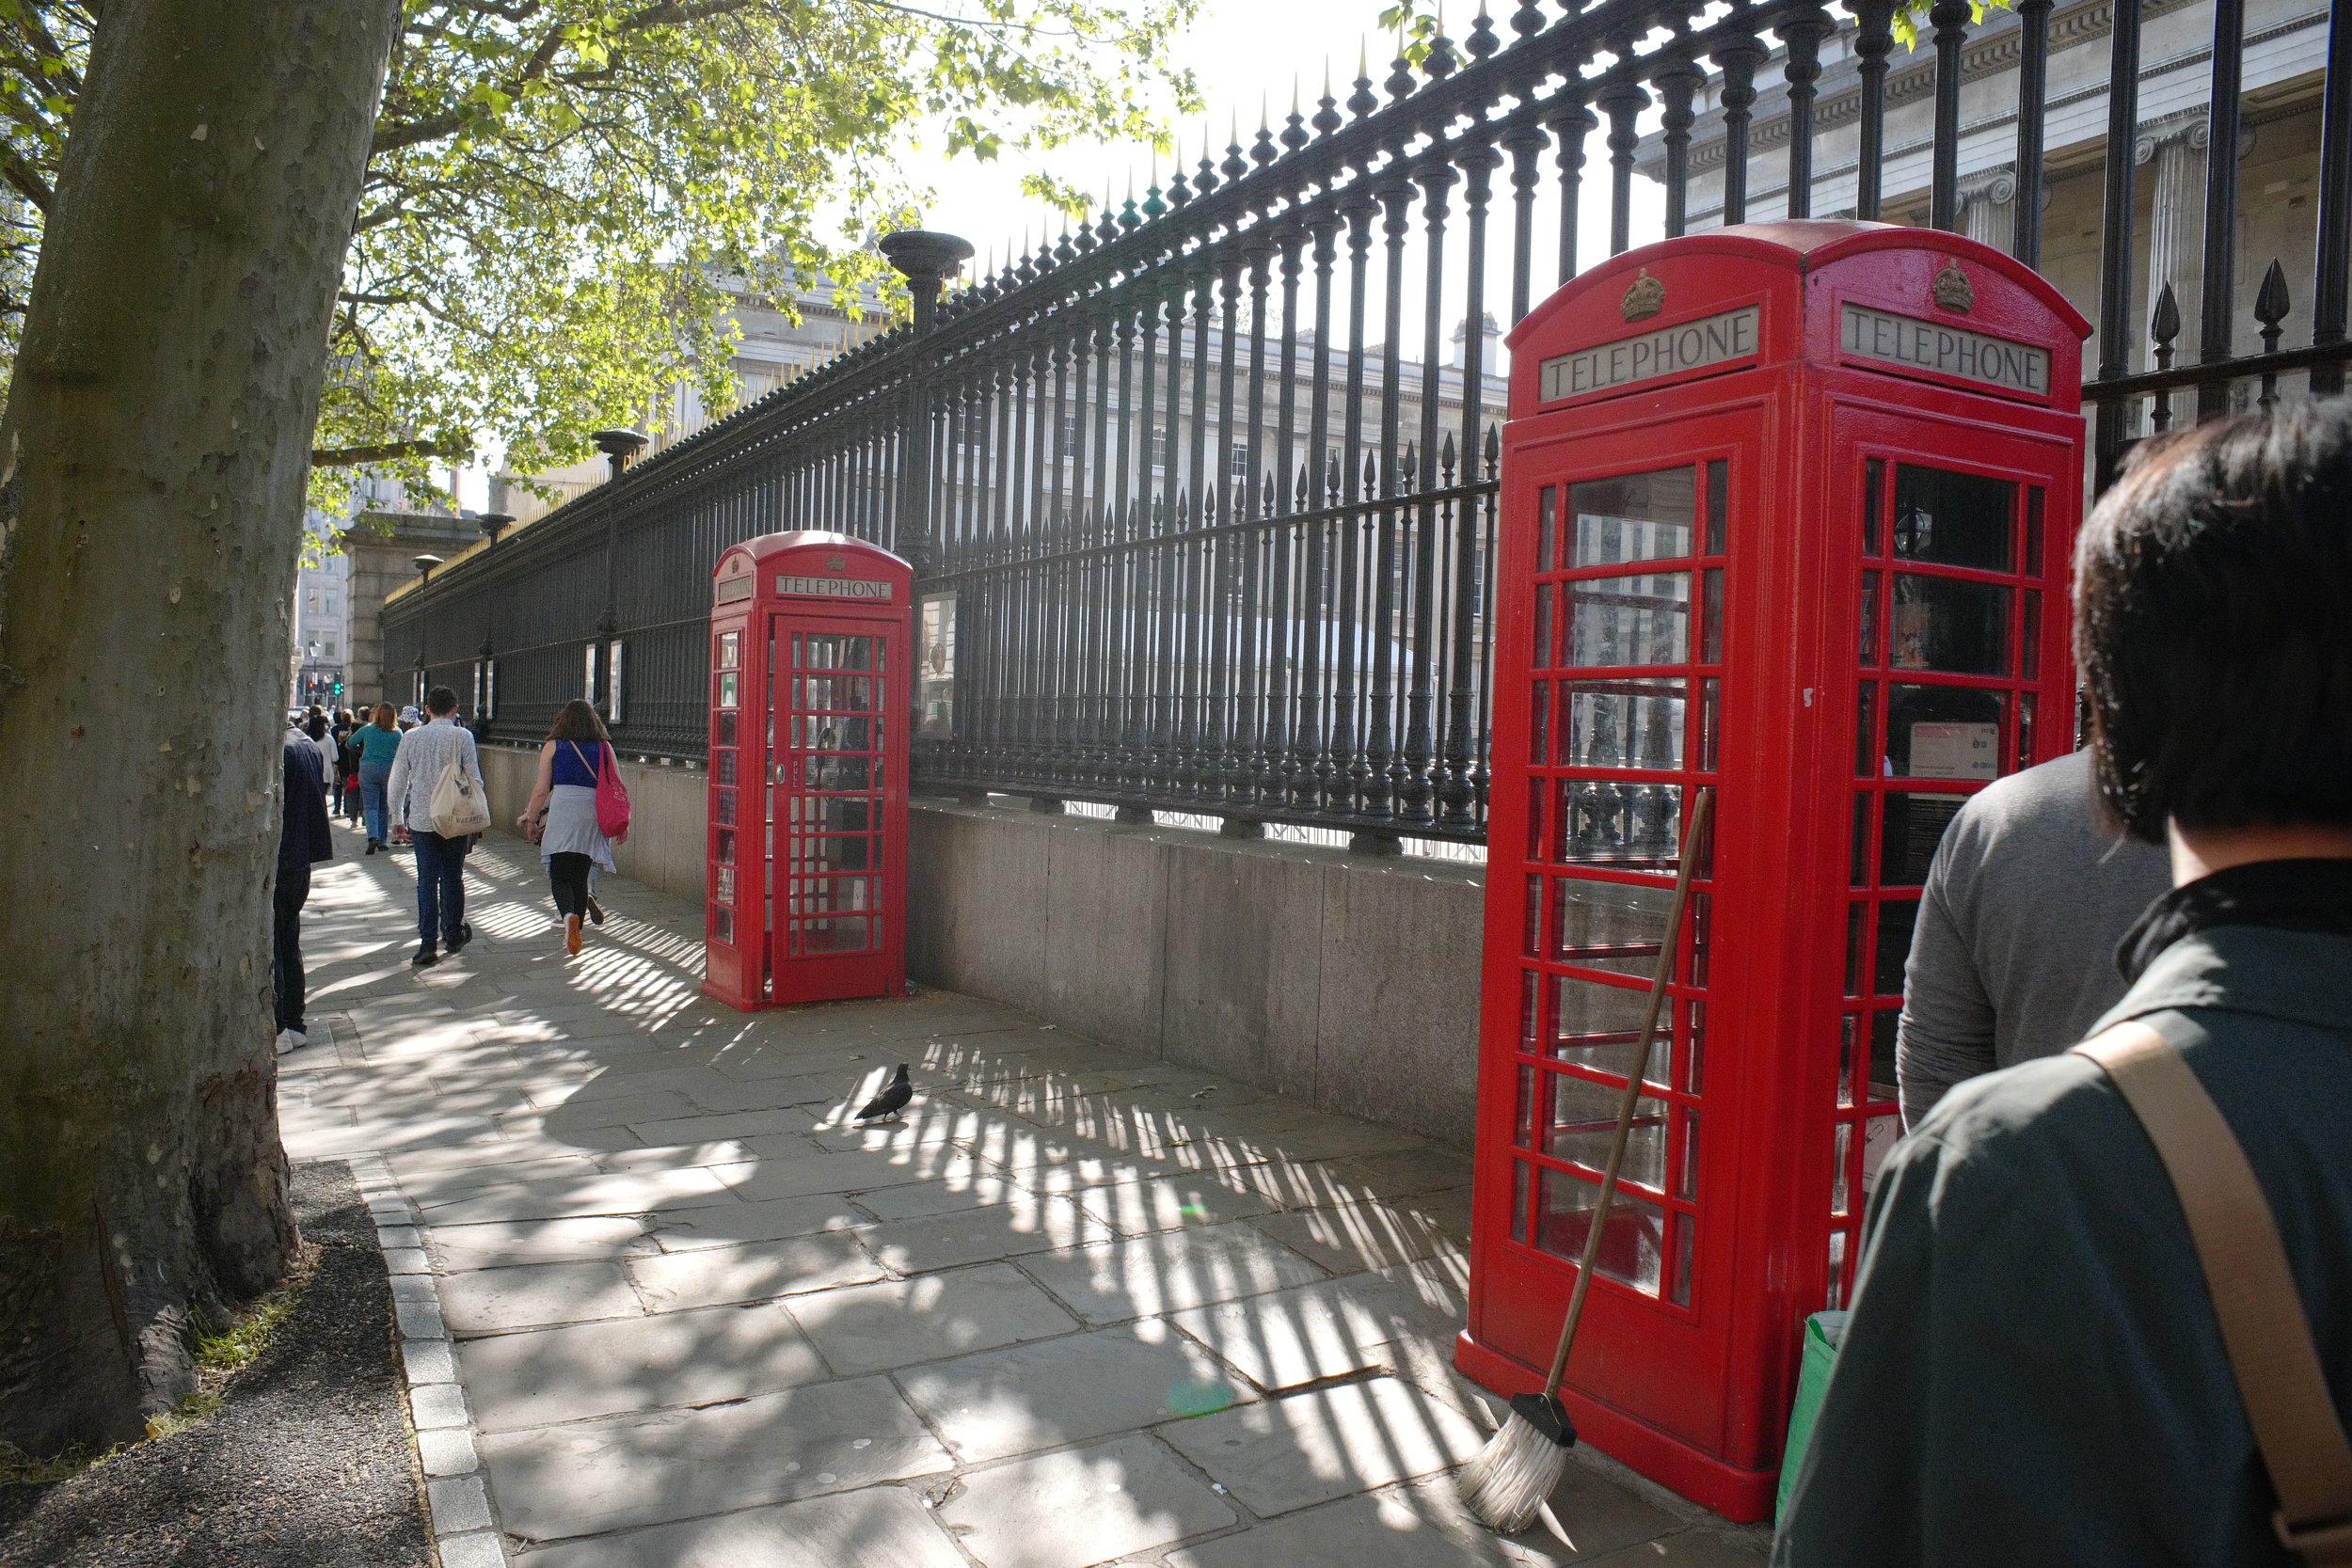
We begin by making our way down to the old foundry turned farmers market. On the way I noticed some interesting stuff at a local processing plant before getting to the farmers market. After grabbing a couple of shots there we headed over to the market space and make some photos of the skate park.

The skate park was basically abandoned so once we worked the scene over as best we could we decided to head over towards the river. From the skate park we make our way to the riverfront industrial area where we grab some photos occasionally while walking down to the aquarium. This is a unique are as it is being converted to modern condominiums and there is a huge development project slated later to construct a park and such as well.

Once we got downtown, we decided to get out of the heat for a little while and grab some lunch at Taco Mac before making our way back to our cars on Main Street. The longer we walked, the hotter it got on this day and by the time we got to Taco Mac I was soaked. We stayed there till I dried out and then went back out in it for more. Haha. Market street has a fair bit of shade fortunately so we was able to avoid most of the sun while heading back to the car.

Some notable stops along the way for me were the intersection of Main and MLK, the HWY 27 bridge, the skate park and the processing plant for me. I hope you enjoyed this little AAR about our photowalk and if you haven’t done it yet, go check out both of our videos from this day at the links below.
Links to both videos are here:
Also, wanted to thank you for following my blog as well as my videos, It means the world to me.
So I went on the Canterbury pilgrimage a few months back…
Yeah, you heard that right? I went on the Canterbury pilgrimage. This is an interesting thing for me because I’ve never really done a long-distance hike like this before.

I wasn’t even sure I was capable of completing it to be quote honest about it. Well, we jumped in with both fett so to speak and went headlong into this trip ill prepared. The first thing we decided to do was limit our equipment to what we could carry in our respective backpacks. This eliminated a literal mountain of gear that we had deemed needed but optional. It also made the journey much nicer. We finally decided on a couple of changes of clothes, I took a small amount of camera gear in a dry bag (since it rains in the UK alot) and a water bottle. We would pick up snacks along the way and add that to our loadout as we needed it.
This also generated another benifiit with our travel, the airport processing got ALOT simpler this way. We literally didnt check anything so we just went through the TSA check point and carried our packs right to the gate and they were not really encumbering as we had literal backpacks so our hands were free to do things like buy coffee or get out credit cards… it made traveling so much less stressful to be quite honest that I might be adjusting my future travel to operate in this mode. You never lose your luggage as you walk onto the plane with it and it fits into the over head space without issue…every time. This was glorious for me as I worry about the luggage making it to the same place as me or even worse, not arriving at all…

Well, once on the ground in England we checked into our hotel and went for some food, what we found is that the food in the UK is … different… from what we are accustomed to here in the US. We had to adjust to this as it seemed that they have a very specific diet and do not vary from it for any reason. We joked about how for a country that conquered most of planet earth at one point for spices, they dont use them!
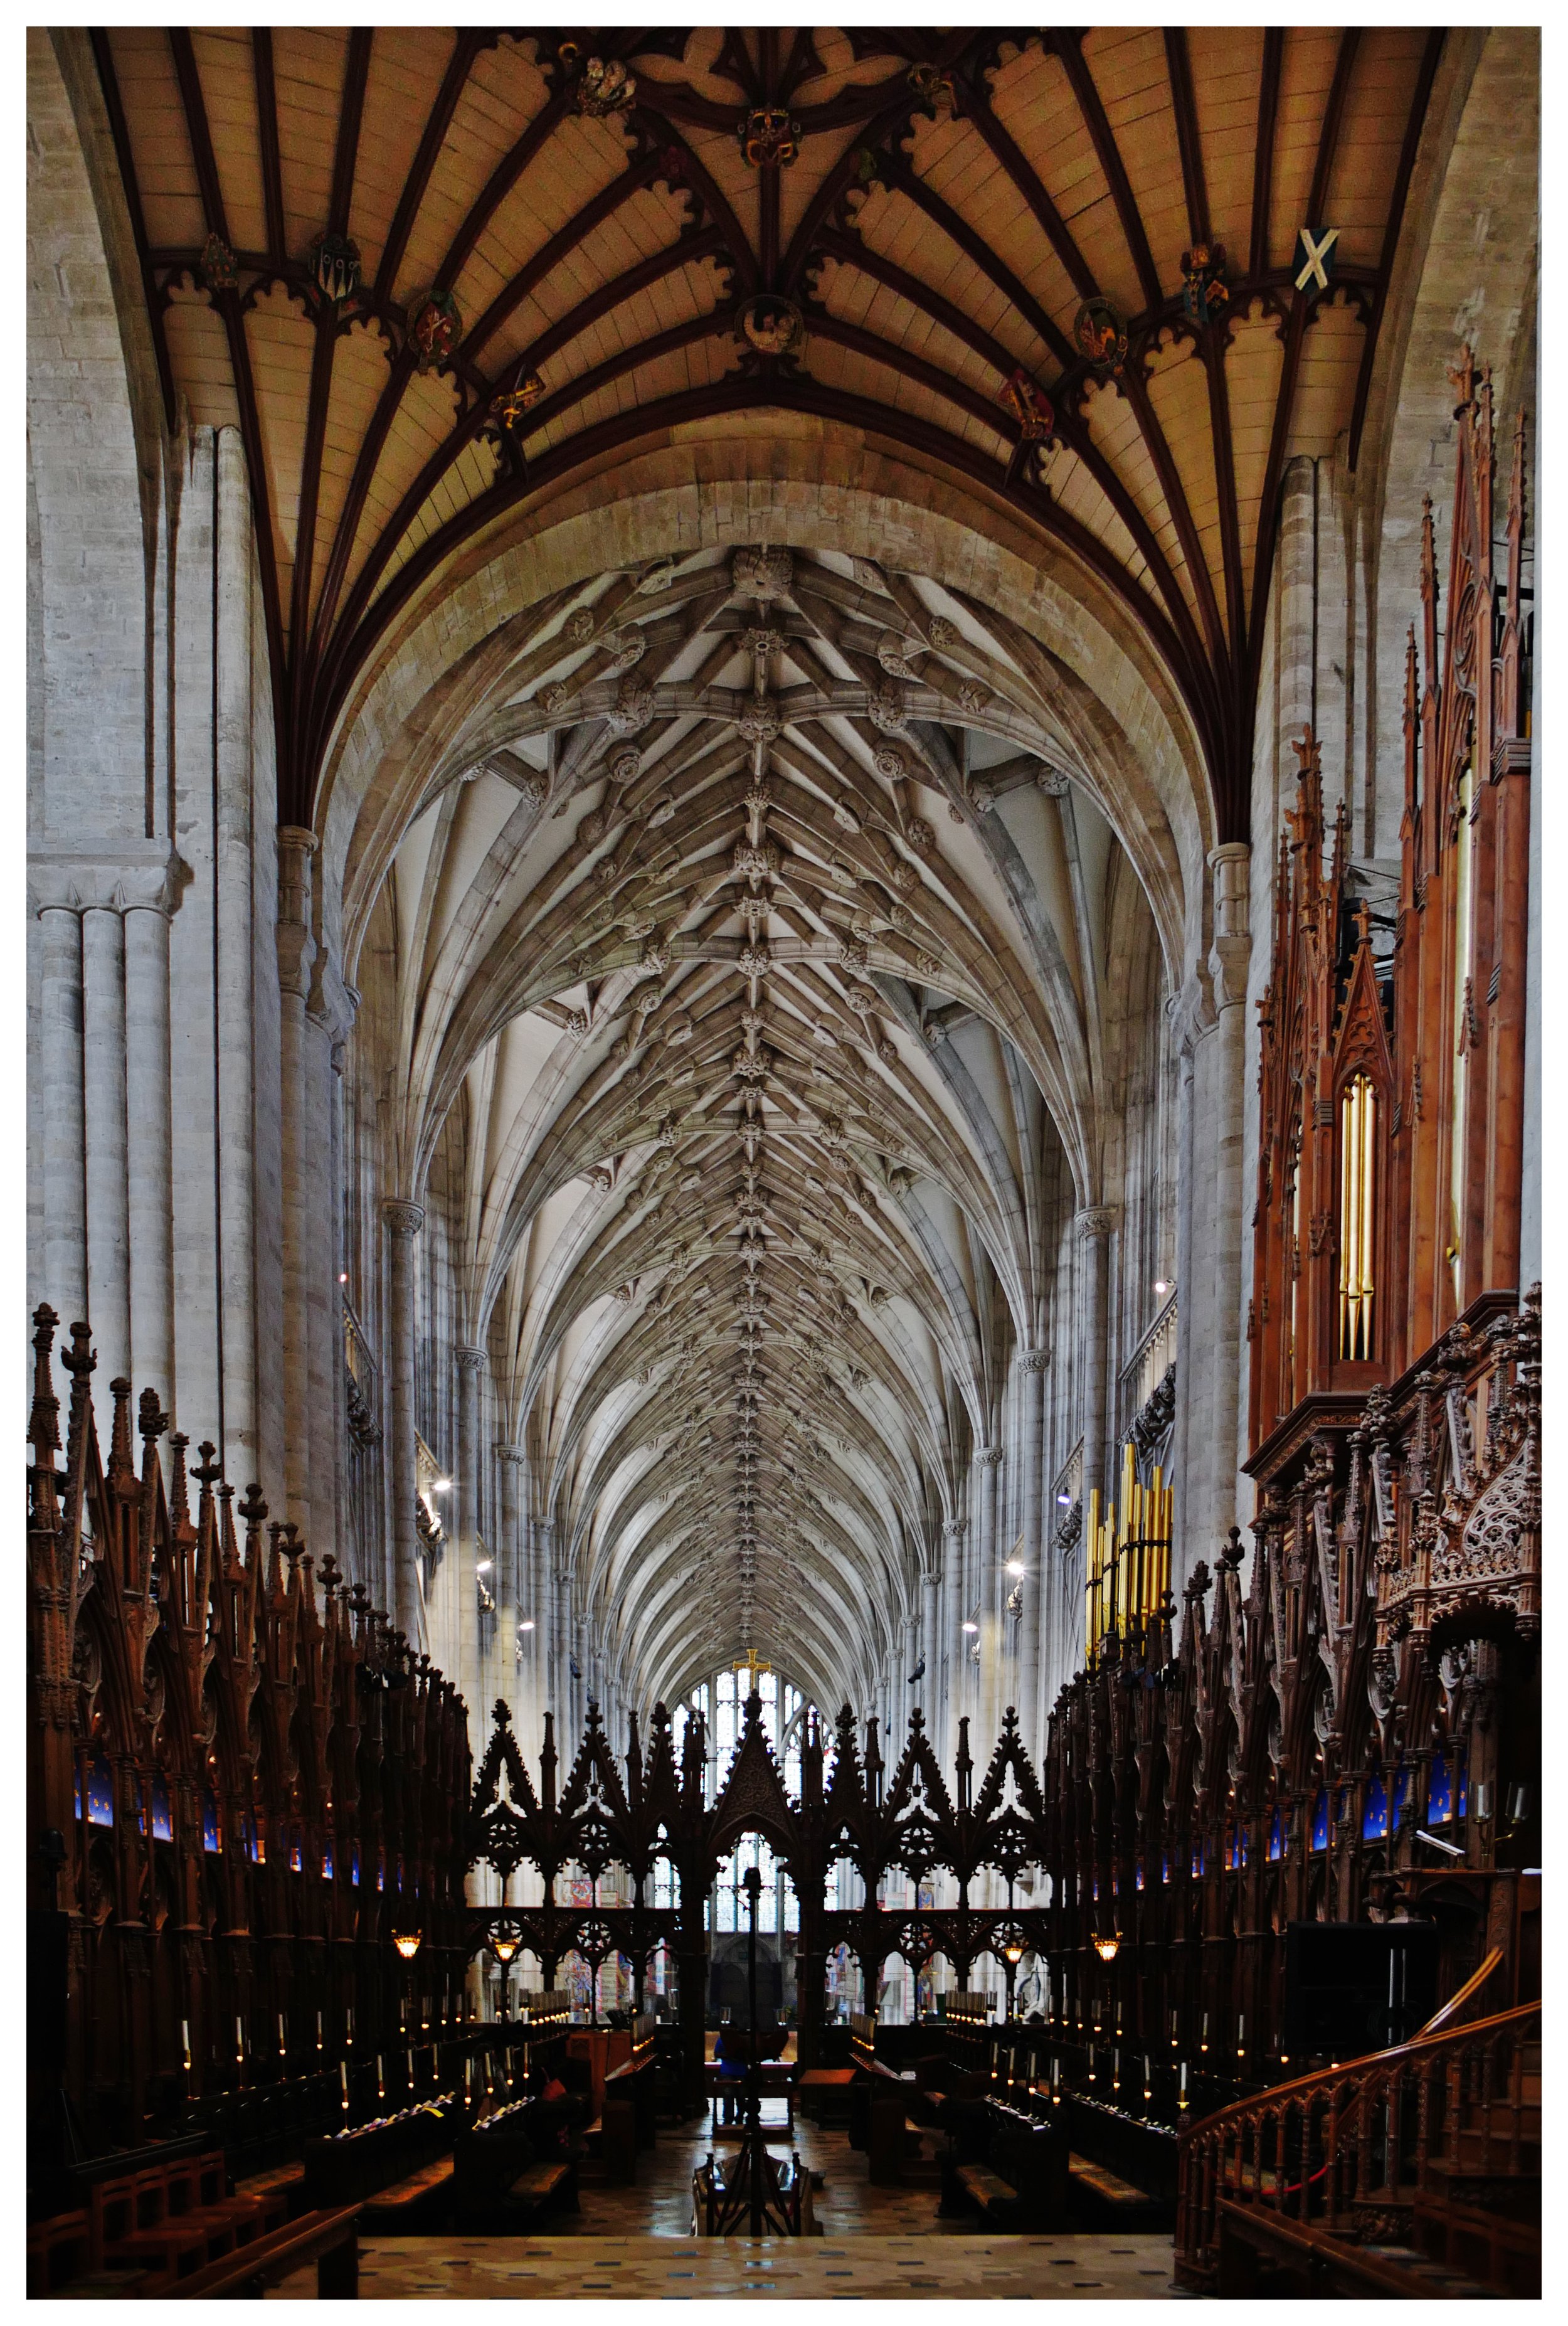
Well, we spent the next couple of days being tourists in London for the sake of brevity then we embarked on the mission to Winchester to start the pilgrimage. Once in Winchester, we found the cathedral where we attended the service the next morning and also got our blessing from the preist at the same time.
So first things first, hiking this trail is actually really fun. It could be monotonous for someone who isn’t comfortable with their own thoughts for hours at a time, but it was fine to me. I didn’t even listen to music on this trip, I was just …there…
We ate at so many restaurants and pubs that I am not even going to get into that. Suffice it to say that we enjoyed them all. Since we didn’t take gear that allowed us to cook we really didn’t have a choice. Which is kinda cool since I love to go out to eat. Lol.

As for hiking gear, here is my load-out for this trip, I had a full change of clothes plus extra socks, I also took my phone charging gear, a Katadyn water filter as I was not sure if I would have ready access to clean water. Sometimes you don’t have that access to be honest and I wished I had taken another water bottle. I took a single Nalgene quart water bottle, a ziplock bag of snacks from the grocery store, a rain coat and my dry bag with my camera gear in it.
I picked up a set of trekking poles in Winchester that I almost wore out by the end. My backpack is a Mystery Ranch Pitch 40 which is actually geared toward rock climbing but worked just fine for this trip. I am going to take a moment here to point out that a really well engineered backpack makes all the difference in the world. I was carrying about 25 to 30 pounds from day to day and my back was NEVER sore or painful from the pack. Not once. I can absolutely with certainty recommend Mystery Ranch backpacks after this trip. They work. I never really understood how to properly use a backpack, but after using this one, I figured it out and got it dialed in. It is not really designed for this kind of trek, but rather it is engineered for route climbing and carrying rope and chalk and harnesses and such instead. I just used it anyway…

Below are links to the YouTube videos where I documented some of the trip. We cover lots of ground in those videos so be prepared to keep up and not wander off during the video as you might not understand what is happening when you come back. Pause it instead and then hit play when you come back from the kitchen…
Well, we strike out and head for the next town and I must say at this point that the English countryside is absolutely gorgeous! We couldn’t get over how everywhere we looked that it looked like a postcard! We walked by beautiful fields, streams and all these little communities with some of the nicest people we have ever met!

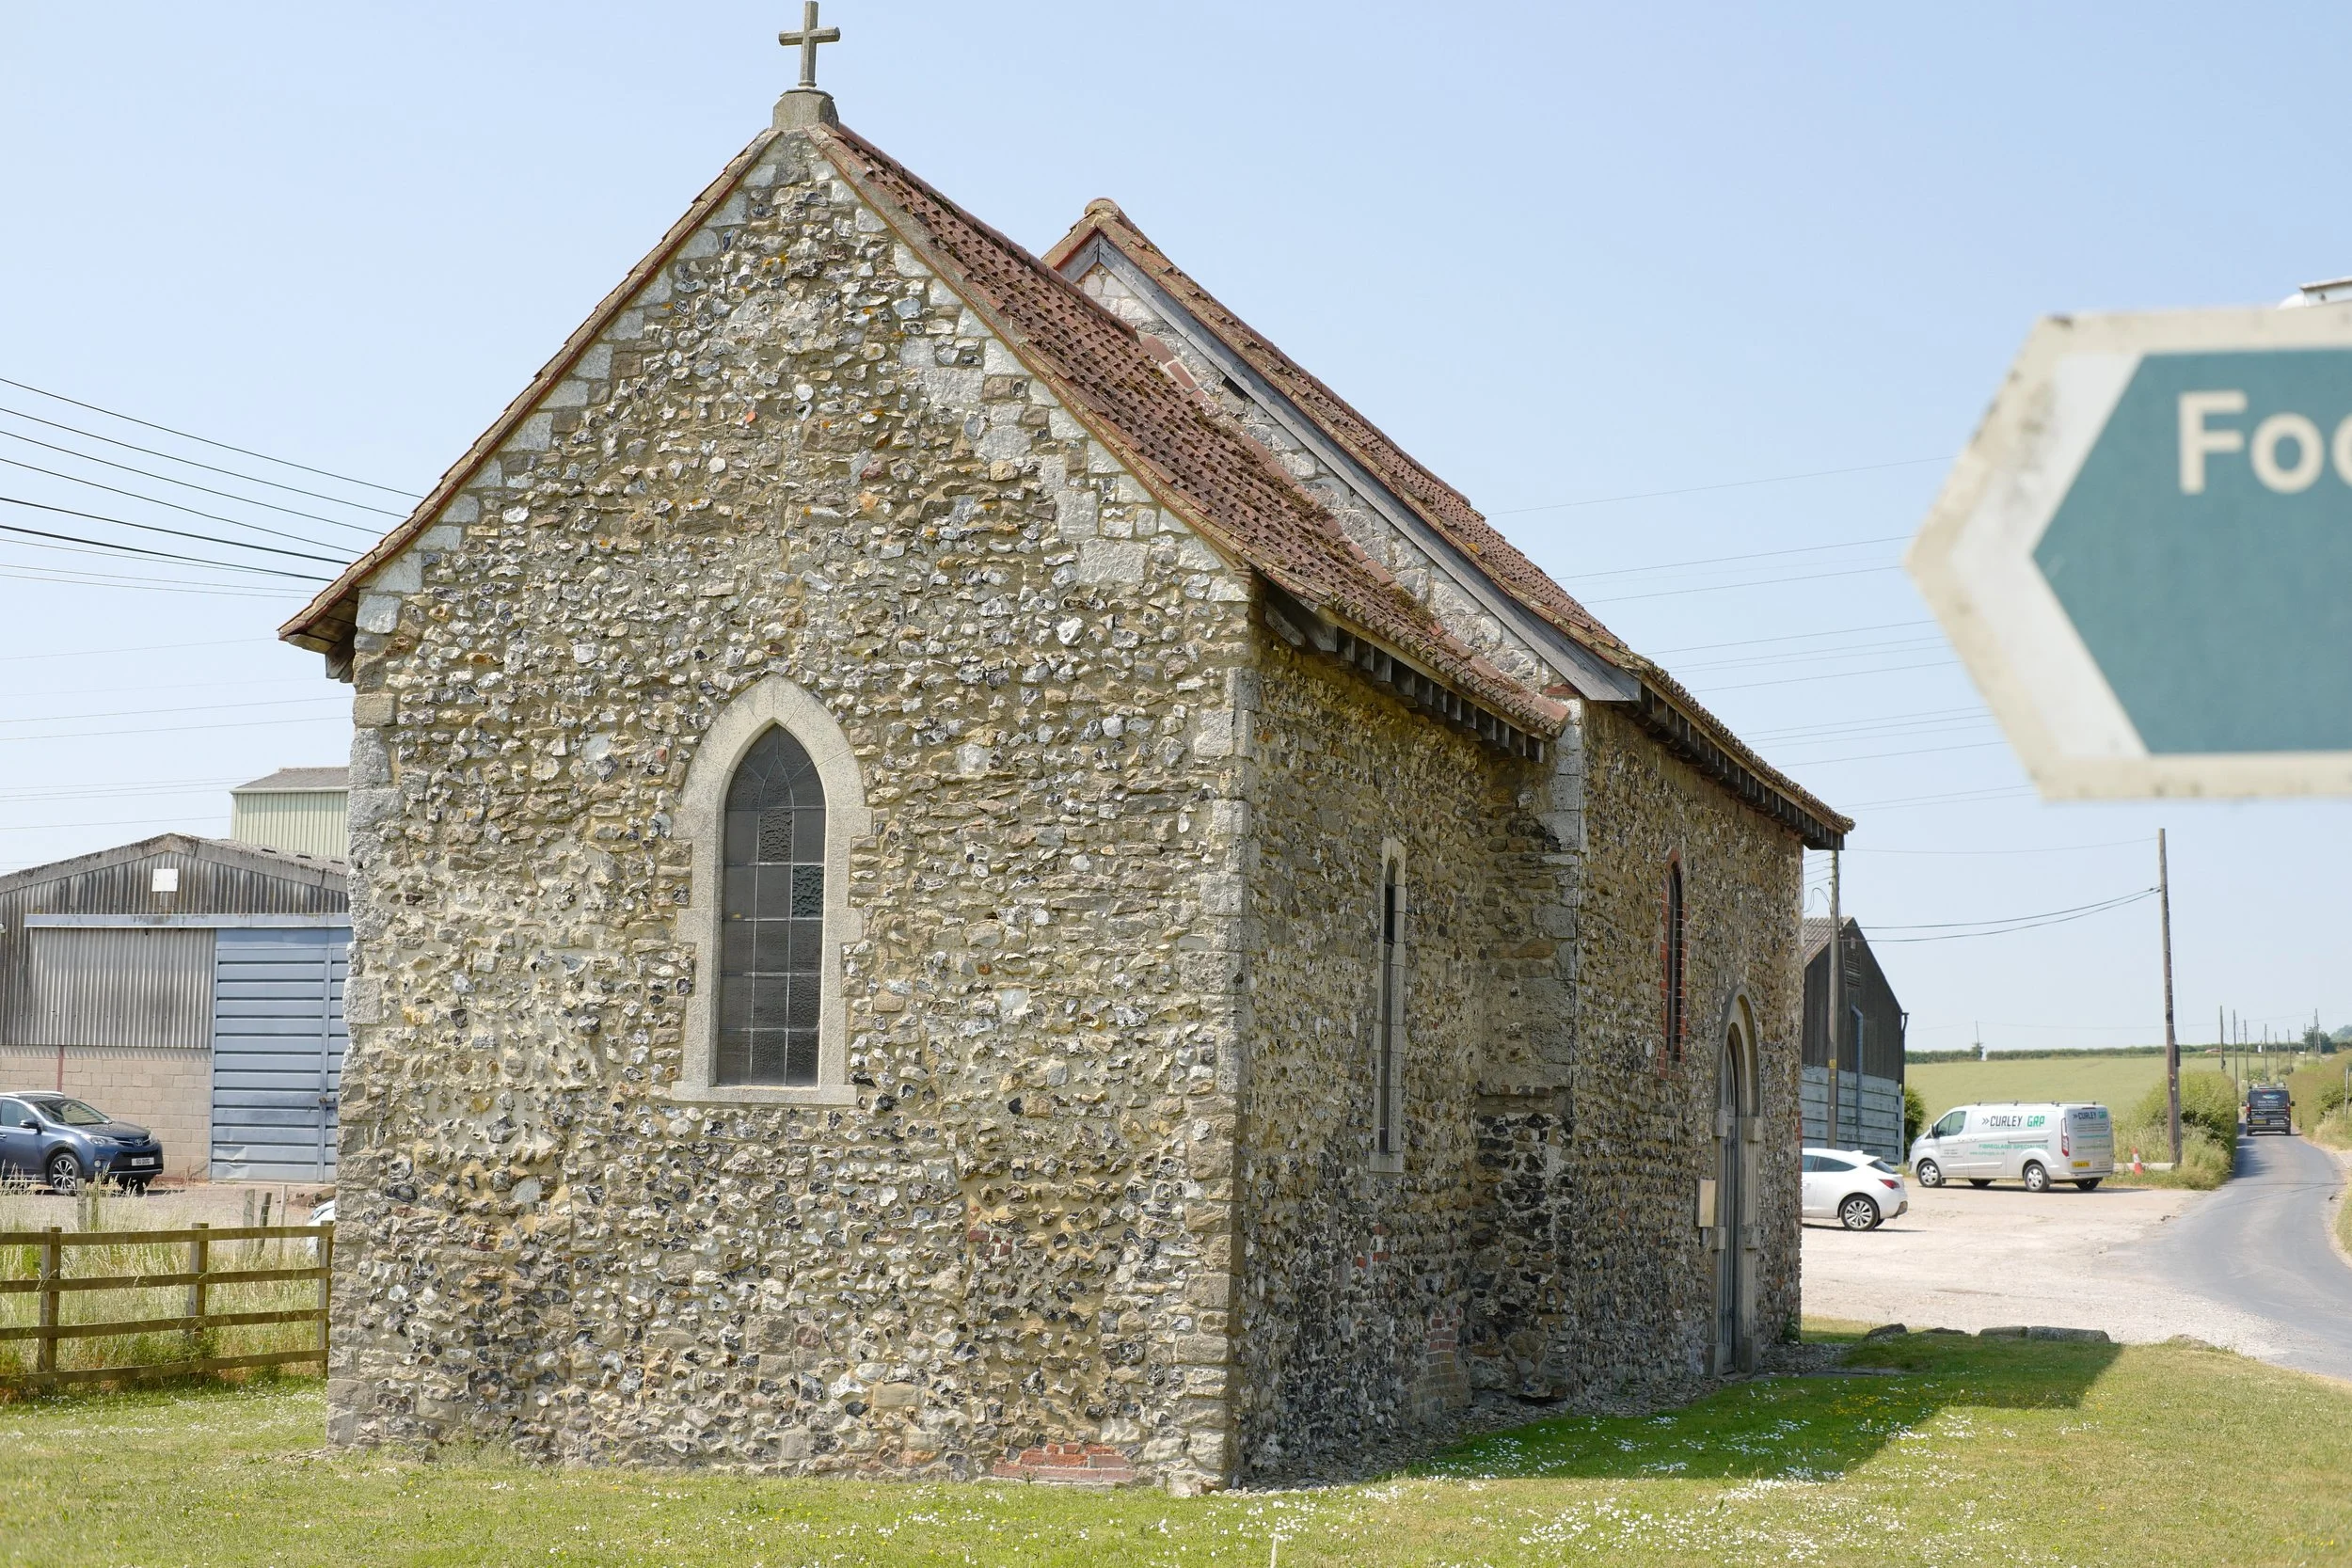
One of the many churches we explored on our pilgrimage to Canterbury.
Over the course of the next two weeks we would explore numerous old churches as well as eat is many of the most quaint pubs you have ever seen! The bulk of the trek though is through the country with some parts being out in farmland for hours at a time on trail. You really need to make sure you take enough water when you leave too as there are times when water just isn’t available. I ran out on one long day and had debilitating leg cramps later that night because of dehydration. It is a thing ya’ll, don’t scoff at this part, drink electrolytes and water, it matters.
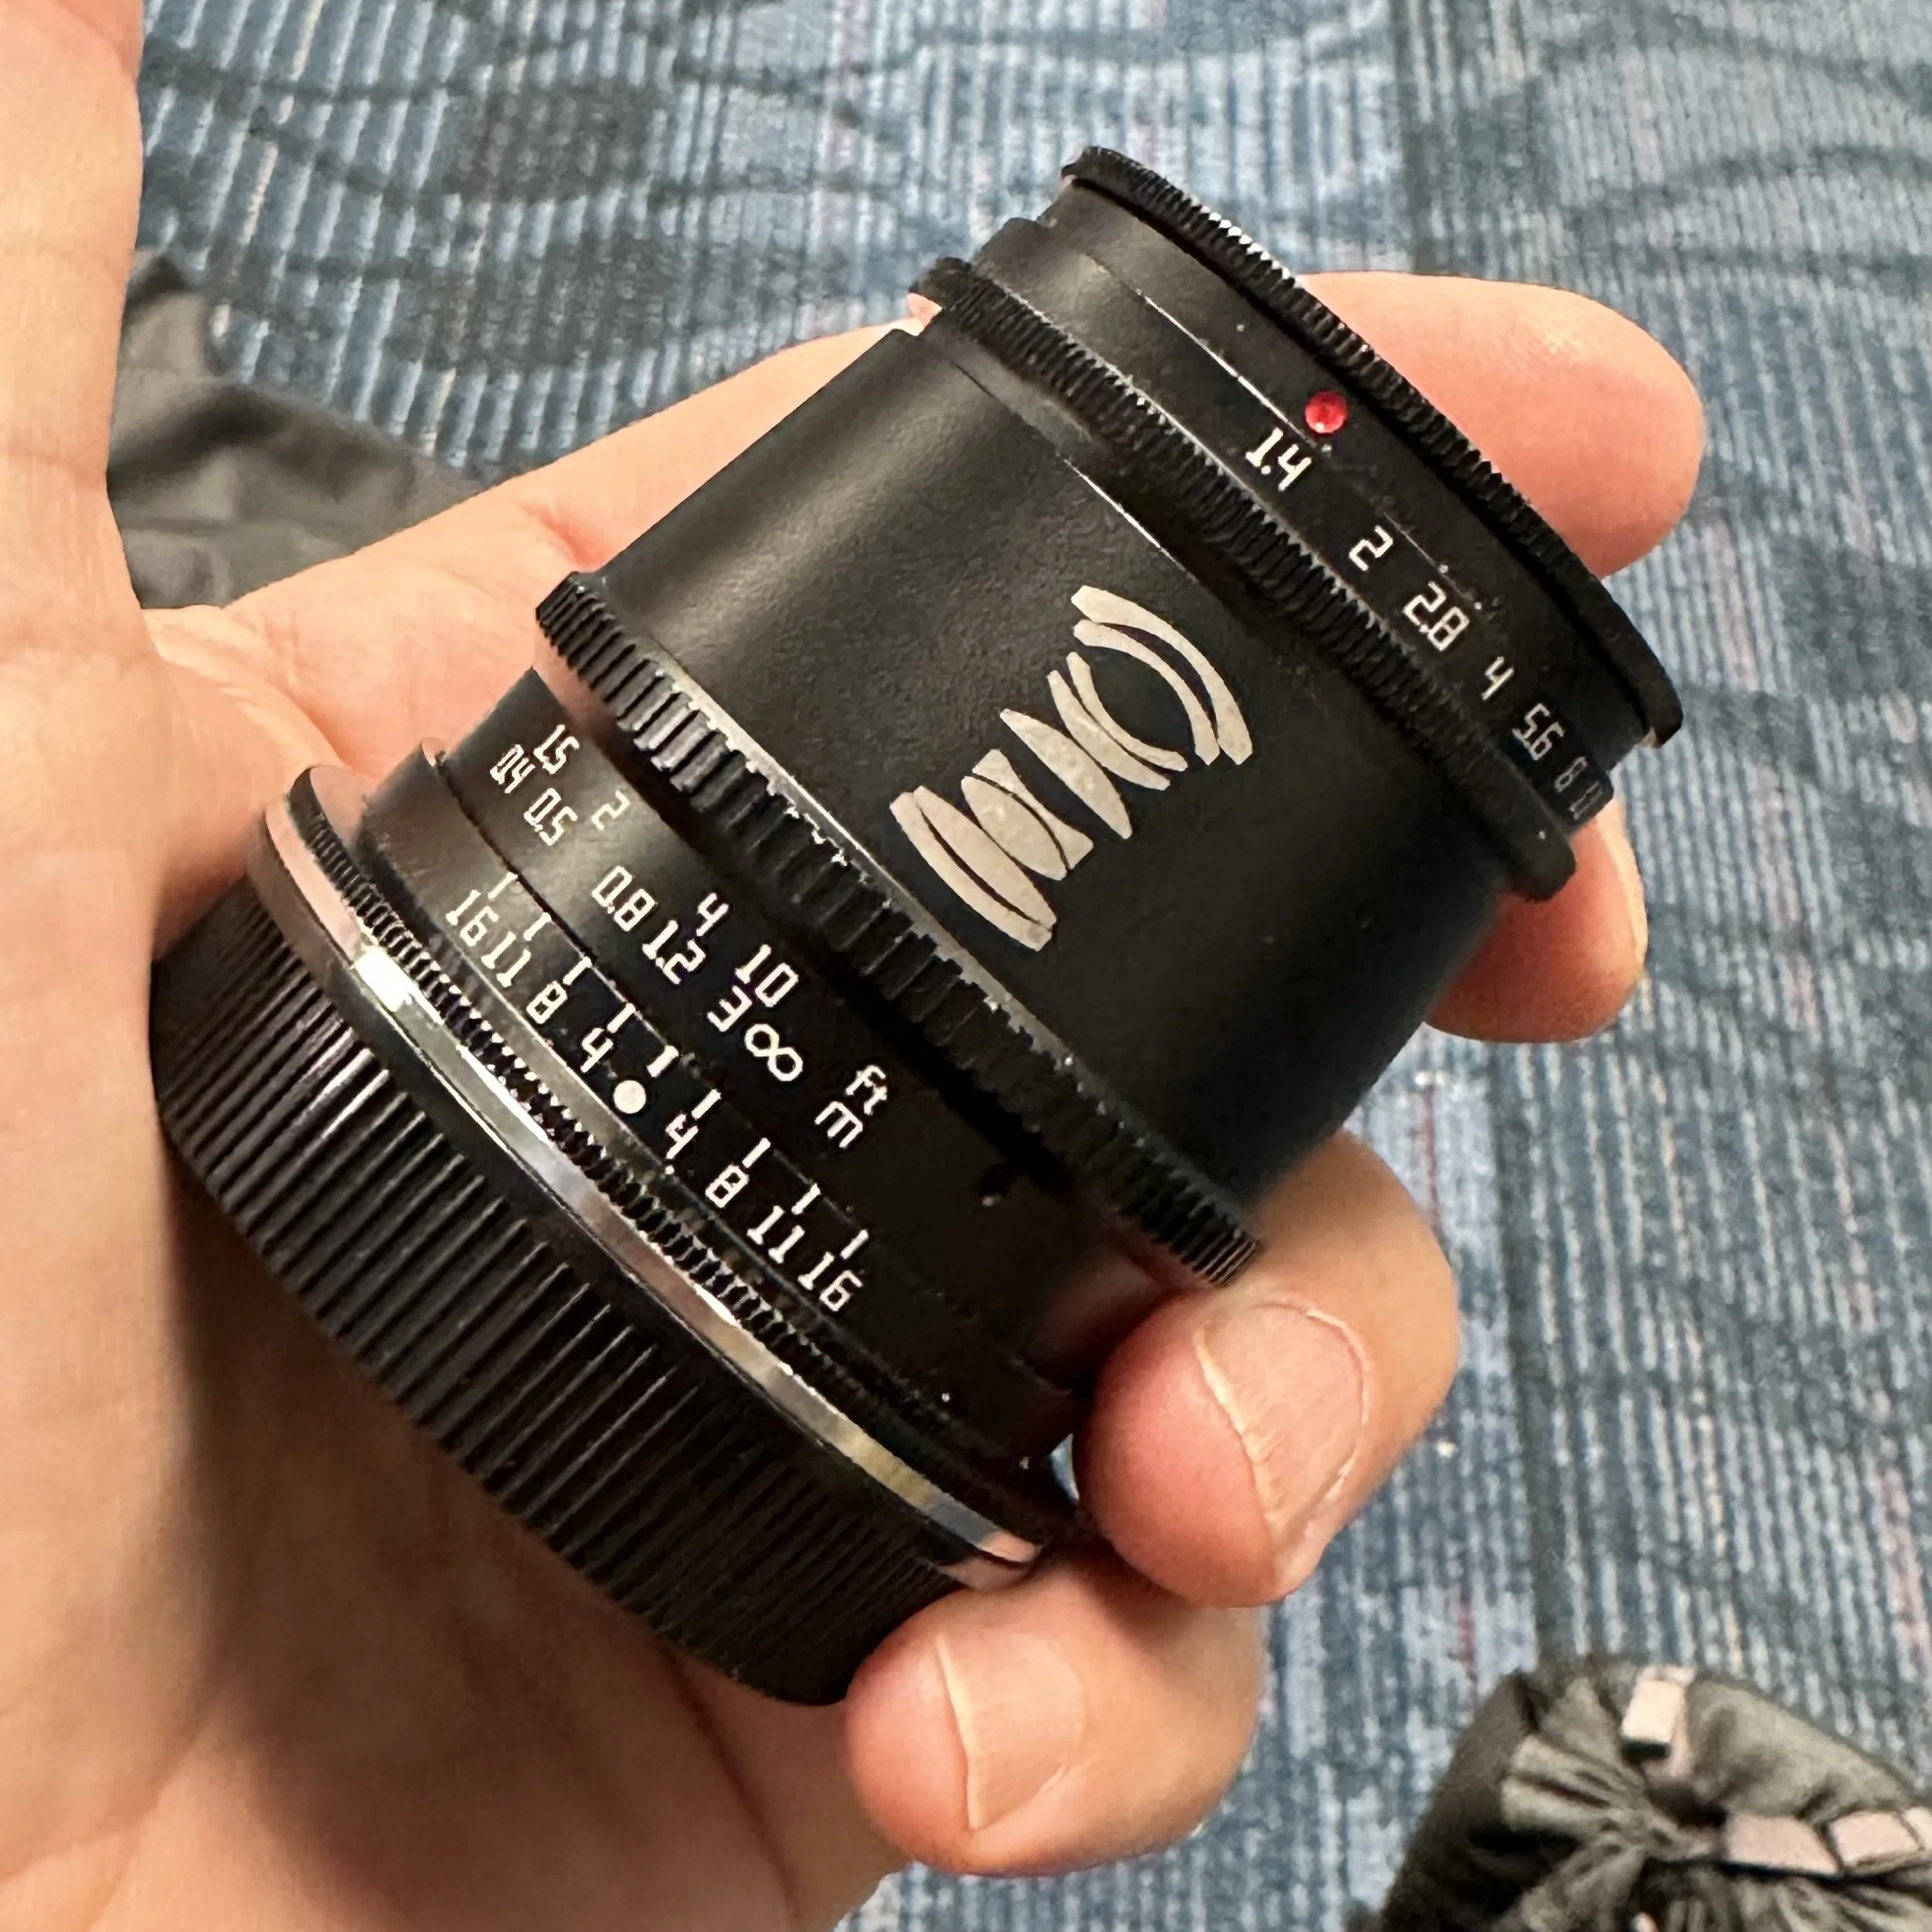
PSA out of the way, let’s talk about the camera gear I decided to take with me on this trip. For this trip I decided to travel light so I took my Leica CL and two prime lenses. The 17mm f1.4 and the 35mm f0.95 prime lens. Turned out I wished I had taken the 35mm f1.4 as it is smaller and lighter than the 0.95 aperture lens and would have saved me some weight. I don’t know if I even once opened up to f0.95 on this trip, even at night. I just didn’t need it so it was wasteful to bring it.
When you would cross from one field to another or maybe pass from the forest to the fields, you would come to one of these gates in a variety of forms, all of them would work in a pretty similar fashion, but none the less, it would be there. This is a simple cattle gate but in the United Kingdom, it is called a kissing gate for some reason.

This is a modern steel kissing gate and they are all over these trail systems in England.
This hike was a two fold event, first it was a way to explore England in a more intimate way than seeing the usual tourist sites and then hopping on a plane for the states. This way we get to talk to the locals and see parts of the country that other visitors will never see, eat food that they will never taste, and just enjoy the country like a traveler should. The second part or probably what should be considered the first part is the pilgrimage part of the trip. A pilgrimage is a trek to a significant location for the purpose of reflection and to be able to spend time with the Lord. I had ample time for this too, you get to be with your own thoughts a lot if you keep your cell phone put away and this gave me a lot of time to reflect. I am glad I did this as it allowed me to just disconnect from life for a while and to be able to just enjoy where I was at the time without having to think about what I was going to do the next day or what ever.
This was so important to me that I didnt even post much about the trip while on it. I used the map function most of the time (there is a website where you can get the route and it overlays on google maps). This was wonderful for someone who has grown VERY accustomed to using their phone alot.

Here is a perfect example of what I am talking about. This bridge is pre-war era construction. The reason I know this is because the whole thing is riveted together. Any other modern form of metal joining would be significantly cheaper than rivets. Arc welding wasn’t really common place till after world war 2 so rivets were used everywhere till then. If I had been a typical traveler heading to the next destination, I most likely would not have noticed this.

In closing, I am going to wrap this with the following quote that I made up just for this blog, but it does seem fitting to me. “If you dont stop to look at the flowers along the way, you wasted part of your trip”
I am really one of those people that likes the journey as much as the destination and this was the perfect blend for me. Daily goal oriented activity with lots to do and see along the way…
Until next time, get your camera out and go take a picture with it.
Episode 2 of the Canterbury Pilgrimage
So we pick up the adventure in Arlesford and head out for Alton, this turned out to be a longer day that I thought it would as I would decide to hike all the way from Inn to Inn on this one…
This is a quaint little town that is really neat and I did some street photos the evening before we left as the light was too good to pass up.

This is the hotel we stayed in and it was simply adorable. The whole first floor of the part you see here is a restaurant/pub and the hotel is L shaped with a significant portion out back behind this street facing portion. The rest of the town is also really neat to me as well. Like the image below of the building supply.

You can tell that they have been in this one spot for a long time. I was not able to get photos of the inside as I didnt not get out to take photos till it was well past closing time and we would be leaving in the AM before they would be open too. I kinda wished we would have planned the trip a little differently so that we could have stayed in a few of the towns an extra day to be able to explore them better…
So the next morning we leave out for the next town and make pretty good time. Alton is a larger town and we are hoping to be there by lunch, well turns out the girls decided to take public transportation after about 5 miles or so and I decided to leg it on in… this would prove to be painful.
I had looked at the map and speculated it to be about 10 miles to Alton and figured I would probably cover the remaining 5 miles in about 3 hours since I would be stopping to get photos and the erratic nature of the trail layout and such as that. Well, this turned into a 6 hour slog that added up to an additional 13 miles for the day! It even got to the point where I realized I needed to cover ground more rapidly or I would miss supper so I stopped capturing video for the YouTube channel all together and just grabbed the occasional photo instead.

Now to be fair, I did cross a lot of beautiful countryside on this leg of the trip and I don’t regret making the trek this day, but I failed to drink enough water and had debilitating cramps later that night from dehydration. The lesson here is to drink more water, especially if you are doing an activity that is physically demanding in any way.
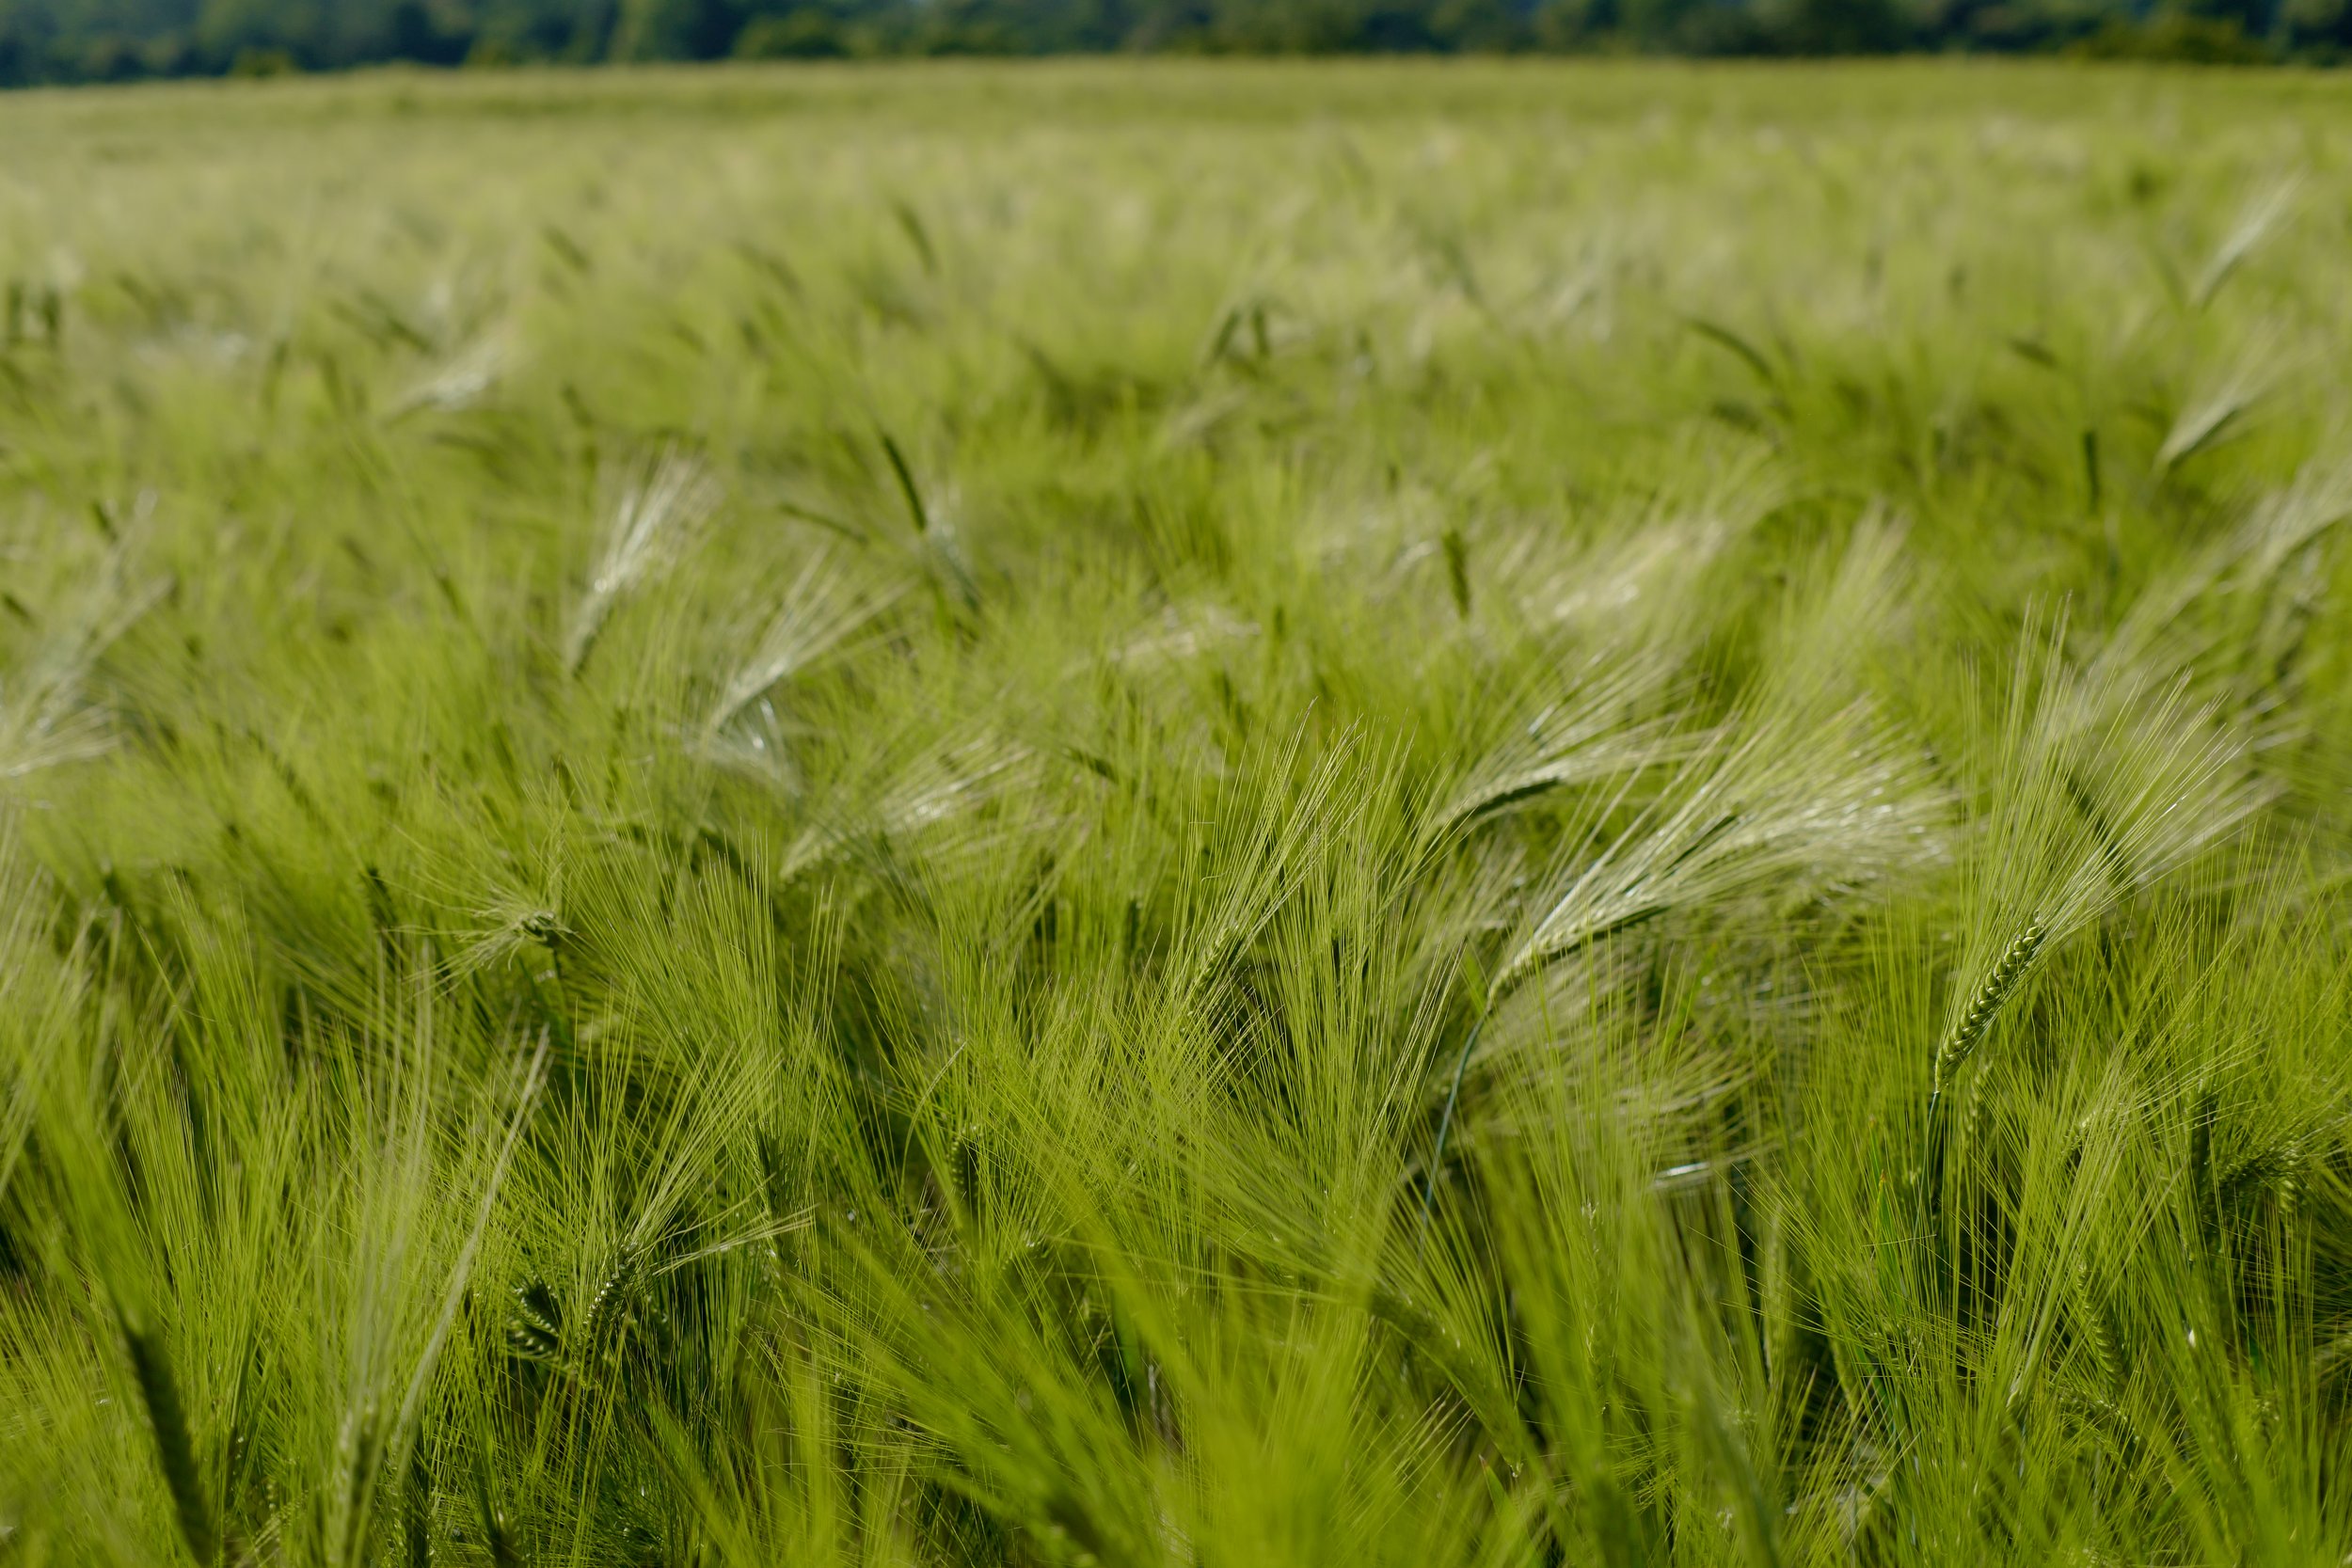
The English countryside is some of the most picturesque terrain I have ever laid my eyes on and for the local is it just …home… I have seen a lot of beautiful places on this earth and they all have a charm. The charm here is the people and how they groom the landscape for agriculture beautifully. It is literally a post card in almost any direction you look. So I did just that, took photos in every direction, and wound up with something like 1400 unique images when I got home two weeks later.

Here we have the road crossing into Alton where you walk under the road to get into the town proper. This is the kind of things you don’t see much where I live and I found interesting. The footpaths are so important to the English that they build this kind of infrastructure to keep them operational. I wished we would have done this with the old hiking trails from our countries early settlements and made them into hiking trails today…just a thought.

The next day we really didnt do much hiking as I escorted Sierra to the airport and then went back and linked up with Teresa and we made our way by train over to Farnham. We really wanted to explore the town and Kelly had already went ahead on her own so it was the perfect opportunity. We had a great time in Farnham and found Kelly later so it all went great. Then the next day we leave Farham and make our way over to the stepping stones which is a huge deal on this trail and I didn’t even know about it till this morning.
These stepping stones are part of the trail system and when we found them we decided to make a small event of it and enjoy a few minutes at this location to make it a little more memorable. If you would like to see the stepping stones just watch the video linked above. I didn’t get my camera out of the dry bag here for obvious reasons so I only have video from this location. These kinds of treks are not just about seeing how fast you can cover ground or seeing how many miles you can hike in one day, but about stopping and smelling the flowers or grabbing some photos. This is what this pilgrimage was about for me.
Going on a hiking trip across England (Part 1)
When I first heard about this I was intrigued to say the least. I had never really considered doing a pilgrimage before or even doing extended length hiking trips of any kind. Enter Kelly, a lifelong friend and adventurer. She tells of this adventure in England where she was planning to hike from town to town and follow the original Pilgrims Way laid out in the Canterbury Tales.
Well, us being the adventurous types that we are, we asked if there was room in the group for us too! As it turned out, the three of us would be that group which actually worked out really well. So we started planning the adventure of a lifetime.
We decided early on to only being what we could carry in our backpacks. Gone would be the “checked bag” at the airport as well as bringing computers and the associated baggage required for their operations. This actually made the airport part of the journey very easy as we didn’t have to stand in lines for the check bag counter nor did we have to deal with baggage claim at all. It was very liberating to be honest.
Since we had decided to travel so light, i took a hard look at the camera kit I would use on the trip as well. I whittled it down to just the Leica CL, the TTartisan 17mm f1.4 L mount lens and the 35mm f0.95 L mount lens. That’s it, no other gear what so ever. Well… there were batteries and a charger, but you get the point here. So I quickly learned that I liked the 17mm in London and then once we got to Winchester I switched to the 35mm and left it in place almost the rest of the trip. Enough about the camera gear and back to the trip…
Once in England we started in London where we did the usual tourist stuff for a couple of days ahead of starting the pilgrimage proper. This included a bus tour and a short trip to the British museum as well. We even took in the Phantom of the Opera while in town. What a treat.

Old city gate to Winchester.
Then it was off to Winchester to start the official pilgrimage. When there we attended a service at Winchester cathedral and received a blessing from the priest before we started which was a really nice touch to add to the whole experience to be honest. If you do this hike, I recommend attending a service at the cathedral even if your not really religious and hear the boys choir. The singing is beautiful. It also just adds a little something special to the trip in my opinion.
Now the adventure officially begins and we strike out for the next town on the list. Alresford is a quaint little village in the countryside that has several really old buildings (which becomes a reoccurring theme on this trip). One of which was constructed before the USA even existed.

Some of the things we have learned are that stinging nettle is a legit plant you don’t mess with and it is literally EVERYWHERE. Another ones is the locals are very friendly, especially the older one and are a real treat to chat with when you find them here and there. The trail also isn’t just a hiking trail through the woods, but more of a “way” which will cross fields, go down designated paths or even along roads at times. You really have to pay attention to make sure you don’t miss your turn…ask me how I know.

All that aside we had a wonderful first day on the trail, albeit a long one where we ran into really interesting people and also learned a few things about the local flora and fauna we didn’t know either. Tune in for Episode 2 to see what we find next on our adventure across England!
Modern cameras make photography so easy.

I bought a vintage Zeiss Ikon and it is pure mechanical in design. It has a light meter built into it, but it is a selenium light meter and it is not connected to the camera’s exposure system at all. This is great in that it doesn’t need batteries at all to work but it also doesn’t do ANYTHING automatically at all either.
I bought this camera while on my trip in the UK and when I got back home I sent it to Zack’s Camera for a CLA as the shutter was dragging pretty bad. Once back from Zack’s, (who did a phenomenal job BTW) I loaded it up with some HP5 and grabbed my old Sekonic light meter and hit the streets of Chattanooga to play with my “new” toy.

It didn’t take long to realize that we as photographers in the 21st century are so spoiled with our cameras that have auto…everything. I am currently 54 years old and even when I was younger we already had cameras with automatic focus and exposure and even auto film advance. This machine is the grandfather to those cameras.
The day I went out to shoot had partly cloudy skies so as I would walk the streets I would take light meter readings and adjust the camera accordingly for the light on hand. This almost turned into a chore as the clouds would move in front of the sun and lower the light by 2 stops then the cloud would move out of the way and the meter would jump back up those two stops. Also, I learned dark shade is 3 stops lower than direct sun, so keep that in the back of your mind while looking for street scenes too.

So now I see why some people like having those tiny little hot shoe mounted light meters. The handheld one was nice but it sure was inconvenient to carry around. Having a free hand to adjust and hold the camera would have been nice at times. Plus the light meter is just in the way all the time. I don’t have a lanyard on it so I either had it in my pocket or my hand, neither of which are really desirable.
Once I started to get the exposure settings figured out, I start thinking, I am ready to hit the trail and get some sweet street photos. Nothing could be further from the truth. I now have to learn how to focus the camera. Yes, you heard that right, I… a photographer, had to learn how to focus a camera. That was strange to me as I have been accustomed to simply looking through the viewfinder and focusing and then pressing the shutter. Not so on the Contina! You have to engage in the fine art of range estimation with this camera. Yeah, you literally either get out a tape measure and put your camera on a tripod OR just guess as best you can. Seriously, those are the choices here. The viewfinder is literally used only for composing the image. The taking lens is a completely separate system.

You quickly learn about f stops and how to change depth of field so you have a hope of getting something in focus. Notice on the lens the distance scale and the depth of field scales? You better, because you are going to be using those alot if you plan to shoot with the aperture opened up at all.
On my first roll of film I used Ilford HP5 400 speed and quickly realized this was actually a mistake. This camera is so old that the highest ISO on the built in meter is 320 and the fastest shutter speed is 1/300 second. Yeah, in a world where I personally have cameras right now that will shoot at 1/32000 second, I just bought a camera that maxes out at 1/300… Luckily, the aperture goes down to f22 so in full sun it is correctly exposing (I think) at 1/300 second. This did help with the other problem though…focus. Since at f22 everything from 1 meter to infinity is in focus I just had to make sure that I had not bumped the focus ring and moved it.
Once I used it for about an hour I would start to choose estimated focus distances to try to land better focus. We will see once I get the film developed and scanned…

Another thing you will notice in this photo is that all three major functions of the camera are on the lens, the focus is the first and smallest ring, then the shutter speed is the middle ring and the rear most and largest ring is the aperture ring. All the controls on the top are used to control film exposure and movement. The shutter release button, the film advance, frame counter, and rewind knob are in this area. There is a cold shoe and a light meter in the center area on top. That’s it. I love the simplicity, but wow, photos made in that period were worked for.
Going forward I will now have a brand new appreciation for my modern cameras with all their conveniences. I have learned that our forefathers had it much harder and that we should be more appreciative of the photos from that period. I will continue to use this warhorse of a machine but plan to get some lower ISO film first and we will see what we get over time.
So until next time, get your camera out!
Nikon Zf Full Frame Concept Camera Rumor Discussion
Well here we are. Talking about fictitious cameras again… lol.

Of course this is my satire photo I cobbled together for a concept, I kind of like the aesthetic though.
When I heard this rumor I thought about it and dismissed it almost immediately, but then I started thinking about it more and more and came to realize that I would really like a camera like the rumored Nikon Zf mirrorless retro camera. Let’s take a walk down “Wishful Lane” and cobble together the main features I would like to see in such a camera.
David Saylors Nikon Zf Full Frame Rumor Street Photography Camera Livestream
First off we need to establish something, Nikon is no newcomer to the retro camera space, if anything they are a leader in this space in my opinion. You see, they have already tried this several years ago. The Nikon Df was a full frame DSLR retro styled camera that first came out in late 2013. Here is the problem with the Df, it was ahead of its time. The Df came out at the height of the DSLR period in camera history and nobody wanted to go back in time to the cameras that looked like that… yet. To say it simpler, nobody wanted it…

Reference photo scraped from the internet courtesy of B&H Photo.
The Nikon Df was a really cool camera too, sporting a full frame sensor in a stylish retro body. It was simply just too soon. Fast forward to mid 2017 and Fujifilm launches arguably their most important camera to date…the XT3. Sure the XT1 and XT2 had done fairly well, but this camera propelled them into the Street, Reportage, Lifestyle camera space like a rocket. Everybody had an XT3 at one point, shoot I even used one for several years. It is a great camera.

Another image scraped from the internet for reference.
Fuji had been chumming the waters for several years at this point in the street photography niche and a strong marketing campaign combined with a period in time when youtubers were the main game in town for getting the word out and the XT3 took over this game…for a time. The point had been finally made that the photography world was in fact ready for a retro styled camera.
Next in this story came the Zf-c from Nikon, this little power house of a camera was basically a test run, in my opinion, to see if Nikon had enough market segment clout to pull users from Fujifilm, Olympus and Leica over to their court. They even released it with a retro styled 28mm lens to go with it. Pure genious in my opinion as the 28mm f2.8 Ai-s was one of their best lenses ever made. This has to be the most blatant shot across the bow of Fujifilm in the company’s history… Just look at the two cameras in the comparison below.

Sceen capture from Cameradecision.com, a website that will allow you to compare many cameras.
I grabbed this image above from CameraDecision.com as it has the measurements to show how close they actually are in physical size and appearance. Just look at it and then try to tell me with a straight face this wasn’t a test shot at improving Nikon's street photography market share…lol
You know what though, it worked. Zfc sales soared and the cameras flew off the shelves. People loved the tiny little camera but it wasn’t without its shortcomings. These shortcomings will be what is fixed in the Zf if I am right… You see Leica has already figured it out. The dropped the CL from their lineup entirly due to the fact that people that want crop sensor street cameras simply buy the Fujifilm machines. Fujifilm owns this market outright now. It is common knowledge that if you shoot crop sensor street photos it is probably on a Fuji… So Leica simply leaned into their full frame machines and focused on them more, this proved to be the right move for them too. Nikon is also starting to see this in my opinion and the Zf will be the camera that they use to show it.
The things I am lookng for in the Zf that will make me choose it will be:
24Mp full frame, stacked, BSI sensor - Low light is what I am wanting here.
IBIS - slow shutter speeds are so much easier with good stabilization.
The same battery as the other full frame machines.
Dual card slots - not a deal breaker but overflow is nice.
High quality EVF - A hi-res EVF is important to me.
Released with a set of fast primes like 28mm, 35mm, & 50mm.
A tilting screen is a must. A side swinging (flip out) design is not important though.
Shutterless design like the Z8 & Z9
Weather resistant in the rain.
You will notice that video is not on this list. That is because I don’t think this camera will be used by video enthusiasts and good video specs will not really matter. Sure, give it 4K 30p or some such if you want. That way you can capture the occasional B roll clip of shoot off of a tripod or what have you, but 90 percent of the people that will choose this camera will be choosing it for the stills experience.
I think that if they lean into the stills side of the game on this machine and integrate the external controls from something like an F3, that they will have a solid winner on their hands. I know I would love to have one. I bought the XT3 back in the day because Nikon didn’t have what I wanted. The Zfc was a near miss for me, I almost bought one when my buddy Phil Thach did, but I was able to keep my resolve to hold out for the full frame version…lol.
You see, I already have a crop sensor street camera with my Leica CL, so I just didn’t see the point in another crop sensor machine that didn’t have IBIS. If I buy another APS-c camera it will have IBIS. The tech is there, just look at the Fujiifilm XH2 for instance. The IBIS makes a big difference for me in that I like to shoot with fairly slow shutter speeds to capture motion blur and in low light or even at night. This is why I want the 24MP sensor, the larger photo-sites will make noise control a lot easier for the processor. Also killing shadow noise at the same time. Another point that needs expanding is that I like the EVF in my Leica cameras as I use glasses and with the EVF I can see the camera display7 information as well as the scene exposure and I can focus it to be able to not need to use my glasses. This matters in that if I looked through my glasses, I have to press the lens against the rubber eye cup and this usually has skin oils on it which in turn makes my glasses useless… Hence the reason for being able to focus the viewfinder to my un-aided eye. I simply look directly into the EVF and I can see everything, including image review if needed. I have grown to NEED a good EVF at this point instead of wanting it.
What do you think would make the perfect retro styled camera? Let me know in the comments below!
Sometimes you come away with nothing…
In the era of social media hyped street photos, we have grown accustomed to seeing something everyday from our favorite accounts. I don’t post very regular anymore so I don’t have that problem with my account but some do. I see people posting literally every day on some accounts and I wonder just how they can collect so many good photos. I went out today and came away with nothing at all.
You see, these days I normally take a camera everywhere I go. Today was different though, I didn’t know the itinerary at all so rather than bring camera gear that bakes in the sun while stored in the car, I opted to leave my cameras at home. This left me with nothing but my smart phone to take photos with tempted to take straight photos with it on Broadway in Nashville, but came away with nothing but junk. They are so bad that I am not even sharing them in this blog post and have already deleted them from my phone, you have to understand that sometimes you just come away with nothing
I am not sure what the premise is that has led people to believe that they need to come away with banger photos every single outing or they are a failure. Somewhere along the way people got mixed up in understanding that. People have to be willing to except that they don’t always get a cool photo. For me, that was today.
You have to be willing to not come away a photo if you shoot street. If your not, then you will start to feel like a failure and that is counterproductive to say the least. I mean, if you are not coming away happy then why are you doing it at all? Simple rational I know, but it works for me. So get out there and take some photos.
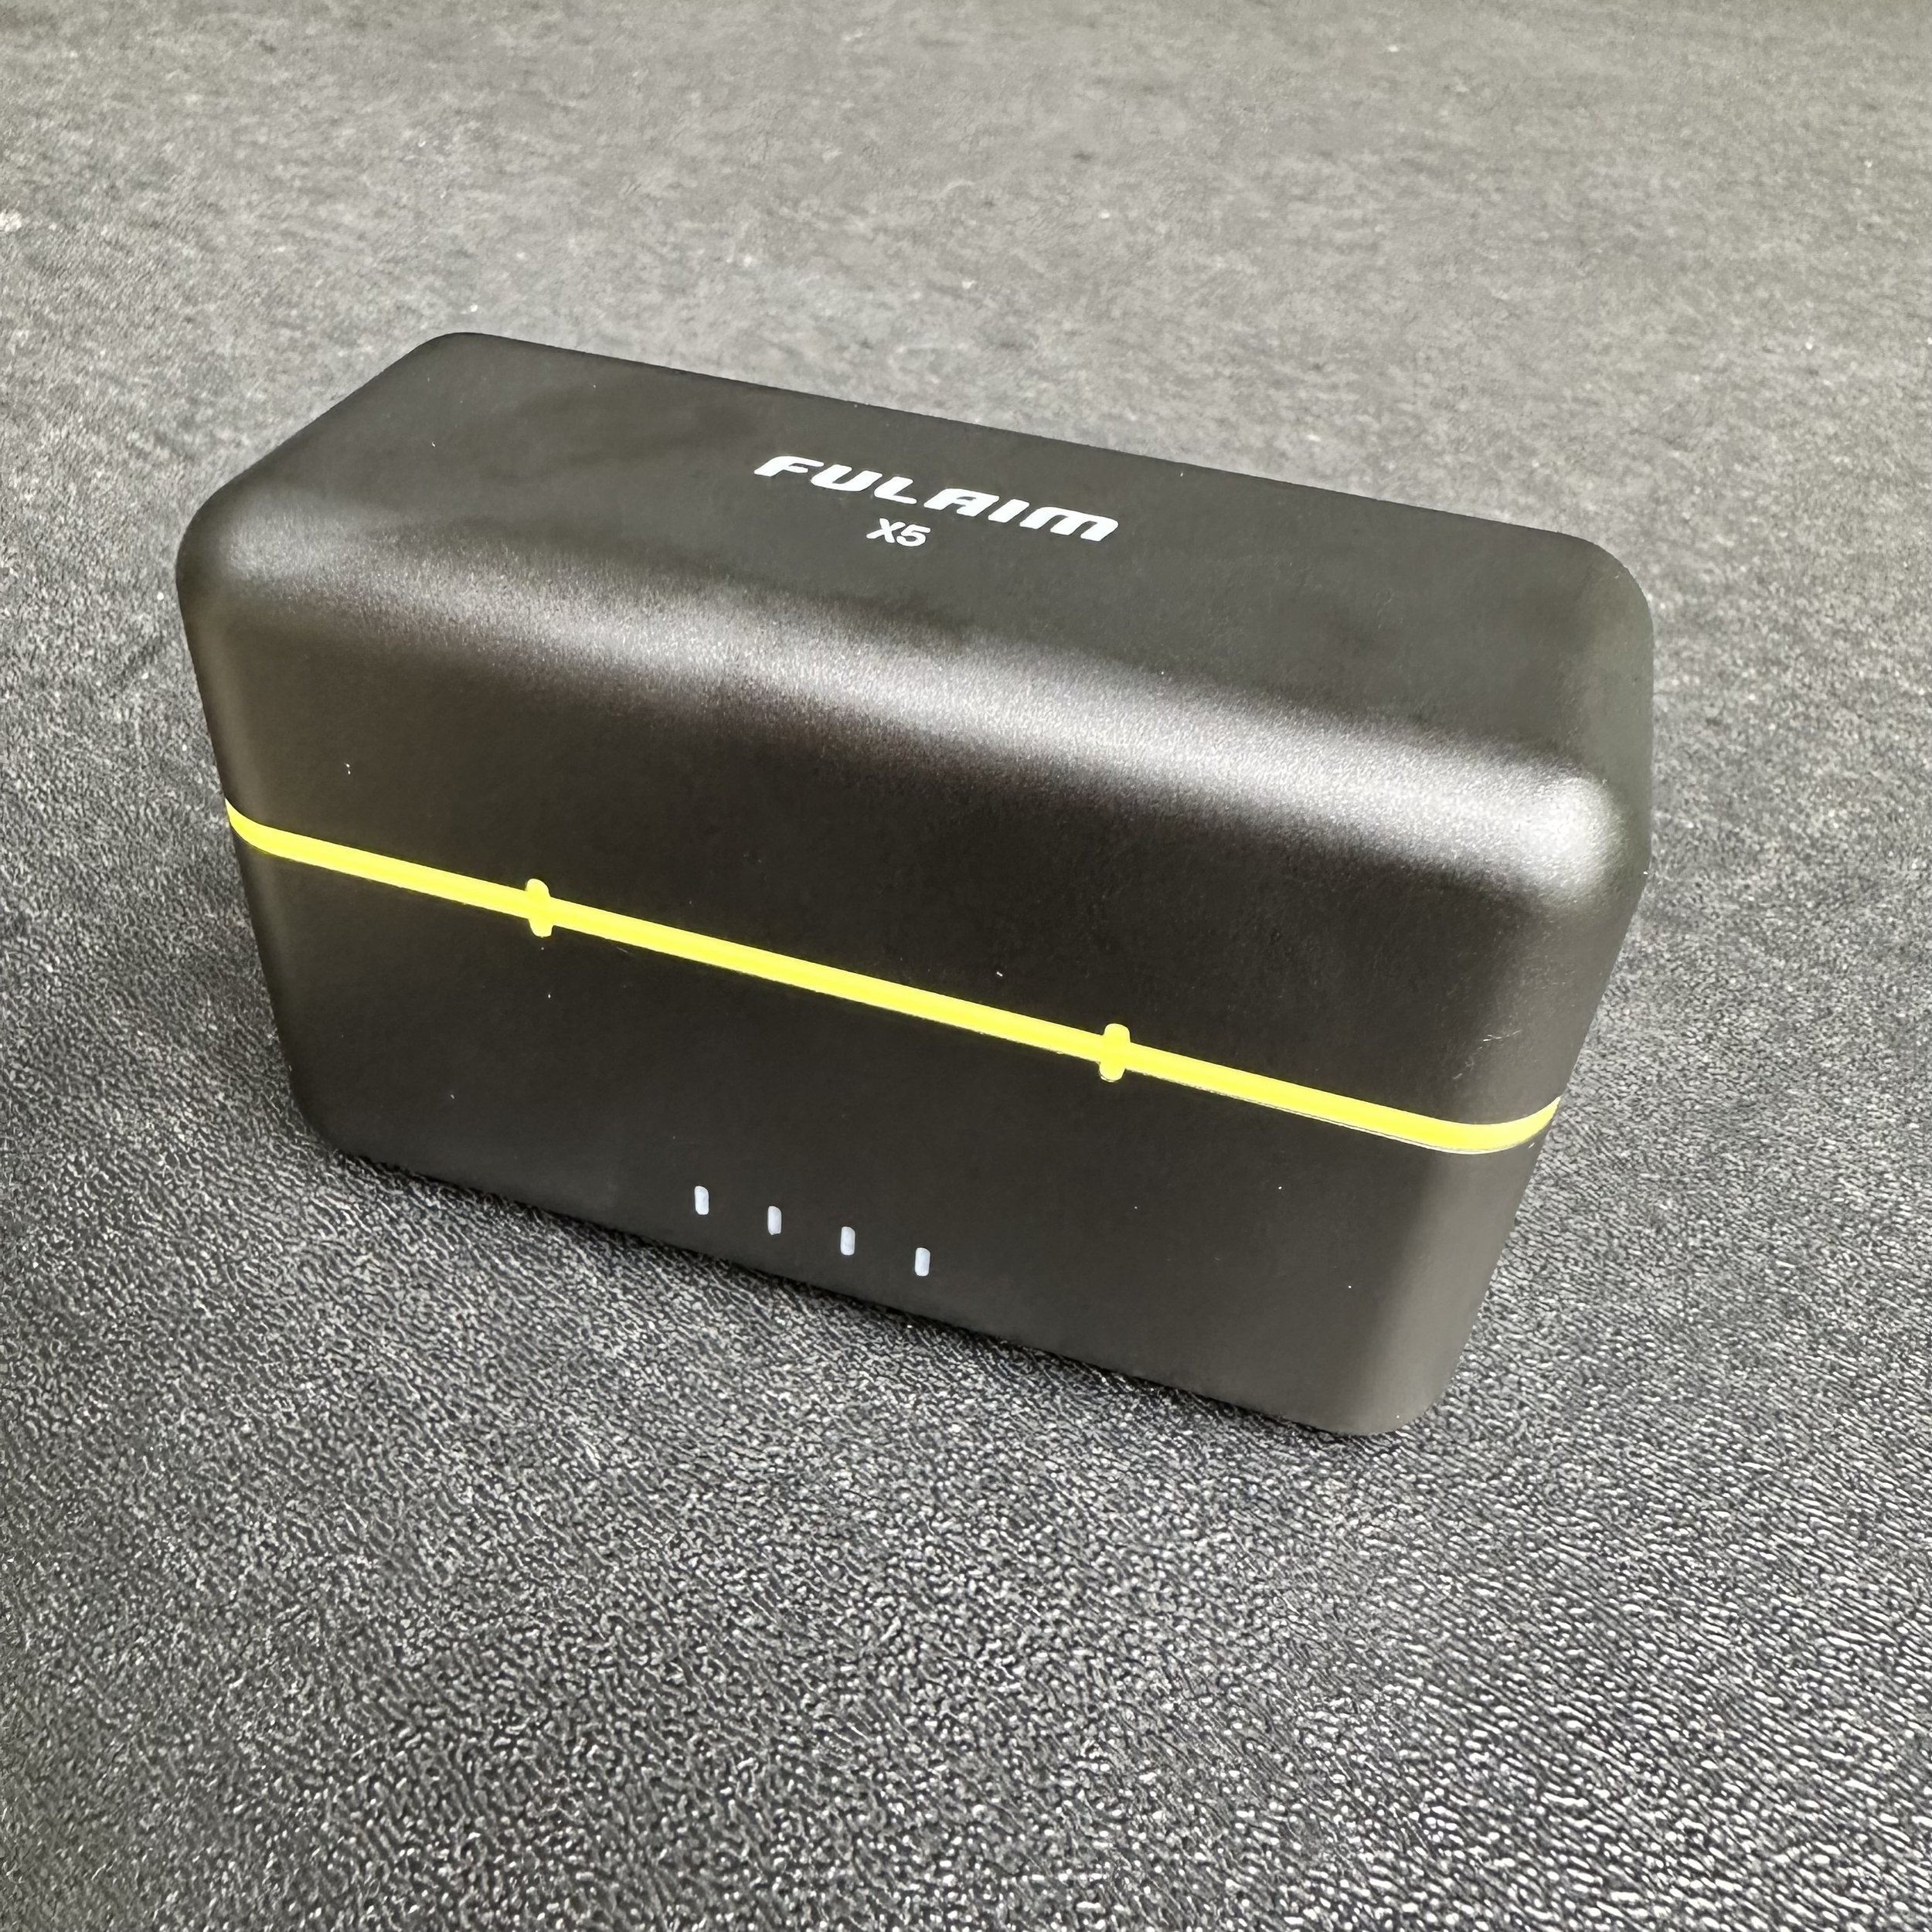
Fulaim X5 Wireless Microphone System Review

So a company reached out to me and asked if I wanted to take a look at their wireless microphone system and I agreed. I am really glad I did too. They sent me a review sample for free and I am happy to say it works exactly as advertised…at least it does from what I tested.
You see these kinds of products usually have some sort of glaring issue that makes them basically unusable for the most part, but this one is different. It actually works as advertised.
So Fulaim sent me the X5 kit to test and write a review on and when it came in I noticed right away that they were really wanting this to have a great presentation. The box is the kind you normally associate with Apple products, the really nice heavy type of card board. So once everything is out of that box, the first thing I noticed was that the charge case is setup for just the microphones and receiver, but the receiver is normally used with the mic cable and there is nowhere to store this cable… Small detail, but frustrating as on the very first outing to test the mics, I forgot this very cable…I attempted to use a AUX cable I had in the truck but it was apparently bad and introduced a ton of noise into the audio, lesson here, check your kit before you leave…

So once I get a good cable and go back out, I tested the Fulaim X5 microphone on my Leica SL2, this camera actually records great video and will record 4k video as well, so I figured I would experiment with the microphones on this camera and also shoot in 4k for a change too.
The charge case is a cool device, when you put the mics and receiver in it and close the lid, it turns them off and starts charging them, when you open the lid, it wakes all three of them up and sets them in motion communicating. That is nice. The battery life on the Fulaim X5 mics and receiver is supposed to be on the order of 9 hours, I would say it is probably closer to 4 or 5 in reality as the 9 hour claim is said for offline recording so if it is powering the radios, then it will be less. But still I have used it for several hours on two different occasions and have not have one die yet in a normal session. The charge case will charge them from dead to full charge twice before needing recharging itself too. This is nice as you are not hunting an outlet after juicing up the mics one time.

In the video above, I test the main factors that matter to me for a microphone I use to make YouTube videos. Distance from the camera that the audio is still good on, extreme distance function, audio fidelity, and offline recording for getting simple audio like wild sounds or when you need dialog for voice over but don’t need video with it too. It passed all of these tests with ease and done very well to be honest. The audio quality is first rate and I couldn’t tell if it was the Zoom F2 (which I have to sync in post) or the Fulaim X5 (which I do not have to sync in post)

There are so many little Easter egg type features built into them that it is hard to keep up, like the spring clip on the mics is made of steel from what I can figure and there is a round rare earth magnet with one so you can magnetically stick it to the lapel of a jacket and hide the mic behind the lapel with only the little black magnet showing. This is brilliant. The spring clips are sized so they will slip directly into a camera hot shoe, so you don’t need a hot shoe adapter at all. There is a port for a lav mic on each transmitter, there is also a port on the receiver for headphones to monitor the audio with, the wind muffs are made with little locks to keep them from falling off the mics, the mics will record in offline mode without the need for memory cards as there is 4GB of internal storage in each mic, You can USB charge them so if the charge case is dead, they can still be charged, they are compatible with smart phones and can be USB connected to laptop computers so you can have wireless mic support for things like zoom meetings…the list goes on but you get the point.

Can I recommend this microphone? Absolutely, the copy I have works perfectly and if this is the production version, you will love it too. They sell them direct on their website but I don’t get anything if you buy one, so don’t worry about using an affiliate link or some such, just get one and use it. Simple as that.
Test driving the Leica Q2...sorta.
If you want to see more photos and some more discussion on the idea, follow this link to the video where I do this walk. Other wise, read on friend!
I went for a little stroll in downtown Chattanooga and decided that on this photowalk that I wanted to simulate the Leica Q2 to see if i really wanted on. Photography is a funny thing, some photographers will buy one camera and use it all their life and others will change out lenses and camera bodies numerous times.

My simulated Leica Q2 for the day.
I am a little of both as I love to play with new gear as well as use gear that has become my favorite kit so to speak. Well, I have the Leica SL2 and I also have a nice little Asahi optical 28mm prime lens that I have an adapter for so I figured I would put this together and see if the shooting experience would be close enough to the Q2 to give me an idea of what it would be like without having to spend 6000$ on it.
I really love those Leica colors for some reason, maybe it is a bias I have towards the brand but to me the images just seem more rich in color. I really love how they turned out though and the idea of the Q2 is a great one for a general street camera. The high megapixel sensor combined with the 28mm lens is a potent street combination as you can see below where I shot the image as a candid just in passing and was able to adjust the composition later in post to get what I was looking for.

This photo was shot about 10 feet away and with the 28mm on a full frame sensor it looks MUCH further away. But through the power of cropping… I can make it take on a couple of different looks as you can see below.

This is a 12 megapixel crop of the original image.

This is a 16 megapixel crop of the original image.
As you can see I can get two very different feeling images from this single frame. That is kinda powerful to be honest. I mean, you can change the entire dynamic of the image with a simple crop. That is actually liberating to be honest. I mean just look at the two again. One has this lonly, almost bleak feeling to it while the other has a warmer almost restful feel to it. That is really cool to me. So this is a perk of the Leica Q2 in my book.
So what else comes with the Q2 that I didnt have today? Well, autofocus is one, another is larger aperture. This lens is f3.5 which is two full stops slower than the lens on the Q2. This would matter more in low light as I was shooting most of this day at f11 to reduce the need to adjust focus. Range focus at f11 on a 28mm prime is basically 4 feet (1.3 meters) to infinitiy. So it literally was point the camera, press the shutter and the image was in focus. But if I wanted to shoot indoors or in the evening, the f1.7 aperture would be nice to have to keep my ISO down some or be able to raise the shutter speed a little to freeze action better.
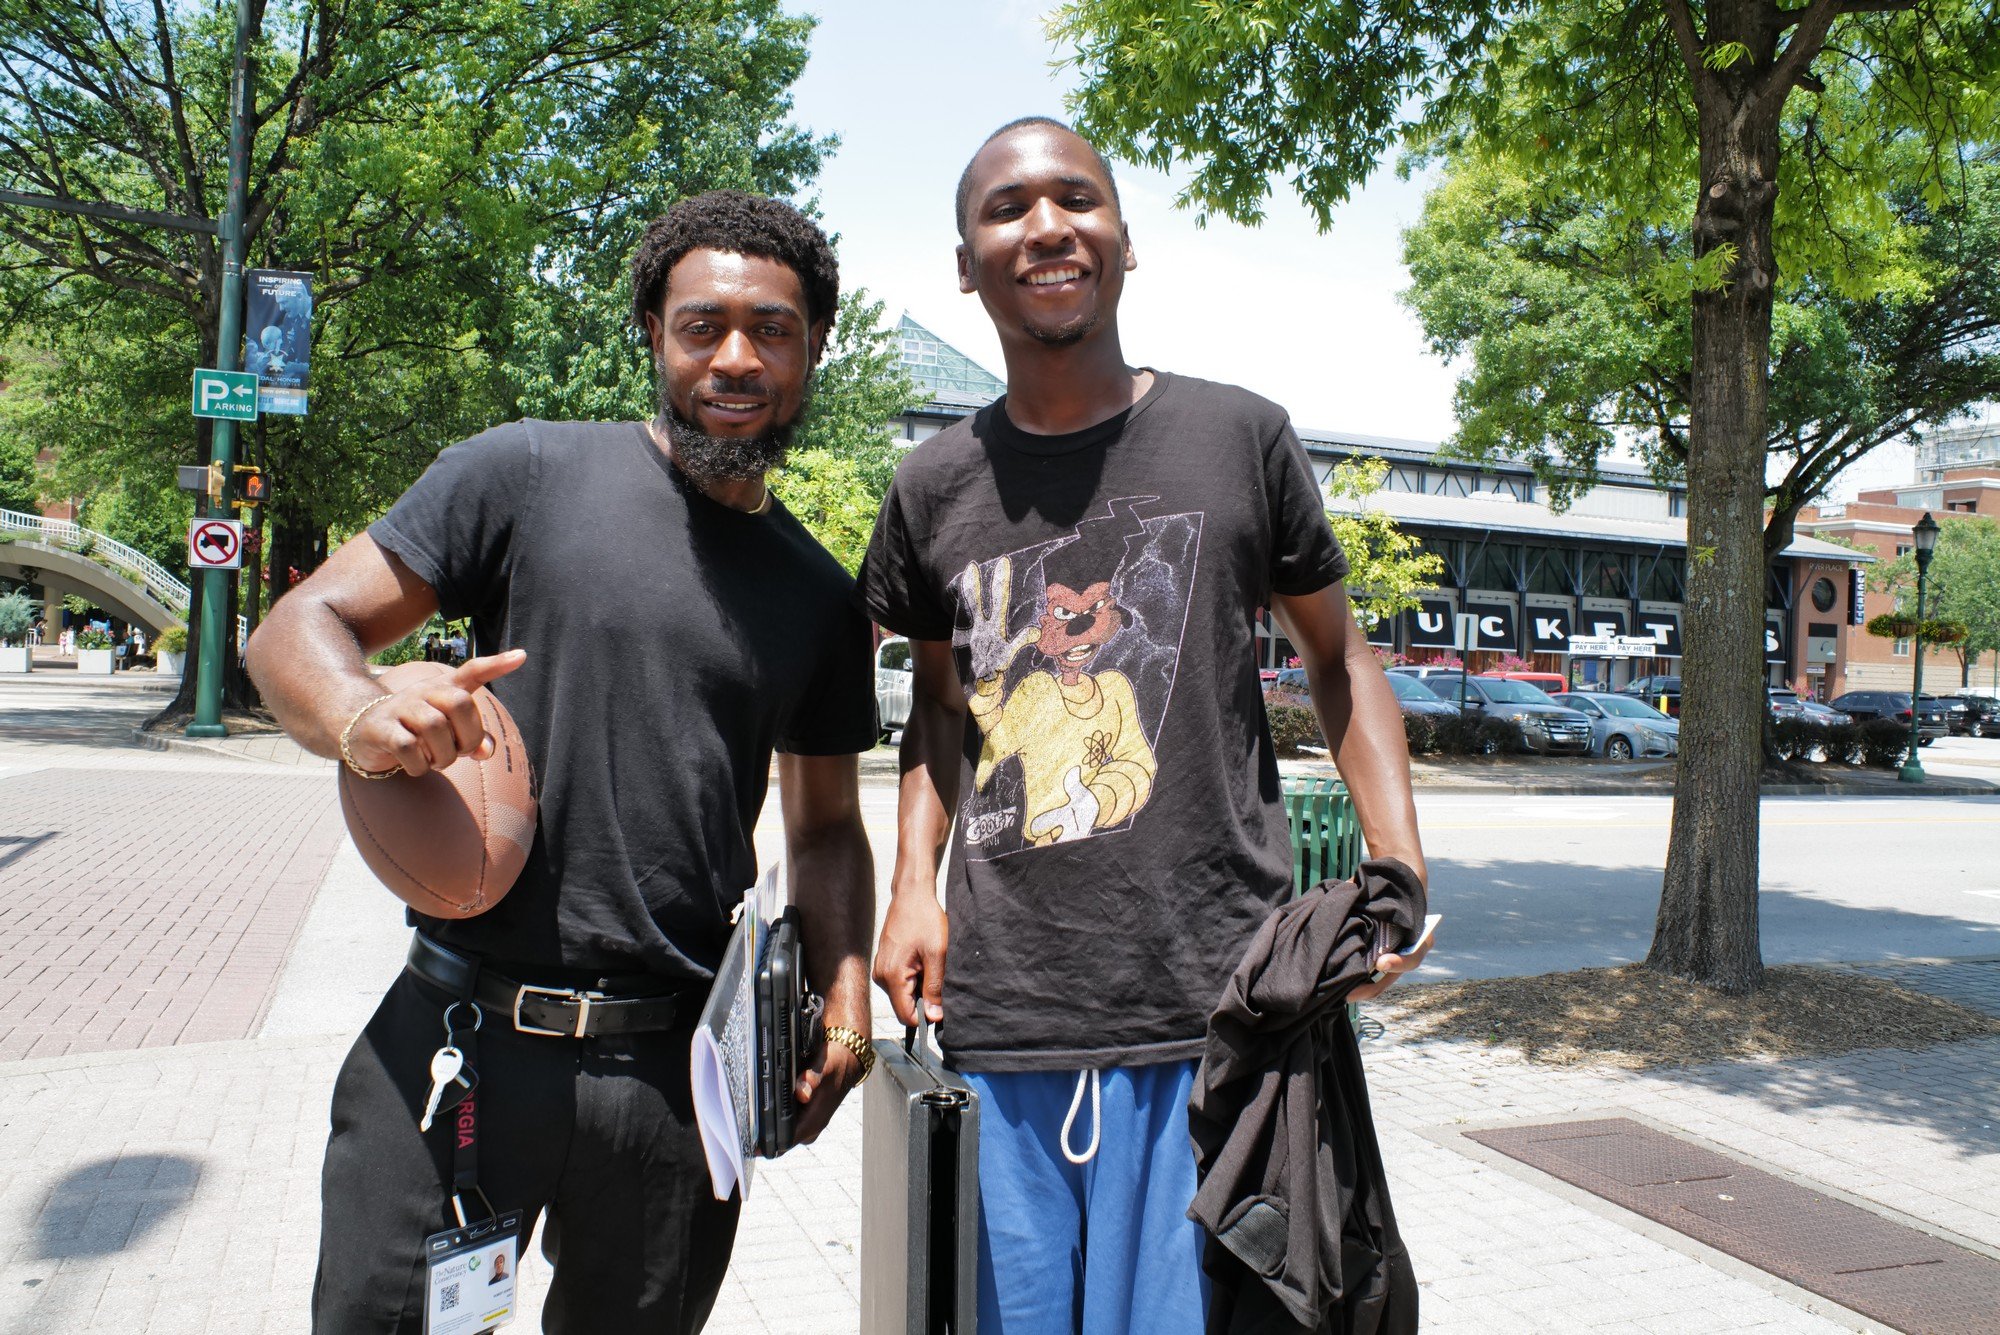
What I really liked about the 28mm was that it made me interact with the people more. The photo above is a great example of this, these two guys were walking by and I just asked them if I could grab a quick photo, they were stoked and so was I. This is honestly a problem I have that I am working to get past. I don’t like bothering people and will walk by potentially great photos simply because I don’t want to bother them. The 28mm forces you to get closer if you want the detail in the photos so I have to get closer to do that. So I think honestly, this is going to have be a perk of the 28mm Summilux lens after all…
All in all, this kit performed really well for me and I think the Leica Q2 would perform equally as well. BUT I do really like the ergonomics of the SL family of camera bodies so for me I will keep my SL2 and use a 28mm lens when I want to have the Q2 experience in a camera. So until next time, get your camera out and go take a photo with it.
Just capturing everyday life…
When I decided to take some time away from youtube and just explore my photography, I didnt know how much fun it would be to just take the camera and an extra battery. It blew my mind to be honest.
Still I found myself starting to look for more interesting photos when I am out and about these days. Something else I have really come to realize is that you cant get the photo if you dont go out with your camera.

Here is an example of what I mean by getting out and shooting more. You are not going to be where the action is if you dont get out and shoot. Just being out in the field greatly increases your chances of getting a photo. That being said, I am the worlds worst at failing to get the shot. I got the one about due to range focus being set on the lens so I didnt need to even bring the camera to my eye. I literally saw it unfolding and just raised the camera and snapped the frame. It is also heavily cropped too so I can get the composition I wanted. That is a luxury of the 47mp sensor on the Leica SL2 that I was using that day, it gives you options.
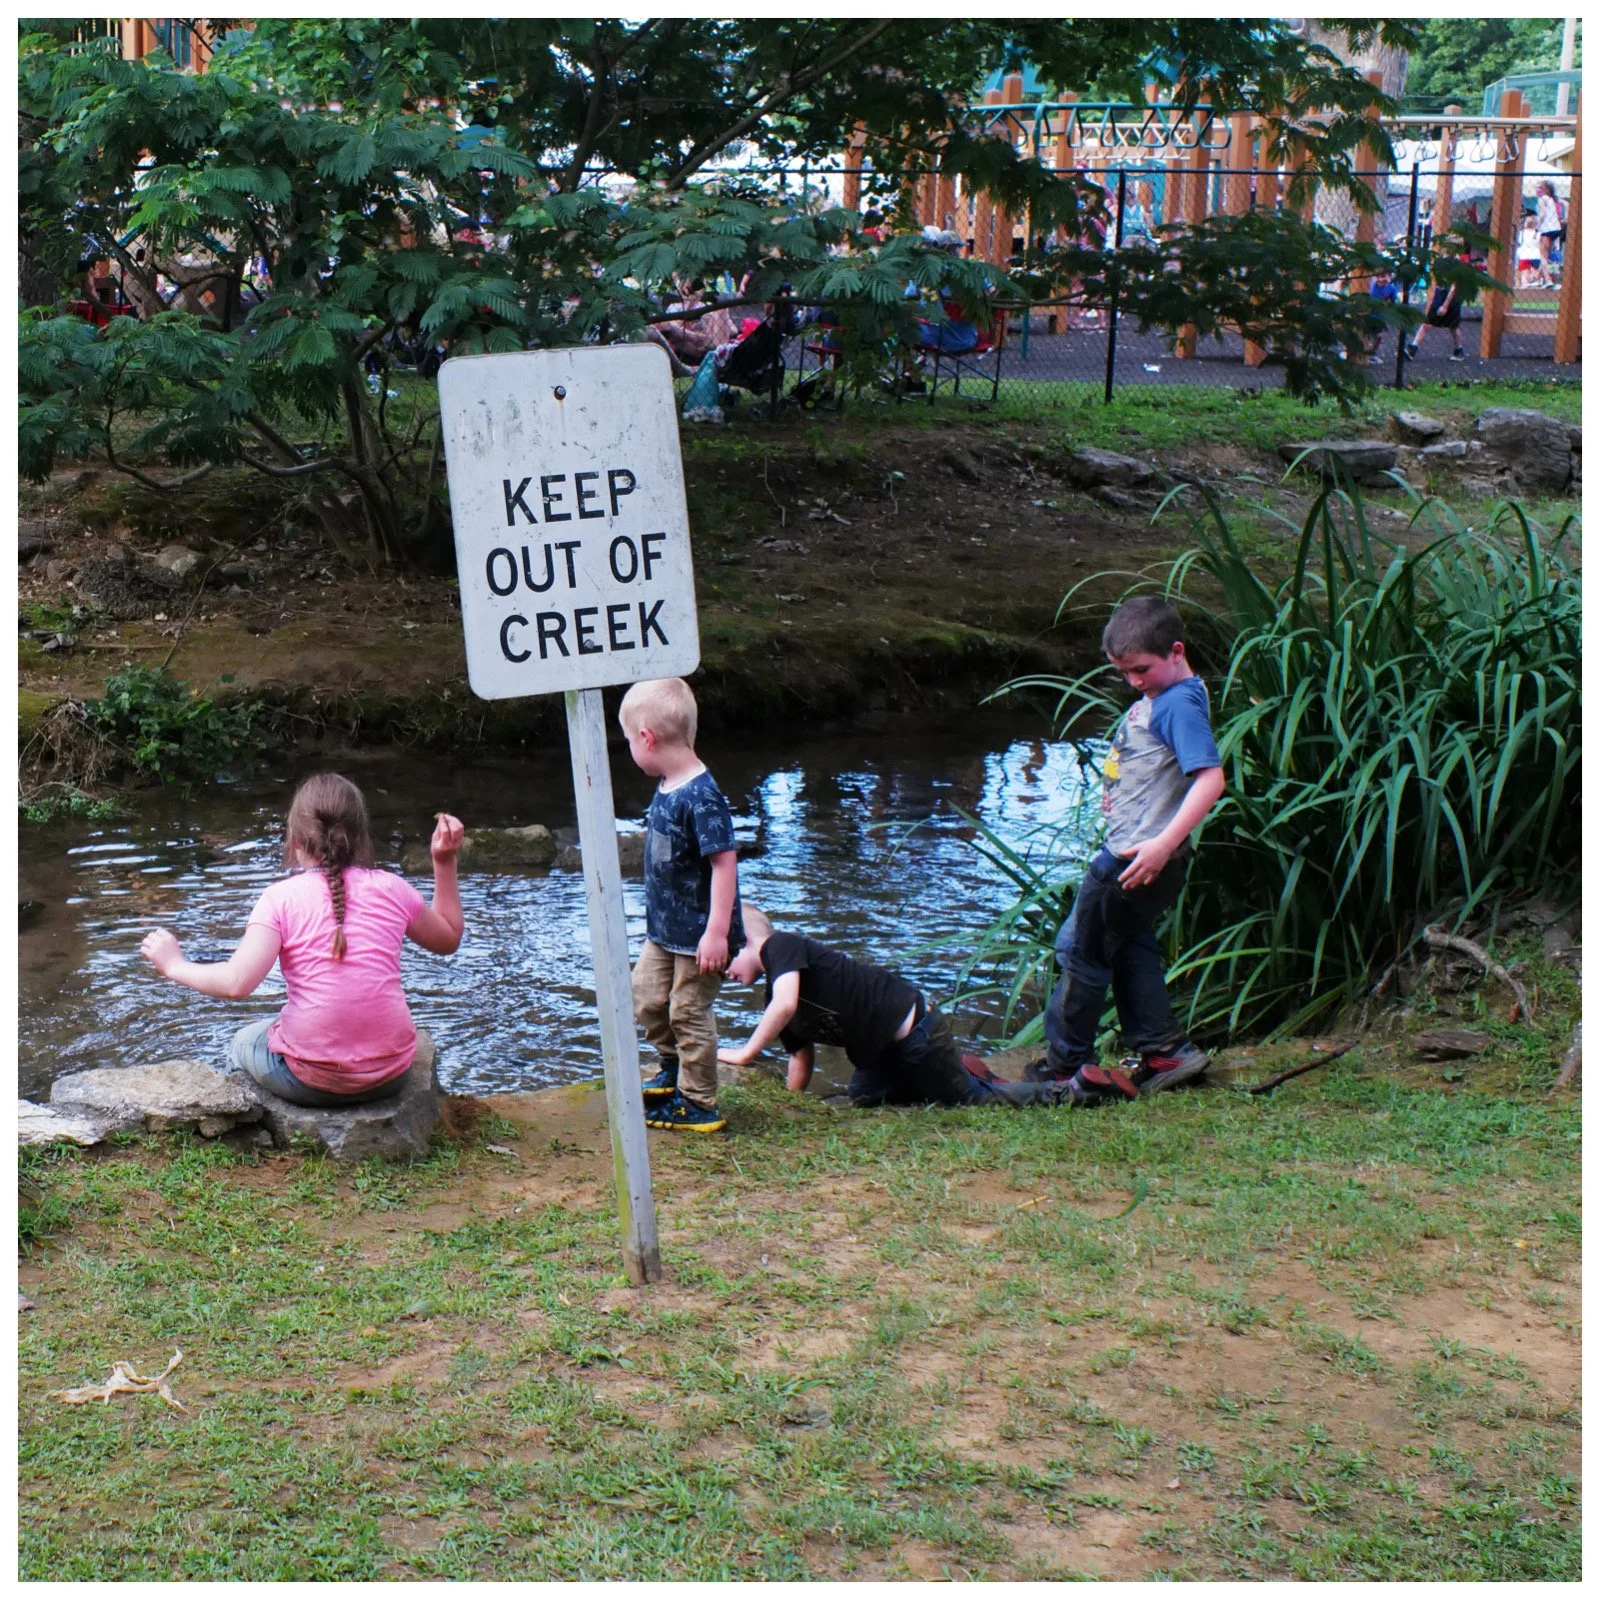
Here we have a photo I have taken a couple of times now. Every year our hometown has an event in this park and the kids play in the creek is flagrant defiance of the posted sign. It is such a cliche photo that I can’t pass it up. Obvious civil disobedience to signage if a fun photo so if you see one of these scenarios just get your camera out and take the picture. You just might like what you end up with.

Here we have a scene of “small town Americana” that I thought was kinda interesting. These little carnival foodie trucks are a common sight in rural America and I wanted to capture that essence if possible. I am not sure if I was successful but to me it is a cool photo.
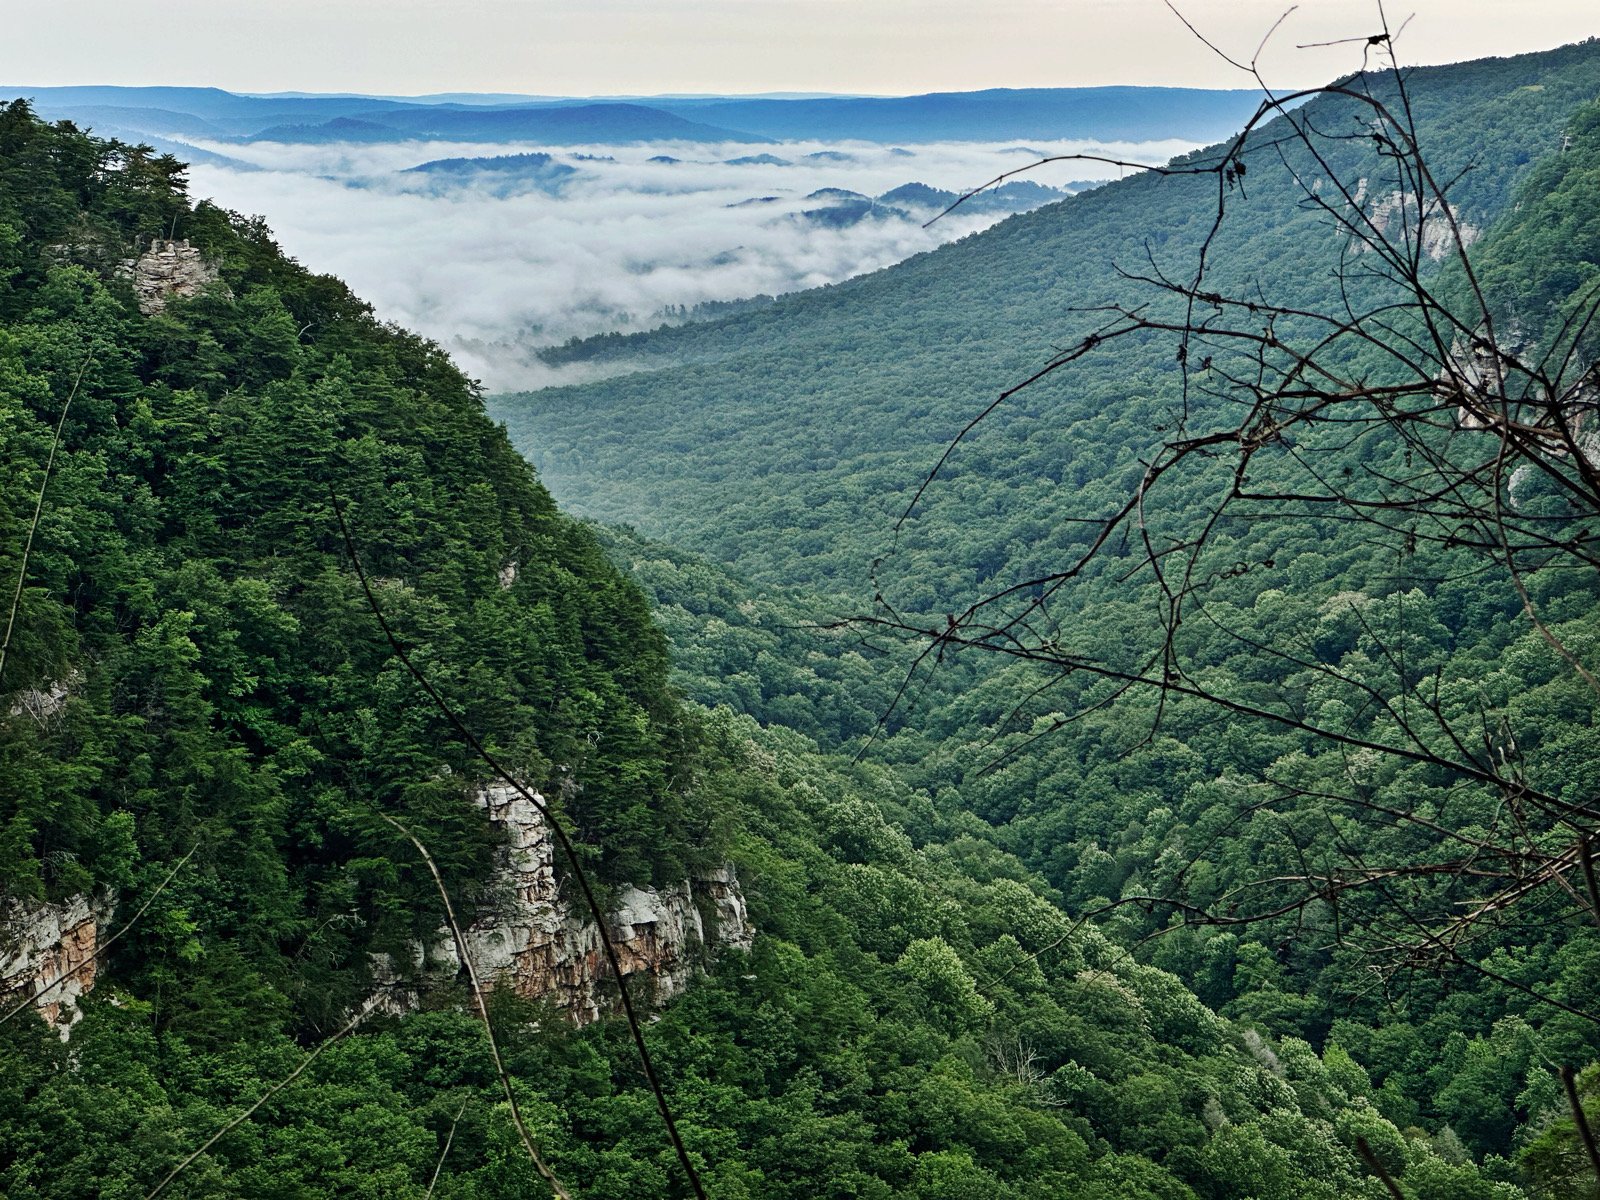
Here I found something interesting when I went to Cloudland Canyon State Park to setup a POTA activation the other morning. A cloud inversion isnt real common until the fall, but conditions were apparently just right. So I grabbed a photo before turning on the radio and now I have this photo.
Here is the last photo I want to talk about. This was a quickie iPhone capture that I saw and just had to get right quick. Use what you have and get the photo, that is the rule of the day. I have come to learn that when you get something like this in your head just go take the photo and be done with it, it will gnaw at you forever if you dont. I think some of the best photos, street or otherwise, come from just capturing everyday life. What do you think?
An updated treatise on my travel camera gear.
When I wrote the last blog post about flying with cameras gear, I had only considered the airport and airplane overhead space only.
Well, here I am again in a different scenario and this time the kit looks very different. The overarching theme here is apparently that you should tailor the kit to suit the trip. Lol. I have done just that.
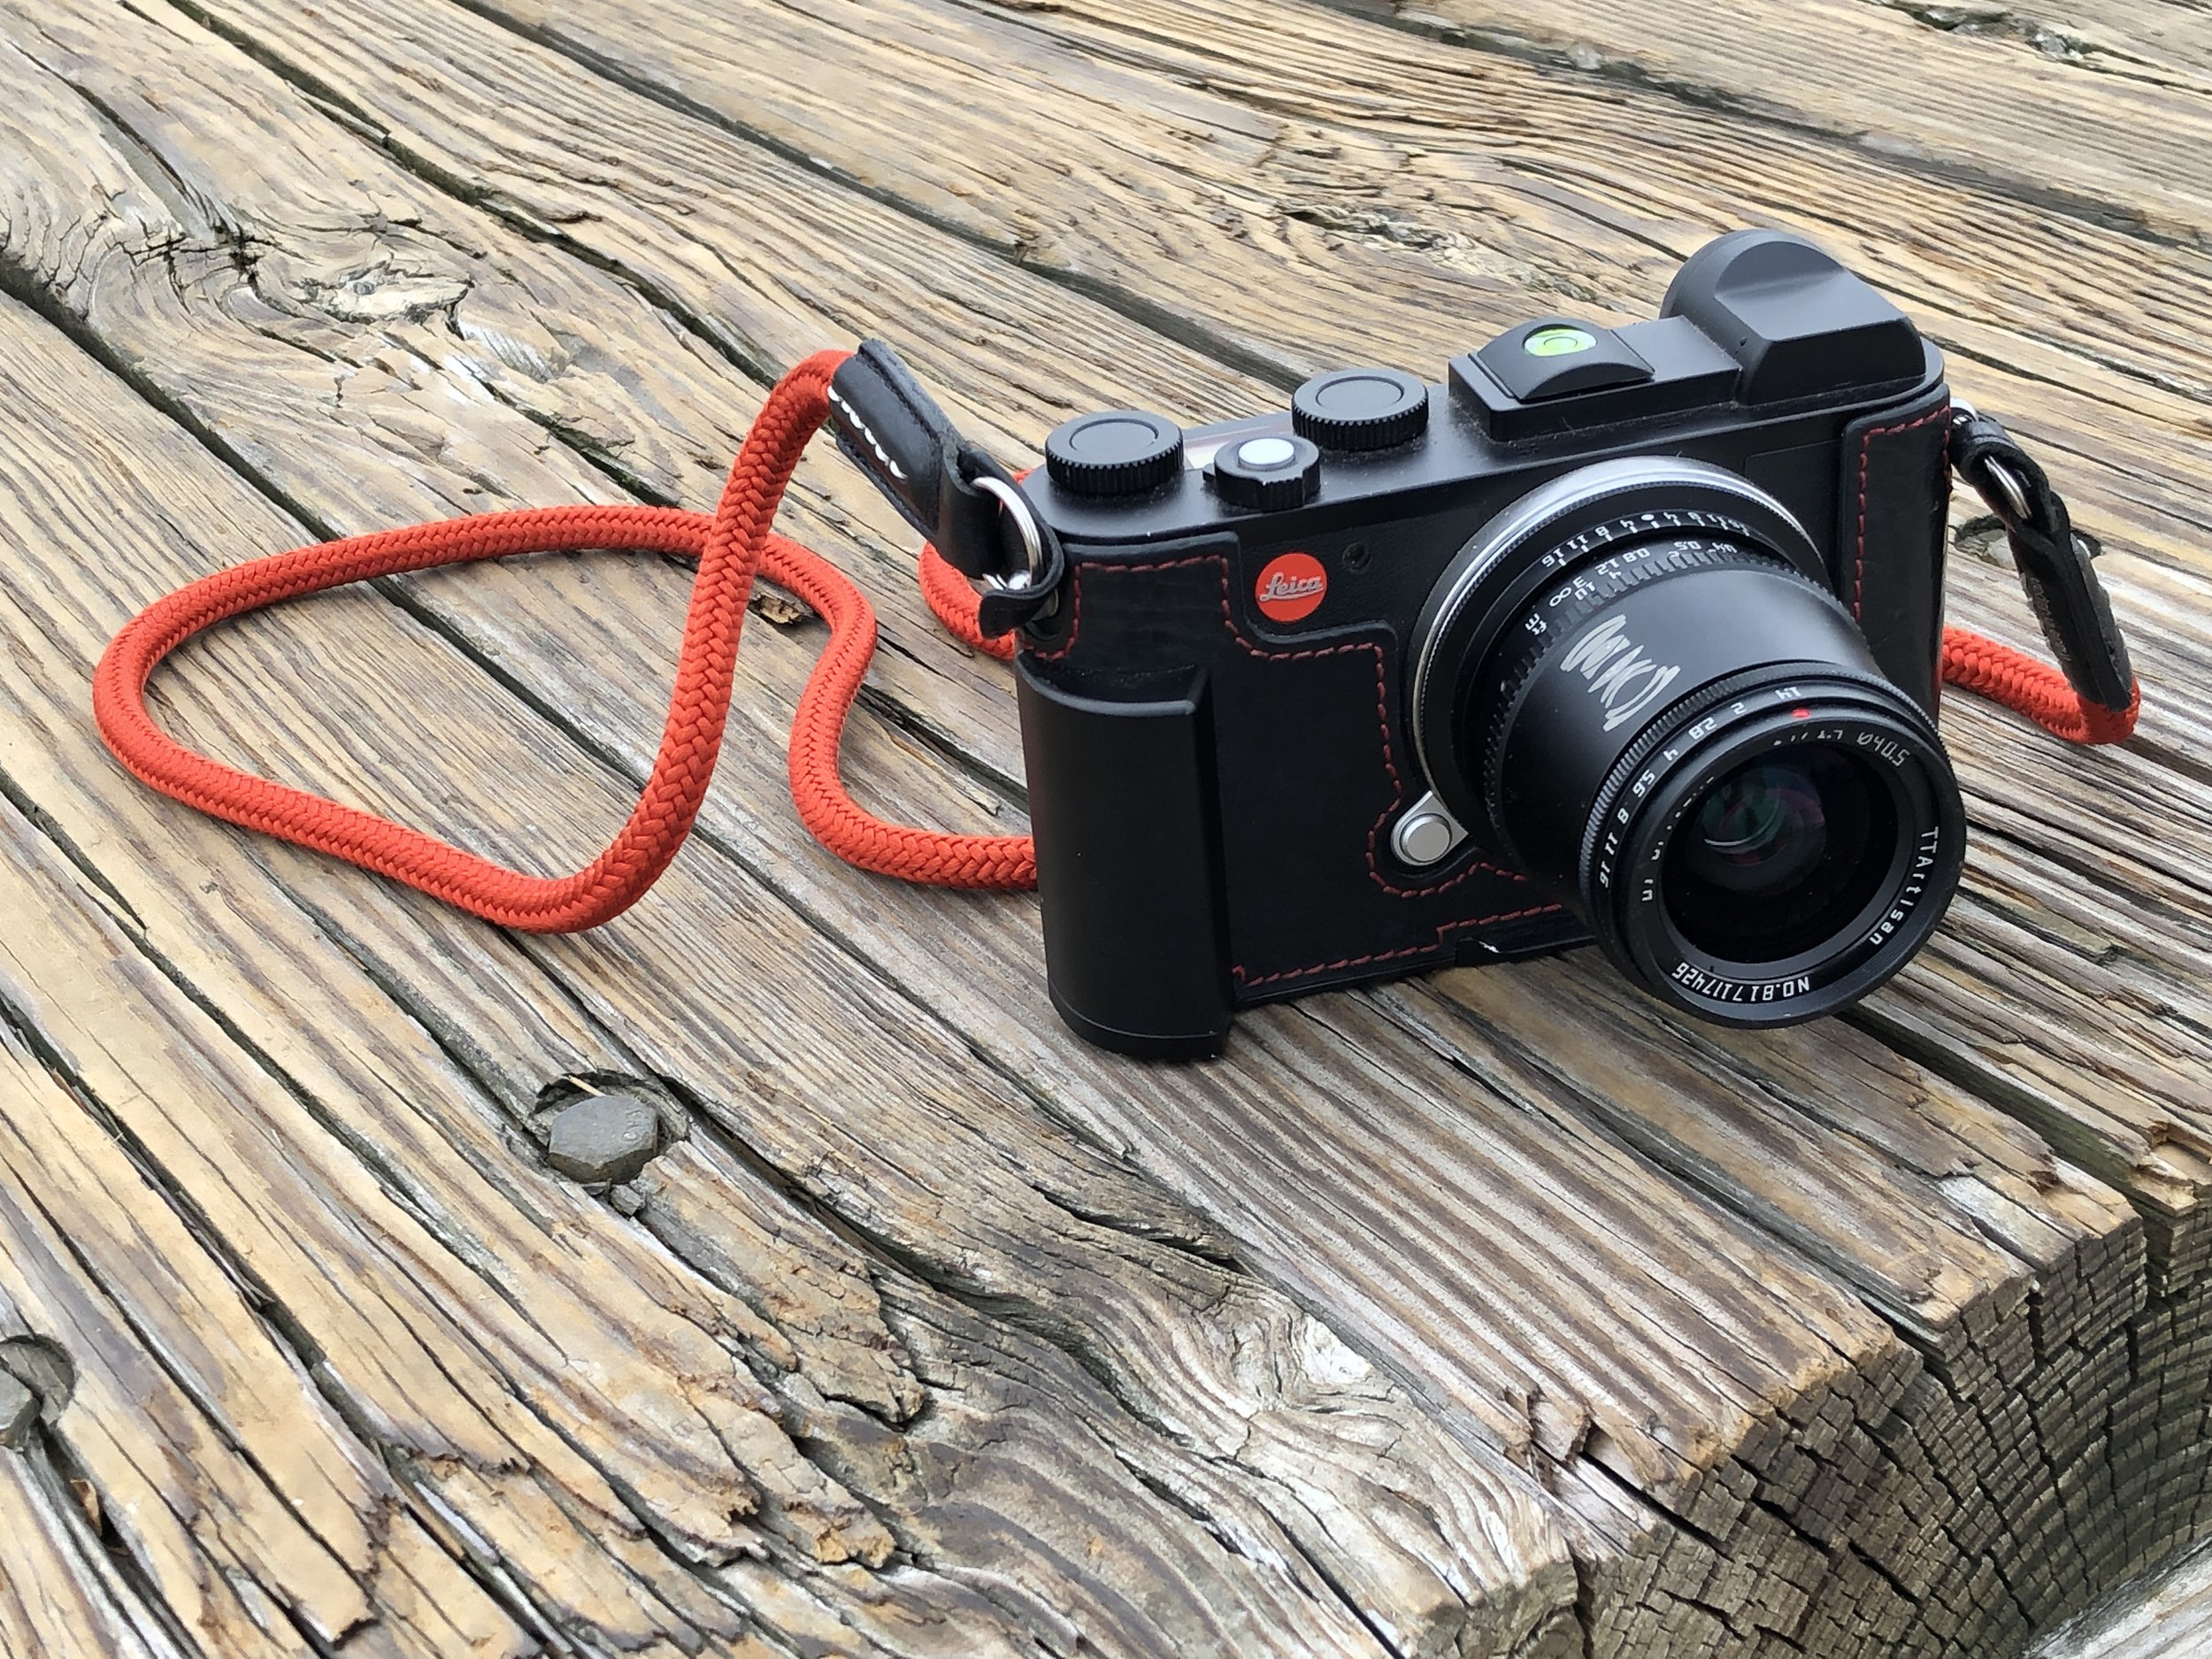
For this trip we are being tourists more or less, so the camera kit will reflect that. I am taking the Leica CL and just two prime lenses. The 17mm and the 35mm lenses are perfect for tourist type photography and there is two more reasons for taking two primes over a single zoom… read on to learn why.
When choosing kit for trips now, I start with the premise of the trip. For a long time, I would have these illusions of grandeur and would take all this gear for events that never happened. You see, I dont plan the trips, the wife does so she plans on things the I don’t consider. She will arrange tours and such and I am just too busy with other things to pay much attention. Well, I finally learned and now I dont bring hardly any of that stuff and this makes travel SO much easier. Some types I have encountered are tourist, wildlife, street, and such as that. Once this is nailed down then I choose a camera that best fits that type of trip. Usually between crop sensor and full frame first as this gets me the right camera. For wildlife I prefer my crop sensor Z50 but for architectural purposes I prefer a full frame sensor. Things like street photography can be shot with either but on long days, the little crop sensor Leica CL is a much better choice over the much heavier Leica SL2.
Now that I have a camera picked out, I will decide what is the most likely scenario I will be shooting in and choose a lens for that. Next I will look at what else there is and choose a lens that will work for this as well as loosely backup for the main lens.
Using this process, I chose the 35mm f0.95 TTArtisan lens as my main lens and the TTArtisan 17mm f1.4 lens as the backup. These are designed for the Leica CL which is a crop sensor camera so the equivalent field of view for these lenses is 50mm and 28mm respectively. These are two VERY useable focal lengths for a travel kit. These will also both work just fine if one or the other gets damaged at some point. I might have to adjust my shooting style a little but the trip is not a loss…
I want to take a moment here to mention TTArtisan and how they are making some amazing lenses for crazy low prices. The quality of all three of the lenses I currently have that they made are just stellar. I have one they gave me as a review sample but I bought the other two on my own. They are great little manual lenses.

Another reason I like using prime lenses for trips is the maximum aperture is much larger than on general purpose zoom lenses. General purpose lenses work great in broad daylight but the lack of large apertures make them less than desirable for me in the evening and early morning.
What this means is I will end up with a really compact kit with this camera and two lenses. These being native L mount lenses also means they are smaller than adapted lenses as well. (This is something that I do regularly and dont sweat it and that is how I know.) Native mounted glass means they are more compact though and that is what I wanted.
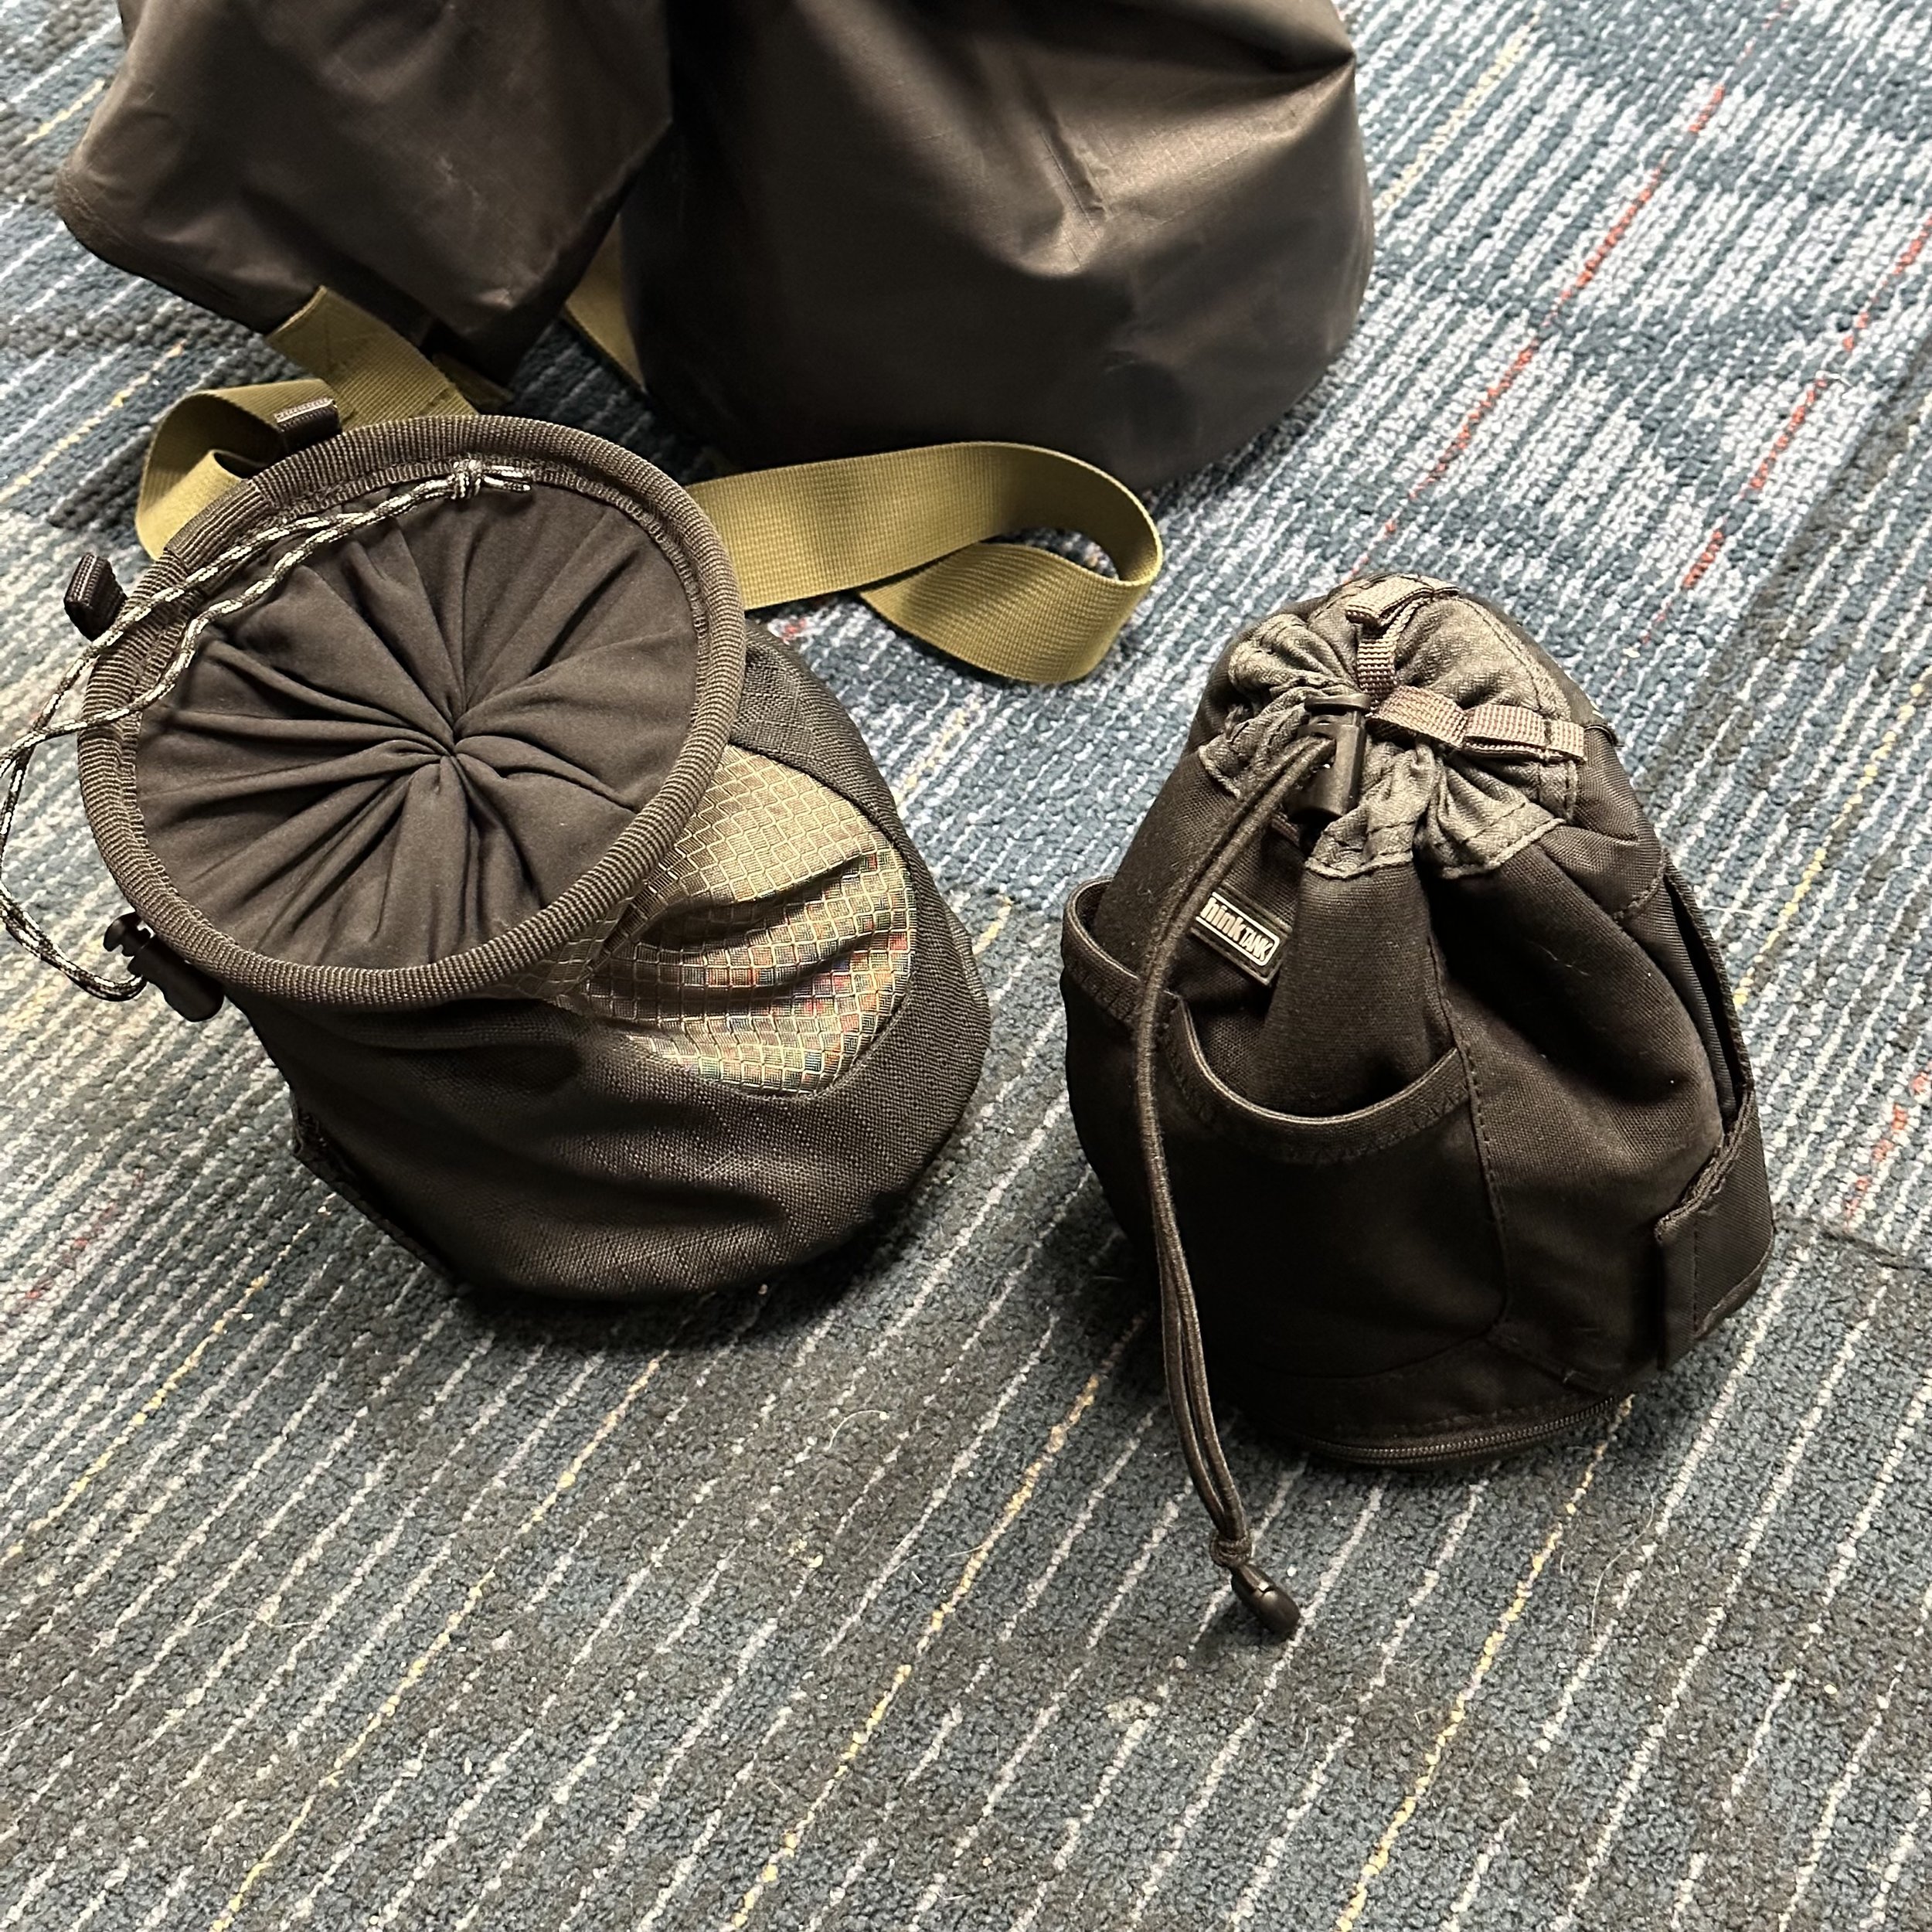
Since we are hiking this trip, I wanted to make sure that rain didn’t ruin my camera gear. This is why I put all my camera gear into a dry bag and then put that inside my backpack.

Once inside the dry bag, they are divided into three different lens “dump” bags I used for this trip to organize this gear loadout. These are made by Thinktank Photo and are great for street photography photo walks as you can stick batteries and a spare lens, business cards and lens wipes and such in them and they are still small and lightweight.

I realize now that I desperately need to clean my lens! Will do that asap!!!
Armed with this kit I am ready to take on just about any tourist, street, or even landscape type photo with hood confidence that I will come away with something reasonable. The next blog post in regards to this kit will be a photo spread describing what I found to photograph.
Until next time, get your camera out!!!
What matters more? Gear or skill?

I raise this question because there is no shortage of people from both camps on YouTube.
The odd thing is that the overwhelming majority of my channel views come from my gear review videos. Not from skill building type videos where we talk about things that you can use with the gear to get better photos.
The underlying theme with people using youtube seems to be “the right gear will make me the photographer I hope for”. I’m sorry if that stings a little as I am just calling it like I see it.
I am not 100% certain about this determination though as I have no way of proving this assumption. It may be that my skill building videos are just way worse than my gear reviews videos. That could be a fair point to be honest as it is common knowledge that I am not very good at video.
My observation though is overwhelming leaning in this direction. The reason for this is that other youtubers also make this observation as well. You hear them talk about how the gear doesn’t make the photographer over and over. Why is that?

I think it is because people dont place as much value on skill learning as they do on tangible items like cameras and lenses. Have you tried to sell your skill to someone in tough times? How about some item you had that was tangible… like say your camera? Deep down I think people place value on tangible items because they know they can cash in on them later, but once they pay for and attend a workshop, that money is gone forever in their eyes. Even though they came away with an amazing experience and new skills, we in the western culture have been trained to place value on the tangible. How many times did I hear as a kid about not “blowing” my money on cheap trinkets or things like going to the fair and playing the games? It was all to common in my little corner of the planet.
Lots of people don’t have much disposable income to spend on things like workshops, or so they believe. I see it more in the realm of Leica more so than other brands because I will see a lens come up for sale that is literally like brand new but they HAVE used it some. They just want to retain as much resale value as possible so they are very careful with it so as to not scratch it up from use. It will basically be new even though it had been used to capture images in the past. This is telling in that they never planned to keep the equipment and placed more importance on resale value than using the gear. Otherwise there would be signs of use on the gear and a lot more photos in the catalog. Now, I know that is a little bit hyperbole as well, but you get the point.
The point is that it seems like for YouTube viewers, the gear matters more. I can’t figure it out either, why not go shoot street in London for a weekend? How cool would that be? It is reachable, just use the same lens you have been using and spend the “new lens money” on the trip instead. Precious few of us will do that though…And that is sad.
Just some food for thought, not really being critical…much…just thought it was interesting to see that and wanted to share my thoughts on it.
Is Leica right for you?

Since moving to the Leica camera system I have learned that the brand is super polarizing in the photography community and the odd part is there is no one other competing brand, except maybe Fujifilm and Ricoh in some genres.
You see there is the Nikon vs. Canon rivalry which everyone knows about. People either love Leica or hate them and there seems to be no middle ground. What I hear the most has to do with the extreme price of Leica cameras and what I usually hear second is how (insert their favorite brand here) had a list of features that Leica lacks. By far these are the two main complaints I hear with there being a few odd things otherwise.
Let’s take a look at some speculation on this topic and see if we can get a better understanding. Now, this next part is pure speculation on my part with only a little actual research behind it. But I did make a simple questionnaire for a few people to see what they thought.
Here is my question list:
Why dont/do you currently own any Leica gear? (Cameras and lenses)
What is your opinion of Leica in general?
Why do you have that opinion?
Armed with these questions let’s see what we get. I got the following answers…
————————————————————————————-
Why don't you own any Leica gear?
1. Between the price point and lack of a body geared towards sports there wasn't a setup that fit into my shooting needs.
What is your opinion of Leica Gear?
2. From my limited experience the camera I used felt well built and the quality I have seen produced by Leica cameras and glass is as good as other brands but seem more geared towards fine art, street or portriat style photography.
Why do you have that opinion?
3. Most photos produced where Leica has been identifed as the camera in my opinion have fit into the fine art, street or portrait categories.
————————————————————————————-
Why don't you own any Leica gear?
1. I have thought about buying a Leica as a street camera or personal camera, but the cost, even used, is a bit prohibitive for me.
What is your opinion of Leica Gear?
2. In general, I have a very favorable opinion about Leica. They are well-built, feel good when holding them, and take most excellent images. I am especially enamored with the M10 that only shoots monochrome. That is my dream, money is no object camera. And I love the look of those square frames lenses. They are quite aesthetically pleasing.
Why do you have that opinion?
3. I have this opinion partly from trying one out previously, but mostly from watching them used on YouTube. They are/were the camera of choice for some of the most famous photographers in the world.
————————————————————————————-
1.Why don't you own any Leica gear?
I would love to own some Leica gear. It’s a little on the expensive side, but I think they truly are pieces of quality kit. Lenses I think are pretty top notch. Also quality of lens construction seems to be pretty great.
2.What is your opinion of Leica Gear?
I think that Leica is focused towards a certain type of photographer. One that wants no compromises, while being methodical and authentic at the same time. They produce a different shooting experience for a more niche audience. But for those who enjoy Leica, they know exactly what they want from a camera. And Leica seems to know what their shooters want as well.
3. Why do you have that opinion?
I met a friend through a friend who was obscenely wealthy and he only shot on Leica. That, and general impressions based off of YouTube and other avenues where stereotypes are routinely expressed. I’m certainly open to change if and when I shoot on one!
————————————————————————————-
1.Why don't you own any Leica gear?
Leica doesn't make a single camera that interests me.
2. What is your opinion of Leica Gear?
I respect the brand and the company. I think they make really great lenses. Their bodies, while well made don't have the features that I look for in a camera body. I like their simplistic beauty. That's just not what I'm looking for. I think they are probably great street photography cameras but not too good for sports and wildlife. On the other hand, there are other brands that make great sports and wildlife cameras. The difference is, these great sports and wildlife cameras can also handle street, portraits and basically any kind of photography with no worries. So I need a camera that can do everything as opposed to a camera that can only do a few things.
3. Why do you have that opinion?
You don't see a lot of Leica shooters on the sidelines of a sporting event or at the wildlife refuge. There is a reason for that.
————————————————————————————-
1.Why do you currently own Leica gear?
What drew me to Leica is it’s history and mystique. Leica is the originator of the 35mm camera, and a great deal of great photographers have used Leica. I wanted a piece of that mystique, not that it would make me a better photographer but it was very enticing. I started with the Leica Q, probably the most affordable full-sensor Leica and I was hooked the color science of that camera is godly, better than any other Leica camera I have owned. Then the Q2 Monochrome, I have always wanted a monochrome camera, so why not. Followed by the Q2 because I wanted more megapixels for cropping, The color science on the Q2 is not in my opinion as good as the Q but it improves on the Q in many other ways. Then finally the M10p, I don’t any Leica glass except for the lenses mounted on the Qs which are all 28mm. I have always said I can afford the camera but not the lenses.
PS. The real reason is David Saylors, I had beaten the bug to get a Leica, then I met David and ended up with a Leica Q
2. What is your opinion of Leica in general?
My first thought is a prestige brand for the affluent. In reality, it is much more than that. I see them as an extremely high-quality brand manufactured in Germany for the most part, you have to pay for that labor and Leica is not a high-volume brand. They need to charge that kind of money to stay in business.
I am lucky enough to have a Leica store near me and I have learned how much they do to promote up-and-coming photographers, free gallery openings, and photo walks and that is at the local level. World wide they have awards to promote photographers no matter what brand they use. They look at photography as an art form and help to cultivate new photographers.
3. Why do you have that opinion?
On the built quality of Leica, all you have to do is pick one up. They are solid and rugged. I could use my M10P to protect myself and still use it to take a photo of the attacker. You can still buy old M2 and earlier that still work perfectly well and they will service them.
Regarding fostering photographs look at the Leica Oskar Barnack Award or the countless events available on Eventbrite for free.
————————————————————————————-

As you can see, the price is what gets most people right away. To be fair to both the consumer and the manufacturer let’s take an honest look at what makes these cameras cost so much. I have been given a unique perspective to see both sides of the transaction event so to speak. For Leica I understand what they have done over the century of their operation as a camera manufacturer.
They were “first movers” in that they invented using 35mm movie projector film in a still frame camera. This gives them a market advantage of sorts… or it did… that is until Nikon released the SLR in 1959. The SLR changed the game, no longer did you worry about your camera getting out of calibration and the photos being out of focus as you are actually looking straight through the taking lens directly for your composition. A large portion of the world that was using Leicas at this point wanted this new technology and went over to Nikon and Canon (who saw the light and jumped into the SLR game as well as many others). Leica stuck to their roots though and this almost proved fatal by the 1970s.
They tried making an SLR in conjunction with Minolta but it was too little too late and the R series never did really take off even though they made them for over 20 years. Leica on the other hand, always stayed focused on the M system. They also spent a lot of time cultivating their target audience as well. But since their company could not employ large scale manufacturing and the mechanical complexity of the M system makes them costly with skilled labor to manufacture, they could never compete in the world of high volume, mass production like the big players. How do you sell something that by its very nature has to have a high retail price due to high fixed costs in manufacturing? Market to the wealthy is how… The mantra of “exclusivity has its price” is true and if you make low volume but yet high quality products you can market to a niche group like the wealthy. There is a reason people joking say Leica is the brand of dentists and lawyers. Because Leica realized they could not compete with Nikon and Canon on low price/features, they had to figure out where they fit in the photography space. This turned out to be in reportage and street photography mainly. This and the aforementioned exclusivity adds up to a potent mixture for a brand that is for the affluent.
The reasons for the cameras price is multifaceted and I am straight speculating here too. I am pretty sure that I am right though as I have worked in the field of manufacturing and selling of products. You see, first the cameras they make are basically like fine mechanical watches, in that they are hand assembled and tuned individually. All this meticulous labor runs the score WAY up. Especially when you consider that it takes a skilled craftsman to build one of these and not just someone off the street trailed to do an assembly line job. Henry Ford figured out that low skill labor can complete complex tasks if there is enough people to break down the job into small enough tasks. Problem with Leica is that they don’t have the business model or the sales volume to be able to setup this sort of operation, so they instead lean into the individual craftsman concept even harder.
Today though, you are starting to see a lot more people shooting on Leica cameras and it is because the world has improved (whether we like it or not, the industrialized “1st world countries” are, over all, wealthier than they have ever been). People have learned that they have enough disposable income to be able to get that M6 with the 35mm Summicrion now, and the do! I am starting to see more and more youtubers using Leica cameras…shoot, even good ole Pete has a Q2 now!
Now does this mean that people need to add one to their arsenal to be cool? No. Absoloutly not, they should use whatever makes them happy and gives them the results that they want. If this means shooting a Leica M11 with a 12,000$ Summilux lens, then you do you. If it means shooting on a Sony RX100, then that is the camera for you.
In the end Leica will never be a cheap camera system, nor will it ever have the bleeding edge features like Sony or Canon, but it will continue to serve a dedicated niche market that they have carefully cultivated over decades. For me, that fact alone makes them an awesome company. They are out there doing there own thing and really dont care about the rest of the market.
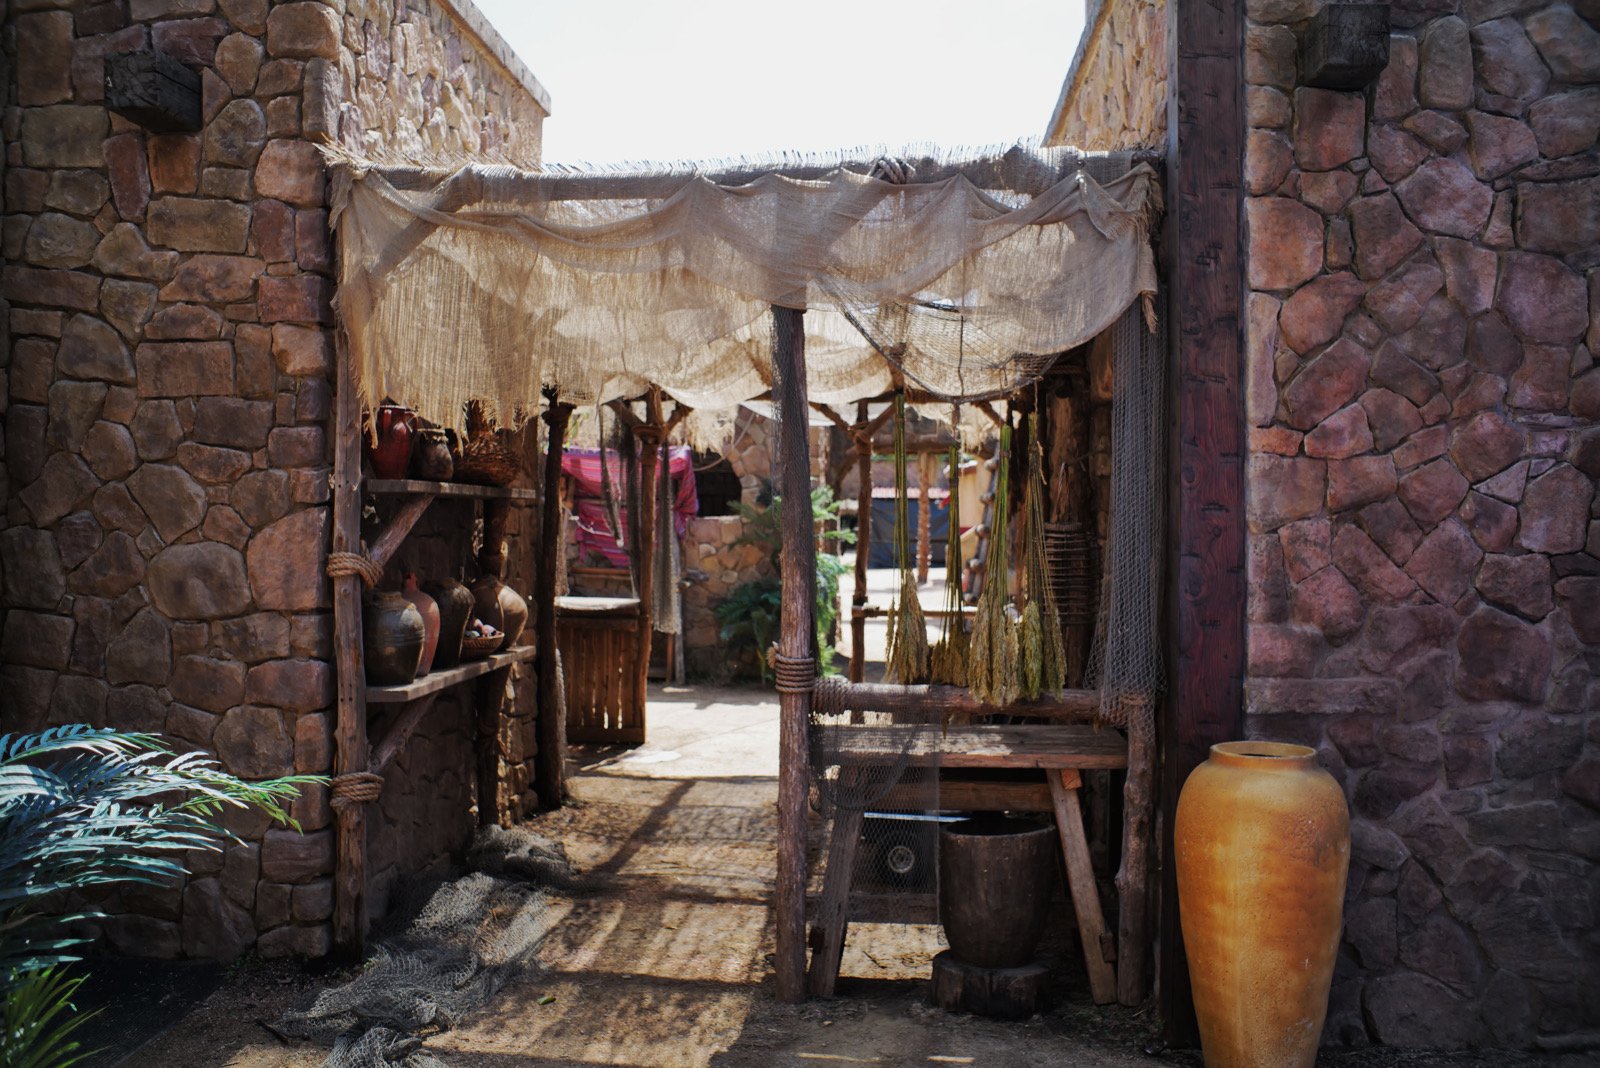
Photography on a movie set
What do you photograph when on a movie set to capture the essence of the set? I felt my job was more to do that than to capture the movie per say. That’s the movie makers job, not mine.

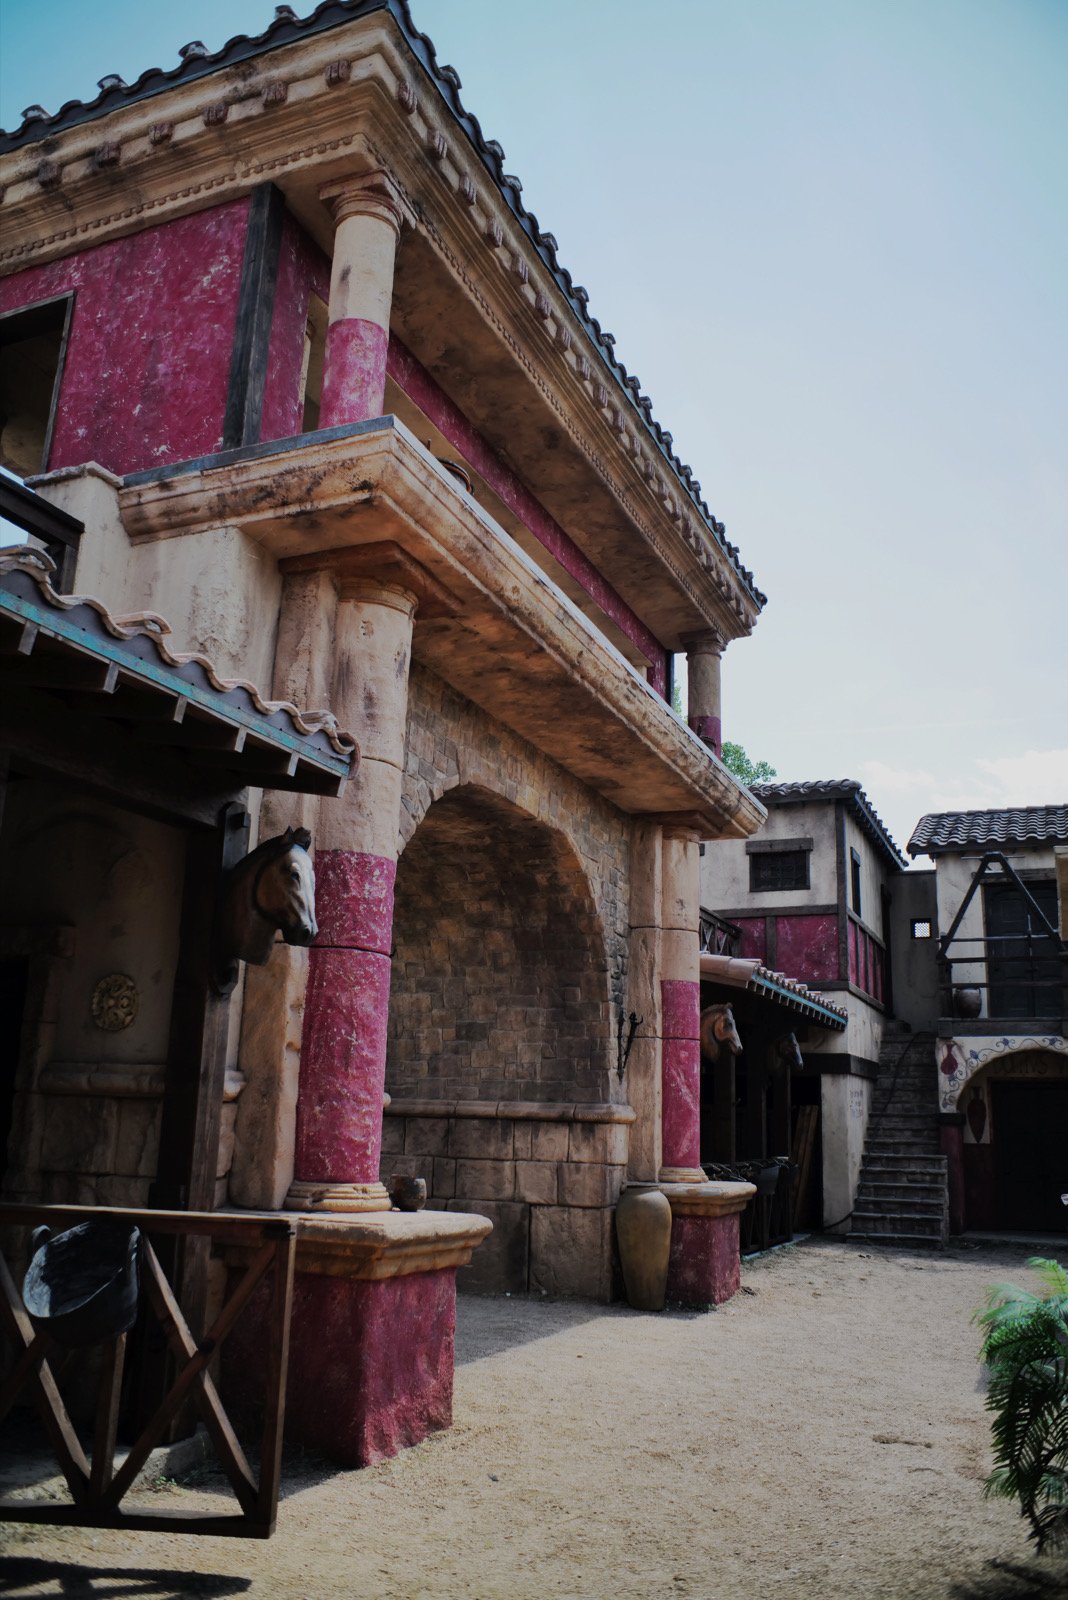
Here I started at the front gate. If you will notice, it’s nondescript and you really have no idea what is here at all. This is by design for obvious reasons but I still found it interesting to see how bland it was.
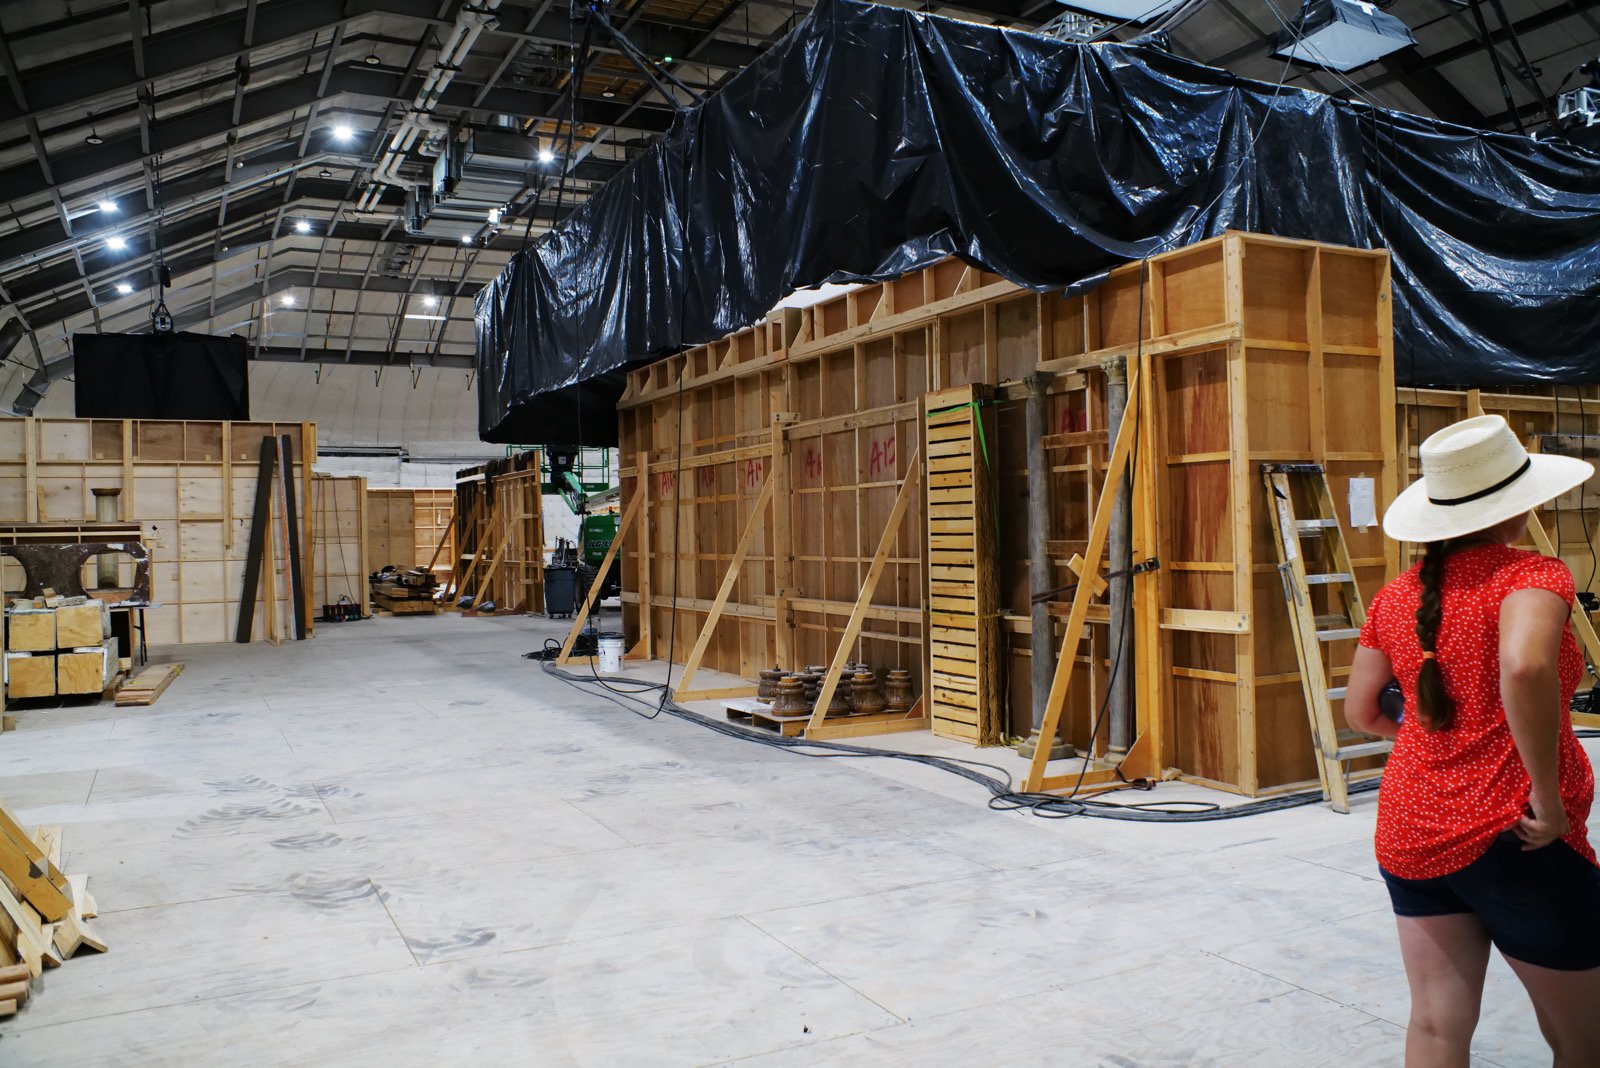
The sound stage is a controlled space where “sets” are built to look like locations but the film makers can control literally everything in the environment such as sound, light and weather. It was important to me to get this “side” of the set to tell the whole story.
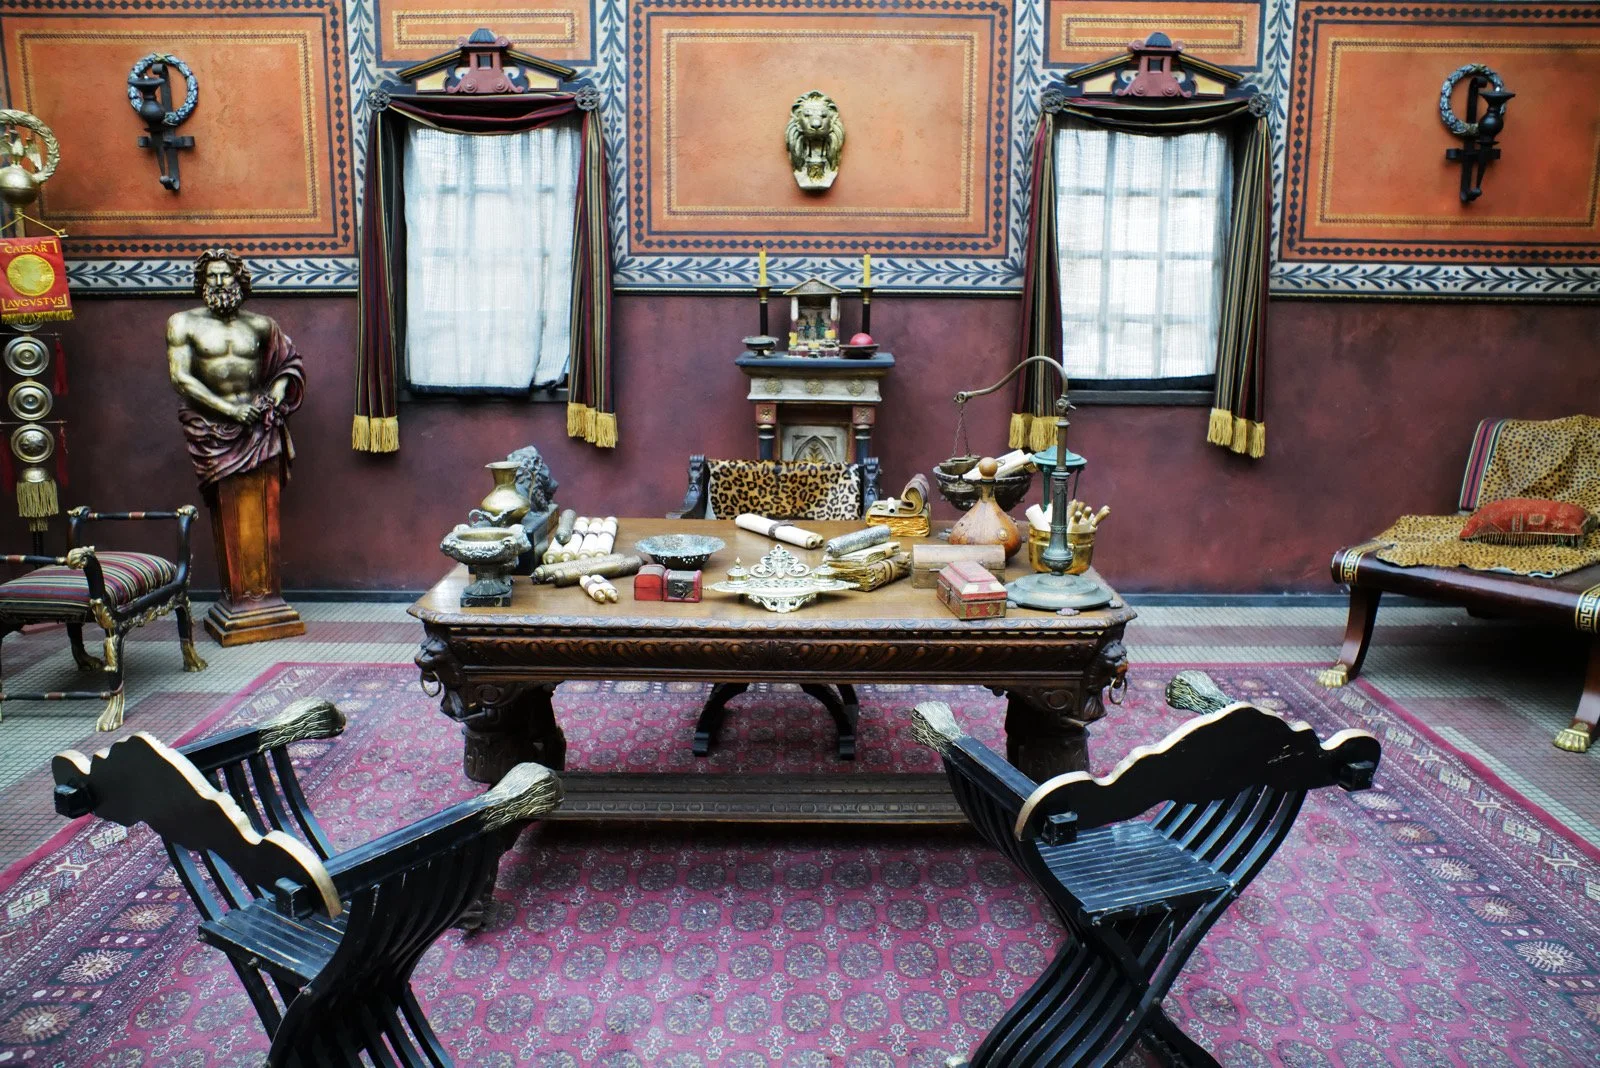
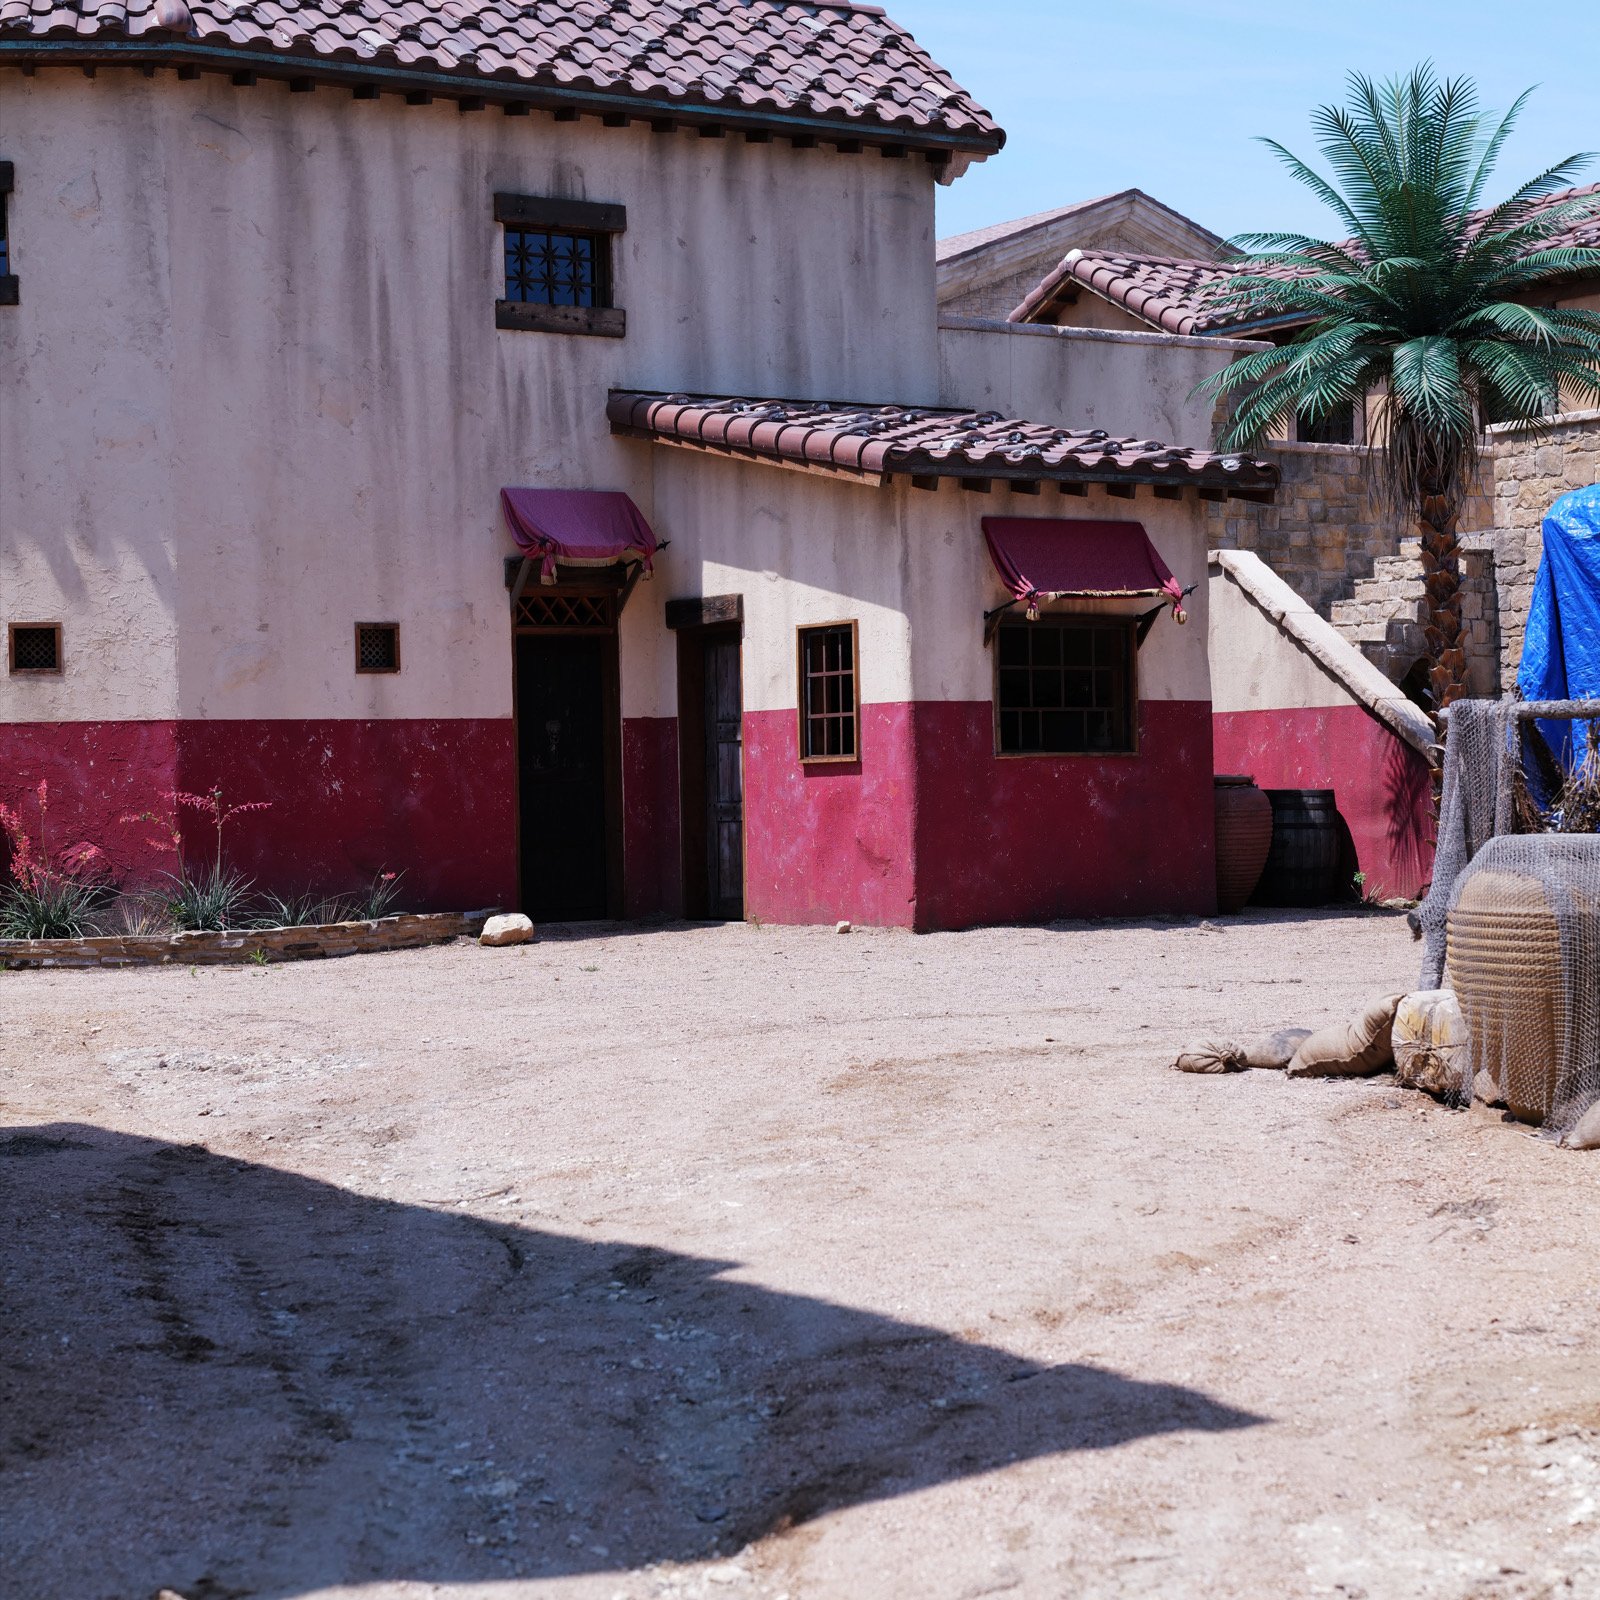
This is what the other side of that rough framed wall has on it. A complete first century Roman executive office ready for the official to go to work. As you can see, this set of photos is not what you would normally see when watching the movie.

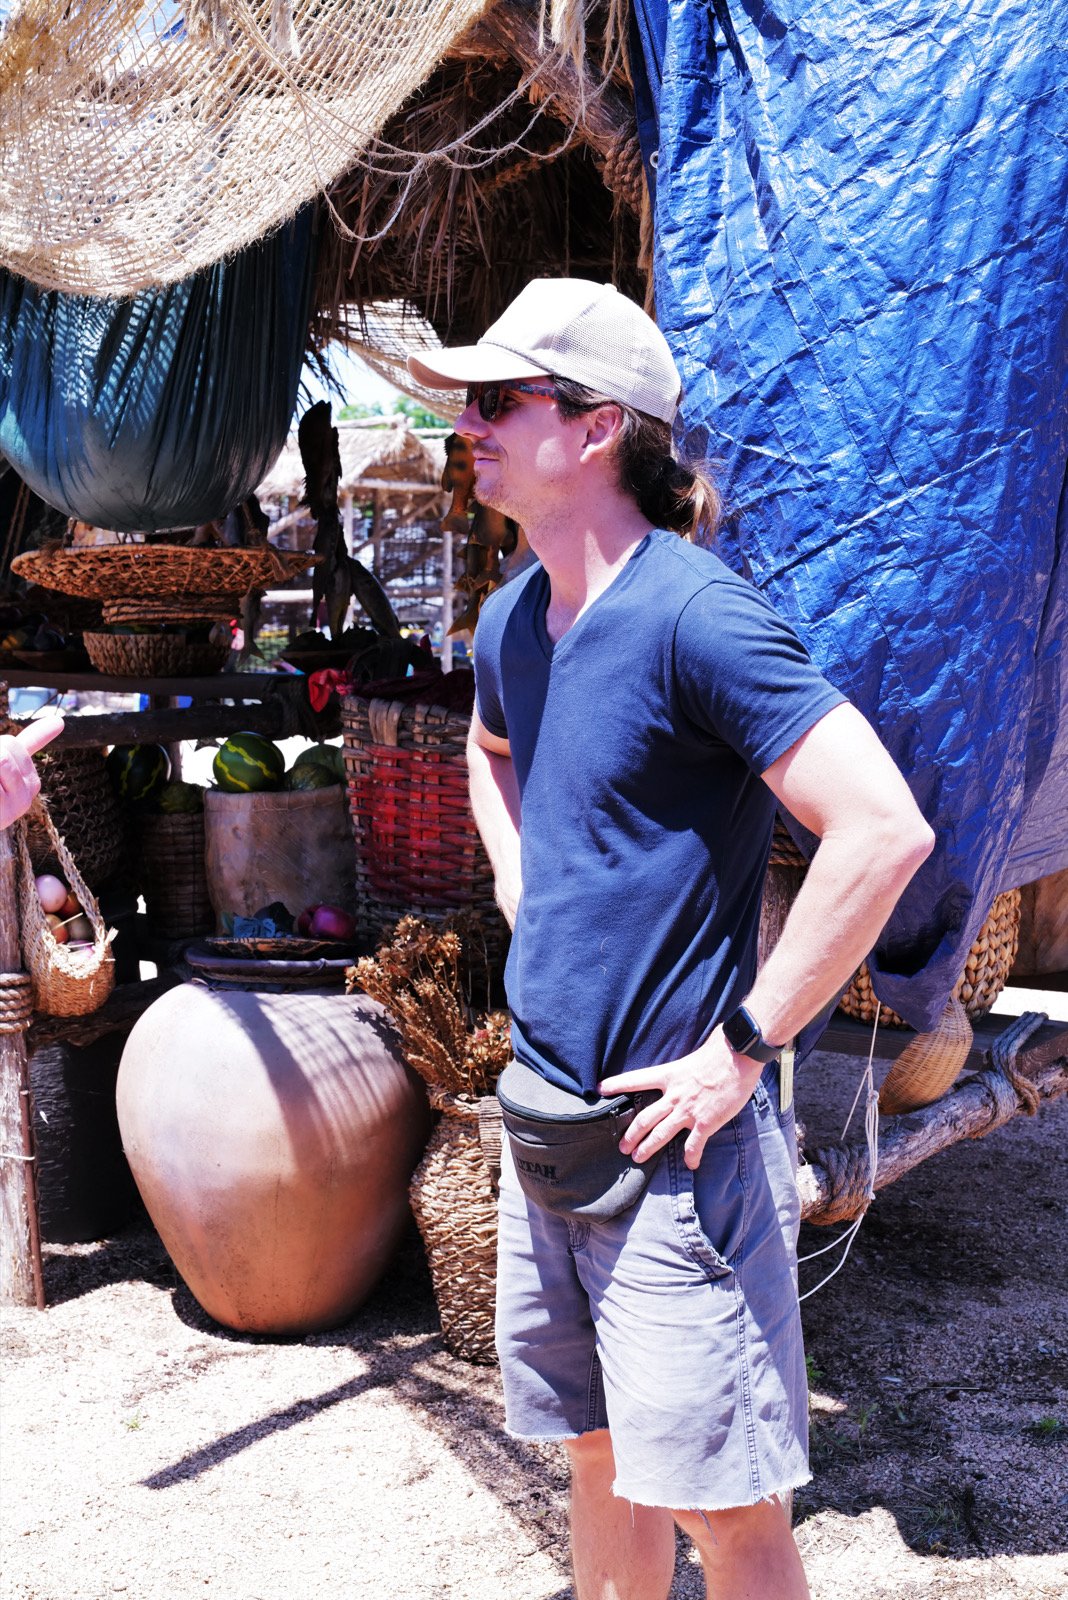
Another aspect I wanted to capture was the people that were there both as tourist and as employees of the location. This shows all of that in one photo as well as how the “more permanent” set features, and then a tarp to protect something not weather resistant too.

Here we have visitors, film crew, actors, film production gear, in a period setting all in one photo. This is what a behind the scenes photo should look like to me. Capturing what is NOT on camera rather than trying to see what is being filmed. This is where the interesting part is at for me. Of course most other people don’t see things like me. They want to see things like the photos below.

Notice how I framed out anything not period correct…
This is fine if you are wanting to maintain the aesthetic of the period in your photos, but that is not my goal.
This is more my speed. Here we have a prop stored in an out of the way spot that is in stark contrast to the modern building in which it is located. Below is another image I quite like. You have a Roman quarter with a prop guy working on decorating the area for an upcoming scene. His presence brings a contrast to the image that makes you wonder about it.
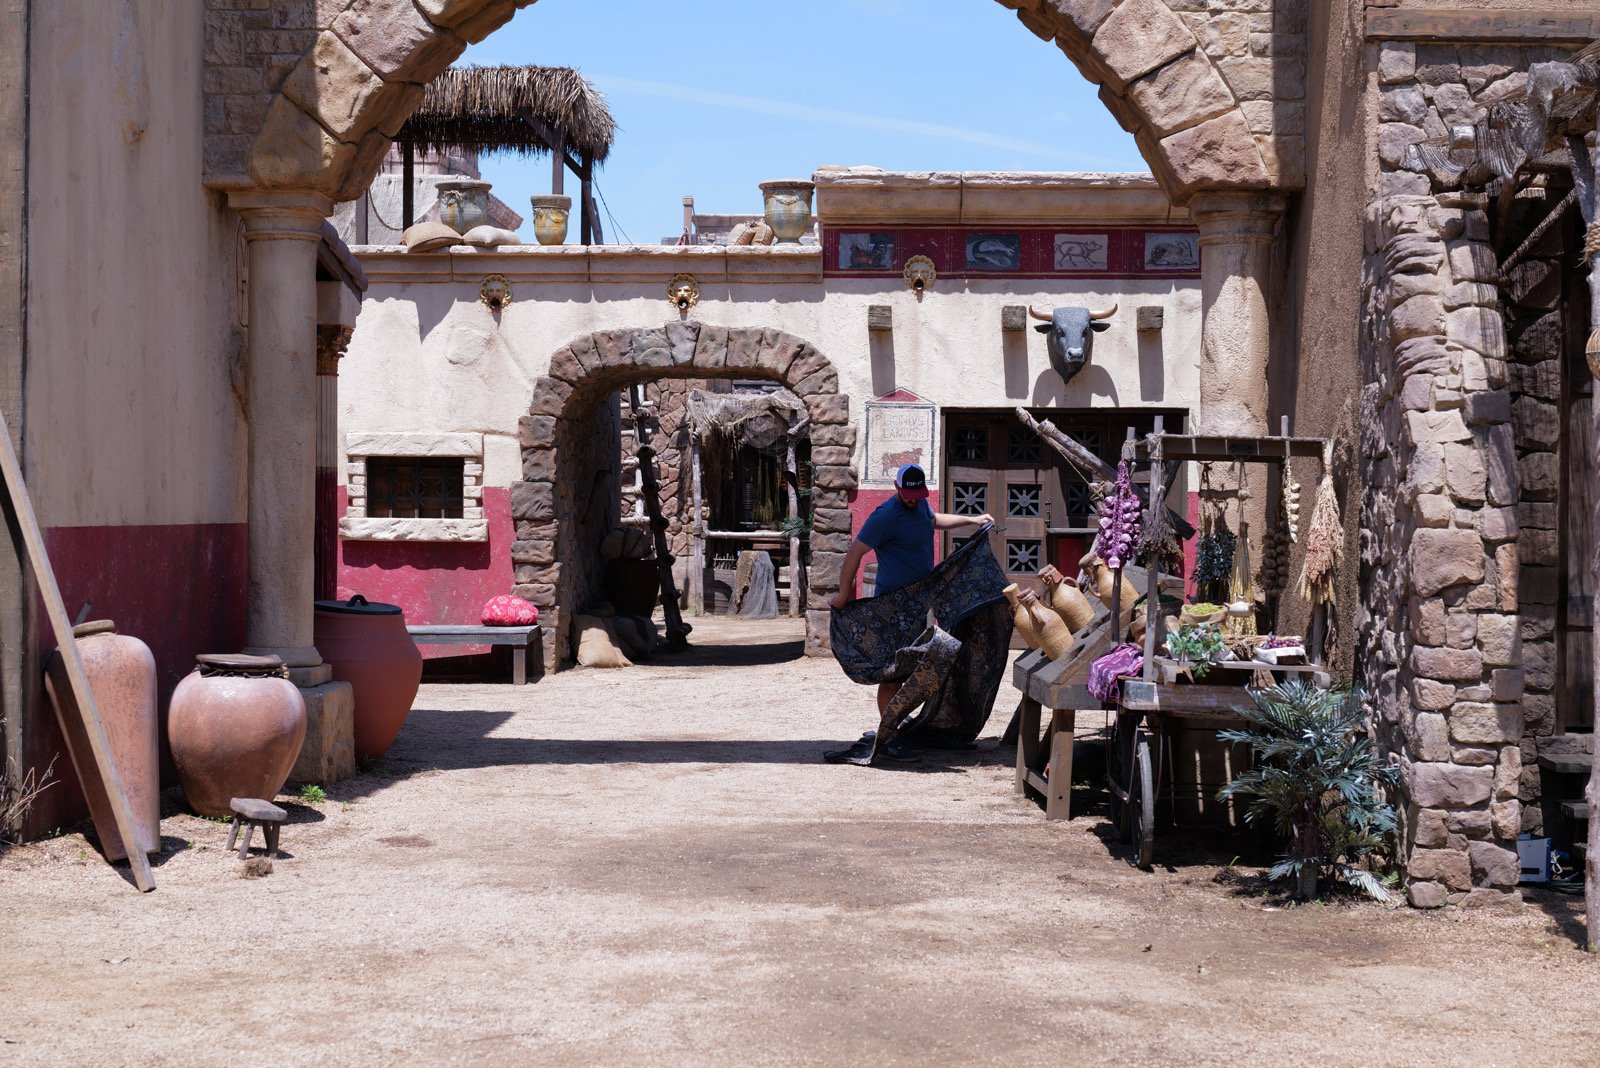

Above is a great example. Here we have gear carts stored in the shade for filming in a nearby area. The juxtaposition is intriguing to me for some reason.
The above image is more subtle though. At a glance it is period correct, but upon closer inspection things will start to appear that should not be there. Like the wheel of a cart or a tarp in the back ground.
As you can see it is fun trying to tell a different story from what the set was built to be used for. The set has become a different part of the actual story which is the behind the scenes life and not first century AD. I hope this has inspired you to do something similar with your photography and thanks for following along!
Getting a fresh perspective on a common event.
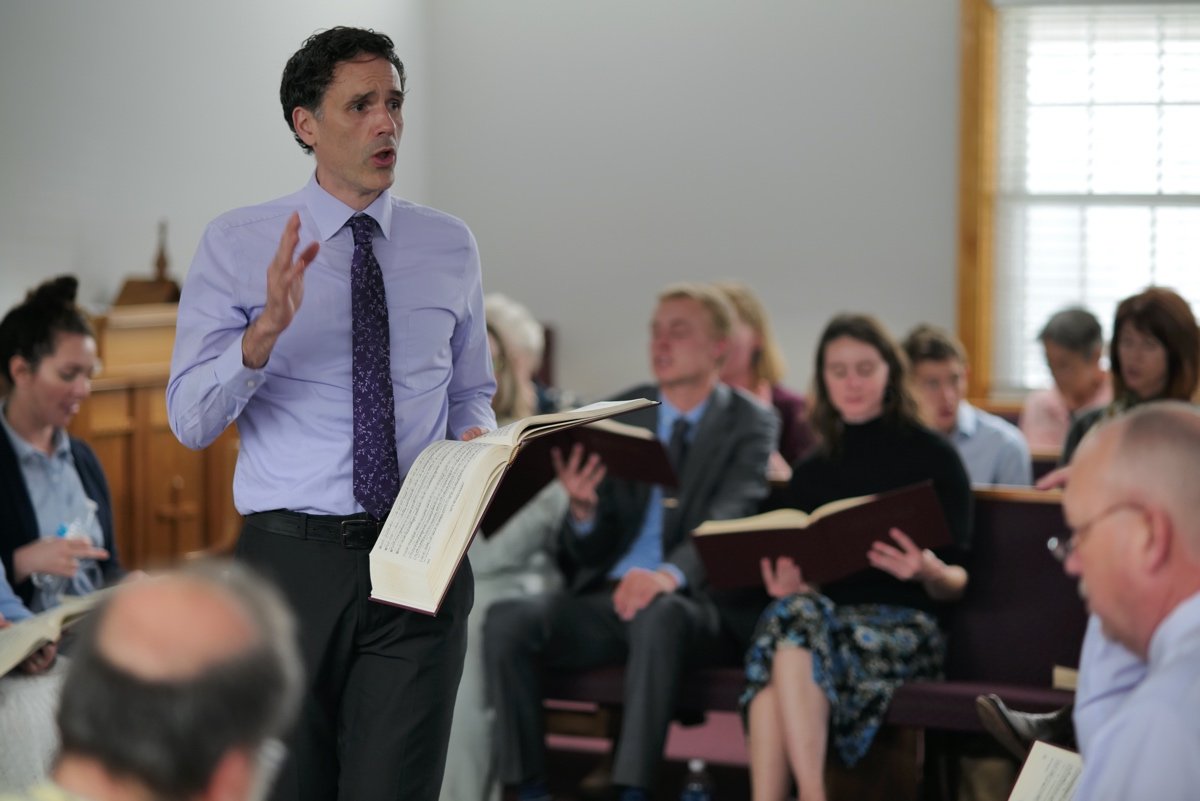
Today I had a thought about what sets my Sacred Harp photos apart from everyone else’s photos.

I thought about this for a while and figured out that my goal is not to simply capture every leader (although that is kind of a side quest) but rather I want to capture the essence of the event as a whole. The reason I say this is because I see others capturing images of just the leaders and usually just from the front straight on. Now to be fair, this does produce good images but for me they are not as interesting. Hence…
When I goto a Sacred Harp singing there is a specific location that I want to be at in the room. It is near the bass section where it meets the tenor section. Now if I were more serious about the photos, and less serious about singing with the class, I would actually goto the other side of the room as most people mark time with their right hand. This makes getting a good photo, which I will spell my recipe for below, even harder since I am on their right side and their hand blocks their face alot.
My “recipe” for a good photo is as follows:
I want them looking at the crowd and not their book if possible (I want to see their eyes)
I would love a strong expression
I want the face to look relaxed and not contorted from singing a strong note
I want their hand in motion and slightly blurred from movement
I want their face properly exposed
I want good white balance
I want them 75 to 80% offset to the side for deep “look space”
Finally, I also want photos of the rest of the event (this is kinda separate but it helps tell the story)
So with that daunting list of requirements delineated let’s take a look at them a little more in depth.

I want them looking at the crowd.
This is kinda standard composition information but this creates a bond in the photo between the leader and the class visually. I want the photo to hold the viewer and have them explore the image.

I love getting a strong expression.
This is really hard to do most of the time. I have certain leaders that I know will give me this and I actually look forward to these leaders for this reason alone. This draws the viewer into the photo and lends an emotional aspect to the image.

I want the face of the leader to look relaxed.
Most of the time, when people lead, they are nervous and it shows in the photos. So I watch for them to relax a little. This usually happens towards the end of the song so I will watch for opportunities to get a better photo then if I can. Sometimes people have odd expressions when they sing as well and this contorts the face to make them look less appealing in the photo, so I will look for pauses in the music to where they might be catching their breath or their part is silent so I can grab a quick photo then. My goal here is to get them actually enjoying the song and not just leading it.
I want the motion blur of them marking time with their hand.
This gets me that “action” look that I am wanting that shows something is happening and that they are not just standing there I want that photos to show that the event is “alive” with activity if possible. By having a little motion blur from the hand moving, it does this without making the whole image blurry. At least for me, it does.

I want their face properly exposed.
This as it turns out, is a really hard thing for me to get right while on the fly. Seems there is almost always a window in the frame and the sunlight is wreaking havoc on the light meter in the camera. I do my best to compensate for this, but sometimes it just doesn’t work right and the person is almost a black silhouette. As a good photographic rule though, this is normally a well exposed part of the image.

I want good white balance.
Again, you would think this would be a no brainer, but as it turns out, this is a lot harder than you would think. You see these events happen normally in venues that are poorly lit with mixed color temperature lights so you never really know what to expect. I will normally grab a white balance value at the beginning, and again at lunch as the sunlight will dope the reading and make your pictures look yellow…

I want them offset way over to one side.
We are talking way past the rule of thirds concept as I am not trying to follow that concept at all, but rather I am wanting to tell a story and it is not about one person, but the class as a whole with the leader just one part of it. The singers are just as important so I want as many of them in the frame as possible to give more context to the image. Sometimes I get a good image and this isn’t the case like with Terry (1st at the top), but this is not what my usual goal is. He leads very uniquely and I love photographing him for this reason.

I want photos of the rest of the event.
You see, there is more than just the singers and the leaders and them singing songs. There are people just there to hear it, kids playing and people eating… Plus this is sometimes the only venue where some people ever meet up so there are lively conversations sometimes as well and lots of laughter. I want to try to capture this as well.

The desert table alone is worth the trip in my book!
This is a tall order to be sure, but I normally get one or two “real keepers” from these singings that will meet either all or nearly all of my rules for leaders. So of those rules are pretty low hanging fruit, like proper white balance, just takes me remembering to take a sample of the interior occasionally to make sure it has not changed on me. some are much harder, like getting position and facial expression and exposure right when they are moving around while they lead… Something I dont strive for though is perfectly sharp images, a little motion blur just adds character to the photo and makes it look like they are actually doing something instead of posting up static for a photo. Also I dont care if the eye isnt tack sharp either as the photo isnt a portrait but rather something closer to reportage in my mind. I like it when the eyes are sharp but it isnt on the list if you will notice. I dont list it because the story is more important to me than that aspect. I dont know why, but that is how I see it. Everyone loves the images when I share them too so I am happy with most of them too…
Do you have a favorite venue or event you like to shoot and do you have a set of personal rules that make us your perfect photo from that event? I would like to hear about your version of this story!!!
Prime lens primer
So you have never used a prime lens before… well let’s change that.

Leica CL with the TTArtisan 35mm f0.95 APS-C prime lens
A prime lens is like a window into another world of photography. They can be had in much larger apertures than zooms usually, they are smaller under most circumstances, and if you get vintage ones…they can produce very unique results.
Another thing that prime lenses are good for is they teach you to compose based on the environment. You have to work within the confines of the focal length which means you will have to either move closer or further away to “zoom” with your feet to get your composition. Sometimes this means not getting a certain shot at all because you would have to stand in the middle of a river to get the composition or something like that. But I rarely run into this problem and once I start seeing in focal length it seems I filter out these problems subconsciously anyway.

Leica CL with the TTArtisan 17mm f1.4 APS-C lens.
You will also learn to see in your chosen focal length over time as well. That is, once you shoot a while with just one focal length… You hear street photographers talk about the 28 or the 35 and they know what the photo is going to look like based on experience.
I will be honest here, it is really liberating to have such a small and potent setup when I run prime lenses. Zoom lenses give you versatility, but I see people that use zoom lenses still carrying a camera bag. This seems overly redundant to me, I use the one lens all day and get out in the environment, but I am not everyone. Some people prefer to have all the options on hand so they can setup and shoot whatever comes their way I guess. Maybe they have missed a opportunity in the past while using a prime and now want the versatility of a zoom to give them better odds in the future should that happen again, I don’t know. Those are some of the speculations I have had, but for me, I just like having something dedicated like the prime brings to the table.
Zoom lenses do serve a purpose though, they are the work horses of the professional photography world. Giving the professional the ability to change focal lengths instantly on demand to fulfill the job at hand. Primes force the professional to move around a lot more to build the composition that the zoom makes short work of. This is important when you are on a clock. Anything that saves time also saves money so zooms have their uses.
So what makes a prime appealing over a zoom? That large aperture and the small size are some of the magic that the zoom lens lacks.

Lenses like the one above with it’s f0.95 maximum aperture can create an effect that nothing else can produce. The “Bokeh” or blurred out background is something that large apertures are well known for. The portrait below is a prime example of the feature. The background was probably 15 feet behind him when I shot this photo.

Primes lenses come into their own when it comes to vintage lenses too. This is where I have found my passion. The old Pentax glass along with the Nikon and early Canon stuff is all phenomenal. I do have some early Leica stuff but the Pentax / Asahi branded glass is just awesome. I also will try about anything to see what the photos are like as well. I have even adapted some glass that should not be able to be adapted like some Argus lenses. I documented that process on my YouTube channel if you want to see how I was able to make that work. Argus had a unusual way to drive the focus on the lens and it posed a challenge to get it to work.

One of my favorite vintage lens brands is Pentax and the Asahi Optical company.
With the advent of the mirrorless camera, we now have a flange distance that is conducive to adapting these vintage lenses to our cameras easily and the electronics in the camera make using these lenses even easier than ever as well. Things like focus magnification and focus peaking as well as exposure preview to see how the image will look before you press the shutter are great for coupling vintage primes to your new shiny mirrorless camera. Some even allow image stabilization via sensor stabilization so you even get that feature with vintage glass sometimes.
So if you have not used prime lenses in the past, I implore you to get a simple one, like the 50mm f1.8 on full frame (affectionately named the “nifty fifty”) or it’s APS-C little brother, the 35mm f1.8 DX (Nikon uses the term DX for their APS-C cameras) and put it on your hobby camera and leave it there for a month. It will either make you hate primes or fall in love with them. For me I got the 35mm f1.8, installed it on my Nikon D7000 and left it for almost a year without removing it. I really loved that lens.
So until next time, get your camera out and go take some photos with it!
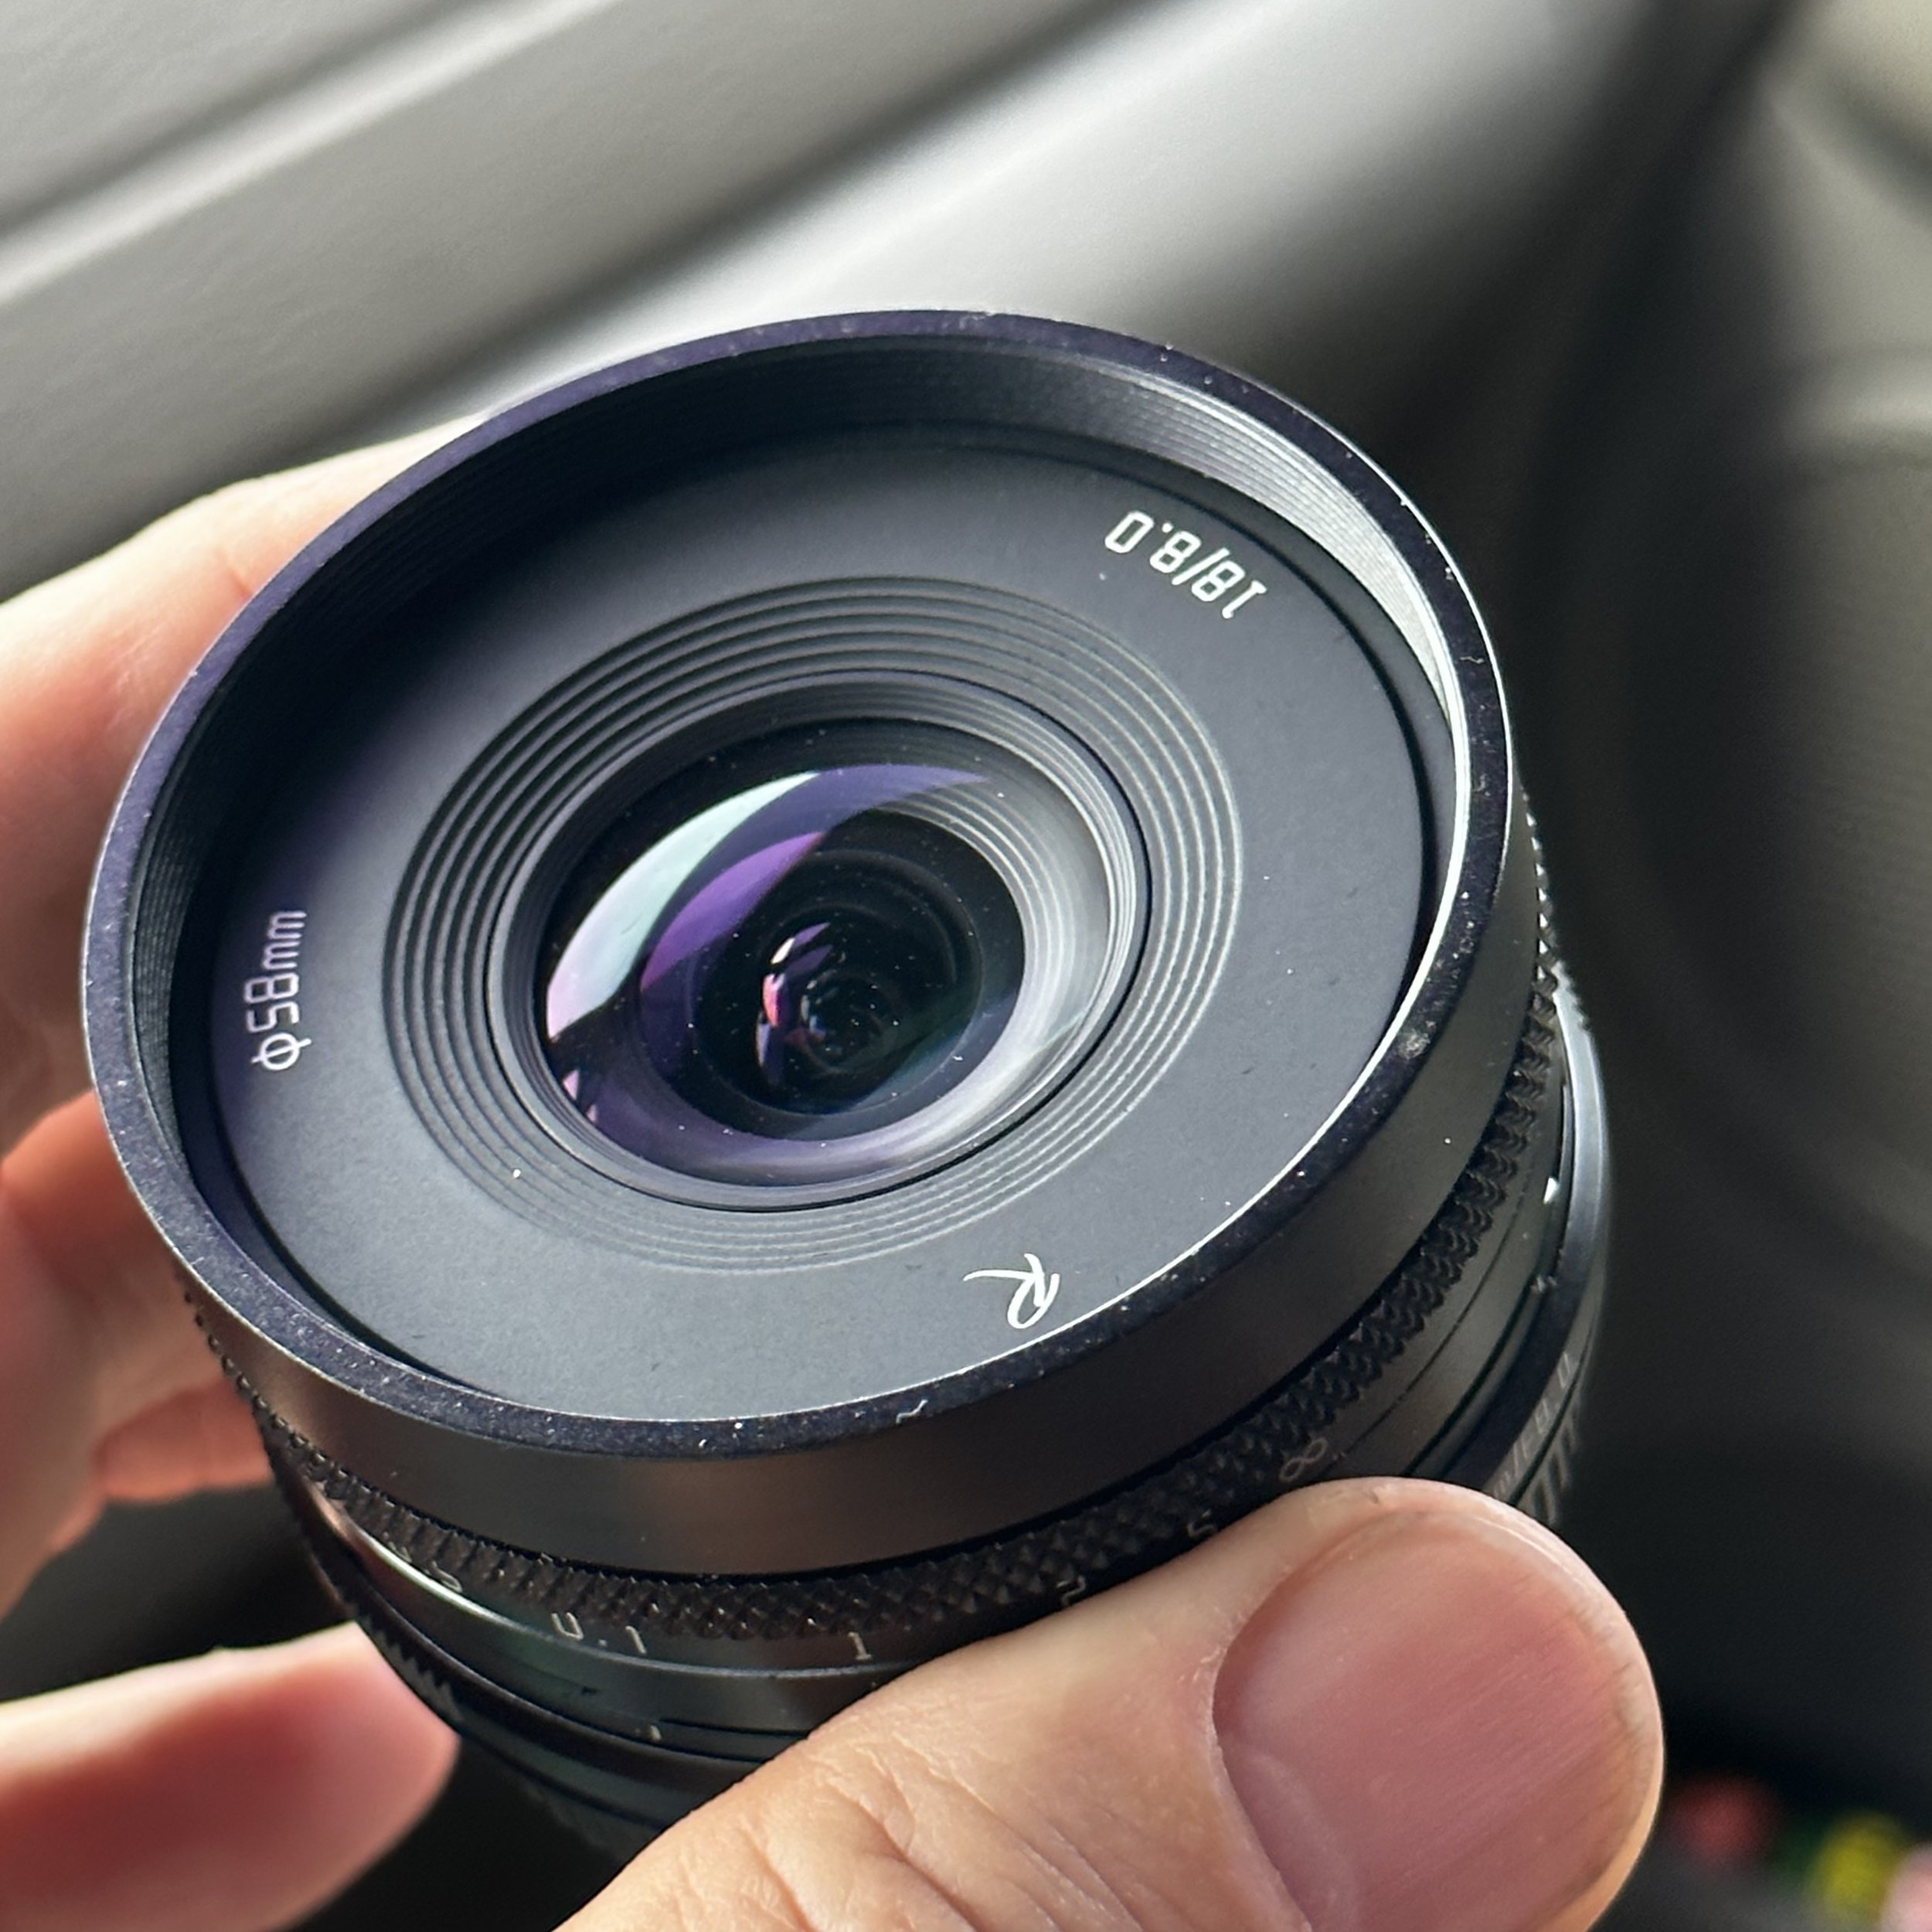
Astrhori 18mm F8 Tilt Shift Lens Review
Camera gear is a interesting thing. ESPECIALLY for photographers as they love collecting it for some reason or another. I have reviewed quite a few lenses over the years on this channel, but never a tilt-shift version of anything. This is because these lenses are very specialized and usually very expensive too. Not having a focal length that I normally use is also another reason I have not bought one before.

Well, Phil Thach was contacted by Pergear about a lens they we’re launching and he recommended me to them. Thank you Phil, I appreciate the contact.
So after some emails, they sent me the sample lens for review. This particular unit did not come in a box but rather just a heavy ziplock bag. I am pretty sure the actual retail variant will be in a really nice box, so don’t worry about that. The lens is really neat for what is happening with it. You see, this little guy has a couple of cool features that most other lenses in the range do not have and it lacks on feature that almost all of the others does have.
The lens has the shift feature from “tilt/shift” lenses without the tilt function. It also has a rotation feature that allows the user to index the shift feature in 45 degree increments. So if you need it to correct vertically, you can do that. It will only shift in one axis at a time as well. This isn’t a real problem though as the intended use case for this lens is correcting converging lines on architecture and such. So you set the shift axis to match you framing and there you have it.
It will shift 6mm in each direction from center and this is more than enough for almost all scenarios. It does vignette the corners on full frame at the extreme ends of this range but carerful application of photo editing software should be able to fix this.
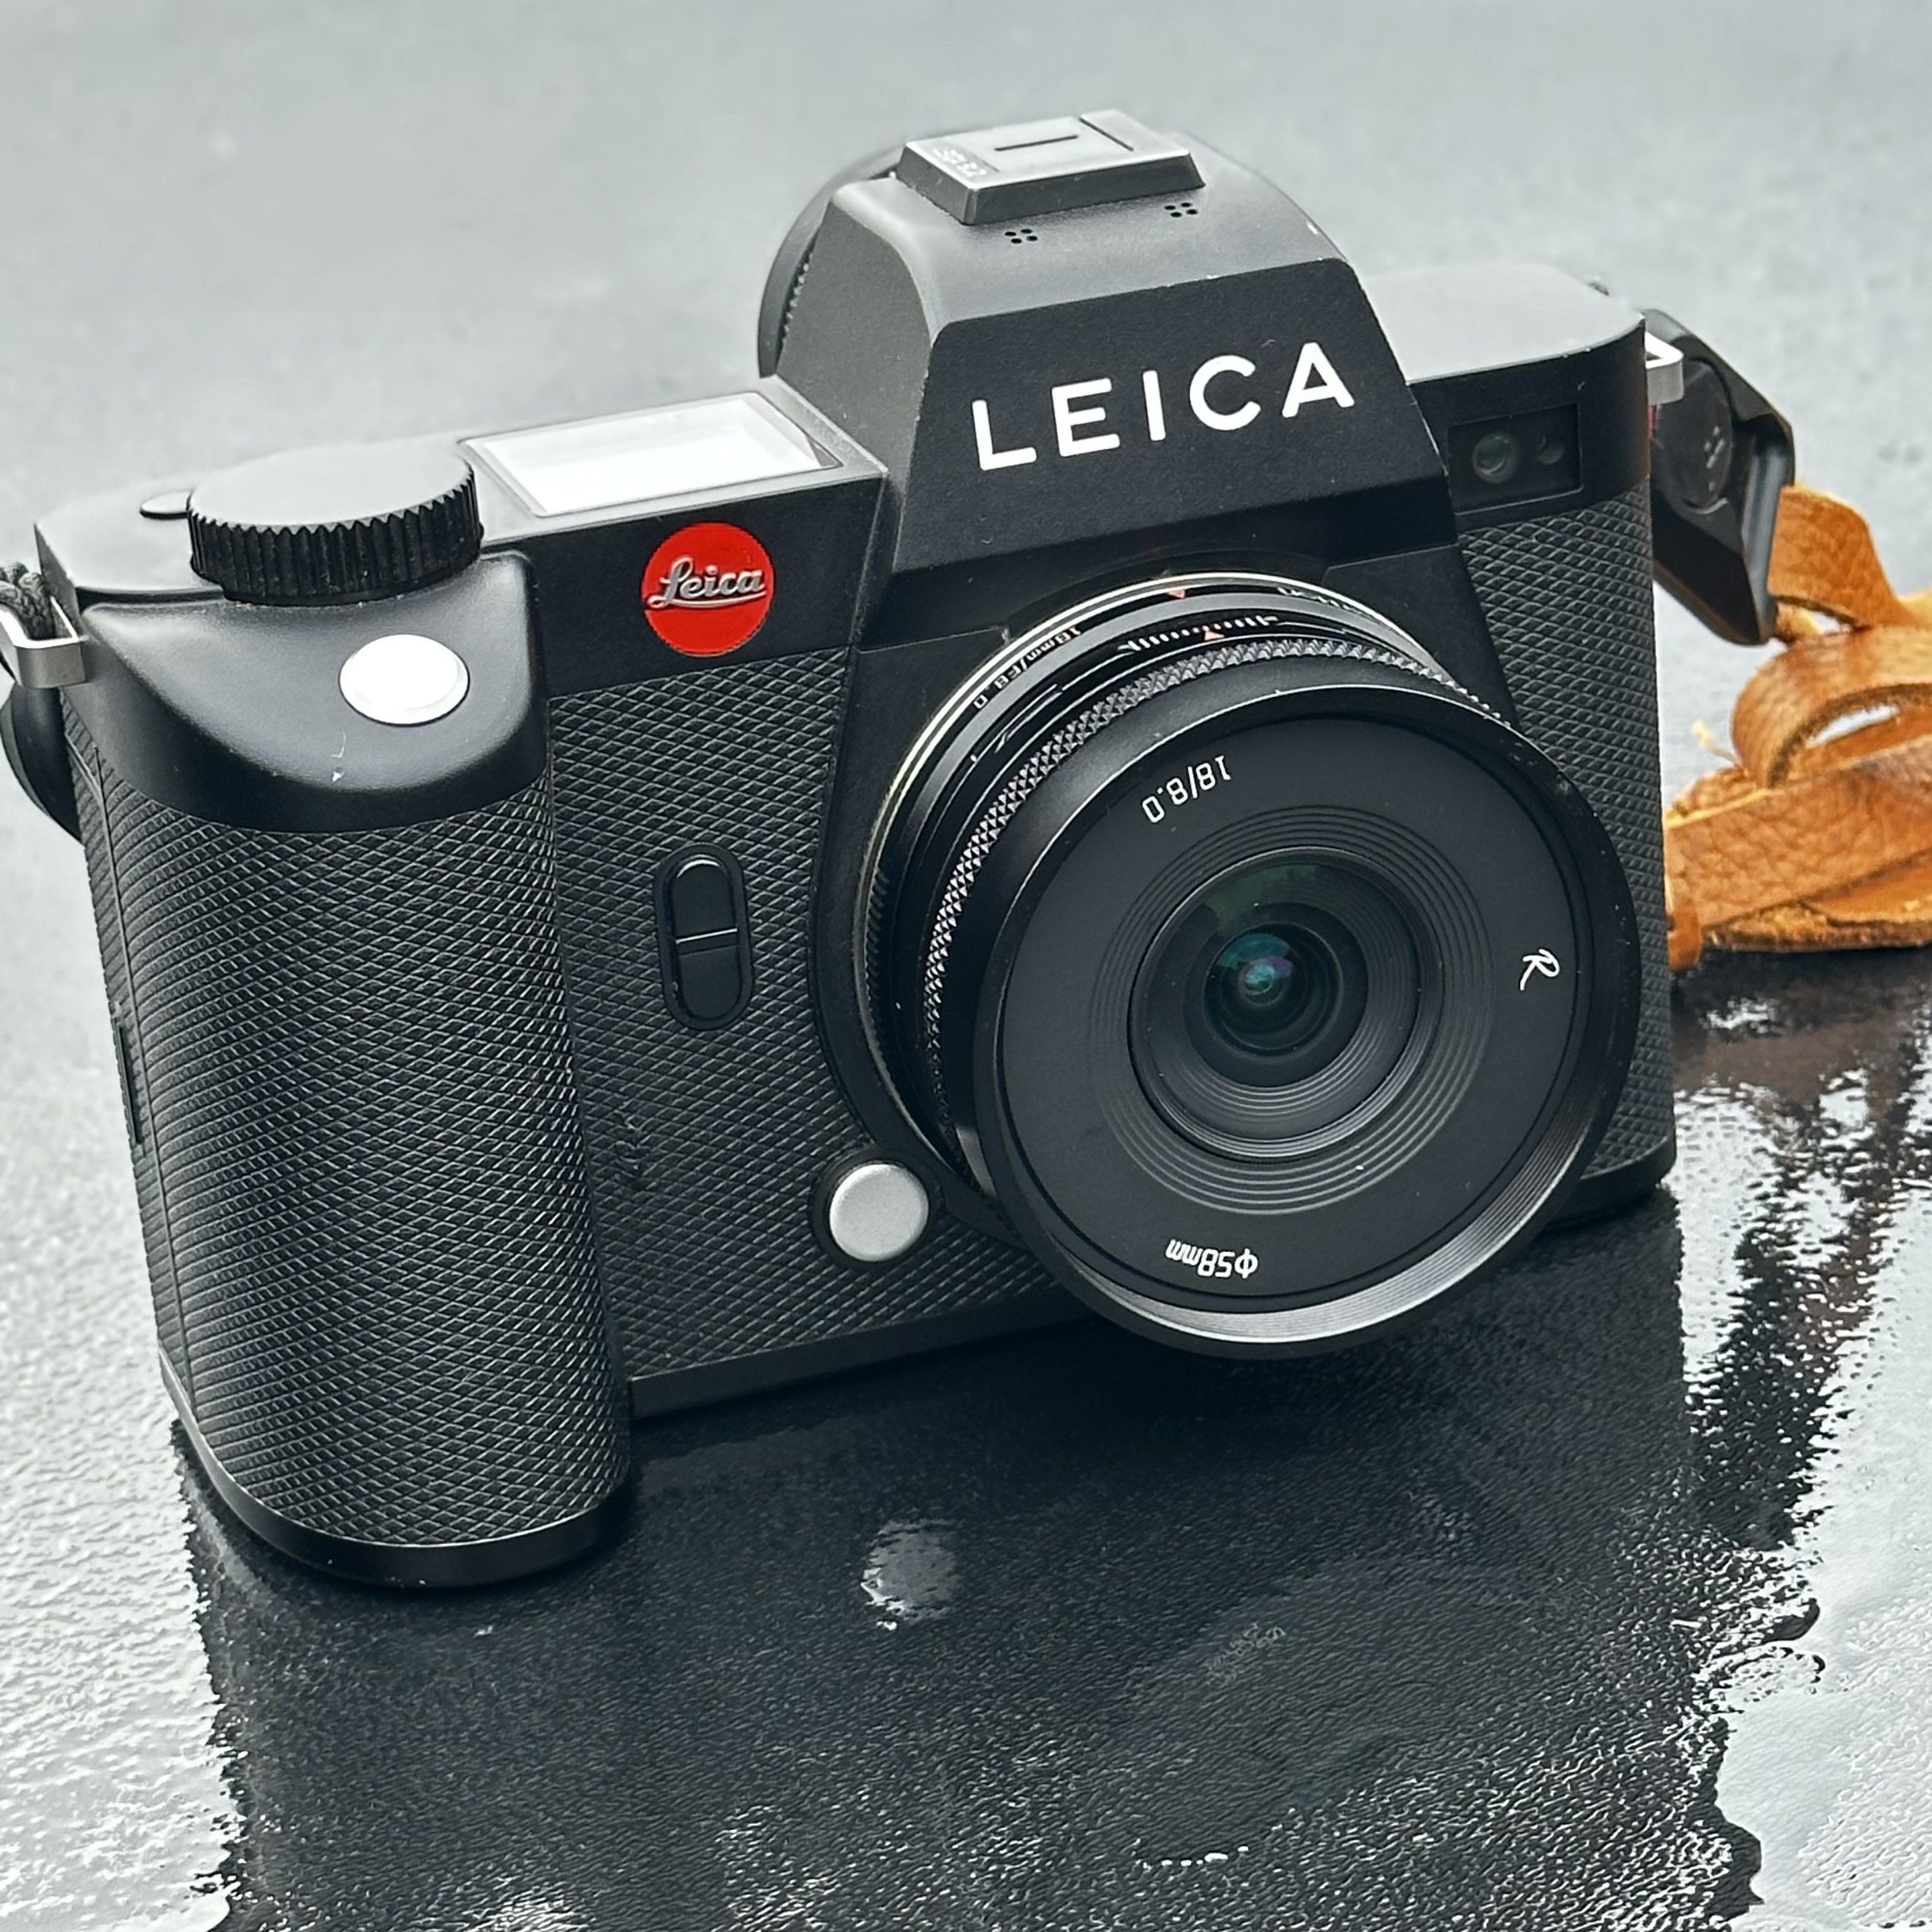
While using this lens, I have learned a few things about it though that I would like to share with you if you are consider getting one of these lenses for architectural photography. Honestly, I cant recommend it. If you plan to be a serious architectural photographer, it is worth the money if you want to dabble in this type of photography, just to see if you are interested because it is a cheaper alternative than a full on tilt/shift lens from any of the major manufacturers. But it lacks certain features that those lenses possess and that makes it more difficult to work with. Also, the build quality is lower than the Nikon and Canon alternatives and makes this lens less desirable in that manner as well. Another problem is that it is a fixed f-stop lens and it is 18 mm only. Traditionally, tilt shift lenses can be had in multiple focal lengths other than 18mm and variable F stops, this one has neither of those functionalities. It is a neat little pancake lens that is easy to use as a street photography lens on a crop sensor camera though, so when I put it on my Leica CL it worked wonderfully for just point shooting.

The F8 aperture and the 18 mm focal length gives you very deep depths of field that makes most everything in focus in your photos. So simple that it only required you to do little more than point the camera at the subject and fire the shutter. This is very beneficial for street photography purposes. A problem kept arising though, when I was shooting street photography with it using my Leica CL was that if I bump the lens, it would shift it or just letting it ride on a camera strap around my neck would be enough inertial force to shift the lens off axis. This is a problem as you could guess. So I really do not recommend this lens unless you were into novelty lenses or you were wanting to dabble in architectural photography with a little correcting shift lens, otherwise I would honestly say do not buy this lens and spend your money on something else.
My loadout for flying with camera gear.
Traveling over the years to locations that require flying commercial has taught me a few things about what to take.
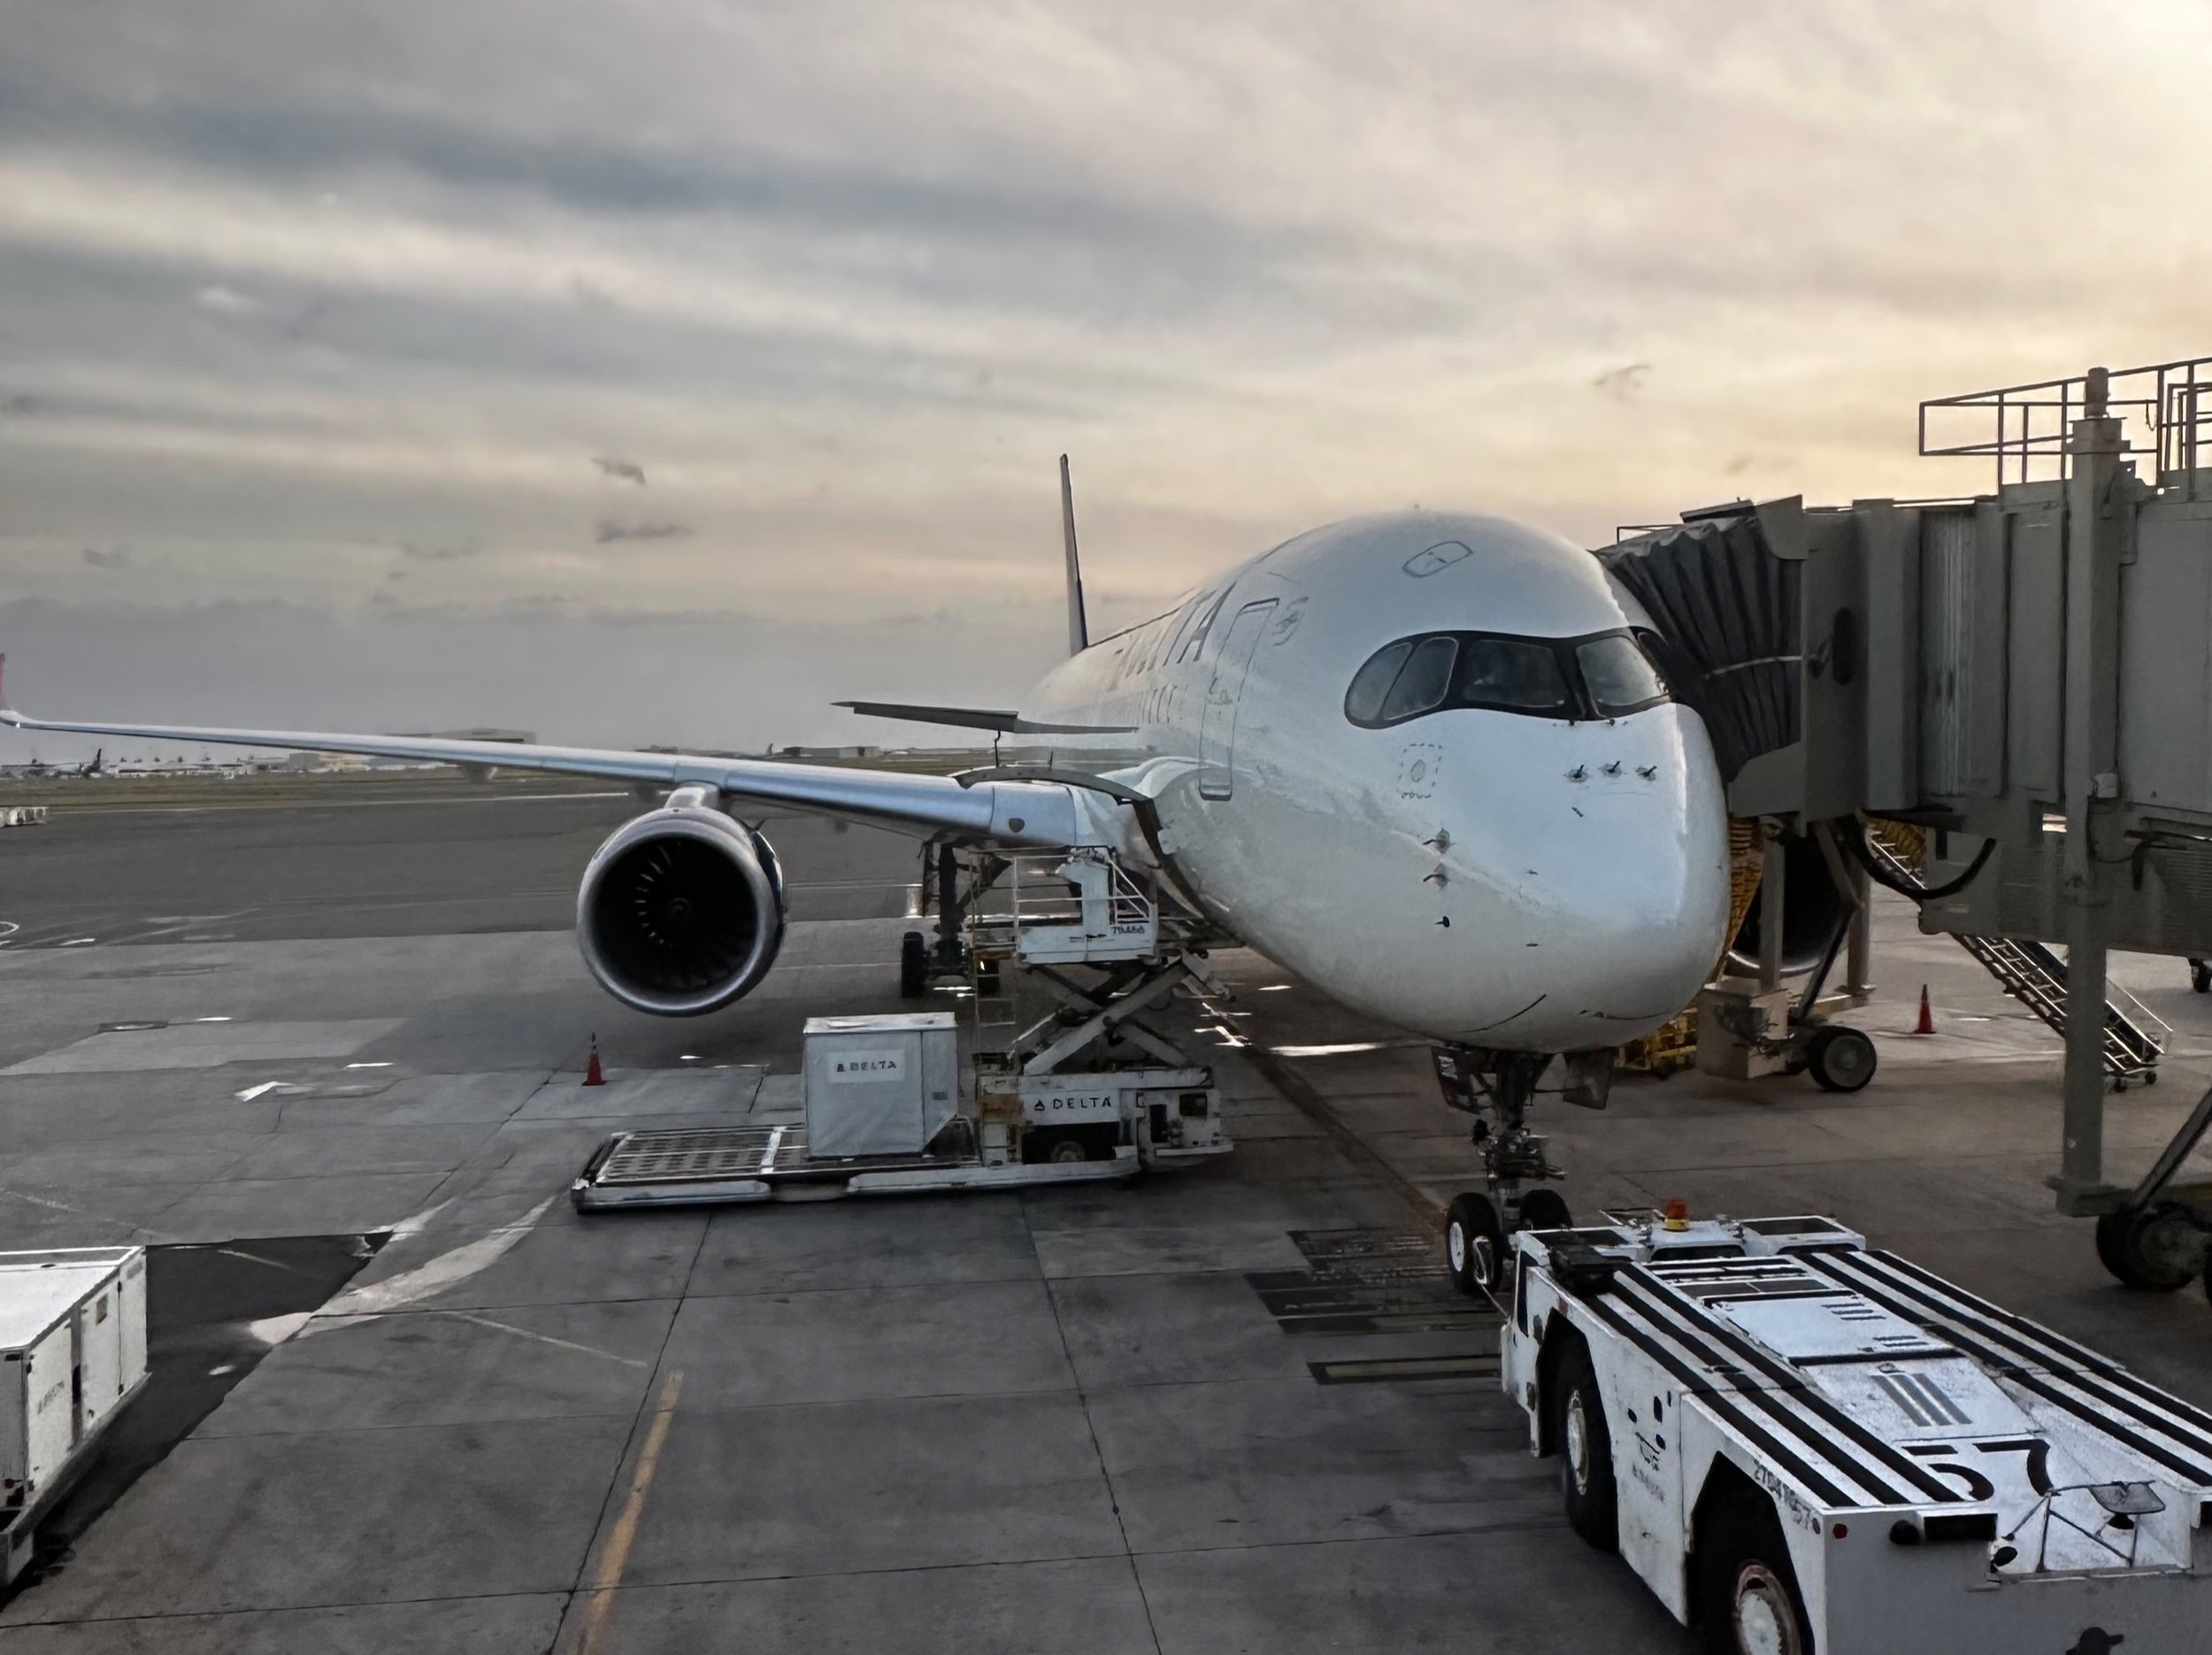
I once carried almost everything I owned when I traveled so I was sure to have whatever I needed for a certain photographic event. Well, with time comes wisdom… I have been adjusting the loadout and searching for the best solution as far as bags go and have finally found the perfect setup…FOR ME. You see, different people have different needs and your loadout will vary depending on your personal needs and wants.
When I traveled early on, I carried a large shoulder bag, very large mind you and a ton of kit in it. I had to fill it up you know! Lol.
Well after a couple of trips like that, I learned that I needed a different bag. So the giant Vanguard bag was retired and replaced with a Thinktank Airport International v2. This was a nice upgrade and allowed me to travel with more confidence in knowing my gear was protected better and it was also a roller bag! No more lugging that massive shoulder bag all over creation!!!
Well, I still use this bag from time to time, but only for roadtrips in my truck. The irony of this statement is not lost on me. I bought a literal aircraft carry own style, camera bag and now I dont even take it when I fly at all.

Thinktank Photo Airport International 2.0
So I learned the hard way something about marketing with this bag. Thinktank Photo will tell you, probably with an asterisk, that this bag will fit in standard overhead spaces. This isn’t so and I learned this the hard way on a trip coming home from Hawaii one year. On the last leg of our long journey, we boarded a small commuter jet and the overhead storage bins were just too small. This is when I got a VERY sick feeling in the pit of my stomach. You see, this meant I had to valet check this bag at this point. If you have never watched baggage handlers loading luggage then you dont know the horror movie I was imagining my expense and fragile camera gear was about to experience. They can be quite rough with check bags, we have had them arrive at baggage claim with wheels missing and such. So I tell the flight attendant my plight and she saves the day by stowing my roller bag of camera gear in what amounts to her broom closet. I almost cried in appreciation. That was the straw the broke the cameras back of roller bags for me.

Pictured here are the Peak Design Everyday Messenger bag and the Thinktank photo street walker backpack.
After the Airport International “incident”, I decided I needed to downsize my kit for multiple reasons. The main one being that I didn’t want to have to valet check my bag because it wouldn’t fit in the overhead bin.
The next reason is the most important though. I was tired of carrying gear I didn’t use or even need.

Taken with the Nikon Z50 handheld and using the kit lens.
So I decided to get something new and smaller. I chose something that had been on the market for just a short time at this point. I chose a Peak Design Everyday Messenger Bag. It is a wonderful way to carry camera gear for the most part with one exception. I cant really carry my big telephoto lens I use for wildlife. I tried it for a couple of years and at the time, I was using a large system consisting of a Nikon D810 with battery grip and the 200-500mm super zoom lens. This combination is very large and would leave me with room for just a couple of smaller lenses. It also came with another problem…pain. Single strap bags are great as long as they are not heavy, which is exactly what mine was at this point in time. So the search continues and I found another Thinktank Photo bag.
The next bag I chose was the Streetwalker v2. This is a smaller bag that is backpack style and is really comfortable. The single shoulder strap on the messenger bag would make my shoulder incredibly sore after just a couple of hours of carry. I tried this for a couple of years and paid the price. The streetwalker solved that problem in short order. It was at this point in my photography journey that I was finding smaller cameras like the Fuji XT3. I took this camera to Israel for a ten day trip and it was on this trip that my eyes were opened to carrying excessive equipment is wasteful. I took three lenses with me and only used one of them. Yes, I used the KIT LENS for the whole trip and it worked gloriously!!! All the while I was carrying around all this other crap and just getting back to the kibbutz tired every day.
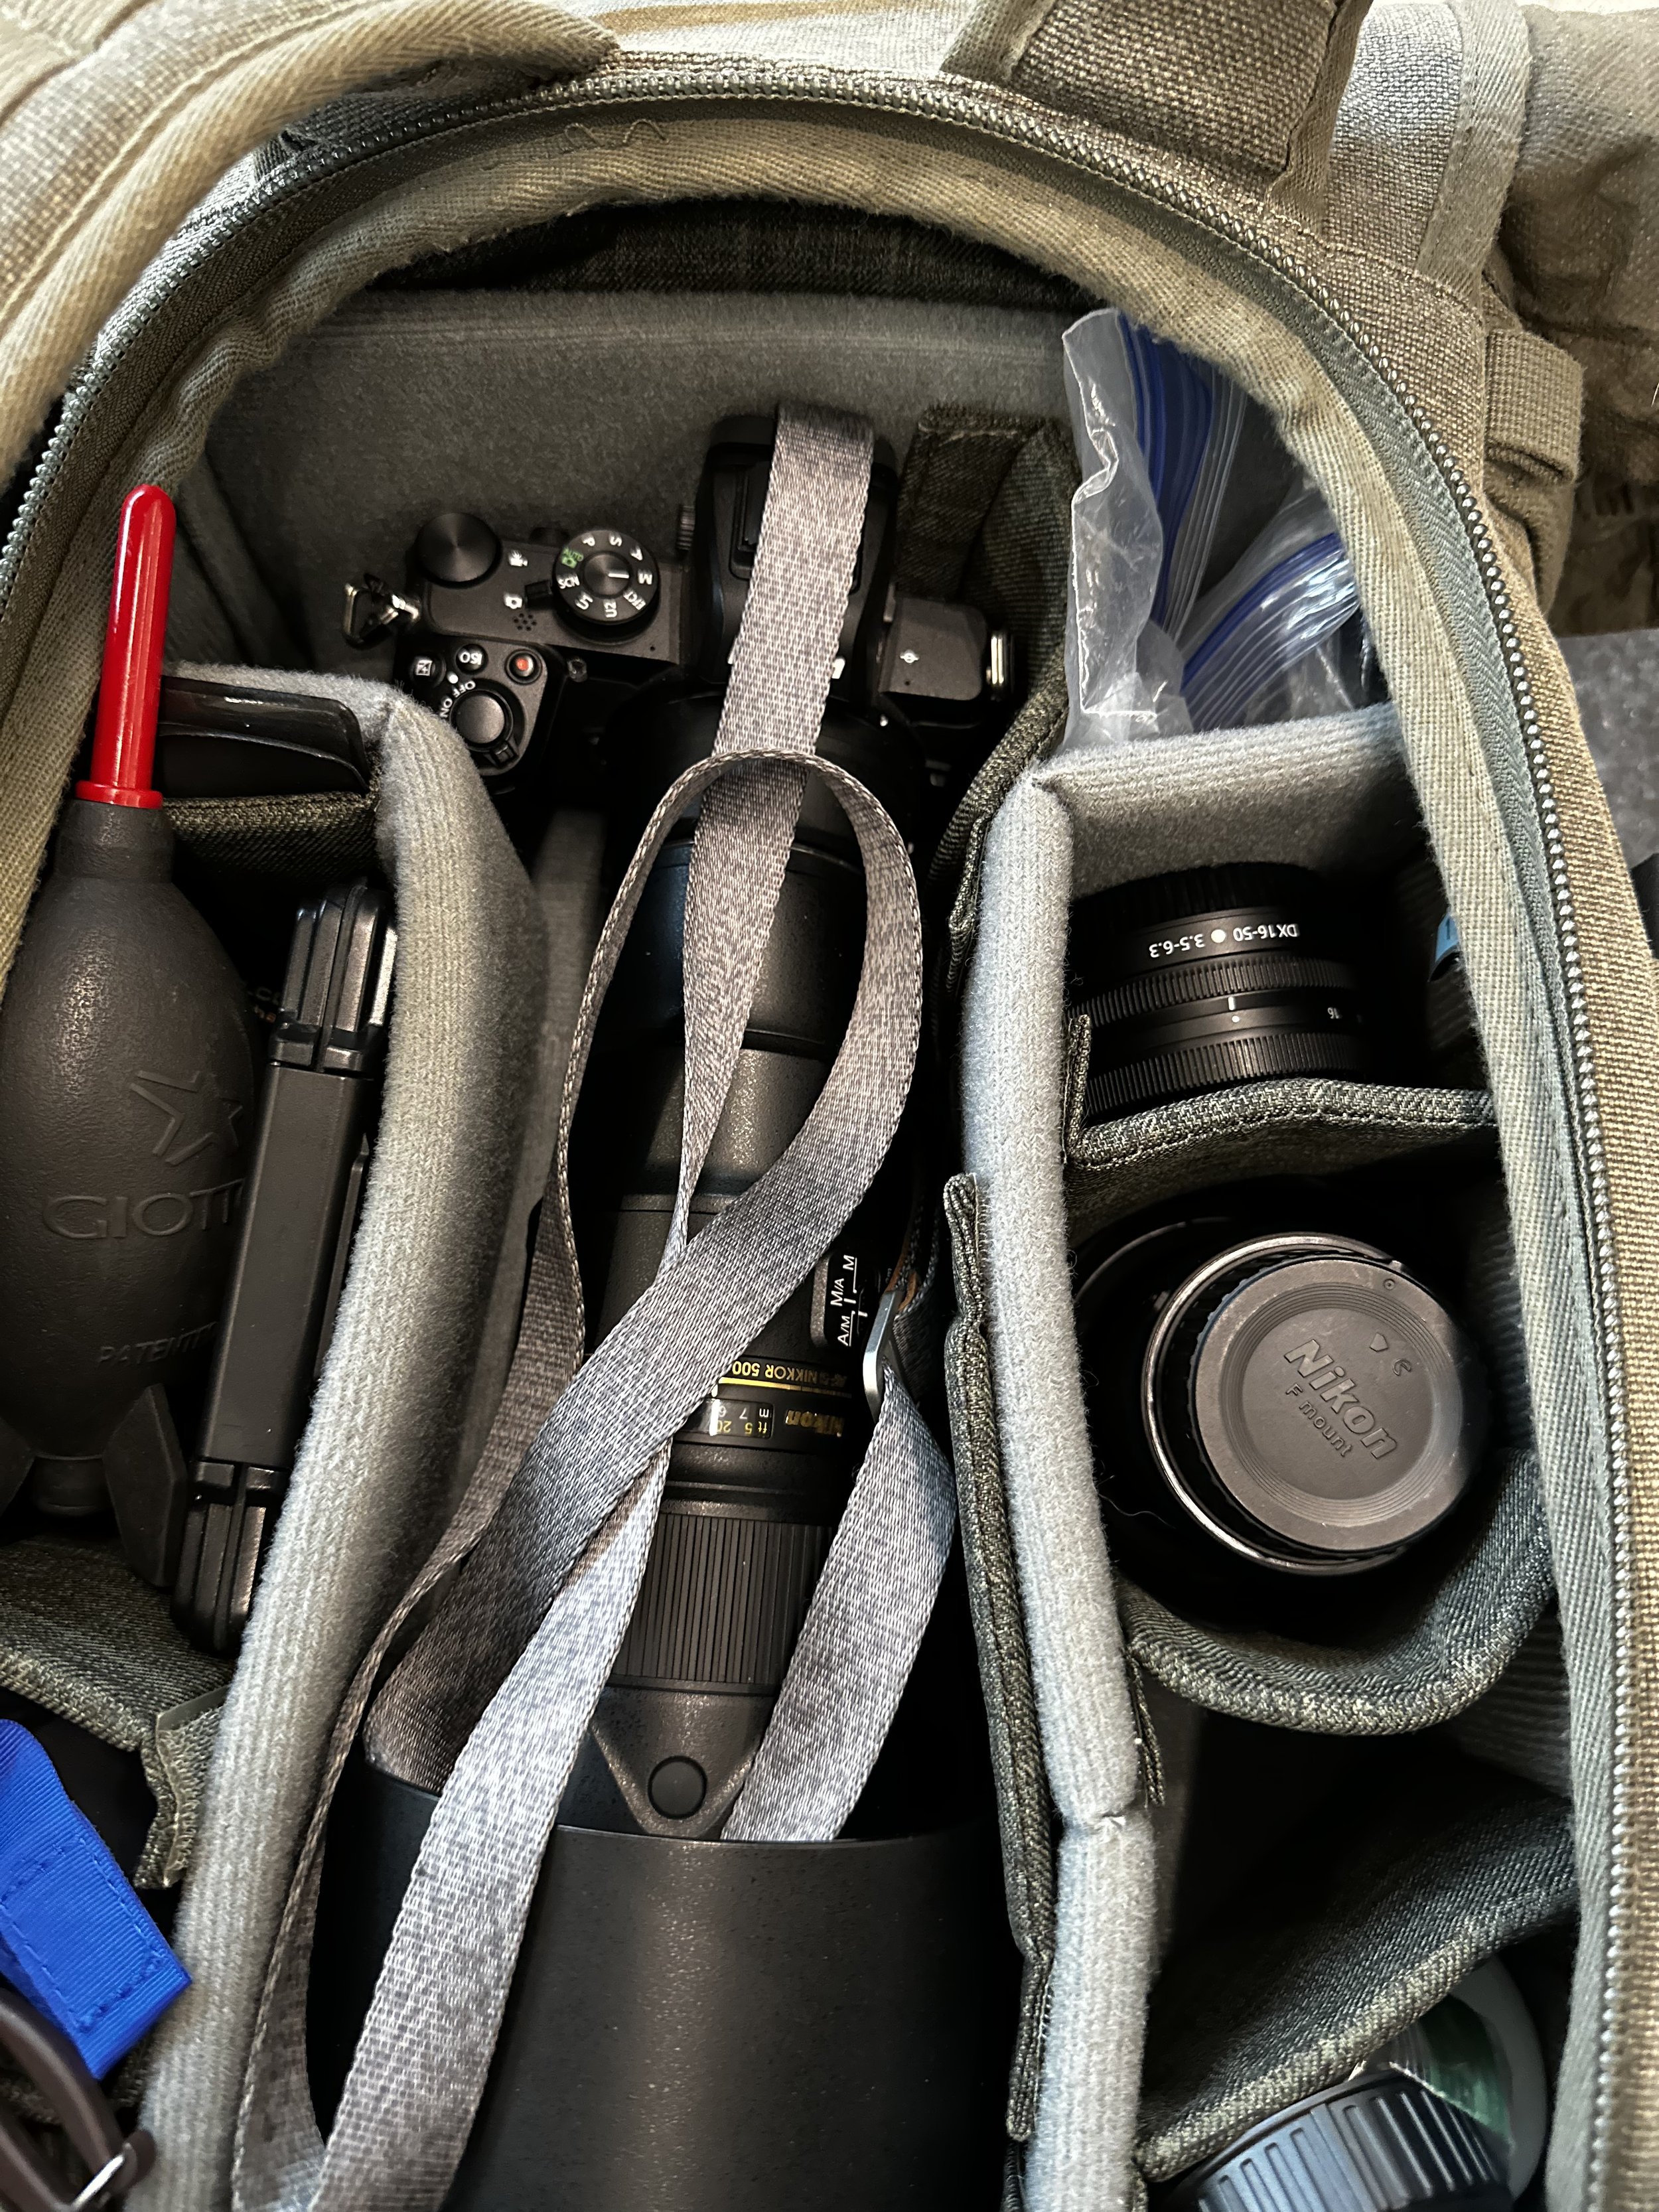
Current travel load out, Z50, 500mm PF, 16-50mm Z Kit, and 10-20mm F mount Nikkor/FTZ adapter.
Well, I finally figured out that the smaller pack was the way to go, but it really didn’t have room for the big wildlife rig I liked to use… It also had one other critical shortcoming that I noticed from regular use. The pack opened to the top when unzipped. What this means is you take off the pack and lay the side that normally sits against your back, on the ground facing down to access the gear area. At this point, I was doing a great deal of photowalks and hikes to waterfalls and such and this caused lots of dirt on the back of my shirt… To say this was frustrating is an understatement but I carried on till…

Enter the Thinktank Photo Retrospective 15L. For my needs, this is as close to perfect for a camera bag as I have ever found. It opens from the back, the side against my body which means you lay to outside one the ground, keeping all the leaves, twigs and dirt off of my shirt. It is slightly larger (15 liters in size) so there is room for my wildlife kit. It is REALLY comfortable and it is made of stone washed canvas. So it has a nice look (it doesn’t look like a nylon camera bag) and has a great feel. This is a hallmark of Thinktank Photo from what I have seen. Their backpacks are very comfortable. So now that I have landed on the perfect camera bag after almost a decade of searching, I can now shift focus to the gear I put in it.

Taken with the Nikon Z50 with the FTZ Adapter and the 500mm PF Amount lens.
The gear loadout for my photography usually involves at least two bodies, three general purpose lenses and then my special purpose lenses and all the support gear too. Like a whole cleaning kit complete with blower bulb, dry wipes, wet wipes and solution and sensor swabs… way too many batteries, like I must have thought I was going to take 10,000 photos per day or something. I never needed most of this crap either. I mean almost none of it. What I had was a case of “fill’er up” syndrome. If there was bag space I felt compelled to put something in that space for some reason. This is a terrible way to operate if I must say. You end up tired, sore and resentful of the hobby as you brought all this kit for nothing.

The Nikon Z50 with kit lens makes for a powerful little general photography kit.
So this trip, the bag is scaled WAY back. I mean, there is room in the bag for stuff and nothing is in those pockets. This is a milestone for me, as I am a prepper at heart and want to cover every conceivable contingency under my normal mindset. To be honest, I probably brought at least one lens more than I will need and could have lightened the load some more there, but we will see. So my takeaway from all this is, your hobby is a journey and you will have to figure out your kit for that hobby as you go. For me, it is still an ongoing journey to be honest. Hopefully I can stop spending tons of money on it and just enjoy it. Let’s be realistic though, probably not…Lol.
How important is the time of day when you shoot a photo?
When you take the photo is just as important as what you photograph
Seems there is all sorts of information out there about what to take pictures of, but no one (other than landscape photographers) talk much about the TIME you take your photo. In this article, I want to explore this a little with a simple location that is right down the road from my apartment and show the difference that just a few hours can make in the mood and feel of a location that is being captured.
The camera of choice with my the Leica CL with the TTArtisan 17mm f1.4 lens shot off of a tripod so shutter speed isn’t a problem. I will be maintaining an ISO of 100 for all photos and an aperture of f11 on all photos, so shutter speed will be what I have to change to keep the exposures to where I like them.
The time of day is something that a lot of people think about a little but really don’t put much effort into the planning of the photo. It takes a good bit of reconnoitering to get the location scouted with the vibe you are wanting in the photo. I see these locations all the time, when I am driving around in the day time and when I see them at night it is a completely different scene. Some people like shooting in the daytime, some like the blue hour or golden hour and some, like me, prefer the night… So seeing a night photo while viewing the scene lit by the sun is a problem. I can get somewhat of a visual based on previous photos I have taken of other locations, but until you see it lit by the street lights and 8’ fluorescent tubes, you just don’t know what you will be getting.
I don’t know why I like shooting at night so much, but I do. The low light and the negative space just do something for me and the photos reflect it.

Ybor City has some interesting light that is only available at night.
I do like some blue hour stuff to add the touch of blue sky to my images at times, but not always. Another perk to shooting at night is that it is cooler in the summer months, with temps being generally lower and the sun in not beating down on me, I am more inclined to stay on a location longer and get better images. Street photos at night are a little tougher as I need larger apertures to keep ISO manageable, and this means focus is a lot more of an issue as depth of field is significantly shallower than in the daytime, but it is manageable if you think about it first.
I normally set focus traps and shoot in burst mode and this will usually net me a sharp photo of a scene at night at even crazy large apertures like f1.4 or f0.95… It just takes a bit of practice and patience.
The gear matters…
The gear you use at night matters just as much as the subject you are shooting. If you have the wrong equipment, you simply won’t get the shot.

Fast glass gives you options.
Take for instance, street photography, this is dynamic and has movement in it. For most human movement, a shutter speed of 1/250 second will freeze action sufficiently. 1/200 in a pinch if the subject isn’t moving too much will net sharp photos. Well, to get a decent exposure, you will need fast glass, shot wide open and will still probably need a fair amount of ISO to compensate.
Now, if you are shooting static subjects like buildings or scenes and motion isn’t an issue, you can just let the shutter stay open until the exposure is good, but once you cross about 10 seconds, humans tend to vanish from the scene… Cars make long lines with their headlights as they drive by and things begin to look different. So you can see it all depends on what you want to capture to drive your gear choices here.

I personally like to have fast glass if possible as this is the most versatile lenses. These lenses can still be stopped down for times when you want deeper depth of field and opened up when you need the extra light gathering power of “fast glass”. So whenever possible, I will always opt for the larger aperture option over the smaller, if just makes sense to me to have that extra optional aperture when needed. The old adage “better to have it and not need it than to need it and not have it” comes to mind…
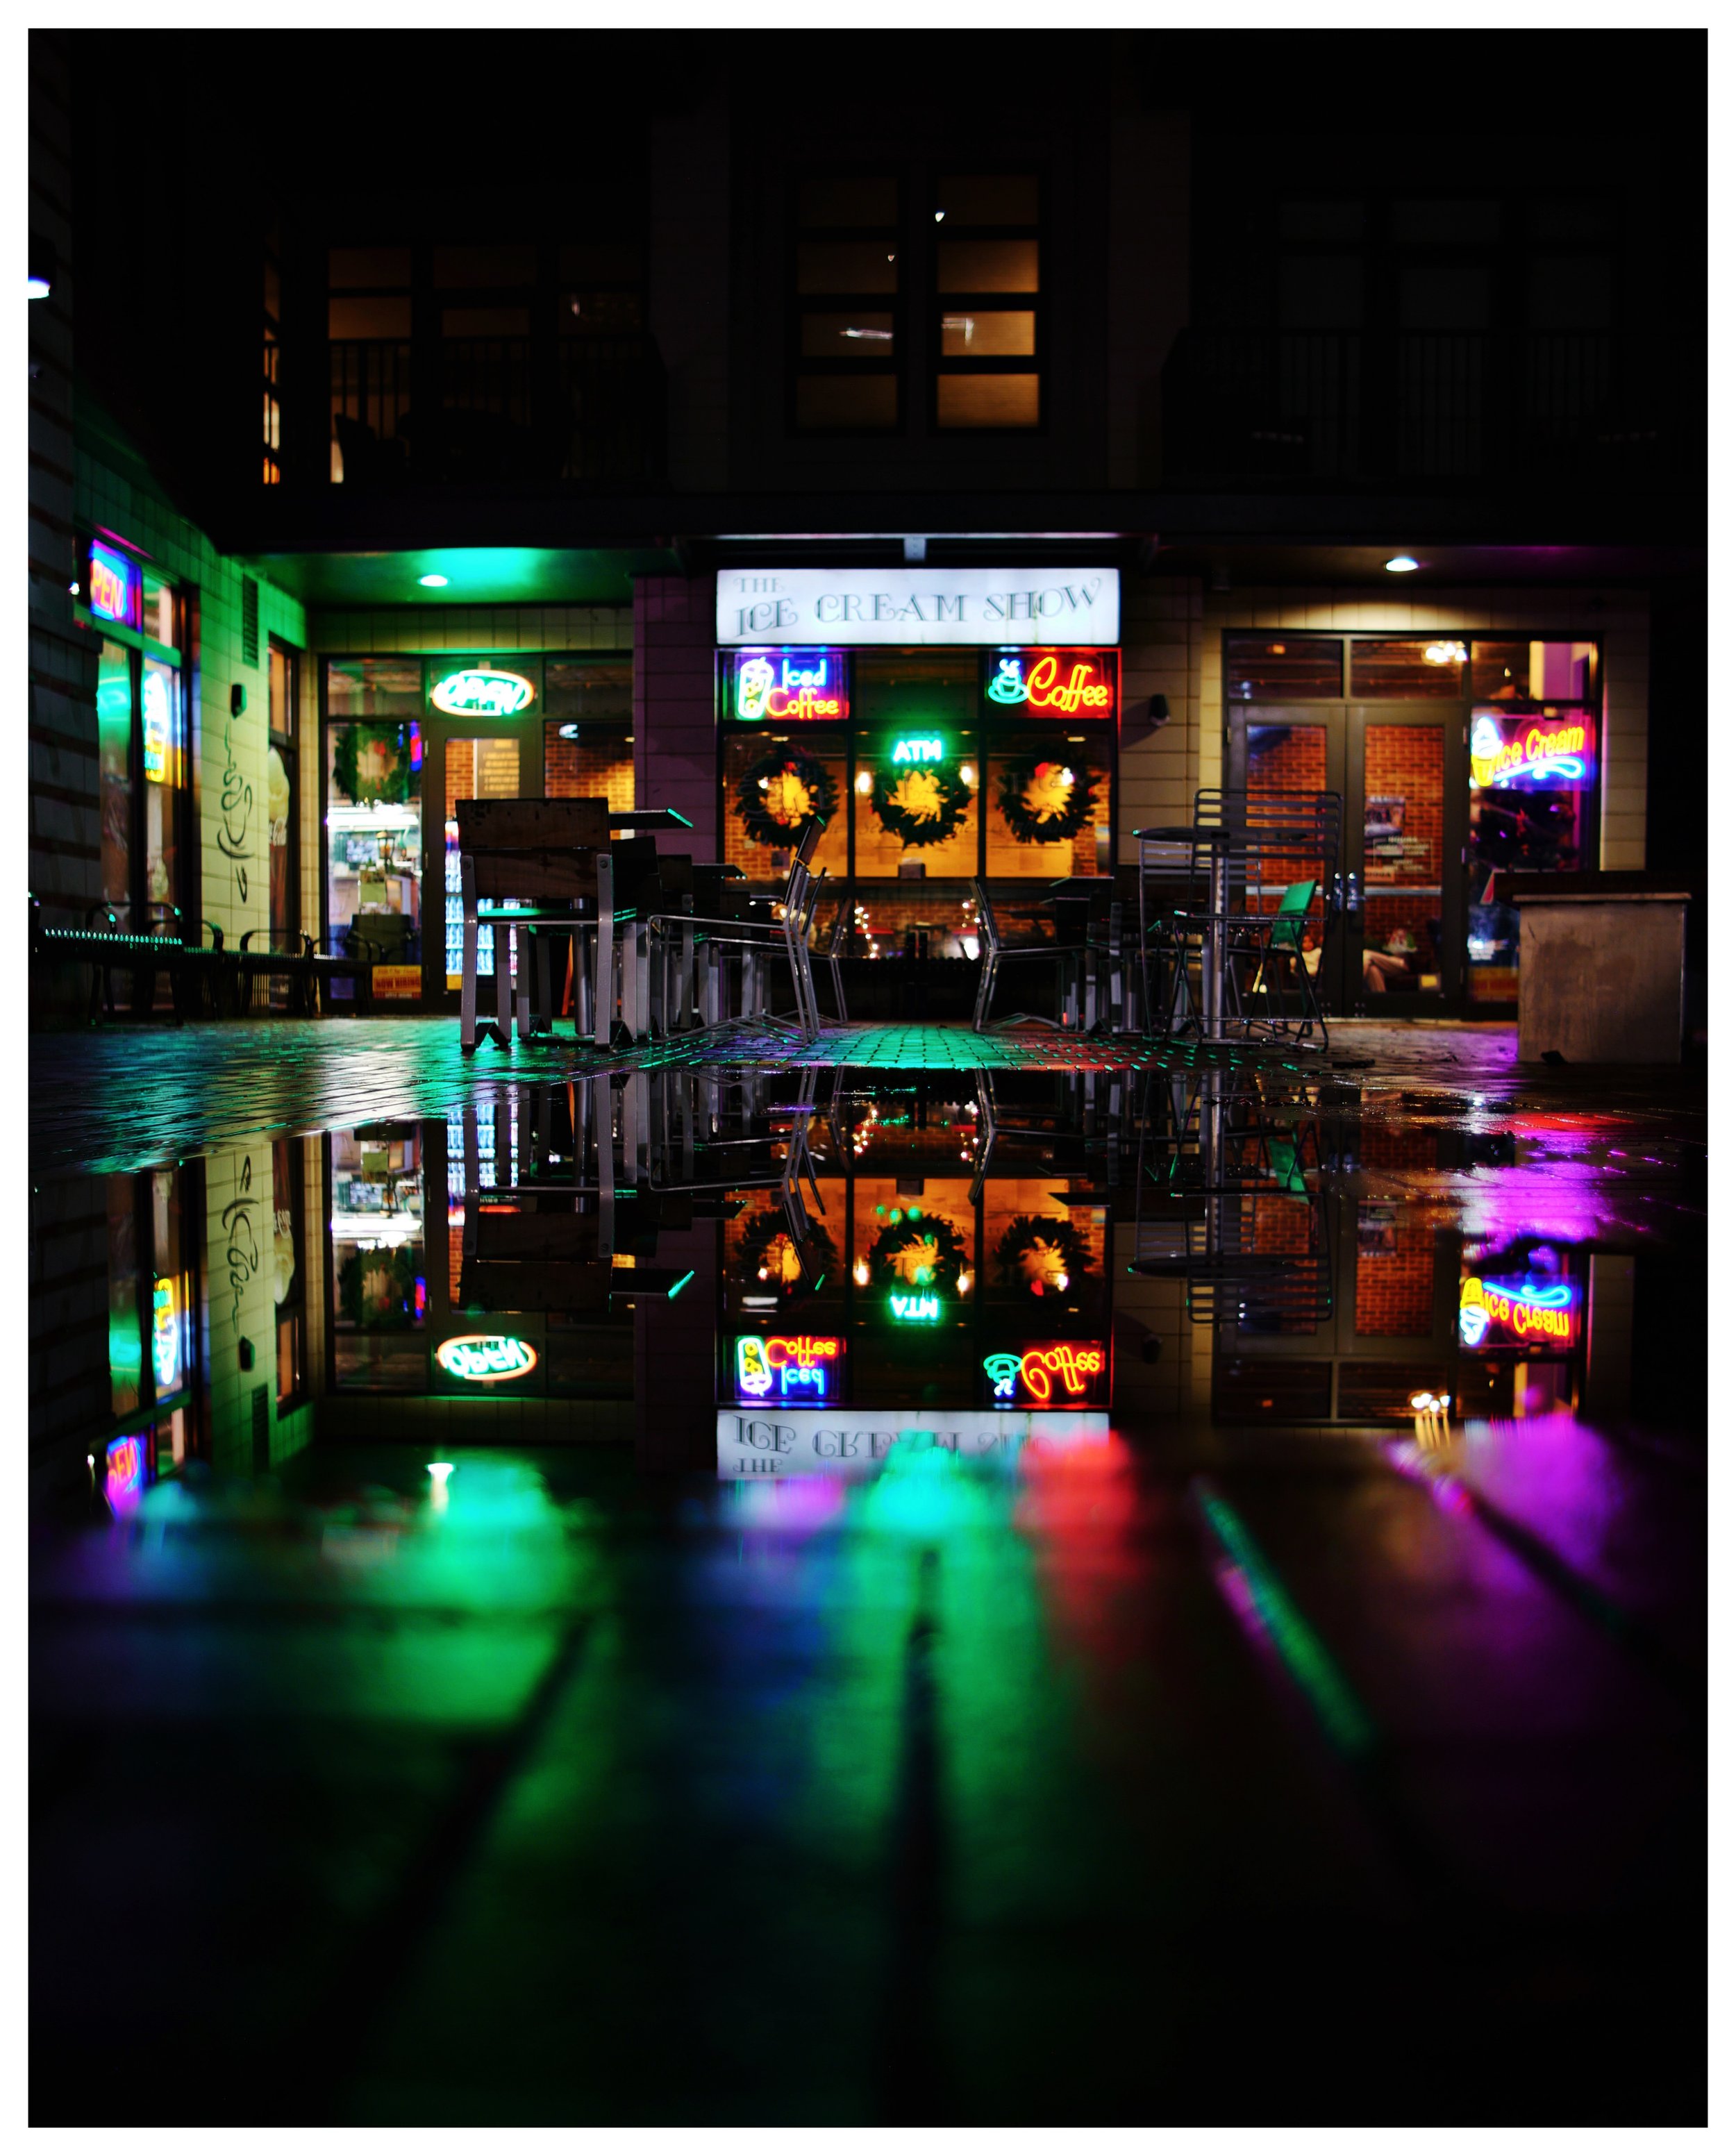
Water reflections are magical in low light or night photos.
Now that lenses are talked to death, what about the camera? Well, honestly any camera will do. It is the least important part of the equation to be honest. As long as it can be controlled manually for all three major functions, it will do. You see, it must be able to adjust shutter speed, ISO and aperture manually to be able to get creative results at night. The camera running in automatic mode will make choices in these controls that will not be what the photographer wants most of the time. It is guessing and will most likely guess wrong… But just about all reasonable cameras will let you control these functions and this is where it gets good…
The time of day.
Back to the original subject. Here are two photos taken from the same location, with the same camera and lens combination, at two different times of day.

Here we have a daytime scene of a garage.
Here is the same composition at night. Notice the change in mood.

Here is the same scene, but the overhead lights are turned off (different day). This changes the mood even more and gives the scene a different feel. Take a look at the scene below of the Dutch Motel sign I found the other evening. The daytime photo isn’t much to look at, but the night time one has all sorts of interesting features that make it unique and otherworldly since it is distorting time so much with the incredible shutter time of 10 seconds!

The Dutch Morel sign isn’t much to ponder during the day…
1/400 second ISO 100 f8
Once nightfall comes and you slow down the shutter, the magic happens
10 seconds ISO 100 f8
This is just a couple of examples too, there are many others that I have noticed over the years. So if you want a certain feel from an image, the time of day absolutely matters. There are some things that a strobe just won’t overcome and the sun is one especially if you are shooting buildings and not portraits.
So if you want to learn more about low light photography, check out my youtube channel here. David Saylors Youtube Channel.
Why don't I shoot more landscape photography?
The short answer…it is out of my reach.

Mid day sun is “flat”…
You see I have always loved shooting nature and landscape photography and such but once I started really looking at it seriously, I started to realize that it can only be shot at certain times of the day or it doesn’t have that magical look to it.

Deep blue hour adds to this image where the building is white and red neon primarily.
Where the sun is at in the sky makes a ton of difference to how the image looks and for the most part, the higher the sun angle the less interesting the image. Just watch most landscape photography youtube videos and you will see them getting up several hours before dawn so they can get the sky colors like they want with the mood of the terrain like they want as well. Most of the time it is dawn or dusk only for the photos they want. This is for good reason too, the images just won’t be interesting otherwise.
You see, the shallow sun angle makes all sorts of things different and not just the direction the light is coming from. It changes the color of the light, the size of the shadows, how dark the shadows are, the sun controls lots of environmental elements like fog rising off of the grass or water, and if there is frost or not in the image. These are just a few of the things the sun directly controls, but you get the idea.
The main thing for me though is that I am not able to get out at these times of the day so I end up shooting either mid-day or early evening. Both of these are terrible for landscape photography and the images out there prove it. You just can’t get good images of wonderful vistas at those times, it only takes a moment to search the web to see this is true.
I do occasionally get out at the right times and will snag a cool photo or two of some cool landscape stuff, but for the most part … not…
What I do get are photos like the one below. I can get out at night some, and mid day as it seems to work out, but not at golden hour or blue hour either for the most part, but sometimes I will get that chance, so instead I have embraced night photography as well as high contrast mid day photography, which works well for street photography if more people were in the area.

I will also do some local documentary style photos of stuff like buildings in the town that are changing or if there is some kind of activity. Most of the time though, I end up just walking around.
This also turns out to be a good practice as it gives you perspective and you will start to notice images that you didnt see before. It makes me more observant of the environment or so it seems.
Well, I successfully wandered down a rabbit hole anyway… lol. You get the idea though, I am pretty sure I am not alone in why I cant do landscape photography and I am also sure there are more reasons than these. what do you shoot because of your circumstances instead? Leave a comment below and until next time. Get your camera out!!!