
Solo Street Photography with Leica CL: Finding Joy Shooting Alone (Not Following the Rules)
I really like the 50mm perspective of these lenses on a crop sensor camera like my Leica CL. If I use a full frame machine then Iwill usually opt for something in the 50 to 58mm range as well.
After years of feeling pressure to do street photography "the right way," I finally figured something out: solo street photography photowalks with my Leica CL and a 50mm lens bring me more joy than following anyone else's rules. This is the story of how I stopped trying to shoot like Peter McKinnon, quit worrying about YouTube success, and rediscovered why I fell in love with photography in the first place—just grabbing my camera and hitting the streets alone.

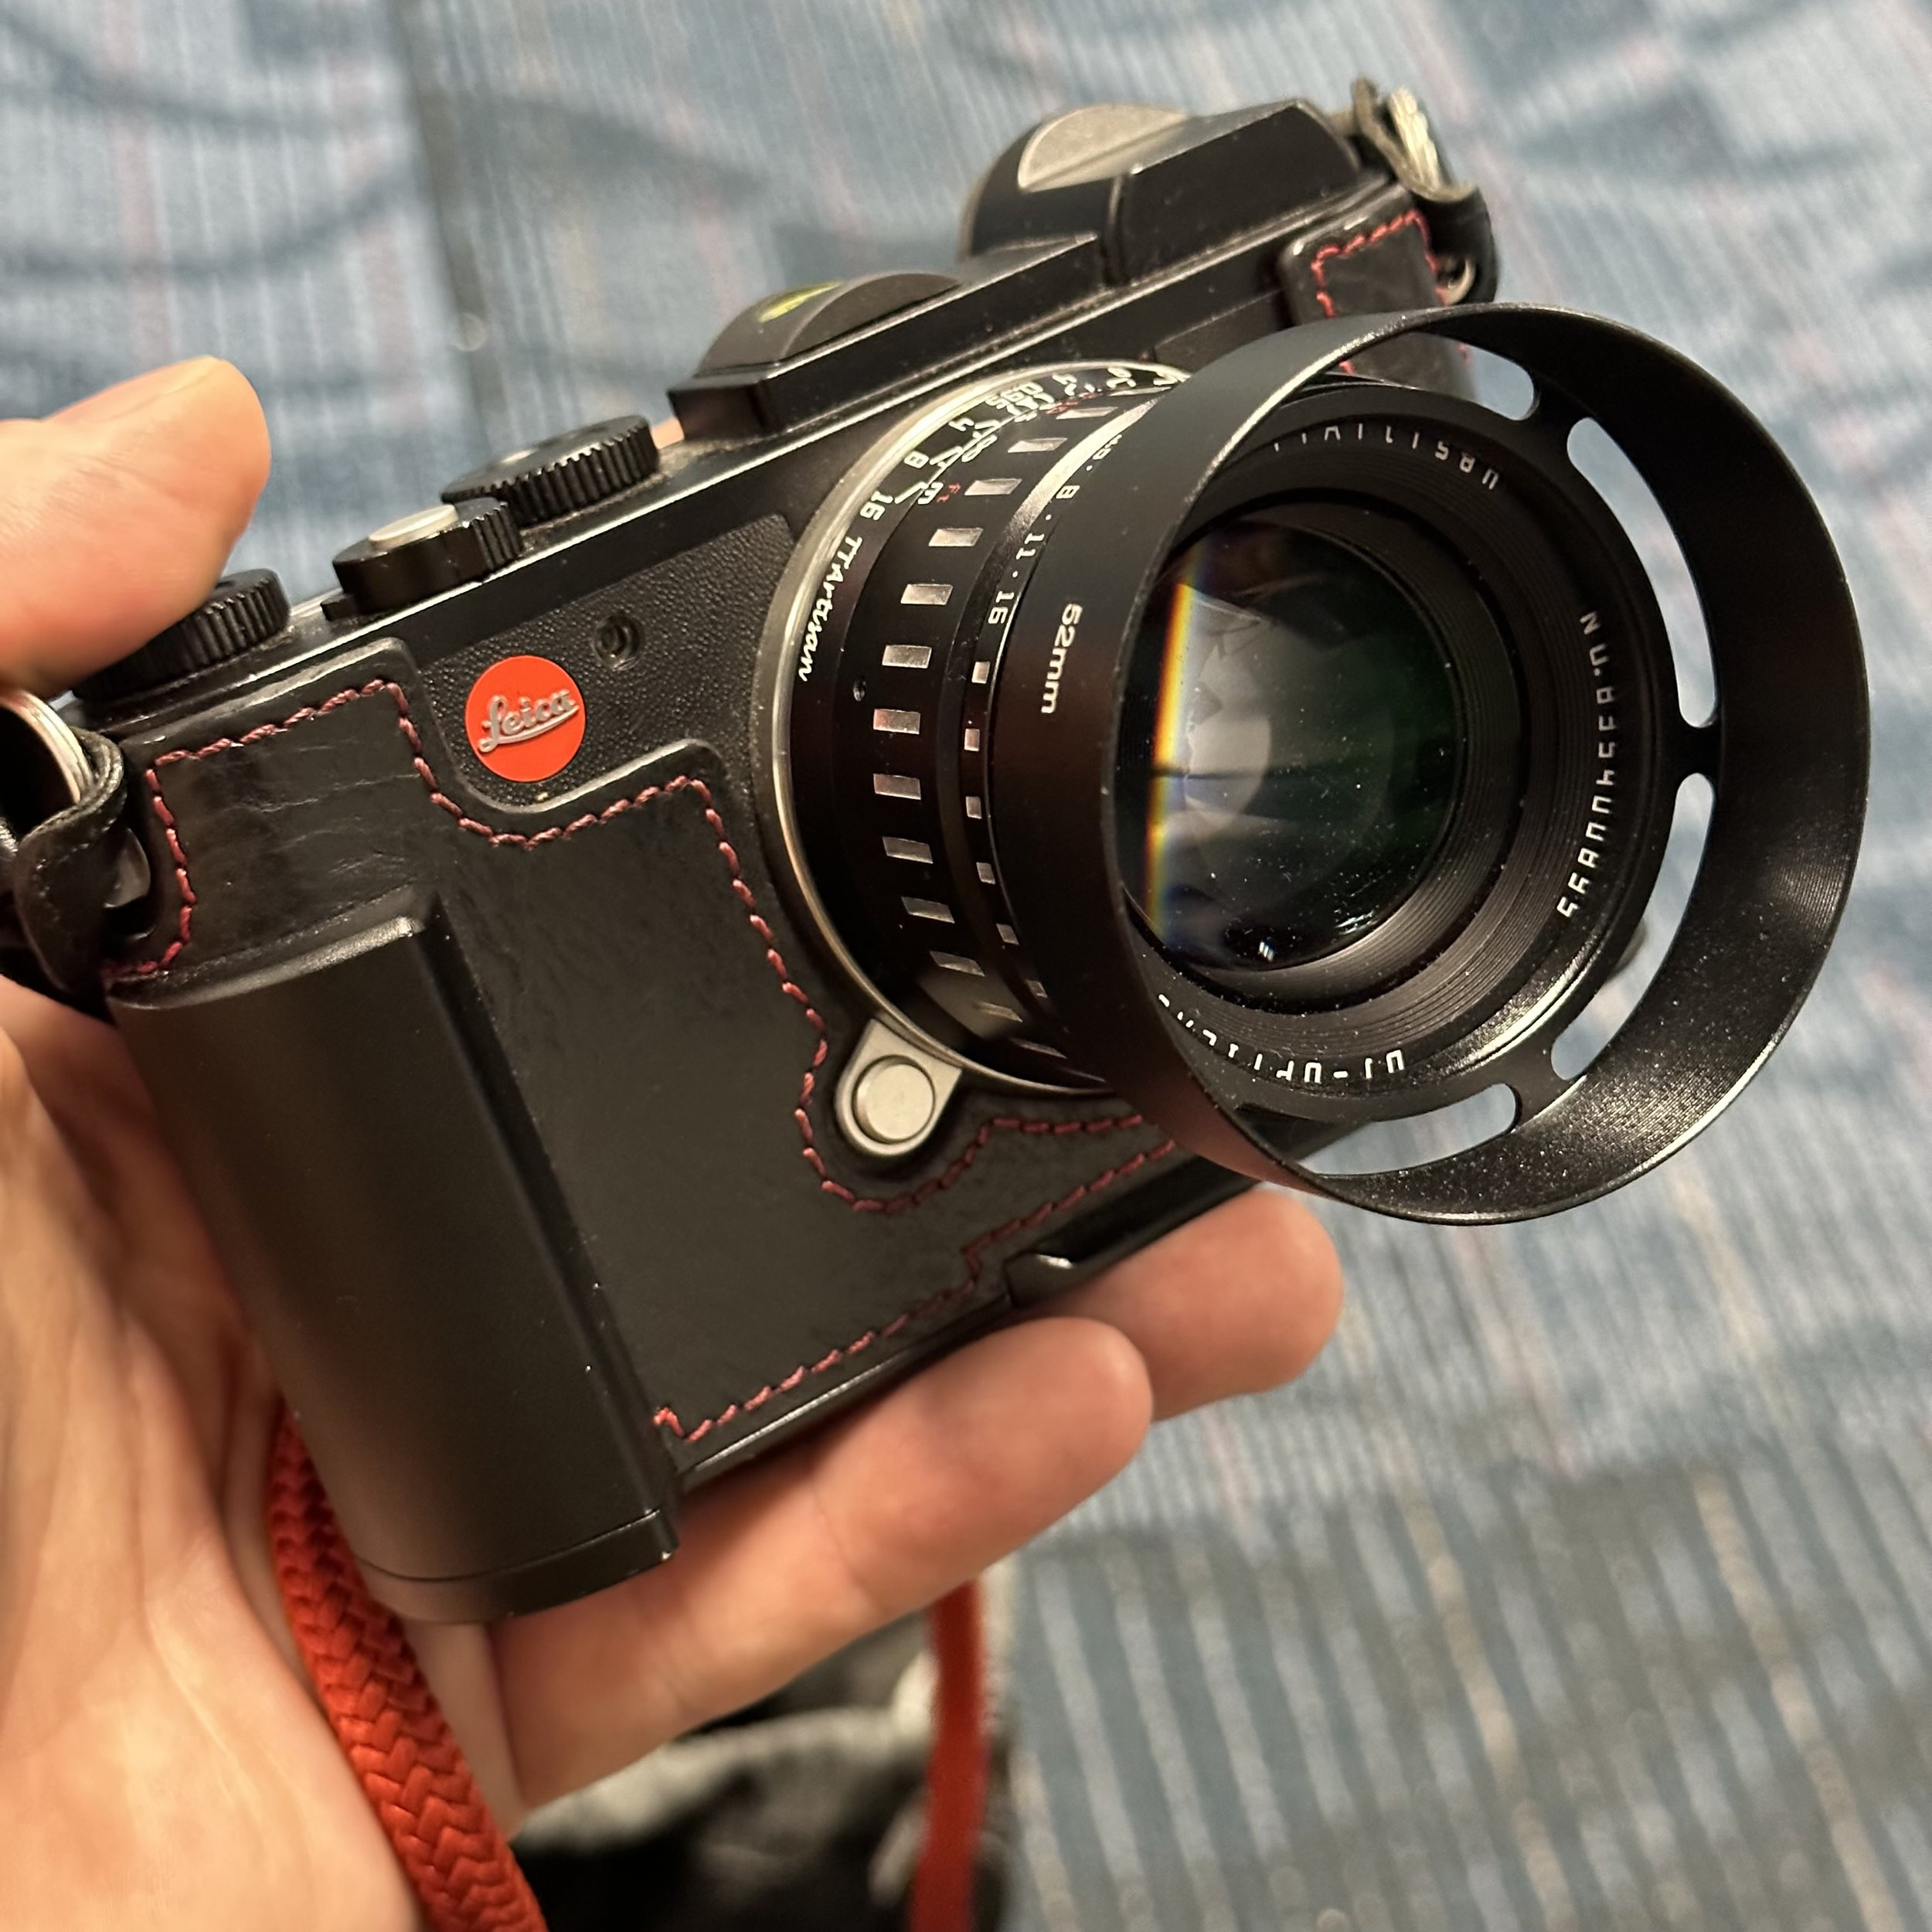
My go-to setup: Leica CL with Voigtlander 35mm Nokton—this gives me a 50mm perspective on the crop sensor.
Why I Love Solo Street Photography (And You Might Too)
There's something incredibly freeing about solo photowalks that I didn't appreciate until I tried them consistently. When you're alone, there's no one to impress, no one waiting on you, and no one questioning why you're standing in the same spot for ten minutes watching the light change. You can be completely present with your camera and your surroundings without any social pressure.
I'll admit, at first the idea of walking around with a camera alone felt a bit weird. But then I realized—nobody cares. People are absorbed in their own lives, and you're just another person walking down the street. The freedom this brings is immense. If I see something interesting, I can stop and shoot it from ten different angles without feeling like I'm holding anyone up. If nothing inspires me, I can just enjoy the walk. There's zero pressure to "perform" or justify your creative choices to anyone.
My Leica CL Street Photography Setup: 50mm Perspective on Crop Sensor
It is just plain fun to grab a camera, a spare battery and hit the streets to see what I can find to photograph. My weapon of choice is the Leica CL mirrorless camera with one of several lenses. Usually though, my Leica CL is wearing a Voigtlander 35mm Nokton or a TTArtisan 35mm f/1.4, you never know which.
I really like the 50mm perspective of these lenses on a crop sensor camera like my Leica CL. The 1.5x crop factor means that 35mm lens gives me a 52.5mm field of view—basically a classic 50mm perspective. This is perfect for my shooting style because it gives me comfortable working distance from my subjects while still creating nice compression and subject isolation. If I use a full frame machine then I will usually opt for something in the 50 to 58mm range as well.
The Leica CL itself is the perfect camera for solo photowalks. It's small enough to not be intimidating, quiet enough to be discreet, and produces image quality that rivals cameras three times its size. The electronic viewfinder is bright and clear, the controls are simple and intuitive, and the whole package fits easily in my hand or jacket pocket. I can carry it all day without fatigue, and more importantly, I can carry it without thinking about it—which means I'm thinking about photography instead of gear.
I will take my 28mm lenses for the occasional stroll, but my staples are the 50mm lenses. Shoot, I even have the Leica APO Summicron SL 50mm for my Leica SL2 mirrorless camera as well because I like them so much. That is an insane package to be just strolling around town with slung around your neck…as well as heavy. Haha.
Breaking the Street Photography Rules: Why 50mm Works Better for Me Than 28mm
This literally took me years if not decades to truly figure it out. That is a hard pill to swallow at times too. Looking back, things could have gone a very different way had I followed my real passion instead of thinking I could be like Peter McKinnon… Live and learn I guess.
Before Pete came along and made me think I could be this ultra successful YouTube personality, I did things that other people said were what you should do. Like do street photography with wide glass and get close to people and stuff like that. That works for some people, but not me, I seem to have a real problem getting close to other people. Invading their personal space is such a red flag for me that I will just let the photo go before I attempt something like that.
Here's what nobody tells you about the "get close with a wide lens" approach: it's not just about technical skill, it's about personality. Some photographers are naturally extroverted, comfortable in stranger's personal space, and can pull off that close-up street style. I'm not one of those people. And you know what? That's completely okay. Using a 50mm or even longer lets me capture authentic moments from a respectful distance where neither I nor my subject feels uncomfortable. The photos are different than 28mm shots, but they're not worse—they're just mine.
This made for some truly terrible photos just to be honest about it. Mostly, it made me not want to go out and shoot though… so my very first Nikon DSLR would sit in the closet for months at a time with me not so much as looking at it. Who wants to go to a job and be stressed about that all day THEN make your hobby about "getting out of your comfort zone" and being stressed about that too?!? I almost gave up photography at one point because of this to be honest.

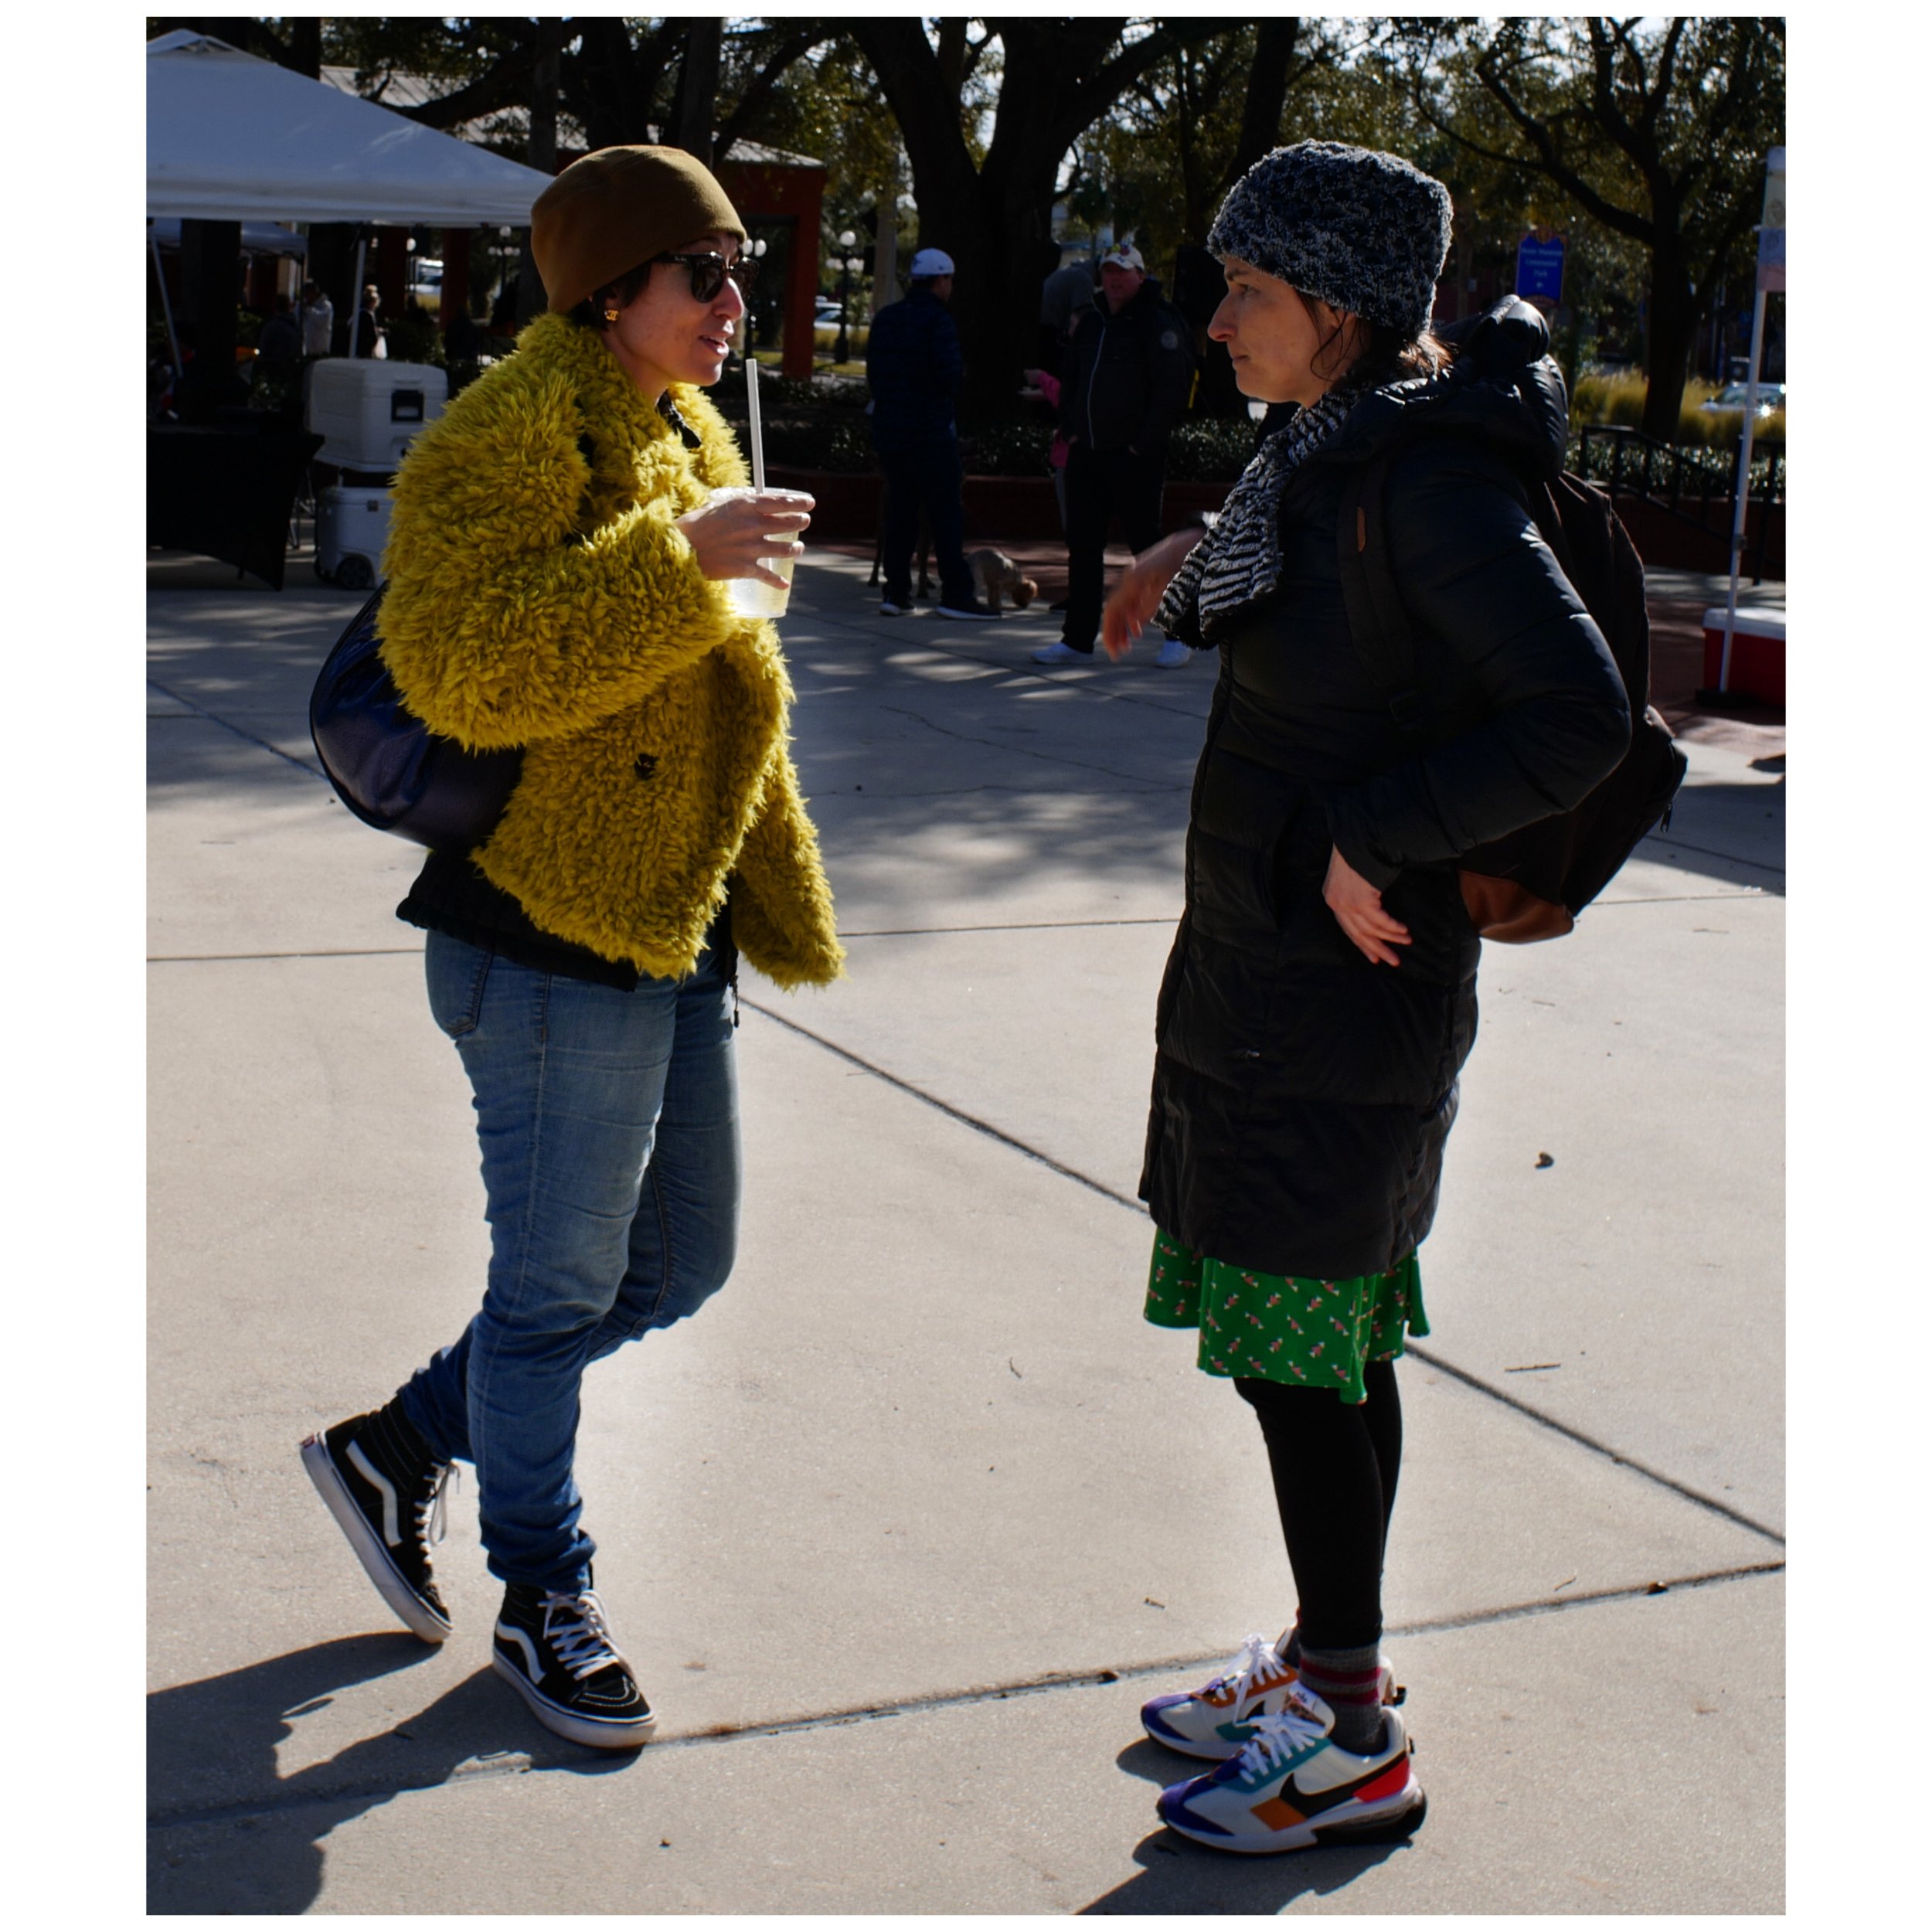
A typical scene from my solo photowalks—natural moments, comfortable distance
I have spent so long making YouTube content that I had actually forgotten how much fun it was to just go shoot. I will now get my camera and a battery or two and just hit the bricks. What I had to learn to do was to make a video about one every so often to share what I am doing with the viewers. I took a “sabbatical” the last two years in the first part of the year so I could do this. It helped dramatically too with my well being and my creativity.


Simple gear for photowalks: one camera, one lens, spare batteries. That's all I need.
From YouTube Pressure to Photography Joy: My Personal Journey
I finally found some joy when my daughter began competing in rock climbing. She joined a team and they would go all over for these events and I got my camera out and started photographing these gatherings and realized that there was more to this hobby than just what others said is good photography. I found a lot of joy in capturing interesting angles of the climbers and going to the trouble of sharing the photos with the team when done. It was really rewarding to be honest.
Then I broke my ankle and at about the same time, Sierra "aged out" of the team and stopped attending the events as life got in the way. Well, I needed a new avenue to focus on and found it in my YouTube channel. I learned over the years that a good YouTube content creator is not a good photographer—they are two very different things and I wandered down that rabbit hole for a while before realizing that it wasn't going to work for me.
The YouTube algorithm rewards consistency, spectacle, and engagement over artistry. It wants you to post weekly, chase trends, and create content that keeps people watching. That's fine if you want to be a content creator, but it's exhausting if you just want to be a photographer. I found myself thinking more about thumbnails and titles than I did about light and composition. I was shooting for the camera review, not for the creative satisfaction. That's when I knew something had to change.
The Joy of Street Photography Photowalks Without Pressure
This is where I am at now… just a guy with a camera out taking some pictures. No YouTube schedule to maintain, no algorithm to please, no gear to review, no style to emulate. Just me, my Leica CL, and whatever catches my eye. Some days that's dramatic light on a building. Other days it's a person waiting for the bus. Sometimes it's nothing at all, and that's fine too.
I have spent so long making YouTube content that I had actually forgotten how much fun it was to just go shoot. I will now get my camera and a battery or two and just hit the bricks. What I had to learn to do was to make a video about one every so often to share what I am doing with the viewers. I took a "sabbatical" the last two years in the first part of the year so I could do this. It helped dramatically too with my wellbeing and my creativity.
The biggest lesson? Photography should add to your life, not drain it. If your hobby is causing you stress instead of joy, you're doing it wrong—not because you're a bad photographer, but because you're following someone else's path instead of your own. Give yourself permission to shoot what you love, how you love, with whatever equipment makes you happy. That's where the good work lives.
Solo Street Photography Tips: Finding Your Own Style
Ultimately I found that I loved to go on photowalks and simply take pictures around me. Here's what I've learned about making solo photowalks work:
Keep your gear simple. I bring one camera, one lens, and two batteries. That's it. No bag, no accessories, nothing to fidget with or second-guess. This simplicity forces you to work within constraints, which actually makes you more creative, not less.
Shoot for yourself first. I used to think about how a photo would perform on Instagram or YouTube before I even took it. Now I shoot what interests me in the moment. Some of my favorite images would probably get three likes on social media, and I don't care. They're mine.
Walk the same routes sometimes. There's this idea that you need exotic locations for good street photography. I've learned more shooting the same three-mile radius around my house than I did traveling to "photogenic" cities. Familiarity breeds understanding. When you know a place well, you start to see the light differently, notice the rhythm of the day, and find moments you'd miss as a tourist rushing through.
Don't force it. Some walks I come home with fifty keepers. Other times I get nothing. Both are valuable. The walks where I don't press the shutter much are still feeding my creative eye, teaching me to see, and giving me time to think. Photography is as much about observation as it is about capture.
Frequently Asked Questions About Solo Street Photography
Is it okay to do street photography alone?
Absolutely! Solo street photography is not just okay—it's often the best way to shoot. When you're alone, you move at your own pace, follow your creative instincts without compromise, and blend into the environment more naturally. I've found that shooting solo actually reduces pressure because there's no one watching, judging, or waiting for you. You can spend five minutes on one corner if that's what feels right, or walk five miles following the light. Some of my best work happens when I'm alone with my camera and my thoughts.
What focal length is best for street photography?
There's no "best" focal length—only what works for your personality and shooting style. The conventional wisdom says 28mm or 35mm, but I prefer 50mm equivalent (which is a 35mm lens on my Leica CL crop sensor). The 50mm perspective gives me comfortable distance from my subjects, creates nice compression, and doesn't make me feel like I'm invading anyone's personal space. If you're uncomfortable getting close to strangers, telephoto focal lengths like 50mm, 85mm, or even 105mm can work beautifully. Don't let anyone tell you there's only one "right" way to do street photography.
How long should a street photography photowalk be?
Your photowalk should be exactly as long as it needs to be. Sometimes I'm out for 30 minutes and come home with great shots. Other times I'll wander for three hours and barely press the shutter. I've learned to follow my energy and creative flow rather than forcing a specific duration. Start with 30-60 minutes if you're new to photowalks, and let it evolve naturally. The goal is joy and creativity, not checking off a time requirement.
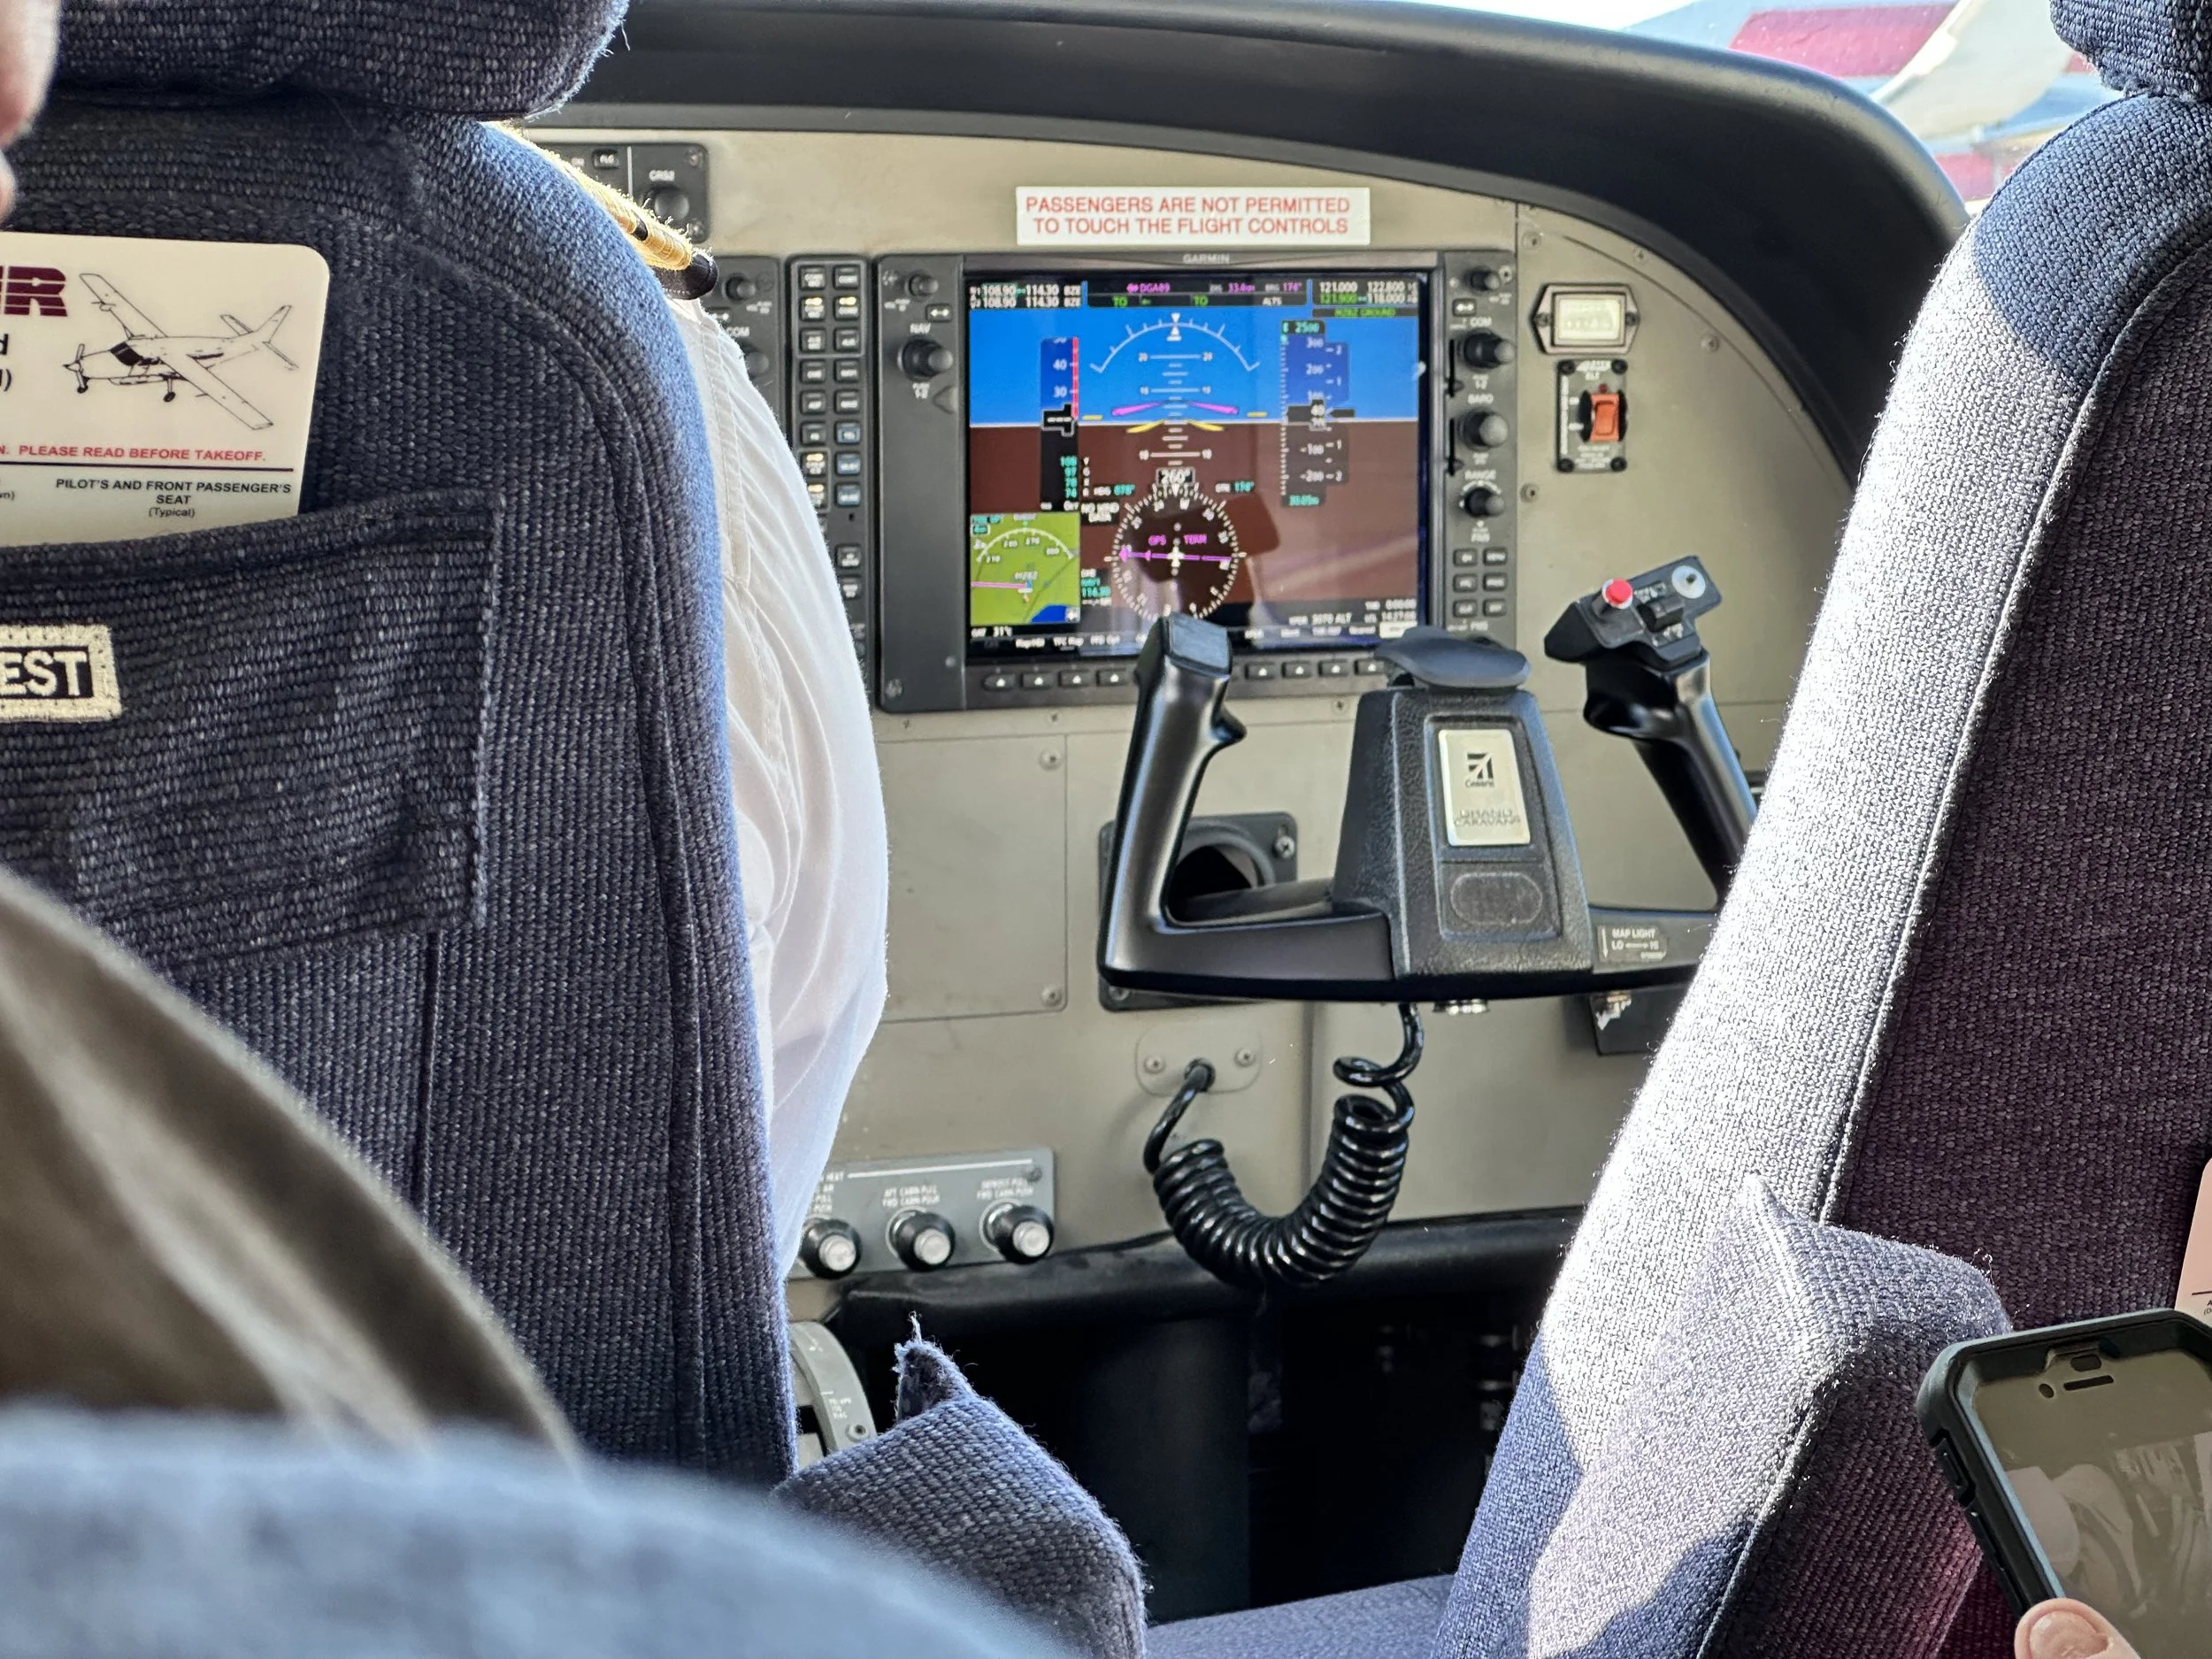
Can you do street photography with a Leica CL?
The Leica CL is fantastic for street photography! It's compact, discreet, produces excellent image quality, and the crop sensor actually gives you a nice 50mm perspective with a 35mm lens (or 75mm with a 50mm lens). The quiet shutter, simple controls, and build quality make it perfect for solo photowalks. I love that it doesn't scream "expensive camera" like a big DSLR or even a Leica M, so I can blend in while still getting Leica color and image quality. It's honestly my favorite camera for just grabbing and hitting the streets.
Do I need to follow street photography "rules"?
No! This is the most important thing I've learned: there are no rules, only guidelines that work for some people. You don't have to shoot wide angle, you don't have to get close to strangers, you don't have to shoot in black and white, and you certainly don't have to make yourself uncomfortable to get "good" street photography. Find what brings you joy and shoot that way. The best street photography comes from authentic vision, not from following someone else's rules. If 85mm or 105mm feels right, use it. If you prefer color, shoot color. Make your own rules.
What should I bring on a solo street photography walk?
Keep it simple—that's the beauty of solo photowalks. I typically bring just my Leica CL with one lens (usually my Voigtlander 35mm Nokton or TTArtisan 35mm f/1.4), and one or two spare batteries. That's it. No camera bag, no lens changes, no complicated gear setup. The simplicity is liberating. You can add a small water bottle and maybe your phone for emergencies, but resist the urge to pack heavy. The lighter you travel, the longer you'll walk and the more you'll enjoy it. Less gear equals more photography.
Support this website by using these affiliate links to shop on Amazon:
Leica M11 Digital Rangefinder Camera
Nikon AF-S FX NIKKOR 105mm f/1.4E ED Lens
Voigtlander Nokton 35mm f/1.4 II
Sandisk 128GB Extreme Pro memory cards
Nikon 50mm f1.8 S Lens for Z mount
Thanks for following along on my ramblings here. If you're feeling the same pressure I felt—to shoot a certain way, use specific focal lengths, or build a YouTube following—I hope this gives you permission to just grab your camera and go shoot for the joy of it.
Are you doing solo photowalks? I'd love to hear about your experiences in the comments below. What focal length do you prefer? Do you follow the "rules" or have you found your own path?
Want more honest photography content without the pressure? Subscribe to my photography blog for weekly posts about real creative journeys, not just gear reviews and pixel-peeping.
Photographing Belize: Nim Li Punit Mayan Ruins, San Pedro Street Photography, and Local Culture
To get a feel for a country, you have to step away from the glitz and glamour of the tourist areas (isn't that true for all tourist destinations though). In some places this can be life threatening but in others it can be very rewarding. Belize seems to be a lot like Costa Rica in this regard. Just about anywhere you go the people are nice and helpful from what I have seen.
To get a feel for a country, you have to step away from the glitz and glamour of the tourist areas (isn't that true for all tourist destinations though). In some places this can be life threatening but in others it can be very rewarding. Belize seems to be a lot like Costa Rica in this regard. Just about anywhere you go the people are nice and helpful from what I have seen.
This is part 2 of my Belize photography journey. If you missed part 1, read about my minimalist camera gear setup and travel philosophy first.
Exploring Rural Belize: The Journey to Nim Li Punit

Rural southern Belize - traditional homes and local life on the way to Nim Li Punit ruins
We saddled up and headed first to the Mayan ruins (it is an active archaeological site) and we got a wonderful "tour" of the rural part of southern Belize on the way over including things like the main modes of transportation being motorcycles and buses as well as seeing many traditional homes made with thatch roof construction. Many of these homes had no electricity or water service to them that I could see while others did. It is always interesting to learn how other parts of the world live.
Why photographing rural areas matters: The journey to the ruins showed me more about Belizean life than any resort could. This is where real documentary photography happens—not in the polished tourist zones, but in the authentic spaces between destinations. Motorcycles and buses dominate the roads. Thatch-roof homes mix with more modern construction. It's this contrast that makes travel photography compelling.
Motorcycles and buses dominate rural Belize transportation - a different world from the tourist zones
Nim Li Punit Mayan Ruins: A Photographer's Hidden Gem
We arrived at the ***Nim Li Punit*** site and get a class on decoding some of the Mayan glyphs that were carved into several stela that were found on the site. We learned how they counted and their numbering systems and how they marked their calendars as well. It was really awesome to see how all this worked on an actual artifact that you can touch.
This site is a smaller site that is easier to access with less crowds and therefore more freedom to navigate yourself without the pressures of large tour groups moving through. There were some tour groups but they were much smaller and didn't choke off the entire area while there.
Why Nim Li Punit beats the famous ruins for photography: Unlike Tikal or Chichen Itza, Nim Li Punit is uncrowded. You can take your time composing shots without tourists walking through your frame. You can touch the actual stelae. Small tour groups mean you can shoot freely without feeling rushed. For travel photographers who want authentic archaeological site photos without the crowds, this is a secret weapon.
I am not sure if the remains that were intact were original or if they were reconstructed for tourism, but it was really interesting to see it nonetheless. I know some was reconstructed as there was mortar in places holding a couple of stones together but the bulk looked original so I let my mind play that game.

Nim Li Punit - an uncrowded Mayan ruins site perfect for photographers who want freedom to shoot
Photography tip for ruins: Look for the details. The carved glyphs on the stelae tell stories. The weathered stone textures. The jungle encroaching on ancient structures. These details make compelling photographs that wide shots of the whole site can't capture.
The Spice Farm: Unexpected Photography Opportunities
On the return trip we stopped for lunch at a spice farm and toured the farm. It was incredibly interesting to see how many different spices they had at one place. Another thing that was interesting was seeing the spices in their natural form in nature. Things like black pepper vines and vanilla as well as other spices I had never heard of before. It was really informative as well as entertaining. After that it was a fairly long drive back to the accommodations for supper and a nap. Haha.

Spice farm tour - seeing vanilla, black pepper, and other spices in their natural form
Pseudo macro photography without a macro lens: The spice farm was perfect for close-up photography, and I only had my 17mm and 35mm primes. The lesson? You don't need specialized gear for every situation. Getting close and using creative framing can produce compelling images even with "normal" lenses.
Moving to San Pedro: A Different Side of Belize
After our stay in Placencia we traveled to another small community called San Pedro on an island. You can get there by plane or ferry.
Flying Tropic Air between Belizean destinations - 10-12 passenger planes flying at low altitude
We flew Tropic Air which uses this fleet of 10 or 12 passenger planes as seen in the photo above. Every plane they have is this particular make and model as well as their competitor, Mayan Air. It is kinda neat to do low altitude flights from town to town. You can see a lot of things normally not within your view. I also pack my camera gear in my pack for travel and stow all of it except my action camera in my pack for safe keeping. This way I don't leave something behind when changing locations. Another side effect though is that I get no high quality photos when the gear is in this condition so it isn't a perfect system by no means… Once on the ground in San Pedro, I will recover it for the evening. I have high hopes that San Pedro will have more photography opportunities than where we stayed in Placencia. Actually, there was a ton of things I wanted to photograph but didn't have time due to the schedule being so full. Lol.
San Pedro Reality Check: Tourist Trap or Photography Paradise?

San Pedro's tourist-focused atmosphere - beautiful but heavily commercialized
Well, I really dont care for San Pedro to be perfectly honest about it. The whole atmosphere is geared towards liberating money from tourist's wallets… this is not enjoyable at all to me. I dont mind paying a fair price for things that cost money but if you are not very careful, you will overpay significantly for the same activities offered just a few hundred meters away. I just want to be left alone to enjoy my time in peace. I really don't know how I feel about this yet to be honest… one thing is I am here in their country kind of in the way and on the other hand the infrastructure is literally being built to support that attendance… tough call to be honest.
Honest travel photography truth: Not every destination lives up to expectations. San Pedro is heavily commercialized, which can be frustrating if you're looking for authentic experiences. But this tension—between tourism infrastructure and local life—is itself worth documenting. The photography opportunities exist, but you have to work harder to find them.
Finding Authentic San Pedro: Early Morning Photography Walk
The first day we went into town for coffee as our villa doesn't have any means to make coffee in it…(not cool)… but it did afford us an opportunity to see some stuff in the early morning that we would not normally see. Like the "Central Park" of San Pedro which is where they put up all the big Christmas and New Year's decorations. It also has the giant sign at this park as well. It is common in Central American culture to have this kind of sign in each city for some reason. I kinda like it though as it is a cool photo opportunity.

San Pedro's Central Park - the classic Central American city sign photo opportunity
Best time for travel photography: Early morning. Before the tourist crowds. Before the heat. When locals are going about their daily routines. This is when you'll find the authentic moments worth photographing.
The sheer number of golf carts on this island is staggering to say the least. Golf carts are the primary means of transportation here and really are convenient to be honest about it. We have a golf cart too so l can't complain but wow, there are a lot of them. There are enough that they become a focal point of some photos.

Golf cart culture in San Pedro - they're everywhere and they're the main way to get around
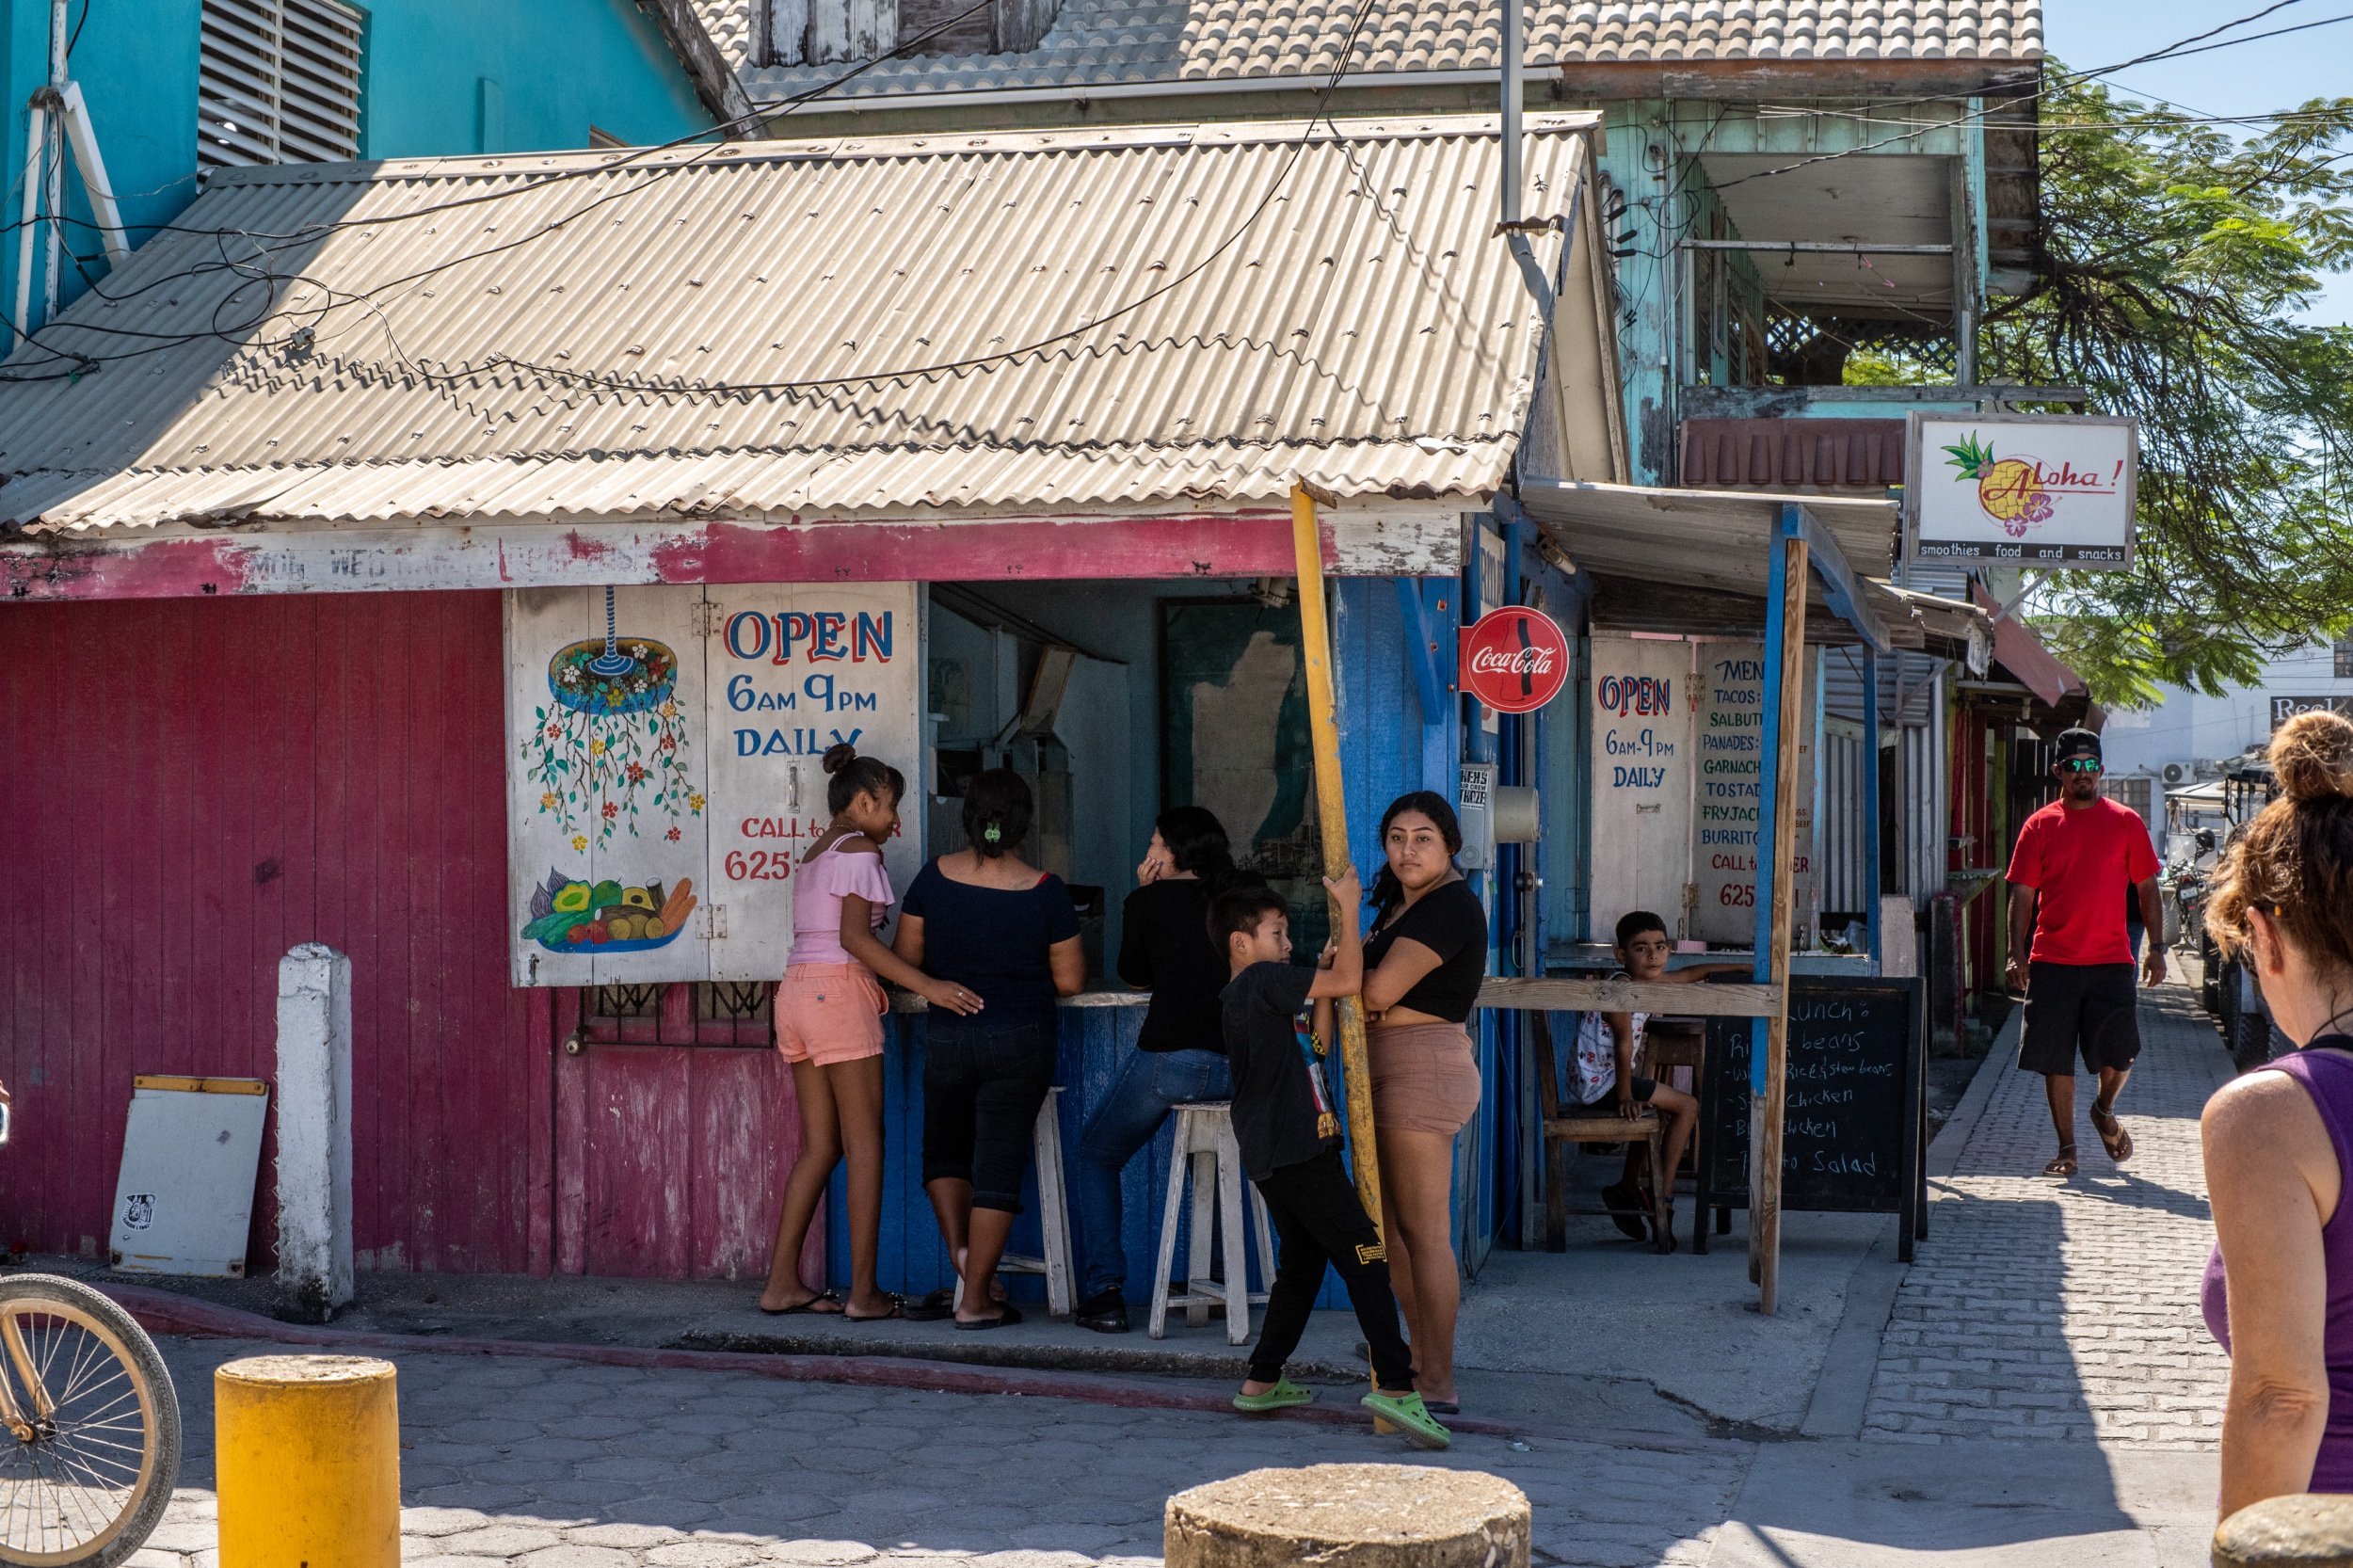
Street Photography in San Pedro: Capturing Local Life
It was fairly interesting to me to see the Belizean people in their day to day lives more than to see all the tourists two streets over. I found them to be wonderful subjects for simple street photography and I saw several more that would have been great photos if I had been able to spend more time out with my camera.

Street life in San Pedro - shot at f/11 with zone focusing for fast, decisive moments

Street life in San Pedro - shot at f/11 with zone focusing for fast, decisive moments

Street life in San Pedro - shot at f/11 with zone focusing for fast, decisive moments
My street photography approach in San Pedro: I shot at f/11 with zone focusing. This means I pre-focused the lens at a certain distance, stopped down for depth of field, and simply composed and shot. Fast. Decisive. No chimping. This technique is perfect for street photography when you want to capture fleeting moments without missing the shot while fiddling with autofocus.
Above are some photos from our 3 mile photowalk that I was able to capture. The locals are so much more interesting to me than the tourists for some reason. Almost the whole photowalk was shot at f11 and range focus so I simply composed the photo and pressed the shutter. This makes for fast photos if you are attempting to capture a fleeting moment.
Another thing you will notice is how a lot of them are looking at me. This is the reason I don't do more street photography in Chattanooga, I stick out like a sore thumb due to my physical stature. Here though, I play the tourist card and get away with it. I just photograph all the things and sort it out later since my time here is limited.
Why manual focus beats autofocus for street photography: With zone focusing at f/11, everything from about 5 feet to infinity is sharp. No focus hunting. No missed moments. Just composition and timing. This is how street photographers worked for decades before autofocus existed, and it still works brilliantly today. For more on my street photography philosophy, check out my post on solo street photography with the Leica CL.
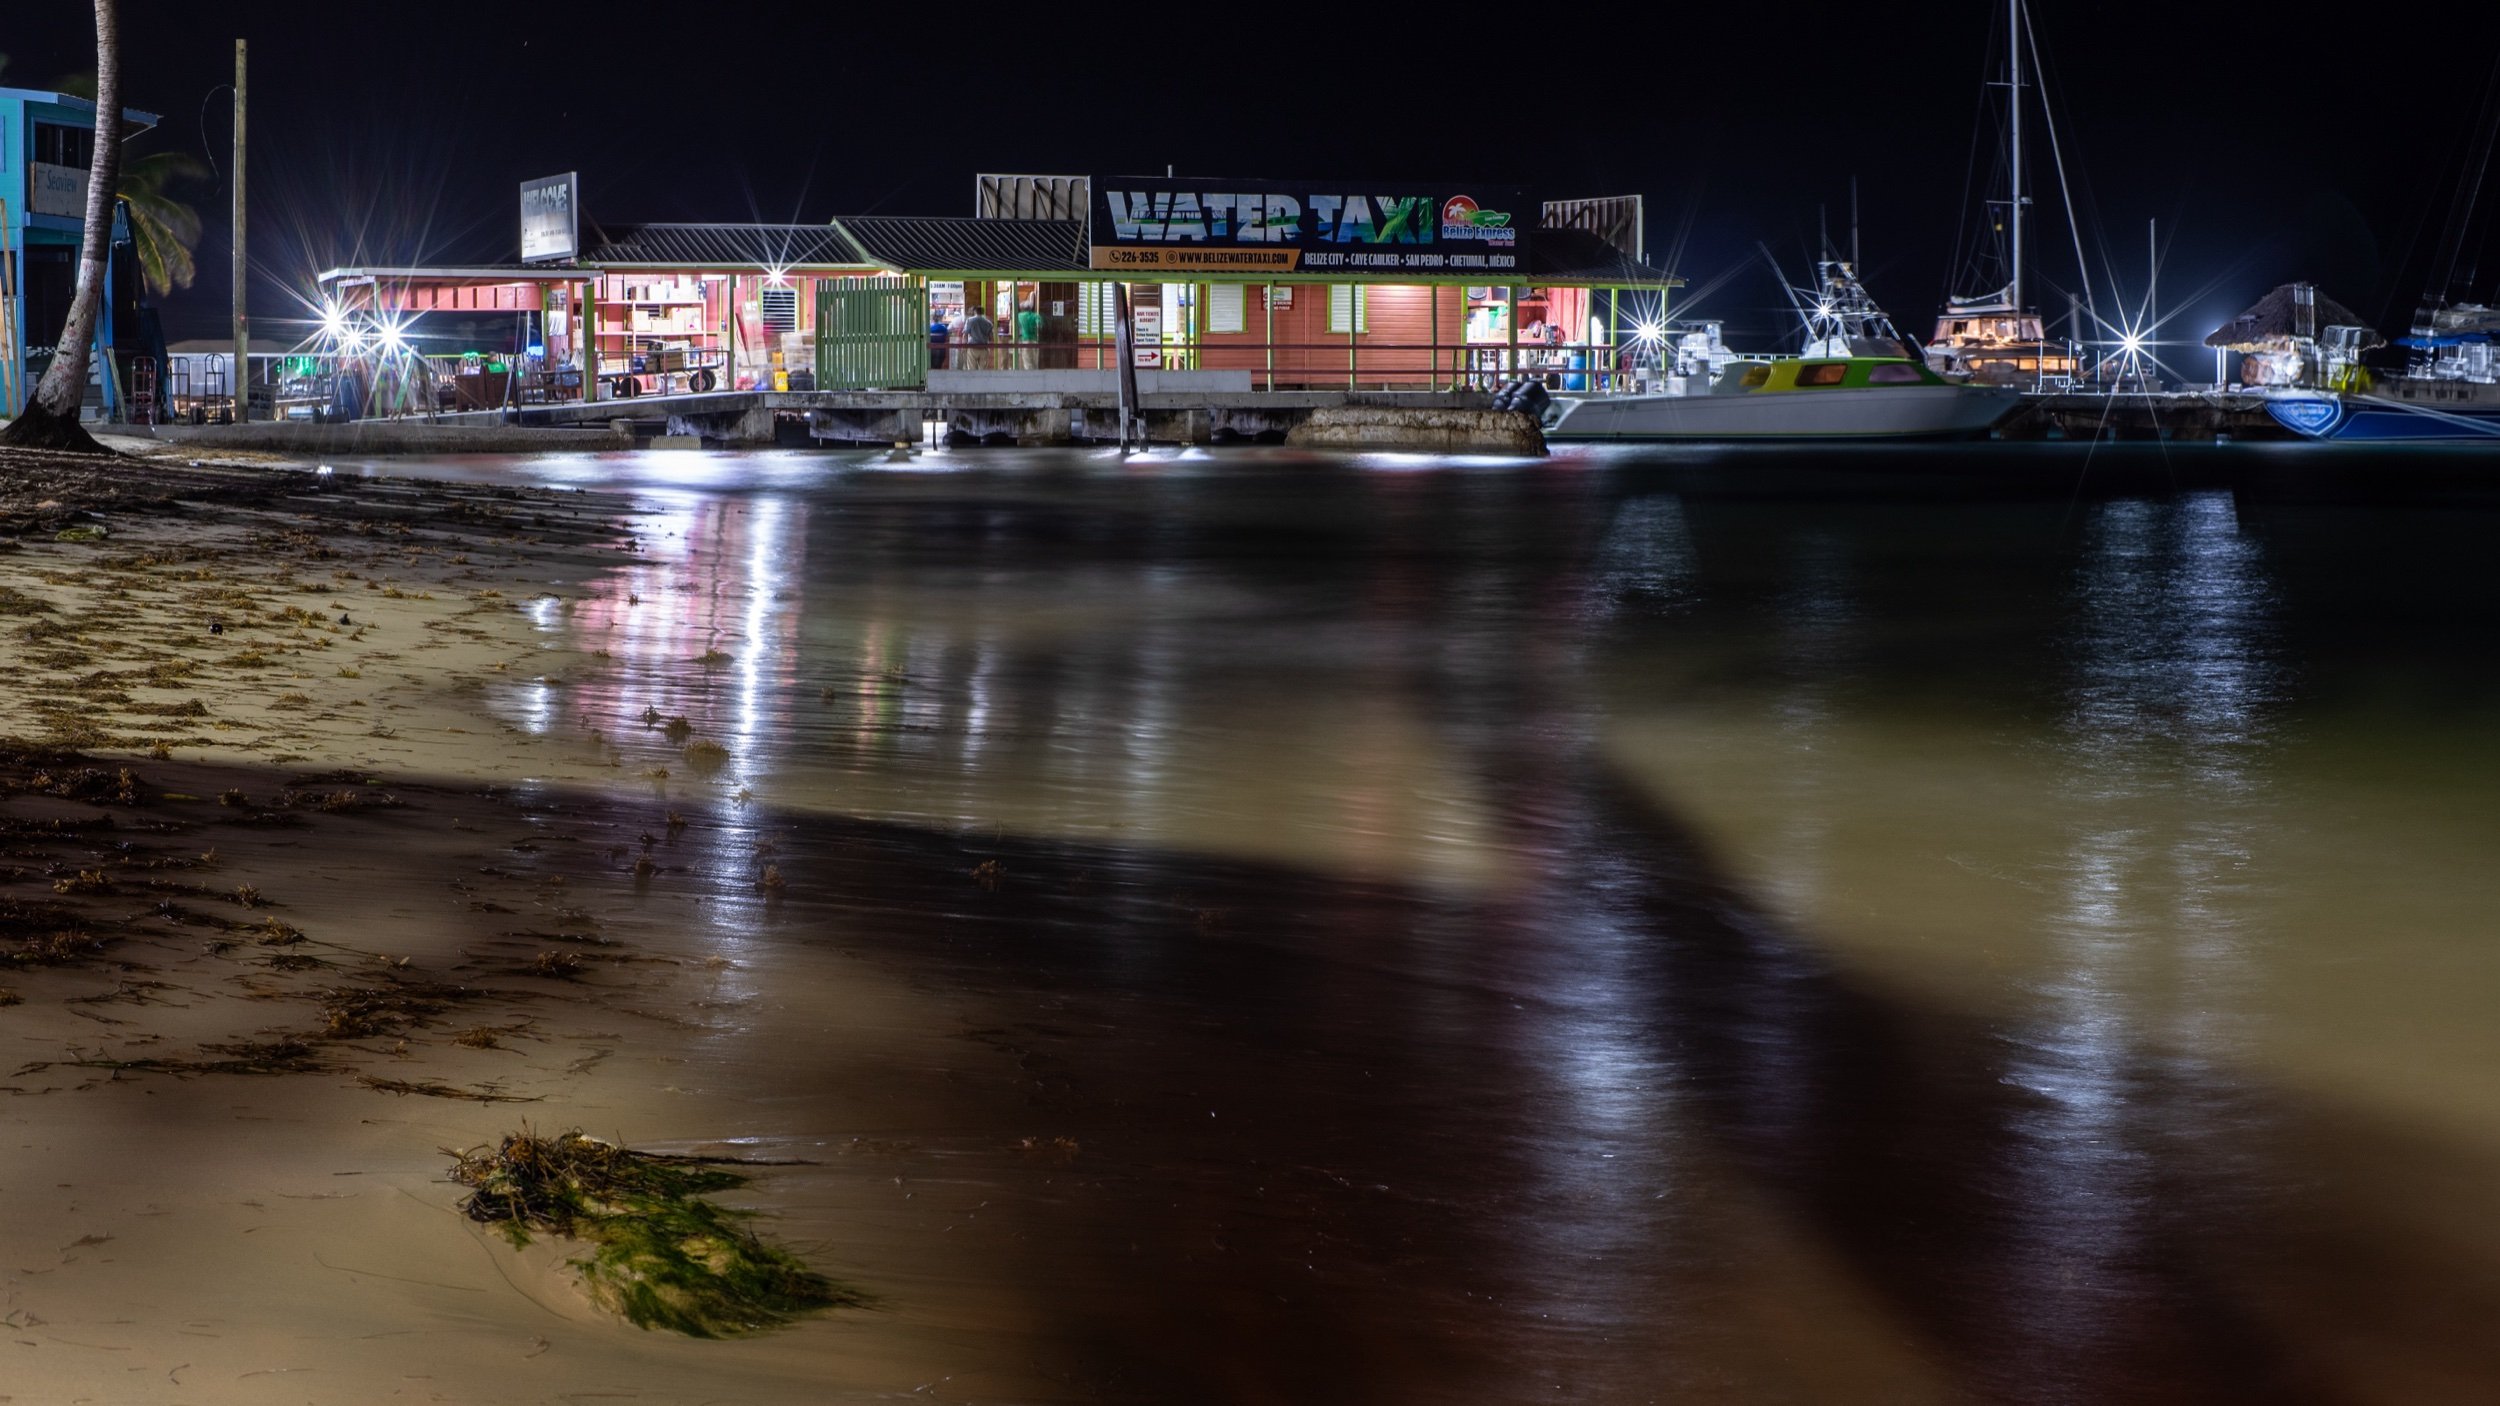
Night Photography in San Pedro: Central Park After Dark
Central Park at night - the decorations stayed up longer than they would in the US
This was taken in Central Park at night…obviously, but it was neat to find these displays still setup and under power a week later. Lots of municipalities in the USA would already be taking all this down.
Below is a photo I captured while waiting on supper to come out of the kitchen at a beachside restaurant. I simply sat the camera on a rock wall and leveled it with my iPhone under one corner since it is a 20 second exposure. My goal here was to get ocean smoothed out some for a cool foreground element. I also had to level the image a little and also set it to 16:9 crop as there was a lot of black sky above the buildings. Would it be better at blue hour? Only if you wanted some color in the sky. I like what I got and I was there at this time too so it worked out well for me.

20-second exposure improvised with rock wall as tripod - sometimes you make do with what you have
Long exposure without a tripod: Sometimes you make do with what you have. A rock wall, an iPhone as a shim for leveling, and a 20-second exposure. This is the kind of creative problem-solving that travel photography demands when you're traveling light without a tripod.
Construction and Culture: Documenting Belizean Building Methods
On our last day we just rode around and looked at the island in general and I found many things that were really interesting to me. The first photo below was interesting to me since I am American and in the USA you would never see this on an official construction site. These poles are locally cut sapling trees and they are holding up the concrete forms for the second floor of this building that is under construction. It was crazy, just how many poles were inside this building like this.

Belizean construction methods - using local saplings as supports, something you'd never see in US construction
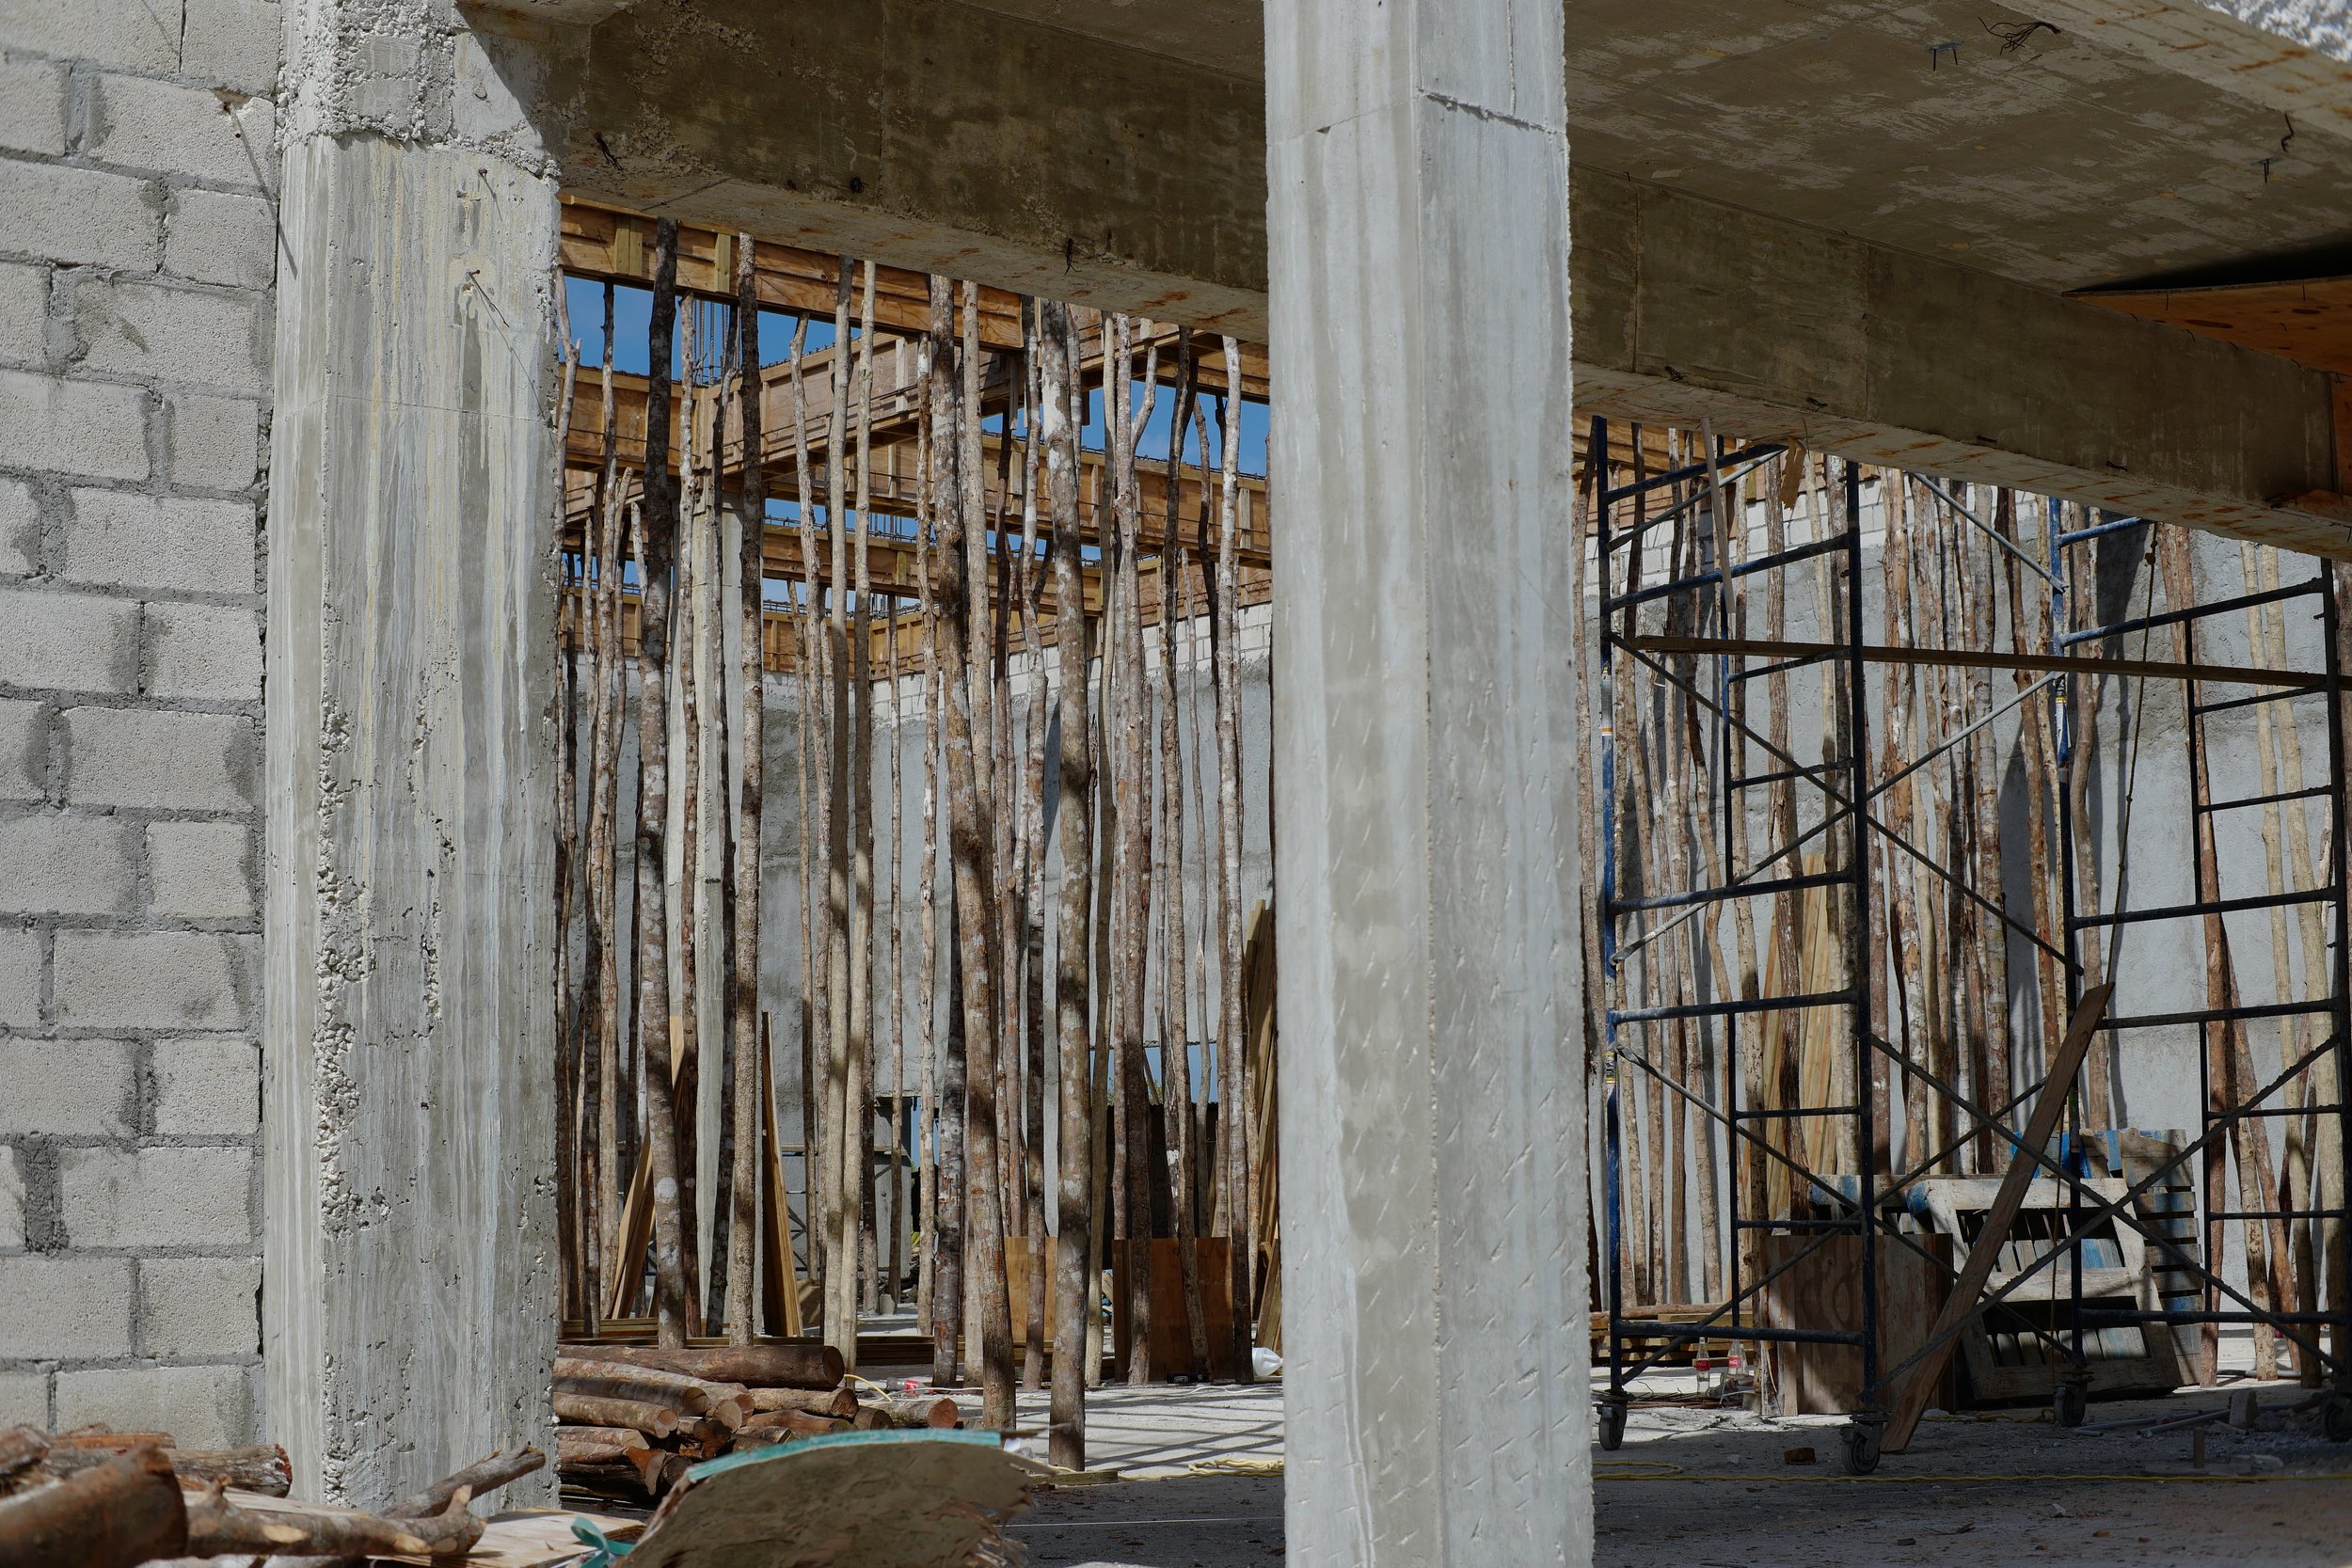
Belizean construction methods - using local saplings as supports, something you'd never see in US construction

Belizean construction methods - using local saplings as supports, something you'd never see in US construction
Documentary photography gold: This construction site shows how different building methods can be from country to country. In the US, this would never pass inspection. In Belize, it's standard practice. These cultural differences are exactly what makes travel photography compelling—you're documenting not just places, but different ways of living and working.
Final Thoughts: Real Talk About Belize Travel Photography
Thanks for tagging along here and I hope to share something new with you soon. Until then, get your camera out and take a picture with it.
Was Belize worth it for photography? Absolutely. But it's important to set realistic expectations. Placencia offered more authentic experiences than San Pedro. The ruins at Nim Li Punit were a highlight precisely because they were uncrowded. The street photography opportunities existed, but required effort to find them away from the tourist strips.
The gear worked perfectly. My minimalist Leica CL setup with just two prime lenses covered everything I needed. The 17mm for landscapes and architecture, the 35mm for street photography and portraits. Zone focusing at f/11 made street photography fast and reliable. Traveling with only a backpack eliminated stress and gave me freedom to move quickly.
Would I go back? Yes, but I'd skip San Pedro and spend more time in the rural areas and smaller sites like Nim Li Punit. The best photography in Belize happens away from the tourist infrastructure.
For more details on the camera gear I used on this trip, check out my minimalist Belize packing guide or see my current gear on my gear page
Frequently Asked Questions
Where are the best places to photograph in Belize?
The best Belize photography locations are Nim Li Punit Mayan ruins (uncrowded, accessible), rural areas between major destinations (authentic local life), early morning in San Pedro's Central Park (before tourist crowds), and Placencia (more laid-back than San Pedro). Skip the heavily touristy areas of San Pedro unless you're documenting commercialized travel culture.
What camera settings work best for street photography in Belize?
For Belize street photography, I used f/11 with zone focusing on my Leica CL and 35mm lens. This technique gives you 5 feet to infinity in sharp focus, eliminating autofocus lag. Pre-focus, compose quickly, and shoot. It's faster than autofocus for candid street moments and works in variable lighting without constant adjustment.
Is San Pedro Belize worth visiting for photographers?
San Pedro is heavily commercialized and tourist-focused, which can be frustrating if you want authentic experiences. The best photography happens early morning before crowds arrive, or by seeking out local neighborhoods away from the main tourist strips. Placencia offers better opportunities for authentic Belizean culture photography. If you do visit San Pedro, lower your expectations and focus on the contrast between tourism and local life.
How do you photograph Mayan ruins without crowds?
Visit lesser-known sites like Nim Li Punit instead of famous ruins like Tikal. Arrive early morning or late afternoon when tour groups are fewer. Nim Li Punit allows you to touch the actual stelae and photograph without constant interruptions. The trade-off is less dramatic architecture, but for photographers, the freedom and access more than compensate.
What's the best lens for travel photography in Central America?
For Belize and Central America, I recommend two focal lengths: a wide lens (17-24mm equivalent) for architecture, landscapes and environmental portraits, and a normal lens (35-50mm equivalent) for street photography and people. My Leica CL with 17mm f/1.4 and 35mm f/0.95 covered 95% of situations. Skip the zoom lenses—prime lenses are lighter, sharper, and force you to think more carefully about composition.
Can you do street photography in Belize safely?
Yes, Belize is generally safe for street photography. The locals in Placencia and San Pedro are accustomed to tourists with cameras. I photographed openly and never had issues. The "tourist card" works here—people expect tourists to take photos. That said, use common sense: avoid photographing in sketchy areas, ask permission when possible, and be respectful. Early morning photography sessions feel safer than late night.
Support this website by using these affiliate links to shop on Amazon:
Leica M11 Digital Rangefinder Camera
Nikon AF-S FX NIKKOR 105mm f/1.4E ED Lens
Voigtlander Nokton 35mm f/1.4 II
Sandisk 128GB Extreme Pro memory cards

Final street scene from San Pedro - capturing authentic moments before departure

Belize Travel Photography Guide: Minimalist Camera Gear and Packing Tips
Something we learned from the trip to England last year that was a basic revelation to us was that we don't need as much stuff as we think we do. This was because we had decided to hike the Canterbury trail in England. This forced us to leave everything behind that wasn't essential for the hike since we had to carry everything we wanted in our backpack.
When I started planning my Belize trip, I knew one thing for certain: I wasn't going to make the same mistake I'd made on countless other trips. No massive camera bag. No roller suitcase full of gear I'd never touch. This time, I was going minimalist.
This is a trip log of sorts, but it's also a lesson in how traveling light with your camera gear can actually improve your photography experience.
The Minimalist Travel Photography Philosophy
Something we learned from the trip to England last year that was a basic revelation to us was that we don't need as much stuff as we think we do. This was because we had decided to hike the Canterbury trail in England. This forced us to leave everything behind that wasn't essential for the hike since we had to carry everything we wanted in our backpack. Let me tell you, you can get brutally honest with yourself when it comes to hiking and weight in your pack. To the point of removing packaging from items to simply cull the dead weight.
This led me to also take a very hard look at my camera kit. I normally would take all sorts of lenses in the off chance I would get to do this or that kind of photography. I learned over the years though that I would end up carrying all this gear and never touch it.
The hard truth about travel photography gear: Most of what we think we "need" stays in the bag. Every extra lens is dead weight. Every "just in case" accessory is a burden you'll resent carrying. The Canterbury trail taught me this lesson through physical pain and exhaustion.
My Belize Camera Kit: Leica CL + Two Prime Lenses
Well, I looked at what we would be doing and what I figured I wanted to capture and I took just one camera and two small prime lenses. A crop sensor camera and a 17mm along with a 35mm lens is all I needed. This would cover 99% of what I would be shooting and I would be able to carry it easily in my backpack.
Now, I am on another trip out of the country and I am applying the same principle again. The kit is just as small as last time but with less charging gear. I only brought chargers for USB only this time. This may prove to have been a mistake but we will see. I am also carrying only the back pack again as well.
My complete Belize camera kit:
- Leica CL (crop sensor camera body)
- 17mm f/1.4 lens (for landscapes and general photography)
- 35mm f/0.95 lens (for street photography and low light)
- 3 spare batteries (I usually only use two per day)
- One USB charger and cable (works for both camera and action cam)
- DJI Osmo Action (for video/vlogging)
- Lume Cube Panel Mini (portable fill light)
- No lens cloths, no rocket air, no card wallet, no spare lens caps, no tripod
That's it. Everything fits in a small belt dump pouch that serves as my camera "bag." What doesn't fit goes in a ziplock bag. Total weight? Maybe 3-4 pounds including the action camera and accessories.

The complete Travel photography Camera Kit in one photo!
Why Backpack-Only Travel Changed Everything
The reason I like to travel with a backpack now is that there is no baggage to check or pickup…or lose, since I have it with me at all times. Plus the airport maneuverings is also much easier too. Much easier since you just go in and get your boarding passes (we still haven't transitioned to using our phones yet), pass through security (which you still do even if you check a bag) and go straight to your gate. Easy. Not to mention that I dont have to drag my roller bag around with me AND both of my hands are free as well.
Benefits of backpack-only travel photography:
- No checked baggage fees
- No waiting at baggage claim
- Zero risk of lost luggage with your expensive camera gear
- Both hands free for navigating airports
- Faster through security checkpoints
- More mobility when shooting on location
- Forces you to be selective about what you really need
You see, I despise airports and air travel to be quite honest about it. That is a blog post all it's own though... Haha.
The Journey: Chattanooga to Belize via Small Planes
Day 1 - We wake up at 4:30 and get ready to leave and pack the last few items we think we will need and head off to the airport.
Flying out of Chattanooga is also better to me since it is a smaller airport, the whole vibe is just lower key. This also gets me past the long lines at the big airports at check in as well as the long lines at the TSA checkpoint too. I don't normally bother with photos at the airport like others do but here are a couple for fun. All photos of travel are taken with my phone so I don't have to break out the camera. The below photo is of note though, this is what overcast skies looks like from the other side of the clouds. Looks almost looks like a desert somewhere, doesn't it?

Flying above the clouds - it almost looks like a desert from up here
Why I love small regional airports for travel photography: Chattanooga's airport lets you move through the whole process in minutes, not hours. Less stress means you arrive at your destination with more creative energy for photography. For more on my travel photography philosophy, check out my other photography insights on the blog.
The camera kit is shown below. I didn't bother with lots of items I normally carry to the point of probably a fault. Lol. No lens cloths, no rocket air, no card wallet, no spare lens caps, no tripod plates (or tripods either for that matter), not even a camera bag… officially. The bag you see is actually a lens "dump pouch" that goes on your belt. It happens to be big enough to hold almost all of the camera equipment I brought. What doesn't fit is in a ziplock bag, like the battery charger and cable and the DJI Osmo Action that I usually vlog with. I didn't even bring all of my spare batteries as I only used two a day at the most so I brought three. Lol…couldn't help myself.
My entire Belize camera kit - Leica CL, 17mm f/1.4, 35mm f/0.95, and minimal accessories
I didn't bother with a spare battery for the Osmo as I never ran one down on my normal days anyways and it USB charges so the same cable will charge the action camera as my camera charger.
The inventory is longer than I had originally planned with me adding the DJI Osmo Action and the Lume Cube Panel Mini (fill light) was a couple of luxuries I really wanted for vlogging but fit in the pack easily enough. I have almost decided that I can vlog on my phone just about as good as the Osmo Action…almost.
Arriving in Belize: First Impressions and the Small Plane Experience
Once on the ground in Belize we pass through customs and then board a smaller plane to Placencia where we will be staying for a couple of days.

Flying Tropic Air's small planes down to Placencia - a completely different experience from commercial jets
You can also tell that they play by different rules in Belize. Notice how there is no copilot, I wonder what the protocol is for a incapacitated pilot? Makes you wonder… anyway, he did just fine and we arrived in fine order. It was actually kind of nice to take the little plane down to Placencia as it flies at a much lower altitude and I could see the towns along the way really well.

Notice something missing? No copilot. Welcome to small plane travel in Central America.
I also noticed that our plane had a copy of Microsoft Flight Simulator installed…haha. It is actually neat how technical the instruments have become but still display like the old ones did. It displayed EXACTLY like the old instruments but just on a digital display. I just thought it was really neat to see that.
The instruments look like Microsoft Flight Simulator - modern digital displays mimicking traditional gauges
Small plane photography tip: These low-altitude flights offer incredible aerial photography opportunities. Keep your phone or camera ready for unique perspectives of coastlines and villages you can't get from commercial jets at 30,000 feet.
First Day in Placencia: Testing the 17mm f/1.4
After we arrived and got settled in, we went to the beach and walked in the ocean. It was really surreal to wake up and the outside temperature be 29 degrees and that evening it be almost 80 degrees.

First evening in Placencia - from 29°F at home to nearly 80°F at the beach
Once settled in, we went to the beach for a bit to relax a little and for this I took my 17mm f1.4 lens on the Leica CL. This is a great focal length for general photography as well as some landscapes. After our beach excursion it was time for some great food and fellowship.

First dinner in Belize - incredible local food and fellowship

Testing the 17mm f/1.4 at the beach - perfect focal length for landscapes and environmental shots
Successfully shooting at f/0.95 - the 35mm lens proved its worth in low light
We ate a wonderful meal for supper and hung out a while then it was off to bed. I used the 35mm at f0.95 for a change just to see if I could get some photos in focus at f0.95 and it was a success!
Shooting wide open at f/0.95: This was a test to see if I could nail focus at such a shallow depth of field while traveling. The answer? Yes. The Leica CL's focus peaking and magnification made it possible even in low light situations. This is why I love shooting with manual lenses—you stay engaged with every shot.
Living in the Moment: Day 2 Without a Camera
Day 2 was an off day from photo and video collection as I wanted to just be in the moment. This meant no camera gear of any kind. It was really nice to "unplug" for a while.
The best travel photography advice I can give: Not every day needs to be a photo day. Some experiences are better lived through your eyes instead of your viewfinder. This is something I learned through my photography evolution from gear-obsessed to minimalist, and it's transformed how I travel.
Next installment will be the "ruins"…I DID take my camera this time. Continue reading about my Belize photography adventures at Mayan ruins and San Pedro.
Frequently Asked Questions
What camera gear should I bring to Belize?
For Belize travel photography, I recommend a lightweight setup: one camera body and two prime lenses. A wide lens (17-24mm equivalent) for landscapes and beach scenes, and a normal to short telephoto (35-50mm equivalent) for street photography and portraits. The Leica CL with 17mm and 35mm lenses covered everything I needed. Skip the zoom lenses—the weight isn't worth it.
Is it safe to travel to Belize with expensive camera gear?
Yes, but be smart about it. I kept my Leica CL in a nondescript belt pouch rather than an obvious camera bag. In tourist areas like Placencia and San Pedro, camera gear is common and generally safe. Away from resorts, I was more discreet. The bigger risk is losing checked luggage—this is why I travel backpack-only with all my gear as carry-on.
Can you really travel with just a backpack for photography trips?
Absolutely. I did a week in Belize with just a backpack containing all my clothes and camera gear. The key is choosing versatile, lightweight equipment. My entire Leica CL kit (camera + 2 lenses + accessories) weighed less than 4 pounds. This left plenty of room for clothes and toiletries in a standard backpack. See my complete packing list in [my gear page](/my-gear-page).
What's the best focal length for travel photography?
For travel photography, I prefer two focal lengths: a wide lens (17-24mm equivalent) for environmental shots and landscapes, and a normal lens (35-50mm equivalent) for people and street scenes. This combination covers about 95% of travel situations. On my Belize trip, I used a 17mm f/1.4 and 35mm f/0.95 on a crop sensor camera, which gave me roughly 25mm and 52mm equivalent fields of view.
How do you pack camera gear for international travel?
Always pack your camera gear in carry-on luggage—never check it. I use a small belt dump pouch that fits my Leica CL and two lenses. It's nondescript and doesn't scream "expensive camera." Everything else (chargers, batteries, cables) goes in ziplock bags inside my backpack. This system has worked flawlessly for multiple international trips. The key is limiting yourself to what truly fits in a carry-on while staying under airline weight limits.
Support this website by using these affiliate links to shop on Amazon:
Leica M11 Digital Rangefinder Camera
Nikon AF-S FX NIKKOR 105mm f/1.4E ED Lens
Voigtlander Nokton 35mm f/1.4 II
Sandisk 128GB Extreme Pro memory cards
An updated treatise on my travel camera gear.
When I wrote the last blog post about flying with cameras gear, I had only considered the airport and airplane overhead space only.
Well, here I am again in a different scenario and this time the kit looks very different. The overarching theme here is apparently that you should tailor the kit to suit the trip. Lol. I have done just that.
For this trip we are being tourists more or less, so the camera kit will reflect that. I am taking the Leica CL and just two prime lenses. The 17mm and the 35mm lenses are perfect for tourist type photography and there is two more reasons for taking two primes over a single zoom… read on to learn why.
When choosing kit for trips now, I start with the premise of the trip. For a long time, I would have these illusions of grandeur and would take all this gear for events that never happened. You see, I dont plan the trips, the wife does so she plans on things the I don’t consider. She will arrange tours and such and I am just too busy with other things to pay much attention. Well, I finally learned and now I dont bring hardly any of that stuff and this makes travel SO much easier. Some types I have encountered are tourist, wildlife, street, and such as that. Once this is nailed down then I choose a camera that best fits that type of trip. Usually between crop sensor and full frame first as this gets me the right camera. For wildlife I prefer my crop sensor Z50 but for architectural purposes I prefer a full frame sensor. Things like street photography can be shot with either but on long days, the little crop sensor Leica CL is a much better choice over the much heavier Leica SL2.
Now that I have a camera picked out, I will decide what is the most likely scenario I will be shooting in and choose a lens for that. Next I will look at what else there is and choose a lens that will work for this as well as loosely backup for the main lens.
Using this process, I chose the 35mm f0.95 TTArtisan lens as my main lens and the TTArtisan 17mm f1.4 lens as the backup. These are designed for the Leica CL which is a crop sensor camera so the equivalent field of view for these lenses is 50mm and 28mm respectively. These are two VERY useable focal lengths for a travel kit. These will also both work just fine if one or the other gets damaged at some point. I might have to adjust my shooting style a little but the trip is not a loss…
I want to take a moment here to mention TTArtisan and how they are making some amazing lenses for crazy low prices. The quality of all three of the lenses I currently have that they made are just stellar. I have one they gave me as a review sample but I bought the other two on my own. They are great little manual lenses.

Another reason I like using prime lenses for trips is the maximum aperture is much larger than on general purpose zoom lenses. General purpose lenses work great in broad daylight but the lack of large apertures make them less than desirable for me in the evening and early morning.
What this means is I will end up with a really compact kit with this camera and two lenses. These being native L mount lenses also means they are smaller than adapted lenses as well. (This is something that I do regularly and dont sweat it and that is how I know.) Native mounted glass means they are more compact though and that is what I wanted.
Since we are hiking this trip, I wanted to make sure that rain didn’t ruin my camera gear. This is why I put all my camera gear into a dry bag and then put that inside my backpack.

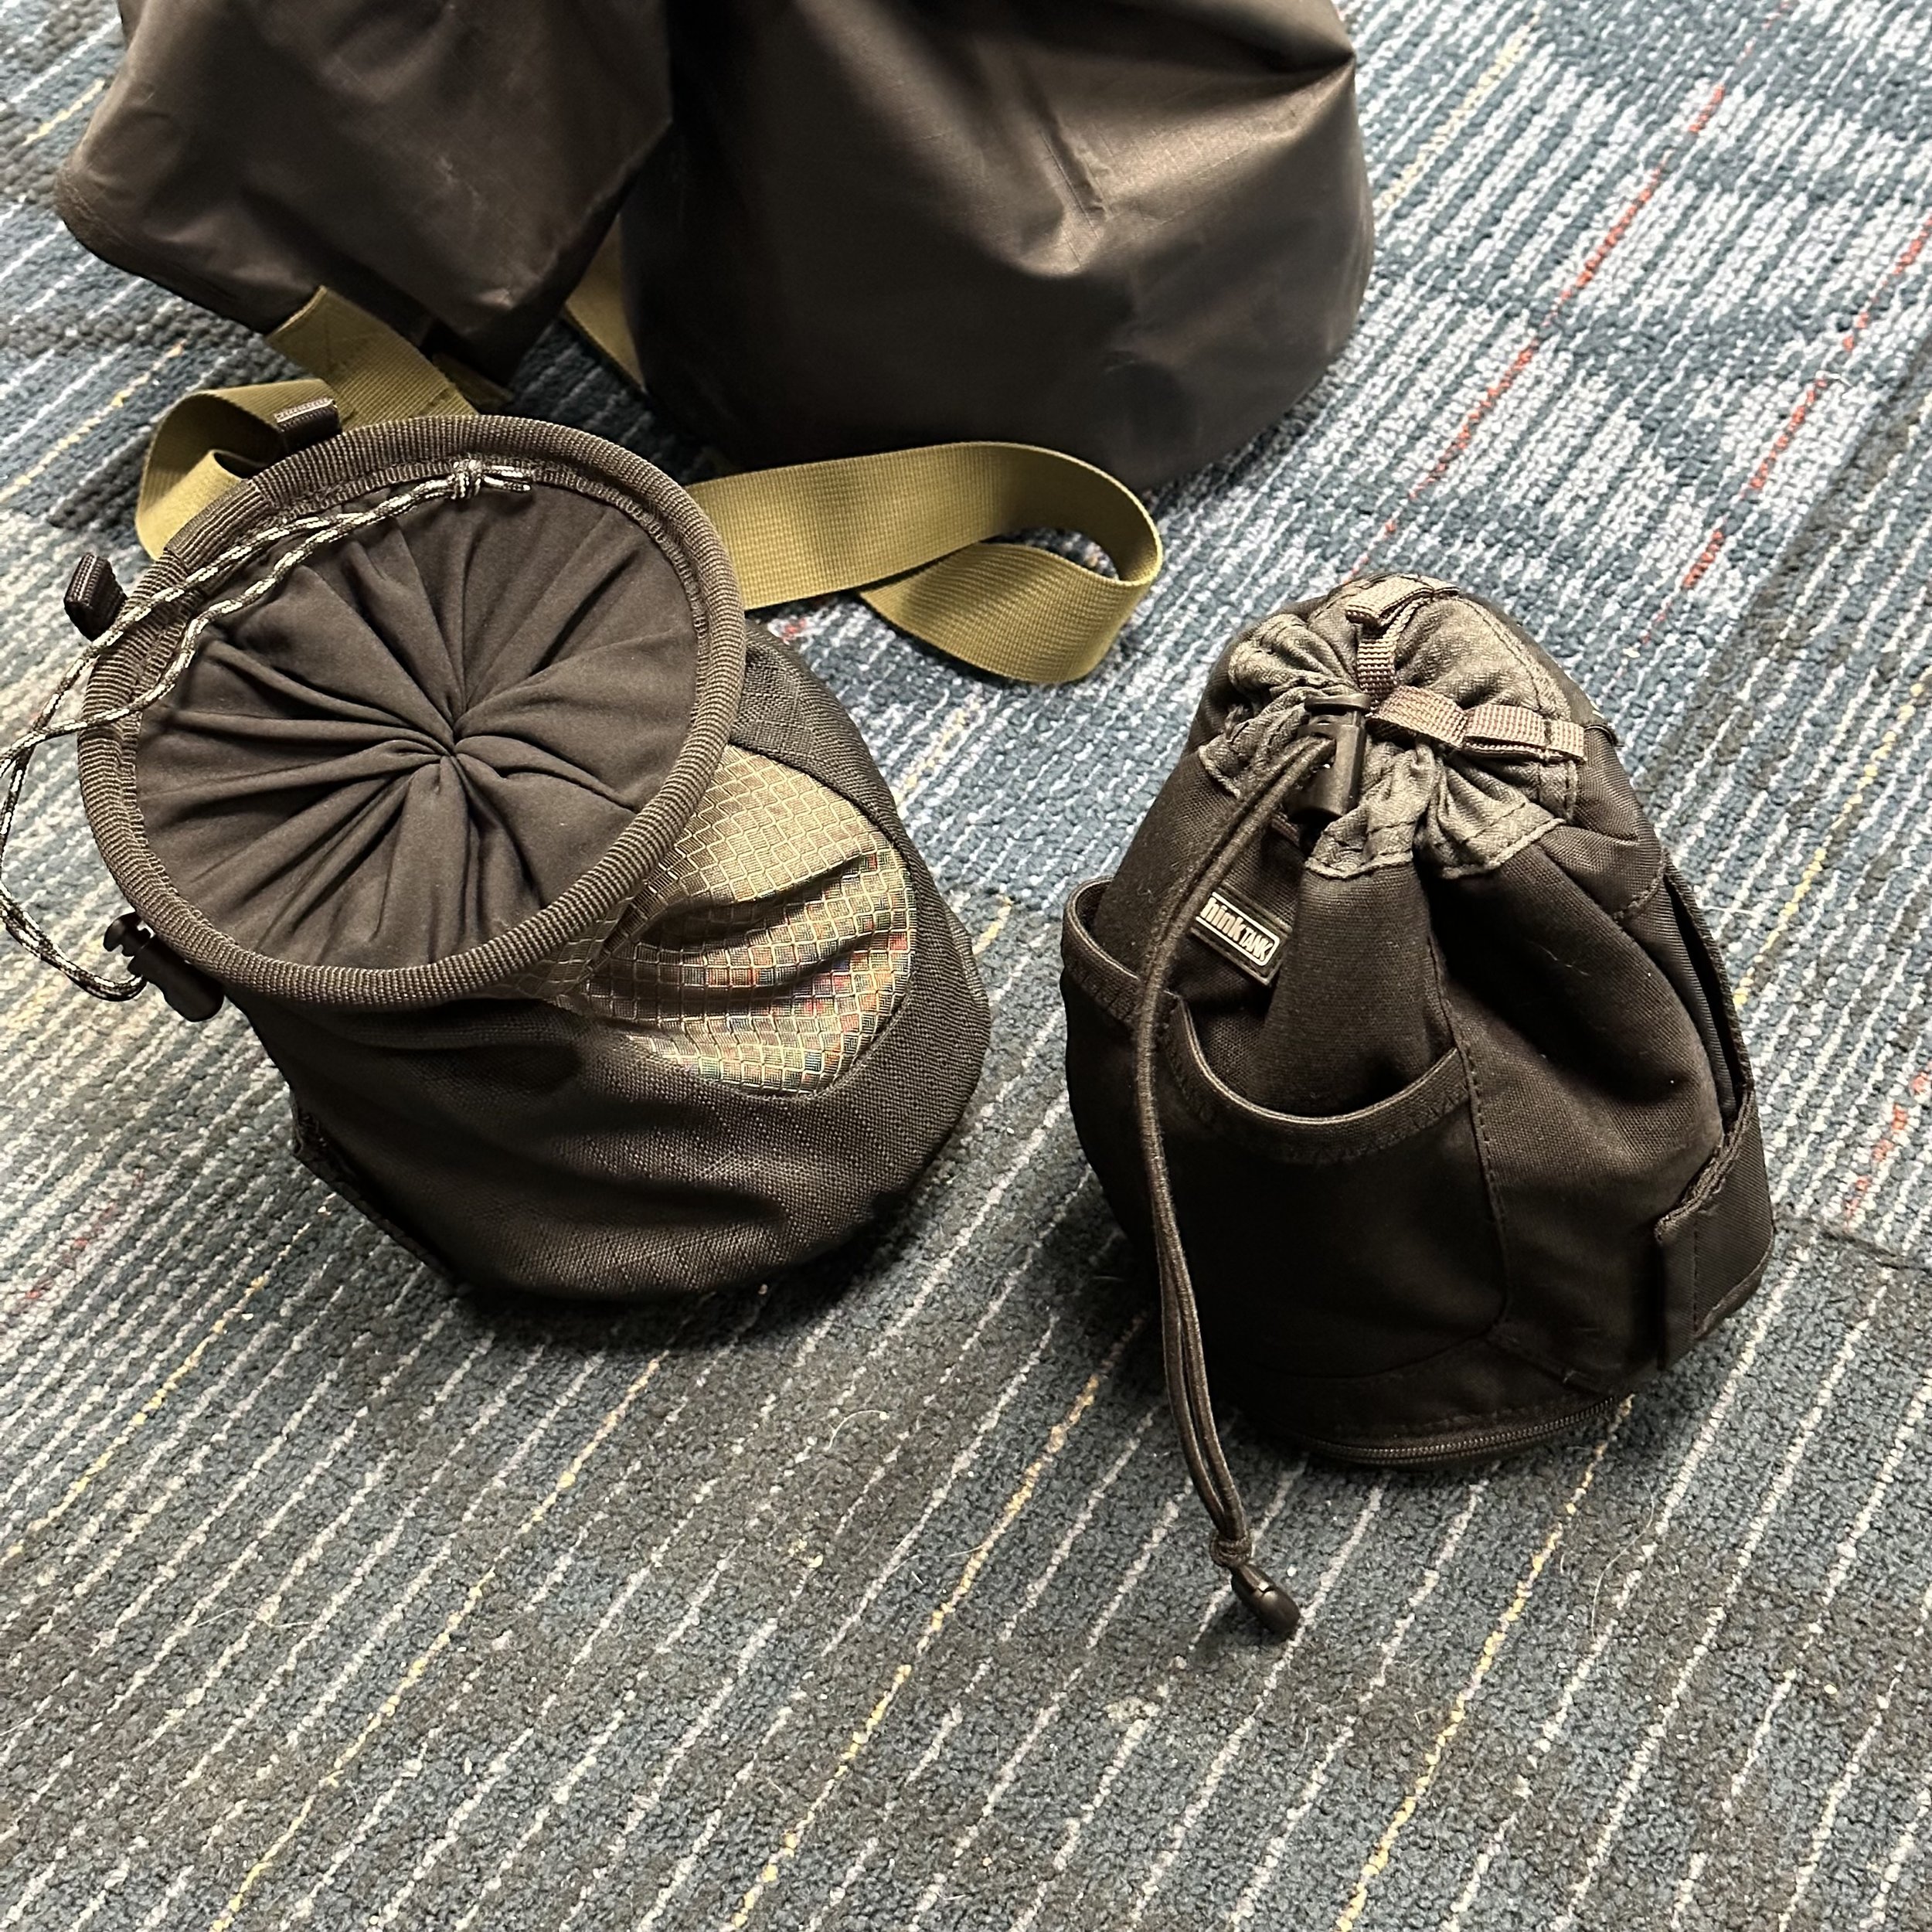
Once inside the dry bag, they are divided into three different lens “dump” bags I used for this trip to organize this gear loadout. These are made by Thinktank Photo and are great for street photography photo walks as you can stick batteries and a spare lens, business cards and lens wipes and such in them and they are still small and lightweight.
I realize now that I desperately need to clean my lens! Will do that asap!!!
Armed with this kit I am ready to take on just about any tourist, street, or even landscape type photo with hood confidence that I will come away with something reasonable. The next blog post in regards to this kit will be a photo spread describing what I found to photograph.
Until next time, get your camera out!!!
How important is the time of day when you shoot a photo?
When you take the photo is just as important as what you photograph
Seems there is all sorts of information out there about what to take pictures of, but no one (other than landscape photographers) talk much about the TIME you take your photo. In this article, I want to explore this a little with a simple location that is right down the road from my apartment and show the difference that just a few hours can make in the mood and feel of a location that is being captured.
The camera of choice with my the Leica CL with the TTArtisan 17mm f1.4 lens shot off of a tripod so shutter speed isn’t a problem. I will be maintaining an ISO of 100 for all photos and an aperture of f11 on all photos, so shutter speed will be what I have to change to keep the exposures to where I like them.
The time of day is something that a lot of people think about a little but really don’t put much effort into the planning of the photo. It takes a good bit of reconnoitering to get the location scouted with the vibe you are wanting in the photo. I see these locations all the time, when I am driving around in the day time and when I see them at night it is a completely different scene. Some people like shooting in the daytime, some like the blue hour or golden hour and some, like me, prefer the night… So seeing a night photo while viewing the scene lit by the sun is a problem. I can get somewhat of a visual based on previous photos I have taken of other locations, but until you see it lit by the street lights and 8’ fluorescent tubes, you just don’t know what you will be getting.
I don’t know why I like shooting at night so much, but I do. The low light and the negative space just do something for me and the photos reflect it.

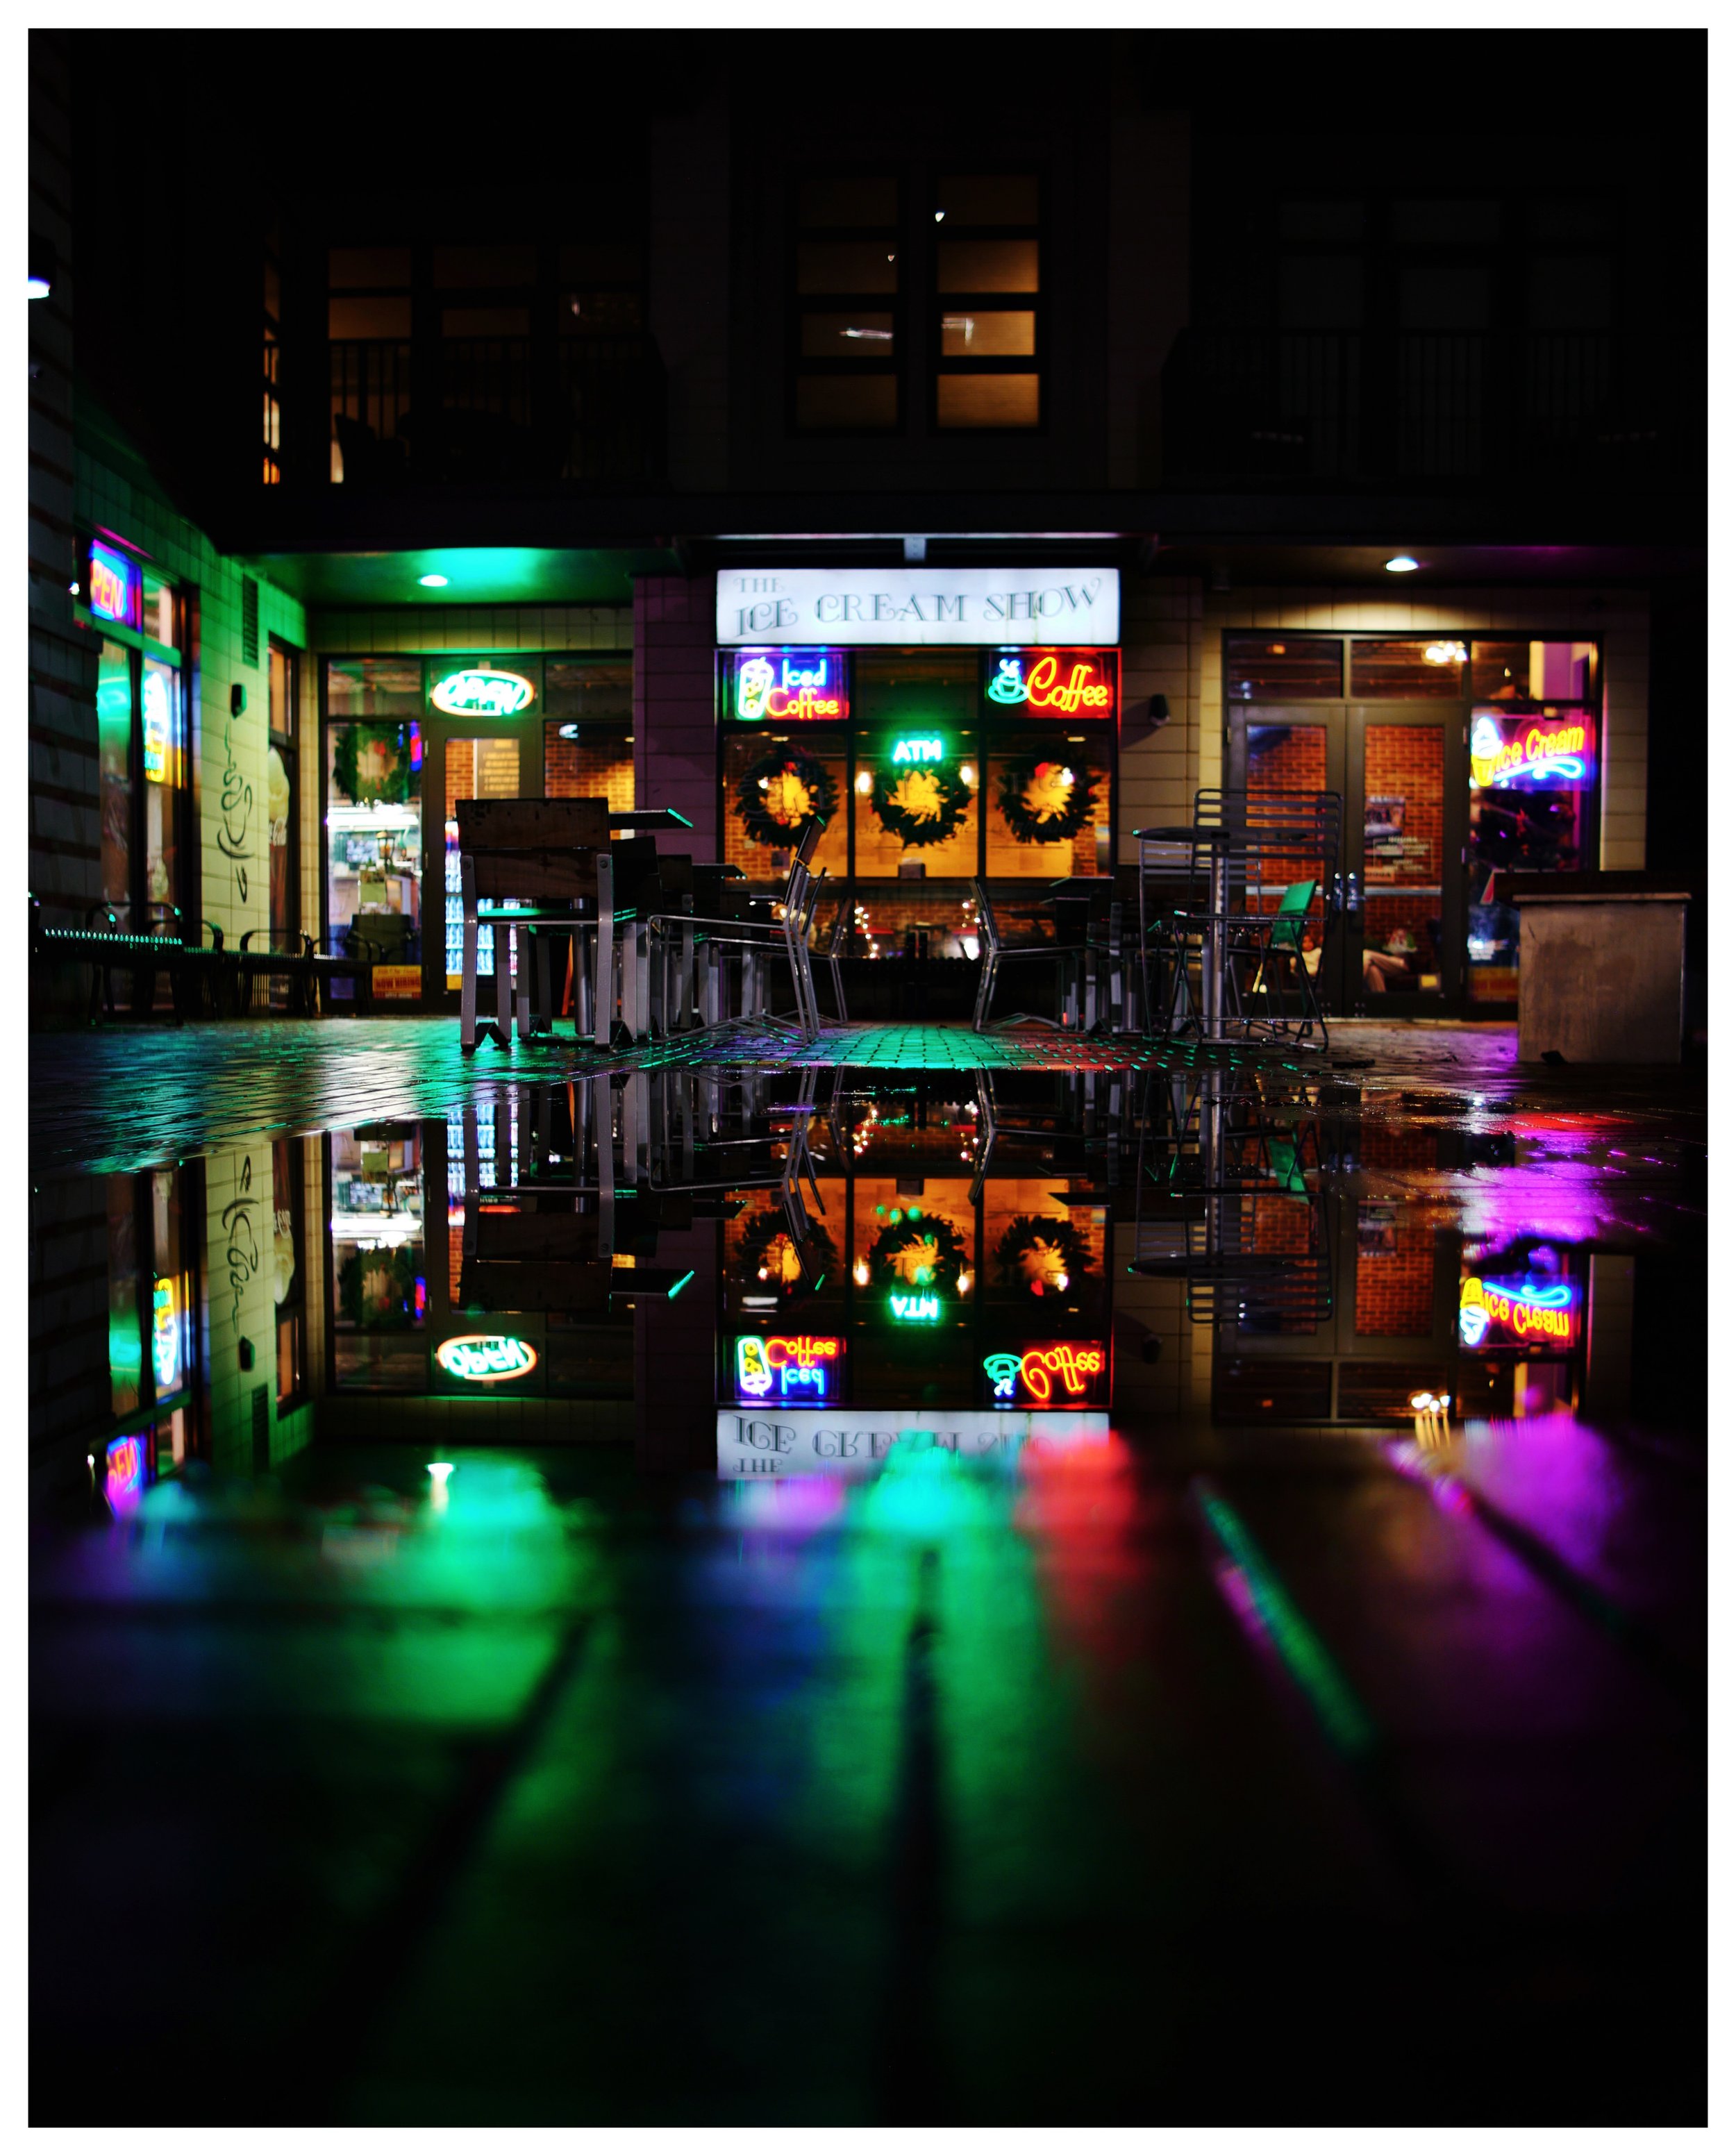
Ybor City has some interesting light that is only available at night.
I do like some blue hour stuff to add the touch of blue sky to my images at times, but not always. Another perk to shooting at night is that it is cooler in the summer months, with temps being generally lower and the sun in not beating down on me, I am more inclined to stay on a location longer and get better images. Street photos at night are a little tougher as I need larger apertures to keep ISO manageable, and this means focus is a lot more of an issue as depth of field is significantly shallower than in the daytime, but it is manageable if you think about it first.
I normally set focus traps and shoot in burst mode and this will usually net me a sharp photo of a scene at night at even crazy large apertures like f1.4 or f0.95… It just takes a bit of practice and patience.
The gear matters…
The gear you use at night matters just as much as the subject you are shooting. If you have the wrong equipment, you simply won’t get the shot.

Fast glass gives you options.
Take for instance, street photography, this is dynamic and has movement in it. For most human movement, a shutter speed of 1/250 second will freeze action sufficiently. 1/200 in a pinch if the subject isn’t moving too much will net sharp photos. Well, to get a decent exposure, you will need fast glass, shot wide open and will still probably need a fair amount of ISO to compensate.
Now, if you are shooting static subjects like buildings or scenes and motion isn’t an issue, you can just let the shutter stay open until the exposure is good, but once you cross about 10 seconds, humans tend to vanish from the scene… Cars make long lines with their headlights as they drive by and things begin to look different. So you can see it all depends on what you want to capture to drive your gear choices here.

I personally like to have fast glass if possible as this is the most versatile lenses. These lenses can still be stopped down for times when you want deeper depth of field and opened up when you need the extra light gathering power of “fast glass”. So whenever possible, I will always opt for the larger aperture option over the smaller, if just makes sense to me to have that extra optional aperture when needed. The old adage “better to have it and not need it than to need it and not have it” comes to mind…
Water reflections are magical in low light or night photos.
Now that lenses are talked to death, what about the camera? Well, honestly any camera will do. It is the least important part of the equation to be honest. As long as it can be controlled manually for all three major functions, it will do. You see, it must be able to adjust shutter speed, ISO and aperture manually to be able to get creative results at night. The camera running in automatic mode will make choices in these controls that will not be what the photographer wants most of the time. It is guessing and will most likely guess wrong… But just about all reasonable cameras will let you control these functions and this is where it gets good…
The time of day.
Back to the original subject. Here are two photos taken from the same location, with the same camera and lens combination, at two different times of day.

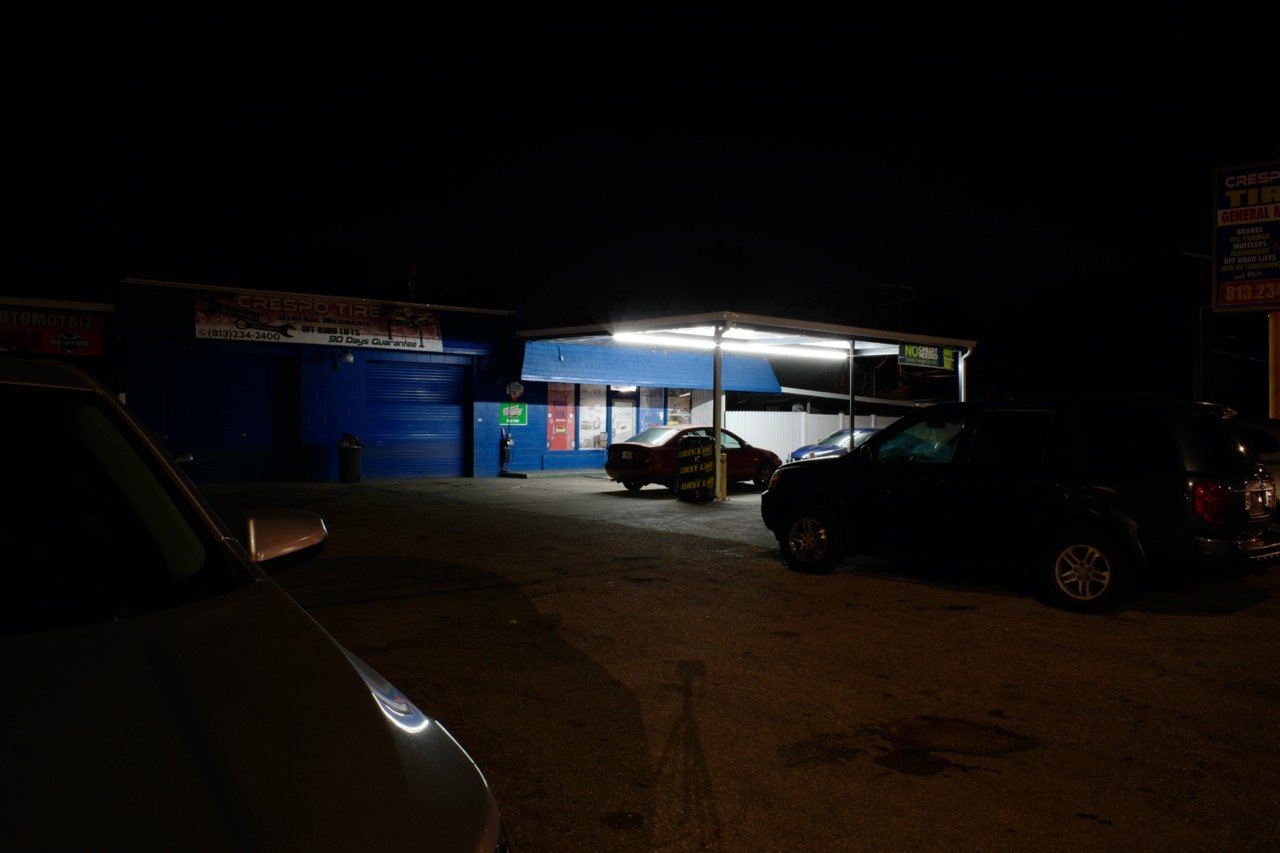
Here we have a daytime scene of a garage.
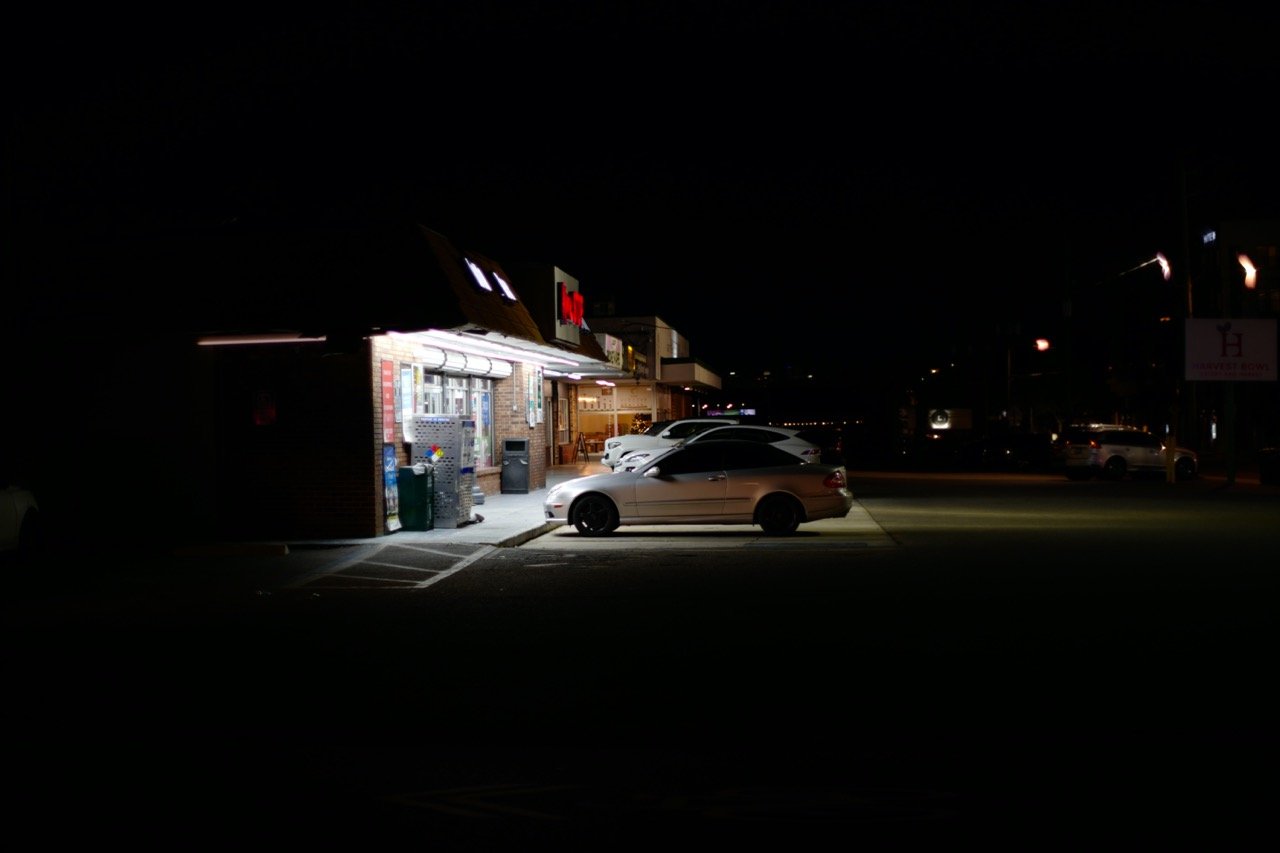
Here is the same composition at night. Notice the change in mood.

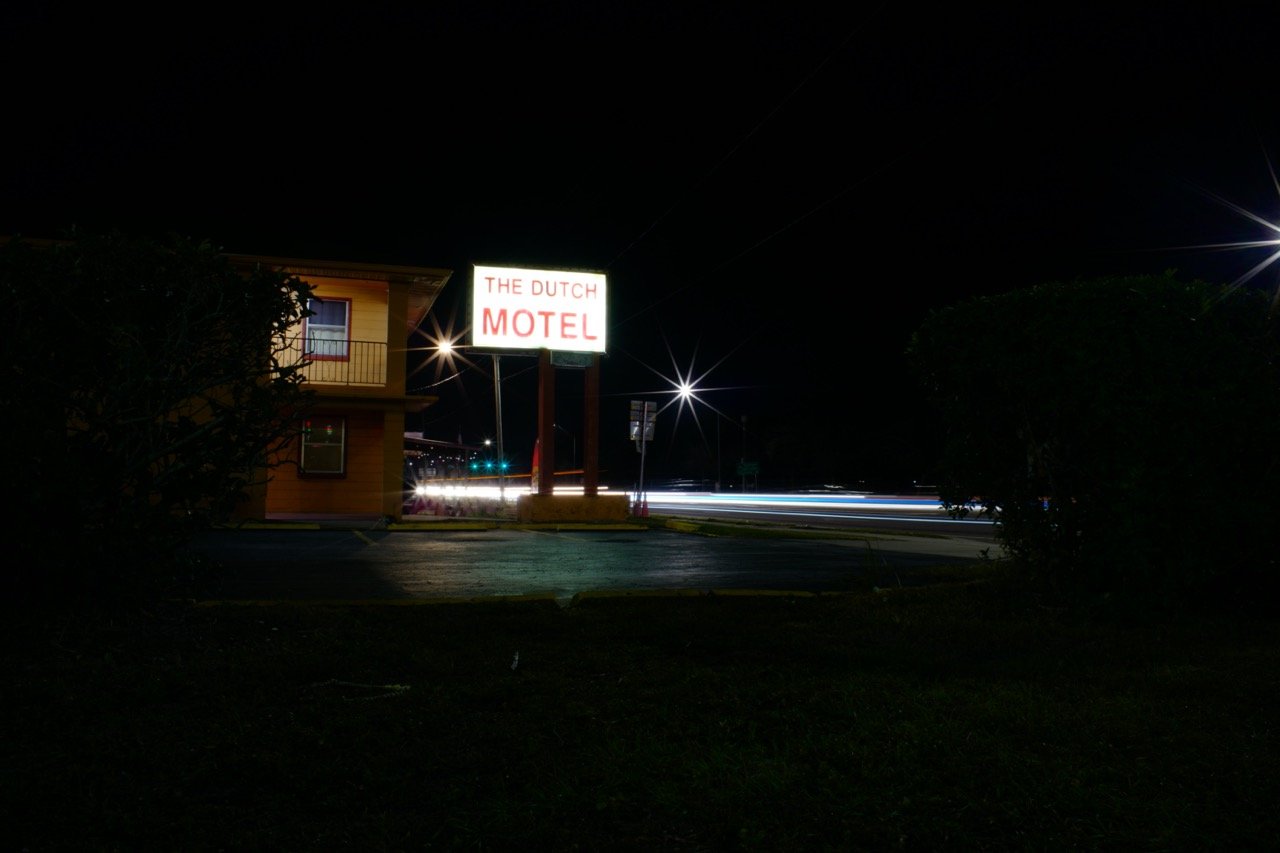
Here is the same scene, but the overhead lights are turned off (different day). This changes the mood even more and gives the scene a different feel. Take a look at the scene below of the Dutch Motel sign I found the other evening. The daytime photo isn’t much to look at, but the night time one has all sorts of interesting features that make it unique and otherworldly since it is distorting time so much with the incredible shutter time of 10 seconds!

The Dutch Morel sign isn’t much to ponder during the day…
1/400 second ISO 100 f8
Once nightfall comes and you slow down the shutter, the magic happens
10 seconds ISO 100 f8
This is just a couple of examples too, there are many others that I have noticed over the years. So if you want a certain feel from an image, the time of day absolutely matters. There are some things that a strobe just won’t overcome and the sun is one especially if you are shooting buildings and not portraits.
So if you want to learn more about low light photography, check out my youtube channel here. David Saylors Youtube Channel.
What does lens focal length do to me psychologically when shooting street photography?
Photography and the human mind…
I have found that when I put on a wide lens, I suddenly loose the fear of getting close to people for some reason. I am still guarded with people and don’t approach a lot of them, but I will still get closer. This is a real struggle for me and I find it even harder due to time constraints that I have to shoot street. I don’t normally get to go shoot street when the large crowds are out and about. I end up being in the areas when there is little to no activity. So for me to get a good candid street photo is pretty special. I don’t get dozens a week like some photogs I see, but maybe one a month…maybe.

17mm APS-C photo on the Leica CL
I find that I like to get two kinds of photos when I shoot wider than 35mm and a different kind of photo when I shoot 35mm or longer. I didn’t even realize it until the other day when I put the 17mm on my Leica CL (like a 28mm on full frame) The 28mm is also what happens to come on the Leica Q series cameras. This particular machine is quite costly and you can’t change the lens either. But for street photography , the 28mm is a great choice and lots of people LOVE the Leica Q2 and Q2 Monochrome just for this reason!
17mm APS-C photo on the Leica CL
When I put the 17mm TTArtisan APS-C lens on the camera I consciously know that the lens is very wide and that I am going to have to get close if I want to fill the frame. Then I fill the frame with images that make me happy for some reason. It is really strange that if you want better photos, sometimes you just have to get closer… Photography is strange, people have all sorts of different ideas about what it is. You know what? They are all correct. Every single one of them. What is that all about? LOL

35mm APS-C photo on the Leica CL
When I put on the 35mm (50mm equivalent) The mindset shifts to scenes with people in them or portraits on the street when I use longer lenses for some reason. It just happens too, I don’t even think about it, I just do it. I start looking for interesting things across the street when running the 35mm or longer lens. I also noticed that I like to compose from different view points too. I will end up shooting from a lower angle with the wide lens and from my eye level with the longer lenses. I think this is because of the viewing angle when I look at the photos in post, but it is a very strong phenomenon.

The Leica CL has become my de-facto street camera with either the 35mm or the 17mm as of late. I really like the form factor of the Leica CL and I also use a grip frame on it. This grip frame is made by LIMS that is currently out of production from everything I have seen. This grip frame is awesome because it has a ARCA SWISS tripod adapter on it and there is an opening for the battery door in the bottom plus it has the grip extension on the right side that makes this basically the perfect street camera for me. I like the form factor of this machine the most, it being very unassuming yet has exceptional image quality, makes this a wonderful little street camera. My only thing I would like better would be to have the Leica Q2 Monochrome as I love monochrome AND the low light power of that camera is phenomenal! But for now, I really want to use the CL all the time.
I say that with a bit of sarcasm, you see as as of late I have really started to embrace color photography more and more and have not shot in monochrome on my digital machines in ages. So the monochrome might not be the best solution for me, but I really like the idea of the low light powerhouse that it is. That is the real appeal for me to be honest about it.

The Leica CL adorned with the TTArtisan 17mm f1.4 APS-C manual lens.
So there you have it, a small treatise on my thoughts about the focal length and what I instinctively shoot with each one. I am odd and I know it, so this is by no means a definitive explanation about anything, but rather just an observation into what I do when I use certain lenses and what kind of gear I tend to lean towards when I go shoot.
Now get your camera out and go take a photo with it!
TTArtisan 35mm f0.95 APSC Manual Lens Review
Ok, yall. This has been in the works for a few weeks now and I am finally ready to publish it.
The short answer… it is totally worth the money if you like manual glass.
The long answer… read on.
Handheld at f0.95 at night shutter speed is 1/80 second. The image is nice and sharp.

Shot at f8 with the focus trap method.
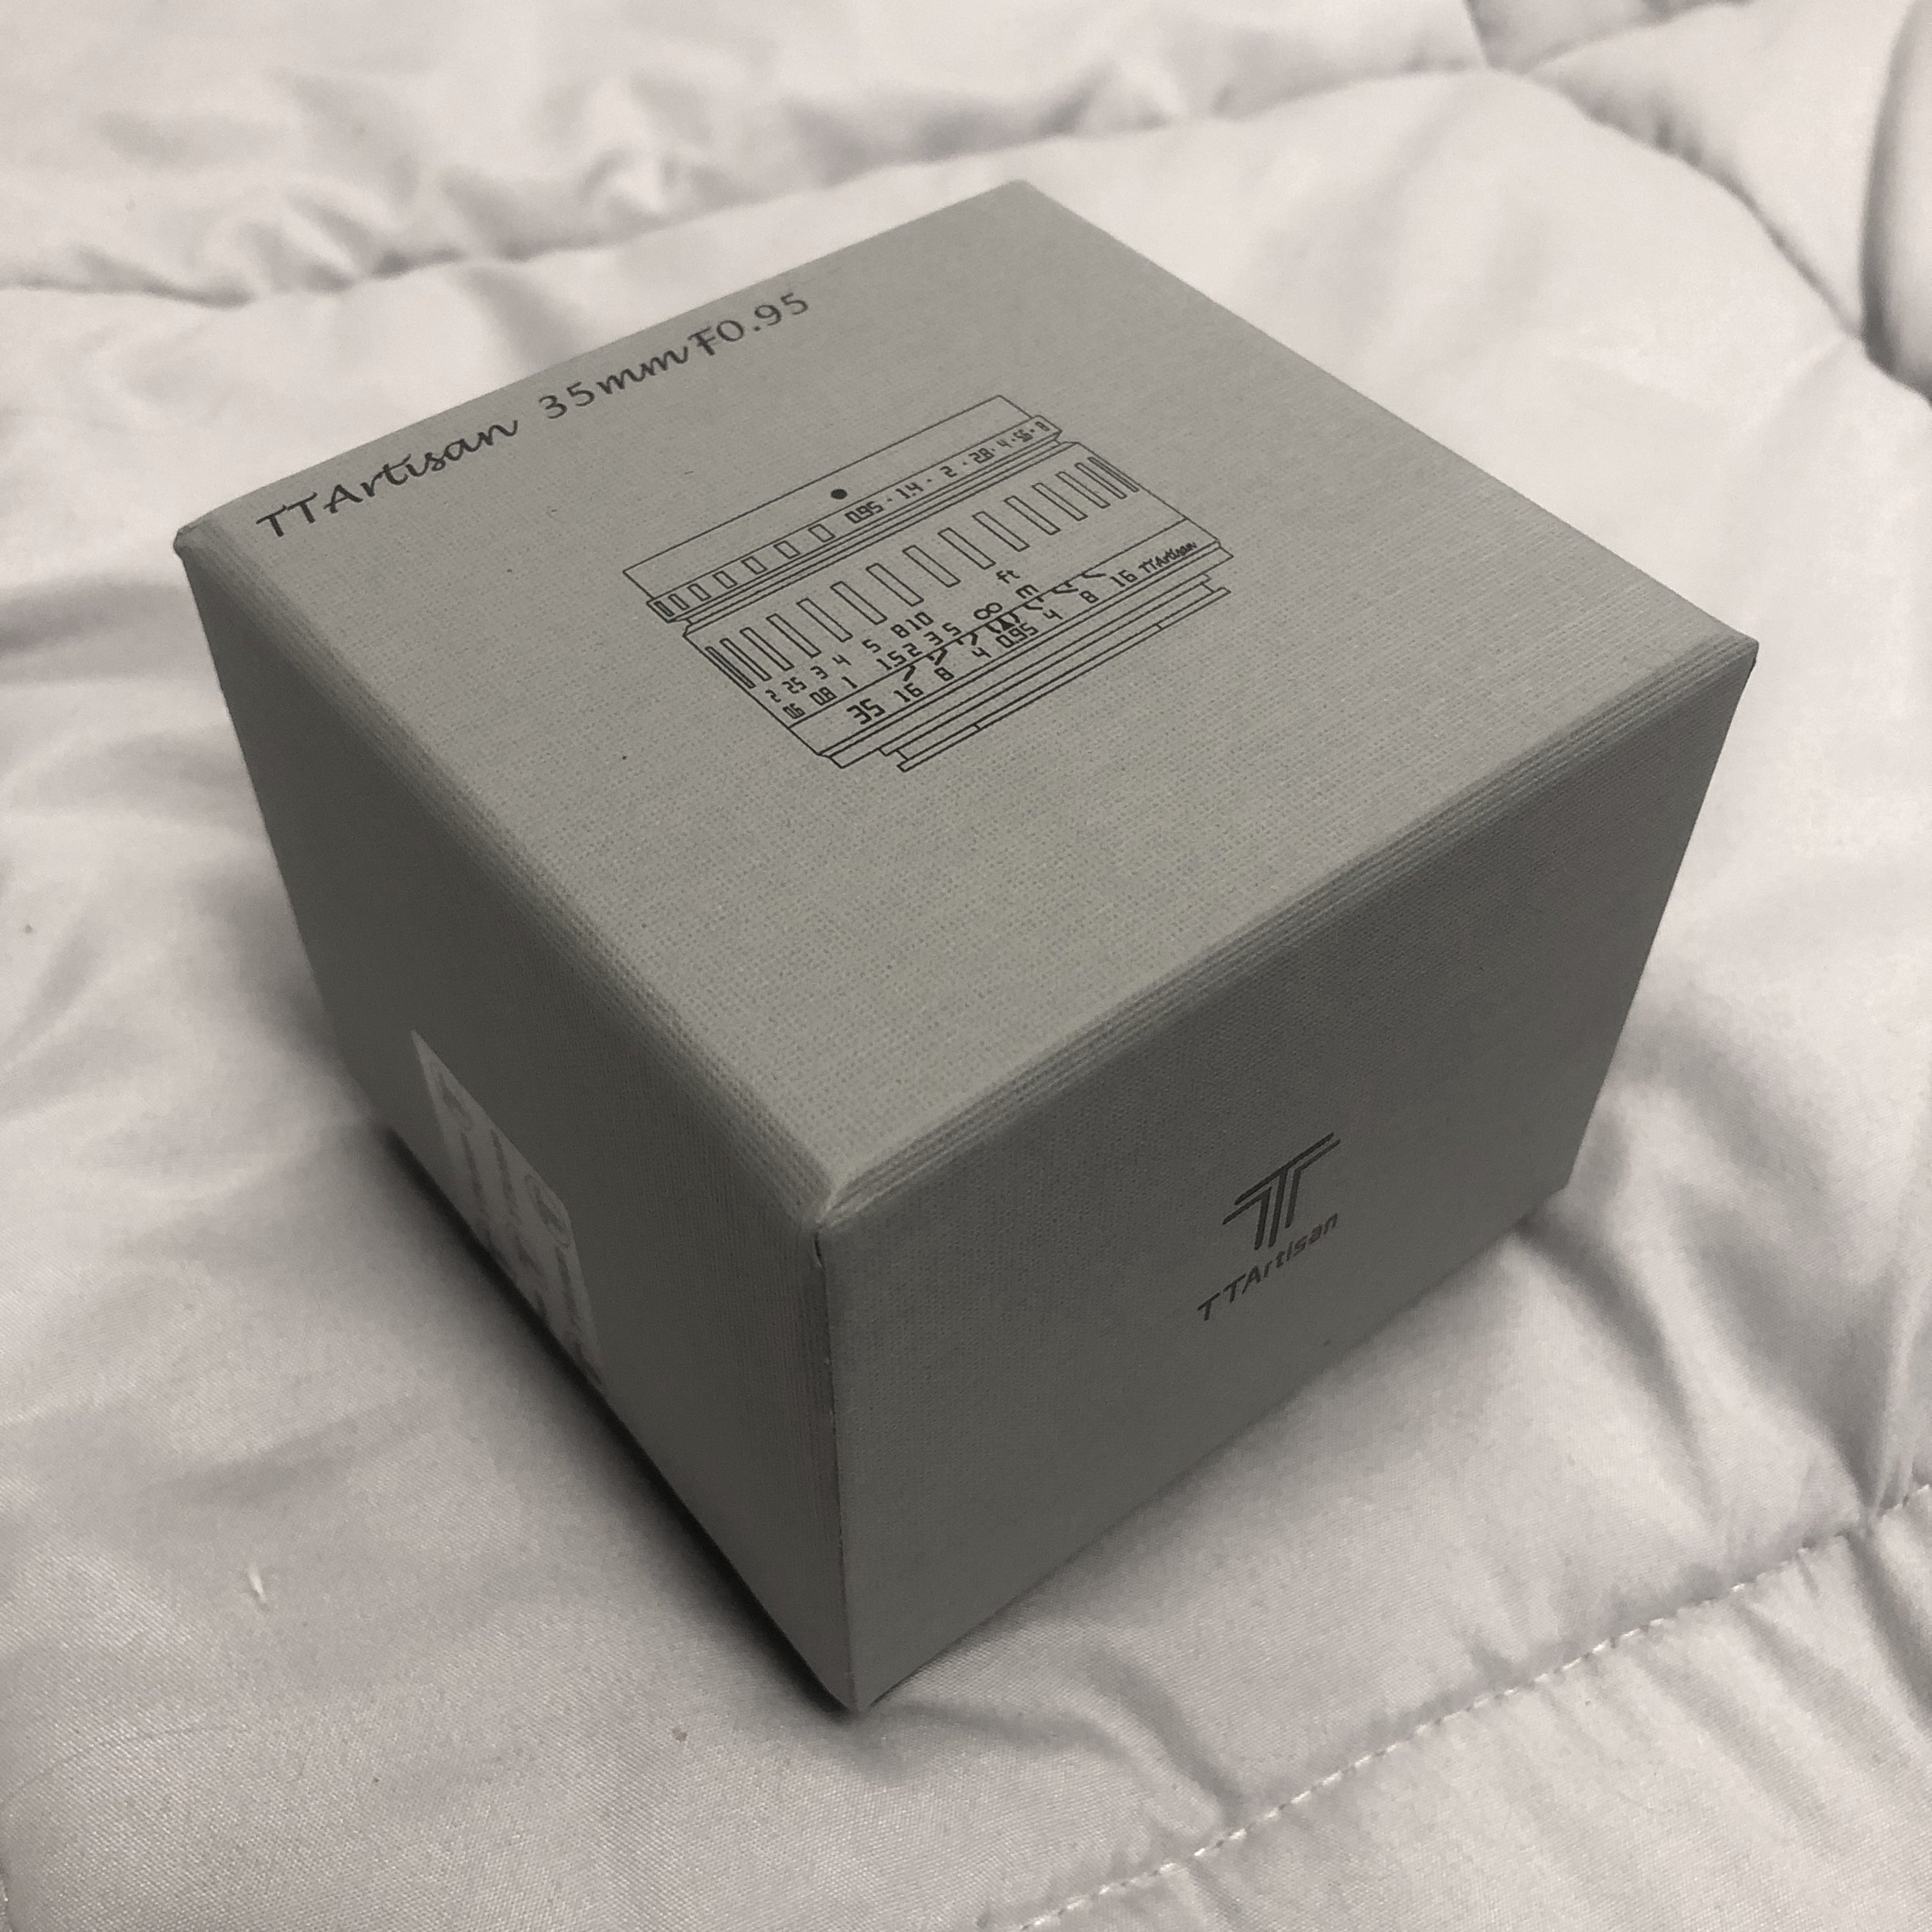
This little lens is a wonder of modern engineering with how they kept the size so small and also kept the optics so clear at the same time. I unboxed this lens and noticed immediately the packaging is top tier, reminiscent of the iPhone styling but in a nice grey/cloth texture for the cover with the lens nomenclature clearly on the top of the box. If the box is a clue to the lens quality then this is going to be a real winner! (Spoiler: It is)
It is no secret that I like to shoot 50mm on my full frame cameras like my Leica SL2 and the 35mm is about as close as it gets on APSC, so I shoot a lot with 35mm on my Leica CL when I am out just shooting street for me. So when TTArtisan reached out to me and asked if I would like to take a look at this beast, I quickly agreed and they sent me a lens.
Now for the whole disclosure part: They(TTArtisan) did give me the lens for free. They also told me that they had no “rules” they wanted me to follow or anything at all to be honest. They just said that if they liked my review that they would like to have permission to share it on their social media. Which I also though was a great idea. So I am free to say what ever I want as I come to this review. With all that said, let’s get started.
I deliberately wanted to shoot with it for a few weeks before rendering judgement as this will allow the “honeymoon” phase of getting something new to wear off a little and I can be more objective in the review for you guys. I have shot a variety of subject matter with it and have come away loving this lens immensely. It only has a couple of things that I dont like all that much and they really are not deal breakers.

Shot at f0.95 in the dark… hand held and manually focused on the bottles.
What do I like about this lens?
Well for starters… THE APERTURE GOES TO f0.95!!! You just have to love some fast glass and this little guy has it, and then some! At one point I stopped down to f4 for a photo that needed some depth of field and realized I had stopped down 4 1/3 stops to do this! That is lunacy! I am just blown away that they can pack that much aperture into such a small package. Speaking of aperture, the aperture blades are nice and round but when stopped down it still produces some glorious sun stars!

The light stars are pretty epic in my book. (I love light stars though)
Stopped down to f16 & 12 second exposure, for this extreme example.
The double bladed one on the left is because there are two bulbs in the street light.

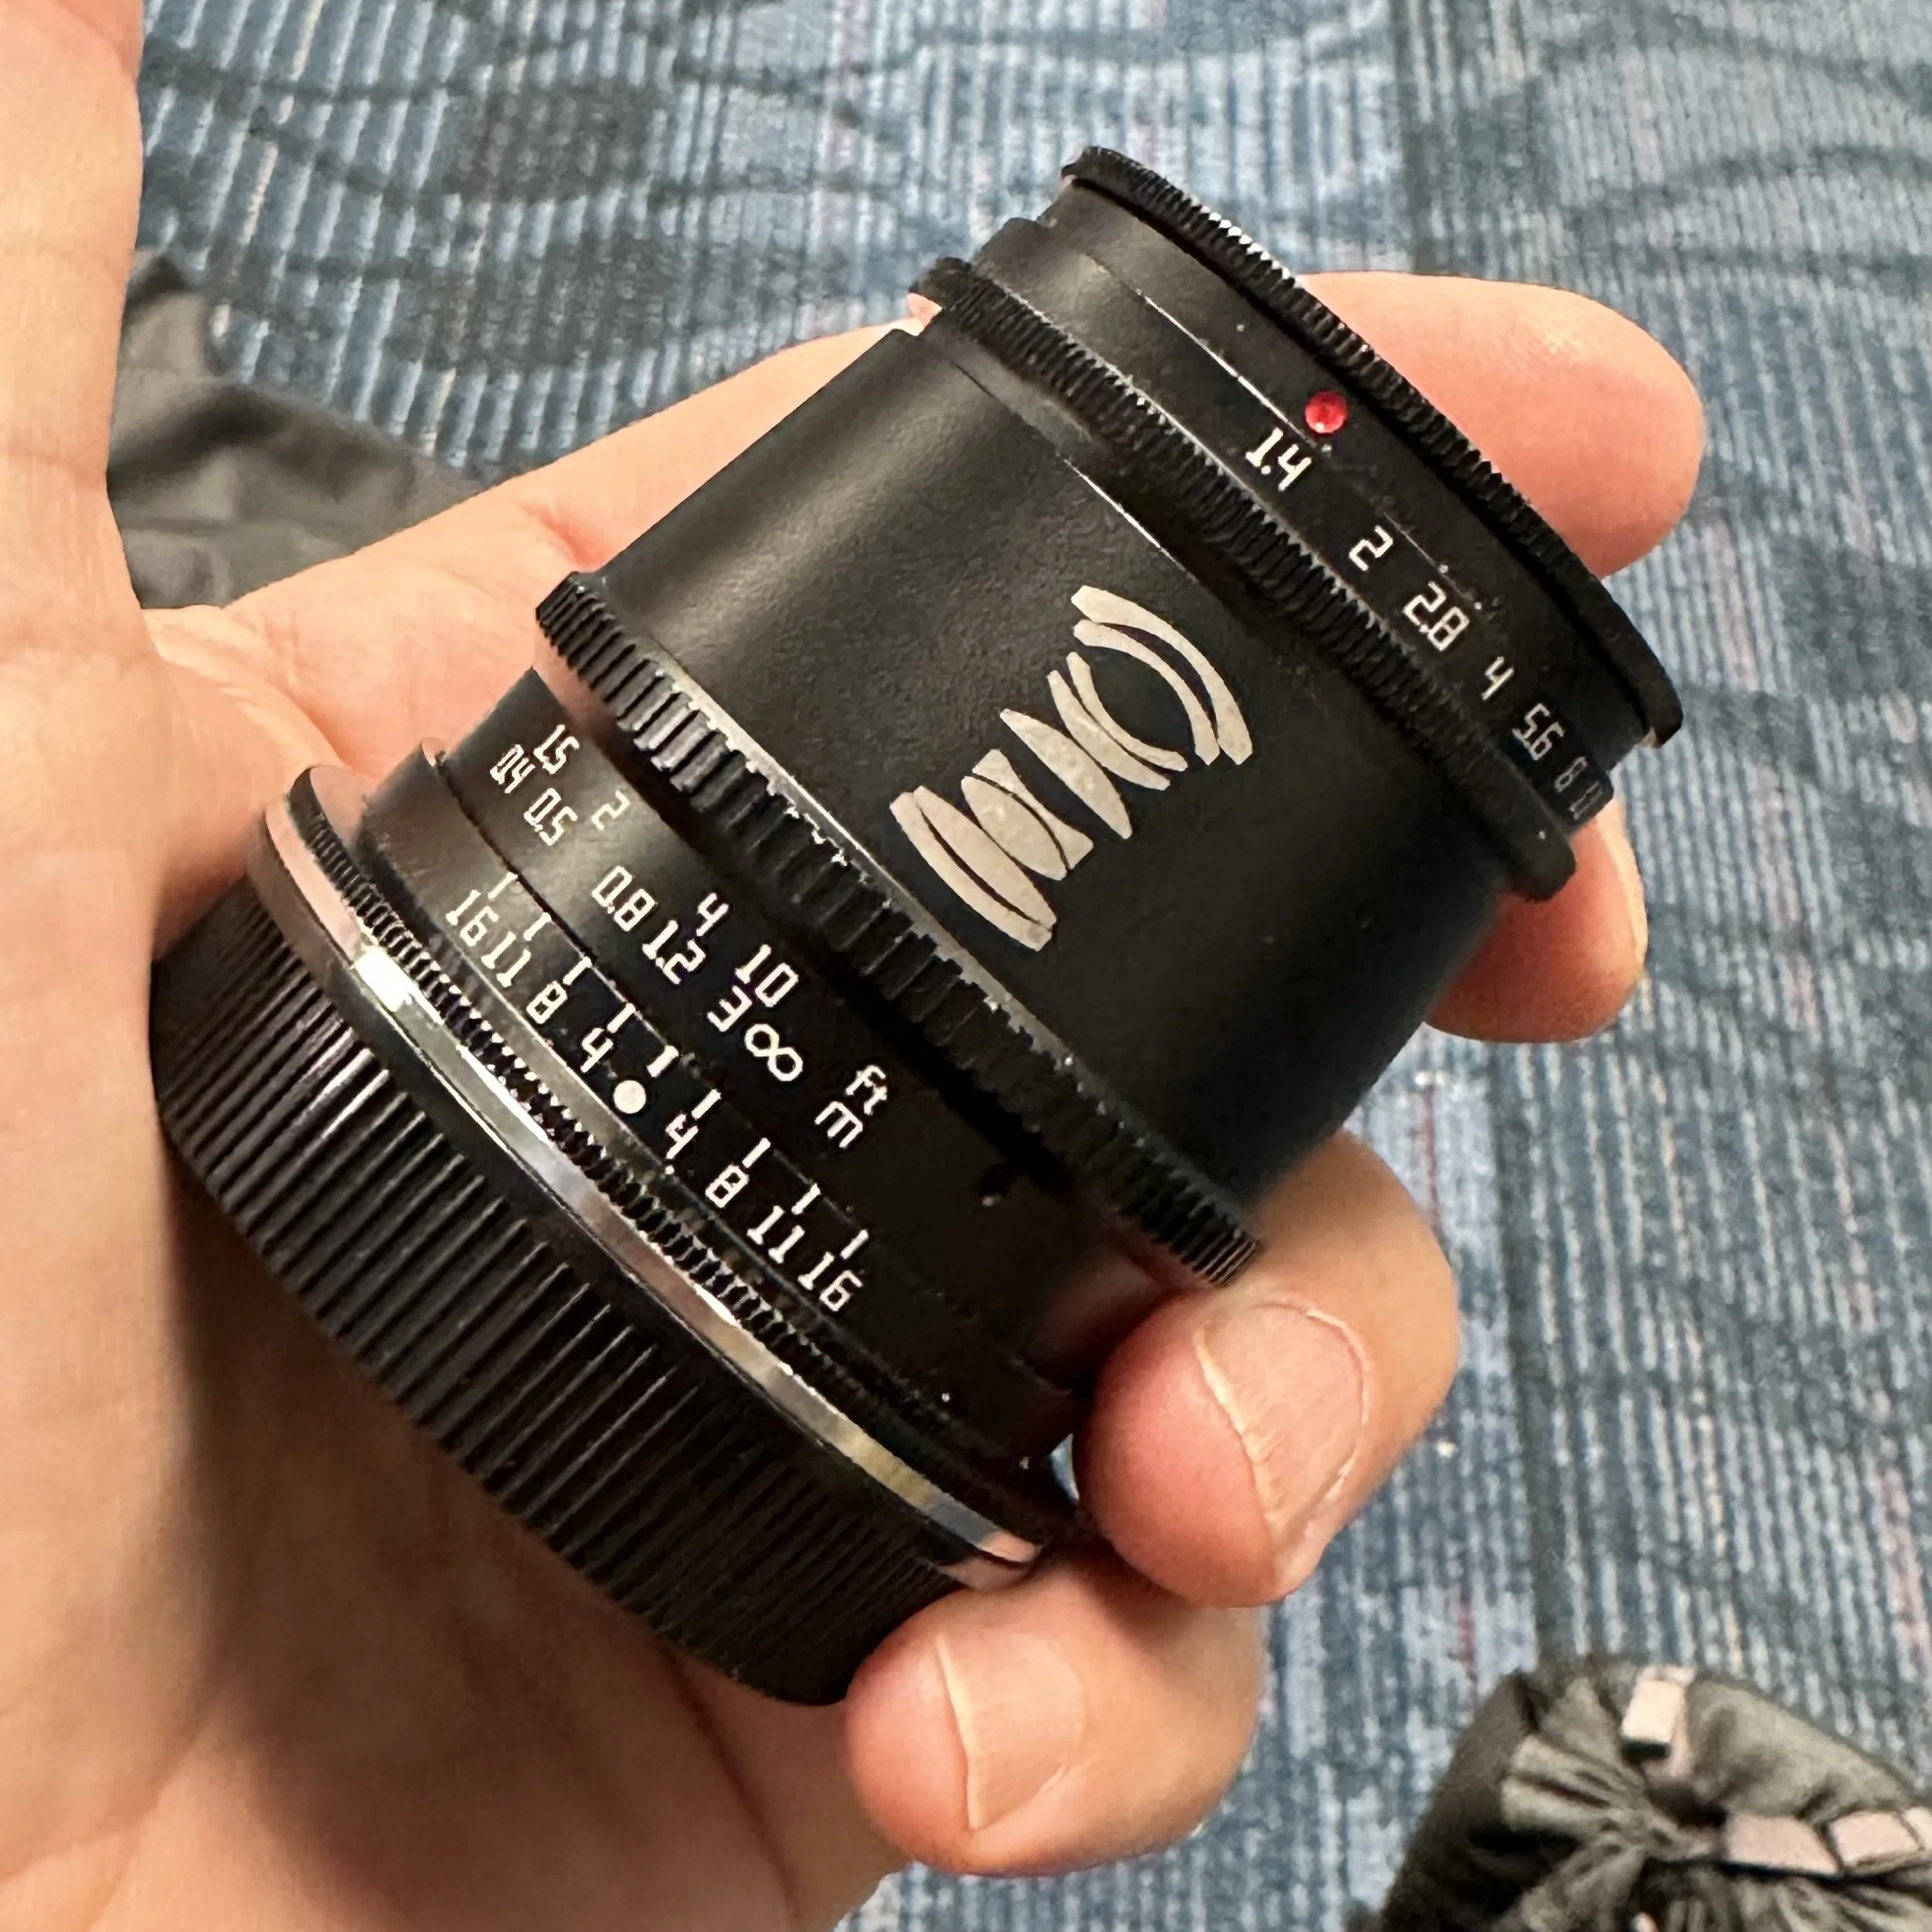
The physical appearance of the lens is really nice. It has a 52mm filter thread. The text is Leica styled with deep, clean engraved characters throughout (yes, the text, all of it, is engraved into the lens pretty deep, it will not wear off…ever) and painted really well for ease of reading. The external controls are easy to find and use. The focus throw is just right, there is a good amount of dampening in the focus barrel and it is smooth. The aperture detents are not like the other two lenses I have from them. My other two lenses are smaller than this one (the 35mm f1.4 and the 17mm f1.4) so there might not be room for a very strong aperture detent system in them, but on this little guy, the detents are perfect. They even have a nice little click as they slip from one detent to the next. I was so happy to see this issue I have with the other lenses, to be resolved in the new lens. This lens contains zero electronics of any kind so the semi-conductor shortage shouldn’t affect your ability to get your hands on one of these little guys. This is also part of the reason it is so small, there isn’t need to make room for a focus motor or any other electronics.
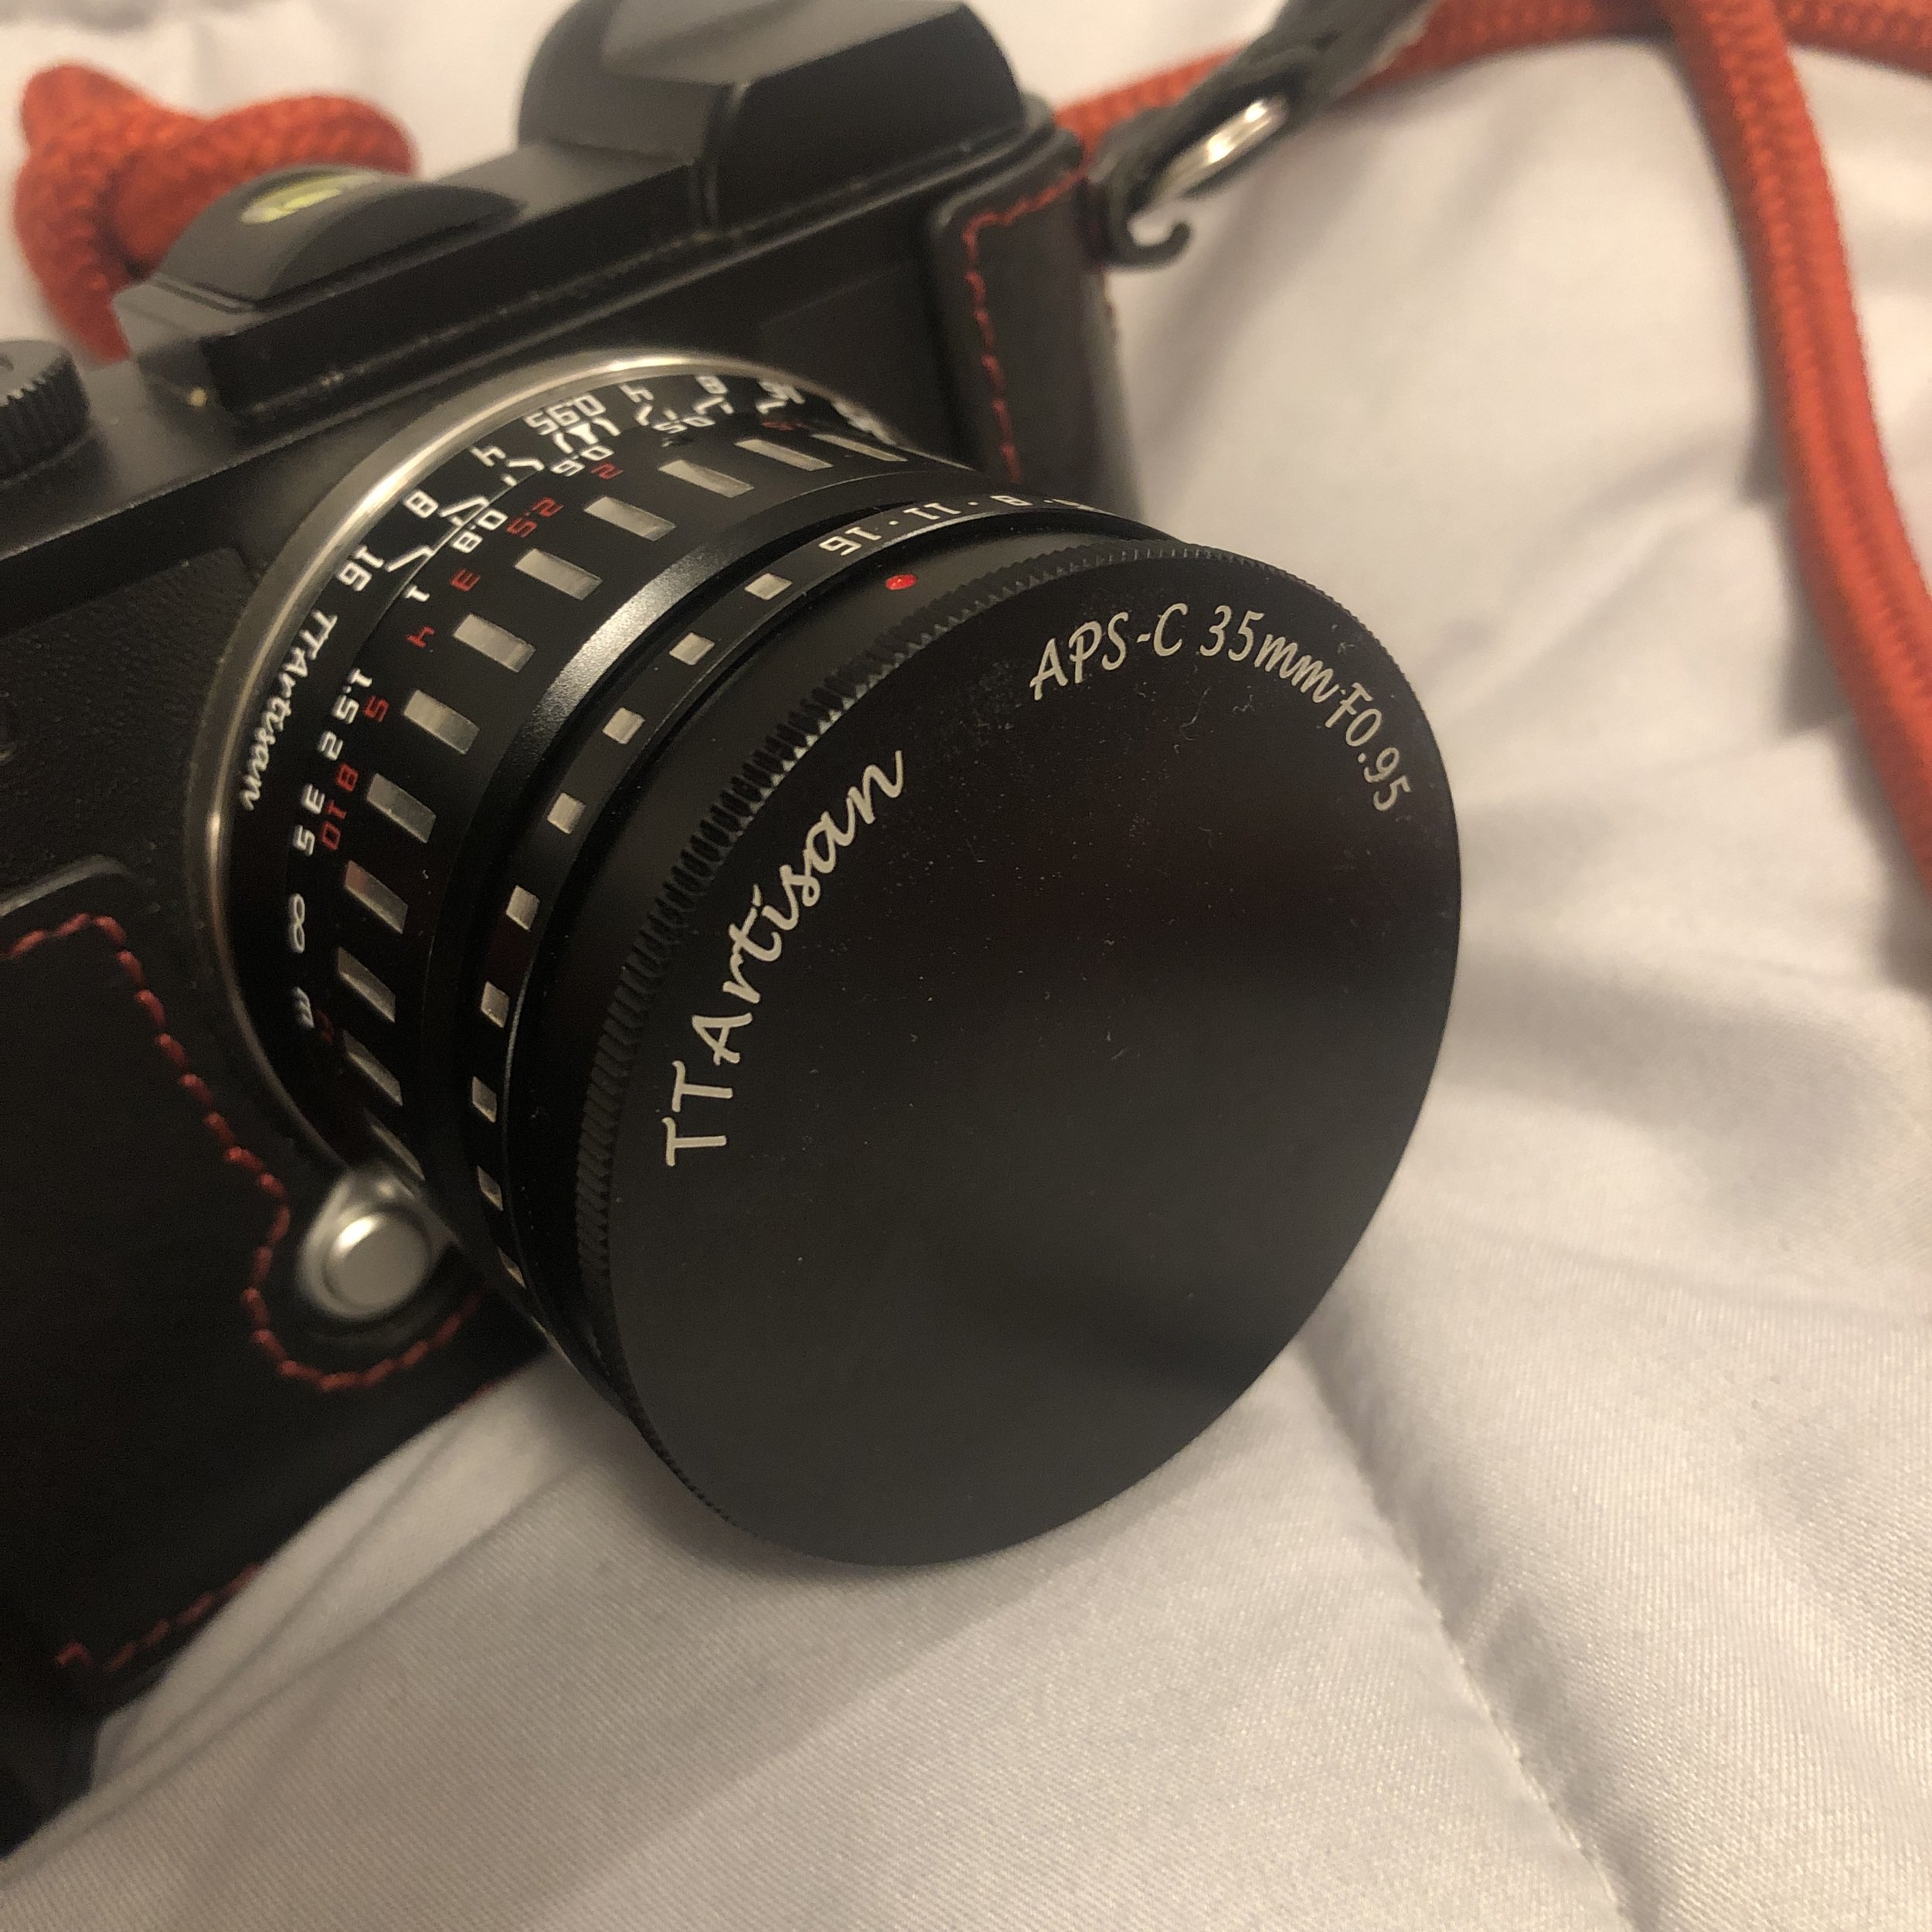
The lens cap is one of their signature solid metal threaded lens cap that screws on to the filter threads, this is good as it protects the lens glass AND the filter threads at the same time. Even so, I do not prefer them and the only real reason is the time to deploy the camera is much longer as it takes some time to remove the lens cap. On top of that, I can never seem to get them to go back on easily, it takes me a couple of tries every time to get the cap back on. Is there a trick to this I am not aware of? Leave me a comment if you have a trick on the lens cap, I need it!
Now, if I was worth two pennies, I would just remove the lens cap before I start shooting and then reinstall it when done…and this is exactly what I do most of the time. We have gotten spoiled to the quick deploy “pinch” style caps, so can I really call this a detractor? The level of protection these caps brings is unmatched by anything made of plastic so there is that to consider…

Shot at f0.95 in the daytime. This car was moving… Shutter speed is 1/400 sec.
The next thing that I noticed is how nice the images are coming out of this lens. The guys over at TTArtisan have really done their homework here as most super fast glass is in one of two categories…crazy expensive or not great image quality wide open. These guys seem to have broken through that glass ceiling (see what I did there? LOL) and have brought us a super fast lens, with really nice image quality, for really, really reasonable money. I dare say that these little lenses they sell are under priced and once they figure it out, the price will go up, so you better get your copy now.

So is there anything I DONT like about this lens?
The grip area on the aperture ring and the focus ring are not knurled (which is what I would have preferred) but instead is a mill cut series of notches. Now, I come from a machine shop background and understand the reasoning for this past the aesthetic look of the lens. These are easier to make, faster to make, more consistent when run at speed, and are less abusive on the machine to make as well. Knurling is one of the highest strain operations on an engine lathe/turning center and if not flooded with copious amounts of coolant or oil, the little tools that make the diamonds will clog up and destroy the part quite easily. By milling the shallow notches it was a simple mill op repeated a number of times, as the part is indexed a few degrees between cuts. This makes manufacturing VERY fast and produces beautiful results…that just don’t feel as good to me. Because I am accustomed to the rough texture of the knurled rings and these are not like that. That is not to say that they don’t work, quite the opposite, they work really well actually, but may post a problem with gloves into the winter. But now I am splitting hairs, so let’s look at some photos!

f0.95 basically in the dark with the shutter speed at 1/400sec.
Some notes about shooting with this lens. It is easy to use for street photos and the such when stopped down. It is not as easy when wide open… The reason is because all large aperture lenses have super shallow depth of field when shot wide open, well f0.95 is so wide open that you have to take a few shots as the subject will move in and out of focus pretty easily. Don’t just shoot one and call it done, it is probably out of focus… lol. I laughed here, but it probably is out of focus… It is the nature of fast glass with manual focus. I am not bothered by this, but some people are, so if you need tack sharp on the first try, then maybe you should buy the native autofocus glass for your brand of camera.

With the previous said, it seems that the more you practice doing it, the easier it gets to get sharp photos. I guess practice does matter… lol. Another thing to remember is that since the lens has no electronics, there is no meta data nor is there anything to help meter, other than the newer mirrorless machines can meter off the sensor, and the only mode of operation on the camera is manual mode. I can get away with automatic ISO as the camera meters off of the sensor in my Leica CL so it doesn’t need the lens to know the metering, but you might need to keep this in mind on your camera. The lens also comes in a plethora of mounting solutions so it should be able to be installed on pretty much any APSC camera out there, just check their website HERE for more info about it.
So there you have it, another wonderful little lens from the fine folks over at TTArtisan and I am not surprised to be honest, they have come on the scene and are taking over the 3rd party lens market by storm. Hope you have a wonderful day and get your camera out and go take some photos with it!
I like fiddling with my camera, do you?

My current street and general photo setup.
Well, there, I said it. I like to fiddle with my camera. Sure, I miss some photos because I am playing with the camera, but to me, that is part of the experience! Getting the photo is a result, but to me the time spent with the camera is as important as the final image.
You see, I am what is referred to as kinesthetic. This means I enjoy engaging with the gear as much as getting the photo, getting to interact with the camera on a deeper level brings me a form of satisfaction and joy that is hard to explain.
I know this goes against the convention of the camera “should disappear” or be so intuitive that you no longer know it is there. This is a bunch of hogwash in my mind. I spent a lot of money on my camera and by golly I want to get my money’s worth out of it!!!

This is my “discrete” film camera! LOL
I have read several of the books on the technical aspect of photography and they all keep saying to get the camera to where it runs almost in automatic so you can “get it out of the way” and focus on getting the shot instead. This is not what brings me joy in photography for some reason. I am just not wired that way. I like to play with the machine and then command it to produce what I ask of it and have it comply. That is a oversimplification, but the point is that I want to have the interaction with the camera as much as getting the photo. I figure it like this too, you get the shot, great, you do your edits say this takes another hour, maybe two if you really want to dial it in. (most people spend way less time than this on the editing process) and then you export it and share it on some website somewhere and wait for the little number to appear by the heart symbol. Then it is basically forgotten and the hunt is on for the next image. I like to get the image I had in my mind, but I ALSO like the interaction with the camera too, it is just fun to mess with it.
I mean, c’mon! Look at my “street photography” rig for crying out loud! All I hear is get a small, unassuming camera like a X100V or a Leica Q2 or some such, and here I was with a Nikon D810 with battery grip and 50mm f1.4 lens or my current rig…the Leica SL2 with 50mm Summicron L…even my film rig is larger than life!!!. HaHa

Back years ago, this was my main goto rig, Nikon D810 with a 50mm f1.4 Nikkor lens.
I do have a smaller camera that I like to use as well, but it is not to “get the camera out of the way” but rather to have a simple camera to grab and have as a backup to my SL2 rig. I have even kitted it out with a focal length lens to simulate the same field of view as my SL2/50mm rig. I do this so the experience using them is similar and I also know pretty much what I am going to be getting when I use them and that they will produce very similar results. It doesn’t allays work out that way, but that is the intention…lol.

This little Leica CL with the 35mm f1.4 M mount lens from Voigtlander makes a great “grab n go” rig.
Something else I have learned is that I like manual mode the best. I once was an aperture priority kind of guy, but I have evolved into a full blown manual shooter now. I just like the fact that the EVF in my camera will show me what the image will be ahead of pressing the shutter and I am able to just dial in the sky till it is blue or up the shadows till I am happy with them. The light meter in the display gives me a point of reference as to how much over or under exposed the image is and I will know then if the highlights are gone or the shadows will be recoverable. most of the time though, I don’t care about either.

My Leica SL2 top display.
As you will notice in this photo, I have set the camera as follows: Manual mode, there is some negative exposure compensation, f8, 1/125 sec shutter, auto ISO at the time (this varies from manual in a static scenario to auto if the light is going to change around constantly), and the rest is “state of the camera” info like both cards are present and set to overflow, there is room for 1937 frames left on the first card, the blue tooth is on so I can connect my phone to the camera, and the battery meter. This is how I run my camera most of the time when I am shooting street photos. Point is, don’t follow conventional wisdom if it doesn’t suit your ideology or normal operational parameters, simplified…you do you. Stop letting other people tell you how to engage in your own hobby. Be like William Eggleston and go against the grain. You are in charge of your life, live it on your terms.
Now, get your camera out and go play with it…I know, I know, I just broke my own advice by telling you what to do, but maybe some of you need a nudge…lol.