WK4DS Amateur Radio Blog
Search Posts

Ten watts to Spain. Ten watts to Germany. Ten watts to Austria. The EFHW at 35 feet made all the difference.
Activating Hillsborough River State Park (US-1878) with a friend is one thing—making over 100 contacts in a single afternoon using QRP power and a homemade wire antenna is another. That's exactly what Chas and I accomplished using a 65-foot EFHW antenna strung 35 feet up in the Florida pines, a ground mounted vertical, his FT891, a Penntek TR-35, and my sBitx v3 running just 10 watts (Chas was running 50 watts today though). This wasn't just a Parks on the Air activation—it was a field test of how well minimalist gear performs in a multi-operator setup, complete with lessons learned about antenna placement, front-end overload, and working around the Florida sun.
Activating Hillsborough River State Park (US-1878) with a friend is one thing, making over 100 contacts in a single afternoon using QRP power and a homemade wire antenna is another. That's exactly what Chas (NA2B) and I accomplished using a 65-foot EFHW antenna strung 35 feet up in the Florida pines, a ground mounted vertical, his FT891, a Penntek TR-35, and my sBitx v3 running just 10 watts (Chas was running 50 watts today though). This wasn't just a Parks on the Air activation, it was a field test of how well minimalist gear performs in a multi-operator setup, complete with lessons learned about antenna placement, front-end overload, and working around the Florida sun.
Hillsborough River State Park entrance designated K-1488 for Parks on the Air activations.
Hillsborough River State Park: Location and Access
Hillsborough River State Park sits about 12 miles north of Tampa and makes for an excellent POTA location. When you arrive at the entrance, the first thing you're greeted with is a ranger station where you pay your four dollar entrance fee. Yes, you read that right—four dollars for the whole day. This is a really nice park with extensive hiking trails, a large loop perfect for biking, and the Hillsborough River running through it where visitors can enjoy boating and fishing.
There's plenty of infrastructure here for families… playgrounds, picnic areas with covered pavilions, and well-maintained facilities. For POTA activators, the key feature is the abundance of tall trees throughout the park, making it ideal for wire antennas. The main loop road has several pull-off areas with picnic tables that work perfectly as operating positions. Cell phone coverage is good throughout the park, which helps for spotting yourself on the POTA network and coordinating with other operators.
After paying the entrance fee, I drove around the loop a couple of times while talking to Chas on the phone, trying to figure out where he'd set up. Here's the kicker, though, he decided to drive over to my location so we could operate together from adjacent tables. This gave us the multi-operator experience but also taught us some valuable lessons about antenna placement and RF interference, which I'll get into later.
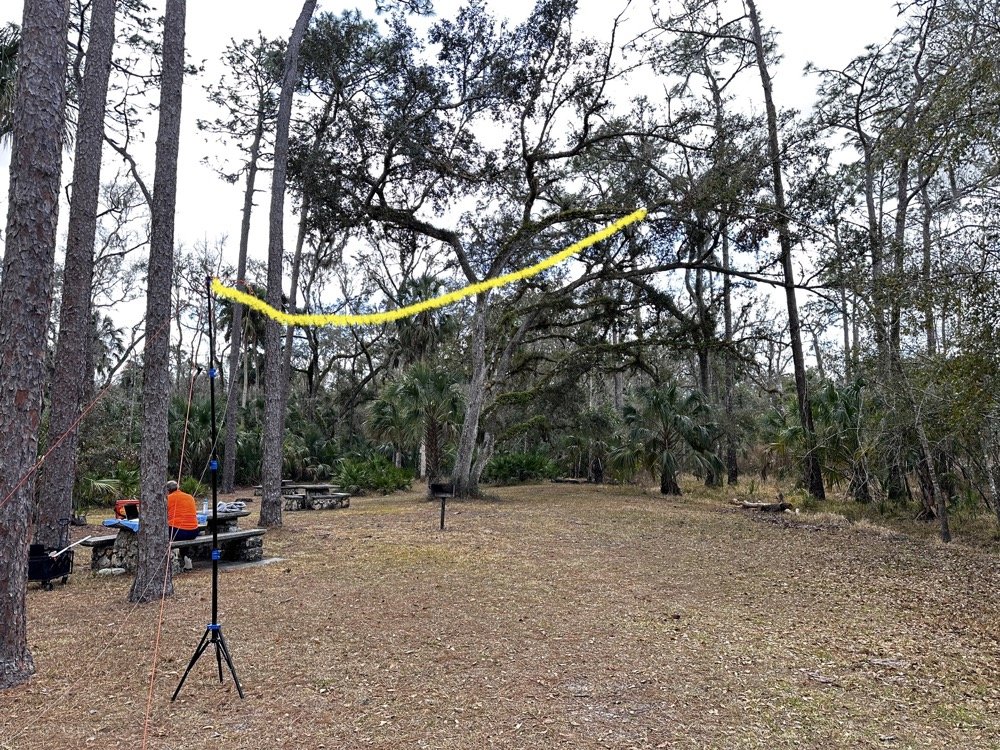
The 65-foot EFHW antenna strung into the tree canopy (highlighted in yellow) getting the wire 35 feet high made a dramatic difference in propagation. The wire itself is nearly invisible against the tree background.
The Antenna Setup: 65-Foot EFHW in the Trees
Today saw the use of a 65-foot long wire antenna, an End-Fed Half-Wave from Reliance Antennas. This antenna isn't rated for high power, so I held all of my transmit power to 10 watts or less throughout the day to prevent potential damage to the matching transformer. We deployed it using throw lines to get it about 35 feet up into a large oak tree, then Chas loaned me his 10-foot push-up pole and stand to support the feed point end of the antenna and get it a little higher off the ground as well.
I believe this additional height aided propagation dramatically. Getting the whole 40-meter EFHW that high off the ground, with the far end even higher in the tree, made a noticeable difference compared to previous activations where I'd run antennas lower. I made many contacts all over the United States, into Mexico, and even worked some European stations on the higher bands with just 10 watts. That's the magic of getting a wire antenna up high… height matters more than power in many cases.
The EFHW is resonant on 40m, 20m, 15m, and 10m without needing an antenna tuner, which keeps the station setup simple. I specifically avoided the WARC bands (30m, 17m, 12m) during this activation because the antenna isn't cut for those frequencies and I didn't want to deploy a tuner. Sometimes keeping things simple is the better approach, especially when you're testing equipment and learning how gear performs in the field.
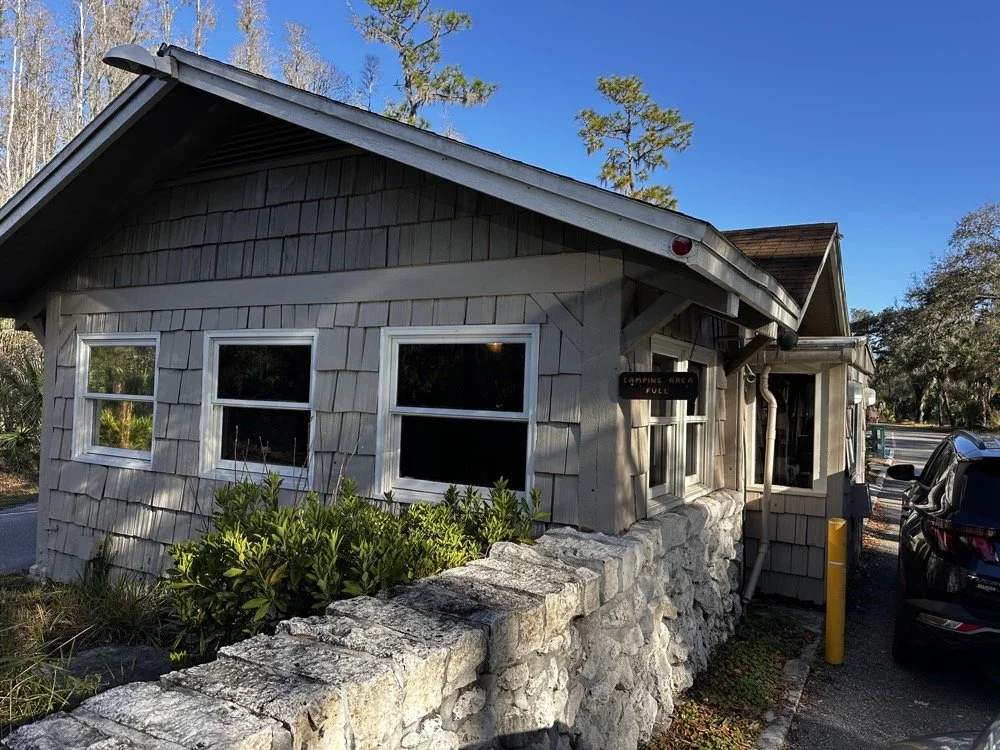
The ranger station where you pay the $4 entrance fee to access the park for POTA activations.
Radio Gear: Penntek TR-35 and sBitx v3 Performance
Once I had the antenna set up and tested, I decided to use the Penntek TR-35 transceiver first. I really enjoy using this tiny little radio, the CW break-in is phenomenal, and the keying from the internal keyer circuit works flawlessly. It's a true QRP radio putting out 5 watts maximum, and I've made some additional accessories for it to turn it into a more complete field station. But even as it sits stock, it's a wonderful little radio that's almost impossible to damage from bad antennas or other field mishaps. Plus, it just works really well at making contacts.
I started on 40 meters and after working through a good run of stations, I decided to move up to 20 meters where activity was heating up. Chas started on 30 meters and worked his way through the WARC bands, eventually ending up on 10 meters where we made a park-to-park contact with each other from 30 feet apart. That was pretty funny, logging a P2P (park-to-park) contact when we could literally see each other across the operating area. I turned my output power all the way down, it showed literally zero output and I was still booming into Chas’ radio!!! Haha!
After finishing my run on 20 meters with the Penntek TR-35, I swapped it out for my sBitx v3. I throttled the output power on the sBitx for two reasons: first, to prevent damage to the antenna which isn't rated for high power, and second, to keep from running down my battery too quickly. I'd brought an 8 amp-hour LiFePO4 battery, and if I'd run the sBitx at full output power I could have easily depleted that battery in an hour or so, especially running FT8 on the lower bands which requires more transmit time. As it turned out, limiting power to 10 watts kept the battery happy all day and I still had plenty of capacity left when we packed up.
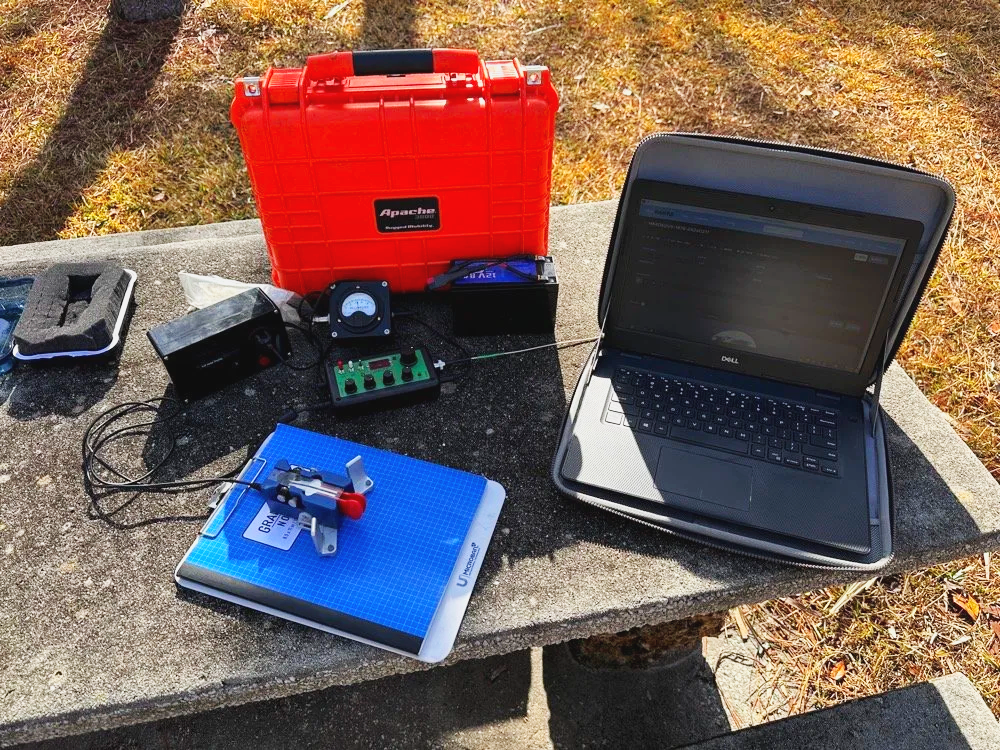
Initial station setup with the Penntek TR-35, Dell laptop for logging, clipboard with paper log, and CW paddle ready to make contacts.
The first thing I did with the sBitx was get on 15 m and attempt to make contacts there on FT8. This went pretty well and I made several contacts on 15 m before moving to 10 m to see what I could make on that band. The reason I skipped the WARC bands today was because this antenna is not resonant on any bands other than 40, 20, 15, and 10 m. So I stayed on those bands as I did not want to try and deploy an antenna tuner as well.

The sBitx v3 with improvised sunshade, Florida sun glare was a constant challenge throughout the activation. Notice the notebook to keep my arm off that rough concrete!
Contact Statistics:
Between Chas and me, we logged 118 total QSOs during the activation! 66 in my log and 52 in Chas's log(I did operate a little longer than him and we were not in a race either). Here's my detailed breakdown:
David's Stats (WK4DS):
40 meters: 5 QSOs (all CW)
20 meters: 50 QSOs (all CW)
15 meters: 1 QSO (CW)
10 meters: 10 QSOs (8 FT8, 2 CW)
Total: 66 QSOs
CW: 58 contacts
FT8: 8 contacts
Geographic Breakdown:
Domestic (USA): 56 QSOs across the continental United States
DX (International): 10 QSOs reaching six countries:
Spain: 2 contacts (EA4T, EA5BCO)
Germany: 2 contacts (DL4JCP, DJ9HX)
Mexico: 2 contacts (XE2BCS, XE2IF)
Austria: 1 contact (OE2IGP)
Canada: 1 contact (VE1ZZ)
Poland: 1 contact (SQ9JS)
Czech Republic: 1 contact (OL26WRTC - special event station)
NA2B Chas's Stats: Chas logged 52 QSOs throughout the day, primarily working 30m, 17m, and 10m (he might have done more but that is all I know of) while I focused on 40m, 20m, 15m & 10m. This band coordination helped us avoid stepping on each other while maximizing total contacts for the activation.
Combined Performance: For QRP power (my 10 watts maximum and Chas running 50 watts) and simple antennas, 118 total contacts in one afternoon represents excellent POTA performance. The 10 DX contacts on 10 meters with just 10 watts and the EFHW antenna particularly stand out, working Spain and Germany on FT8, then switching to CW for additional European contacts, demonstrates what's possible when propagation cooperates and you get your antenna up high.
Twenty meters was the workhorse band, delivering 50 contacts in my log alone. The concentration of activity on 20m CW (14.061 MHz) is typical for POTA activations, as this is where most hunters are listening for parks. The handful of 40m contacts at the start of the activation caught the tail end of daytime propagation before that band shifted to primarily short-skip domestic contacts.
Operating Challenges - Sun and Glare
Both Chas and I learned pretty quickly that the Florida sun was not our friend today, even though the temperature was pleasant. The glare from the sun continuously made us struggle to see our displays and adjust settings. I think Chas literally just toughed it out and lived with squinting at his screen. I, on the other hand, kept deploying improvised sunshades and repositioning my station to create shade for my equipment as the day wore on, as you can see in the photos. This is something to think about when planning a POTA activation, a simple popup canopy or umbrella can make the difference between comfortable operating and constantly fighting the sun. Add that to my growing list of field operation lessons learned.
sBitx v3 CW Keying: Improvements and Remaining Issues
The CW keying in the sBitx has been dramatically improved as the software revisions continue. The developers keep optimizing the scan time of the Raspberry Pi processor and how the program executes, making the keyer more responsive with each update. It's almost like using a regular radio now, though there are still quirks you need to work around.
I've learned that I have to pay very close attention to my sending cadence when working CW with the sBitx. The keyer isn't as forgiving as a traditional Curtis-style keyer circuit, and it will send errors if you're not careful with your timing. Knowing this limitation, I work much harder to stay at one speed setting throughout a contact when possible. It's easier to develop muscle memory and consistent sending rhythm at one speed rather than constantly adjusting the keyer speed up and down as I might do with other radios.
With a traditional Curtis keyer, minor variations in your paddle timing get smoothed out by the keyer circuitry and everything sends cleanly. The sBitx will occasionally miss characters if you vary your speed too much, if you slow down suddenly, you can actually outrun the radio's keyer circuit and it won't register that you asked for a "dit," so it leaves it out. This isn't a deal breaker, but it does mean the sBitx requires more disciplined sending technique than most modern transceivers.
I do tend to make more mistakes with the sBitx than I do with other more traditional Morse code radios, and I think all of this traces back to the timing limitations from the Raspberry Pi's scan cycle. But it's getting better with each software update, and for a radio that does CW, SSB, and all digital modes in a package this small and affordable, I'm willing to work around the keyer quirks.

Chas operating his Yaesu rig from the adjacent picnic table. His vertical antenna is behind me and to my right. My wire antenna is behind him.
My operating position in the foreground with Chas visible about 30 feet away in the background—close enough for a park-to-park contact but creating some RF interference challenges.
20-Meter Band Issues: IRF520 vs IRF510 Amplifier Problems and Receiver Front End Overload"
The final two photos show a couple issues I've been wrestling with on my sBitx. The first image shows my sBitx operating on 10 meters with lots of noise lines visible in the waterfall display. These noise lines are coming from Chas transmitting Morse code on a different band, his signal is getting into my receiver and creating visible interference. I don't remember exactly what band he was on, but the important lesson here is that antenna placement matters tremendously when you're running multi-station setups like this one.
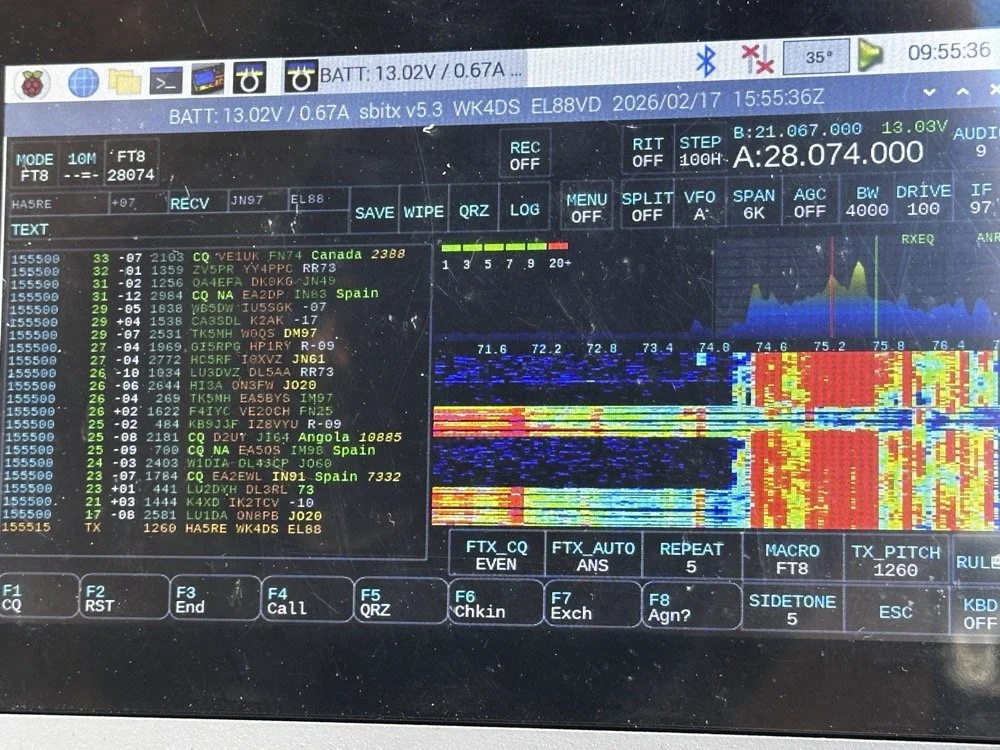
sBitx running FT8 on 10 meters (28.074 MHz) showing the noise spikes from Chas transmitting on a different band nearby 9in the waterfall) this is what front-end overload looks like in a multi-op field setup. The vertical lines in the waterfall are RF bleed-through from his station 30 feet away.
Be mindful of where you place antennas if you're operating a multi-operator event. We were only 30 feet apart, which is far too close for optimal isolation. I was still able to work many contacts even with this persistent noise coming through, though. This is something you learn to work around if you're going to be an amateur radio operator in a multi-operator event of any kind…think Field Day here. It's just part of the game, so you expect it and adapt. We could have used bandpass filters to eliminate most of this interference, but I didn't bring mine to the park.
The next photo shows my sBitx on 20 meters, and on 20 meters my radio has a persistent issue that I'm still troubleshooting. I'm beginning to believe it has to do with the IRF520 MOSFET transistors that I used in the power amplifier section when I built this radio. These IRF520 transistors have significantly more internal capacitance than the IRF510 transistors that Farhan originally specified in the revised amplifier design. I think this extra capacitance is causing the amplifier to oscillate, and that oscillation is what you're seeing as the noise signal in the photo.

sBitx on 20 meters CW mode (14.061 MHz) showing the noise from what I am suspecting is from oscillating mosfets.
Here's the interesting part: as the radio warms up during operation, this spurious noise signal moves down in frequency within the 20-meter band. If I want to push it out of the way temporarily, I'll switch to 40 meters or 80 meters and run FT8 for a few minutes. You generate more output power on those lower bands, which heats up the amplifier section faster. Usually, if I just run FT8 first thing when setting up, it warms up the transmitter enough to push the oscillation down to below where I normally work CW on 20 meters anyway, giving me a temporary workaround.
This isn't a permanent solution, obviously. I'm convinced I'm going to have to address this capacitance issue when I get back home, probably by swapping out the IRF520s for the specified IRF510s or adding additional filtering to the amplifier circuit. But for now, knowing the workaround lets me keep the sBitx operational in the field for POTA activations, which is what matters most.
Multi-Operator Challenges: RF Interference and Antenna Placement
Operating two stations in close proximity taught us several valuable lessons about multi-operator setups. The biggest challenge was RF interference between our stations. With antennas only 30 feet apart, we experienced significant front-end overload, when Chas was transmitting on his station, I could see his signal bleeding through into my receiver on completely different bands.
The sBitx has a somewhat easy-to-overload front end compared to more expensive commercial receivers, which made this problem more pronounced. But even with a better radio, operating this close together without bandpass filters or careful band coordination is asking for trouble. The solution for future multi-op activations is simple: either space antennas much farther apart (100+ feet minimum if possible), or operate on bands that are far enough apart in frequency that filter roll-off provides natural isolation.
The position of your antennas matters just as much as the distance between them. If we'd oriented our antennas at right angles to each other instead of parallel, we might have achieved better isolation through pattern nulls. These are the kinds of things you learn by doing, and they apply equally to Field Day operations where you might have multiple stations running simultaneously.
Despite the interference challenges, we still made excellent contact numbers. Multi-operator POTA activations are worthwhile because you can cover more bands simultaneously, operate different modes at the same time, and keep the activation going continuously while one operator takes a break. Just be prepared to work around the RF challenges that come with the territory.
Who Should Activate This Park?
Hillsborough River State Park is an excellent choice for both first-time and experienced POTA activators. Here's why:
For beginners: The $4 entrance fee is minimal, facilities are excellent with clean restrooms and covered picnic areas, and the tree coverage makes wire antenna deployment easy. You don't need to hike to reach good operating locations…everything is accessible by car right off the main loop road.
For experienced activators: The park's location north of Tampa puts you in a good spot for both domestic and DX contacts. The tall pines support wire antennas at significant heights, and there's plenty of space to spread out if you're running a multi-operator activation.
Best practices for K-1488:
Arrive early morning (8-10 AM) or late afternoon (3-5 PM) to avoid midday heat and sun glare
Bring sunshade or canopy, there's limited natural shade at the picnic tables
Plan for 2-3 hours of operating to get a good contact count
Cell coverage is good for self-spotting on the POTA network
Spring and fall offer the best weather conditions
If you're in the Tampa Bay area and looking for an easy, productive POTA park with good facilities, Hillsborough River State Park should be on your list.
Activating Hillsborough River State Park proved to be a highly productive POTA outing. Between Chas and me, we logged well over 100 contacts using QRP power and simple wire antennas…proof that you don't need high power or expensive gear to have success in Parks on the Air. The 65-foot EFHW at 35 feet worked exceptionally well, the Penntek TR-35 remains one of my favorite field radios for CW, and the sBitx v3 continues to impress despite some remaining amplifier quirks on 20 meters.
Key lessons learned: antenna height matters more than output power, multi-operator setups require thoughtful antenna placement to avoid interference, and limiting transmit power to 10 watts keeps your batteries happy all day. If you're looking for a beginner-friendly POTA park in Florida with good tree support and easy access, Hillsborough River State Park (K-1488) is an excellent choice.
Have you activated K-1488 or other Florida state parks? Share your experiences in the comments below, I'd love to hear about your favorite POTA locations and antenna setups.
Want more POTA activation reports and technical amateur radio content? Check out my other WK4DS blog posts for detailed equipment reviews, antenna builds, and field operation tips.
Frequently Asked Questions About POTA Activations
What is Parks on the Air (POTA)?
Parks on the Air is an amateur radio operating activity where hams set up portable stations in state and national parks to make contacts. Activators (operators in parks) try to make at least 10 contacts to qualify the activation, while hunters (operators at home) try to contact as many parks as possible. It's similar to Field Day but focused on public parks and conservation areas. POTA encourages hams to get outdoors, test portable equipment, and promote amateur radio to park visitors. The program started in 2016 and has grown to include thousands of parks across the United States and internationally.
How do you activate Hillsborough River State Park for POTA?
To activate Hillsborough River State Park (K-1488), you need to set up your amateur radio station within the park boundaries and make at least 10 contacts. Pay the $4 entrance fee at the ranger station when you arrive, then find a suitable operating location with trees for antenna support. Most activators set up at picnic tables near the main loop. Operate from battery power or a generator, no AC mains allowed for POTA activations. Log your contacts using a smartphone app like HAMRS or POTA Logger, then upload your log to the POTA website within a few days. The park has excellent tree coverage for wire antennas and is open from 8 AM to sundown year-round.
What is an EFHW antenna and why use it for POTA?
An End-Fed Half-Wave (EFHW) antenna is a wire antenna that's fed at one end through a matching transformer (typically a 49:1 unun), making it incredibly easy to deploy in the field. For POTA activations, EFHWs are popular because they require no ground radials, work on multiple bands without a tuner if cut for harmonically-related bands, and can be thrown into trees using a throw line and weight. My 65-foot EFHW works on 40m, 20m, 15m, and 10m, covering the most productive POTA bands. Getting it 35 feet high significantly improved propagation compared to running the same antenna closer to the ground. A properly deployed EFHW antenna at height will often outperform a vertical antenna at ground level for DX contacts.
Can you run two stations at the same POTA activation?
Yes! Running multiple operators at the same park location is allowed and encouraged in POTA. Each operator logs their own contacts and submits their own activation log. Chas and I each operated our own stations about 30 feet apart, which let us cover different bands simultaneously and maximize the total contact count. However, you need to be mindful of RF interference between stations. With our antennas so close together, I experienced front-end overload on my sBitx when Chas was transmitting on nearby bands. Solutions include better antenna separation (100+ feet apart if possible), using bandpass filters on receivers, or coordinating to operate on widely separated bands like 40m and 10m simultaneously.
What's the best QRP radio for POTA activations?
For CW-only POTA activations, the Penntek TR-35 is exceptional. It's lightweight (under a pound), battery-efficient, has outstanding CW break-in, and is nearly indestructible, perfect for field operations. For multi-mode operation covering CW, SSB, and digital modes, the sBitx v3 offers incredible value and capability in a portable package, though the CW keying requires careful technique and practice. Other popular POTA QRP rigs include the Elecraft KX2/KX3 (premium price but premium performance and battery efficiency), QRP Labs QCX-mini (CW-only, ultra-portable and inexpensive), and the Xiegu G90 (good SSB performance, acceptable CW, built-in tuner). Choose based on your preferred modes, budget, and how much weight you want to carry into the field.
How many contacts should you expect from a POTA activation?
Contact numbers vary widely based on propagation conditions, time of day, your operating skill, and whether you're spotted on the POTA network. A successful activation requires at least 10 contacts to count, but most activations yield 20-40 QSOs in an hour or two of operating. Our 100+ contacts in one afternoon between two operators was excellent, partly because we covered multiple bands and modes (CW, FT8) and had good propagation to Europe on the higher bands. If you're new to POTA, expect 15-30 contacts on your first few activations. Using CW typically yields more contacts than SSB due to pile-ups from hunters chasing parks, and FT8 can be productive when propagation is marginal or when SSB isn't getting through.
My 66 contacts plus Chas's 52 gave us 118 total QSOs from K-1488 on February 17, 2026. Ten of mine reached six countries across two continents, all at 10 watts or less.
You can help support this channel by using these Amazon Affiliate Links as well:
QRP/Portable Radios:
Antennas & Tuning:
CW Equipment:
Power & Accessories:
Organization & Transport:
BONUS ITEMS
73
David / WK4DS
Overall, today we had a wonderful day and made many contacts and was able to test antennas and enjoy ourselves in the warm Florida sun far from home where all the cold weather and dreariness is at. So until next time, get your radio out and go power it up and make a contact on it. That’s why you bought it after all.

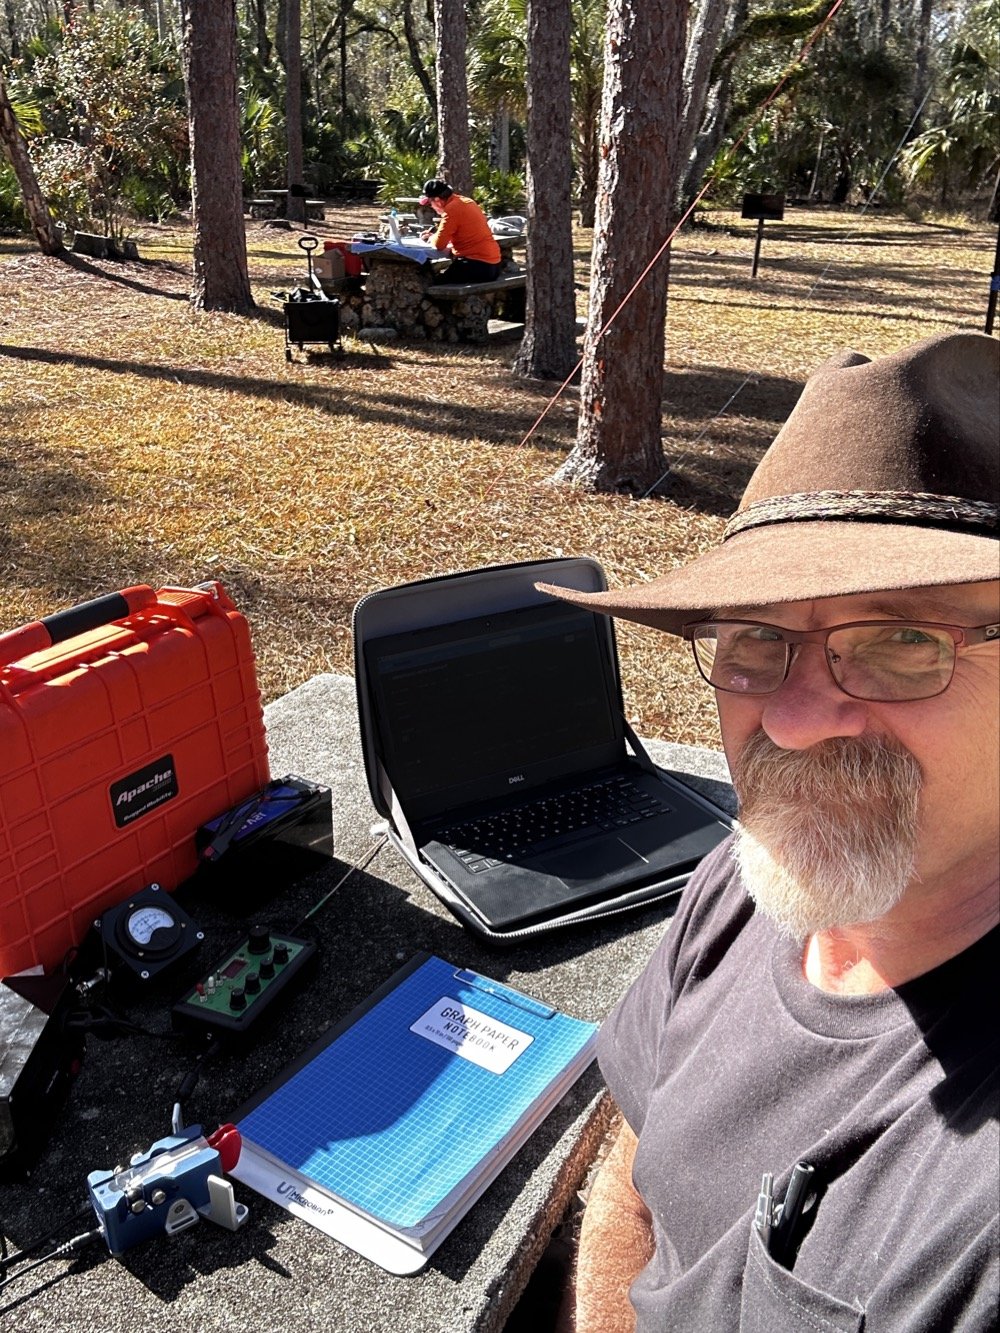
Chas grabbing a photo from his perspective for posterity! HaHa! Look at all that stuff I brought!

Go bag POTA!
The idea behind building a POTA go bag is simple. You want everything you need in one place, ready to grab and go. No hunting for coax in the garage, no trying to remember which box has the paddle, no scrambling to charge batteries. Just grab the bag, throw it in the truck, and you're ready for a park activation. Or an emergency. That's the whole point!
The idea behind building a POTA go bag is simple. You want everything you need in one place, ready to grab and go. No hunting for coax in the garage, no trying to remember which box has the paddle, no scrambling to charge batteries. Just grab the bag, throw it in the truck, and you're ready for a park activation. Or an emergency. That's the whole point!
Why Build a POTA Go Bag?
Today was about testing my emergency / travel radio kit to see how it actually performs in the field at Eagle's Nest (US-0716). Spoiler: it works better than I expected, even with some equipment drama along the way.

The QRP Guys SWR meter checking the Reliance Antennas 40m EFHW before starting the activation. I wanted to make sure the SWR was acceptable before putting power through it.
Complete Gear Walkthrough: Everything in the Bag
Here's every single item in my POTA go bag with approximate costs. This is everything you need for a complete field station that fits in one bag:
Radio and Accessories:
Penntek TR-35 QRP transceiver: N/A (no longer available… sad radio sounds…)
Xiegu G90 HF Radio Transceiver: 465$ (A great Alternative but not quite as small)
N6ARA CW paddle with case: ~$70
Headphones in ziplock bag: ~$20 (any decent pair works)
QRP Guys SWR meter: ~$20 (for field checks)
Power:
10-cell AA battery holder from Amazon: ~$12
10 rechargeable AA batteries (Eneloop or similar): ~$25
Power cord with Anderson Powerpoles: ~$10
Antenna System:
Reliance Antennas 40m EFHW: ~$60
ABR Industries coax with ferrite choke: ~$70
Backup coax (generic RG-8X): ~$30
Arborist throw line (40 feet): ~$8
Throw weight (1" nut from machine shop): Free!
Accessories:
Nylon tool bag from Amazon: ~$25
Small notebook for logging: ~$3
Pen (main) and pencil (backup): ~$5
Ziplock bags for organization: ~$2
Total Kit Cost: Approximately $825
Now, I know that seems like a lot upfront, but remember this includes the $465 radio. If you already have a QRP rig, you're looking at about $350 for everything else. And this entire kit lives in one bag ready to deploy. No hunting for gear, no forgetting critical pieces. That's worth something!
The beauty of this setup is that it's modular. Start with the basics (radio, antenna, power) and add the nice-to-haves over time. I didn't buy everything at once. I built this kit over about six months as I figured out what I actually needed in the field.
I did the entire activation from Eagle’s Nest in US-0716 with just the “kit” radio that I have put together. I have the QRP Guys SWR meter in the photo here as well (it is in the clear plastic case), but this is because I wanted to check the 40m Endfed Halfwave Antenna from Reliance Antennas to make sure the SWR was ok. He cuts them long so you can tune them once in the field and I have not cut mine yet.
You might be wondering, why go through the trouble of building a dedicated go bag instead of just grabbing gear as needed? Fair question! Here's my thinking:
For POTA operations: Having everything organized in one bag means I can decide to do an activation on a whim. If it's a nice day and I have two free hours, I don't need to spend 30 minutes gathering equipment. Grab the bag, drive to a park, and I'm on the air. This makes POTA way more accessible and way more fun.
For emergency communications: This is the real reason I built it this way. If there's ever a real emergency where I need to set up communications quickly (hurricane, power outage, whatever), I don't want to be hunting through the garage for my radio gear. The go bag concept means I can grab it and have a complete, tested, working field station ready to deploy immediately.
For travel: The bag is small enough to throw in the car for road trips or to check as luggage on a flight. Having everything self-contained makes it easy to operate from anywhere. I don't need to bring my whole shack, just this one bag.
The mindset shift: Building a go bag forces you to think about what you actually need versus what's nice to have. Every item has to justify its space in the bag. This makes you focus on core functionality rather than bringing every gadget you own. It's a good exercise!
The result is a system that's ready when you are, tested and proven in the field, with no excuses for not getting on the air.

One side of the bag showing the Penntek TR-35, the 40m EFHW antenna, power cord with Anderson Powerpoles, and the throw line with weight. Everything organized and ready to deploy.
The Penntek TR-35: Heart of the Go Bag
This particular nylon bag came from Amazon and has two main sides that unzip and lay flat. Inside each side are additional pockets to hold small, thin items as well. I have organized mine to hold the Penntek TR-35 and all the stuff needed to deploy it in the field. Literally everything. Let’s go for a short “walk” through this bag.
In the above photo is the radio, antenna and a power cord with Anderson Powerpoles installed. I also have the battery pack in the zippered pocket (more on that later). As well as a rope and weight for throwing a line up into a tree to haul up the wire antenna with. I just wound off about 40’ or so of arborist throw line for this kit and I have included a huge 1'“ nut from the machine shop for a throw weight, which works perfectly…
The other side contains the coax for the antenna and this is the only thing that I have two of in the kit. Coax has let me down more than once while out at parks so I now carry backup coax. No matter how careful you are with this stuff, it will fail on you. It just ins’t designed for all that movement and eventually you will break the center conductor. This is also why I check my system with the nanoVNA before starting…except today where I used the little SWR meter instead. One of the coaxial cables is the gold colored one made by ABR Industries and it has the ferrite common mode choke built into it. This is really wonderful coax and I wished I had learned how important quality coax was a long time ago…it makes a huge difference.
Also in view in the below photo is the N6ARA CW key in the little storage box it comes in and the headphones are in a ziplock bag to keep dust and dirt out of them. Nestled into the pocket behind the coax is a small notebook for logging. I also have a pen (my preferred tool for logging as I can see it easier than pencil) and a pencil since a pencil never runs dry, it is my long term back up to me pen…lol. I dont really trust pens either…haha.

The other side holds coax (including backup coax, because it will fail on you eventually), the N6ARA CW key in its case, headphones in a ziplock bag, and a notebook with pen and pencil for logging.

The N6ARA CW key comes in this little storage box which fits perfectly in the bag. Headphones stay clean in a ziplock, and the notebook/pen/pencil combo is my preferred logging method in the field.
So here is the station assembled and under power. You would be surprised at how long this radio will run on those AA batteries too. It is really shocking to me how well this little system works. I have yet to have the batteries die during an activation and one of them was three hours long. I need to run them till the radio dies to just see how long they will last at some point, but for now I know I can get at least three hours out of them. Also note that it is 10 AA rechargeable batteries, this gives me almost 14 volts which is what a car battery produces when new.
The station assembled and under power at Eagle's Nest (US-0716). You'd be surprised how long this radio runs on 10 AA batteries. I've never drained them during an activation!

Pointing to how I routed the coax. Started with it in a U-shape and got 2.6:1 SWR. Straightened it out and SWR dropped to 1.7:1, much better! This is why you check things in the field.
Here I am pointing to the coax that I used showing how I laid it out. I started with it in a “U” shape at first but the SWR showed to be 2.6:1 and I did use this for a bit as the TR-35 has final protections that make it pretty much impossible to damage them.
After a few minutes though, I decided to straighten the coax and this moved the SWR down to about 1.7:1 making me much more comfortable. I then checked all the bands that the TR-35 covers and only 30 meters was not usable. So that is why you see contacts on three bands instead of 4 today. Haha

My makeshift antenna support keeping tension on the wire and keeping it off the coax. It worked okay, but next time I want to get the wire higher. 30-40 feet would be better than the 15-20 feet I got here.
This is what I came up with to keep tension on the wire antenna and keep it off of the coax. It worked OK, but it the future, I would prefer to get the antenna higher. I also want to add another piece of cord so I can raise the transformer end of the antenna off the ground too. I think this will also help with radiation angle and pattern. The Reliance Antenna EFHW works really well and I am glad I got one from them. This is one of those items from the “Ham Made Gear” forum on QRZ.com. I have bought a few items from this area and have never been disappointed.
In the below photo, you can see my truck parked where I normally activate from and on the right side of that are a couple of trees that I tied the antenna up into. It is strange looking out on it now that it is cleared compared to just a few weeks ago.

Wide shot showing my truck where I normally park and the trees on the right where I tied up the antenna. This area was just cleared a few weeks ago so it looks different than it used to.

Here's what happens when you short circuit a 10-cell AA battery pack! The springs melted completely through the plastic housing. This is what I get for storing it with the power connector attached. Live and learn!
The Battery Pack Disaster (And What I Learned)
Now I need to tell you about the battery pack disaster, because this is the kind of thing that happens when you're figuring stuff out in amateur radio!
When I pulled the batteries out to charge them before this activation, I noticed the springs were melted completely through the housing. Like, melted through the plastic and everything. It took me a few minutes to figure out what happened, and when I did, I felt pretty dumb.
Here's what went wrong: The power connector barrel plug has the ground connection on the outside ring. When I stored the battery pack in the bag with the power cord attached, that barrel connector must have shifted and contacted one of the metal points along the battery bank on the outside of the holder. This shorted several batteries directly to ground!
Turns out when you short circuit AA batteries, they dump a LOT of current very quickly. Those poor springs turned into heating elements and melted the plastic housing. I'm honestly lucky the whole thing didn't catch fire or rupture the batteries. This could have been way worse!
What I learned (the hard way):
NEVER store the battery pack with the power connector attached. Ever.
A simple inline fuse would have prevented this entirely. I'm adding one.
I stretched out the melted springs and the pack still works, but I'm watching it closely.
I now store the last battery in the bank in a separate ziplock bag so nothing can short across the holder.
This is why we test equipment before we need it in an emergency! If this had been a real emergency situation and my battery pack was dead because of a storage mistake, that would have been a problem. Now I know better, and hopefully you can learn from my mistake without melting your own battery pack.
AA Battery Power: 3+ Hours of Runtime
Let me talk about why I went with AA batteries instead of the fancy LiFePO4 packs everyone recommends. Yeah, LiFePO4 batteries are great. They're lighter, hold more capacity, and last longer. They also cost $100 to $200 for a decent pack!
This 10-cell AA battery holder cost me $12 on Amazon, and a set of 10 Eneloop rechargeable AAs runs about $25. That's $37 total for a power solution that gives me 3+ hours of runtime with the Penntek TR-35. I've done a three hour activation and never came close to draining the pack.
Even better: AA batteries are available everywhere. If I'm traveling and forget to charge my batteries, I can walk into any gas station or convenience store and buy alkaline AAs to get me through an activation. Try that with a LiFePO4 pack!
The 10 cells in series give me about 14 volts when freshly charged (this presents a small problem with Alkaline batteries as the voltage is greater by .3 volts! I guess I need to get two dummy cells so I can “detune the pack for Alkaline batteries), which is perfect for the TR-35. As they discharge, voltage drops to around 12 volts, but the radio still works fine all the way down. I typically recharge them when I get home, even if they're not fully drained, just to keep them ready to go.
Is it the most elegant power solution? No. Is it the lightest? Definitely not. But it's cheap, reliable, and universally available. For a go bag / emergency radio setup, those qualities matter more than saving a few ounces.

Close-up of the melted springs. The barrel connector contacted the battery holder and shorted several cells to ground. Those springs turned into heating elements real fast. I'm lucky it didn't catch fire!

My paper log showing contacts on three bands (20m, 17m, 40m). 30m wouldn't tune because I haven't trimmed the antenna to resonance yet. I still use paper logging as my primary method in the field.

Complete Go Bag Checklist and Cost Breakdown
1. Get the antenna higher I only got the wire up about 15-20 feet using the tree right next to my operating position. This worked fine, but higher is always better for HF propagation. Next time I'm bringing a longer throw line so I can aim for branches 30-40 feet up. The extra height will help with DX contacts and cleaner signal patterns.
2. Add a second cord for the transformer end Right now the EFHW transformer just hangs near the ground. I want to add another piece of cord so I can raise that end off the ground too. This should help with the radiation pattern and might improve performance on the higher bands.
3. Inline fuse for the battery pack Yeah, after the melting springs incident, this is happening. A simple 5-amp inline fuse between the battery pack and the power connector would have saved me a lot of stress. I'll add this before the next activation.
4. Pre-tune the antenna The Reliance Antennas EFHW comes cut long so you can trim it to perfect resonance in the field. I still haven't done this trimming, which is why 40 meters wouldn't tune properly (SWR was a little high). I need to take an hour and actually tune this antenna across all the bands the TR-35 covers. Then I'll know it'll work on 40m,, 20m, and maybe 17m (if I can live with the SWR) without field adjustments. (30 meters never tunes on these antennas so I dont count it.)
5. Add a small groundsheet The bag sits directly on the dirt/grass right now. A small tarp or groundsheet would keep everything cleaner and drier if I'm setting up in damp conditions. Nothing fancy needed, just something to protect the gear.
What's working perfectly:
The bag itself is the right size
Having backup coax has saved me multiple times
Coax with ferrite common mode choke from ABR Industries
The AA battery runtime is more than adequate
The throw weight works great
Everything fits and is organized
Overall, I'm really happy with how this kit performs. These are all minor tweaks, not major problems. The core concept of "everything in one bag" is solid!
Let me give you the actual numbers from this Eagle's Nest activation using just the go bag kit:
Activation Details:
Park: Eagle's Nest, US-0716
Date: November 13, 2024
Equipment: Penntek TR-35 at 5 watts QRP
Antenna: Reliance 40m EFHW at ~15-20 feet
Power: 10 AA rechargeable batteries
Bands: 20m, 17m, 40m (30m wouldn't tune)
Contact Breakdown: I started on 20 meters calling CQ and had a good little run of contacts. After working through the initial pile-up, I switched to hunting for other POTA activators on the band. Then I moved to 17 meters (one of my favorite bands these days!) for a few more contacts before finishing up on 40 meters.
Total activation time was probably 90 minutes, and the batteries still had plenty of charge left. I didn't drain them even close to empty. This confirms what I've seen before with this setup: you can easily get 3+ hours of field time on a single charge of AAs.
The go bag concept worked exactly as intended. I grabbed the bag from my truck, walked about 50 feet to my operating spot, threw the wire up in a tree, and was on the air in maybe 15 minutes. When I was done, everything packed back into the bag just as quickly. No loose gear rolling around in the truck, no forgetting pieces of equipment. It all stays together!
72