
A day out with Aaron in Chattanooga
It was time...
We have not gathered to shoot photos in quite some time now so Aaron found there was a beard competition happening in Chattanooga and decided to make his way down for it.
It was time...
We have not gathered to shoot photos in quite some time now so Aaron found there was a beard competition happening in Chattanooga and decided to make his way down for it.
The Setup: What I Shot With
For this day out with Aaron, I kept my setup simple:
Camera: Leica SL2 (full-frame mirrorless) Lens: Leica 50mm APO-Summicron Mode: Aperture priority with -2/3 exposure compensation ISO: Auto (probably ranged between 200-800) Settings: Wide open or close to it (f/2 to f/4 for subject separation)
Aaron was shooting with his new Nikon Z8, and we kept comparing how our cameras metered the scenes differently. The Leica wanted to overexpose about 2/3 stop compared to his Nikon, which meant I had to dial in negative exposure compensation the whole time. This is something you learn when shooting different camera systems together!
The SL2 is heavy (like really heavy compared to smaller mirrorless cameras or rangefinders), but it makes stunning images and the build quality is tank-like. I don't baby it on the streets, which is exactly how a street camera should be used!

Shot with Leica SL2 and 50mm during our Chattanooga day out with Aaron at the beard competition.
When he arrived we spent the evening playing with stuff (his new Z8 in particular) and catching up. But then it was off to bed so we could get up and start our big day of photography.
The next morning comes around and we down some coffee and make a plan to meet up about lunchtime as I had to go to our Church’s Association as a delegate. Seems I made a mistake and assumed I didn’t need to go… lol, I see what that got me. Anyway, I really enjoy Association so it wasn’t like a chore, it meant changing plans a little from the original plans for the day.
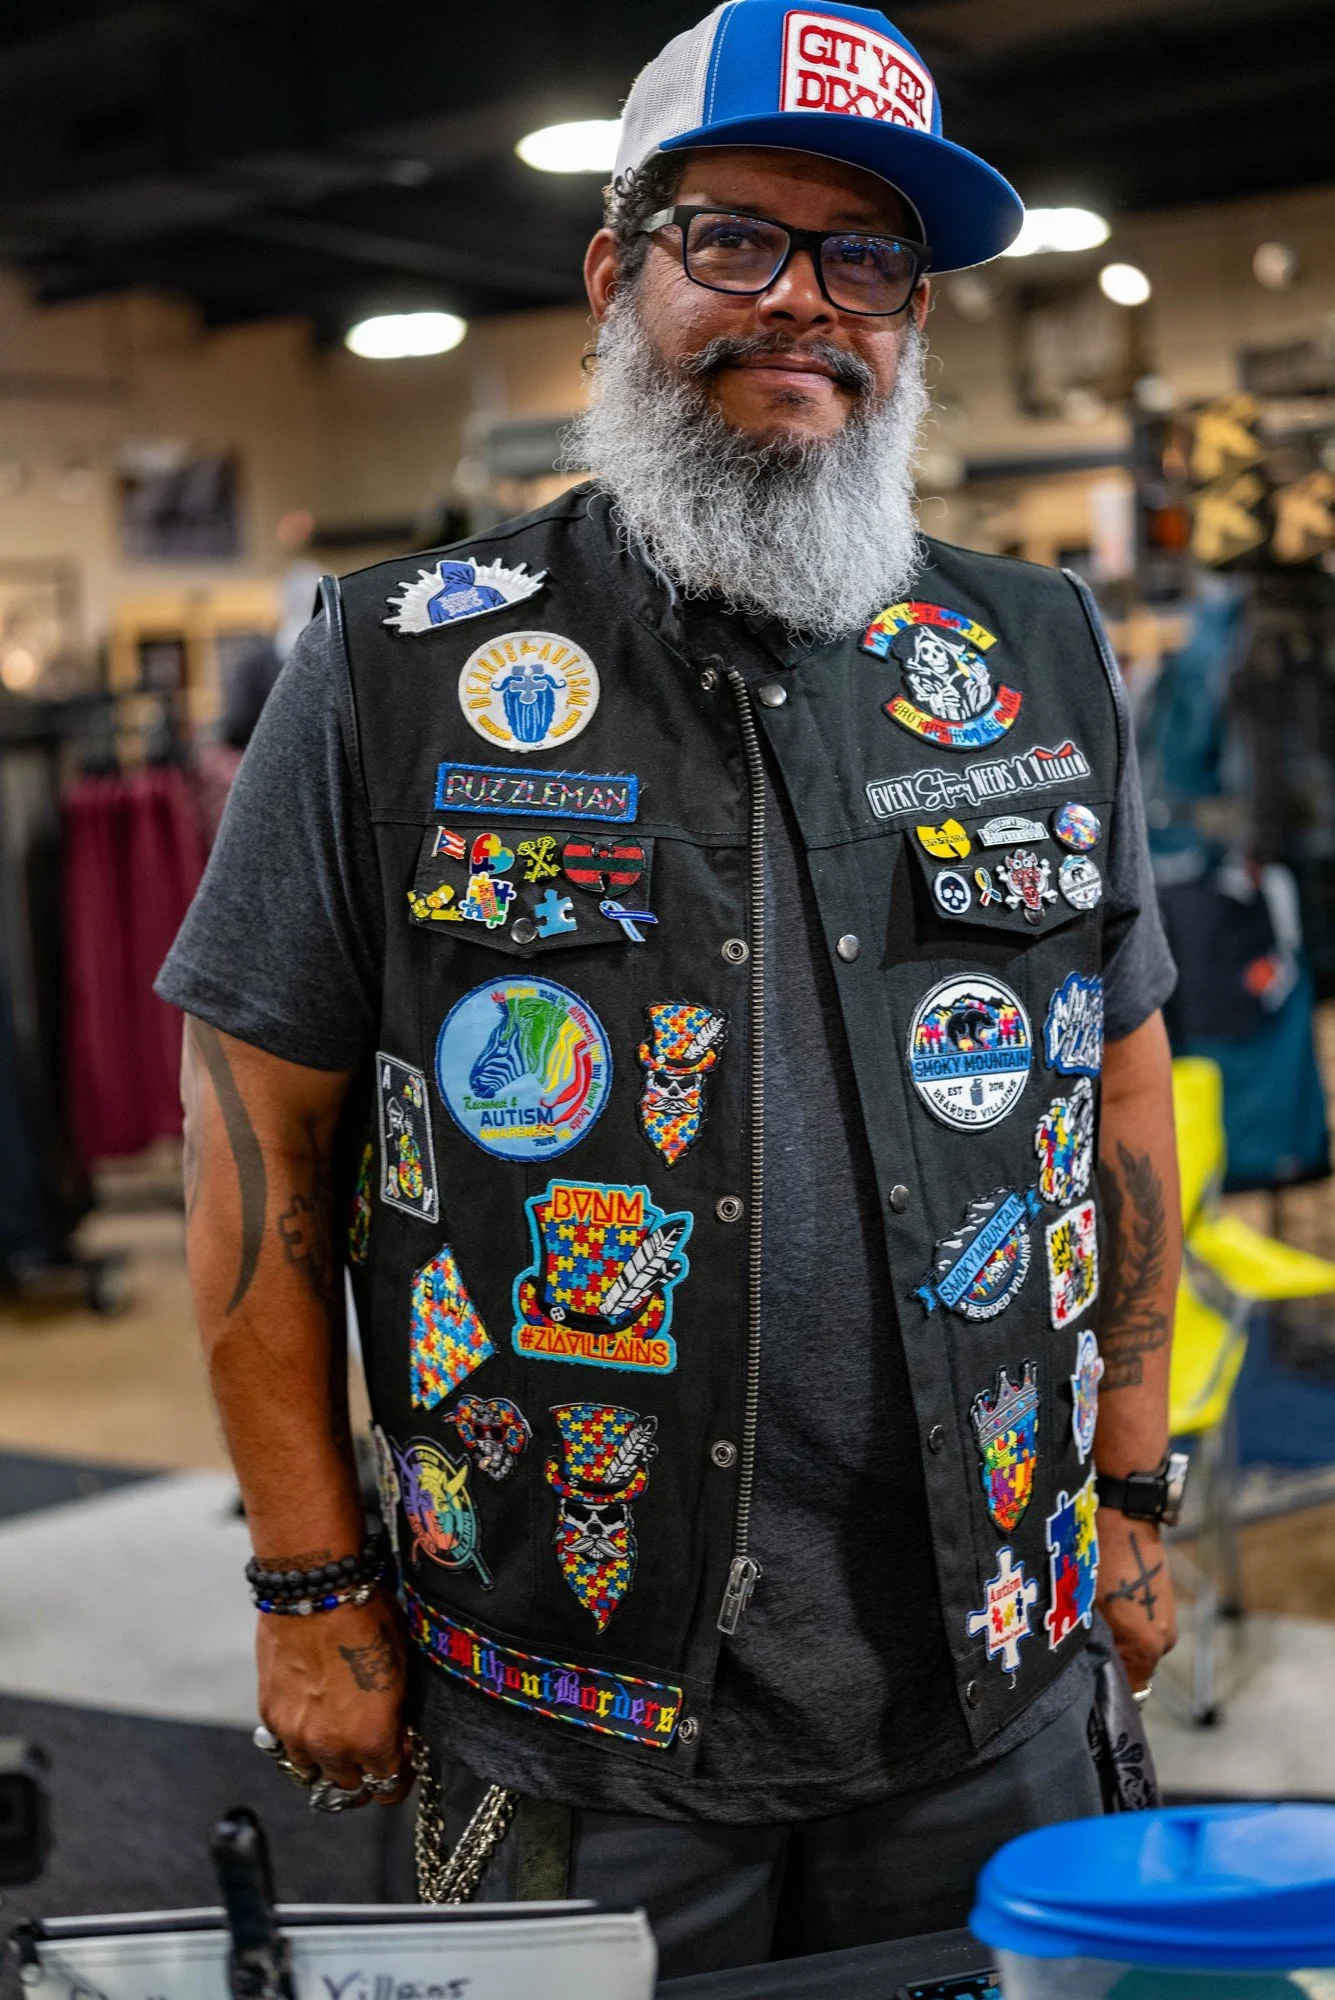
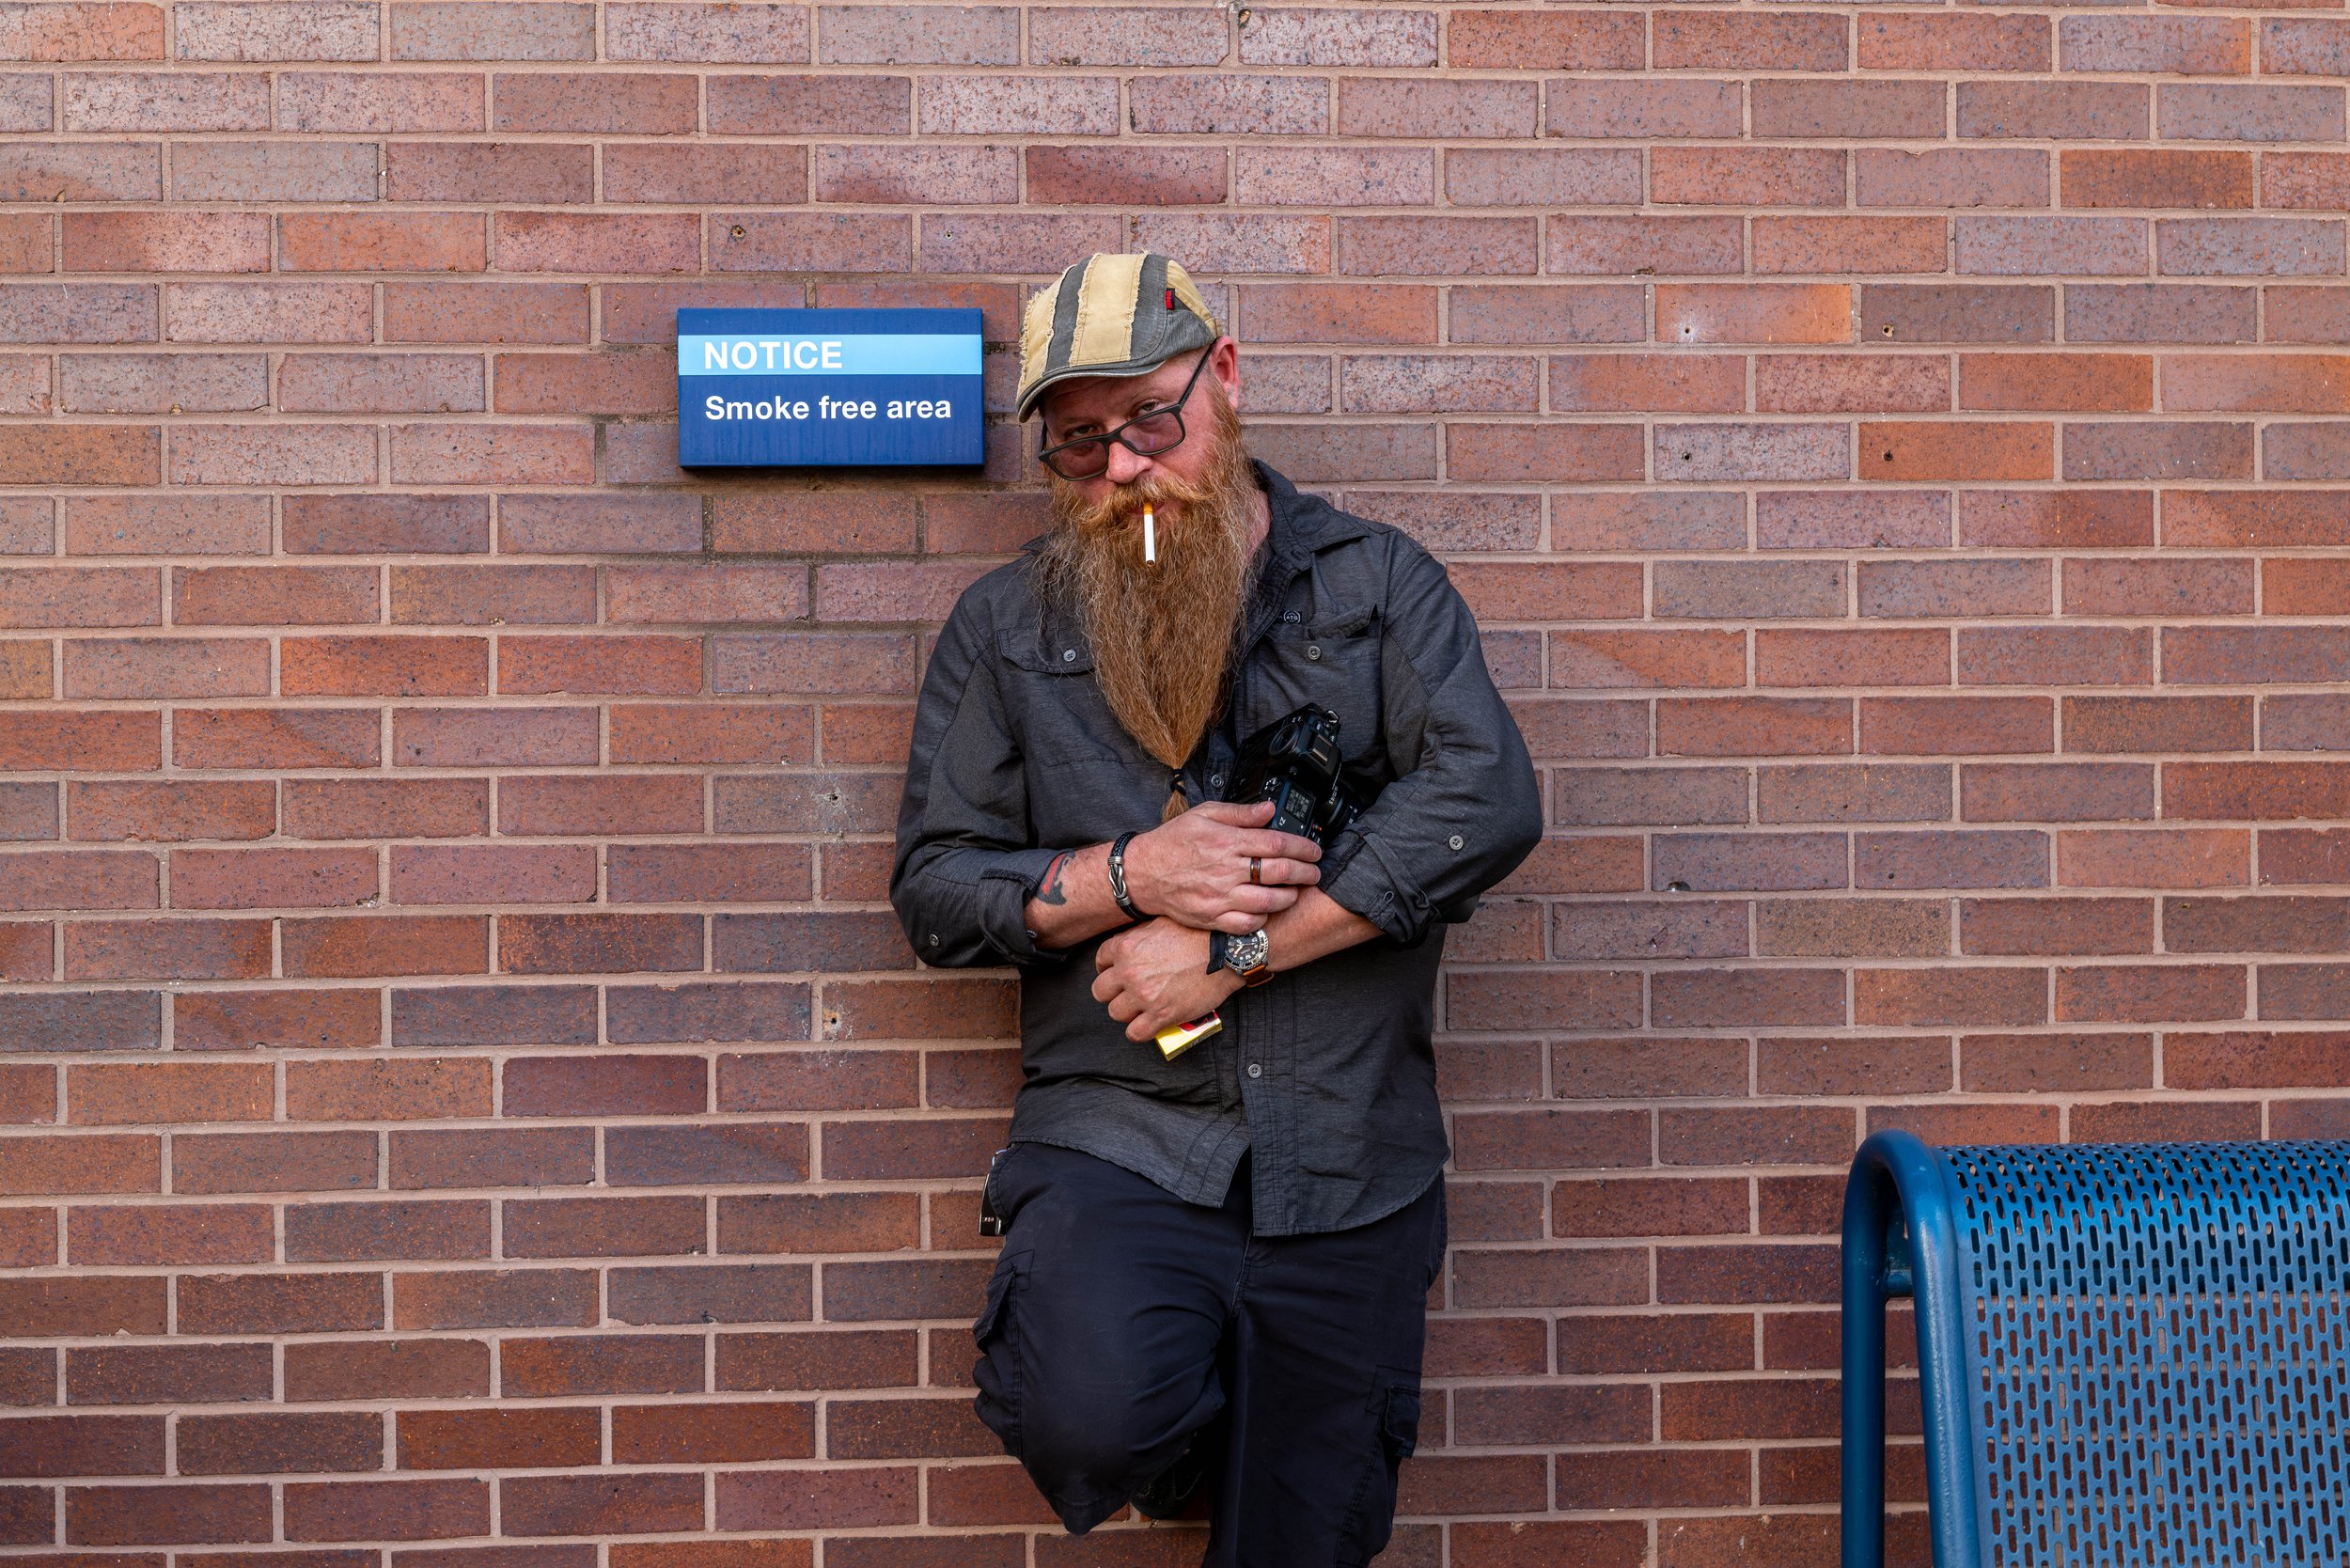
So after I finish with business at association, I head over to the Harley Davidson dealership which is where the beard competition is being held. There I find Aaron is short order and it is really crowded. He basically tells me to get my camera out and take a picture with it so I sheepishly do as I am told.

The beard competition at Harley Davidson in Chattanooga. This event was perfect for breaking down personal barriers to photographing strangers! People were there to be seen and photographed, making it easy practice for someone like me who's normally shy with the camera. Shot with Leica SL2 + 50mm.

This fellow was more than happy to pose for me at the beard competition! Events like this are perfect for overcoming shyness in street photography because people expect cameras and are happy to participate. Shot with Leica SL2 and 50mm. The afternoon light gave great contrast for portraits like this!
The atmosphere at the beard competition was incredible! Crowded but friendly, with people everywhere happy to get their photos taken. Aaron was right when he told me to just get my camera out and shoot. Sometimes you need that push from a friend! Leica SL2 + 50mm, aperture priority mode.

The atmosphere at the beard competition was incredible! Crowded but friendly, with people everywhere happy to get their photos taken. Aaron was right when he told me to just get my camera out and shoot. Sometimes you need that push from a friend! Leica SL2 + 50mm, aperture priority mode.
You see I am not very aggressive with my photography especially when it involves people. I will ask at times but most of the time, this is why I don’t shoot aggressive street stuff. So now I am starting to get some photos and it is exactly as he mentioned. People happy to get their photos captured are everywhere. Like this fellow below, he was more than happy to pose for me. I will be honest, this kind of event is the perfect thing to break down your personal barriers to shooting photos of people you don’t know.

The Leica SL2 with the 50mm APO Summicron is the perfect camera for a beard Competition!

Even the girls got in on the fun at the beard competition! Not everyone there had a beard, lol. Shot with Leica SL2 + 50mm at Harley Davidson in Chattanooga. This is why I love event photography as practice for street work!
Why Events Are Perfect for Shy Street Photographers
I mentioned I'm not very aggressive with my photography, especially when it involves people. This is something a lot of photographers struggle with! We want to capture candid moments and interesting people, but we don't want to be intrusive or make anyone uncomfortable.
Events like the beard competition are the perfect training ground because:
People expect cameras. They're there to be seen and photographed, so you're not the weird person with a camera. You're just another photographer at an event.
Subjects are willing. Most people will happily pose if you ask, and many will even seek you out to get their photo taken. This builds your confidence!
Low stakes. If someone says no or looks uncomfortable, there are dozens of other subjects around. You're not losing a once-in-a-lifetime shot.
Practice makes perfect. The more you shoot people at events, the more comfortable you get approaching strangers in regular street situations.
Aaron's advice was simple: "Get your camera out and take a picture with it." Sounds obvious, but when you're standing there feeling shy, you need someone to tell you it's okay to just shoot!
Start with events. Work up to regular street photography. Your shyness will fade as your confidence grows! Back to the story in progress…
Well the beard competition winds down about 3 or so in the afternoon and we decide to rearrange the rest of the day to shoot some street photography in downtown and also to go have supper at a great Italian restaurant later on.
The streets of Chattanooga were busier than usual with it being a holiday weekend but it still wasnt really bad where we went for our walk.

We found this mural with light reflecting from the building across the alley and it was just something we couldn't pass up! This is what afternoon light does in downtown Chattanooga. The light spill creates scenes you don't get at other times of day. Leica SL2 + 50mm on our photowalk route through Main and Broad Streets.
We started on Main Street and then headed down Market Street to about 7th where we turned over to Broad Street and then back towards Main eventually diverting over to Cowart street before arriving at the truck.
So now you have the route, let see what we got. I kept joking about channeling my inner Eggleston as I would take photos of the mundane. Another thing I have learned is my Leica wants to shoot about 2/3 stop over exposed compared to my friends Nikon cameras. I kept -2/3 stop exposure compensation dialed in the whole time. I did this to keep the sky from being blown out as the shadows would be dark due to the bright afternoon sun. I will dig into the setup on my camera more to see if I can find out why it is doing that.

The Tivoli Theater is an iconic landmark in downtown Chattanooga Tennessee and never disappoints for a photograph.
Along the way we saw a lot of cool stuff to photograph, like in the images below where it is different light so the images come out different from my usual time of day. With the light further over to the west we kept getting these awesome light spill shots like the one below of the old Rone Regency Jewelers location. This location will be sorely missed by me when they finally do something with this building. I love the gritty nature of the old signage and it wasn’t long ago that the windows were not boarded up so you could actually see inside the store. Even so, the black painted plywood makes a nice contrast to the lighter color of the upper section of the building bringing balance to the image.

The old Rone Regency Jewelers location with afternoon light spilling across the facade. This location will be sorely missed by me when they finally do something with this building. I love the gritty nature of the old signage! The black painted plywood makes a nice contrast to the lighter color of the upper section, bringing balance to the image. Shot with Leica SL2 + 50mm Summicron on our downtown Chattanooga photowalk with Aaron.
We also found a few people to photograph as well. It was not quite as busy as I had figured it would be for a holiday weekend in the downtown area, but there were a few people out and about and I was able to grab a few photos of them. The Leica SL2 is a great camera for this kind of photography as it makes stunning portraits as well as makes for a wonderful, albeit heavy, street camera.
Why Afternoon Light Changed Everything
I usually shoot at different times of day (mid-morning usually), so this late afternoon session was different for me. With the sun further over to the west, we kept getting these awesome, direct sun light spill shots that I don't normally see.
What made afternoon light special:
Hard shadows: The bright afternoon sun created strong shadows and high contrast. Great for black and white or dramatic color shots.
Light spill: Buildings reflecting light into alleys and onto other buildings. This is what made the Rone Regency Jewelers shot work so well!
Window light: Storefronts and windows become light sources, creating interesting reflections and secondary lighting.
Challenge mode: Protecting highlights meant I had to underexpose a bit (-2/3 stop), which made shadows darker. This forced me to look for scenes that worked with that contrast.
Different light means different photos. Don't just shoot at the same time every day! Mix it up and see what you discover.
All in all we had a great time and then even got to go eat wonderful Italian cuisine later too. What more could you ask for? Well, there is one more thing I could ask for…
Lightroom Classic… I did it, I went over to the dark side and installed Lightroom back on my system again. It has the power to edit like I need finally and I kept running into problems that Exposure couldn’t easily solve for me so it was time to upgrade…or move over laterally to or what ever you call it…So going forward, I will be learning how to use Lightroom to edit my photos…wish me luck.
If you want to see more abotu this day, I made a vlog cideo about the photowalk portion of the day and it can be watched here.
What I Look For in Street Photography
During the photowalk, Aaron joked about me "channeling my inner Eggleston" as I photographed mundane things. But that's what street photography is about! Here's some of the things that I look for:
Light: Always first. How is the light hitting the subject? Is there interesting shadow play? Is it spilling from one building to another?
Layers: Foreground, midground, background. The best street photos have depth and multiple elements working together.
People: Not always necessary, but human presence adds scale and story. Even just a silhouette or someone walking through the frame.
Color or contrast: Bright colors that pop, or strong black and white contrast. Something that makes the eye stop.
Geometry: Leading lines, patterns, shapes, architecture. The bones of a good composition.
Moments: Candid expressions, interesting gestures, unexpected juxtapositions.
The mundane: Everyday things that become interesting when you isolate them with your camera.
Don't overthink it! Just walk and shoot what catches your eye. You can analyze it later when you're editing. Then you can take inventory of what you shoot the most and see if those images have some meaning or if it is just what you like to shoot…either way, it is good to get out and shoot photos so go have some fun.
Frequently Asked Questions About Street Photography and Chattanooga Photowalks
How do you overcome shyness when photographing strangers?
Honestly, I still struggle with this! I'm not aggressive with my photography, especially when people are involved. I'll ask permission sometimes, but most of the time I just shoot what feels natural without getting in people's faces. What helped at the beard competition was that people were already there to be seen and photographed. They were happy to pose! Events like this are perfect for breaking down those personal barriers to shooting photos of people you don't know. Start with events where people expect cameras, then work your way up to regular street photography. Aaron's advice of "get your camera out and take a picture with it" is the best cure for shyness, even if it feels awkward at first!
What's the best time of day for street photography in downtown Chattanooga?
The afternoon worked great for us! With the sun further over to the west, we kept getting these awesome light spill shots bouncing off buildings. The light was different from my usual shooting times, and it created some really interesting shadows and contrasts. Late afternoon (around 3-5pm) gives you that warm golden light that looks great for both architecture and people. Early morning works too, but afternoons tend to have more people out and about, which is what you want for street photography. Avoid harsh midday sun if you can, unless you're going for high-contrast black and white work!
What's a good street photography route in downtown Chattanooga?
The route Aaron and I took worked really well: Start on Main Street, head down Market Street to about 7th, turn over to Broad Street, then back towards Main, and eventually divert over to Cowart Street. This gives you a good mix of architecture, street scenes, and people. You'll pass old buildings like the Rone Regency Jewelers location (which has great gritty signage), modern storefronts, alleys with interesting light, and public spaces where people gather. The whole loop is maybe 2-3 miles depending on how much you wander, perfect for a couple hours of shooting!
Is the Leica SL2 too heavy for street photography?
Yes and no, lol. The SL2 is definitely heavy compared to smaller mirrorless cameras or rangefinders. But it makes stunning portraits and the image quality is just incredible. I kept it paired with just the 50mm lens to keep things simple. Is it the "ideal" street camera? Probably not if you're walking all day. But does it work? Absolutely! The weight actually helps stabilize handheld shots, and the build quality means I don't baby it. If you've got one, use it for street photography. Don't let the weight stop you. Your shoulders might complain, but the photos will be worth it!
Why was your Leica exposing differently than Aaron's Nikon?
Great question! I noticed my Leica SL2 wants to shoot about 2/3 stop overexposed compared to Aaron's Nikon cameras. I kept -2/3 stop exposure compensation dialed in the whole time to keep the sky from being blown out. The shadows would be dark anyway due to the bright afternoon sun, so I was protecting the highlights. Different camera brands meter scenes differently, and Leica tends to be a bit generous with exposure to preserve shadow detail. This is something you learn when shooting with multiple camera systems. Just dial in the compensation and keep shooting! I need to dig into my camera setup more to see if there's a metering mode that matches my shooting style better.
What camera settings do you use for street photography?
For this photowalk with the Leica SL2, I was shooting mostly in aperture priority mode with the 50mm lens. I kept -2/3 exposure compensation dialed in (as mentioned above). ISO was probably auto, and I let the camera pick the shutter speed. For street photography, I like to shoot wide open or close to it (f/2 to f/4) to get that subject separation, but I'll stop down if I need more depth of field. The key is to keep your settings simple so you're reacting to moments, not fiddling with dials. Set it and forget it, then just focus on composition and timing!
Can you photograph people at public events without permission?
At events like the beard competition where people are specifically there to show off and be seen? Yes! Most people were happy to be photographed and many posed for us. That said, I still try to be respectful. If someone looks uncomfortable or waves me off, I move on. For regular street photography, it's trickier. I generally don't ask permission before shooting (it kills the moment), but if someone objects after I've taken their photo, I delete it. Know your local laws, be respectful, and don't be creepy. Events are the easiest place to start because people expect cameras!
What makes a good subject for street photography?
Honestly? Almost anything! During the photowalk I kept joking about channeling my inner Eggleston as I would take photos of the mundane. Look for interesting light (like that spill on the Rone Regency Jewelers building), patterns, textures, people doing everyday things, architectural details, reflections, shadows... anything that catches your eye. Don't overthink it. I shot everything from bearded bikers to boarded-up buildings to random street corners. The beauty of street photography is finding the interesting in the ordinary. Just walk around and let things reveal themselves to you!
Should I shoot RAW or JPEG for street photography?
I shoot RAW because I like having the flexibility in post-processing. For this shoot, I ended up using Lightroom Classic to edit (I went back to the "dark side" after trying to use Exposure, lol). RAW gives me the power to recover highlights, lift shadows, and adjust colors the way I want them. That said, if you're comfortable with your camera's JPEG processing and you don't want to spend time editing, shoot JPEG! The best format is the one that gets you shooting. Street photography is about being out there capturing moments, not agonizing over file formats!
How do you choose which photos to keep from a street photography session?
I wish I had a good systematic answer for this, lol. Honestly, I just go through them and keep the ones that speak to me. Does the composition work? Is the light interesting? Did I capture a genuine moment or expression? Is there something about the image that makes me want to look at it again? I'm pretty ruthless in culling, especially with street photography where you might shoot hundreds of frames. If it doesn't grab me immediately, it gets deleted. The photos I shared in this post were the ones that stood out when I was editing. Trust your gut, and don't be afraid to delete mediocre shots. Only keep the good stuff!
BONUS QUESTION: What's the best way to learn street photography?
Go out with a friend like Aaron who will tell you to "get your camera out and take a picture with it"! Seriously, having a photography buddy makes a huge difference. You push each other, share ideas, and it's way less awkward than being alone with a camera on the street. Start with events (like the beard competition) where cameras are expected, then work up to regular street shooting. Use a simple setup (one camera, one lens), set your camera to aperture priority or full manual, and just walk. Don't overthink it. The best teacher is just getting out there and shooting. Oh, and watch Aaron's work or other street photographers you admire, but then go do your own thing. Your style will develop over time!
Support this website by using these affiliate links to shop on Amazon:
Leica M11 Digital Rangefinder Camera
Nikon AF-S FX NIKKOR 105mm f/1.4E ED Lens
Voigtlander Nokton 35mm f/1.4 II
Sandisk 128GB Extreme Pro memory cards
Nikon 50mm f1.8 S Lens for Z mount
Thanks for stopping by, now get your camera out and go take a photo or two with it!

Carl Zeiss Jena Biotar 58mm f/2 Review: 60-Year-Old Vintage Magic
When Aaron offered to loan me his 58mm, I had no idea it was a Zeiss and over 60 years old. But once I held it in my hands, the history became obvious. This isn't just any vintage lens. It's a Carl Zeiss Jena Biotar from East Germany!
The Carl Zeiss Jena Biotar 58mm f/2 from East Germany. This lens is over 60 years old and still producing beautiful images! Notice the all-metal construction and vintage styling. This is German engineering that lasts!
Carl Zeiss Jena Biotar 58mm f/2: A 60-Year-Old Lens
When Aaron offered to loan me his 58mm, I had no idea it was a Zeiss and over 60 years old. But once I held it in my hands, the history became obvious. This isn't just any vintage lens. It's a Carl Zeiss Jena Biotar from East Germany!
The Carl Zeiss Jena Story: After World War II, the original Carl Zeiss optical company in Germany was split between East and West. The Jena facility ended up in East Germany (DDR), while the West German operation continued in Oberkochen. For decades during the Cold War, there were TWO Carl Zeiss companies making lenses! The East German Carl Zeiss Jena produced exceptional optics throughout the 1950s, 60s, 70s, and into the 1990s.
The Biotar design dates back to the 1920s-1930s and is a double Gauss optical formula. This particular 58mm f/2 version was produced primarily in the 1960s and early 1970s. That means this lens I'm holding is literally 60+ years old and still producing sharp images! That's German engineering right there.
What makes Carl Zeiss Jena lenses special today is that they were made to the same high standards as West German Zeiss, but now they're available on the used market for a fraction of what modern Zeiss lenses cost. You can find these Biotar lenses for $100 to $300 depending on condition, versus thousands for a modern Zeiss prime!
Well, it didn’t take long to figure that out and to round up a simple M42 to Leica L mount adapter so I could get this lens on my Leica SL2.
The next thing I did was look the lens over really closely. The usual controls are there of aperture and focus but it has a third ring as well. This ring is spring loaded and is some sort of adjustable stop for the minimum aperture. This is how it works, you pull the ring towards the camera, compressing the spring. While the spring is compressed, you rotate the ring and align a mark on it with the aperture you want it to stop at. Once here, release the spring and it will seat in this position stopping the aperture ring from stopping down past this point. This was for cameras back in the day as you had to meter the scene manually then set the aperture for the meter value. To compose though, you needed all the light you could get so you set the ring for the aperture you plan to shoot the photo at then you would open the aperture all the way to see good and get good focus. Once this was done, you could simply spin the aperture ring to the stop and it was set to the metered value and you didnt even have to come off the camera to do it. Pretty slick if you ask me.
Another item of note is that the aperture ring is ”clickless” or in other words, it simply turns smoothly through the range without any detents to locate it at specific settings.
The next thing I noticed is that the machine work is impeccable…which I have grown to expect no less from the German people. The focus ring is smooth as silk even with its advanced years. Quite the opposite of some of my other lenses to be quite honest.
330 Degrees of Focus Throw: Close Focus Priority
Something else I noticed is that the lens has incredible close focus with about 330 degrees of focus throw. Of that 330 degrees it devotes probably 250 degrees to close focus. Crazy precise focus for a lens this old. The first 1/4 turn though is the normal use range so it will go from infinity to 2.5 meters in that 1/4 turn and then the rest of the throw is for close range work. Pretty neat how the normal range stuff is in such a short throw so you can get focus fast with it. Just a little practice and you a can get street photos of moving subjects and fairly large apertures in focus. You just learn how to use it with some time.
Sample Photos: What This Vintage Lens Can Do
Let me show you what this 60-year-old lens can actually produce on a modern 47-megapixel Leica SL2:

Portrait of Teresa shot with the Biotar at a local state park. Look at that sharpness and the smooth bokeh! This is what makes vintage lenses so cool—they still got it after 60+ years. Razor sharp where it matters with beautiful rendering.
Teresa's Portrait: Look at that sharpness! The Biotar is razor sharp at f/2 where it matters (Teresa's face and eyes), with smooth falloff to the background. The 15-blade aperture creates beautifully smooth bokeh without harsh edges. This is exactly what you want in a portrait lens. The rendering has that vintage "look" that's hard to describe but you know it when you see it. Colors are slightly warm, micro-contrast is excellent, and the overall feel is organic rather than clinical.
Walk Around Shots: The other samples show the Biotar's versatility as a general-purpose lens. At 58mm, it's slightly longer than the standard 50mm, which gives you a bit more reach for street photography while still being wide enough for environmental shots. I took these during photowalks around Chattanooga, just grabbing scenes that caught my eye. The lens renders these scenes with great detail and pleasant tonality.
What Makes Vintage Rendering Special: Modern lenses are designed to be clinically perfect. Flat field correction, perfect color neutrality, zero distortion. That's great for product photography or technical work! But vintage lenses like the Biotar have character. Slight warm color cast, gentle vignetting, bokeh that's smooth rather than razor-sharp. It's the difference between digital perfection and analog soul. Not better or worse, just different. And for portraits or artistic work? I'll take the vintage rendering every time!
Technical Specifications and Pricing
Here are the specs for this vintage glass:
Optical Specs:
Focal length: 58mm (slightly longer than standard 50mm)
Maximum aperture: f/2
Minimum aperture: f/16
Aperture blades: 15 (yes, fifteen! Creates smooth bokeh)
Optical design: Double Gauss (Biotar formula)
Physical Specs:
Mount: M42 screw mount (universal vintage mount!)
Filter size: 49mm
Weight: Approximately 290g (10.2 oz)
Length: About 45mm
Focus throw: 330 degrees (!) with close focus priority
Minimum focus distance: Approximately 0.5 meters (very close!)
Age and Origin:
Manufactured: 1960s-1970s (60+ years old!)
Origin: Carl Zeiss Jena, East Germany (DDR)
Production numbers: Relatively common, still available used
Used Market Pricing:
Typical price: $100-300 depending on condition
Excellent condition: $200-300
Good condition with some wear: $100-180
Compared to modern Zeiss Batis 55mm f/1.8: $900+
The value proposition here is incredible! You're getting genuine Carl Zeiss optics with 60+ years of proven performance for less than the cost of a cheap modern lens. That's what makes vintage glass so appealing!
It is not a bad lens in any way either, just look at the photo of Teresa I got at the local state park one day with it. Razor sharp and great rendition too. This is what makes vintage lenses so cool, they still got it…

The Biotar works great as a general purpose walk around lens too. I grabbed this during a photowalk in Cloudland Canyon State Park. The lens renders scenes with excellent detail and pleasant tonality. This is real-world performance, not controlled test shots!
Adapting M42 Lenses to Modern Mirrorless
One of the best things about the Biotar 58mm is that it uses the M42 screw mount. If you're not familiar with M42, let me explain why this is actually a huge advantage!
What is M42 Mount? M42 (also called "Universal Screw Mount") was THE standard lens mount for decades, used by dozens of camera manufacturers from the 1940s through 1980s. Companies like Pentax, Praktica, Zenit, Fujica, Mamiya, and many others all used M42. This means there are millions of M42 lenses out there on the used market!
Why M42 is Great for Modern Mirrorless: The M42 flange distance (the distance from the lens mount to the sensor) is 45.46mm, which is longer than any modern mirrorless mount. This means you can adapt M42 lenses to pretty much ANY mirrorless camera with a simple, inexpensive adapter. No optics needed, just a metal ring!
Adapters are Cheap and Easy:
M42 to Leica L-mount adapter: $15-40
M42 to Sony E-mount: $10-30
M42 to Canon RF: $20-40
M42 to Nikon Z: $15-35
I'm using a simple M42 to L-mount adapter that cost me about $25 on Amazon. No electronics, no optics, just a precisely machined metal ring. Screw the Biotar into the adapter, mount it on my Leica SL2, and boom! I've got a working 58mm f/2 lens.
Manual Focus on Modern Mirrorless: The beauty of using vintage manual lenses on modern mirrorless cameras is focus peaking! My Leica SL2 shows colored highlights on in-focus areas in the electronic viewfinder, making manual focus actually easier than it was back in the 1960s with optical viewfinders. Combined with the Biotar's smooth 330-degree focus throw, you get precise control that's honestly pretty enjoyable!
What You Give Up:
No autofocus (obviously!)
No electronic aperture control
No EXIF data recorded
No lens corrections applied
What You Gain:
Incredible value ($100-300 vs $900+ for modern Zeiss)
Built-in character and vintage rendering
All-metal construction that'll last another 60 years
The satisfaction of using historic glass!

Another example of the Biotar's versatility. At 58mm, it's slightly longer than the standard 50mm, giving you a bit more reach while still being wide enough for environmental shots. The vintage rendering has character that modern lenses don't replicate!

The Biotar's close focus capability is impressive! That 330-degree focus throw with close focus priority means you can get really close to subjects. This 60-year-old lens works beautifully on my modern 47-megapixel Leica SL2.

Final sample showing what this vintage lens can do in real-world use. If you're into the vintage glass look, the Biotar is definitely worth grabbing if you can find one. Genuine Carl Zeiss optics for $100-300? That's incredible value!
Pros, Cons, and Who Should Buy the Biotar 58mm
Let me break down the good and the not-so-good about this vintage lens:
What I Love (Pros):
Build quality is exceptional: German engineering from 60+ years ago that still works perfectly
f/2 is fast enough: Good low light capability, nice bokeh
Incredible close focus: That 330-degree throw with close focus priority is amazing
Unique mechanical features: Adjustable aperture stop, clickless aperture ring
M42 mount universality: Adapts to any modern mirrorless camera easily
Price: $100-300 for genuine Carl Zeiss optics!
Vintage rendering: Character and soul that modern lenses don't have
15-blade aperture: Smooth, round bokeh
What I Don't Love (Cons):
No autofocus: Manual focus only (but focus peaking helps!)
No EXIF data: Camera doesn't know what lens you're using
Some copies are soft: Vintage lenses vary in condition, test before buying
Not weather sealed: It's 60 years old, be gentle!
Clickless aperture: Great for video, but some photographers prefer detents
Requires adapter: Extra $15-40 expense and adds a bit of length
Who Should Buy This Lens:
Vintage lens enthusiasts who appreciate the history
Portrait photographers wanting unique rendering
Budget shooters who can't justify $900+ for modern Zeiss
Film aesthetic lovers who want that organic look
People who enjoy the slower, more deliberate manual focus process
Collectors interested in Carl Zeiss Jena heritage
Who Should Skip This Lens:
Anyone who needs autofocus for their work
Sports or action photographers
People who want perfectly clinical modern rendering
Photographers who hate manual focus
Anyone expecting modern lens perfection
Frequently Asked Questions About the Carl Zeiss Jena Biotar 58mm f/2
What is Carl Zeiss Jena and how is it different from regular Zeiss?
Carl Zeiss Jena was the East German optical manufacturer that operated from 1946 to 1991 after the original Carl Zeiss company was split following World War II. The Jena facility ended up in East Germany (DDR), while West German Zeiss continued in Oberkochen. For decades during the Cold War, there were TWO Carl Zeiss companies both making excellent lenses! Carl Zeiss Jena lenses were made to the same high standards as West German Zeiss but are now available on the used market for much less money. The quality is genuinely excellent, it's just Cold War history that created the split!
How much does a Carl Zeiss Jena Biotar 58mm f/2 cost?
On the used market today, you can find the Biotar 58mm f/2 for $100 to $300 depending on condition. Excellent condition copies with clean glass go for $200-300, while good working copies with some cosmetic wear run $100-180. Compare that to a modern Zeiss Batis 55mm f/1.8 which costs $900+, or a Leica Summilux 50mm which is $4,000+. You're getting genuine Carl Zeiss optics with 60+ years of proven performance for less than the price of a cheap modern lens. That's incredible value!
What is M42 mount and can I use it on modern cameras?
M42 (Universal Screw Mount) was the standard lens mount used by dozens of camera manufacturers from the 1940s through 1980s. The beauty of M42 is that it adapts to pretty much ANY modern mirrorless camera with a simple $15-40 adapter. No optics needed, just a metal ring! M42 to Sony E-mount, M42 to Leica L-mount, M42 to Canon RF, M42 to Nikon Z—adapters exist for everything. I'm using a $25 M42 to L-mount adapter on my Leica SL2 and it works perfectly. This makes M42 vintage lenses incredibly versatile!
Does the Biotar 58mm work on Leica cameras?
Yes! The Biotar 58mm f/2 uses M42 screw mount, which adapts to Leica L-mount cameras (SL, SL2, SL2-S, CL) with a simple M42 to L-mount adapter. I'm using this lens on my Leica SL2 with a $25 adapter and it works great. You get manual focus only (obviously), and the camera's focus peaking feature makes manual focusing actually easier than it was in the 1960s with optical viewfinders. No autofocus or electronic aperture, but you get genuine Carl Zeiss optics on your Leica for $100-300 instead of thousands!
Is the Biotar 58mm sharp enough for modern high-resolution sensors?
Absolutely! I'm using it on a 47-megapixel Leica SL2 and it's sharp where it matters. At f/2 it's razor sharp in the center with smooth falloff toward the edges (exactly what you want for portraits). Stopped down to f/4 or f/5.6, it's sharp across the entire frame. Sure, a modern $900 Zeiss Batis might be slightly sharper in the absolute corners at 500% zoom, but for real-world photography? The Biotar is more than sharp enough. Look at the sample photos in this review—that's what you get on a modern high-resolution sensor!
What is the adjustable aperture stop on the Biotar?
The Biotar has a unique spring-loaded ring that lets you set a minimum aperture stop. Here's how it works: pull the ring toward the camera (compressing the spring), rotate it to align with your desired aperture, then release. The ring locks in place and prevents the aperture from closing past that point. This was brilliant for manual metering cameras in the 1960s! You'd meter the scene, set the stop to that aperture, then open up to f/2 for composing and focusing with maximum light. When ready to shoot, just spin the aperture ring until it hits the stop—instant correct exposure without looking. Pretty clever mechanical solution!
Is 58mm better than 50mm?
58mm is slightly longer than the standard 50mm focal length. That extra 8mm gives you a bit more compression and working distance, which is nice for portraits. It's still wide enough for general purpose photography and street work, but with slightly more reach than 50mm. Some people find 58mm to be the "perfect" focal length—not quite as wide as 50mm but not as tight as 85mm. It's a Goldilocks focal length! The Biotar was designed as 58mm rather than 50mm for optical reasons related to the double Gauss formula.
Can you use vintage lenses professionally?
Absolutely, if your work allows for manual focus! Many portrait photographers, wedding photographers, and commercial shooters use vintage lenses specifically for the unique rendering they provide. The vintage "look" with its smooth bokeh, slight warm cast, and organic rendering is something clients actually request. Obviously you wouldn't use a manual focus vintage lens for sports or fast-moving subjects, but for portraits, product photography, or artistic work? Vintage lenses are totally viable. Just make sure you test your specific copy thoroughly—condition varies with vintage glass!
How do I know if a vintage Biotar is in good condition?
When buying a used Biotar (or any vintage lens), check for: (1) Clean glass with no fungus, haze, or separation, (2) Smooth focus ring with no grinding or sticking, (3) Aperture blades that open and close properly, (4) No oil on the aperture blades, (5) Clean exterior with no major dents. Hold it up to a light and look through the glass for any issues. Some dust is normal for 60-year-old lenses and won't affect image quality. Fungus, haze, and separated elements are deal-breakers. Always ask for sample photos if buying online!
Should I buy vintage lenses or save for modern lenses?
Both! I use modern lenses for work that requires autofocus and vintage lenses for creative projects where I want character. The Biotar 58mm f/2 costs $100-300, which is pocket change compared to modern Zeiss or Leica lenses. You can build a whole collection of vintage glass (35mm, 50mm, 85mm, 135mm) for less than the cost of one modern premium lens. Start with vintage lenses to learn what focal lengths you love, then invest in modern versions if needed. Or just use vintage glass forever—it genuinely produces beautiful images!
Pros, Cons, and Who Should Buy the Biotar 58mm
So if you are into the vintage glass "look" then I might suggest grabbing one of these old girls if you can find one and adapting it to your mirrorless camera to see what you can get with it. I think you'll be pleasantly surprised!
Here's my bottom line: The Carl Zeiss Jena Biotar 58mm f/2 is a phenomenal example of why vintage lenses are still worth using in 2024. This lens was made 60+ years ago in East Germany, and it still produces sharp, beautiful images with character that modern lenses can't replicate. The fact that you can buy one for $100 to $300 makes it even better!
The mechanical features are genuinely clever. That adjustable aperture stop? Brilliant design from an era before electronic everything. The 330-degree focus throw with close focus priority? Purposeful engineering that still makes sense today. The clickless aperture ring and 15-blade aperture? Features that modern lenses charge hundreds extra for!
Yes, you give up autofocus. Yes, you have to use an adapter. Yes, you won't get EXIF data. But what you gain is access to genuine Carl Zeiss optics with history, character, and exceptional build quality for the price of a cheap modern lens. That's a trade I'll make every time for creative work.
I need to give this lens back to Aaron eventually, but honestly? I might just need to find my own copy. The Biotar has earned a permanent spot in my bag for portrait work and photowalks where I want that vintage rendering. If you see one at a camera show or online for $200 in good condition, grab it! You won't regret it.
Now get your camera out and go take a picture with it!
Support this website by using these affiliate links to shop on Amazon:
Leica M11 Digital Rangefinder Camera
Nikon AF-S FX NIKKOR 105mm f/1.4E ED Lens
Voigtlander Nokton 35mm f/1.4 II
Sandisk 128GB Extreme Pro memory cards