WK4DS Amateur Radio Blog
Finally got my sBitx V2 radio…so I went to a park!!!
Quick synopsis is I like it. Read on to see why.
When you see this radio, you think it is like one of the big name machines. It is not. It is actually so much more because of the nature of the project that it comes from.
The HF Signals sBitx V2 is an evolution in their radio designs and brings so much to the table that is cant be described in one blog post…well maybe…I can write as much as I want in one post…lol.

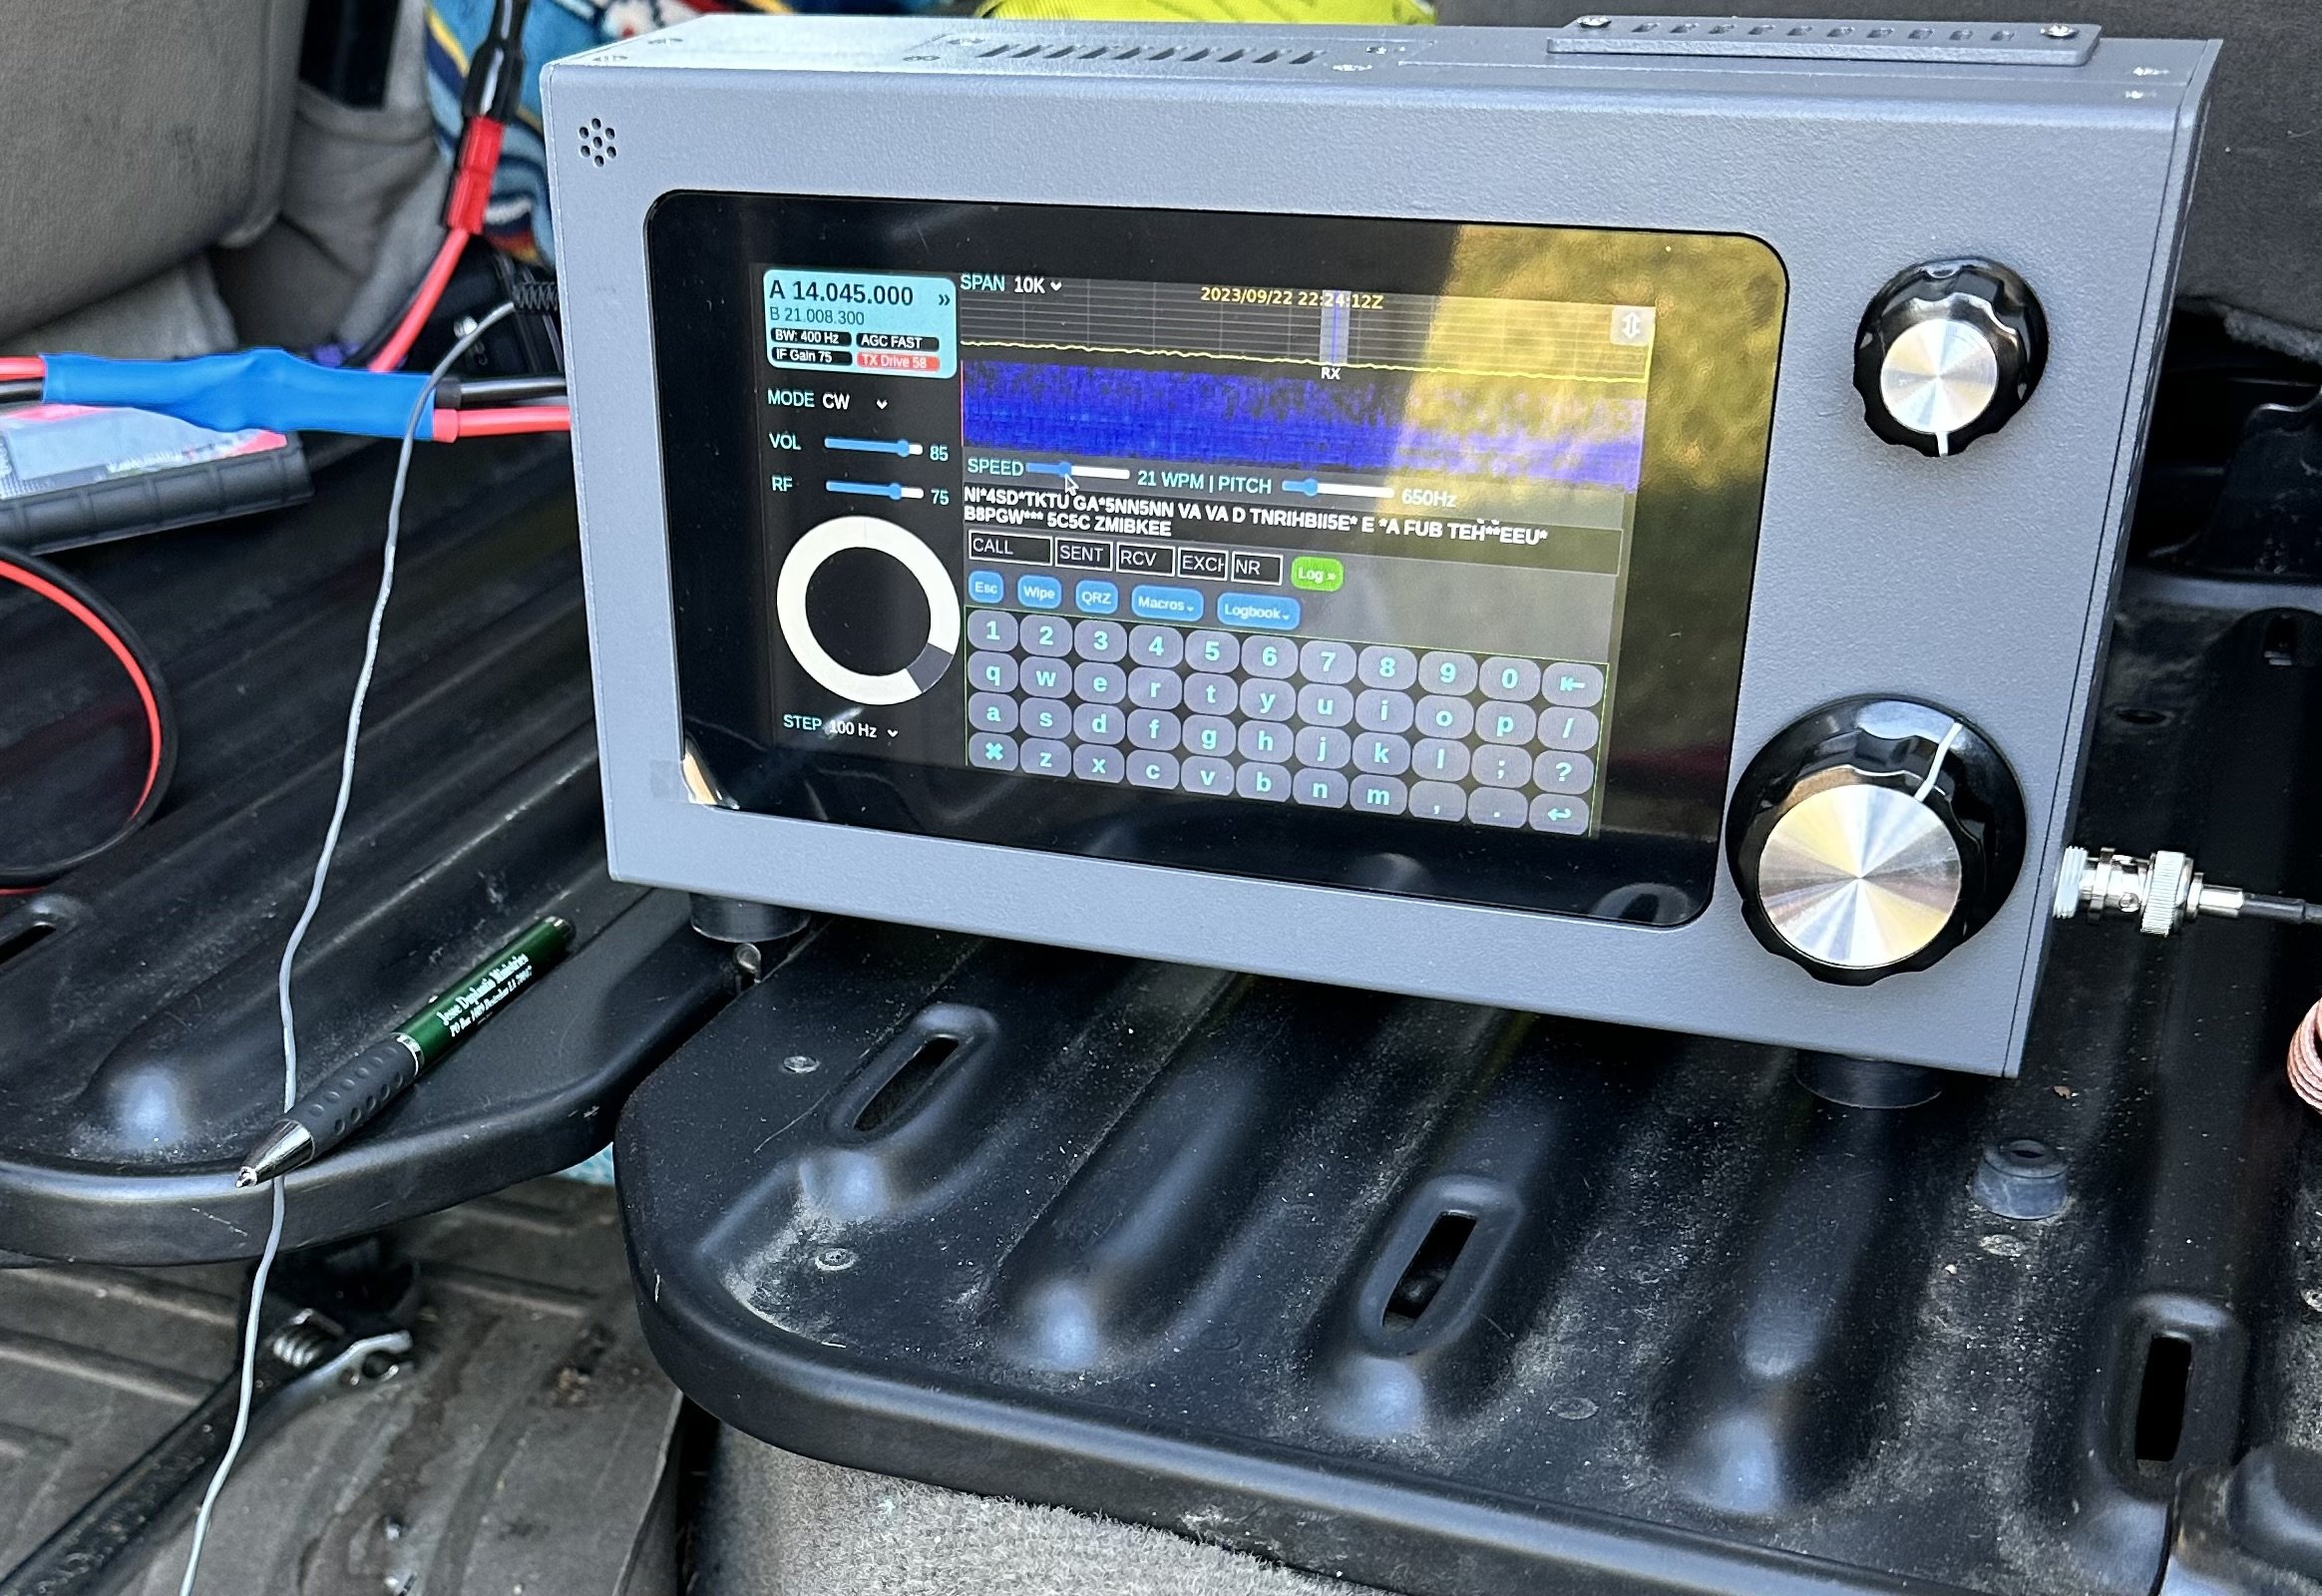
The TR-35’s magic is the lack of menus.
The first thing you notice it the lack of buttons or switches like my Penntek TR-35 has on it in the photo above. There are simply two knobs and a display and that is all you are greeted with at first glance.
Well this is a kind of sleight of hand trick as the display is actually a touch screen and almost all of the controls are driven from this display. In fact, what appears to be at AF Gain (volume) knob, is actually like the multi-function knob on my Ten Tec Omni 7 being selectable for an array of things it can control.
Both knobs are also push buttons and the smaller one defaults to volume control if pressed, but the larger (VFO) knob doesnt appear to do anything when pressed, I can not find anything in the literature describing it so it is there for tinkerers from what I gather. You see, this is an open source SDR, this menas you can download the source code and if you are savvy with coding, you can add features or modify how the radio works to suit you. This is the point of the whole project to be quite honest. This radio does work, but it is not as polished as a big brand machine as it is intended for the owner to go inside and play with things, like add circuits or modify existing ones or even write new features to add to the radio outright. You can literally download the schematic and the actual source code from their GitHub… What ever you want to do, this radio is fully “unlocked” so that you can do it.
Enough about the radio in general, how did it do on the first outing to a POTA park? Well, it did really well, I did power it from the truck battery which means I had to setup in the truck somewhere so the power cable would reach the connection I have in the truck. (I finally added a power pole cable inside the truck cable that is fed directly from the batteries so losses are a minimum.
Back to what I was saying, I got to K-2169 and setup in the truck so I have somewhere to sit this time as I planned to stay a while today and didn’t want to have to stand up the whole time. It took me a few minutes to get it all organized, but once I did, everything fit quite well. I wanted to use my N3ZN key, but to be honest, this arrangement literally made it impossible, so I defaulted to the little travel key I have used so much over the last year. I didn’t have a table top that was convenient to setup the other key on and I even tried to sit the N3ZN key on my clipboard, but it was just too difficult and I kept running into problems trying to use it. Hence you see the Gemini cw paddle in my hand for this activation.
Once I settled on the key and radio, I chose 15 meters to get on the air, the band was wide open and even the propagation report said it would do well… Well, FT8 was rocking pretty strong (I tend to use these guys for my beacon report on a band), so I move down into the CW area and start calling CQ…and I call and I call…and nothing. Seems either no one was on the band or they simply could not hear me. It did appear that the band was fading in and out pretty bad though as the RBN would give me a great report one minute and then it would go 3 minutes without a single update. So after what seemed like an eternity on 15 meters, calling CQ with no answers I caved and went down to 17 meters to see what I can scare up.

The hamstick collection at this point. 15 (Green), 17 (Brown), 20 (Yellow), 30 (Blue) & 40 meters (Red) are all represented here (well, 30 meters was on the truck when I took this photo)

So since I had not edited the memories in the sBitx V2 yet for my use, I planned to use the PICO Keyer I picked up a while back, well it worked somewhat, I think it had trouble keying the radio because the radio is looking for contact closure and not a semiconductor so it would work, but it was introducing errors into the code pretty bad. I finally threw in the towel and just used the key the whole time and ran with it. This turned out to work really well though and I really didn’t mind it after all. Once I got home I built a complete set of memories for the keyer complete with all sorts of messages. You get as many memories as you want, they are in sets of twelve, I tested this by copying the CW1 memory and renaming it then I edited the messages and saved it, rebooted the radio (just as a precaution) and the new set of messages were right there in the drop down menu! They are really simple to edit, but you need a keyboard to do it. I didn’t take one with me on this trip hence I didn’t bother with trying till I got back home. If there is demand for it, I will detail how I added a memory and show how to edit the messages and the message names as well.

So I ended up using almost 4 Amp Hours of energy on this activation. Not bad for over 50 contacts in the log. I am happy with that! When I am going to be at the park for a while, I will get all the antennas out and sort them by band like you see below. Well, they are not sorted at this point, but imagine that they are for the story. Then I can change bands quickly and easily as I will lay them near the mount for the truck. The 2” PVC pipe is maxed out too. I don’t think I can get another antenna in it at this point. If you plan to run hamsticks, I recommend that you get some sort of tube to store them in to protect them. They are not very durable in construction so it would be best to try to store them in a way that will make them last.

You see, I know the radio is transmitting as I have been using it at home for the past week or so before taking it to the field. So I get down to 17 meters, find a clear frequency and start calling CQ here. Well things pick up for me here as I get a few answers so I know the radio is in fact working as it should and I didnt do something to it while I had it taken apart… More on that later when I talk about the mods I did to this radio right out of the box.
So after messing around on 17 for a few minutes I hit a dead spot, so I figure it is a good time to QSY down to 20 meters and see what I can find down there. Well, I found all the ham radio ops in the United States and some from across the Atlantic too! I proceed to make over FOURTY contacts in an almost continuous stream in about as many minutes! I was busy! The radio was working great too. At this point, I clear all the callers and decide to try the lower bands for a minute and see what I can do there.

So I hop on 40 meters first as this antenna has consistently been on the upper edge of SWR for my operating preferences, and the sBitx agreed with it showing about 2.1:1 while I was there. Also of note is that the radio self adjusts the output power based on band and SWR from what I can tell. I was running about 20 or so watts on 20 meters and wihtout changing the power setting at all, jumping on 40 meters netted me 9 watts output into the 2.1:1 SWR where on 20 meters I think the SWR was closer to 1.2:1… So I turned up the drive some in an attempt to get the power out consistent across the whole activation. I didnt get it past 15 watts if I remember right… But it was enough to make a few contacts and get some in the log from more local hams as the 20 meter band hops right over the closer states.
Then I finally moved up to 30 meters to see what it could do as well since that was the only antenna I had not tried yet. Well, 30 meters also did not let me down…like 15 meters did… haha. I got it on the band with good SWR and output power and easily made several QSOs on that band to finish up the HF portion of this activation.
The next part is just for fun, but I also recently got a new HT (Handy Talky) radio and was playing with it while out on this day. So I called into the KG4WBI/R 1.25m repeater to see if Roger was monitoring and he was. So then I asked him to switch his radio to VFO and simplex so we could make a 1.25m FM UHF contact. 5 watts was more than enough to make the trip the roughly 3 or so miles it was to his house from my location! So I netted 54 contacts on this day on 5 bands and two modes. I had a great activation and the sBitx pulled quite a long shift on it’s first outing.
Now to discuss some issues I found with the new radio that I am going to look into solving or upgrading. The first one is actually really easy, it needs a fan… or two. The heat sink got SO hot in the two hours I was in the field operating at about 20 to 25 watts. REALLY hot, the whole radio was hot actually and I think this is what made it start doing the next issue..

This is something I noticed after a while, when the radio is getting really warm, it starts to “stutter” in the refresh rate of the screen. I am thinking this is due to thermal throttling of the Raspberry Pi processor in an attempt to prevent sudden death from overheating. I confirmed this was not due to ram overflow by swapping the Pi out with a second one I own that has 8GB of onboard ram and it did it too with minimal use “on the air” back in the shack at home. So my solution is two fold, one is to install a fan on the main heatsink for the power amplifier in the RF deck and a second fan pulling air through the radio chassis where the Pi is located in an attempt to cool the processor as well. I know this will increase current draw from the battery, but I am not concerned with this as my activations normally don’t run over two hours at a time and this limits amp hour usage to usually no more than 3 or 4 amp hours, which even my smaller battery can handle at this time. If adding the fans runs the draw up to 5 amp hours or even 10 in an activation, then I will just take a bigger battery since this is not a backpacking radio in my book. Also, it did work at 25 watts down to 15 watts, depending on band and SWR, for the whole activation. If I were to just turn the power down to 5 watts, it probably wouldn’t get warm enough to matter on the power amplifier considering the size of the heat sink on it. This means I will probably install a small toggle switch to manually cut the power to the fans should I want to run it at true QRP levels in the field. I also plan to wire the fans through a circuit that will automatically turn them on and off as needed to prevent them from just drinking the battery dry when they are not needed. This involves a small temperature sensitive resistor called a thermistor in a voltage divider and a transistor to flow current to the fan. This way if the radio doesn’t get very hot, it wont come on at all. I think I did the math on this device and it will bias the transistor base at about 105F degrees, which is about right for it to protect the electronics. The processor cooling fan could be done the same way (and probably will) but I don’t want this fan to be very large so I am searching for a small 12 VDC fan for this application and also I want to see if I have room to install the processor heatsink, which is not currently installed. This alone will help tremendously, but with long activations the heat will eventually soak the heatsink and we will be right back to square one. This is why I want to add forced air flow to the system…
Even with all the heat buildup, the radio trucked right along and I put over 50 contacts in the log on the first outing! I even got some from overseas in the log!!! It is always good to get some DX in the logbook. I really liked this radio for a station that will be near the truck. The reason for this is that it is fairly large and heavy compared to my other radios, well maybe the Argonaut 5 is similar in weight. This is one of the reasons the Argonaut 5 doesn’t go on activations that stray far from the vehicle too. That guy is heavy, and it is a fairly fragile radio like the sBitx V2. So who knows what I will end up using it for, but for now, it will be one of my POTA radios.


All that aside, the radio works really well for the most part and over time this will be a wonderful little rig to run on activaitons. I plan to get it going on digital modes as well so I can work contacts on FT8, PSK31 and RTTY as well since it does all those modes natively and without the need for an external computer. This was one of the main reasons for getting this radio, I really didn’t want to have to bring an additional computer to the field to do digital modes… Anyway, with all that said, I packed up and on the way out found a few deer wandering around the area and I was able to get a photo of one of them. That was just icing on the cake for a day with so much activity and fun and getting to use my new radio. So until next week, get your radio out and go make a contact with it!

POTA Activation AAR and some antenna testing.
Let’s take a look at hamstick antennas and see how they perform without tuning the counterpoise for each band.

No POTA outing is complete without some good ole McDonalds java to get you cranked up. I normally make my coffee at home but today I was in a bit of a hurry so I went through the drive through and picked up some of their magic water. Today I chose the Sittons Gulch parking lot at the bottom of the mountain as it is significantly closer to my home compared to the upper lot. Google Maps says it is a full 15 minute drive from one lot to the other. So operating from here gives me an additional 1/2 hour on the air. That is awesome.

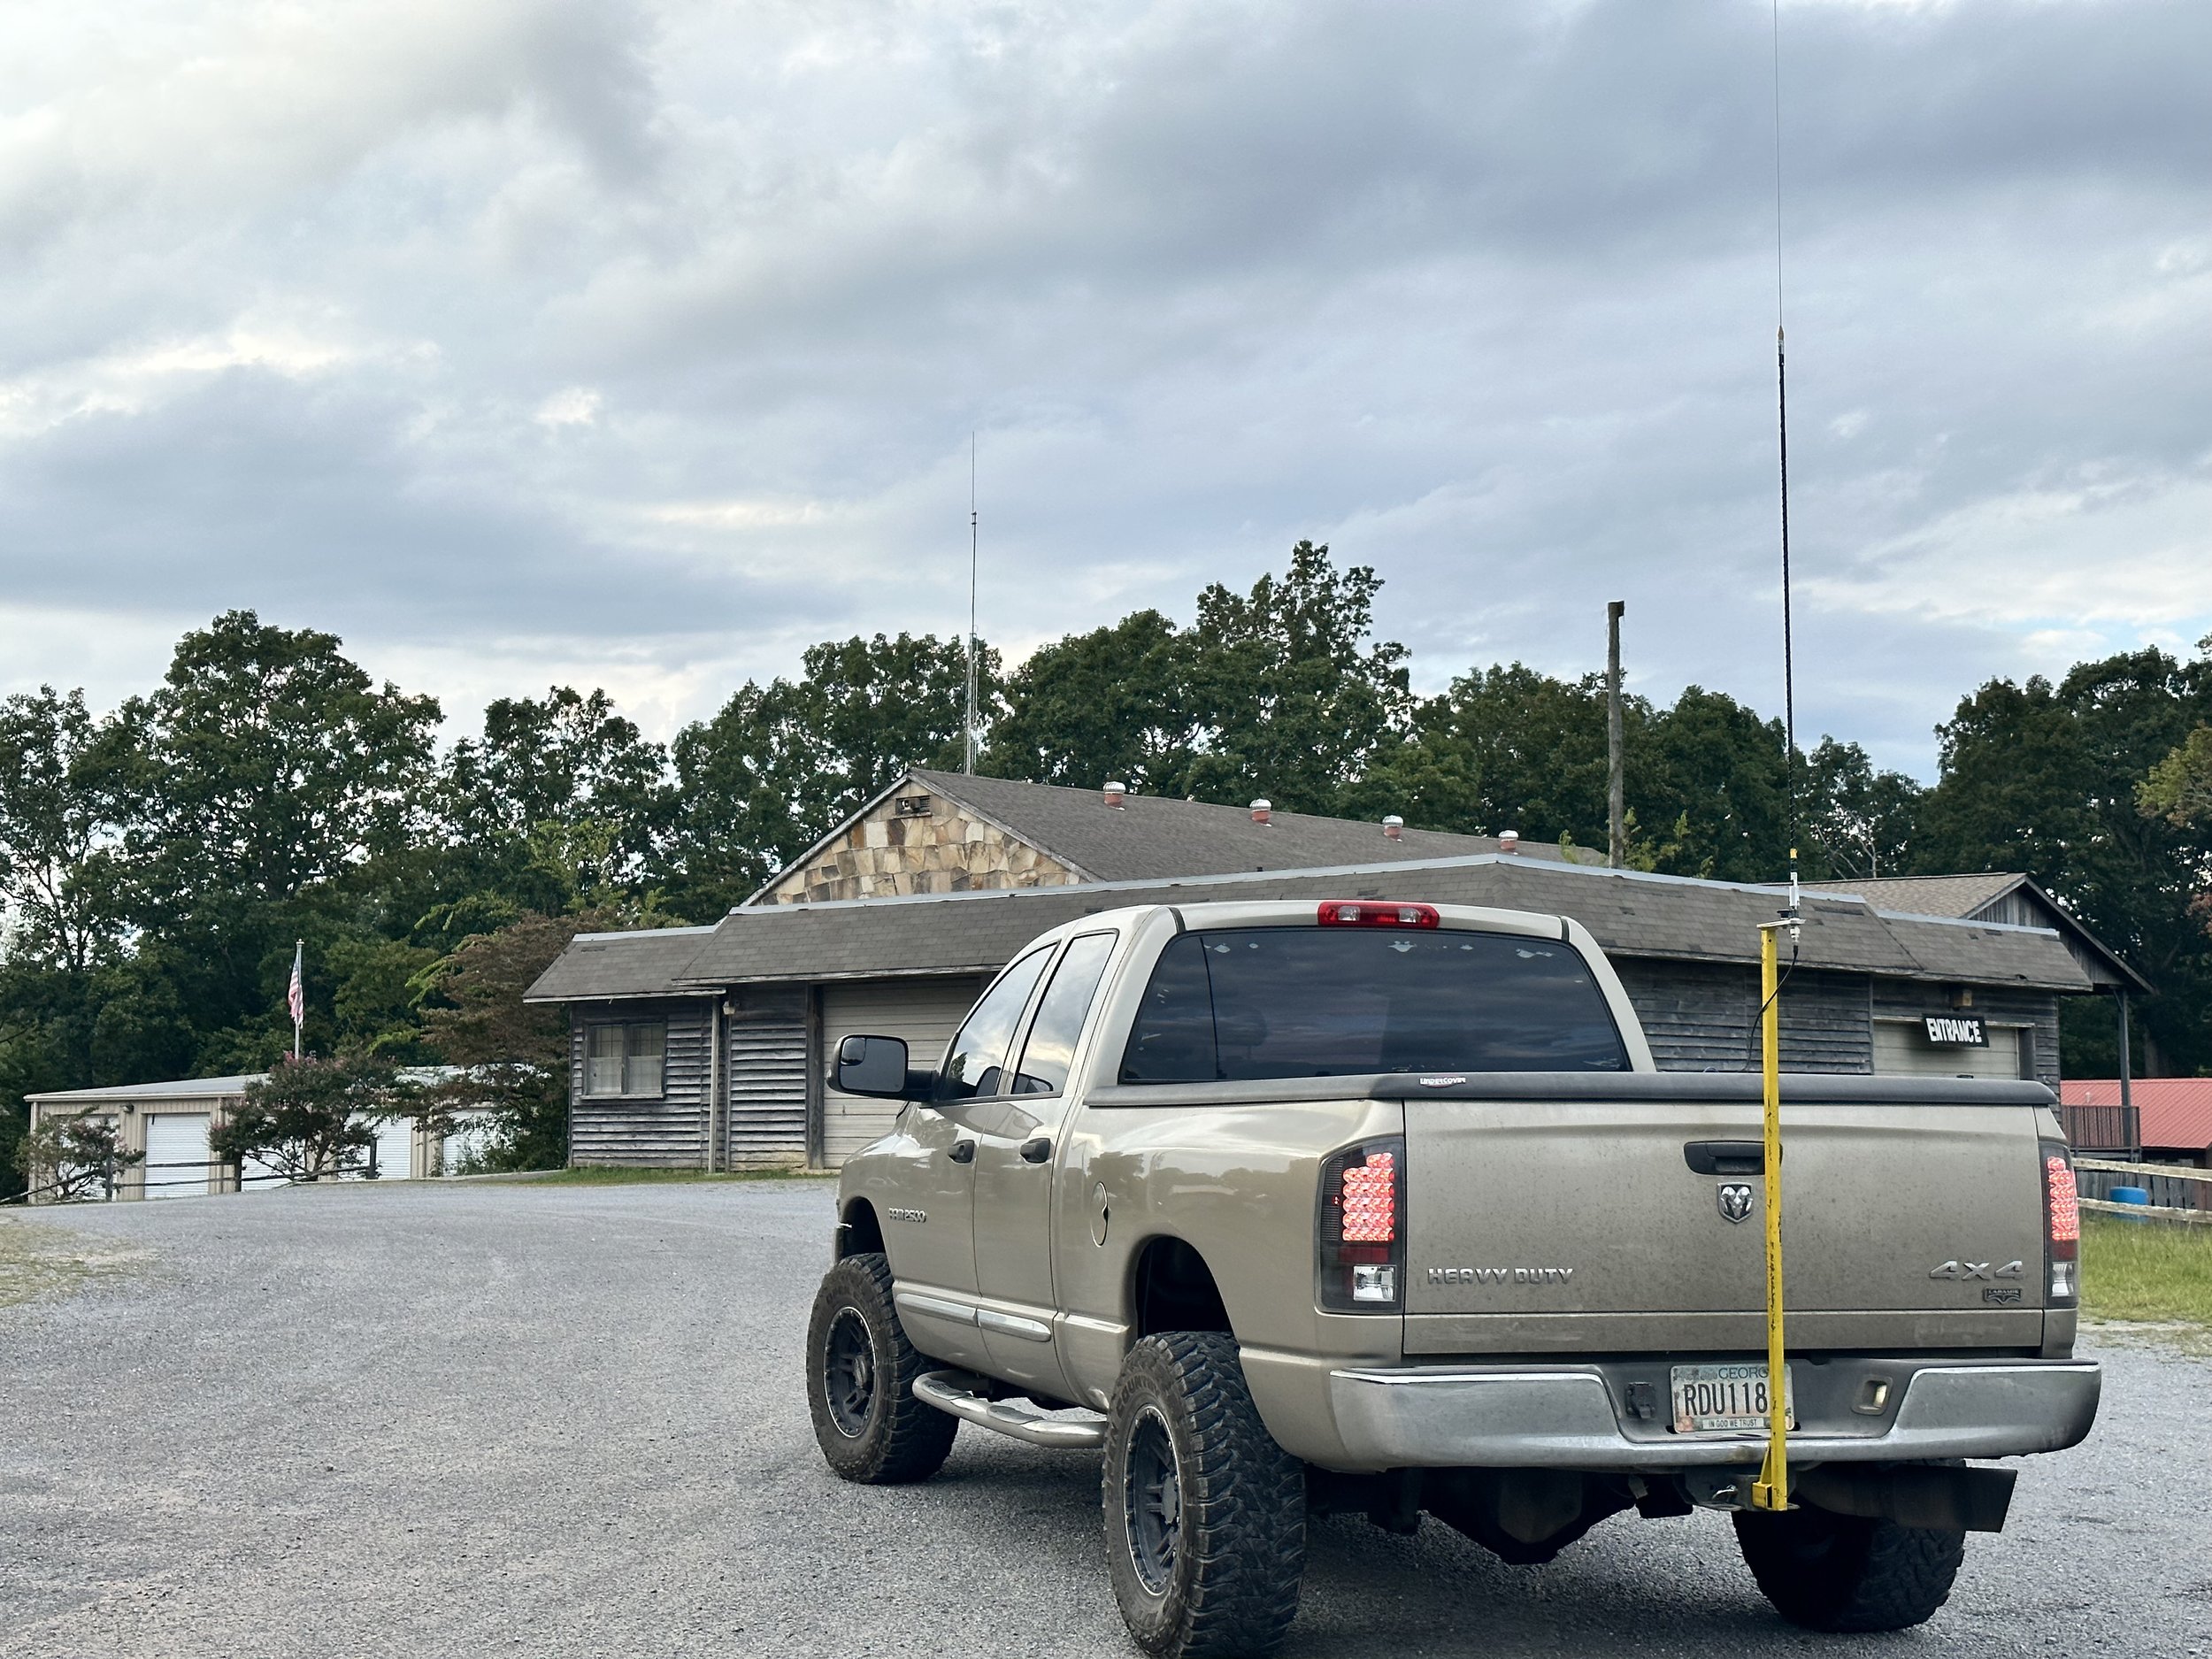
So I setup the station in the truck today and learn a few things that I didn’t know before. One is that the power port on the dash I use is not great at carrying the load of a 20 watt radio. I can see the voltage dip to almost 11 volts on transmit. This is not good. So I opted to switch to the battery and get the voltage back to where it needs to be. This means that I now have another side project to fix this socket… But I am also going to install a direct power feed to the cab of the truck for my winter time ops so I can power the radio off of the truck batteries directly and install a anderson powerpole outlet inside the truck.

Today saw the battery deliver another 2 amp hours of supply, that is four total so far for the 8 amp hour cell. If I get 6 out of it at this point, I will be happy. It is over a year old at this point and it is still going strong. This is not some big name brand battery either but rather some cell I found on Amazon last year. It has seen many activations too. I used it heavily when I was using the Icom IC-705 and kept it in the backpack with the radio. Then when I transitioned to my Penntek TR-35 I used it with that radio for months. So this battery has seen a significant amount of use. I am impressed.

Another thing I have been doing is testing the antennas on the same set of radials (the set I tuned for 40/20 meters) and just switching out the vertical radiator only. I was pleasantly surprised at what I found out today to be quite honest.
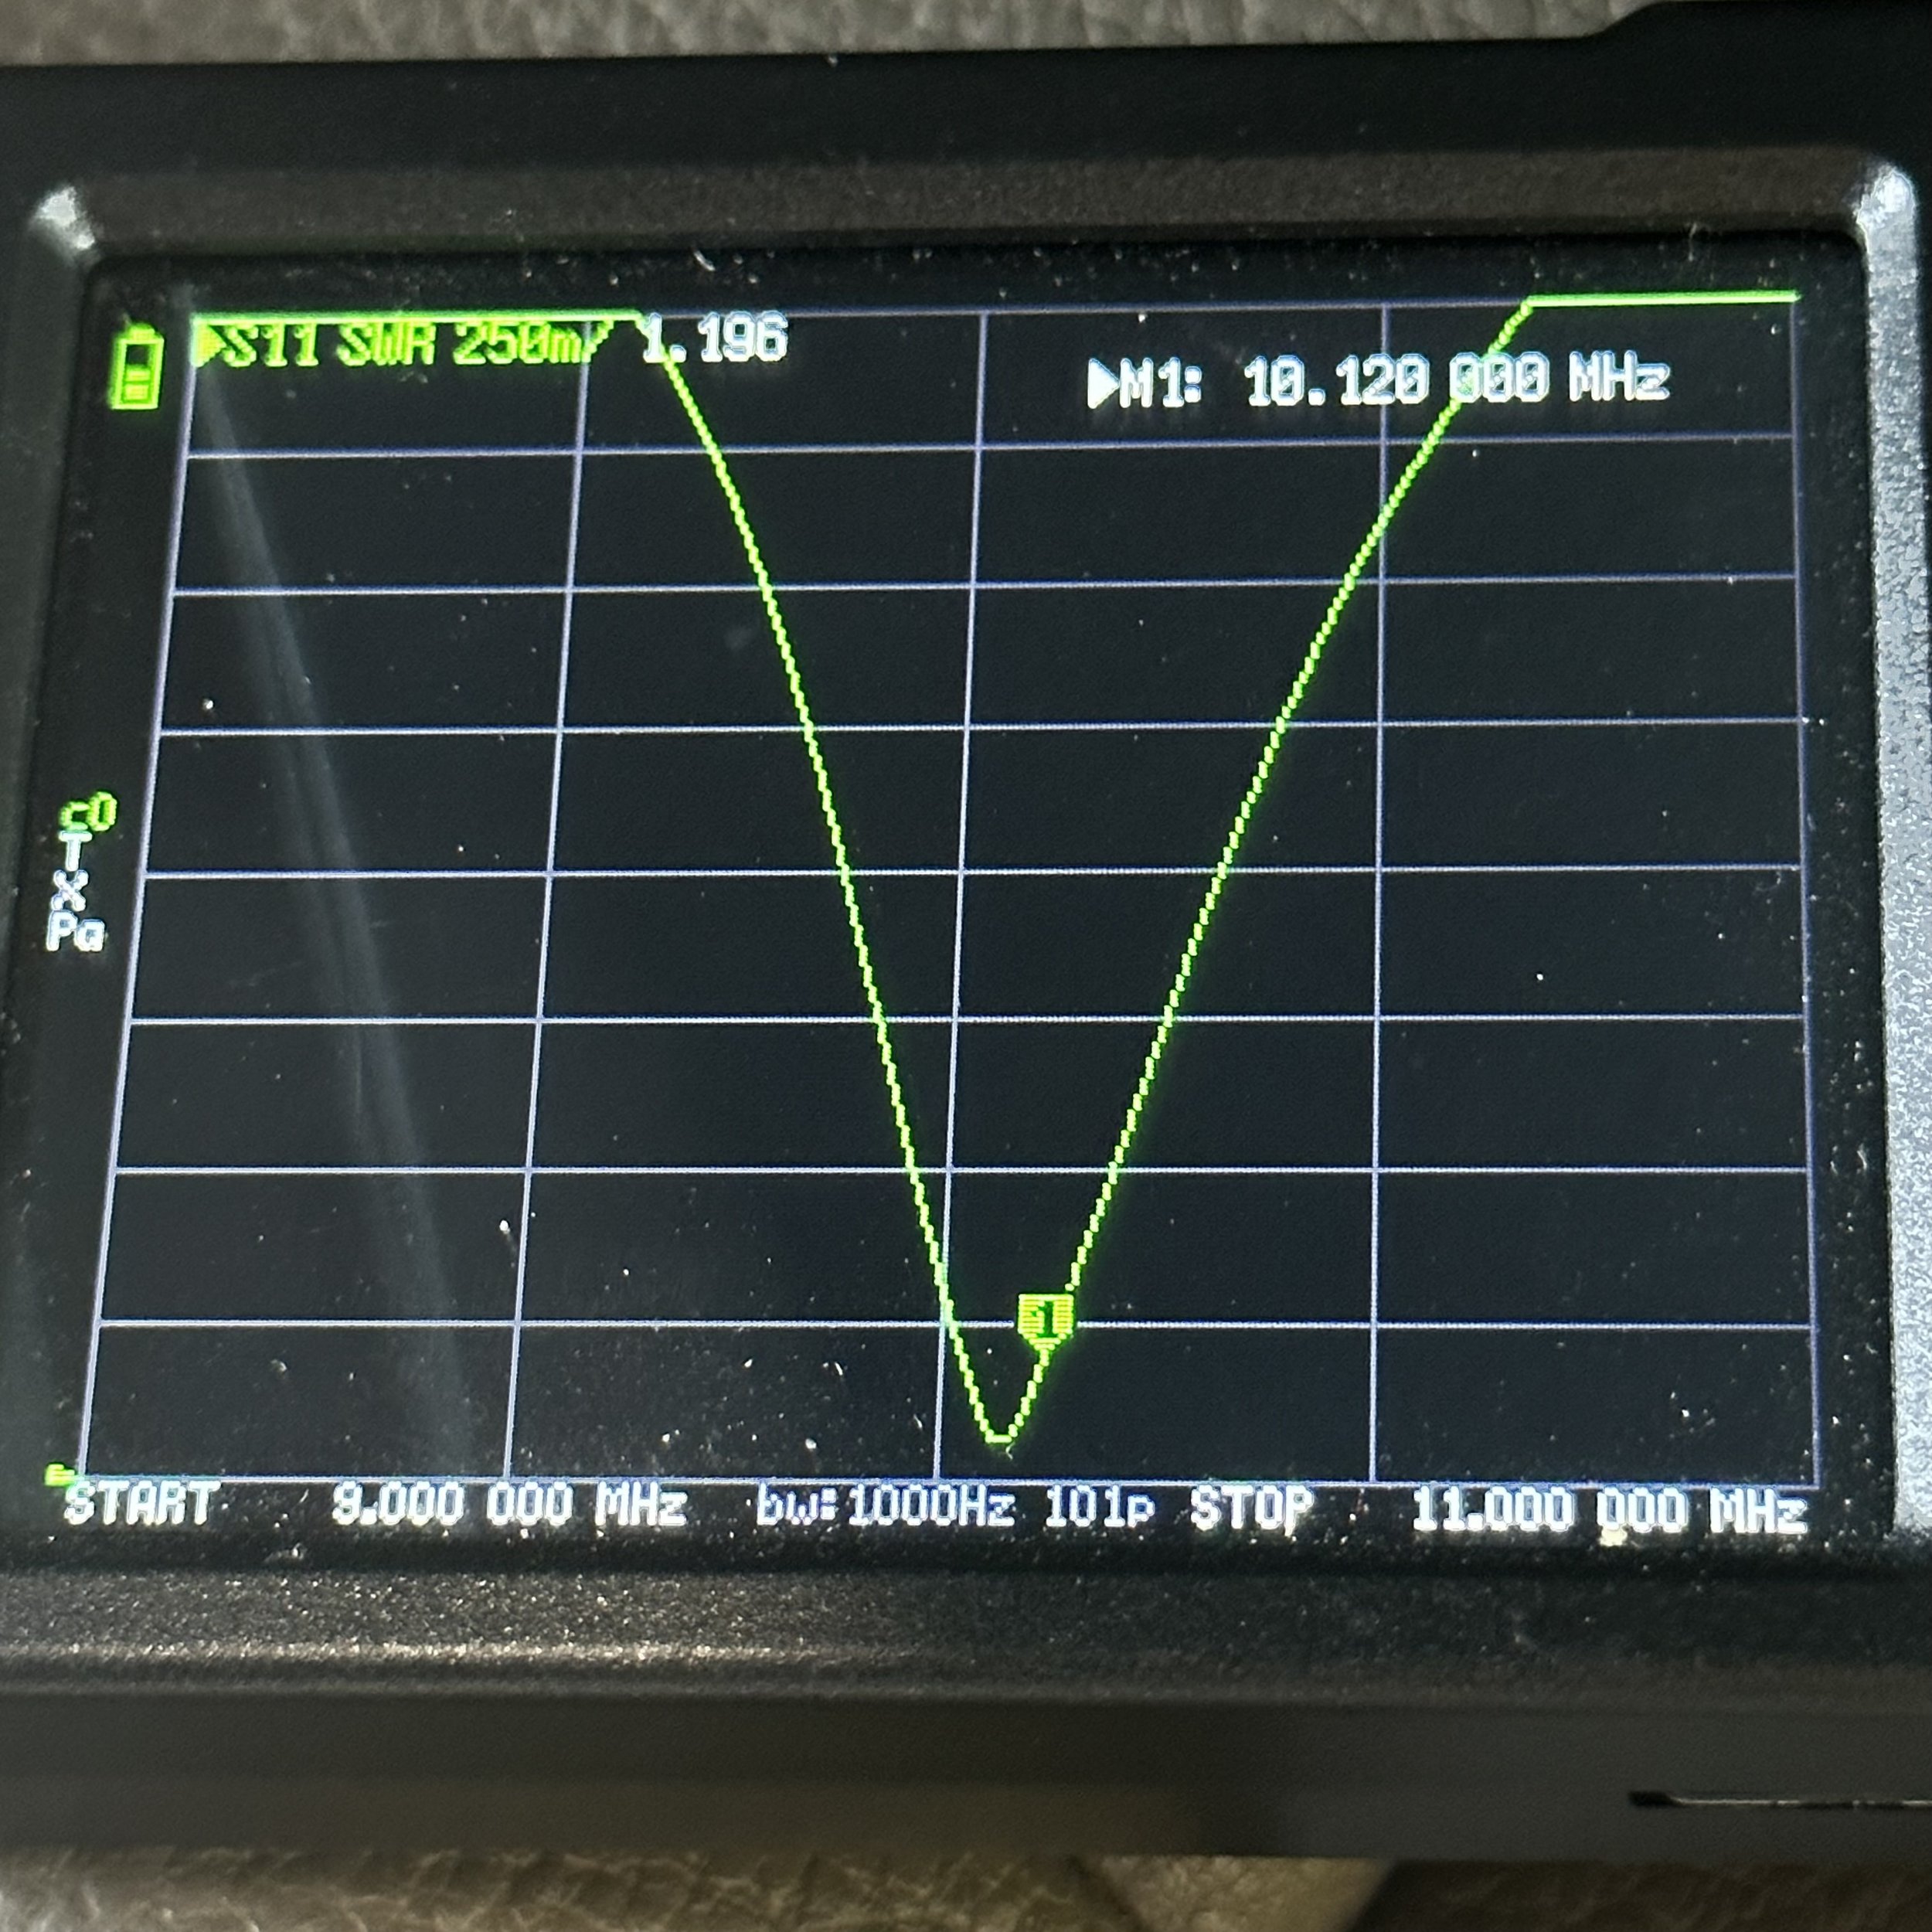
Ham-stick antennas work shockingly well for what they are. So well in fact that I am about to go on a 10 park rover operation and use only the 20 meter ham stick (unless the band closes then I will move… lol) for the whole event. My strategy being that 20 meters is the most popular band by far so I should be able to get ten contacts at each park pretty easily. This should give me the best odds at completing my rove and making it to ten in one day. Below is the report from my nanoVNA showing each band I have a ham-stick for and just using the same counterpoise every time. (Side note here, I was also deploying the counterpoise differently too so as to keep them out of the way and this also affects the antenna, see the photo below there is a photo further down in the post showing them). The plots are arranged from the highest band to the lowest but after seeing the results, I don’t think it matters as I dont see a pattern to be honest.

15 meters kinda threw me for a loop. I need to trim the “stinger” some and push this one up into the band more. The null is actually at something like 20.250mhz so yeah, this one needs work. I didn’t have my cutters with me or I would have done it right then. Even so, the SWR was still low enough to get on the air and I was getting RBN reports as high as 20dB which is phenomenal for a 15 watt signal out of a ham-stick several hundred miles away…that is off-tune.

17 meters also caught me off guard. Look at that plot with radials tuned for 20 meters instead! Ft8 on this band will be epic! I have plans to start doing some digital modes during POTA outings in the future so I am happy to see this.

20 meters actually needs trimming too. I have known this for a while, but it is close enough for CW so I have not bothered yet. As you can see, at 14.060mhz on this day, with this radial arrangement, it was still less than 1.2:1SWR. I have had this particular radiator the longest out of my entire collection and bought it last year in anticipation of winter ops. Which it worked perfectly for me in that role. This is why I have slowly collected the set I have now. They just work.

30 meters is honestly the best looking lower band out of the three that I have. 20 is tuned low and 40 needs some help with more radials (most likely), but 30 meters lands just right, with the null point covering the whole band.

40 meters is odd to me. It works and has respectable SWR even with a poor radial field but I would like to see it even better if possible. I think this is more to do with the antenna design and poor counterpoise than anything else. The other bands work great but this one is just not that awesome and I am still sorting it out. Dont get me wrong, 1.46:1 SWR is great but I think it can be alot better. I just need to dial in the counterpoise or something. I am also going to setup another trace on smith chart to see if I am capacitive or inductive and not purely resistive. That might be part of the problem. The SWR plot is nice for simple and quick checks but there is more data to consider. More to come on this…


I did all my tests with the common mode choke installed so I would know what the radio actually is transmitting into. This way I dont get surprises along the way from things not being like they were when I did my test.
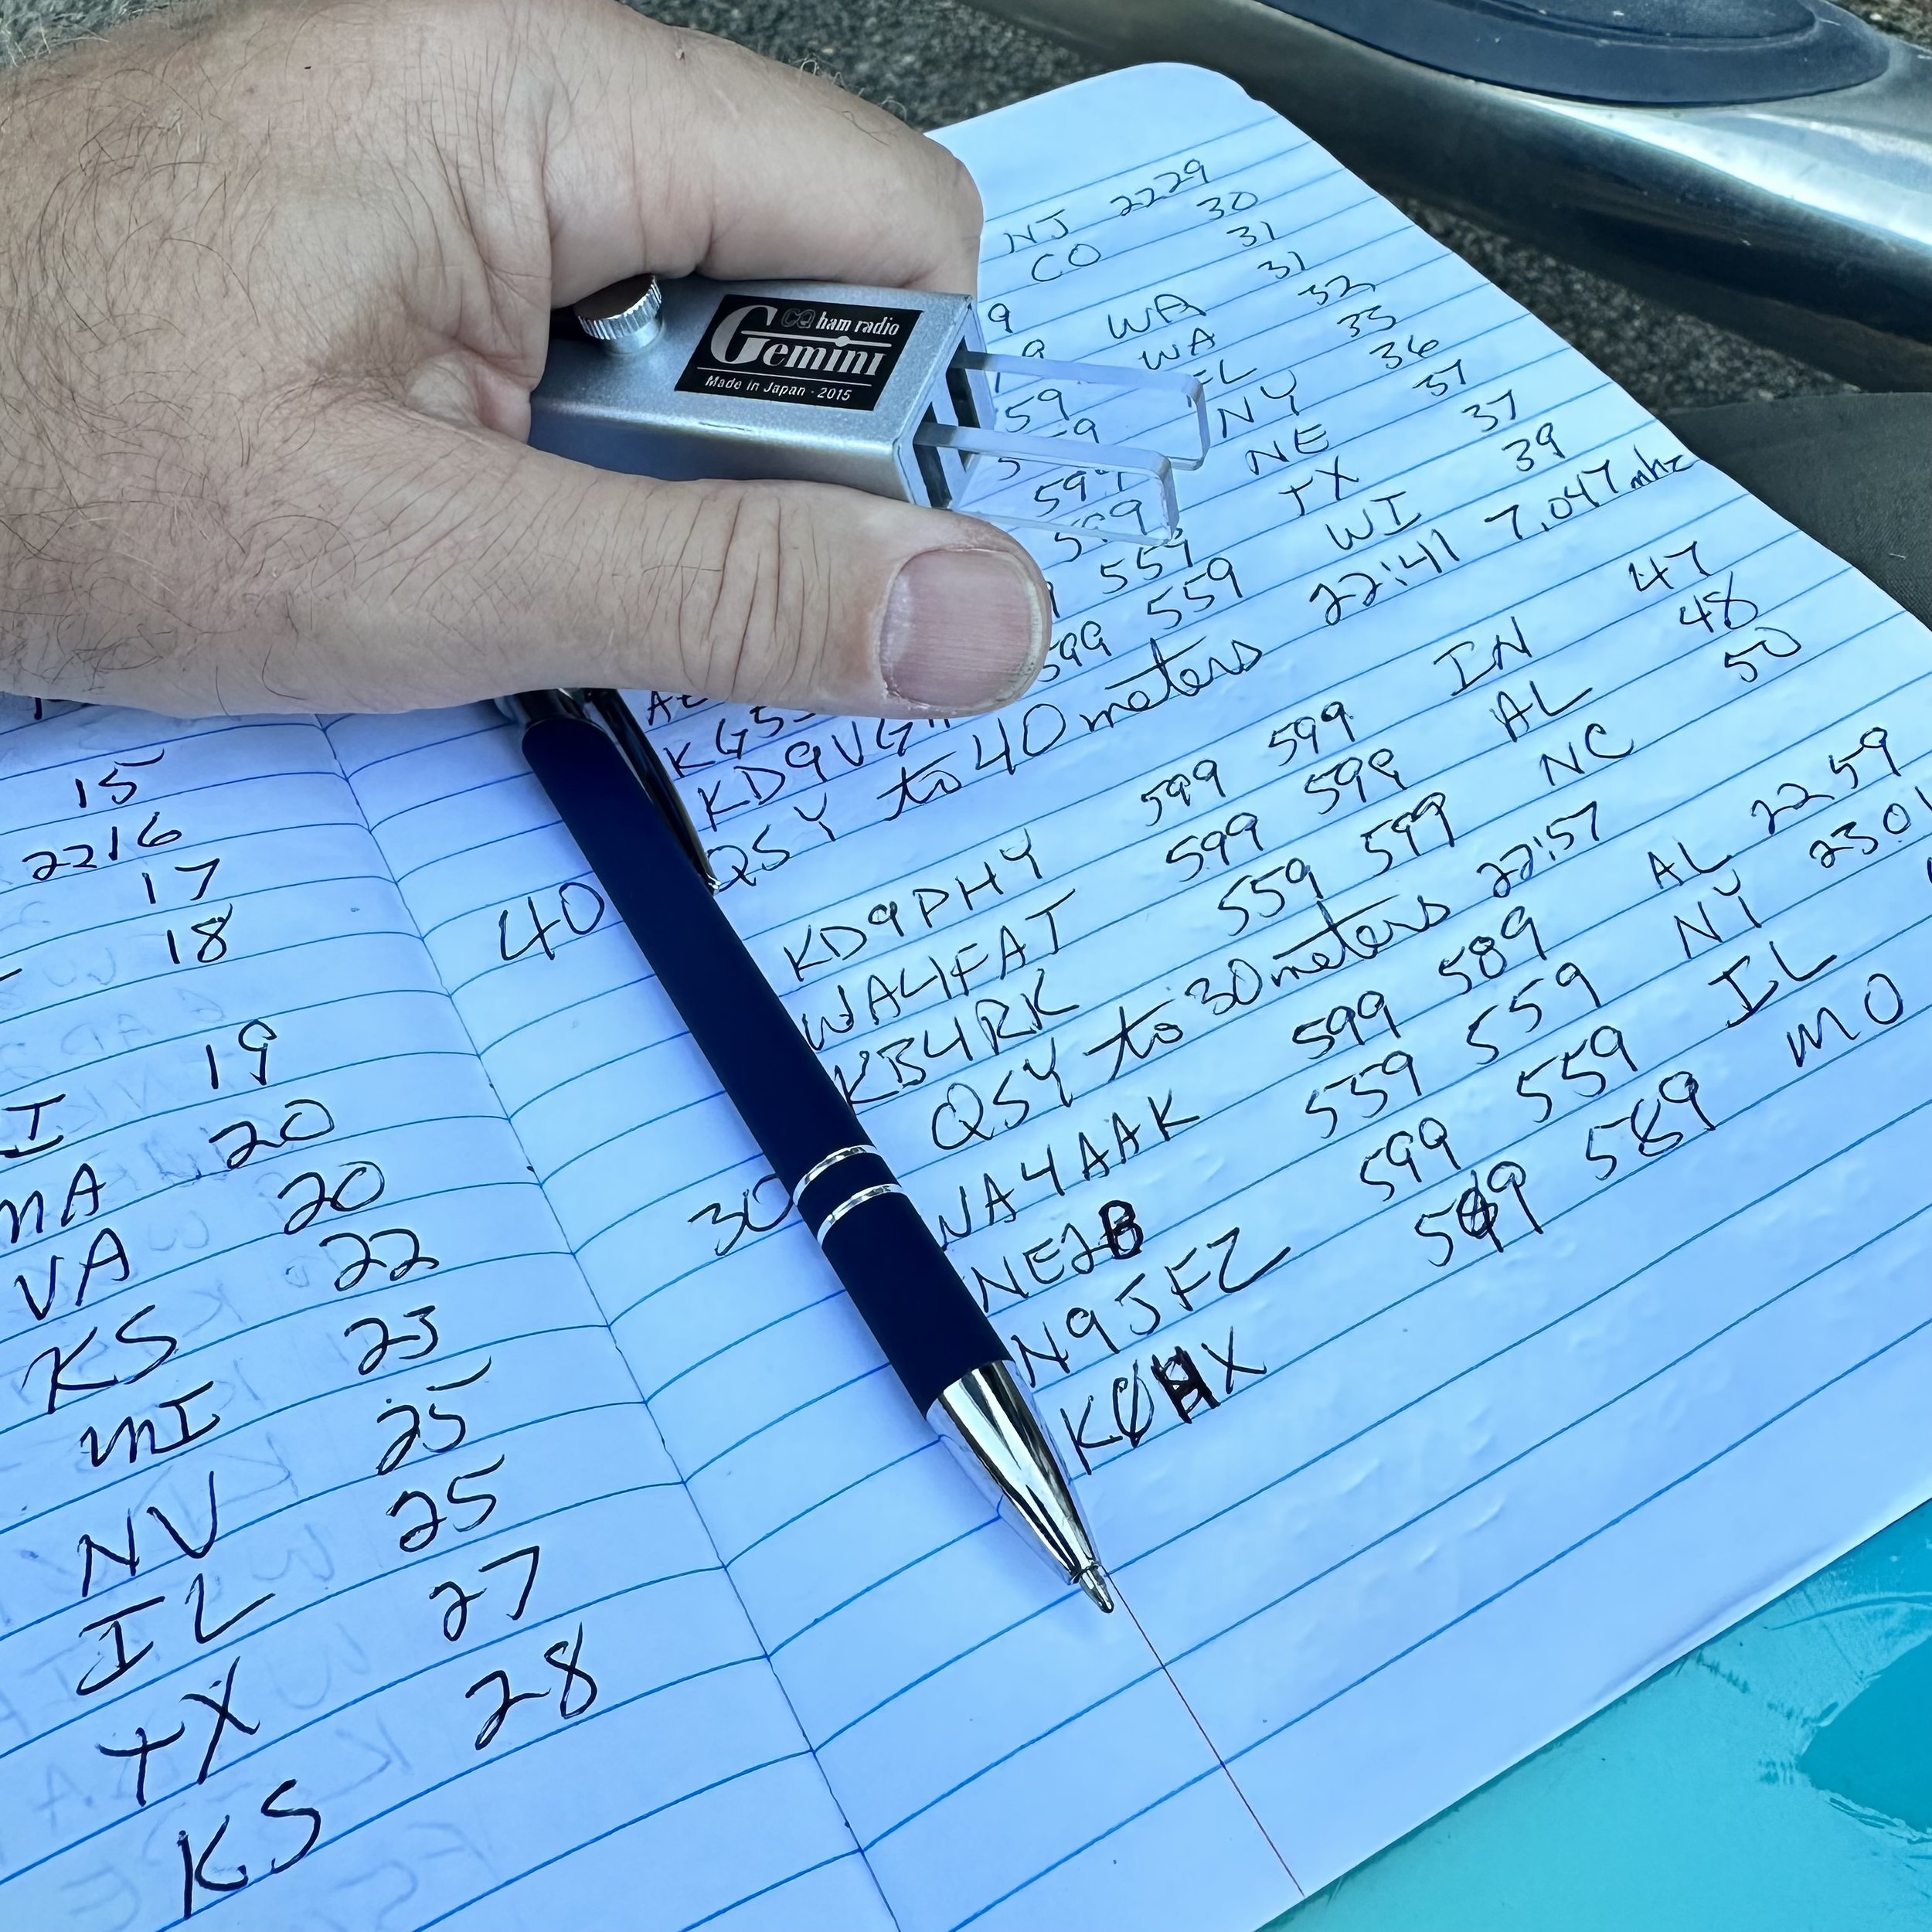
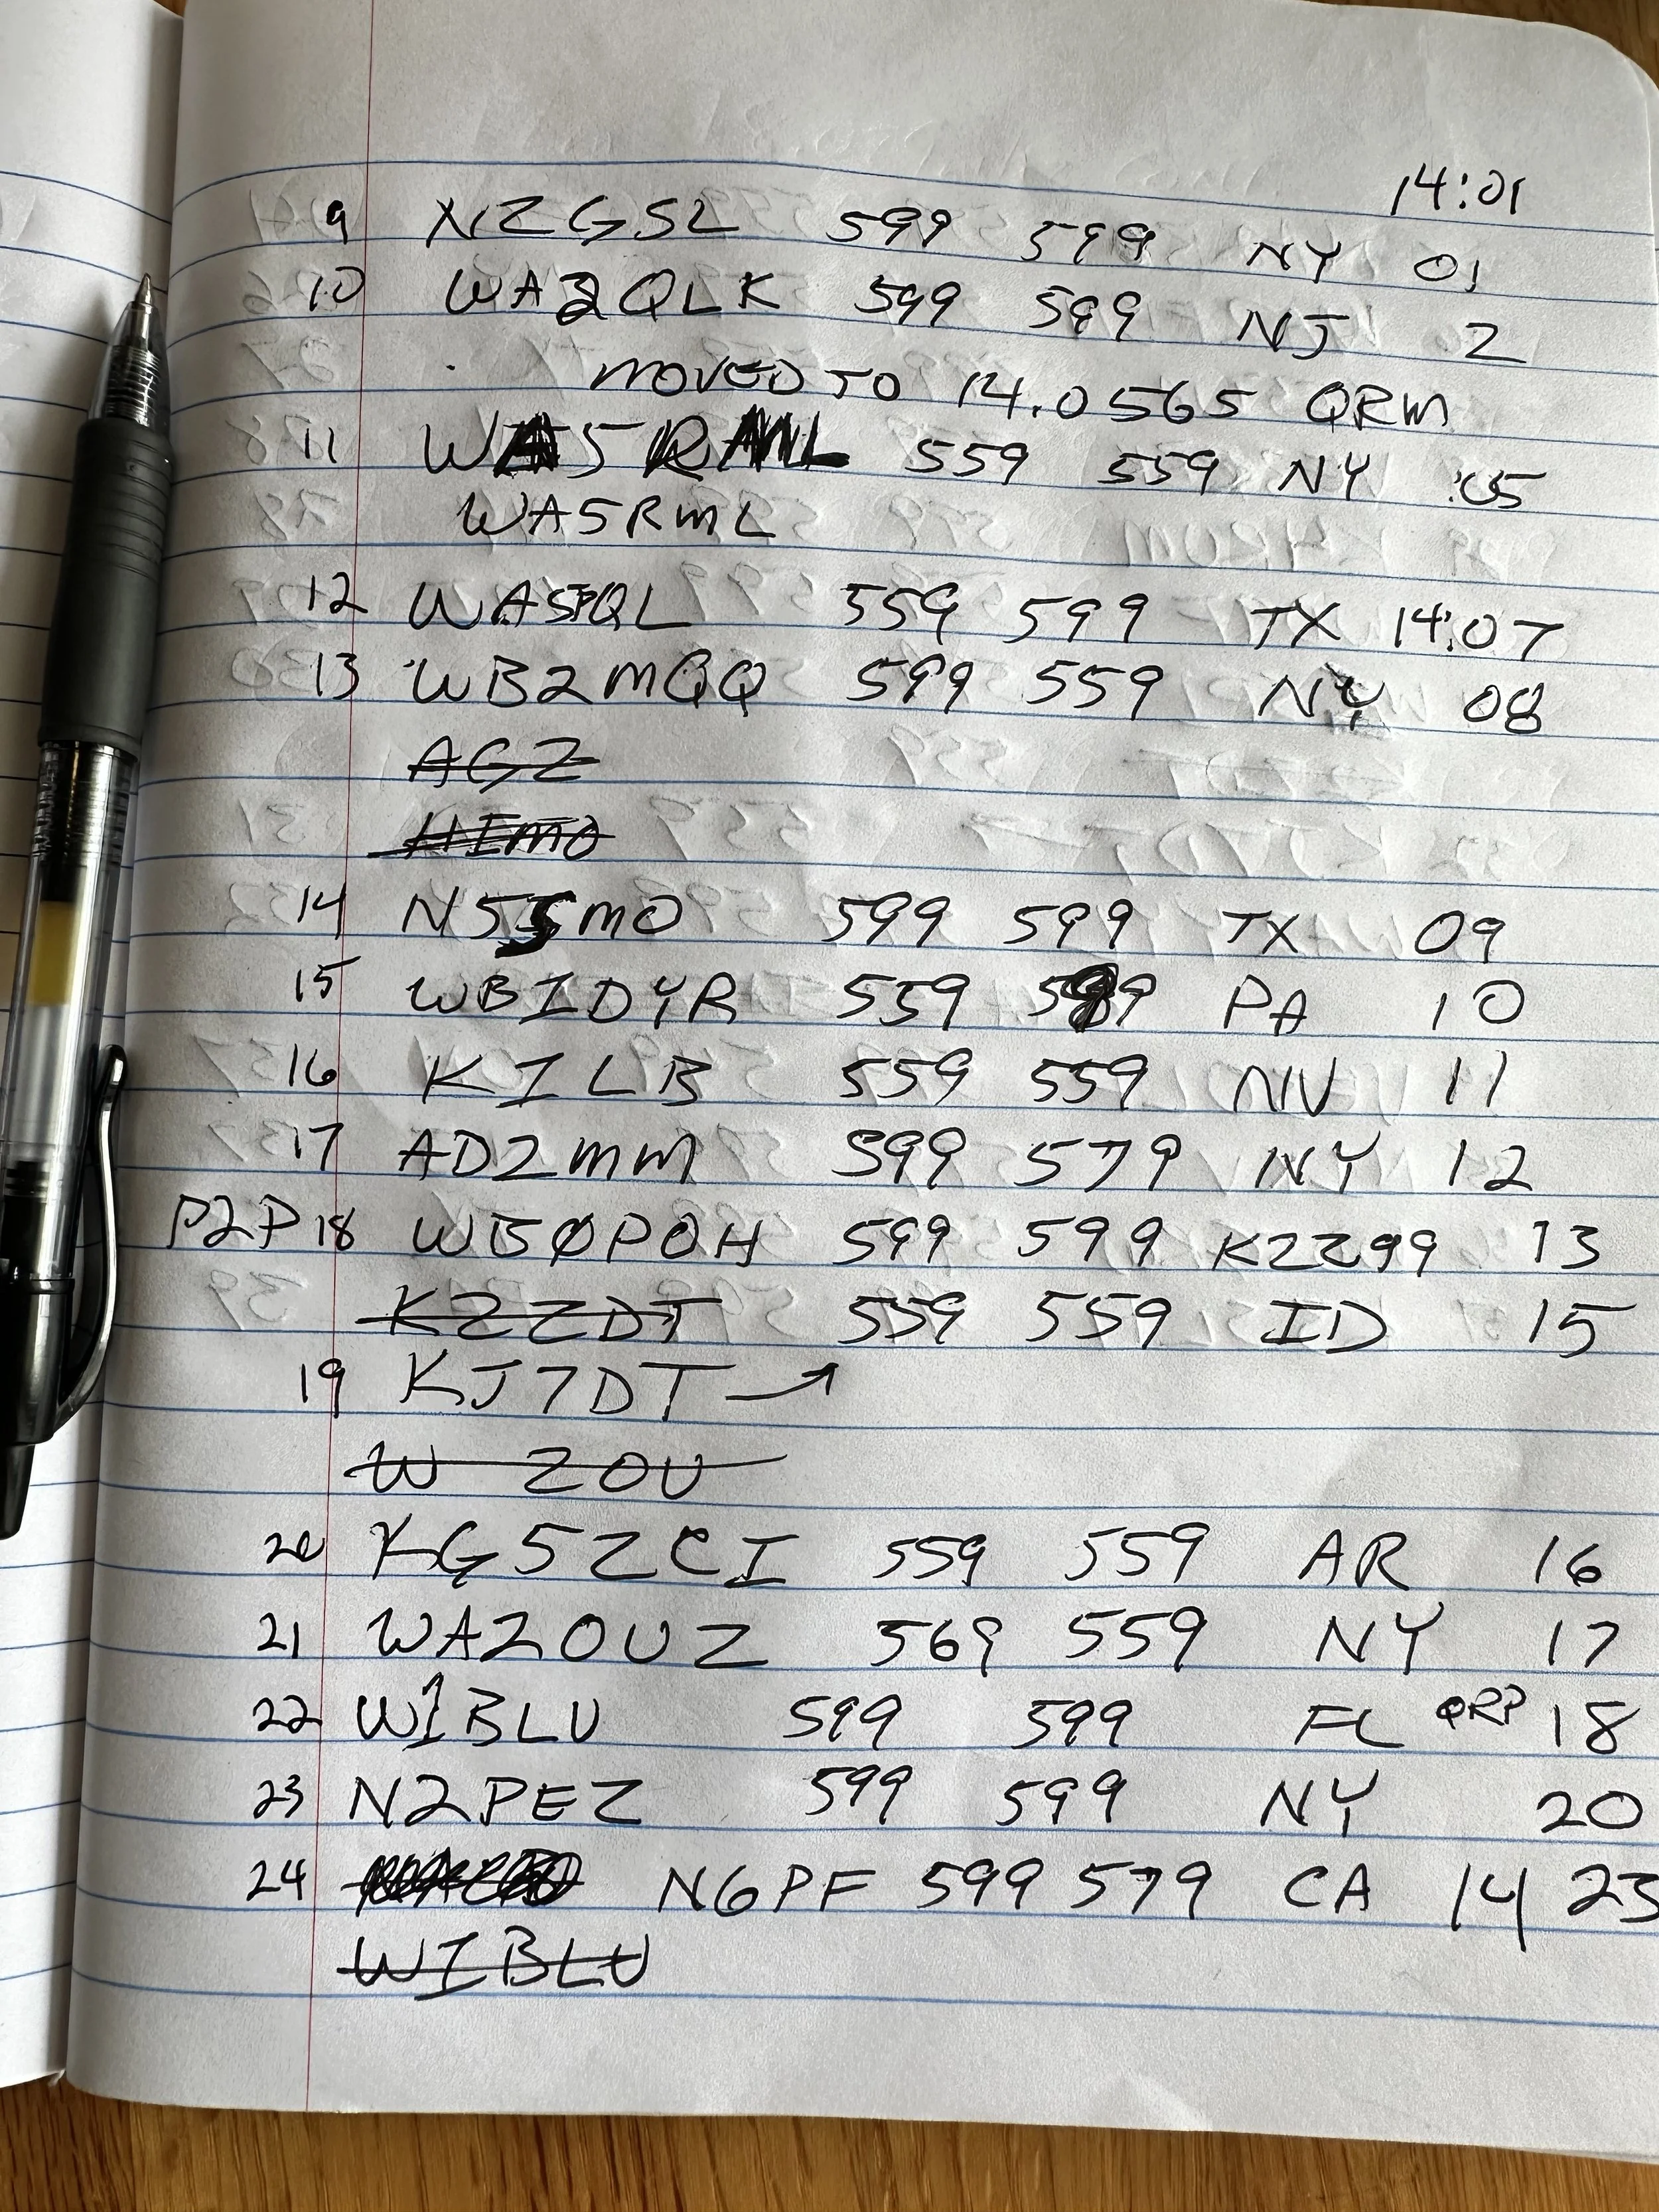
The logbook today looked good too. I didn’t have a long time to work the activation so I was happy to see 23 get into the log today. That is a good day for me. I was a little sad though since I was getting picked up on the RBN and could hear stations on 15 meters but no one could hear me… Oh well, maybe next time.

I messed up the sequence and had to correct it. Hence all the scribble in the margin… sorry about that.

Thanks for coming along on this after action report, hope to work you on the air soon!
72
WK4DS
A POTA activation that was incredibly rewarding!!!
When we activate a park we never know what is going to happen.

So today is Labor day here in the USA. This is the first Monday in September set aside for the workers of this country to grill out with their buddies and such as that. So for me that means going out and setting up a POTA activation somewhere. I decided on Cloudland Canyon after deciding that the drive time to other parks would make the activation very short for me and I wanted more time on the air instead. I choose the upper parking lot since I wanted to use my hamstick system instead of rigging to the trees today. The trees I normally use have a lot of traffic today from hikers and I didn’t want them tripping over antenna wires all day so this just made sense. As you can see below, there was plenty of room for me here today…

I don’t know if I have shared this or not, but I have converted all of my hamsticks to this QD system so band changes are fast. It works really well, I do need to retune my antennas though as this did lengthen them a little and now they are all low on the meter for their center frequency… always something to do…lol.

Once installed, these mounts work really well and the tune is very stable, I have not seen it change at all from the numbers on the VNA since adding these QD adapters. So if you think you might want to use hamsticks for POTA, I really like them. Now to be honest, I don’t think I would use them for mobile (in motion on the roadway) use as there is a lot of leverage on this little mount and the spring is not that heavy to me, they might work fine like that and probably have been deployed that way, but for me, this is a site setup tool only.

Another reason for the hamstick setup is the use of the truck for shade during the activation. By strategic positioning of the truck I can leave the doors open with the engine off and not have RFI from the operating parts of the truck to contend with as well as having a natural shade from the sun too. I use this trick a lot when I don’t have a ton of time for an activation and want to operate in inclement weather like rain. Simple and robust, plus the system just works, look at the logbook below and tell me how hamsticks don’t work…

I carry all of the stuff in the photo below in the hard-shell case that I keep the Ten Tec Argonaut 5 in so I don’t have to search for cables or things like my key. It is all in there and I just grab the case and go. This makes life so much simpler for me. Seen in the photo is the Ham-gadgets Pico Keyer and the N3ZN tiny CW key I picked up at the Huntsville Hamfest. Once I get all the parts out of the case I close it up and use it in the passenger seat for the hard surface to place the radio on so it is out of the way while I use the center armrest for logging and sending CW.

Here you can see how simple the connection scheme is when running Hamstick antennas, there is no tuner or interconnecting cables, just the RF choke to the coax, the power cable (I plugged into the truck’s cigarette lighter port today) and the CW key cable and nothing else is needed. Simple is king here and it also makes setup fast. That is another reason I like using CW instead of other digital modes with this radio as well as my other radios to this point. They all need a computer and a sound card to get them to do digital modes (other than CW) and I normally don’t have a ton of time for all that setup and getting it going. CW is on the air really fast, like SSB. You can also see the silent fan mod I did a while back (there is a blog post showing what I did) and I really like this mod as it eliminated the fan noise entirely. I need to make a screen to protect the fan though, that is still a project to be done…

You have seen this view shown below in the past, but I included it today since I got the moon in the photo too… lol. I do like the system I have built for activating a park with a hamstick, it is really fast to deploy and when I do a rove, I simply coil up the counterpoise wires and lay them in the truck bed. pull off the radiator from the QD base and lay it in the bed of the truck too, unplug the coax and coil up the portion to get it inside the truck and I am off to the next park. The antenna mount can ride in the receiver hitch easily enough so it is not an issue. This sounds like a lot but it literally happens in two minutes tops and I am driving to the next park.

Another thing I did today was hook up the inline power meter. Now I don’t remember why it only shows 8.9 watts of output. I had the radio set to 15 watts forward power so I probably took the photo after I let off of the key as the amp hour meter doesn’t clear till you disconnect it from power. I don’t remember if I had it in tune mode or if I was simply sending dashes. But what I was looking for was the total amp hours of use, this tells me if my little 8A/h battery would hold up to a heavy activation. From this meter reading it will. Now remember, this is with the radio set to 15 watts too, so under a normal activation of 5 to 8 watts, this would last for many hours. Today I went for two hours and got 70 contacts in the log and only used 3.68A/h and that makes me much more confident in using the smaller battery for activations now. I had my concerns before but now I don’t. Another point here is that I normally try to add something else to the activation that has to do with information gathering so I also learn something that I didn’t know before, today it was the amp hour info.

So I get to the park and take my time and listen to the bands a few minutes once the rig is installed and decide to start on 40 meters as the noise level was really low today. I get on the air at 13:25 UTC (9:25 local time) and start calling CQ… It didn’t take long to secure the activation and I had not left 40 meters! I don’t get on the lower bands too often as I am not at the park at night when the bands are less noisy so I don’t get the hams in the closer states like Tennessee or Georgia, it was really nice to get some of those states in the log for a change. Hanging out on 15 and 17 meters nets much more distant stations so I have to remember to come back to 40 every once in a while…

I then move to 30 meters for a little while to see what I could do there and work several more people on 30 meters in about ten minutes of operating. 30 meters at this park is a crap shoot to be honest, some days it is quiet and some days it has this intermittent computer noise that just shuts the band down, today the noise was nowhere to be found to my delight!
Then…I…got…on…twenty…
First off, who doesn’t work Bill (K4NYM) if he is booming in to your station and for a Park to Park no less? So I hunted him before setting up on frequency. It took one try, he is an amazing operator and I aspire to operate as efficiently as him some day.

Things take off once I park on a frequency and start calling CQ. I promptly work a page and a half of calls then I get the one you see below. Not one to brush off anyone calling me, I take the time to have a nice QSO with him as he is working on getting on the air with CW and is having to do head copy only…I later learn… So I take the time to write down what he is sending so I can read it and respond when it is my turn. Turns out he is just now getting back active in CW after taking a long hiatus from it and also, he cant see, hence the head copy only. Talk about a person with conviction, he never gave up. I was so glad Justin called me and feel honored he felt confident in me enough to throw his call into the fray of POTA not knowing what would happen. That took guts.


Once we finished our QSO it was back to the POTA game in full swing. I struggled with one thing today more than anything else… stations zero beating me. It never fails, I get two or three stations that due to modern technology, will zero beat me perfectly. This in itself isn’t a problem and is really the most efficient QSO to have in CW, but what happens is that those two or three stations melt together into the one single tone and it is unintelligible. So If I don’t pull you out on the first try, move up or down 30 to 40 hertz, This will make you off frequency enough to sound different and you wont blend with the other stations and I will get you on the first try, this is an old contesting trick and by golly it works, I will have one station that stands out and is clearly definable and the rest is this one huge tone. I never really understood it till I was an activator trying to pull one call out of the mayhem, then I got it. Now when I hunt I leave my XIT or Transmit Incremental Tuning on and set 40 hz high just for this reason.
Once I hit 70 QSOs today I had been on the air for two straight hours so I went QRT and shut down the radio. It was a great activation and I really enjoyed working with a new (relatively speaking) ham on building his CW skills back up to what they were. So till next time get your radio out!!!
72
WK4DS - David
The Penntek TR-35 goes QRO with the OUTCOM OPA-202 Amplifier
You have heard me mention KG4WBI a few times in this blog. He literally has what seems to be a veritable museum of vintage ham gear.

Well in today’s episode of “what oddball, ancient but yet working piece of gear is he going to pull out today” he hands me an amplifier. It is the OUTCOM OPA-202 to be exact and it has a feature we are really interested in. It doesn’t have a keying input which means it is RF sensing only. This stands to reason too as it also takes 1-10watts of RF energy and turns it into almost 175 watts on the output. At least that is what the literature says.

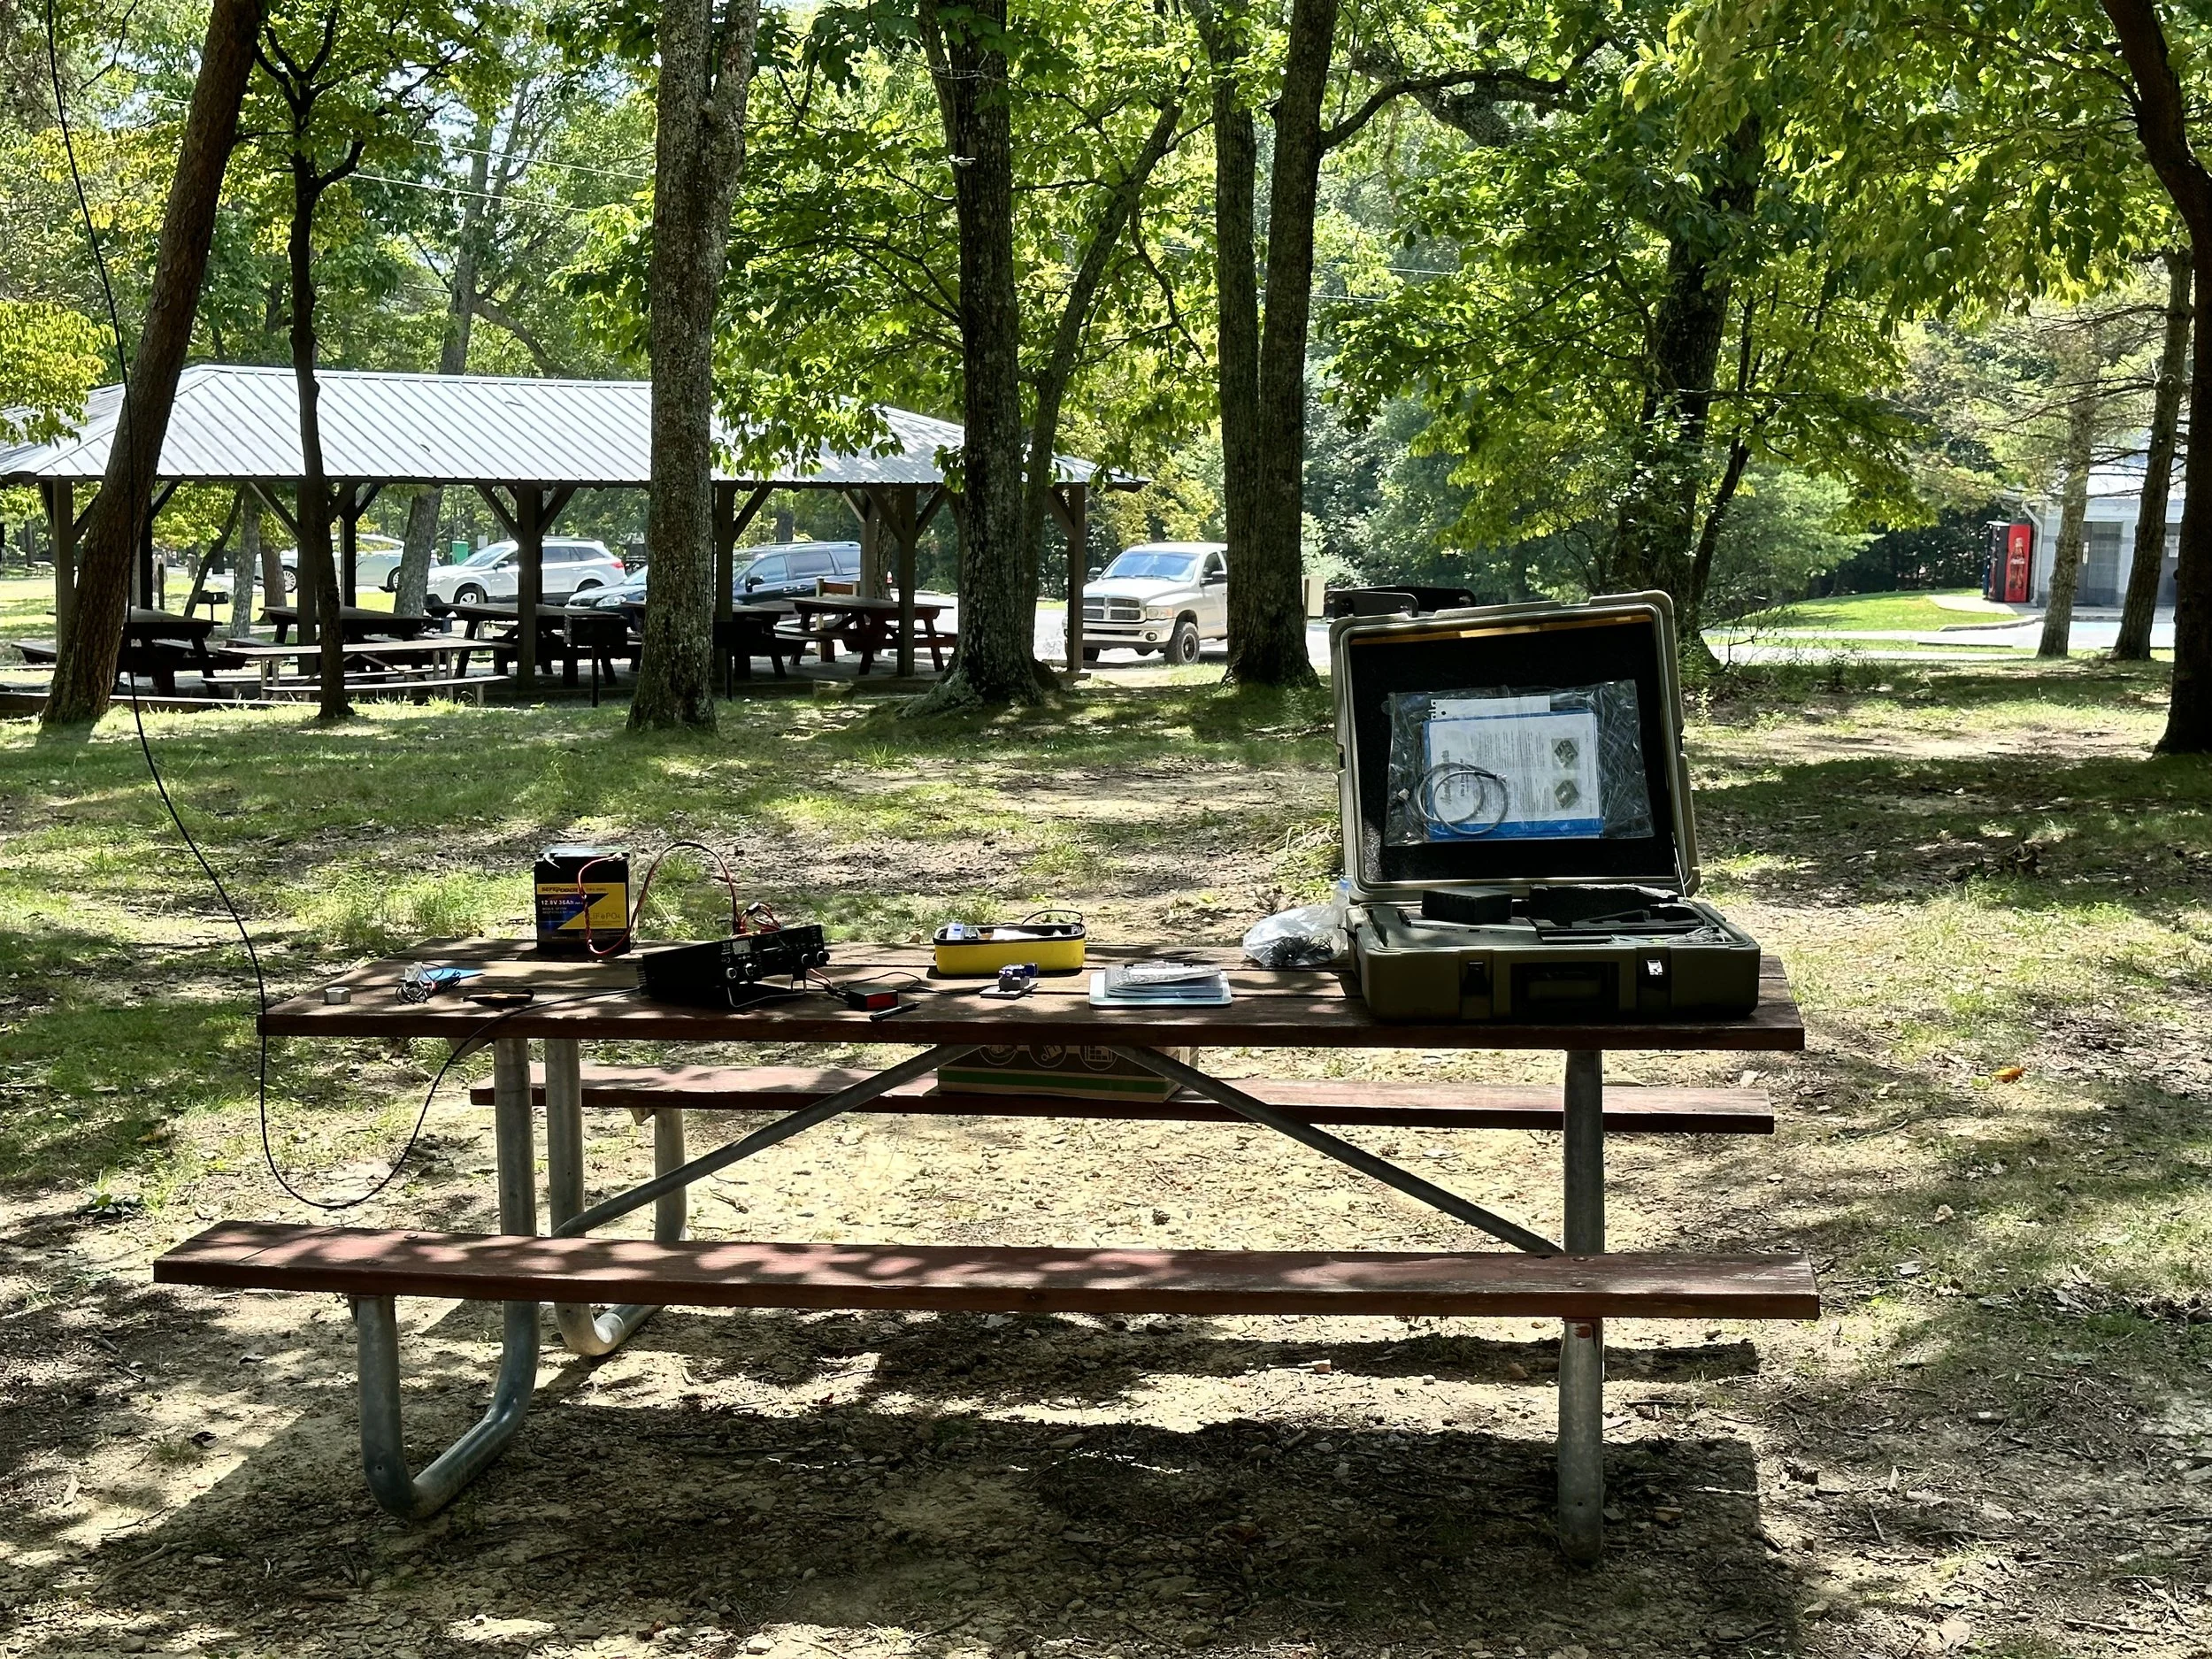
Here is my current test setup for gear, I have a coax stubbed out to the shack bench plus the Astron has powerpoles on the front making for an easy temporary setup location.
Made in copious quantities at what appears to be the end of the last ice age, the OUTCOM OPA-202 was a ham radio amplifier that was designed for 40 meters to 10 meters. Now your going to say, David, I know that…it says that right on the front with the 7-30mhz. I think this was done to target both the CB genre as well as the amateur radio group but I dont know for sure. What is odd is the literature below shows that it is rated for 80 meters too. Who knows what the lowest band it will work on is… I do know it works on 20 meters and 17 meters though as I tested it on both of those bands with my Penntek TR-35 transceiver.
The next thing you will notice is the selection buttons are labeled only for voice modes. This is another marketing ploy to help sell these little power houses. The buttons are actually power output selectors and depending on the combination you can theoretically get up to 175 watts out of this thing. Seen below I have it set to “SSB” mode which turns out to be semi break-in keying and 80 watts out. There are 4 levels depending on how you set the “AM” and “SSB” switches, but it also limits the amount of energy/duty cycle depending on the mode. It actually lists CW in the modes and the output and such, hence I am not running it full tilt. It also has protections built in to keep the over zealous operator from working it to death with long winded conversations. This particular unit seems to produce full break in keying if you select “AM” and semi break in with “SSB” modes. Probably due to the style of transmission coming with each of those modes. AM will produce a carrier the whole time you have the radio keyed and SSB only when you talk. To smooth out the relay action in SSB they have added a 1000 microfarad capacitor and a 470 ohm resistor to the relay keying circuit to keep it closed in just a little longer when SSB is selected so the relay wont sound like a machine gun. Another switch right beside the power switch is the pre-amp switch (REC AMP) which turns on a receiver pre-amp for weak signal work and it actually performs really well. I used it quite a bit and liked in particularly well.

So Roger wants me to … as he puts it… play with it and see how it works. This is his way of giving me something new to write about. LOL Once done, his plan is to integrate this amp into a vintage Field Day kit. This would be a neat little addition to his early Argonaut 2 that he has since it is only 5 watts output at full power.

In the flyer above, the bands go all the way to 80 meters but the unit we have doesn’t list 80 so they must have updated the specs over time for some reason.
Back to the RF sensing part, the reason we want this is it simplifies setup at field day for us. If we want to use QRP power for our ops then we can but if the bands just aint cooperating then we can easily add some power and get things moving. Our goal has always been to see if we can get on the air with QRP first and most years we are successful but occasionally we are not. So this allows us that leeway to be able to add output power as needed easily and with literally any radio we connect to it. We like this design so much that we are going to hijack the RF sensing circuit and see if we can copy it for another little amplifier he has that doesn’t have current sensing. We think it should be a simple thing to build a little project box that goes between the radio and amp that has both coax ports, a 12v power cable and a simple keying cable coming out to connect to the keying input on the amplifier. We even considered using the little 4 pin Amphenol plug so it will look “official” when we build it…hi hi.

Things of note about this amplifier, it has no fan, so it is static cooling only with the enormous heat sink that is attached. Don’t forget you have this monster of a heat sink when you install it in your car too as it will be on the bottom and I am pretty sure it needs ALOT of air to be able to keep it cool enough at full power. Another thing is the meter on this unit is frosted over, but no worries as when you key the radio, a light comes on behind it and lights it up just enough to be able to read the milliamperes DC that are flowing…somewhere…lol. Actually, from what I gather, the meters in these amplifiers were terrible and replacement was pretty common so apparently someone replaced this one and didn’t switch out the backplane so the meter would read right. It is supposed to be some sort of SWR meter from what I can gather by reading the manual.

Lastly, someone has replaced the power cable with new wire…and left the bulkhead connector off so I will add one back if I can find one before returning it to Trey. At least it is fused on both the +13.8 as well as the ground lead. That is nice when the insulation breaks down at the sheet metal and decides to short one of the wire.

Anyway, all that said, his museum piece actually works as I made several CW contacts with it using my Penntek TR-35 QRP transceiver. The little radio has plenty of drive for the OUTCOM OPA-202 so I was easily able to get 80 watts without issue and this was plenty to work one ragchew QSO as well as several POTA contacts. The system looks a little messy on the bench but will quickly clean up now that I have proven it works. So until next time, 72…errrr…73
de WK4DS
Counterpoise testing during a POTA Activation
Today involved some experimentation as well as a POTA activation. I tested some changes to the radials I use on my hamstick system out of curiosity and came away with some interesting results. Read on to see the AAR and the results of this test.

Today was supposed to be a quick little activation and then I was going to do a few other things, but plans are made to be changed from what I can tell as the bands were doing well for me and I stayed longer than I planned. But then the sun can bring that full circle as you will see below.

The operating position today shown above, was on top of the hill at the frisbee golf course and on the bed cover of the truck. Turns out that was somewhat of a bad idea. It just got hotter as the day progressed and the sun quickly came over the door I was using to shade me. This is what ultimately caused me to go QRT when I did as I was having a decent run on 20 meters at the time. It was just plain hot, with the sun seemingly cooking my right ear while I was working ops. I did enjoy working several ops today I have seen in my log before plus some that I have not. I even got a Canadian which is always nice.

This is probably the best image of my 40m hamstick and mount I have ever gotten. With the sun in the right spot, the whole antenna lit up well enough for the camera to get it. The setup is not actually mobile as it requires a counter poise to get it to work it’s best, but wow… it worked really well today, especially well today actually for some reason. I can hear surprisingly well on these tiny HF antennas too. I own three different brands of hamsticks (covering 40, 30, 20, 17 and 15) and can not tell a difference in any of them as far as how well they work. They all just work really well.

These two photos tell a story about what was happening at the location today on 30 meters. When people talk about having RF noise at a location, this is what it looks like on a radio that doesn’t have a waterfall display. The photo above is what the noise floor looked like when the RF noise was not present and the bottom image is what it looked like when it started up. It also was not constant, but appeared to by cyclic in nature as it would spool up and would just be some sort of hash for about 20 seconds and then it would just go away for about 30 seconds maybe longer. I would be able to work one contact and then it would come back and if the hunters were not transmitting with an S9 signal, I couldn’t hear them. This is really frustrating and is one of the reasons I don’t activate 30 meters more than I do. But so it life and how much fun would it be if we never had problems to solve? It would get pretty boring pretty fast… Even with this RF hash coming in and out, I was still able to get 9 calls in the log on 30 meters today so I count that as a win anyway.

The next thing I want to share about today has to do with the antenna system I was using. I have made tuned radials for all of my hamstick except the 15 meter unit (I have not deployed it yet, but soon I will.) I went to a lot of trouble to tune these radials too, with a ton of time at home working on this. Well, it turns out that I didn’t need to do that for the 30 meter hamstick at all. I deployed my nanoVNA today and did some measurements on the hamsticks to confirm nothing has changed with them and figured out something just out of curiosity. Seems that the radials for 40 & 20 meters work just fine on 30 meters too. This means one set of radials for all three of those hamsticks. Next outing I will take the 17 and 15 meter hamsticks and tune them up and see if the same radials will work on them too…fingers crossed. I am always looking for ways to simplify my station setup and the radials has been one of the slowest things to deploy of all the gear for POTA with the hamsticks. So if I can get it down to just the two radials and not having to remember the color codes for them and such I will count that as another win in my book.

The above photo shows that the antenna is fine on the 20 meter CW section, even though it is technically low on the best part of the chart, it is only 1.188:1 where I normally work on the 20 meter band. Well, knowing that, below is what it looks like on 30 meters with the 40/20 meter radials instead of the tuned radials I made up for just for the 30 meter band. Pretty crazy huh? Looks almost identical to the 20 meter chart and even almost matches the 20 meter SWR value. I was blown away by how good this turned out and to think I have never even tried it before today… Another thing I noticed about hamsticks in general is that they act like bandpass filters across the HF spectrum, I did open up the range on the nanoVNA and it does have other nulls IN THE VHF SPACE, but each hamstick has ONLY ONE spot they are resonant at in the 0 - 30mhz spectrum. No multiple harmonics like the EFHW, just one really deep SWR null is all you get. So plan accordingly, but to be honest, it works really well so I am not going to complain. I think this might actually work as a band pass filter but have not had the chance to test it yet. Maybe I will set this up at winter field day and see what it sounds like there. That should do it.
Here is the log from this activation and the signal reports look good for a mismatched antenna on the trailer hitch of my truck. I was using 15 watts though so that might have helped some. I have been sending with more power lately to just play with the Argonaut to see how hot the heat sink gets at various power levels and on CW it barely gets warm at all with 15 watts of RF so I am really happy with that. I am doing this test since i changes the fan a while back to reduce the fan noise as the factory fan is quite loud. I have a blog post showing what I did with this if you are interested in that.


All in all I learned something new and had a great activation at the same time. So till next time go get your radio out and make some contacts on it!
Testing a new antenna AND CW key during a POTA activation!
I decided to pack up the Argonaut 5 and go activate Cloudland Canyon today to get some much needed air time and wanted to try out my new POTA key that I picked up at the 2023 Hamfest in Huntsville a little while back (actually you will be reading this in the future as I picked up the key last weekend but so is the life of a blog post) So follow along and look at what I found out today while making a few contacts from K-2169.
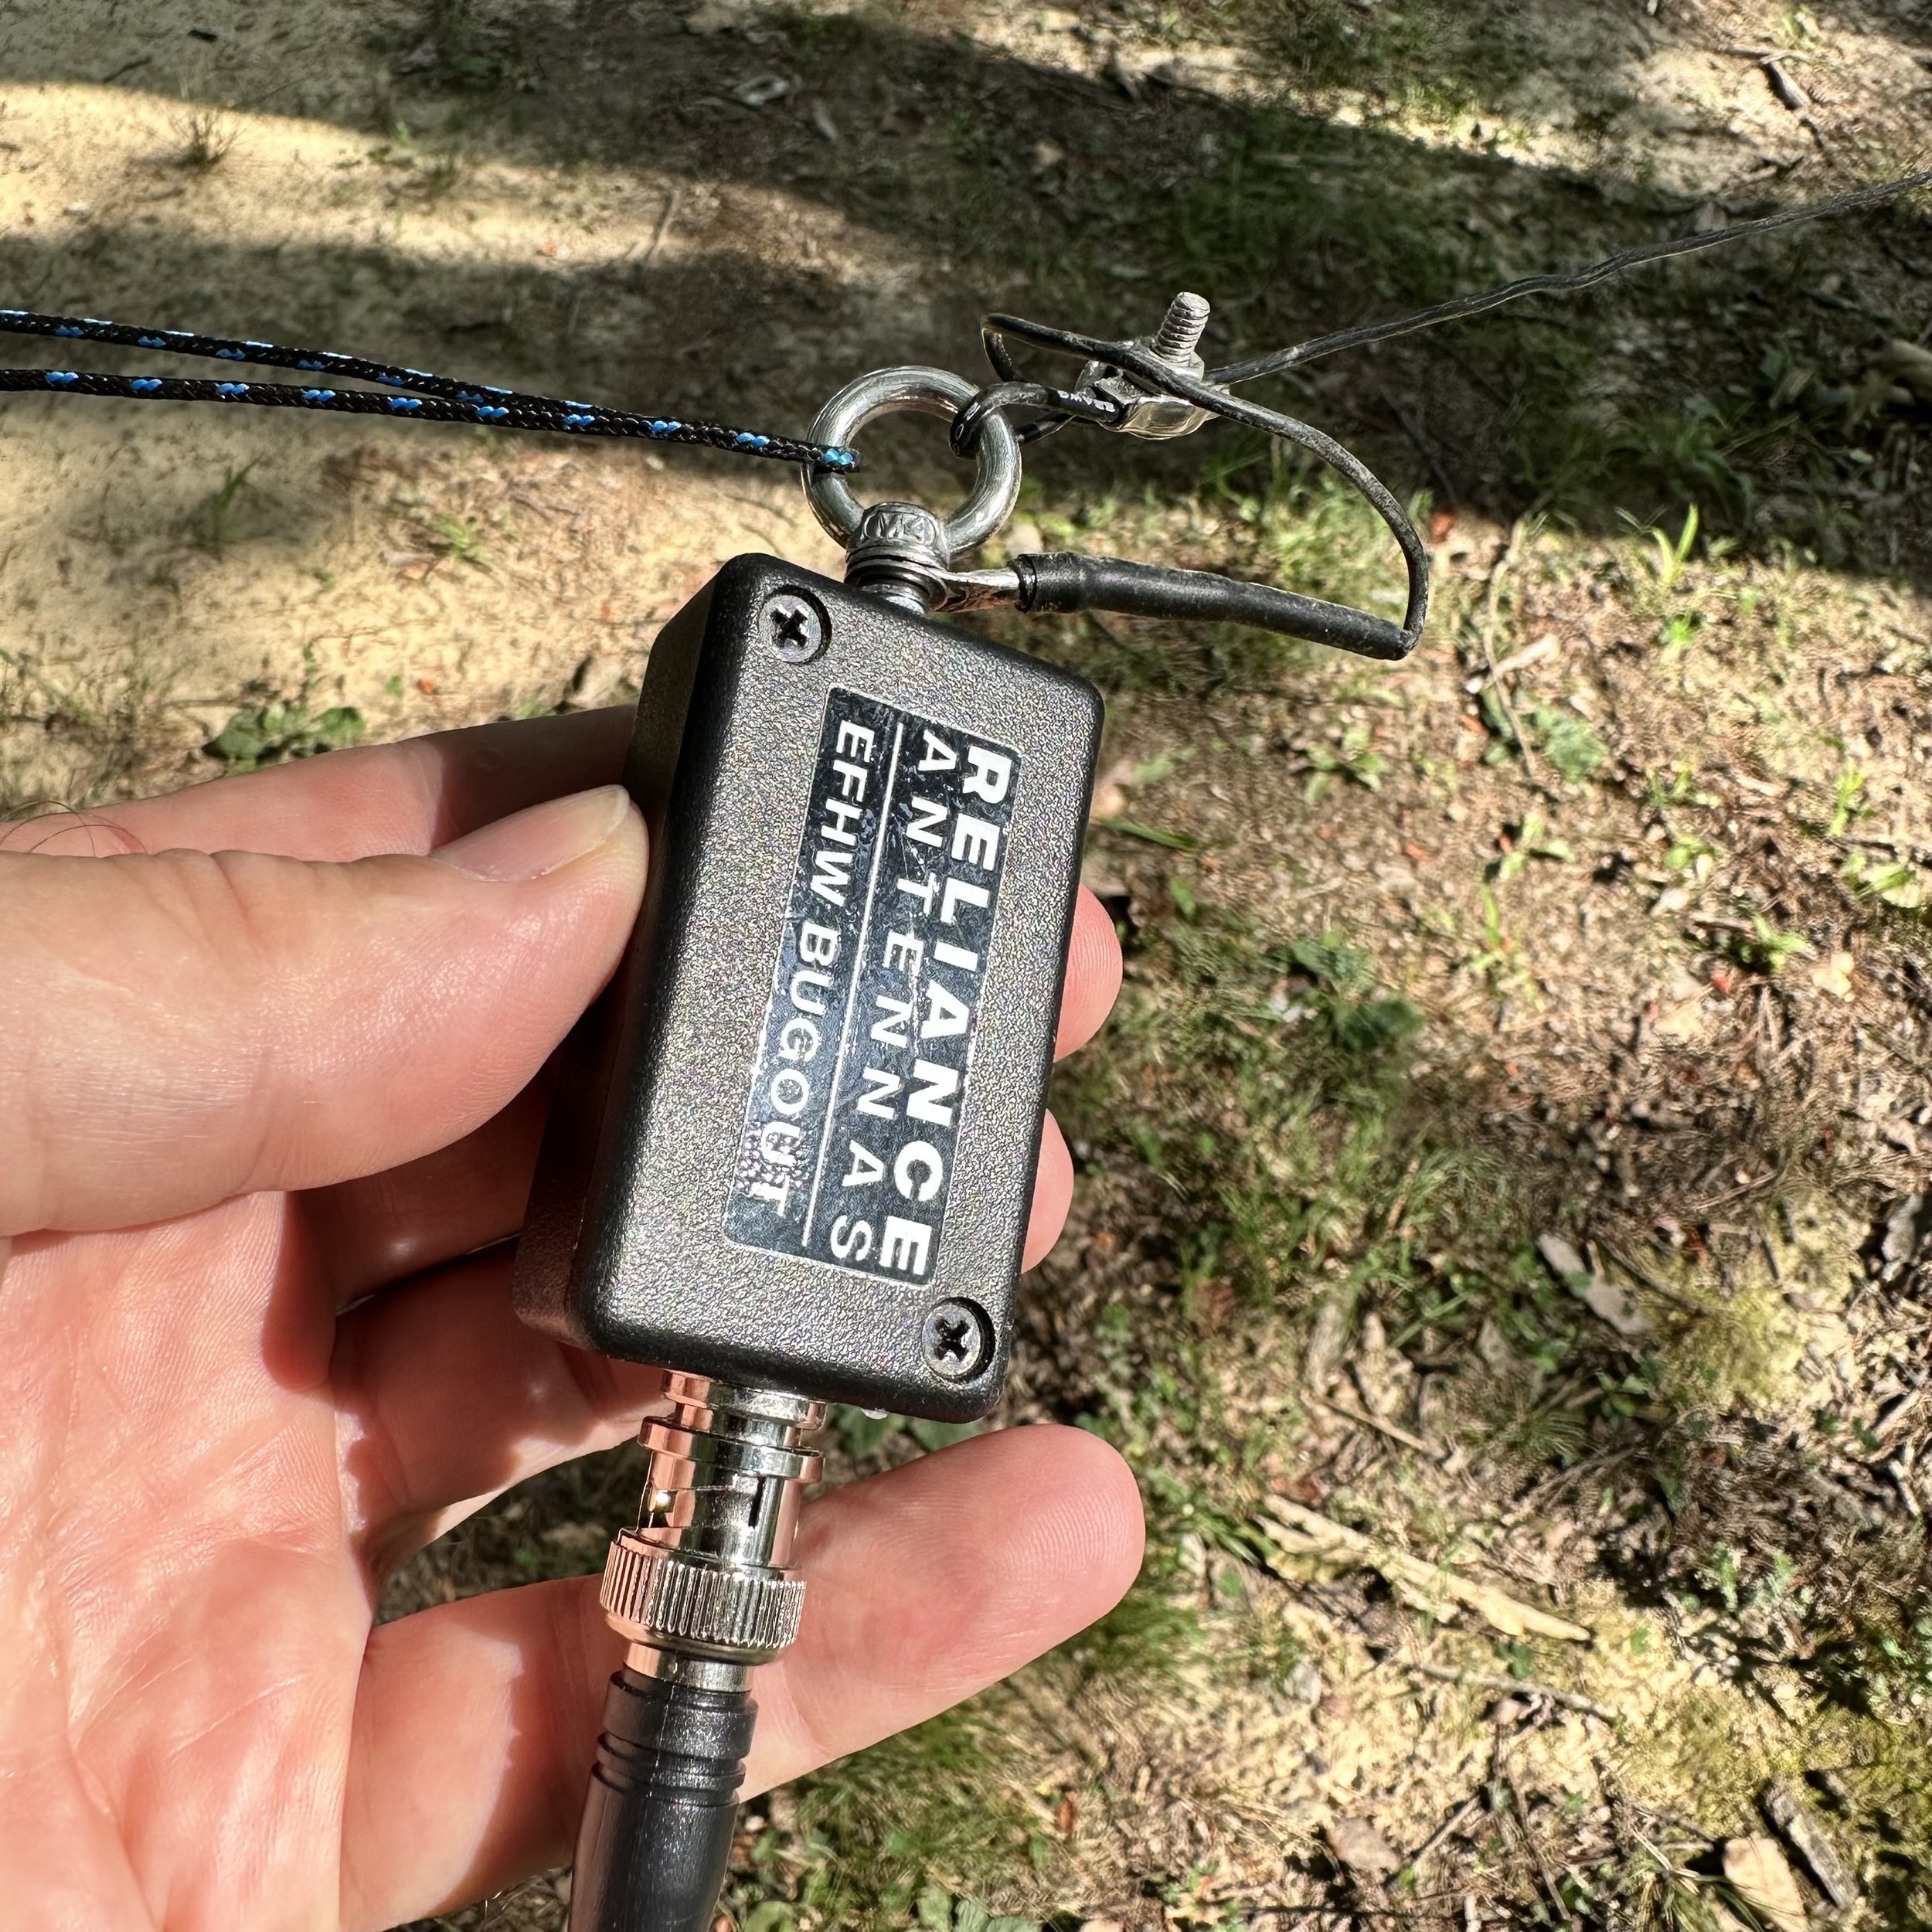
I also decided to do some testing of the Reliance Antenna Bugout 40 EFHW I had bought from N3VAN who was making them and selling them on the QRZ forums. The antenna looks really good with lots of attention to detail in the construction. I have never used an antenna that doesn’t have radials or a formal counterpoise at all. This one uses the coax shield as the counterpoise so, in theory, you don’t need a counterpoise at all. (Come to find out, you can bend the rules of EFHW antennas if you do add a counterpoise) I strung it up in the air between two trees out near the bluff at the park. This may have doped my results, but I am doing a test anyway so why not, right? The far end is about 30’ in the air. The near end is about 12’ up to the transformer and I dropped a 15’ piece of coax down to the radio. Done. Well, so I thought at least.
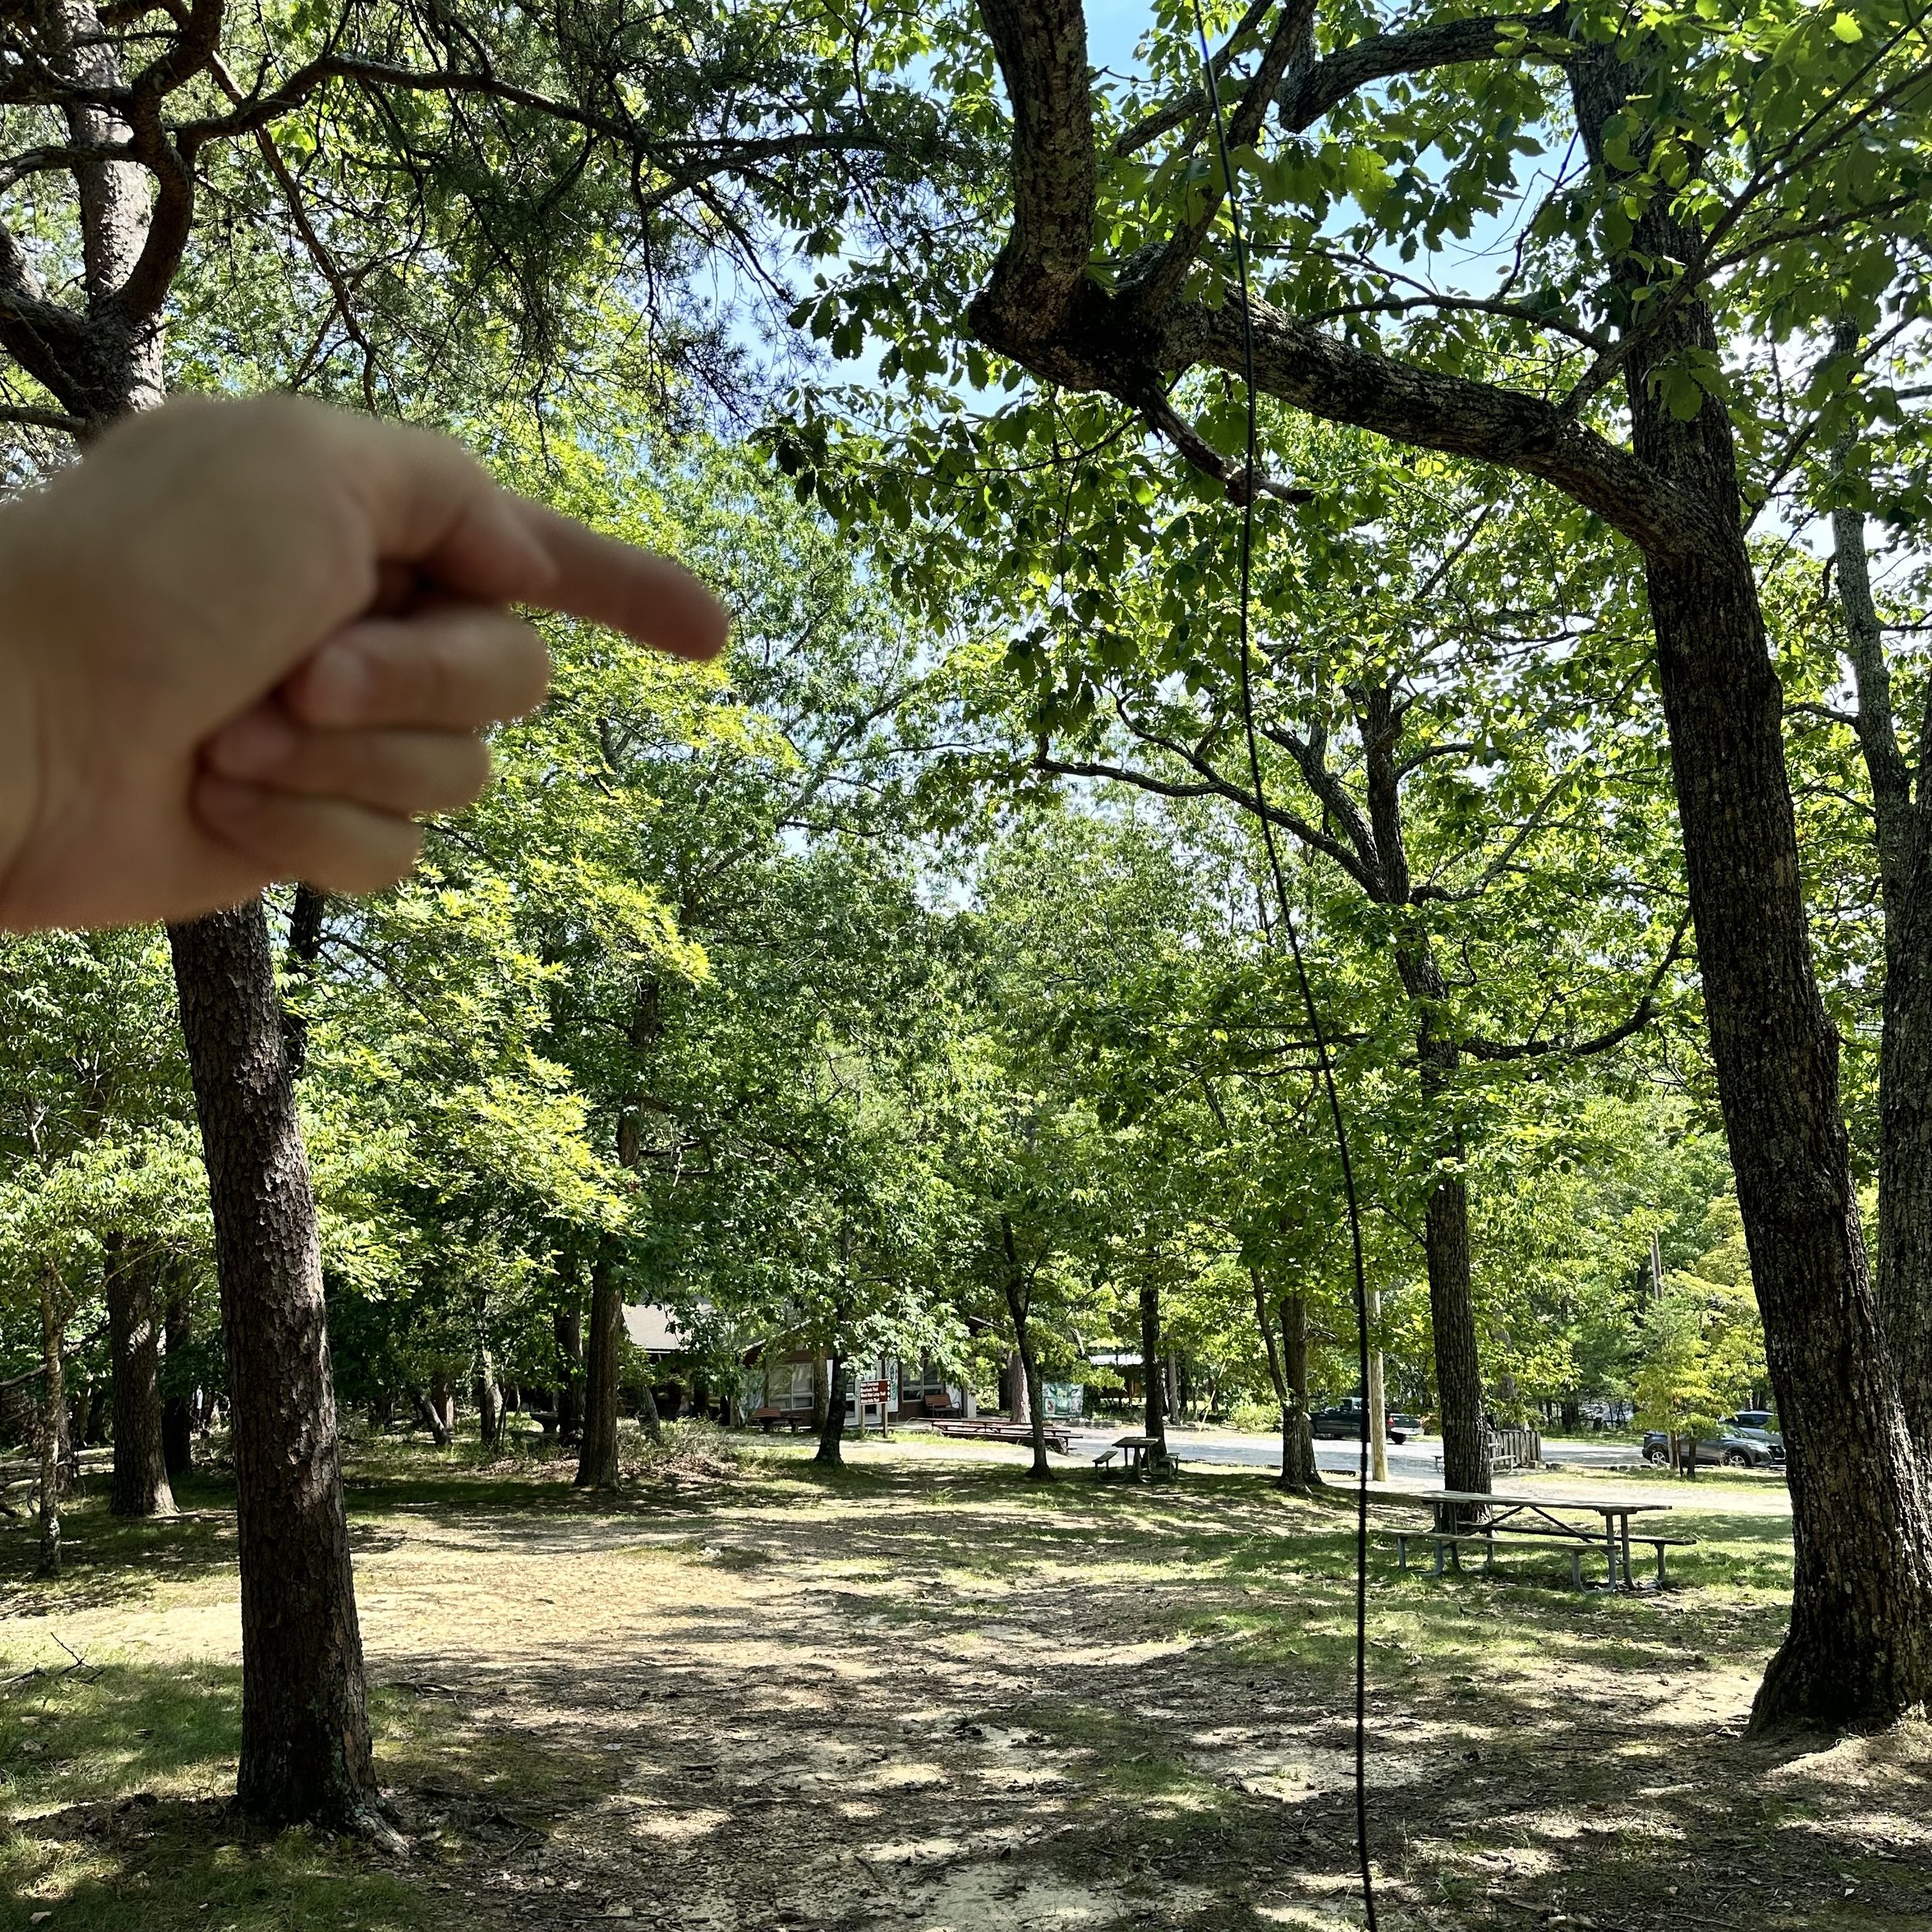
The far end is way up in this bright green tree behind my hand in the back ground. I am pointing to the end of the wire location in the tree.
Once I got the antenna up in the trees, I wanted to see what the plot looked like on the nanoVNA so I plugged it all in and this is what I got. The antenna is technically slightly long and is a little below optimal frequency on this day and rigged like this. I am not going to trim it at this point as I want to see what it does in other kinds of conditions like the winter and maybe right after a rain when it is still wet or maybe where it is set up over night and is soaked with dew. Even though it was off frequency a little in the configuration I had it in, the SWR was well within safe limits for operating any transceiver. I didn’t have a 2:1 SWR at any point when I was testing a particular band and that if fine with me if I don’t have to carry a tuner with me. There was a side bonus to this setup too, for some reason with the whole antenna elevated like I had it, it was giving me a wide coverage (read that as a low q) in the bottom of the 10 meter band. So low in fact, that it was within usable range even on 12 meters without needing any sort of a tuner! That is 40,20,15,12 & 10 in one antenna with zero mods needed. That is winning in my book.

This was the plot without anything other than the 15’ coax going to the common mode choke.
Now get this, I added a radial to the system, but in an unusual location. I put it on the end of the coax on the connector next to the common mode choke right next to the radio and just stretched it out over the ground. This length of wire was 9.5’ in length and when I did this, the plot changed a lot. I lost the 12 meter dip but picked up a much broader area between 20 and 15 meters to the point that 17 meters was below 2:1 SWR at this point. This means that if I add this simple piece of wire I now have a “no tuner needed” antenna that covers 6 bands! Almost everything is usable…sans 30 meters, so I am really happy with this antenna. The next time I set it up will be to test it as a sloper like it would be used if it is a portable setup and I had only one tree to rig it to. Then we will plot it again and see what I come up with. I am curious to see if the frequency of the dips changes with the relation of the end of the antenna to the ground. I dont think it will but RF is a fickle girl…lol.
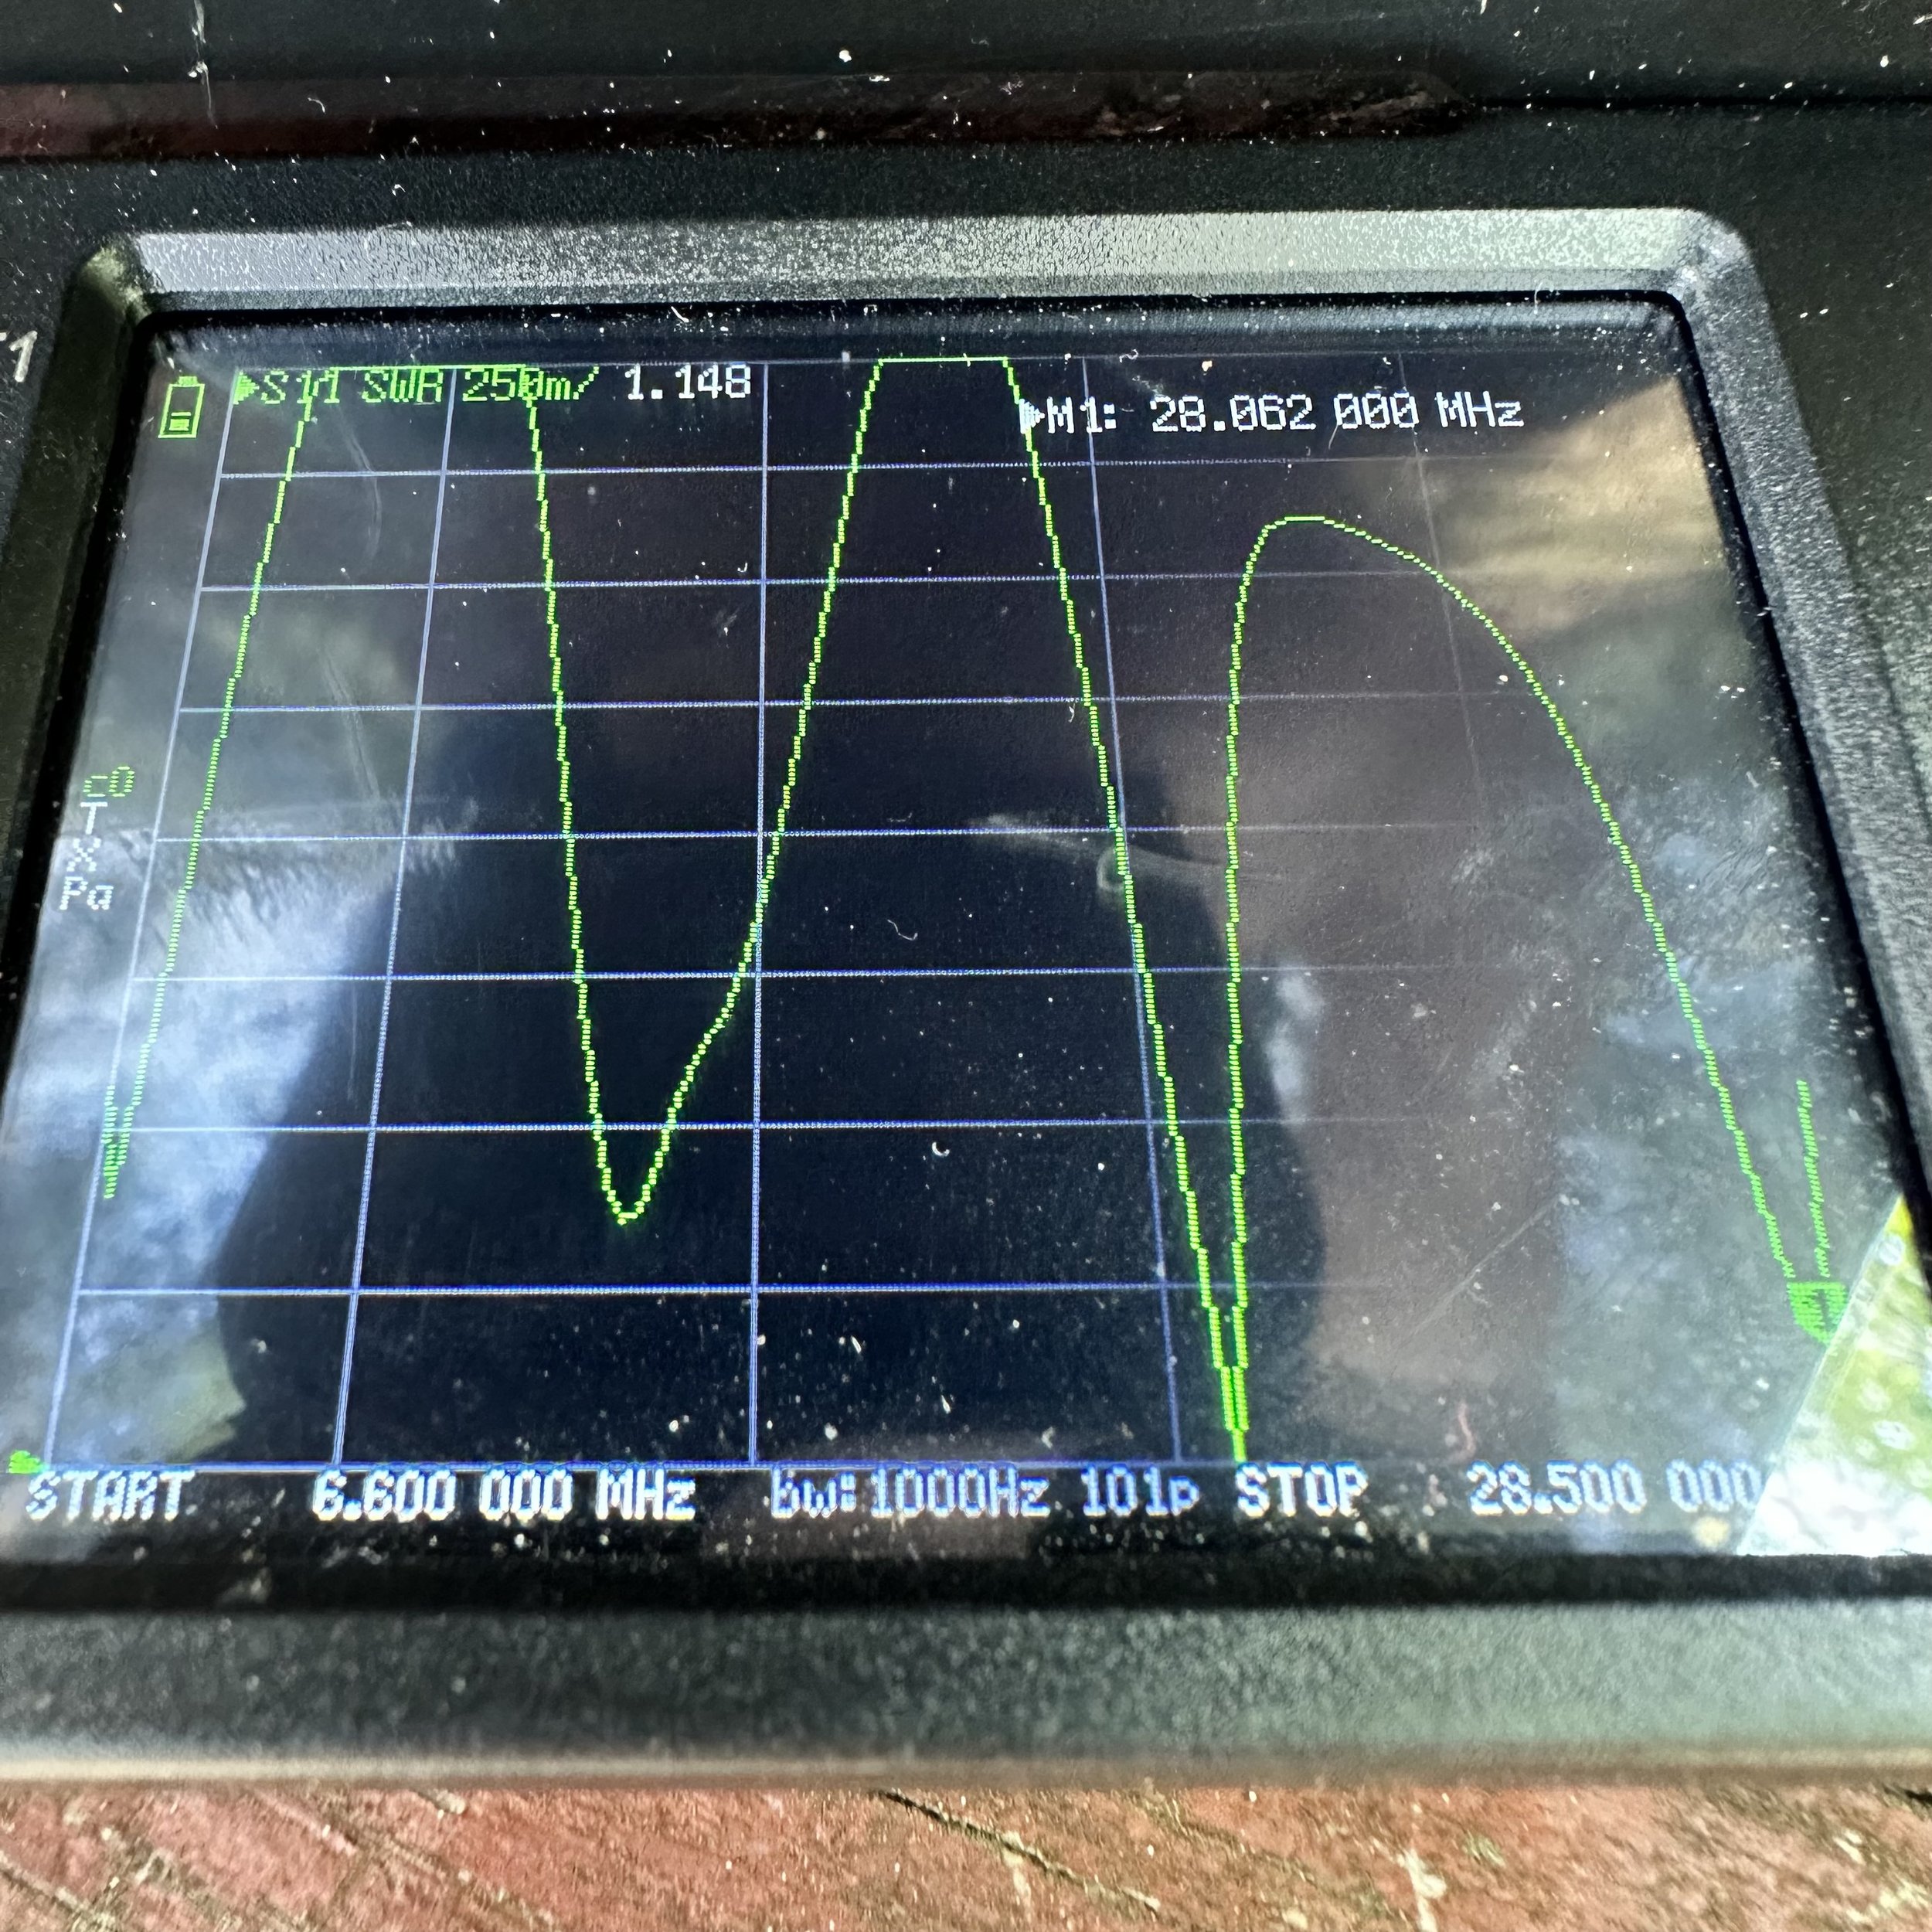
This plot is the aforementioned setup plus a 9.5’ length of wire tied to the coax connecter at the common mode choke.

This much wire is all that I needed to gain access to 17 meters without having to carry an antenna tuner with me, this is very liberating to be honest. Just adding a small radial to the system makes this super easy to use. The Reliance Antennas 40m Bugout EFHW comes with a winder to store in on as well as a carabiner clip to connect the far end to the cord. The transformer end has an eye bolt that works well for a hoist point to raise the other end of the antenna.

I next setup the Ten Tec Argonaut 5 radio on the table and connected all the stuff to make it work. Once it was powered up and ready, I plugged in the star of the show, my new N3ZN CW Key. He builds some really nice keys and I have walked by his table at several hamfests recently and today I decided that it was time to give one a whirl as they say. So I chose the smallest one he had at the show since I wanted it for POTA activations. The plan is to keep it in the Argonaut “GO BOX” that I built last year. It took me two trips to the field to learn to use it properly too. Since it is so small, if you have a heavy hand when you send it will move around a lot on you. The trick is to set the action light enough that you just have to touch the paddles to send the code, this way it is a light operation and the key stays put on the table like it should. These keys come with the cord hardwired to them so you cant buy a simple aux cable and plug it into the key, but it didn’t cause me any trouble so I don’t mind it. The installed cable is high quality and I have no doubt that it will last a very long time.

Once the antenna was squared away and I had my 17m “element” nearby, I was ready to crank up the radio. The new key plugged into the keyer I recently acquired from eBay and we are off to the races! Or so I thought as it turned out that KJ4BAD happened to be walking by and stopped in to see if I was doing POTA and we had a great chat for about 10 minutes or so about all things radio. I always enjoy running into other hams while out at a park.

I really like the Ten Tec Argonaut 5 radio, it has almost all of the CW functions that I use are on the surface. There is a could of things that you hit a button and then make the adjustments and you are good to go. The other thing that is great about this radio is that it has 20 watts of transmitter power. This is awesome when the bands are not as good as they were back in the winter. Also the DSP filtering works surprisingly well. It is also really good with other modes, but I just use it for CW… I might make a cable at some point to put the key into the front socket instead so it is simpler to connect the key. You see the mic key will key the radio so that means my little memory keyer will work in that socket. Who knows when I will do that though…


After we finished chatting I settled in for some POTA therapy and dialed around a little to find 15 was open with a bunch of stations on the air. I setup and start calling and you can see in the log that I only made two contacts before giving up and moving to 17 meters where I usually make several contacts but today I only netted one. Things were looking pretty dismal till I went to 20 meters. Once on 20 things turned around for me. I fairly quickly got the activation and proved out all the gear I had brought that day.
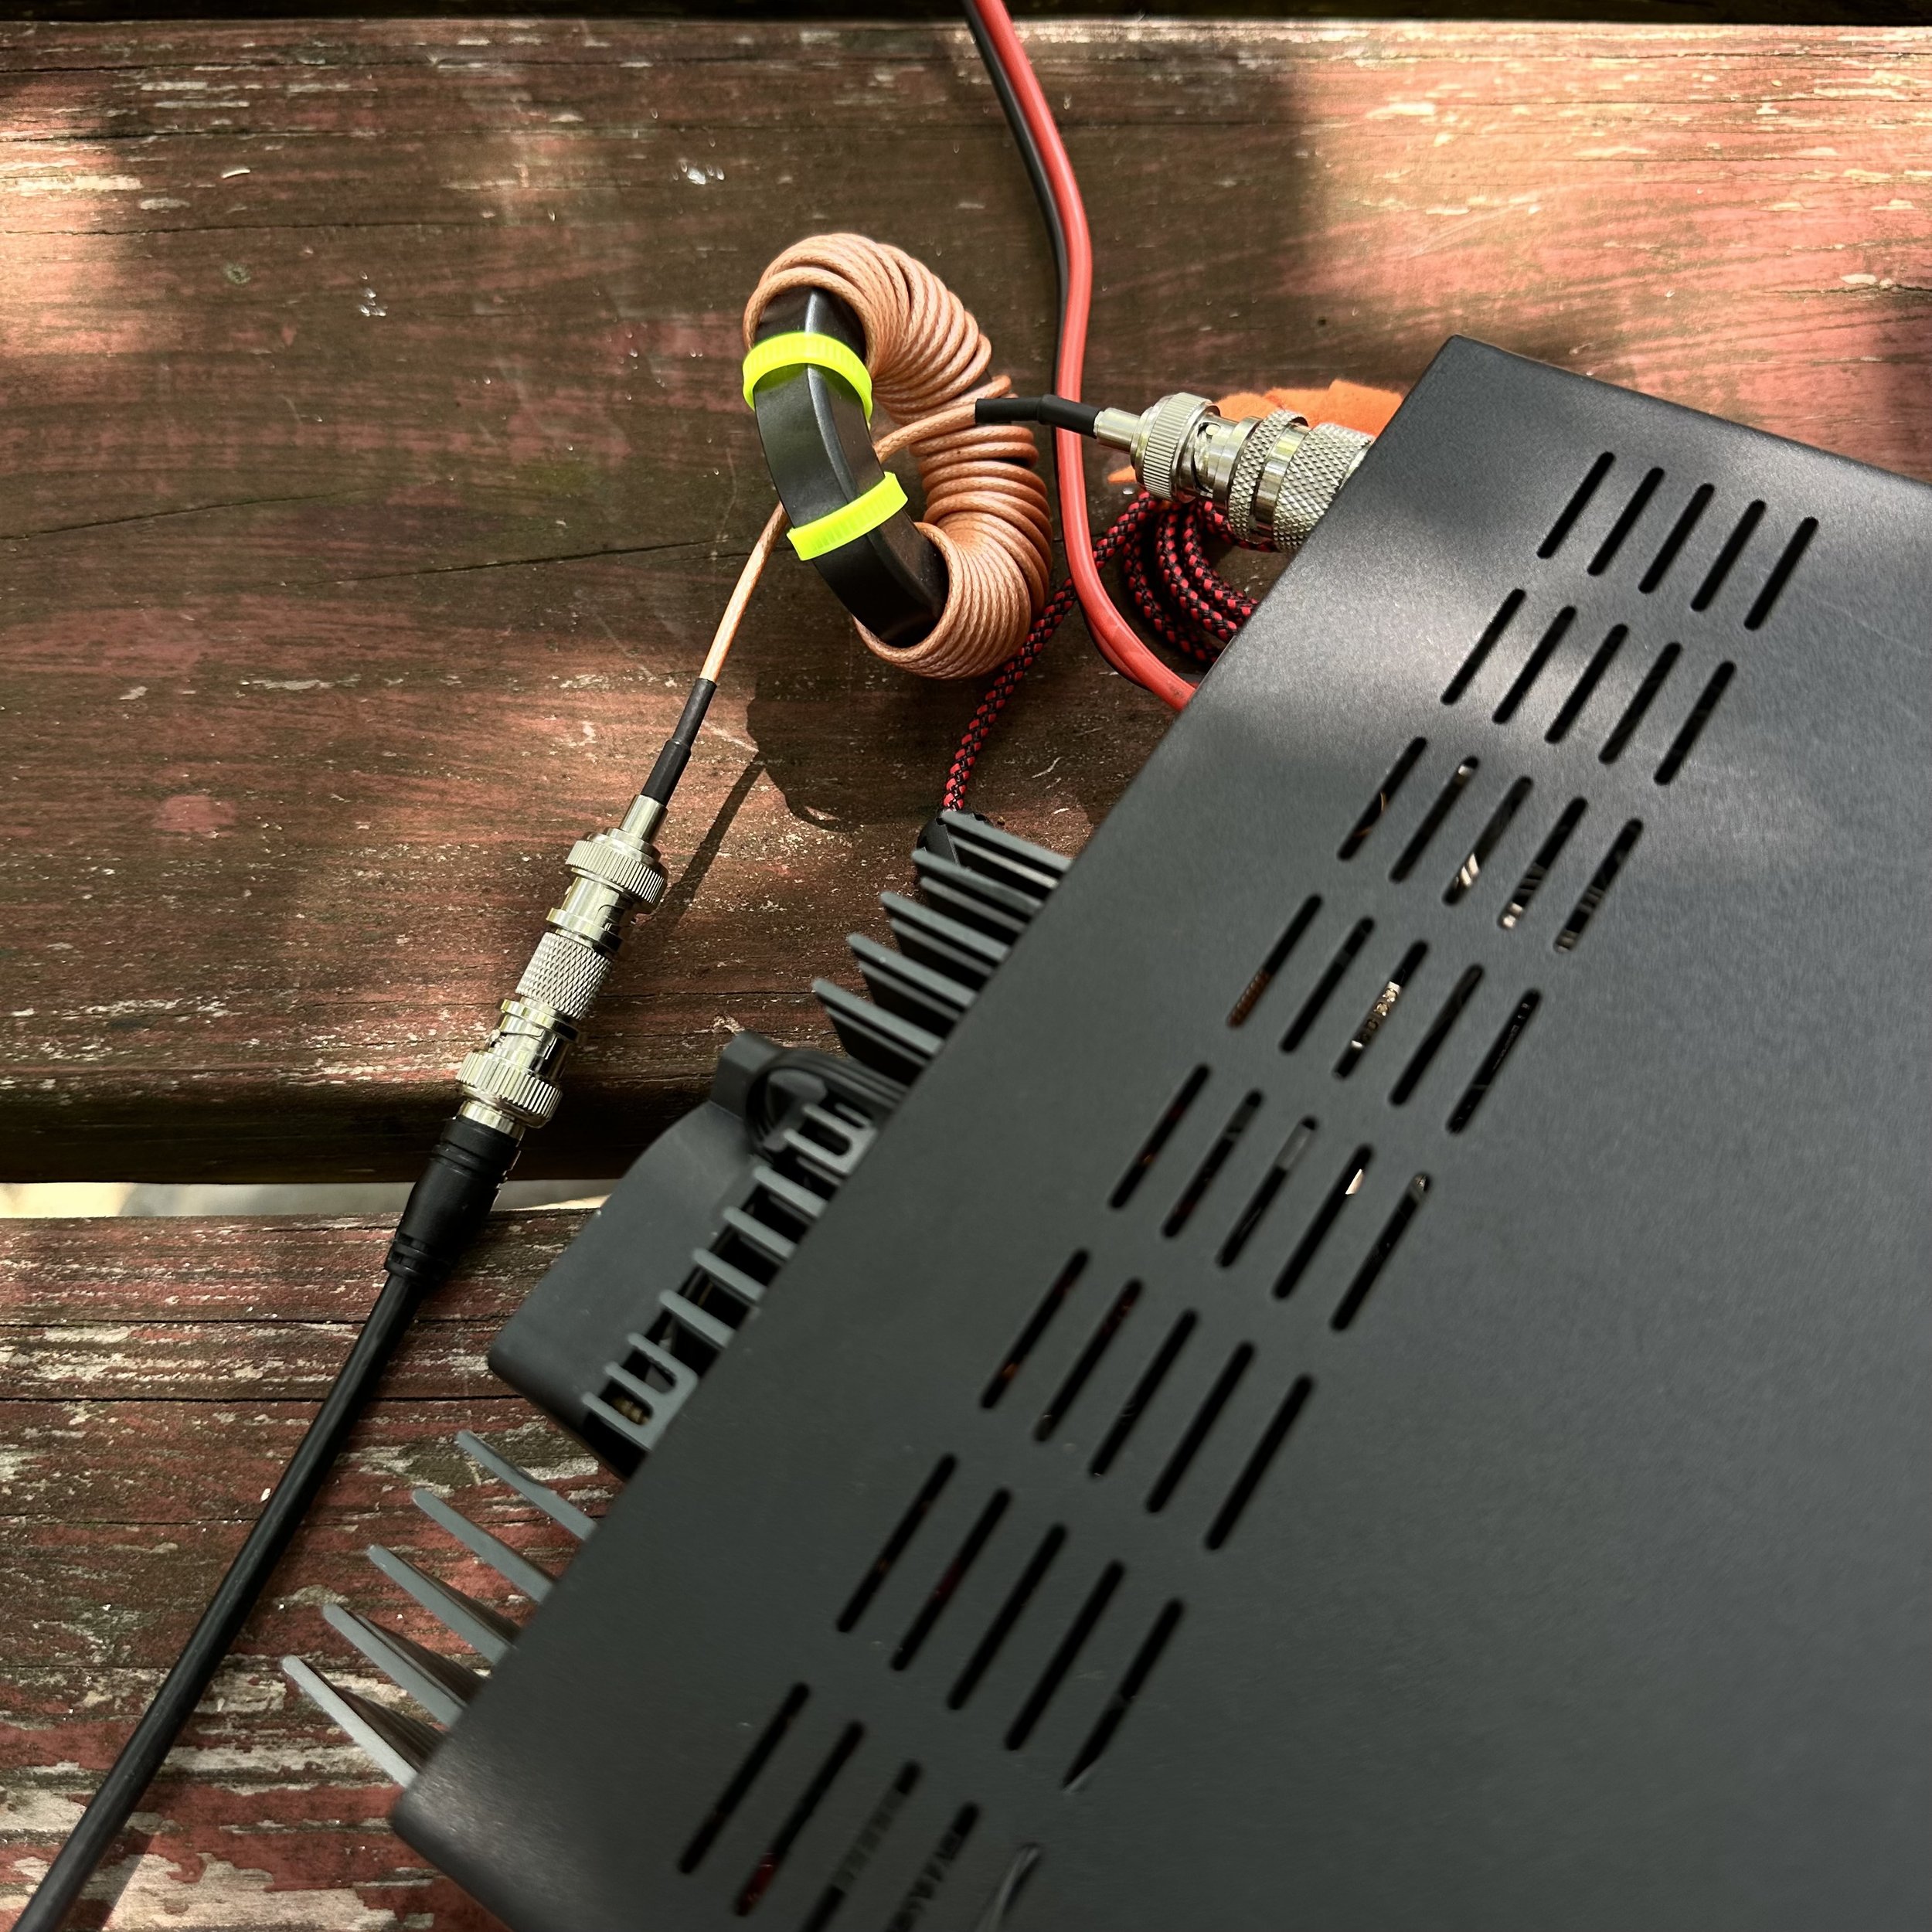
This photo shows where I would place the extra radial on the Coax connector. The coupling between the common mode choke and the feedline made for an easy spot to add it. I simply stripped the wire back a little and twisted the wire over this point. Simple as that. The easiest mod I have ever done to tune my antenna to another band in the history of ever.

This was the view I had today while operating, this is why I like POTA over other activities. The view is epic. So there you have it. My POTA “test and tune” trip in a simple blog post. Until next time, 72.
de WK4DS
DX QSL Cards are Awesome!!!
I once did 100% QSL with paper cards… those days are long gone though. It turned into this huge project to keep up with them to the point that I spent more time working on the QSL cards than I did on the air.
It was at this point that I decided to alter my strategy for QSL management to the one I am using currently. This strategy led to me getting this letter in the mail.

My current (and sustainable as well) process is to cherry pick the QSOs I send cards to. I have some criteria that I use though.
Ragchews almost always get a card. If the other op doesn’t QSL I wont but usually I send one for this.
QRP contacts whether from my home or abroad will also usually get a card. To clarify that is they are QRP. I work it so much that I dont use my radio as a factor. Same exclusions as above here too.
DX if it is a country I have never worked before. Actually this criteria is a mandatory QSL…as long as they do QSL.
If I just want to is the last one.

So back in July, I did a POTA activation at K-2169 and used my Ten Tec Argonaut 5 transceiver for the activation. On that day the bands were in great shape and so I start On 15 meters and after a while moved down to 17 meters to get a few contacts in the log. I felt pretty confident 17 would be good as I had already worked two DX stations on 15 meters. Albeit fairly close to home, but they were still DX none the less.
Well, I work several US hams and they are coming in sporadically but then I hear this station that is clean but weak. I thought at first I had missed the first letter of his call as I heard a J next, we went through the “on air gymnastics” of asking for the call again and when I got it, I was blown away to realize it was a Japan station!!! I had to send him a card! So I write one out and check his QRZ and he does QSL, so threw in a few green stamps to help offset his costs and off it went into the mail. Today, I got my reply…
In the photo above you will see three cards, one is handwritten, one ís typed and one is a different card altogether. The odd one is an extra card he sent that was his old QSL. That is awesome to me. I love getting these in the mail. If you will notice he has a 4 element beam so that combined with good band conditions allowed my 20 watts to reach him in Japan.

It is interesting to me that I will get so accustomed to hearing the 4 US call letters first that when I hear one from somewhere else, it “breaks my brain” for lack of a better term. I am listening so much for A, N, W & K that I completely miss the other letters most of the time. I actually can catch V calls pretty good now as I have worked many since starting POTA activating regularly but it is the exception. This has prompted me to listen on the bands more to try to hear DX calls and not lose my marbles when I hear one… lol. I copied a Swedish station the other day first try and was kinda stoked so my practice is working. But this is a side effect of being a US amateur working a lot of POTA in the eastern USA, you do get accustomed to hearing certain prefixes a lot (or at least I do). I have a bunch of those stories if you want me to recount them at some point…
Do you have any odd idiosyncrasies that you run into while operating on the air? Let’s hear them! Till next time 72
de WK4DS - David
A couple of quick activations testing the antennas
The past couple of days have been busy and there was still time for a couple of quick activations along the way.

First stop is the Estelle Trailhead on Crockford Pigeon Mtn WMA (K-3742) over in LaFayette GA while coming home from visiting with my mom. This is actually a new park for me even though it is only 15 miles from home by road… I dont know why, but I have never activated it for some reason. The Estelle parking area is fully within the WMA boundary so it was a simple matter to pull in, get parked out of the road and setup a radio in the shade for a little while. Today saw the Ten Tec Argonaut 5 again as this radio was the one in the truck at the time. It is also one of my favorite HF radios at this point. It only lacks two things to be the perfect radio, an SWR meter and an internal antenna tuner…but I digress.


I said that I setup in the shade, but there really wasn’t much to start with…lol. I did get lucky and a nice cloud moved in after a few minutes and helped keep things cool. I don’t like to let my radios just sit and cook in the sun if I can help it and will go to fairly great lengths to prevent them from getting hot. This is what you see here. The shade was just wide enough to protect most of the radio from direct sun so it didn’t get very hot before the clouds moved in. On top of that the tool bag is shading my battery in this photo too, I didn’t want it to get too hot either…haha.

I started on 15 meters today as I finally have a 15 meter capable radio and antenna too! Well the RBN showed 29dB for me! That is crazy good for someone with 15 watts under their belt into “7” land. But try as I may, there just wasnt that many hunters on 15 meters for some reason. I did get 3 QSOs in the log while on 15 meters so all was not lost. Then I moved down to 17 meters and did quite well there, picking up several more contacts. Then I finished out the activation on 20 meters which is my backup if I need to get my 10 for the activation. 20 never seems to let me down either as I can almost garuntee at least a few contacts there.

So after getting the activation, I wanted to experiment with the antenna system and see how it would work on the drive home. Turns out the 20 meter hamstick without radials has worse SWR than with them, going from 1.15:1 up to 1.7:1. Who would have guessed? LOL. This is not a real problem though as this is still well below what I consider useable SWR. As long as I can stay below 2.5:1 I will operate. That is the upper limit though and I will work on the antenna a good bit to get it down but if nothing helps and I have 2.5:1 SWR, I will try it. The radios can handle anything below 3:1 so I set my personal threshold below that… I know some people wont use their gear if isn’t almost perfectly 1:1, but I have come to realize that it isn’t so important and the signal reports speak for themselves.

On the drive home, I start hearing this REALLY strong signal booming in to the Argonaut 5. The above photo shows what the signal level coming into the radio was 20 over S9, and remember that the Argonaut 5 has a S meter that doesn’t like to give out good signal reports. So I start working on head copy on the drive and finally get that it is W1AW/0 in Colorado and he (or she) is working as a POTA park! So I do what any sane POTA hunter would do, I pull over at the New Salem Firehall and work them mobile! WK4DS/M got into their log!!! WooHoo!!! So at the bottom of the logbook page you will see where I logged the hunter contacts on this trip since I was not at a park when I made these contacts.

New Salem Firehall parking lot was empty and worked great for getting my hunter contact on the drive home.
As a side note, I finally made the hitch pin (shown below) for my antenna mount so I can use it for the rover program without having to pull it off the truck and stow it between parks. I am working on reducing the setup and breakdown time at each park as I am going to attempt a 10 park rove and this will take planning to make it happen. Things like this can add up on the rove to make it take too long since the drive time from one park to the next will be the biggest time eater of the day. So if I can find simple little things that I can do on each stop to save time, I can make the most of the activation.

I made the main pin that holds the mount, but I simply bought the little pin to lock it in place. Sometimes it is smarter to buy a part rather than spend the time to make it. The main pin was easy enough to make from scrap shafting material. but to make the keeper pin would have taken more than the 3$ it cost in time so I opted to simply buy it instead. To be honest, it would have probably been smarter to buy the main pin too, but I had a scrap piece of round and time available on the lathe so I just carved one out right quick rather than drive to the store to buy one. Another plus is that I could make it like I wanted which included adding the handle to the main side so it is easier to pull when breaking down the system. On top of the pin making, I also opted to add an extra set of holes to the antenna mount so that the pin can be left in for simple POTA activation days where I dont have to pull the pin to simply setup for a single park. This allows me to just stick the mount in the hitch and use it like I have been and take it down when done so I can stow it inside the truck bed when not in use.

The next park I went to a couple of days later is the Chickamauga National Military Park. K-0716. This park lies in two states, so today I opted to activate the Tennessee side of the park. This location is easy to access as it is literally on the side of the road. This is why I like this location and hate it at the same time. The location is called Eagles Nest and is part of the military park completely within the park boundary.


K-0716 presents me with a quandary. This “shack” position makes for a comfortable operating position but the road noise is really bad due to the proximity to the road… I have used headphones here before and that seems like the correct thing to do if I operate here much more. I am going to go ahead and get my repeat offender for activating this park. I am already half way to this award anyway so why not? Ha Ha… Another thing that surprises me is that there are some fairly large trucks to travel up this narrow and winding road to the top of the mountain. Like large d4livery trucks kind of large, I guess it is normal, but it just kind of caught me off guard to see such large trucks going by while I was there.

The radial situation is unique here too, since it is on the shoulder of the road, I have to put both radials on the same side of the truck. Whenever I do this, I always get out the nanoVNA to see what this has done to the SWR plot. As usual, it did affect it but not by much. I was surprised to see that on 15 meters it needed both radials to get a decent SWR before I was happy. So I get it setup, spot myself, start a log in HAMRS and start calling CQ. I finally net a couple of contacts on 15 meters, but there are not many hunters even though the band was open. It did have some fading, but it was fairly strong anyway and could easily support use, but people were not there. So I moved down to 17 meters. Once on 17 meters the RBN (Reverse Beacon Network) picked me up and showed the strongest signal report I have ever seen for one of my activations. 42dB is insane! I have never seen that and this was with 15 watts no less. So people MUST be on this band, right? Well no, it seems that all the people on HF were down on 20 meters having a grand old time without the few of us up on 17 meters. I added 4 more QSOs to the log with one being KJ7DT who followed me down the bands working me on all three on this day. To me this is awesome as it shows the propagation for all three bands was really good as he is in Idaho which is almost 1800 miles from me.

So I finally decide to join in on the fun on 20 meters and QSY down with what seemed like the rest of planet earth and secured the activation in short order. Getting Paul - KJ7DT a third time on this day and Keith WI0S twice! Both of these calls have appeared in my log on numerous occasions. These are some very prolific hunters and I just want to thank them for being there to hunt like they do. They are what make activating parks fun. With 13 calls in the log I officially had the activation so I packed up as it was getting close to lunch and the road noise made it very hard to hear as well and headed into Chattanooga to go have lunch with the girls.

The clip board has made a huge difference in operating ease for me. I can now not worry about the wind turning the pages and it gives me a hard surface to work from no matter where I am. This alone helps a ton. As seen here, I am able to lay the keyer and the key on it as well as log. If you still paper log this is a very handy addition to the POTA kit in my book. Yes, I still paper log. I have had too many computers where they crash unexpectant and you have to reboot the machine and wait for it to get back up and running to trust it with my only log of an activation. The paper notebook gives me a durable backup to my phone logbook that I run at the same time.
Side note about how I log… I will run HAMRS in parallel to my paper logs and if the activation is going kinda slow, I can log both at once and keep the electronic log caught up in real time. This is a recent thing brought on by me wanting to not have to set aside time at home just to transcribe the log so I can submit it online. I found that a lot of my activations are slow enough to permit time to log the QSOs while I work the activation and not have to do it at home. So if things speed up and I cant log both the paper and electronic, then I always default to paper and the battery never goes dead in paper logs nor does the app crash… Then when things slow down, I will let the keyer send CQs and I will catch up the electronic log while I am calling so I don’t waste that time just sitting there waiting on an answer. This works really well and I can normally email the log from the park before I leave so when I get home I can simply upload them to the POTA site since it wont let me upload from my phone yet…


Here is something else that a lot of people that don’t do field ops have no idea about. A carrier with a bunch of backup equipment is a must. Everything in this bag has been used on an activation in the last few months in one way or the other. Notice there is power cords and spare coax and three pens are visible on the side, this is something that you quickly learn, things break, pens dry out, you run out of paper, all of this is things you have to prepare for before going to the park and the only way you learn this is from doing it. I can preach to the ends of time but until you have to end your activation because your coax connector came off or the center conductor broke on the coax or your antenna mount breaks, you wont prepare for it as a contingency. That is just how it is…Another really handy tool to have is a Leatherman multitool of some kind, brand isn’t important, what matters is that you have one, I don’t know how many times I have used mine to save the activation some how. Totally worth the price of admission in my book.

QSO maps are awesome, I have KJ7DT in the log on all three bands today so his one pin is actually three. Just like I have WI0S in the log twice so his pin represents two contacts. This is neat to see though as you get a visual idea of what the bands were like on this day. If I studied space weather more then I would be able to corelate the data so that it would be more meaningful, but like this it really doesn’t tell much other than skip distance for the bands I used. That is about it but it is still fun to look at them nonetheless.

So this is what it looks like to activate two parks on two different days and how the setups vary for each one based on the conditions for each location. Next time I will carry headphones for the one by the road so I can hear better. Till then, get your radio out and make some contacts with it!!!!
The weather can be fickle…
We went to my local park (K-2169) to do a little POTA and to enjoy the nice weather there.

I setup at the canyon rim today in the shade and got my rig setup in my usual tree and everything. I look on the web and the MUF showed that 17 meters was open and I dialed around and did hear stations so that was promising. I tuned up the antenna on an open frequency and started calling CQ…and called and called …and called. No one answered my calls for something like 10 straight minutes. I even had someone respot me once but never heard anyone on the air
I even took a few minutes to confirm that the Ten Tec Argonaut 5 and the Ten Tec 277 Antenna tuner were set correctly with my nanoVNA. They were in fact set correctly…so I just wasn’t being heard on 17 meters. Probably because I am only using 15 watts from the Argonaut. Maybe because the band sucked like a Hoover vacuum cleaner that day, who knows…


This antenna tuner is the Ten Tec 277. It has options to connect a COAX to an antenna, a balanced line to the antenna and even a random wire input (which is what I was using on this day) The variety of connections is what led me to acquire it in the first place, I like the ability to use it with any antenna I have and it works quite well in that role. It is easy to tune and the SWR meter works well too. I don’t use it as a traditional SWR meter though, I use it to watch for changes in the antenna system. If the SWR starts to climb then I know something is changing and I need to look into it, I have had things like the counterpoise wire break in the crimp lug before and not realize it due to it being inside the heat shrink tubing and this meter showed it to me. It also works for tuning purposes if I forget my nanoVNA as well.
My nanoVNA kit is almost entirely adapters and the tiny little VNA over to the side. I love this device and wonder how I got along without one before.

Anyway, back to that activation on that day. Since17 meters was apparently turned off by this point, it was with a heavy heart that I QSY-ed to 40 meters. I tuned up and started calling on this band and it didn’t take long to get someone in the log. After getting quite a few “locals” on 40 meters, I shifted my focus up to 20 meters. For me with my low antennas in park activations I will normally get closer states on 40 meters and more distant stations on 20 meters and higher. That is one of the reasons I like 17 and 15 so much. When they are open I have had great performance with DX stations. If you look at the map below, the close in contacts are all the 40 meter contacts and some of the closer ones are 20 meters.


I just love maps like this one where there is this one lone QSO way off.
It was about this time that the storm clouds really started to look ominous on the western horizon. But they didn’t really seem to be moving closer so I kept going. Well, 20 meters was open is all I can say. My very first QSO on 20 meters was with G3WPF in the UK! I actually thought he was an American station and I was missing the first letter so I had him repeat it a couple of times…lol. I am glad he didnt give up as I figured it out finally and got him in the log. What an awesome way to hop on 20 meters with! DX right out of the chute!!!

As can be seen from the logbook, I had a decent run on 20 meters before two things happened at basically the same time. The storm started to move into the area, and another ham tuned up on top of me and I couldn’t hear stations anymore. I chalk it up to them not being able to hear me as I was only 15 watts into a random wire pretty low to the ground. Anyway, that was enough to get me to call QRT and pack it all up before it got wet.


Until next time I hope to hear you on the air!
de WK4DS 72
Overcast POTA activation strikes gold!
So today was a good day for POTA. I did some small work related items, grabbed the Ten Tec Argonaut 5 and headed to Cloudland to get an activation in before lunch. Before I even setup on frequency I was dial-ing around on 17 meters to check the band and found G3VBS calling CQ with no takers! So I figure, why not see if he can hear me… turns out 20 watts was plenty to make a contact with England and we had a great chat for quite a few minutes with only a little QSB.

Today I setup at the frisbee golf course parking area as it is the highest part of the park as well as the quietest RF wise. The lower lot has a nicer view but with the proximity to the campground and so many more people in general, it tends to be noisy comparatively.

Something else I like about the upper lot is I can either deploy the setup in the photo above or I can string a wire in a tree as well. Rigging the hamsticks in the lower lot is more difficult to say the least. So I was a little worried about the impending rain that was on the radar, I normally use the setup you see as I can sit in the truck and operate even in the rain. This is really nice as even inclement weather cant stop my POTA activations! Haha.

Well sure enough when I got home, it started raining so I made a good call here.

I did setup on the bed cover though, which is a little exposed but I figured I could move it into the truck pretty fast should it start to rain.

Today’s radio is the Ten Tec Argonaut 5 which is a wonderful little portable HF transceiver. It is larger than the TR-35 but it also has multiple modes and has every HF band available as well. Today I started on 17 meters because… why not? And that is where I heard G3VBS. I figured I would secure the activation with ease after having a great QSO with the UK. I couldn’t have been further from the truth. I only made one more contact on 17 before giving up and moving to 20 meters. Once on 20 meters things started to pick up for me.


There were a couple of pretty strong pile ups at times and it was fairly difficult to dig out a sinlge call. Mainly because most of the stations were zero beat with me. This makes all the signals turn into one large tone and I get garbled info. Luckily, I have learned a couple of tricks around this and can work with most people now. I will simple call W? Or if I get part of a Canadian call, VE? You get the point. This is a tried and true trick of pile up runners (did I just make up a new term? LOL) around the world. When you cant make out anything, just ask for the most common prefix you know and someone will reply. It worked well for me today as I was able to break apart the pile up and get every one into the log that I could hear. I even worked 4 or 5 stations after calling QRT as they were asking and I had time. I ended up with 36 QSOs toward my day as I had one dupe so it was a great day for POTA. If you want to know more about POTA just give it a google search and head over to their website. Until later, 73 de WK4DS
Component failure sucks…
When things dont go right it can be frustrating but when things are like my activation recently they are downright demoralizing…

So I had an evening free and wanted to do some POTA so I decide to setup in the truck with my hamsticks … since it is faster… you know since everything is ready to go. Little did I know what I was about to get into.
So I goto the frisbee golf parking area and get everything out to do an in-truck activation. This is how I operate if it is raining and has worked well for me in the past. I just tape a “rain shield” to the coax connector made from a peanut package with both ends cut out. Haha, reuse at its finest. But today, I didnt need it since it was not raining.

Next I break out the Ten Tec Argonaut 5 and my N3ZN cw key and connect it with my HamGadgets PicoKeyer and I am all set. Another thing with today is I planned to activate with my 8Ah LiFePO4 battery to see if it can handle an activation with the Argonaut 5. I have my inline power meter this time so I can monitor the voltage too. I also can monitor Amp/hour usage but completely forgot to do this since I got wrapped up in other things. I setup this kit in the cab of the truck as you see so that I could sit comfortably while being in the truck. This works really well when I am solo, but gets tougher if I bring someone with me. As you can see below it was up to almost 3 Ah by the time I took this photo. I wished I had thought to get a photo of it at the end to have that data. I guess I will have to do it again… lol.

But before all this got started I connected my antenna and wanted to check the SWR before starting as I have been experimenting with the radials some here lately and have learned some interesting things about them. I get out my nanoVNA and connect it to the antenna and it shows like it isn’t there…at all. I mess with the VNA a while and try to see if it might have a loose adapter on the VNA or if the calibration might have been done wrong, which I found not to be the case after calibrating it again… Nothing in the VNA was wrong, so I get out of the truck and inspect the antenna and it looks right, nothing is out of the ordinary. I go back and get my trusty little multimeter and decide to ohm the center pin of the coax to the shield to see what it measures, it should be open to the meter…it isn’t, quite the opposite actually, it is shorted. So I immediately go to the antenna and disconnect my brand new, reputable brand coax and check it with it removed from the antenna, it measures good now. Whew! That was close! I didn’t want my new coax to be bad right out of the chute.

So now that I am pretty sure it isn’t the coax, I turn my attention to the antenna. I remove the radiator and test the base to center pin and it reads shorted!! What in the world is going on here!?!? I look closely at the mount, which at this point has the BNC to PL259 adapter on it and nothing else and so I remove the top portion of the antenna mount to make sure water has not entered the plate where it passed through and has created a path with corrosion to the mount. Nope, not there, it looks perfect.

So I remove the adapter and the short goes away immediately. I reinstall it and it returns. I remove the adapter and check it and it measures fine and so does the antenna mount now. What gives? Well, I had a new adapter I picked up at the hamfest from the Wireman and I just installed it to see what would happen. The problem vanished. I tried wiggling the antenna and the coax and pushed and pulled on the adapter and the meter didn’t change a bit, all I can figure is that something in the other adapter is shorting when the adapter bottoms out on the antenna mount at the point where it gets tight.

This is what went bad. On the surface from every angle it looks perfect, but when tightened in place it produces a dead short across the antenna to ground. Don’t blindly think that simple things like this can’t fail. Obviously they can. I will be more diligent in checking my system routinely too. The Argonaut 5 has no SWR meter on it, which is pretty much the only thing about it I don’t like, so I have to use other means of monitoring the SWR. The VNA was that tool today.


Once that was sorted out, I was able to get on the air and make some contacts. Since I was dancing with the end of the UTC day, I figured I would start on 20 meters to improve my odds of getting an activation before the day flips over. The hunters came in clutch and I EASILY made the activation. Once I cleared all the calling stations, I QSYed to 17 meters to see what I could do there as the band was open earlier…before I found the bad antenna adapter…
Turns out 17 meters right during grey line to the west coast will net some cool contacts. All but one are from the west coast and that is always fun as I rarely get to work California due to noise on the bands. All in all, I netted 41 contacts in the log all before the UTC day ended. So it all worked out anyway. Moral to the story is two fold. The first one is to take extra parts for your system and two is don’t assume anything… this adapter looked perfect visually but did not work when installed. Have fun y’all and I hope to hear you on the air soon.


PS: Another perk to working POTA is things like these photos I grabbed of the clouds. You normally don’t see these at home in the house. If I had stayed home or threw in the towel on the antenna (which I almost did) I would not have seen these beautiful sunset clouds.
73 de WK4DS
15 meter POTA activation with DX!
Today I went to K-2169 (Cloudland Canyon State Park) and setup my Ten Tec Argonaut 5 and proceeded to work 15 meters with the intent to not get on 20 meters at all. (I did wander down to 17 meters but not till I had secured the activation on 15 meters first.) I just enjoy the pursuit of the higher bands for some reason. I really like to work 15 meters in particular and I have no good reason why either… I pulled the wire up into a tree in an almost vertical orientation but it could still be called a sloper if you held you head right. Probably a 60 degree angle sloper, but it was up in the tree and the 13’ counter poise was 90 degrees to it.

The view from my operating position never gets old. I love activating this park with the view and the tree canopy giving almost perpetual shade it makes for a wonderful location almost all year round.

This is the view directly behind me. There was a fairly lively family reunion or some such happening in this shelter. I had to turn up the volume a couple of times to be able to hear over them. LOL. This is also one of the reasons I like the location I am at, should it start to rain, I can just unhook the antenna wire and battery and basically carry the radio and tuner to the shelter in just seconds.

Once again, the Ten Tec Argonaut 5 was front and center. I have really grow to love this little radio. I can see why they have such a cult following, the receiver is great, the filters are simple to use and effective, the radio has minimal menu options that mainly follow the “set n forget” ideology, What’s not to love for a CW op? I think going forward this will be my main POTA radio for ops where I am near the truck and I will use the Penntek TR-35 for backpack ops due to its small size.

Another thing I did today was bring one of my large keys, this one has been out of the house several times already so it is no stranger to a picnic table. It is my prototype CW key I made many years ago, it works wonderfully too. I actually use it more than the newer model I made later that is still on the bench connected to the Omni 6+…
I am also using the HamGadgets keyer I picked up off of eBay a while back. This little keyer is the reason I now like using the Argonaut 5 on activations. The Argonaut doesn’t have memories in the keyer, so you have to pound out every bit of the code you send with it. This allows me to record some messages like my CQ and such so I can just hit a button and send the whole call for POTA.

Here we have something that a lot of people gloss over. Fuses. Also note that I have the battery connected to the input fuse and I deliberately chose the 10 amp fuse for the Argonaut since it is only 20 watts out. I need to take my inline meter and see what the draw is on dead key and adjust accordingly but for now I know the battery and radio are fuse protected like this. Don’t neglect to add fuses to your portable system, it still matters as much as at home. This is not a name brand fuse bank either which means I wont load it as heavy as they advertise, we all know these are built to the edge of spec anyway.

I wanted to show the case I transport the radio in. This is some sort of surplus military case that we picked up as Huntsville Hamfest last year for really reasonable money. A little cutting here and there and some new closed cell foam and contact adhesive and we have a case to carry the Argonaut 5 and a MFJ antenna tuner with a wire antenna connection input on it as well. You can see the tuner still in the case as I was using my Ten Tec tuner today since it was in the box with the antenna.


Well, I got on the air today on 15 meters and heard a good bit of band activity and so I figured I would check the POTA spots to see who all was on 15…turns out I was the only one on 15 meters on the spot page. I didn’t check it after that for a while but when I did there still wasn’t anyone other than me that was there. I don’t know why other than the QSB (fading) that was happening. You can see the timestamps in my log where I would go 3 or 4 four minutes without so much as a call and then I would get several in a row. You can also see from the signal reports that when they did come in, they came in strong! As I was working through a tiny pile up with NK8O and VE3CT I could hear a weak station near the noise. Once I cleared the other two stations I could hear YS1MS coming out a little louder now! I was stoked to get central America in the log today! Yeah, I know the Oregon call was probably further away, but I got a DX call in the log from El Salvador today!!! WooHoo! When 15 is open is goes WAY out there! KJ7DT came booming in to me right off the bat. Man I love this hobby!

So it seemed that 15 meters started to close or something as I went several minutes without a call so I decided to tune up on 17 meters and see what I could scratch up. Well, 17 did not disappoint. I worked several stations fairly quickly and I could tell that I was on a lower band than before as the station that was coming in loud on 15 that was kind of near me (N2DI) was weaker on 17 meters. I actually worked several hams on both bands today, which is always awesome. But I did notice several hams from out west were on 17 but not 15 meters. You will notice two Idaho stations, two Utah stations and a Arizona station. It was almost like the signal on 15 hopped right over these guys or they don’t have a 15 meter antenna…who knows to be honest. Anyway at about 21:43 UTC I hit a little pileup of 3 or 4 stations and once again started pulling the callsigns out one at a time. I kept hearing this station down near the noise, but it was solid, just the other stations were a lot louder and I could copy them easier so I went ahead and worked them out. Then I started pulling out the call. I got the number right away, it was a 1 and I knew I had heard the CC at the end…what was that first letter again? W? No, that isn’t right. “UR CALL?” J… It was a J callsign!!! I have never worked a Japan call before, I have never honestly heard a Japan ham loud enough to be able to make a QSO with them, I have heard them before but they were down in the noise. This one was weak, but clearly I could hear the call. J…H…1…O…C…C… YES, it was Japan!!! I couldn’t believe it when he gave me a 539 with my compromise antenna and 20 watts of power! I was on cloud nine for a few minutes after this. I even bragged to my buddies about it. It was a great day today. I had hoped to work a few J calls while I was in Hawaii, but never heard one while I was there. That is just how it goes…lol.

I ended up with 29 QSOs in the log today which is a great day as it means I secured the activation as I worked several DX stations to boot. What is your favorite DX station you have worked while operation portable or picnic table mobile or some such?
73 WK4DS
222mhz Repeater upgrades for better reliability.
When KG4WBI decides to do something, he does it right. So we finally got a stable repeater operating at the repeater site. It has a little bit of a hot receiver, but it is working so we are not complaining.

Above you can see the new and improved KG4WBI 1.25m repeater in operation! This system works like a charm and we have been happily giving it a good work out ever since he built this out.
Up till recently we have been using an old GE Master II (2 meter repeater) that has been retuned to work on 1.25 meters. This was apparently no small feat either as there were extensive notes about what had to be done and all the new information was written out meticulously. This was nice as we soon ran into a problem with it due to the old solder joints and corroded connectors were making it have a plethora of problems. We would chase one down and get it fixed only to find another one a day or two later. What clued us in that we had a good location for the repeater though was that we had found out that we had been talking on the repeater with the finals shut down so it was literally transmitting with the preamp, we found it in the manual and it was something like 90mW if I remember right. I can be wrong here, but that is what I think it was… needless to say it wasn’t much, and were able to ragchew on it and have a great time for the most part. So the tuned repeater antenna up 50 feet above the grade on the brow of the mountain was an excellent location.

Here you have yours truly putting the coax on the wall with plastic “one hole” style tie downs. We wanted to do this so that it wouldn’t risk crushing the coax as we tighten it down.
Well the preamp finally went out too and we actually had to shut the repeater down for a while till we could go work on it. So we get a day and go trouble shoot on it a while and the problem comes and goes while we are there looking at it and the silly thing even juiced up the PA for a few minutes to full output while were testing into a dummy load. Then it all went out again and there was nothing we could do without an oscilloscope to check for signal. At this point we shut it back off and go home to look at oscilloscopes to see what we could find that would work up to 250mhz…

In the mean time, Roger gets out a couple of mobile 222 radios he has and orders a Hamgadgets repeater controller off the interwebs. He then proceeds to build a working repeater out of these two radios with only a couple of slight modifications and just goes to the site and temporarily connects them to the existing duplexer and powers the system on. It takes him a few minutes to get a few of the settings right and BAM! The KG4WBI 1.25m repeater is back on the air! These radios work surprisingly well too. We ran it like that for a few weeks with the radios laying on a 5 gallon bucket if memory serves. Well, once we figure out that these radios work fine in this role, we decided to make the install a little more permanent and get all the repeater parts out of his son’s way so he can work on cars again… lol. You see, his son wants his garage back so he can tinker on project cars…

The antenna is sitting on top of a 48’ push up pole that we guyed too to the site once we got it raised just to eliminate any chance of wind blowing it over. The power supply below was chosen for the main power supply should we choose to run it on mains again directly at some point. So this is here for that expansion should we choose to do it.

Instead we chose the route below. We have a 10 amp smart battery charger wired to these batteries and since we are only running 25 watts, the whole thing only draw about 7 or 8 amps on transmit. I want to say we tested it and measured right at 7 amps on transmit, but this means that if the power fails for any reason, this repeater will not miss a beat for many hours. something on the order of 30 straight hours of transmit… Which means in reality it will last 2 or three days of casual use before the batteries expire. By then we will have been able to take some solar cells to the site or even a small generator should we want it to stay online past that. Most power outages for us in this area will last less than one full day so this means we should never have the repeater go offline for power failure 99% of the time.

As you can see above, Roger also installed a copious amount of these RFI chokes on the power wires everywhere! These work reasonably well and are really easy to install so there isn’t really a reason not to take the precaution and use a few of them. We were hoping to suppress and RFI coming out of the smart charger and as far as we can tell, either the charger has good radio noise suppression or these chokes did the trick…or a combination thereof.

Below you can see one of Roger’s experiments. This is part of the “if one is good then two is better” plan. He is testing how clean the skirts are with the smaller duplexer wired in series with the larger one. It has incredible sensitivity on receive without even a hint of the transmitter RF in it. I think this actually worked… Out of this duplexer you see the coax going into the lightening protector which is grounded with that huge ground wire you see in the photo. The coax then comes out of the lightening arrestor and heads out to the antenna with LMR 400 DB.

I just wanted to share something about ham radio that wasn’t a POTA activation for a change… lol. Thanks for reading along and 73
WK4DS - David
2023 Huntsville Hamfest from the view of a vendor this time!!!
Man time flies! It has already been a year since me and Trey had come over and bought all those military surplus cases and stuff! I cant understand how that has happened…
Anyway, I signed up for a table in the “bone yard” which is indoors at Huntsville, which is nice since it means it is out of the direct sun in August and has air conditioning. Well Trey arrives the day of the event and I already have my stuff int he truck, we just load a couple things he is bringing and we are off.
Side notes: Check out the vintage Ten Tec t-shirt I only get out for this and sometimes Field Day, I am probably the only person alive who still has one. I am also monitoring two ham bands here, our 2 meter simplex frequency and our 1.25 meter simplex frequency, We used both over the course of the day to make contact with friends. Back to the story already in progress…
We get to the convention center right on time and find a huge line of cars waiting to get into the show area. Once we work our way through the line we figure out these people are parking in the underground parking lot and we need to go to the back to unload the truck, well we get out of line, unload the truck and setup in short order. I can tell already it is going to be a good show for me when I can’t even get the truck parked before Trey (who went with the stuff to the table) is already being pummeled by dealers wanting to buy my stuff! This is a good sign!
By the time this photo was taken, the Icom IC 705 and tuner were sold. It literally lasted 5 minutes. this is good as the proceeds from the sale of this radio went to purchase the sBitx radio that I want for POTA instead. I had also already sold one of the two power supplies I took over as well. Common items seem to have went really fast to be honest.

Here, Trey (KG4WBI) Is getting settled in for the long arduous day of minding the table. Also, at this point I still had the Elecraft K1 pictured here as well. More on this radio later.

Once the doors opened, it was a free for all till about lunch time. It was REALLY crowded with so many people that it was hard to imagine the total number of participants. Everybody seemed to have a radio, even the little kids!

Things moved off of the table steadily all morning though and I had high hopes that I would actually achieve my goal of not taking any of it home with me! Each little item, one by one, would get picked up and bought by some enterprising person looking for the find of the day. I was happy to help them too.

After lunch I made my way over to the POTA table and grabbed a photo for the blog, they were pretty busy so I didn’t bother them with my shenanigans but left them to inform the youth about the wonders of ham radio. While out on my stroll I did check on a couple of items I was looking for and stopped to play with the N3ZN keys for a minute as they are SWEEEEET! Then it was back to the grind of tending “shop”…

I continued to see the stuff I didn’t use goto new homes one at a time till I was down to the K1, the Ten Tec 238 tuner and the Comet Antenna Analyzer. Then the strangest thing happened. I had to goto the bathroom. Well, that wasnt really all that odd, but what was happening at the table was. Turns out Josh from Ham Radio Crash Course had sent out scouts looking for a K1 or a K2 and they found mine and told him. He was livestreaming the event too! Well, he finds the table and makes his way over to it to find Trey minding the booth in my absence. You can actually watch his stream and see the whole thing transpire, just fast forward to about the 18 minute mark to see where it all starts.

A little back story here. I love the little K1, it was a favorite of mine for many years and I have used it off and on for that time. I just took a long hard look at the gear in the shack and realized the K1 sits on a shelf WAY more than not and I needed it to goto a good home where it would see more air time. So with a little sadness, I packed it up to goto the hamfest to find a new home. I get attached to things like this way to much and this is an exercise in decluttering my life, I wanted to move out a ton of gear and not just throw it away or such but turn it into something I would use instead. The K1 is just a plain fun radio to use, hence the pain in seeing it leave. I believe Josh will do a wonderful job at this and look forward to seeing the little K1 on his youtube channel soon.
It was great interacting with him and getting to chat for a minute, he took it straight way over to the test bench and had them check it for operation and he was happy it worked as advertised, All of this is also in the livestream…lol.

Then I had one more trek around a little to pick up a few items I have been looking for and actually found. I got a coax and some connectors from the Wire Man, I got the drop-in desk charger for my old Icom HT I have been using lately and it even came with a working radio! So now I have two!!! HAHA, why did I come to the hamfest again??? Then I bought a cable from another cable builder, ABR Industries, and I must say they look really good, I wanted a new coax for my POTA work and he builds his with common mode chokes built into the cable, that is really nice and i am looking forward to testing this cable on the nanoVNA to see how it compares to my homebrew chokes I made.
Then the finale of the day came when I went back over to N3ZN’s booth and talked to him about a small POTA key. The next thing I know, I bought one!

This key is tiny, at about 1.5” by 1.5”, it will be an awesome POTA key. I am going to look into how I plan to use it and expect there to be blog posts coming soon about it. I also got to talk to the man himself while he filed out my ticket on it and he is an amazing guy, I count it as a blessing to have met him. Hopefully we will cross paths again soon. If I get the chance I want to share with him my keys I built back in the day, we talked for a while and he is one of the few people that can actually appreciate the work that went into making them.

In closing I wanted to share a photo of my current dream rig, the Elecraft K4 with or without the amplifier, I just want the radio to be honest. At some point I will upgrade from the aging Ten Tec radios in my shack and this is probably what will replace them. I love everything about this radio and quietly take a peek at it when I am at the hamfest, but for now, there is POTA to do and contacts to make with the gear I have!
PS: All I brought home was the antenna analyzer and the Ten Tec tuner, both of which I dont mind holding on to for a while longer…
73
WK4DS-David
Activating a park on the side of the road.

I have been here before but never setup like this. K-0716 has park boundaries in both Georgia as well as Tennessee. I have activated both states with this park and have found this to be a great spot for a simple activation when time is short since the pull-off area is inside the park boundary itself. There is also a parking lot at the top of the quarry too and I will use it next time as I think it will be a little bit less exposed as well as I think I can get a wire up in a tree there. This location is called Eagles Nest and is a rock quarry probably used when the old Wauhatchie road was built back in the day, I couldn’t find any reference to the name of the place online, but it has this huge NPS sign so it is a thing…lol.

Today saw use of my trusty 20 meter ham-stick and the single 20 meter tuned counterpoise wire. I ran the counterpoise over to a large rock and draped the weight over it so that it kept the wire taught. This made setup pretty fast and simple, I was on the air in no time really. Although I did start out with the external speaker on my power pack for audio, I quickly realized the error of my way as the traffic was going by on the other side of the truck and made copy difficult at best. So I switched to my ear-buds and suddenly was able to copy all sorts of stations I couldn’t hear before!

I am pretty sure this forms an elevated counterpoise system and makes the antenna work better than laying the counterpoise on the ground…

The station today was setup in the rear floorboard of the truck and I was using the power pack I built containing a 3Ah Bioenno battery. I just used it to prop up the radio so I could see the display are reach the Aux switch for memory keying.

There was a little QSB on the bands today, but for the most part they were open really good, I was able to get runs of 10 minutes at times with strong signals coming in and I was even getting decent reports back to me. for the most part. But what was strange was that after I worked N9EDL it was like the band just closed or something, I called CQ for 10 or 15 minutes without so much as a peep coming back to me. It was like someone just turned the switch off… Then again the last 5 or so in the log are starting to spread out more than the previous contacts so it might have just been a deep null in propagation and if I had stuck it out it would have come back.

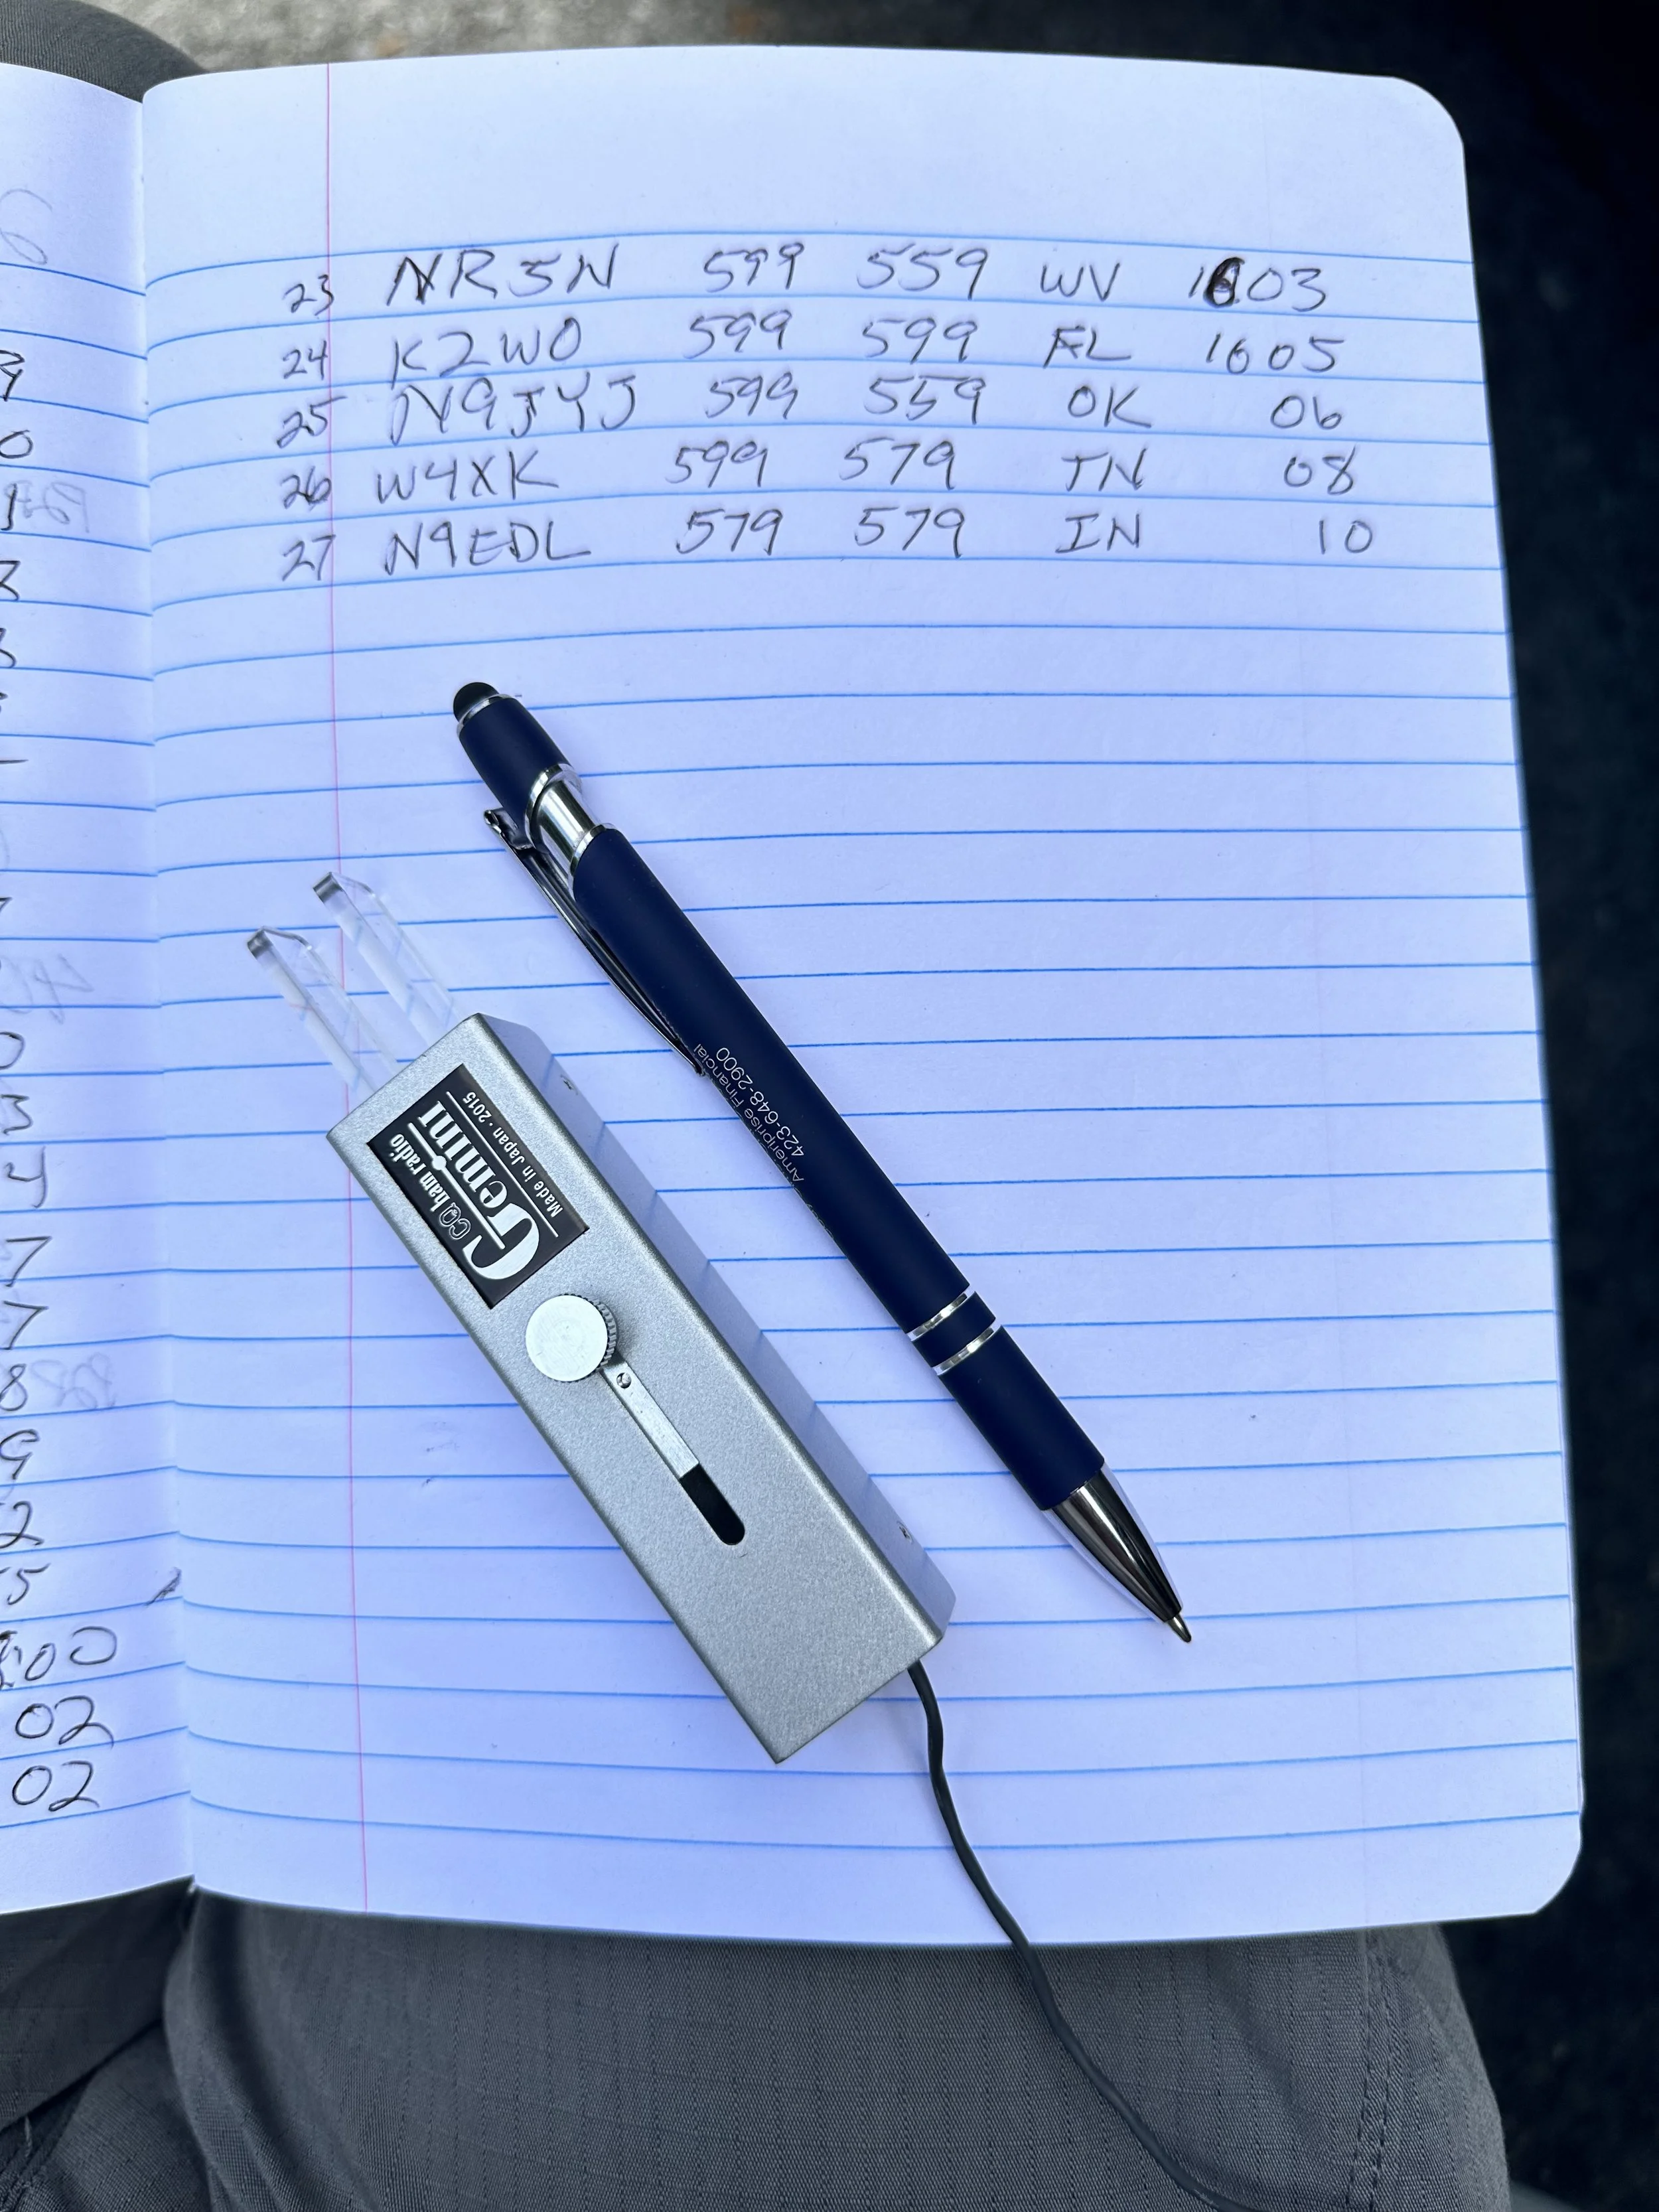
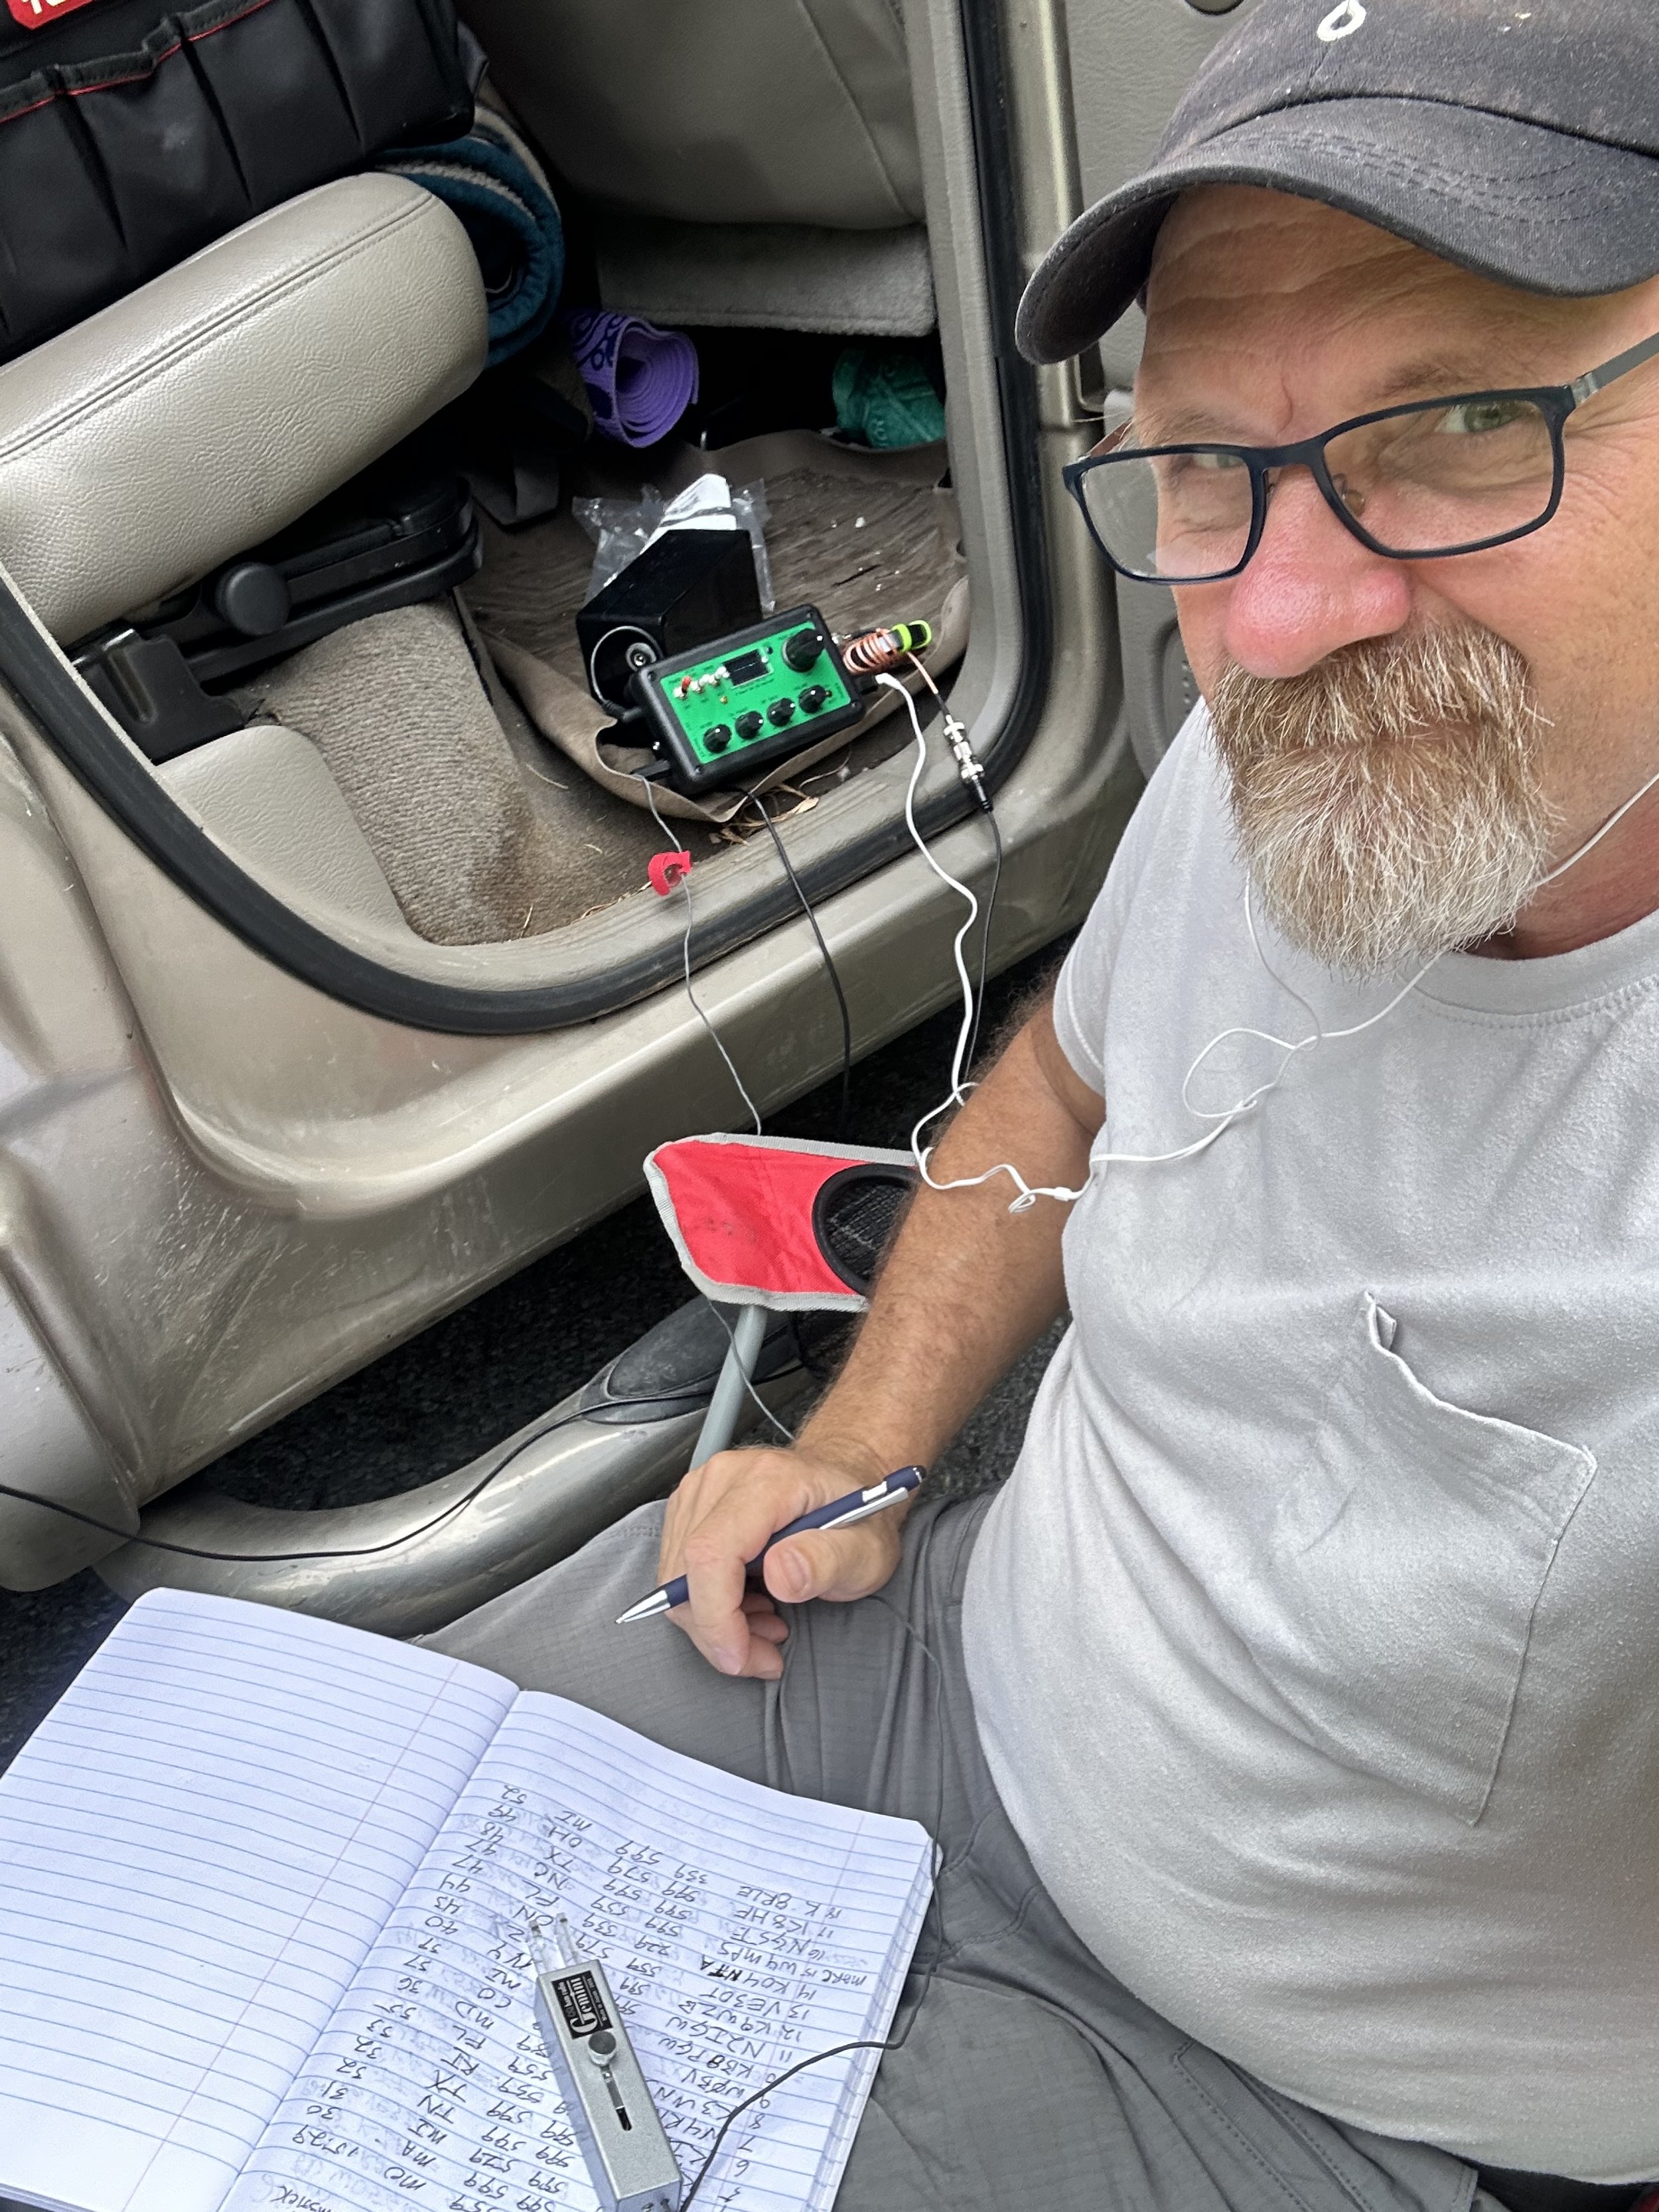
I took that as time to close up shop though and shut down the radio and packed it all up. It was a great little activation and I had a great time doing it even with the traffic on the other side of the truck. Good quality headphones saved the day here, so that is the lesson from this trip. Until next time. 72 de WK4DS
Activating a park in Louisiana was different…

I went to New Orleans for a conference and we stayed one extra day to do some sightseeing. We did a tour in the morning and ate lunch and figured I had time to ride over to a nearby state park and get an activation in before supper. I chose Bayou Segnette State Park (K-2356) as it was only about a 30 minute drive from the B&B we were staying at.

We get there to find a beautiful state park and almost every pavilion was occupied by these huge family reunions! That is fine though as the park is really roomy and there were plenty of picnic tables elsewhere. We looked for a picnic table in the shade of a tree that was keep kind of close to the parking lot so I didnt have to transport my gear very far.
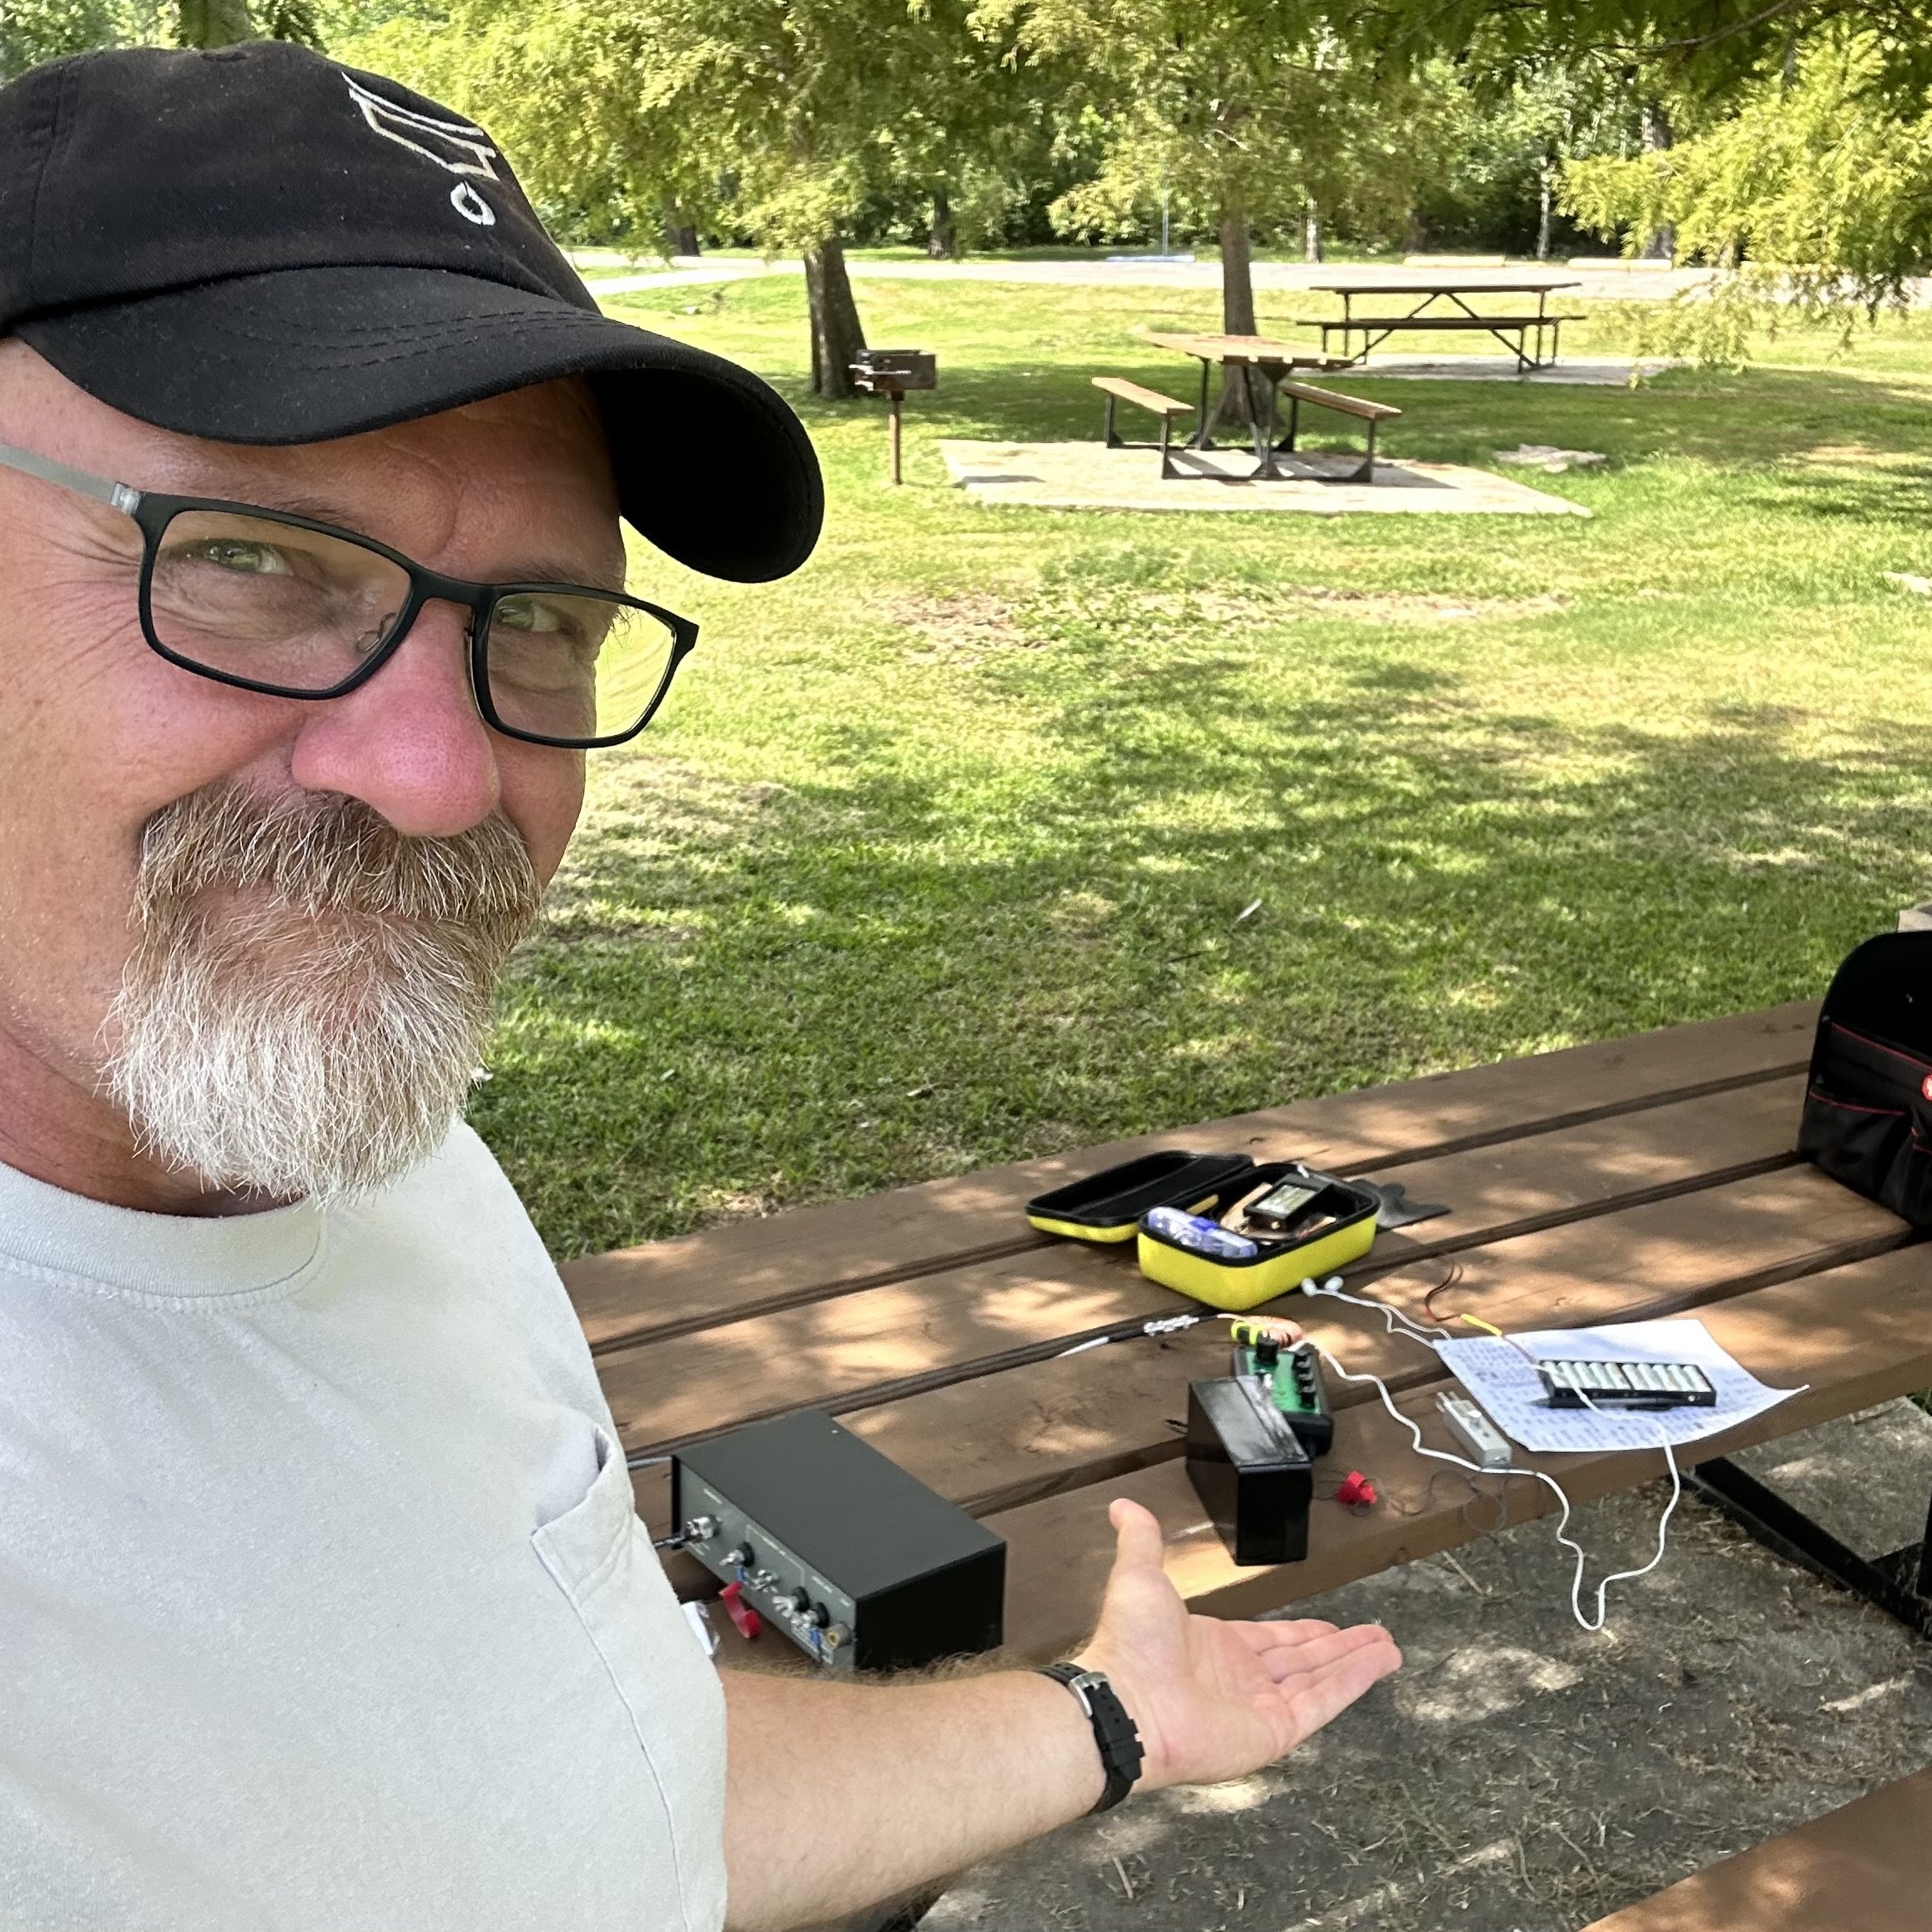
We also decided to come during an apparent heat wave too! The temps easily reaching 99 degrees (37.2C) every day so it was like standing in front of a blow dryer while outside. It was just plain hot… This was the reason I was looking for some shade to setup in, at least we didnt have the sun beating down on me while I worked some contacts.

So I found a table by this abandoned playground. Lol! It really wasn’t abandoned but no kid wanted to touch that stuff with the air temp that high!!! The shade made all the difference though as it was kinda pleasant once you sat there a minute, got a little sweaty and then a breeze would blow.

I had my TR-35 kit in the truck from an activation last week so I got out the throw line and threw it up into this cypress tree. In the photo below you can see the table and I am pointing to the spot where the throw line went over the tree. The antenna didn’t reach into the tree itself so it was a great placement in my book. The wire being fully exposed and not crossing tree branches makes a big difference to me if for no other reason.

This made my wire a sloper running uphill to the southeast. I ran the counterpoise out at about a 90 degree angle to the 41’ wire and connected them to the tuner.

I tuned it up on 17 meters and dial around the band for a minute to find HA3NU booming in and working a fairly deep pile up. I thought about trying to work him for a minute but finally decided to find an open frequency and call CQ instead as I wasn’t sure how much time I would have. Turns out I had about an hour… good call.

I called CQ for about 1 minute and was blown away when I worked SM2SUM in Sweden right out of the gate. Today is going to be a good day…I thought. The very next station was KP4M in Puerto Rico!!! It just keeps getting better!!! I worked a few more on 17 meters and then made the jump to 20 meters (where the scores can really change…)

I worked another 26 people on 20 meters in about a half hour or so, bagging KP4M again on 20! Shoot, I even worked Paul KJ7DT today up in Idaho! The bands were pretty good if you ask me.
I wished I had time and a radio that would cover more bands to be able to get a few more out of it, TenTec Argonaut 5 I’m looking at you buddy... Maybe next time… It was a great day though and I added Louisiana to my states that I have activated!! I hope this motivates you to get out and do some POTA too. Thanks and 72!
Somedays you just make a mistake…

Today is Sunday, 6 AUG 2023 and I had a small window of time to get in an activation in the late afternoon. Teresa also decided to ride with me so she could get out of the house and planned on using her computer to do some projects she had been wanting to do. I forgot she mentioned that she would need AC power and this turned into a problem for me or so I thought. The inverter I have in my truck is apparently not very “clean” from what I saw today on my S meter…once again so I thought.
We get to the park (K-2169) and I grab the photo you see of the storm front coming into view. This is when I realized I would need to hurry if I was going to setup in time. I throw out a counterpoise and stuck the 20 meter hamstick on the back of the truck and ran the coax into the cab. I simply taped up the connector to keep the rain out and got back in the truck just in time before the deluge began.

So then once in the cab with it raining buckets outside, I do some yoga moves to get turned around and uncrate the Ten Tec Argonaut 5 transceiver. Since it is in that huge military case in the back seat, it was not easy to get it out from the front seat with the doors closed and Teresa in the seat beside me. I finally get the radio loosed from the surly bonds of the hard case and setup on the armrest of the truck seat.

I learned something at this point. I had blamed the inverter and Teresa’s computer for the rf hash I was hearing on the radio. Well, turns out when you are setting up in an active thunderstorm that the atmosphere is charging and discharging constantly. The static buildup is audible and visible on the radio as I watched the S meter climb to S9+10dB, hold there for several seconds then a flash of light would happen and the noise floor would drop to S2 and I could hear other stations again. Then the process would start over…

I listened to this a couple of times fascinated by the phenomenon I was witnessing in real time in front of me. Then it occurred to me that the static discharge that was resetting the S meter to normal was LIGHTENING!!! “Good grief, I’m such an idiot” I thought… I hurriedly shut off the radio and disconnected the coax as fast as possible. I threw the cable into the back seat and waited on the rain to let up. I figured since it wasn’t grounded that it wouldn’t attract a lightning strike and I was right as it didn’t hit the antenna. That is my theory at least… Once the rain subsided to just a drizzle, I pulled the truck forward to get the counterpoise out of the grass, got out and quickly broke down the antenna and stowed it in the truck bed. Once back in the truck the rain picked back up and I threw in the towel at this point and just headed home.

Mother Nature has a cruel sense of humor at times though so just as soon as we cleared the park and was on HWY 136 headed back home, the rain literally stops and the clouds start to break up. I was too frustrated at this point so I just went on home instead. I don’t count this as a failed activation officially as I never sent a CQ, but in reality, I should as I had the entire station online and never made a single contact. That would make this the second failed activation in my entire POTA “career” you might say. I should have believed the weather man…errrr… app when it said a front was inbound. Next time I will pay attention.

I never even opened the logbook today…sad. I should have stuck it out 15 more minutes, I could have gotten an activation in by the end of the UTC day at least…
Thanks for following along, but the point of this article is to pay attention to the signs your radio gives you about thunderstorms. If you see the S meter climb and it has a ton of static on the band with a constant signal and then it just drops back to normal all at once and you either see a bright flash or hear thunder a few seconds later, this is probably the clouds and you might want to turn your radio off and disconnect the antenna…just as a precaution.
73
WK4DS - David
How about this new tiny CW keyer I bought?

I have been on the hunt for a quality keyer for my Ten Tec Argonaut 5 radio for a long time now. You see, this radio is a bucket list item for me and I finally found one. Well, just like all Ten Tec radios, this one only has a simple keyer, with no memories to record messages like most modern radios today. I really enjoy having message memories to send CQ and even sometimes to send the closing statement at the end for a number of reasons. So enter the external keyer…

So to spoil the outcome right at the start. This keyer is just what the doctor ordered. It worked just exactly like I wanted it to. I love the form factor, the size and especially the functionality. It has so much going on that I had no idea was there, like it has macros… kinda. It has these short hand codes that will call up other memories or repeat information or trigger other functions. One that is really neat is that you can change the keying speed with a command embedded in the memory message, so say your in a contest and you want to send the 599 BK really faster as literally everyone is using this exchange. Then you can add a small command at the beginning to change the speed of the message to say, something like 35WPM, then send the exchange and at the end execute another command to change the speed back to what the knob on the front is set for. This works, I tried it. On top of that, it will do serialized messages too! This little keyer is loaded!


Below is what you get when you buy it. The widget and a slip of paper with the info on where the manual is online. I downloaded the manual and promptly printed it out. The manual is well done, easy to understand and also has the assembly instruction as apparently this can be had in kit form too.


The front of the keyer has 4 buttons and the speed control knob, that’s it. It has everything you need and nothing you dont. Plain as that.
Another thing that I kept going back to was just how small and light it is. It weighs practically nothing and is about the size of a pack of playing cards cut in half… As for the buttons, there are things these do other than record and playback memories. By pressing multiple keys together, you can do all sorts of other things, like go into the menu, or set it for tune up mode where it will send a constant carrier so you can set the tuner for the antenna and so fourth.

The back is even simpler. The sockets are as follows: left to right, The headphone Jack for use as a practice oscillator, the paddle / straight key input, and then the output used for keying the radio. By the way, this thing even auto detects the keying device and sets itself to the right mode for you somehow. That is some serious dark magic right there.

These are the screws you will remove to replace the battery…next year. It is supposed to last that long, we shall see as I plan to use this radio a lot more now that I have a memory keyer for it.

You will see below that I had to adapt the cable going to the Argonaut 5. This is because the output is setup to send to the radio as a straight key. (I am pretty sure my other keyers were the same way and I simply forgot this little fact.) So you have to set your radio to straight key mode and then come up with a 3.5mm mono to 3.5mm mono cable. Well I didn’t have a cable so I used one of my headphone adapters that turns stereo headphones to mono headphones and it went right to work. I will most likely get the right cable pretty soon, but for now this will get me by just fine.
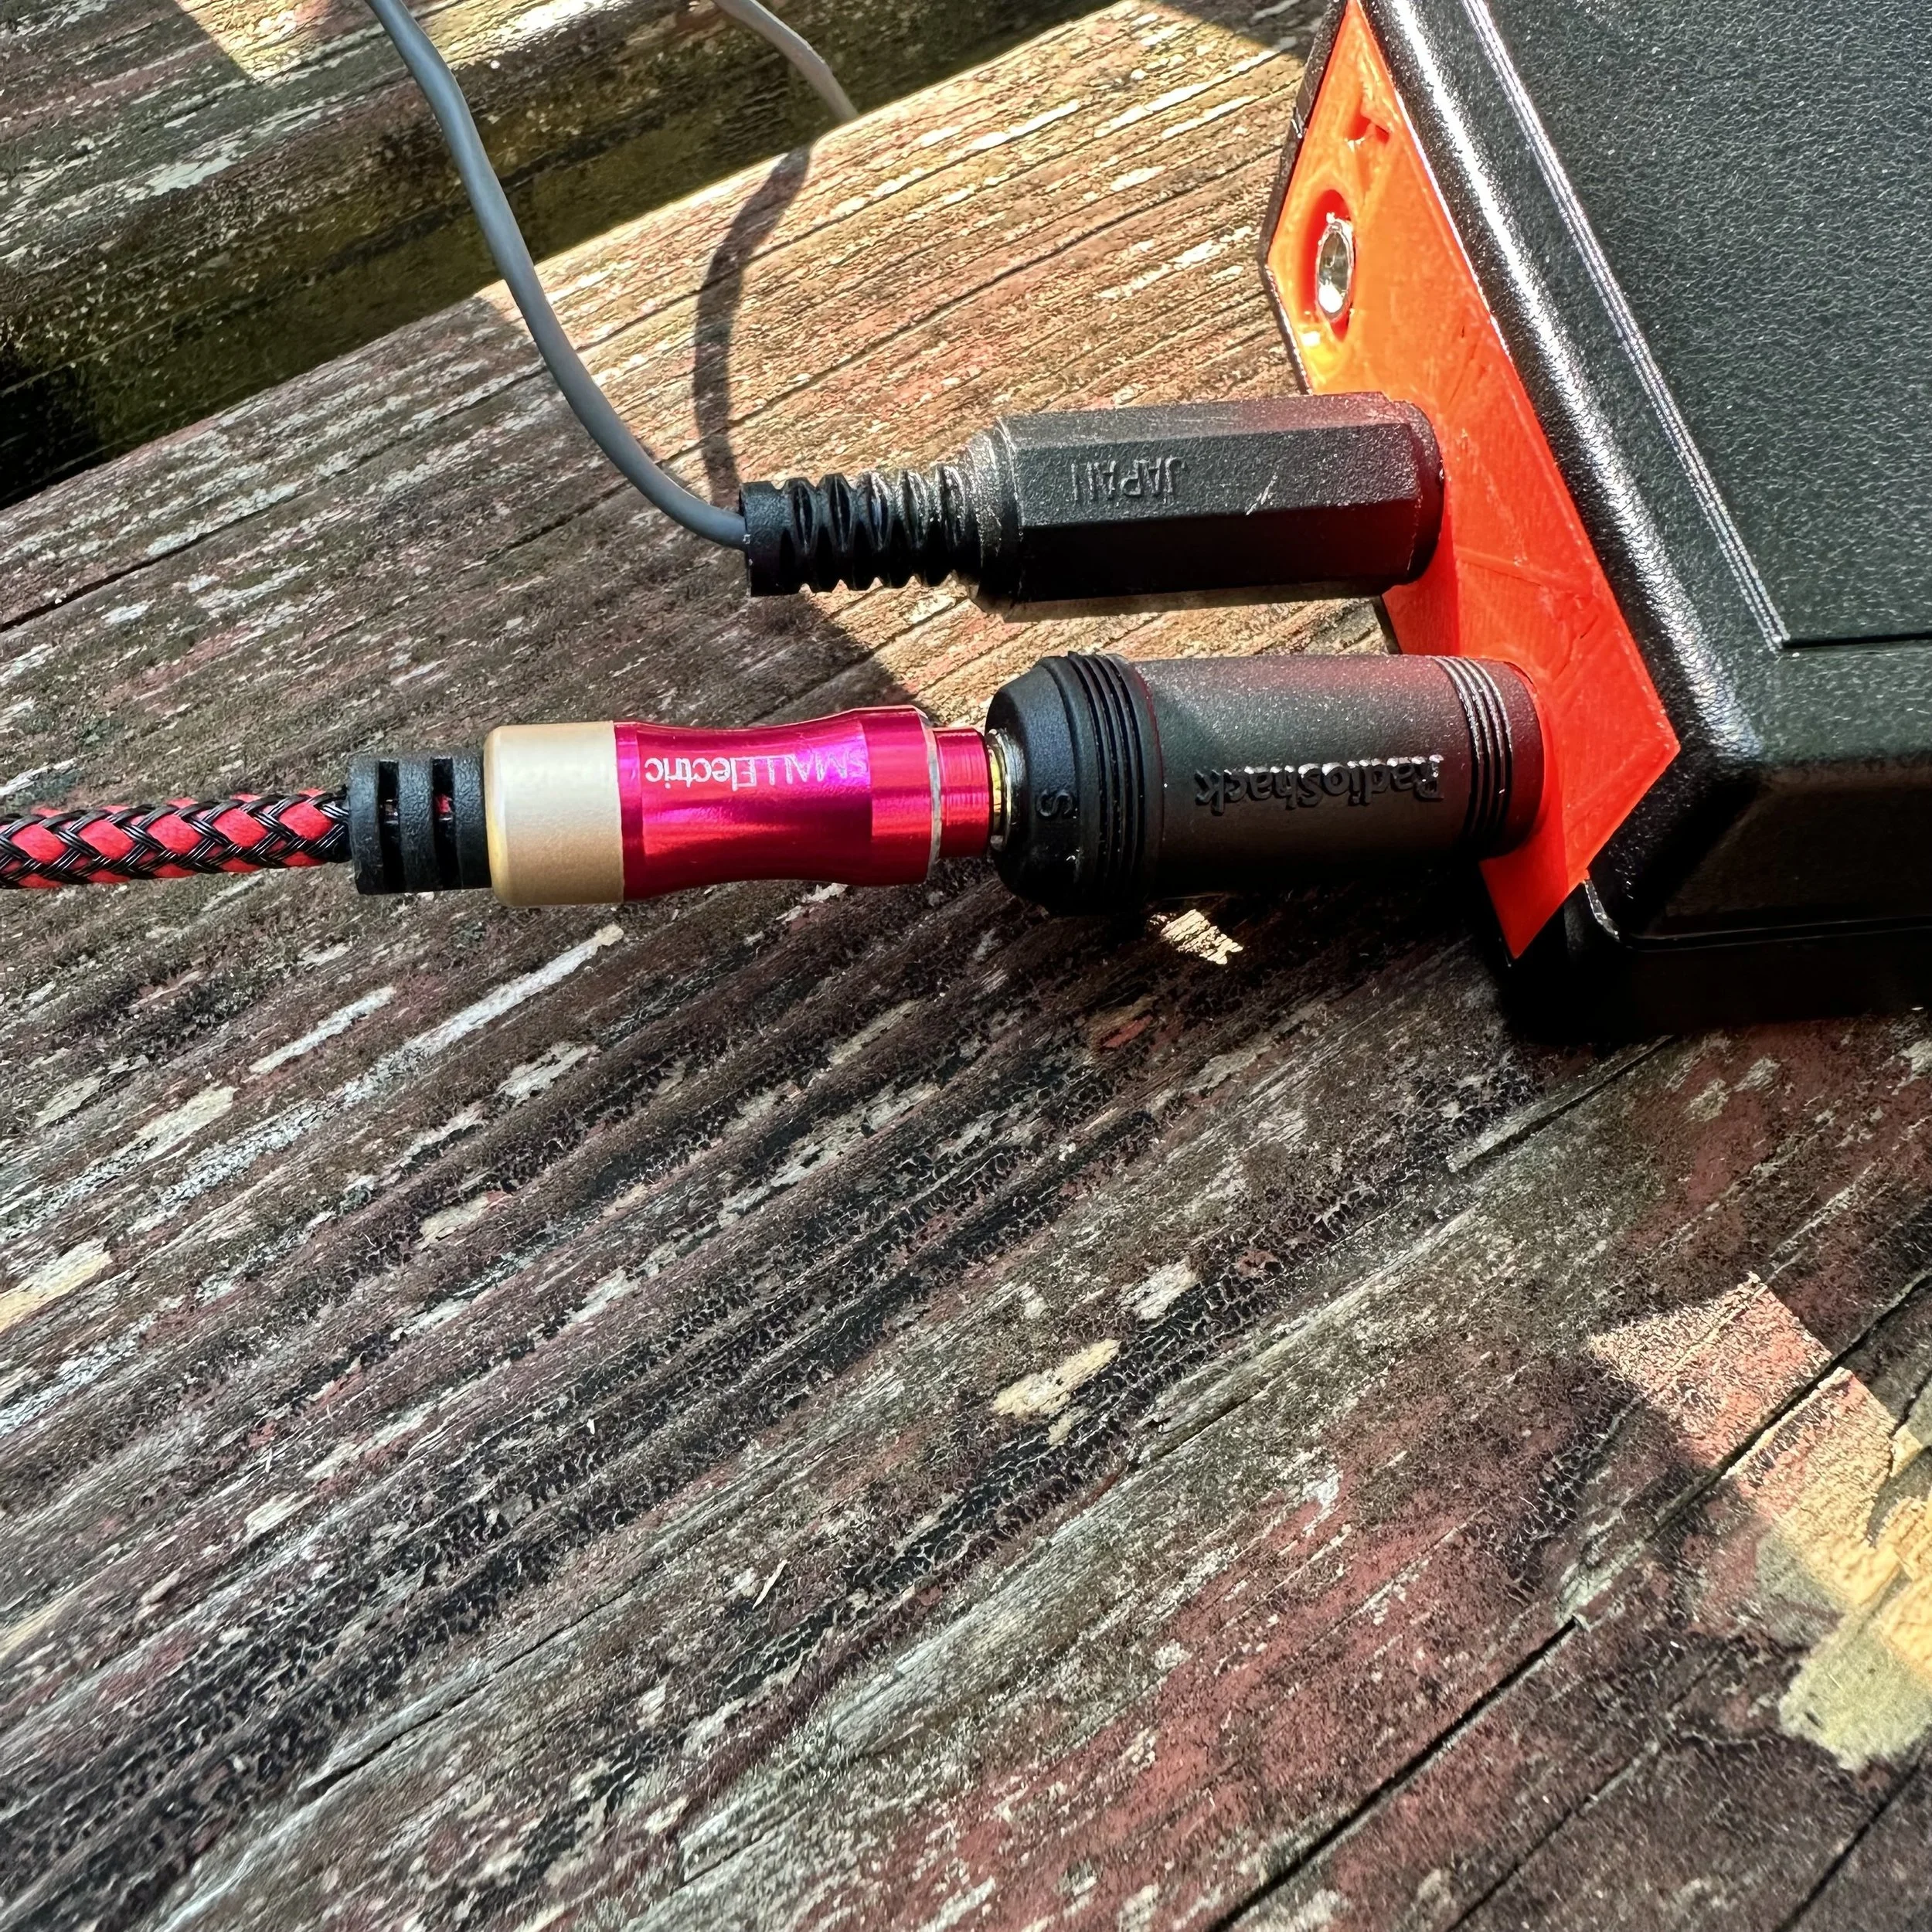
When I had the keyer setup in the shack at home, it performed flawlessly and I was able to get it programmed and used it to chase some DX as well as hunt a bunch of POTA activators before deploying it.
As soon as I got to the park and setup, it went nuts on me. The code had this odd “modulated” kind of thing going on and was unusable. So now what???

Turns out this coax was my problem…well not this coax in particular but the fact that it was so short. You see, the antenna was connected directly to the back of the tuner so the RF was in close proximity to the radio. I speculated that this might be the problem so I got in the support box and found another cable that was longer and spread the radio set out as far as possible. This solved the problem for the most part. I think that some RF choking on the cable going to the radio will help more too.


I also included my common mode choke since this cable is BNC on one end to get rid of that possible problem. This also required me to convert the connector on the radio from SO-239 to BNC.
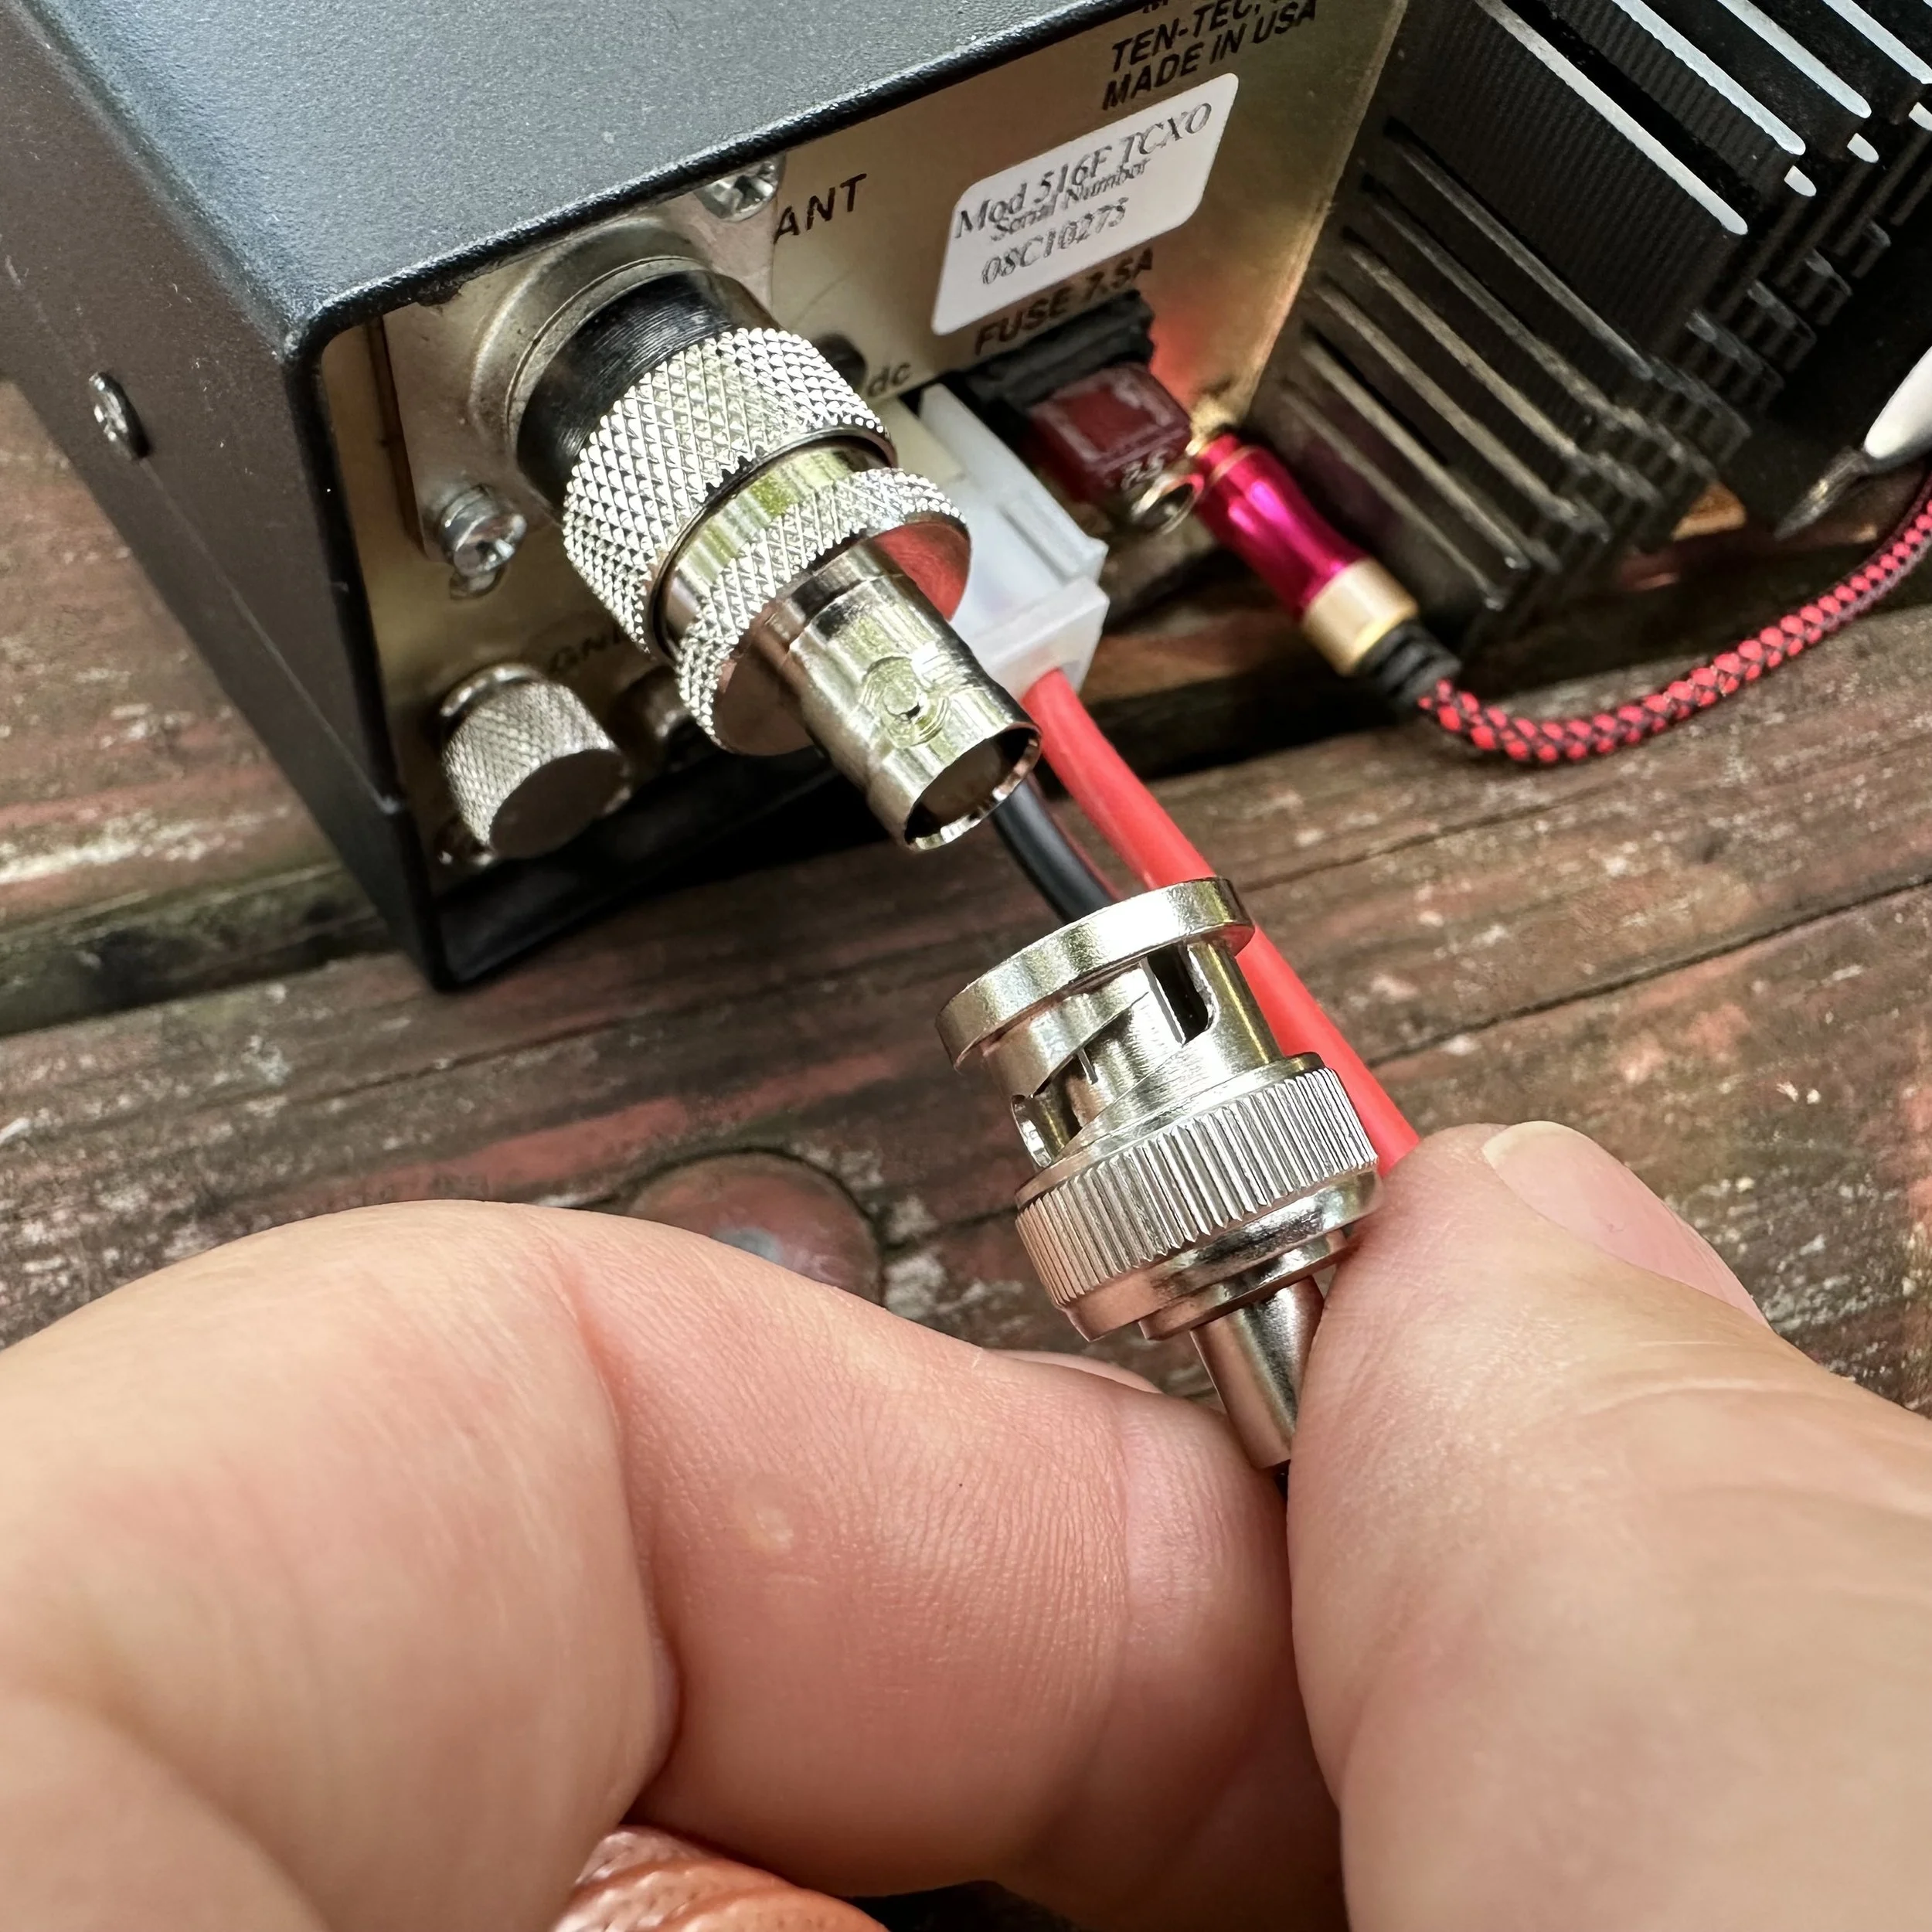
The radio performed very well at this point and I was able to secure an activation pretty easily even though there was heavy fading with the bands on this day. I could literally hear a 599+20dB station fade to almost nothing while copying the simple POTA exchange. It was really bad at times. If you will notice W8LEO is struck through with a 599 signal report, he called me and I never heard him again, he just vanished.


All in all, I am almost done sorting this little machine out and I am confident it will perform wonderfully on the air for many upcoming activations in the future. It is always nice to take a chance on something like this and find out it is much more than you bargained for. If you want one for yourself here is a link to the website and a screenshot of the eBay listing for reference. Hamgadgets.com Thanks and I hope to see you soon.

Band conditions can be evaluated quickly.
When I figured this out I was doing an activation and decided to take a bunch of screen shots to show what I am talking about.
The other day I was activating K-2169 and kept getting signal reports with people telling me there was QSB (that is band fading for those that are not familiar with CW shorthand terminology). A little later into the activation I went to the POTA spot page to check to see what my most recent signal strength report was and thought…self, what does the history look like for this activation?


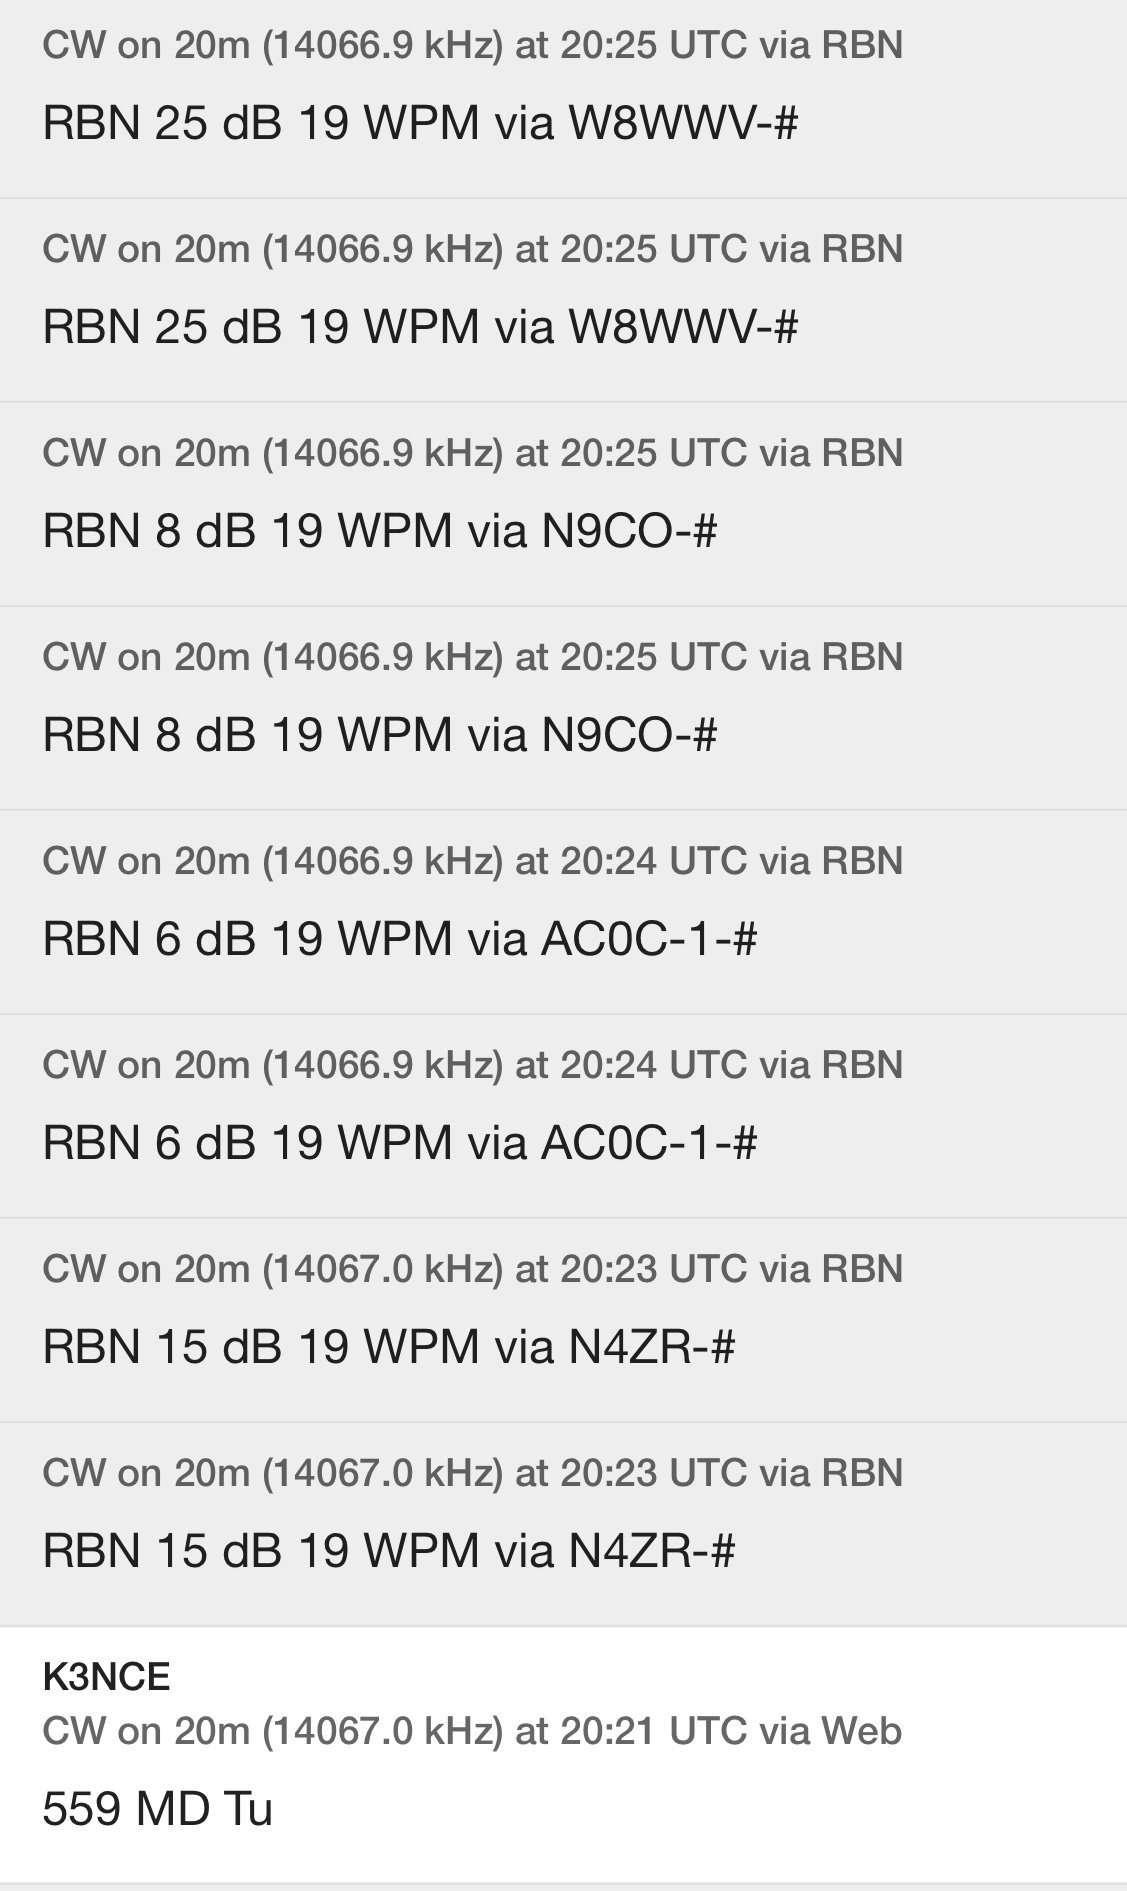

Now you have to take these reports with a grain of salt as the reporting stations are all over the place, but the signal reports as still indicative of what is going on with the band from where I am to the areas these listening stations are in. It also shows that the signal was fading in and out pretty hard every few minutes which is why I would go for five minutes at times with no one calling me back. then I would work for or five in as many minutes. These little short band openings are all I got when running QRP… So to get these reports you will log into the POTA spots page and pick a station that is active and click the little symbol next to the re-spot button and it will pop up on the screen. Looking at the history a little will show if the band is strong or weak or that it is fading in and out and even what the interval of the fading is so you can kind of tell what will probably happen in the next few minutes. I think this is a valuable resource that a lot of people don’t even know is there.
I hope this helps someone on their ham radio journey. 72
Testing a new power pack for backpacking…
This is the idea… I think I want to do some SOTA activations after listening to K4SWL talk about them on his YouTube channel. So this means that I need a smallish radio setup to be able to do these kinds of activations. I have to be able to pack them in and out from the SUMMIT, yeah, the very tip top of a mountain…

Today’s blog post covers the idea I have for a power source. I am going to use AA batteries. I know I can buy a Bioenno battery, but this gives me the options of picking up regular alkaline batteries if need be (I plan to make a couple of aluminum dummy cells for this option so the voltage wont be too high). It also allows me to repurpose the cells for my HT radios too as I have them configured to used these batteries as well. I found these 10 cell battery holders on Amazon and ordered one to try it out. Since it hold 10 cells, the voltage is higher and gets closer to the regular battery voltage everyone uses. The cells are 1.3 VDC when charged so this adds up to just over 13 volts in this kit. I measured the pack today before the activation at 13.2VDC…Perfect for what I wanted. So I load up the new battery pack and head over to K-2169 to test out the power pack life with a POTA activation.

The above photo is an optical illusion that has to do with the shutter speed of me camera and the refresh rate of the display on the radio, to the naked eye it was not gapped like this but looked fine. This little radio is a perfect little radio for SOTA so I am going to use it for that purpose.

Here is the basic radio kit as I plan to deploy it. The headphones are smaller and lighter than my box speaker/battery pack I made. I can also hear better on headphones too so it just made sense to use these instead. These are Sony headphones if I remember right, but I could be wrong. I will also be using my little travel key I bought as it is perfect for this project…till I get the new one that I plan on in the not-to-distant future.

I also plan to use a 40m EFHW antenna for my activations and just work 40m and 20m bands with it. This is the simplest antenna setup I can come up with as it doesn’t require a tuner and is pretty small for what it can do. I might get one of the compact verticals at some point, but for now that will have to do. I will also take a piece of throw line and a throw weight as well to get the antenna into the air. I will also add a piece of coax as this is the counterpoise in most cases. Otherwise I will need a coax AND a counterpoise… so I will eliminate the counterpoise and just work off the coax shield instead. Above is the tuner I used today as it was still in the truck from the last activation and I know how good it works.

This is the beauty of using campgrounds to activate, there are plenty of tie off points for your antenna system. LOL

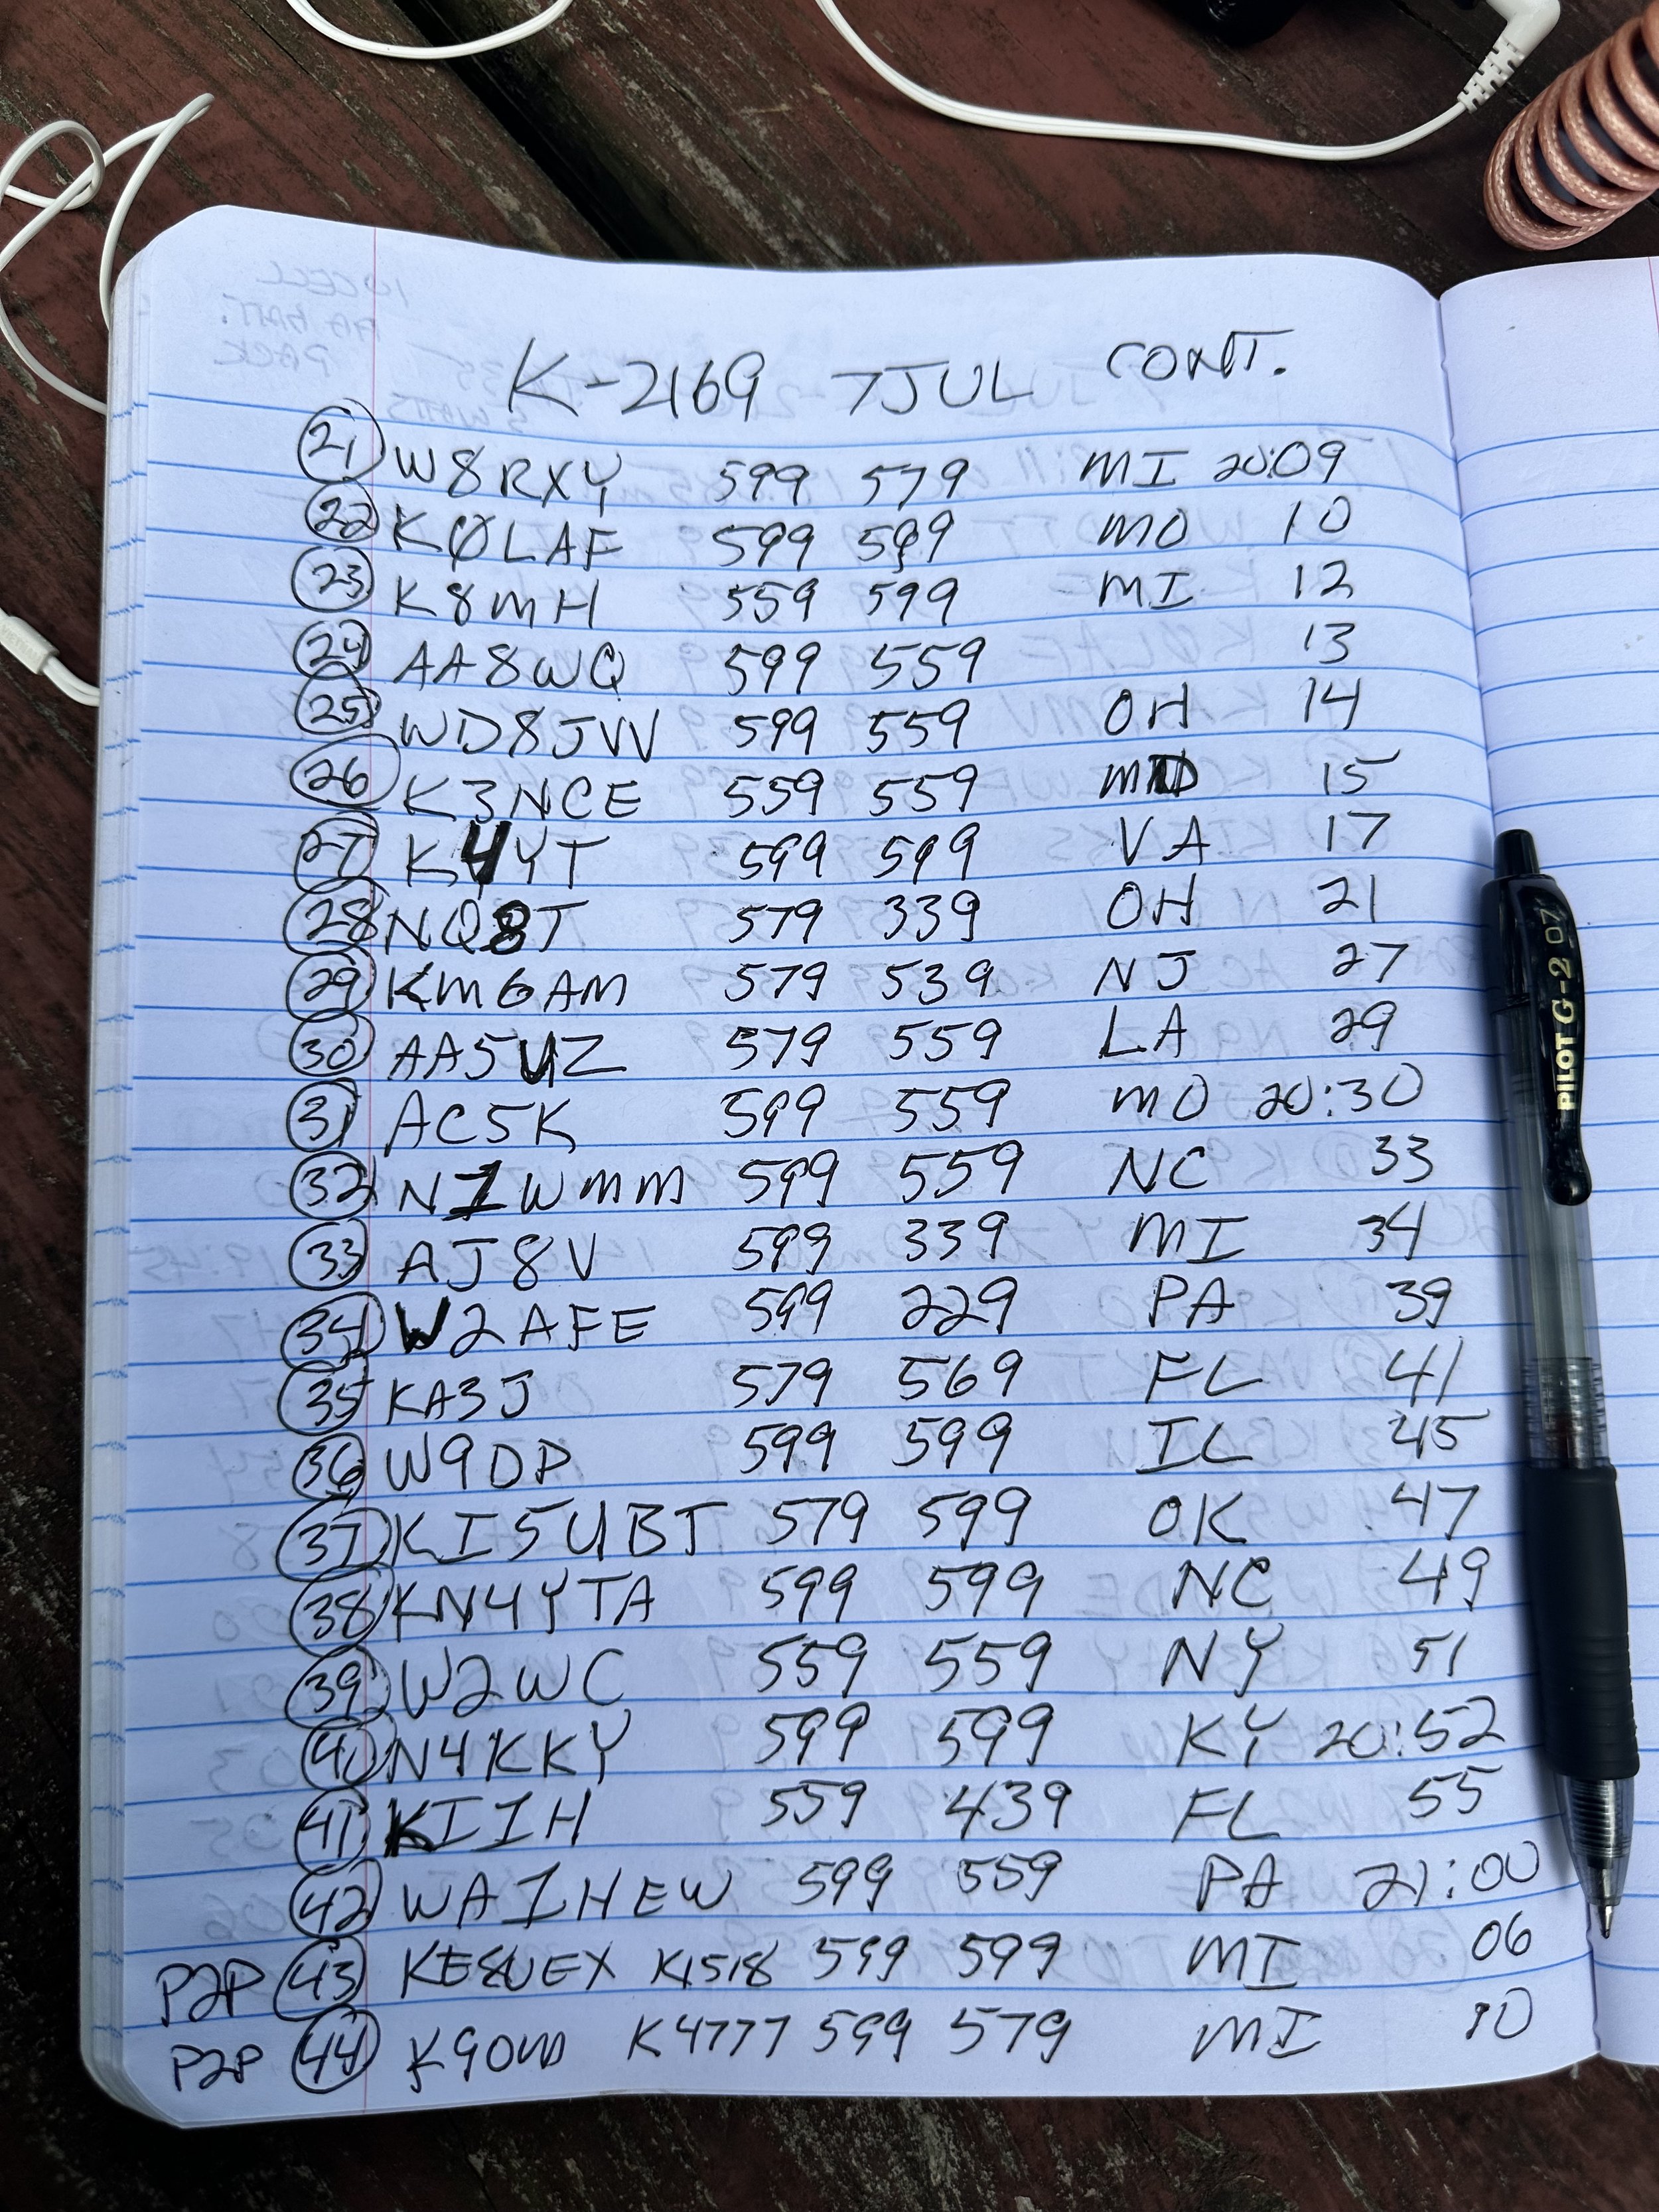
After working almost 50 contacts over about 2 hours with almost all of it either making a contact or sending CQs meaning there was significant battery draw over these two hours, the battery voltage had only dropped from 13.2 to 12.82VDC. A little less than .4VDC or about 3% of the pack voltage overall. That is great as this tells me that almost any hike-to activation will have plenty of power to make contacts. I dont think I will be doing SOTA where I will have more than two or three hours on the summit for radio as there is the hike to and fro that has to be factored in as well. I call this part a success.

Pro-tip to the new hams just getting going. Grab a cheapo little volt meter for a field meter. This one was only a few dollars and worked perfectly. This technology has gotten very affordable and can be a priceless tool when you need to check the continuity of a piece of coax or to see if the battery pack has voltage on it like here. It has come in handy quite a few times now and stays in my POTA kit all the time. Until next time…72