WK4DS Amateur Radio Blog
Search Posts
My 17 meter band pass filter and POTA…
Today I met up with some other hams that routinely go out together and activate POTA parks and was able to fellowship with them for a while before and after I made some contacts. There was (Jonathan Frye AA6H, Allen Padgett KN4FKS and Danny Wooten AG4DW) and they were running what appeared to be FT8 and SSB stations today. Allen and Jonathan were operating SSB the whole time and made quite a few contacts themselves. It was kind of neat to plug in the nanoVNA and see one of the other stations transmitting and messing with my antenna reading and when they stopped I could see the graph again! HAHA!
I built this band pass filter after having a couple of activations with my friend in Florida, Chas (NA2B). We were is such close proximity that if I didn’t have a bandpass filter for the band I was working, I simply couldn’t hear. The sBitx is notorious for front end overload and when the antennas are just a few yards apart, you are going to get front end overload! Well, on the bands that I had bandpass filters for, I had no issues, it was only the bands I lacked filters that I had a problem. It is pretty easy to find bandpass filters for the non-WARC bands, but WARC bandpass filters are kinda rare.
Well, I never let that stop me before…haha. A while back I went down the rabbit hole of wanting to make my own bandpass filters and I figured I would start with the 17 meter band since it is harder to find. I now own a spectrum analyzer with a tracking generator so I can sweep the filter in real time to see what tuning does to the filter shape. That is kinda awesome in its own right, but you could easily do the same thing with a nanoVNA too.

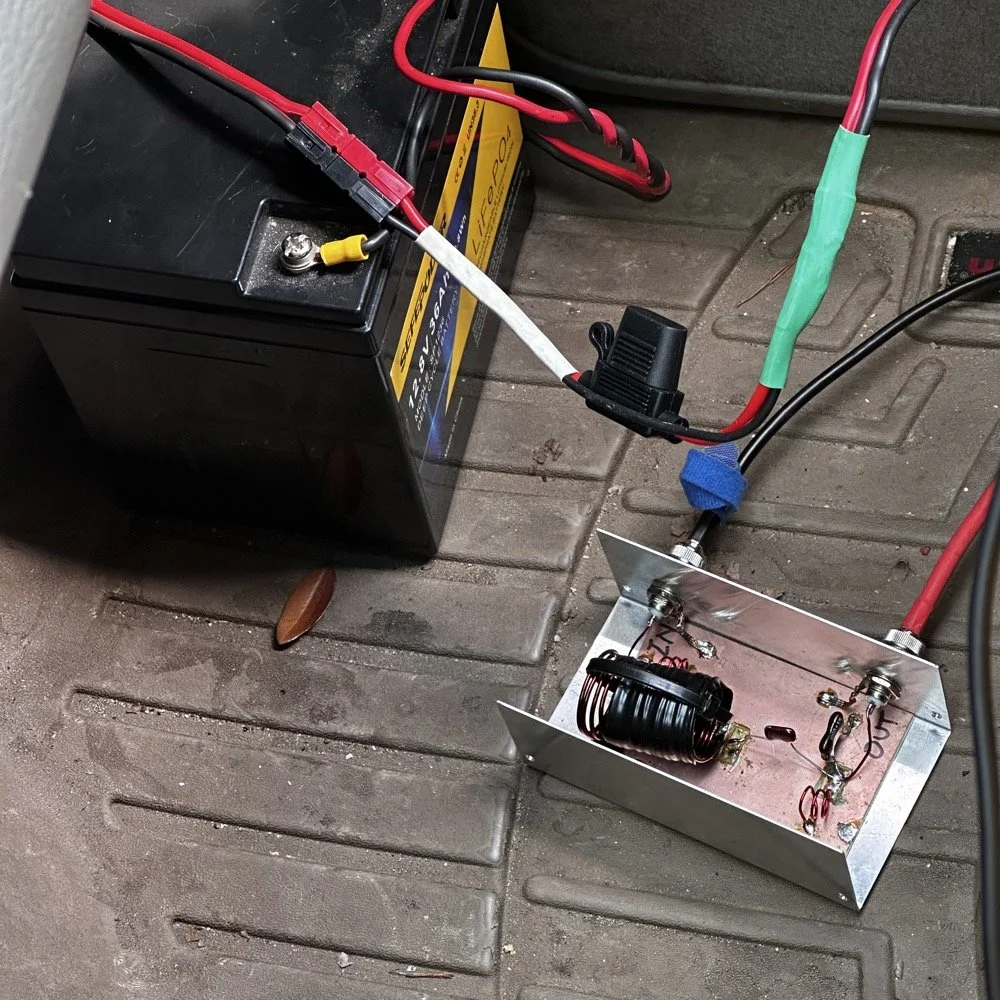
So here is the current iteration of the 17m bandpass module I built. IT sure looks like I home-brewed it, doesn’t it? HAHA! That big inductor It is a classic Pi design with an inductor and capacitor in parallel to ground at the front and back and a series inductor and capacitor in the middle. The input capacitor is underneath that massive 5.31uH inductor in the middle.. I taped it to keep the coils from moving around while I tuned it and then put the ziptie on it to hold the coils in place once I got it like I wanted it. I pulled the values for this filter from the internet off of one of the many website calculators that are out there…I don’t remember which one though… It has been a minute…haha.
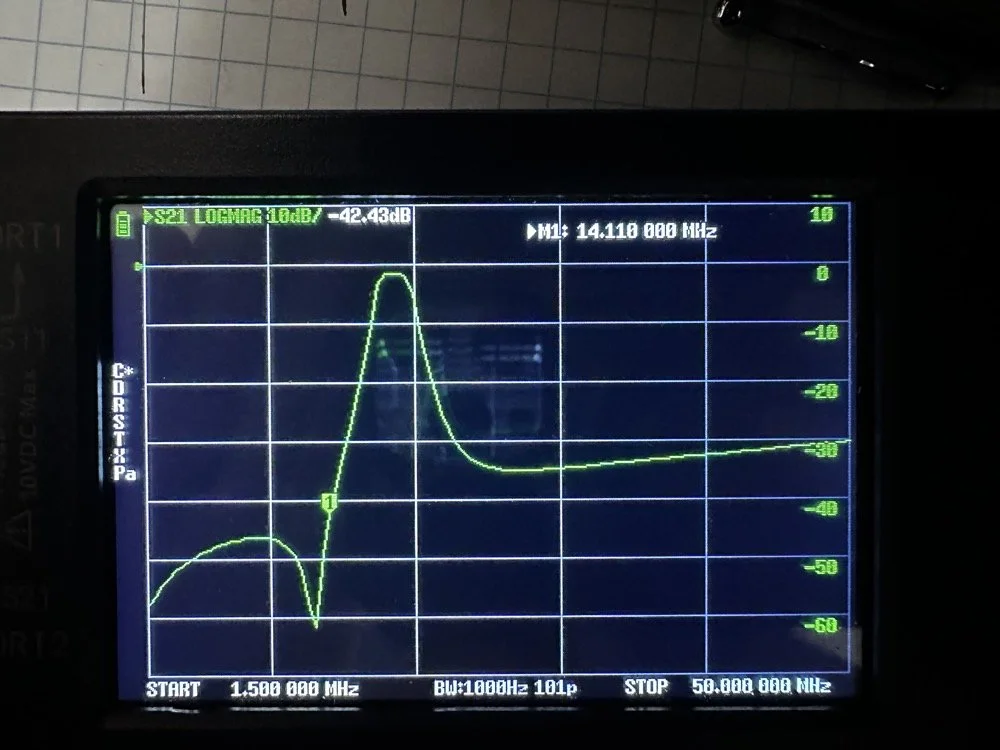
Adding this filter literally stopped all the 20 and 40 meter signals that I had from my neighbors today. It isn’t even all that great of a filter, it does have decent rolloff, but it isnt some knife edge vertical skirt filter. I grabbed a quick photo of the plot on my nanoVNA with the marker on the 20 meter band. I have a little more insertion loss (mine is 1.3dB as compared to a commercial unit at about .65dB), but it works almost as good as one that would cost 200$ and I have about 10$ in it. The filter was even better on the passband before I put it in the chassis. Since I used open air coils, they are interacting capacitivly with the aluminium body to ground. This added capacitance increased the passband insertion loss about .6dB, but it is so clean, I chose to just leave it as is and use it for now. The 20 meter band being over 40dB down compared to the 17 meter band, I was able to setup right next to Danny, who was on 20 meters at the time, without him coming into my radio at all from what I could tell. All the lower bands past 20 meters are lower than that too, so all of them are pushed out of the way so to speak. The higher bands are interesting to me. Before I mounted the unit in the aluminium chassis, it fell off on the high end too. Once mounted it looks like it is about 35dB on 10 meters and about 20dB on 15 meters, which is still good. Another problem that I encountered wtih the added capacitance is that it moved the passband up some. I had it to where the high side of the passband was right at the end of the 17m band before I mounted it. This gave me more attenuation on 15 meters, by probably 6dB or so, but you use what you have and move on with life… This would have also raised the 20 meter rejection some as well, by probably about 6dB or so.
This band pass filter project looks really simple.. The aluminum box, the two BNC connectors, some 16ga magnet wire, three capacitors and a piece of pc board material for a build plane and I am good to go. I lost the lid to the aluminum box hence no cover, but it appears to work just fine like this so I used it. It turns out that if you use toroid inductor cores, that this is a lot easeier to build as the toroids are LESS affected by the chassis ground plane. Notice I said less… they will still change values, just not as much as air wound inductors like I used here. I deliberately chose air wound inductors due to their high Q, which is what gives me the sharpness to the skirts you see in the plot below. I have it marked with “IN” and “OUT” but I honestly think it doesn’t matter which way it is inserted into the feedline as long as it is there. Another benefit of adding a passband filter is that is works both ways, it keeps out stray signals from strong nearby sources and it also only lets the part of your signal LEAVE that will fit through the passband. This makes a huge difference in your signal purity as you are adding a filter to the output of your radio.
Today I met up with some other hams that routinely go out together and activate POTA parks and was able to fellowship with them for a while before and after I made some contacts. There was (Jonathan Frye AA6H, Allen Padgett KN4FKS and Danny Wooten AG4DW) and they were running what appeared to be FT8 and SSB stations today. Allen and Jonathan were operating SSB the whole time and made quite a few contacts themselves. It was kind of neat to plug in the nanoVNA and see one of the other stations transmitting and messing with my antenna reading and when they stopped I could see the graph again! HAHA!
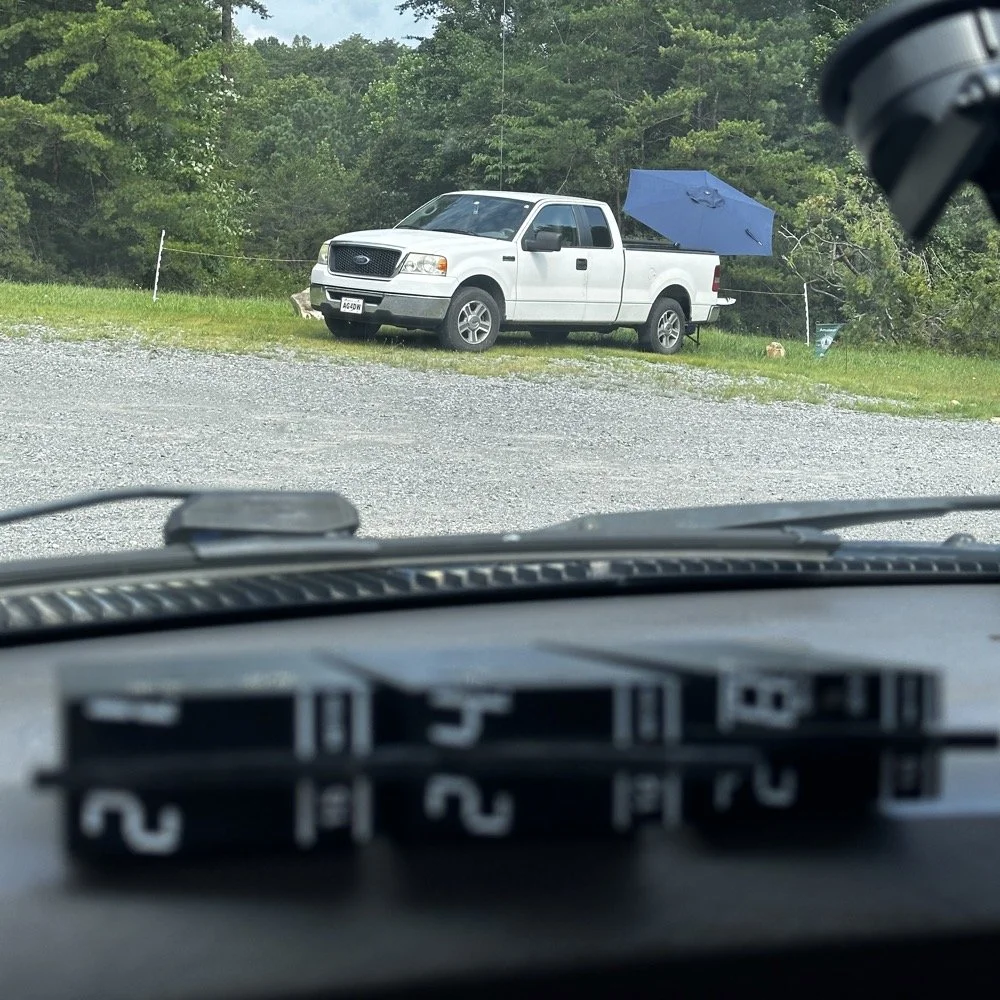
You can see the antenna right behind Danny’s (AG4DW) truck looking out the windshield of my truck today and I moved as far away from the other people as I could muster without driving in the yard… This area is really small to be fair. It just doesnt have a lot of room to setup too many stations. In reality I was probaby the last one that could fit without too much trouble being caused by other radios. Now that doesnt mean this park is overloaded with three stations. Not at all! There are 5 other locations to set up radios that I can think of right off hand with out even trying hard so we could setup several sites at this park very easily. Now, that turns it into something else thoguh, that might be enough activity to trigger the need for a permitted activity, but I dont know. I normally just hand out wtih these guys or go by myself for the most part so it is pretty low key like that.
Those band modules in the above photo are a precursor to what I did today. I opted to stay on the higher bands no matter what. I knew I could land the activation with FT8 and CW, but I had no idea just how hard it would be…haha. This poses a good challenge though as I know I can easily land the minimum ten QSOs to get the activation if I just start on 20 meters but lately the bands have been up and down and have been real inconsistent on the higher bands so to get my ten would take a bit more work on my part. Challenge accepted!
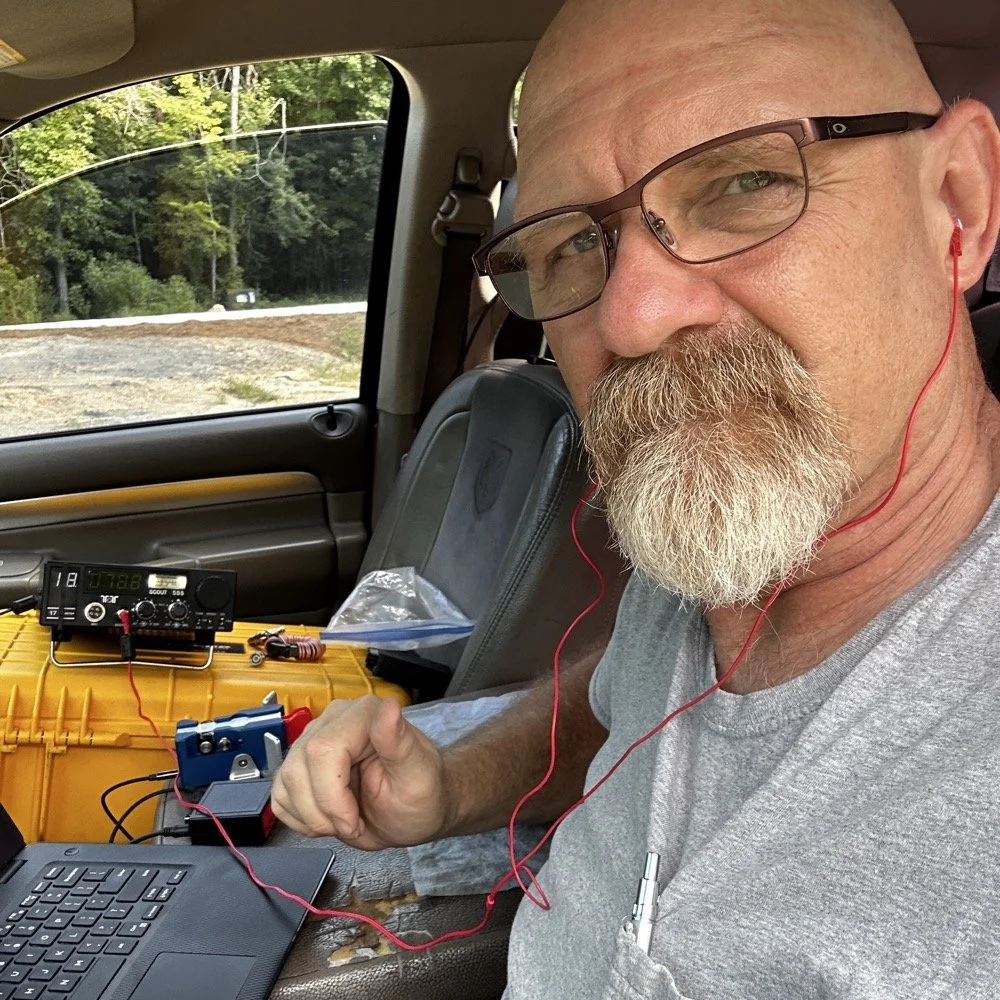
So, natuarally I started on 17 meters…haha. I actually planned to work my way up to ten meters, hence all those band modules you saw earlier. I found W1AW operating CW on 17 meters and busted his pileup to get in their log! That was my first QSO of the day too, I knew right then that it was going to be a good day. As you can see in the photo above, the station was setup in the truck cab to keep me out of the sun as much as possible. I also was using the Begali Traveler key and the HamGadgets Pico keyer as well. Also if you will notice, I dont have the common mode choke installed today. I was testing to see if getting the SWR below 2:1 made using it irrelevant or not. I had really good SWR all day at the radio so I dont think I need this thing adding losses to the system when I was having a good showing on the radio. (It is the thing laying next to the radio in the background.) Do you use one every time you go out or is it something you dont worry too much about? I ran this one through the nanoVNA and it said it had from -.06dB to -.19dB of loss just inserting it in the line. Look at the chart below to see what it looked like across the HF bands for this common mode choke on the nanoVNA.
160m: -.06dB
80m: -.09dB
60m: -.10dB
40m: -.12dB
30m: -.13dB
20m: -.15dB
17m: -.16dB
15m: -.16dB
12m: -.17dB
10m: -.19dB
While this might not sound like much loss (all of them being less than 2/10ths of a single dB), if the bands are in bad shape and you are trying to hear stations near the noise floor, this can make a difference. I routinely listen along the noise floor with headphones for stations that are really weak. Today was one of those days. The bands were really bad for the most part. CW was not being used much because of this. I did get a good run on FT8 on 17 and then 15 meters, but the CW portions were all in the tank.
I started on 17 meters as mentioned earlier, I started by hunting a little and found W1AW was making contacts so I worked them first thing. It only took me three or four trys to get them in the log so I was pretty stoked about the day at that. But then it took me 50 minutes to land the 5th QSO in the log! That is super slow for my normal operations. So I opted to switch to FT8 so I could get the activation locked in before I went off on the higher bands playing…
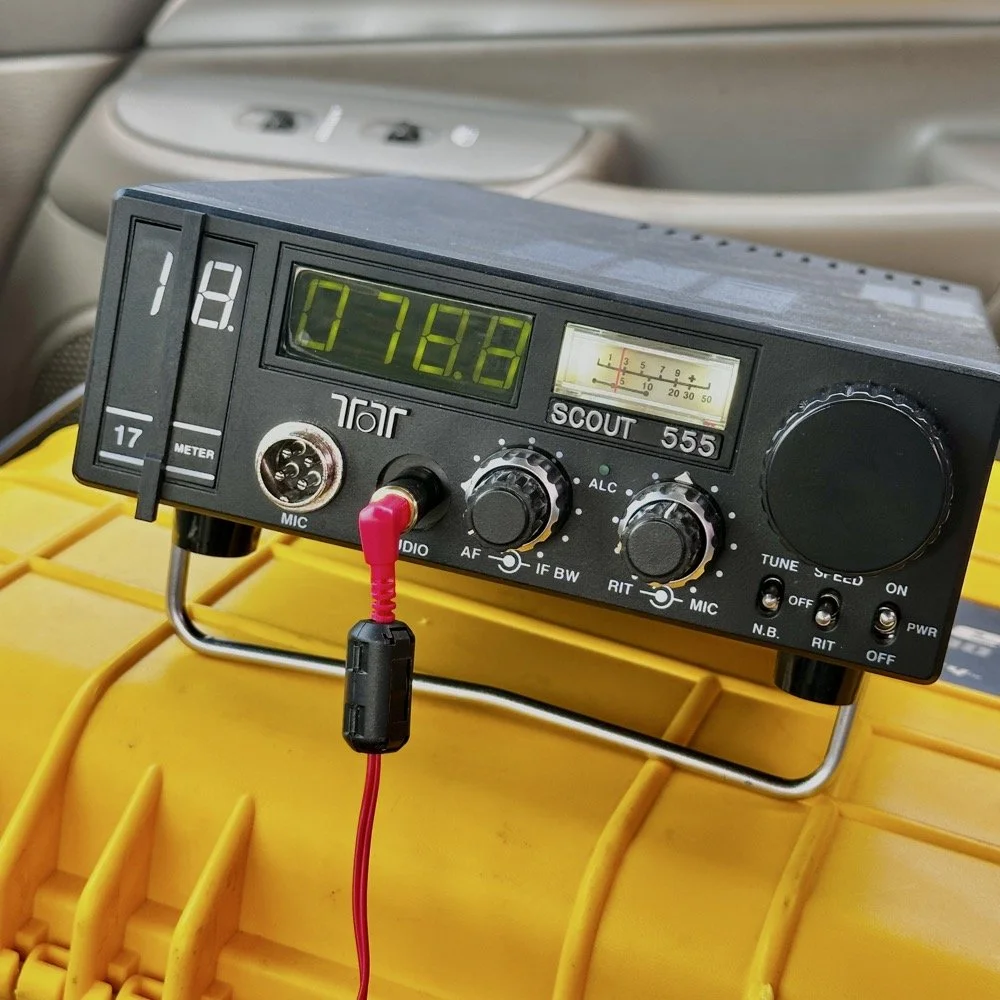
I worked five FT8 contacts in a little under 20 minutes just using hunt and pounce. This had my ten in the log so now the rest are “gravy” at this point. Next thing I did was re-tune the antenna to 15 meters and since the sBitx was already running, I hunted on FT8 there for a while. I netted 6 QSOs in something like 14 minutes. This is actually a pretty good rate for me on this radio so I was happy with that. After landing those in the log, I set the Scout 555 back up and called CQ on 15m CW for a while… I had zero replies… It was like the CW portion was simply turned off. Seriously, where did all the CW ops go? FT8 was booming! I saw a ton of DX on FT8, even though I couldn’t work them, but they were there. Anyway, after calling CQ for like 15 minutes with no replies I figured I would hop on 10 meters and listen for my beacon and then see if I could get at least one QSO there before calling it quits for the day.
It took me about 50 minutes of calling CQ into the void to finally land a contact between 15 and 10 meters. The last FT8 QSO in the log and the one on 10 meters CW are literally 50 minutes apart! That is a lot of calling CQ with no responses. I actually was listening to the radio while talking to Jonathan and just letting the keyer do its thing. When suddenly there was a reply out of the ether! KE2FUA up in New York heard my pitiful pleas for a call and felt sorry for me. Giving me the QSO on 10 meters I desperately wanted. With that in the log, I called QRT and broke down the station. Afterwards I was able to spend some time with the other operators on site and chat with them a little. This is the main reason I love activating with these guys, the camaraderie is incredible.
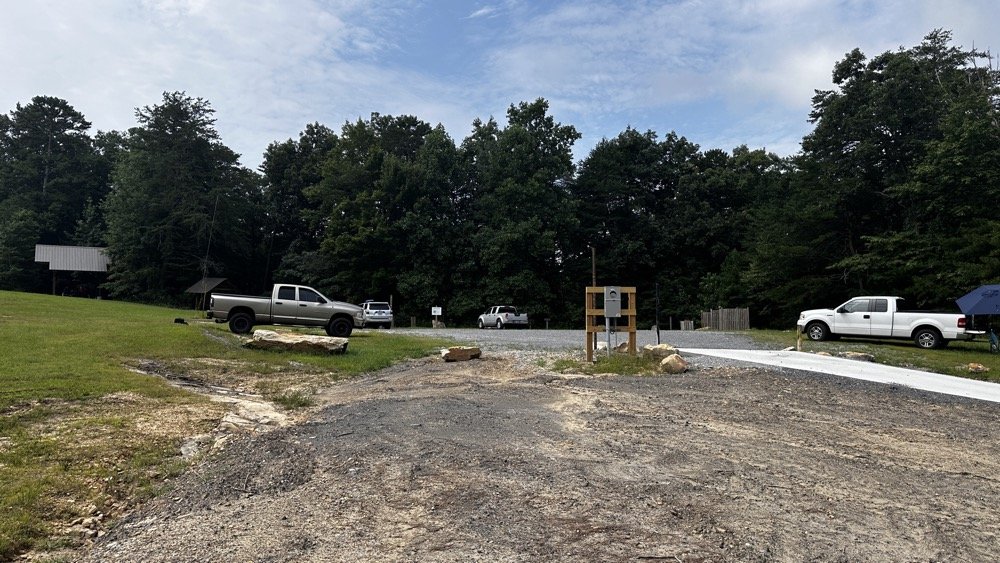
This view shows the tight conditions pretty good. The pavilion in the back has the SSB setup and the white truck had the other station with me kinda in the middle. As long as we used band pass filters or there was enough band space between us, I didnt have a problem. While I was on 10 meters I didn’t have a filter for that band, so I was open to interference and didn’t hear anything from the other stations. I know that at this time, one was on 17 meters and the other was on 20 meters. Band pass filters are a life saver as well as a little coordination between stations. When I arrived, the others were already setup and operating so I went over to each one and gathered some intel about how it was going for them and their current band so I could pick one that they were not currently on. They were both running band pass filters so I was able to start literally anywhere I wanted except 20 and 40 meters. I love the higher bands so that was when I cooked up the idea to do just the higher bands to see what I could net with that sort of restriction. It also allowed me to use my newly minted 17m band pass filter too…
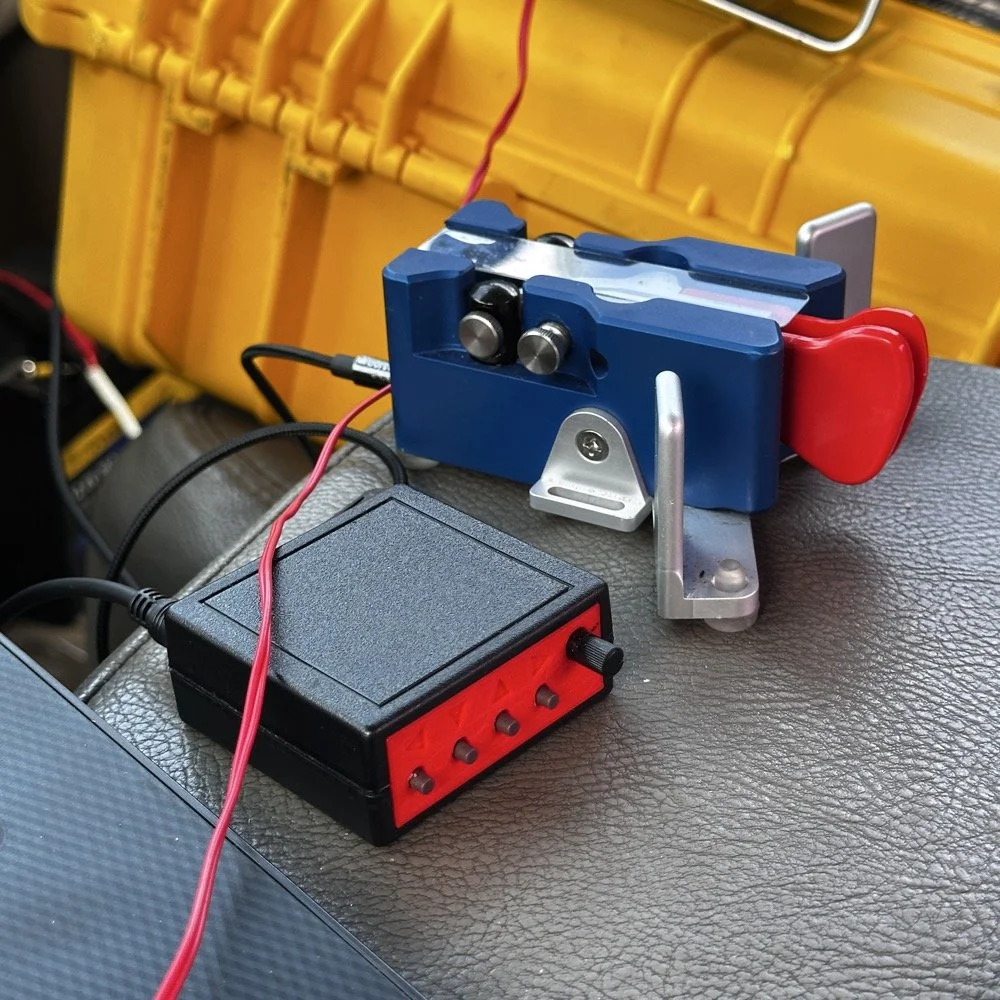
I cant say enough good things about this little keyer. The stark contrast between the cost of each item is not lost on me… I like things the work well and serve me without too much fuss. Both of these tools have done that well. I have finally used the keyer long enough to need to replace the battery in it. Which is a simple task, but does require a screw driver… I thought I would hate having a battery powered keyer, but to be honest, it is kinda nice being able to put it literally anywhere and it just works. I printed the operation manual and keep it in the case with the Scout 555 so if I need to do something in the menu that I dont remember how to do, I can just look it up right quick.
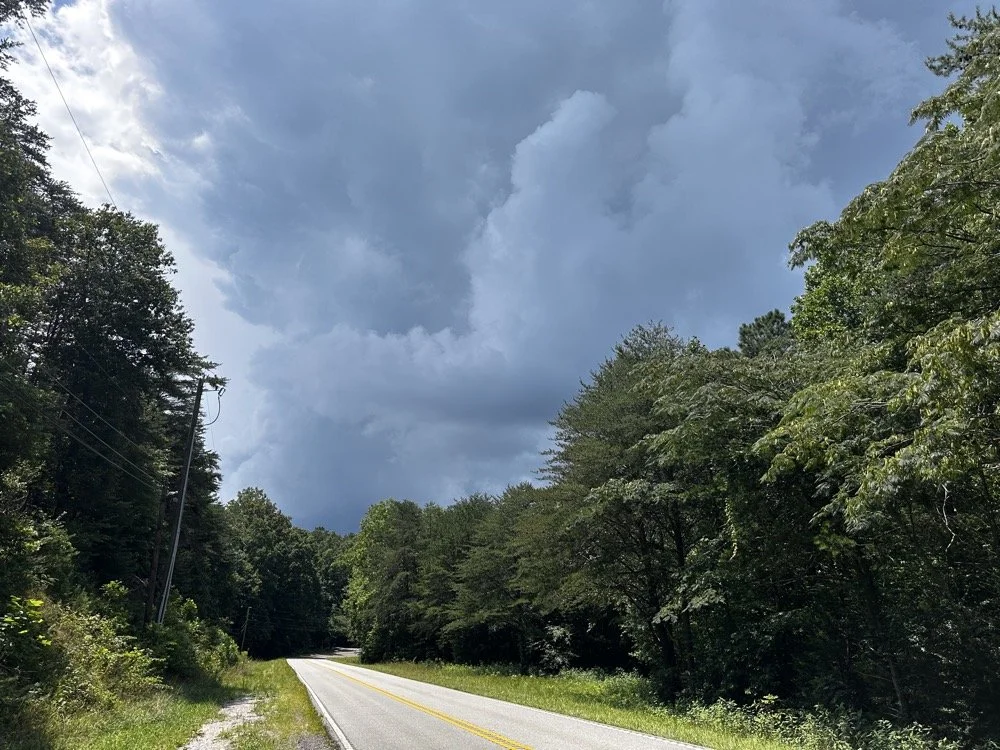
At the end of the activation, I had to break down early and go run some errands and I did itjust in time too as this was what greeted me when I pulled out of the parking lot onto the main road. Sometimes you just get the right amount of things to happen in the right order I guess…
You can help support this channel by using these Amazon Affiliate Links as well:
QRP/Portable Radios:
Antennas & Tuning:
CW Equipment:
Power & Accessories:
Organization & Transport:
BONUS ITEMS (Optional 16-20):
73
WK4DS - David
POTA tip for a CW op…
Just scroll down a couple of posts to see my thoughts on this new release. I setup on 15 meters first as it looked like it was doing well. I only got one CW and one FT8 contact on that band! Well, deflated by this reailty check, I went to 20 meters to get the activation locked in before I wandered off to the higher bands to play. Well, even 20 meters was not that great, I finally got the ten I needed to lock n the activation while there, but it took a while. A lot longer than it normally takes me to land 10 contacts from Georgia, that is for sure.
Today I activated US-2169 with my trusty TenTec Scout 555 using CW and realized I needed to share a “trick” I use every time I go out…almost. But first I wanted to share an update with the shack…
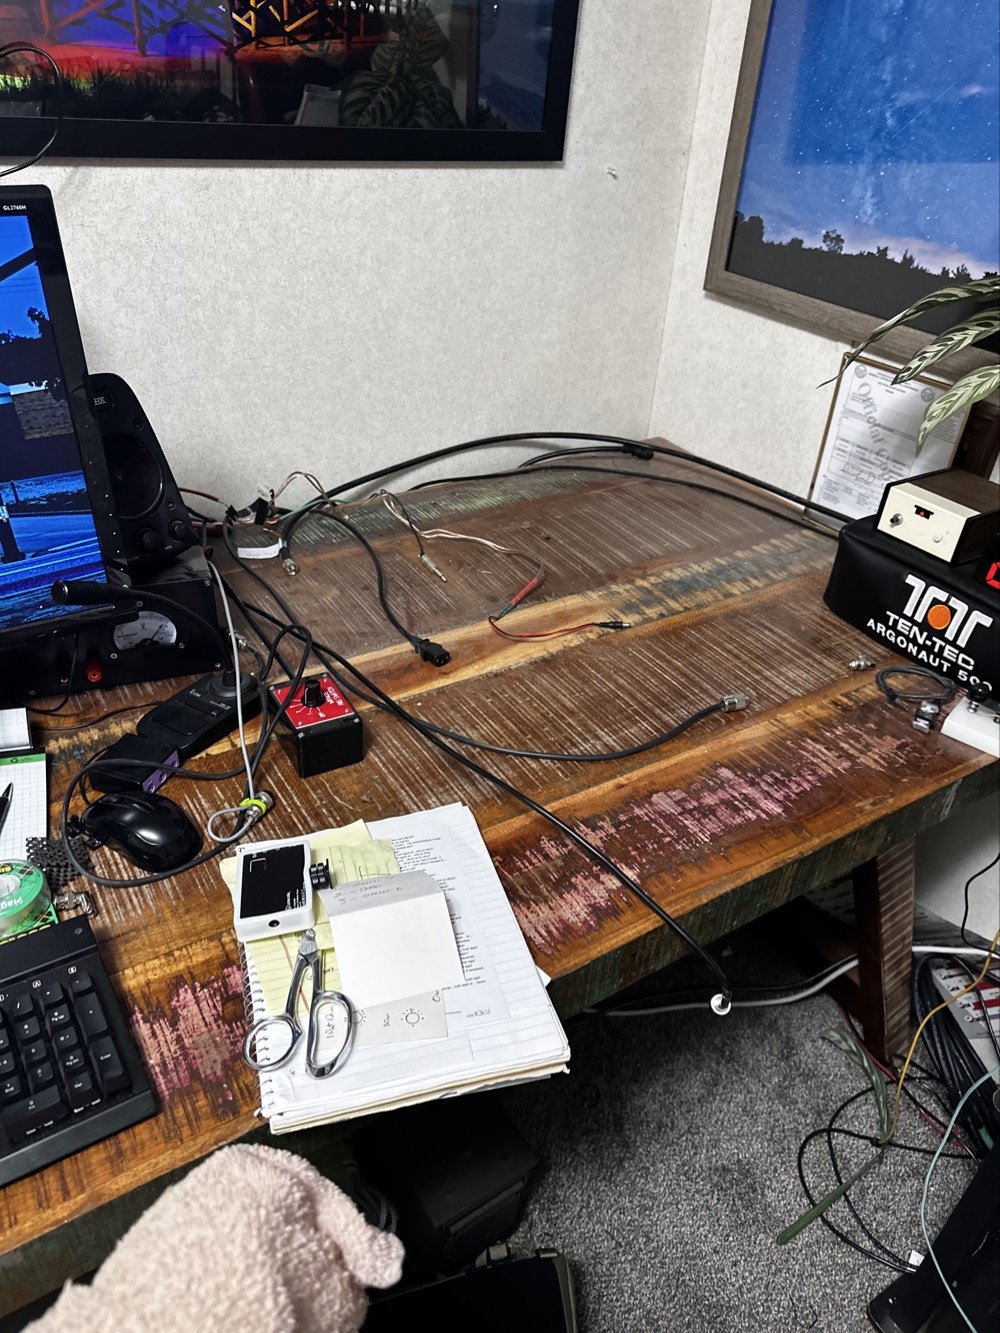
So, to lead off, my “hunter” station finally went through an update. I tore out the entire system to get the TenTec Omni 6+ station out as it needs some service.
This took three days to get it broken down, sorted and separated and finally reassembled without the Omni 6+ station so it can goto the Radiosmith for repairs. I was going to just sell it for parts, but since posting about it I have had several Hams email me about what is probably the problem. This isnt near as bad as I first thought so I will hopefully be able to use it soon.
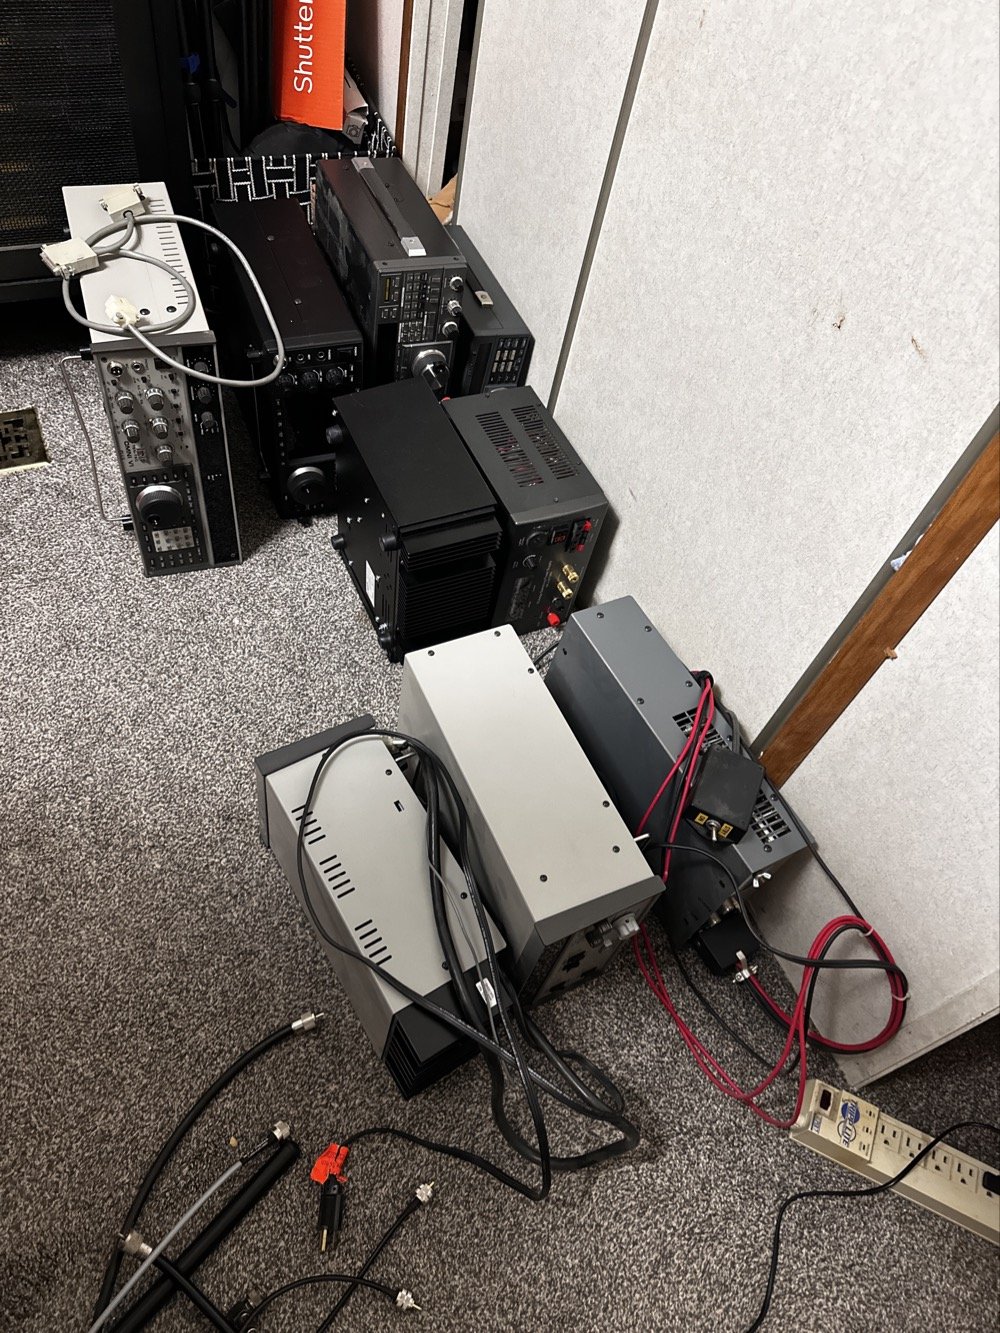
This is what it looks like to break down a normal ham shack so you can remove a part THAT IS ON THE BOTTOM! Haha. It figures that the bottom radio would be the one to fail on me first. It was during this transition that I had the Yaesu FT-736 go down too. Coincidentally at this exact time…. Hmmm.
Here is a link to a short video about what I found, Link to video: https://youtube.com/shorts/pQbP4yRiXAg?is=4TWSAL9qMet0UAhd
The long and short of it is that I did some troubleshooting with my oscilloscope and found that I had audio coming into the audio processing board at a low level but the board was essentially dead. The audio amplifier IC only had .556 volts instead of 13.8vdc which is what it was supposed to be… So I tore the radio apart and had trouble with the connectors on the board. The connectors were really tight and I was chewing them up to get them to release. Instead of destroying it in the attempt to get it apart, I started looking at the power delivery and found that it was probably a bad solder joint or something like that. I decided to run a fresh power wire and solder it directly to the audio amp IC. I added a 1 ohm resistor as that was in the original print so it would work properly and POOF! It came back to life!
Once this repair was done, I was able to reassemble the stack and get the radios back on the air.
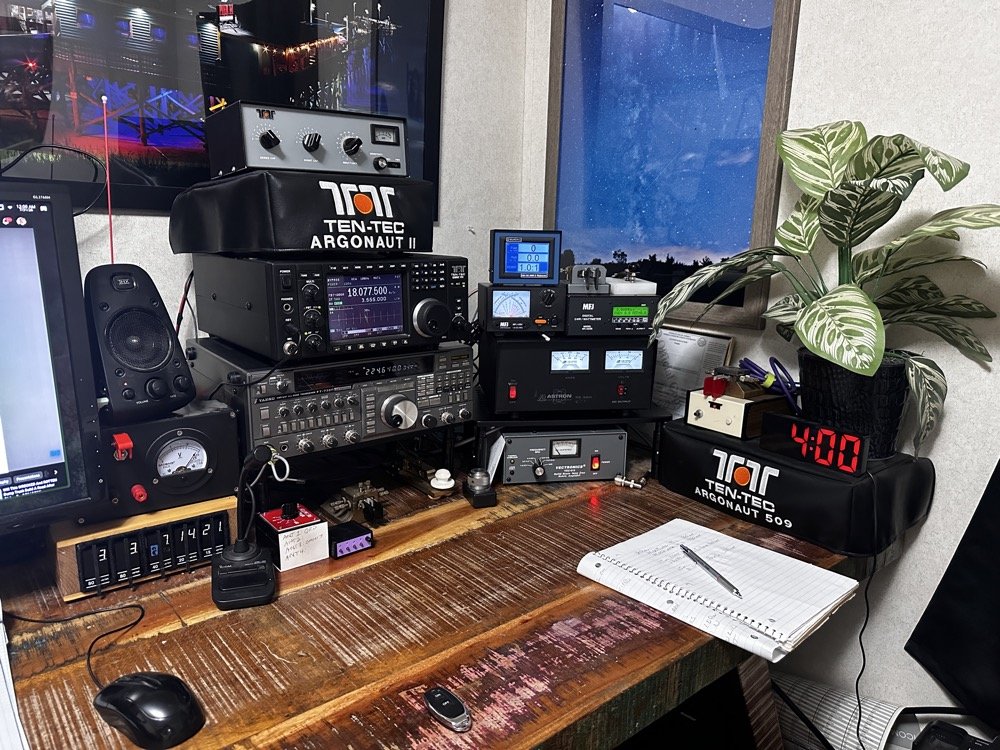
This is what the station looks like right now. Once the Omni 6+ is out of the shop and back in operation, I plan to sell the Omni 7 as I really want an Elecraft rig in the shack. I am thinking a K3 or K3S, but I am without an Elecraft radio at this time and that bothers me a little. I like the Omni 7 but it just doesnt scratch the itch for me like the Omni 6+ does. You can also see the Scout 555 band modules in this photo, I finally got the holder out an added to the shack for those too. Look at all that space that I have now, thanks to a tip from KG4WBI about some adjustable stands, I was able to elevate the radios and that allowed me to store the CW gear underneath them…
On to the park activation!
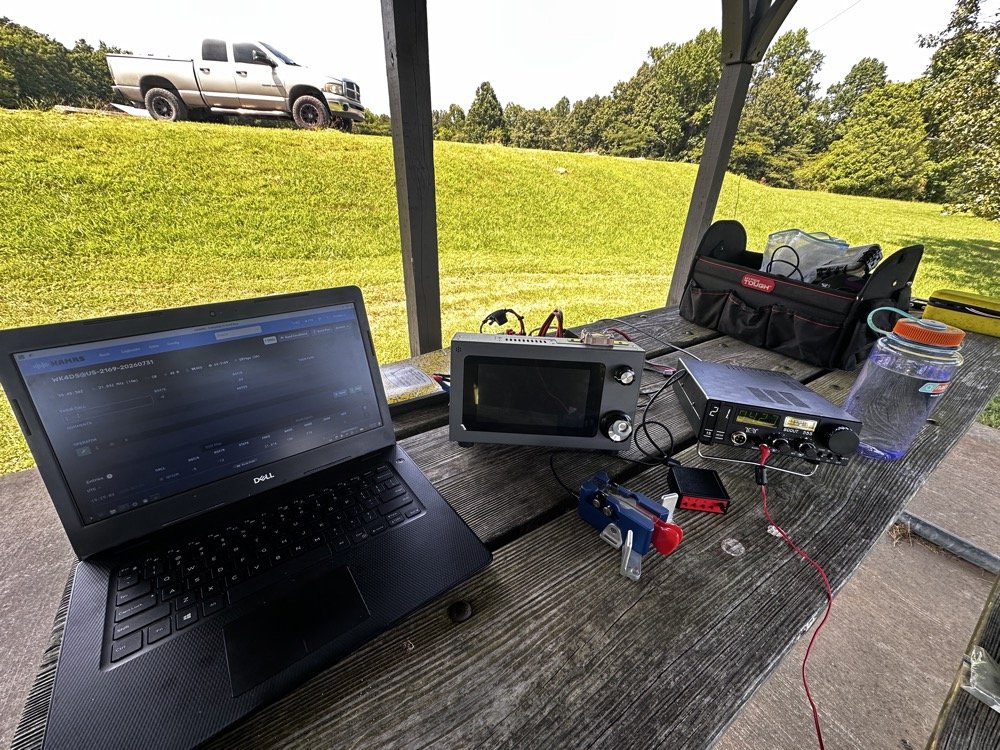
Today, I chose to operate on just two modes, but. I wanted to run 5 bands. this can be accomplished with just one of the radios I used, the sBitx, but I love using my TenTec Scout 555 for CW so I brought it out for that mode. The sBitx is a joy to use on FT8 now and JJ’s crew has it working even better on the current release of the software package.
Just scroll down a couple of posts to see my thoughts on this new release. I setup on 15 meters first as it looked like it was doing well. I only got one CW and one FT8 contact on that band! Well, deflated by this reailty check, I went to 20 meters to get the activation locked in before I wandered off to the higher bands to play. Well, even 20 meters was not that great, I finally got the ten I needed to lock n the activation while there, but it took a while. A lot longer than it normally takes me to land 10 contacts from Georgia, that is for sure.
After that I moved up to 12 meters where I worked quite a few DX stations as well as several US ops on FT8. I dont remember if I worked anyone on CW, I really dont think I did, maybe one… The bulk of the QSOs was on FT8, I finally decided to give 10 meters a shot… this went really bad. I think I made one contact on 10 meters before I gave up and went to 17 meters to see what I could do. I worked a few stations there and finally called it quits after about 2 hours with 23 calls in the log.
I have absolutely fallen in love with these silly little radios. They make such great CW machines! They also work pretty good for SSB too but I dont use that very often. I think this was a great idea from TenTec and I for one am glad to be able to have a few of these radios.
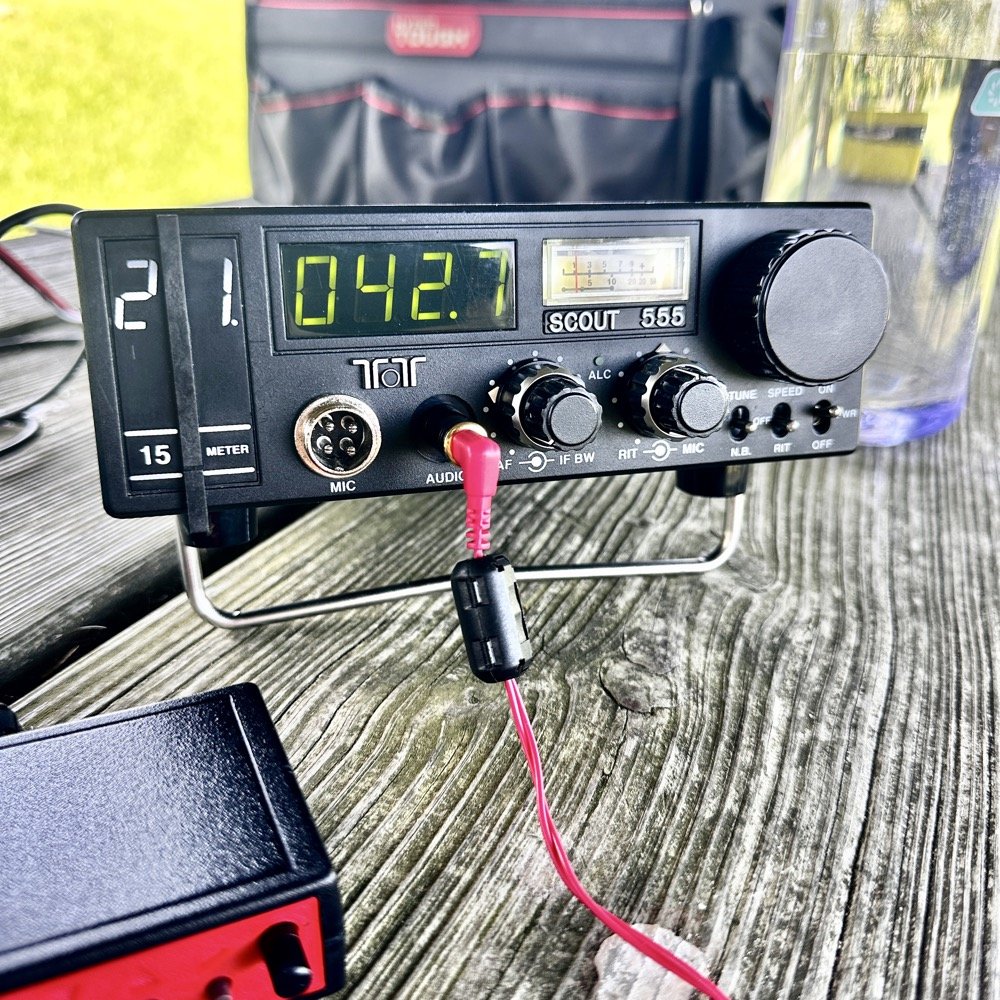
They do have a fault at this age though. The audio from the speaker is not great for weak signals. All of my Scouts exhibit the same issue. There is a low level “whine” on the audio. Something inside the radio is adding this noise. The answer for this is simple…ear buds and minimum volume. That is my trick. Use earbuds and turn the volume way down… This is an old trick I was taught years ago to be able to hear weak signal CW…….
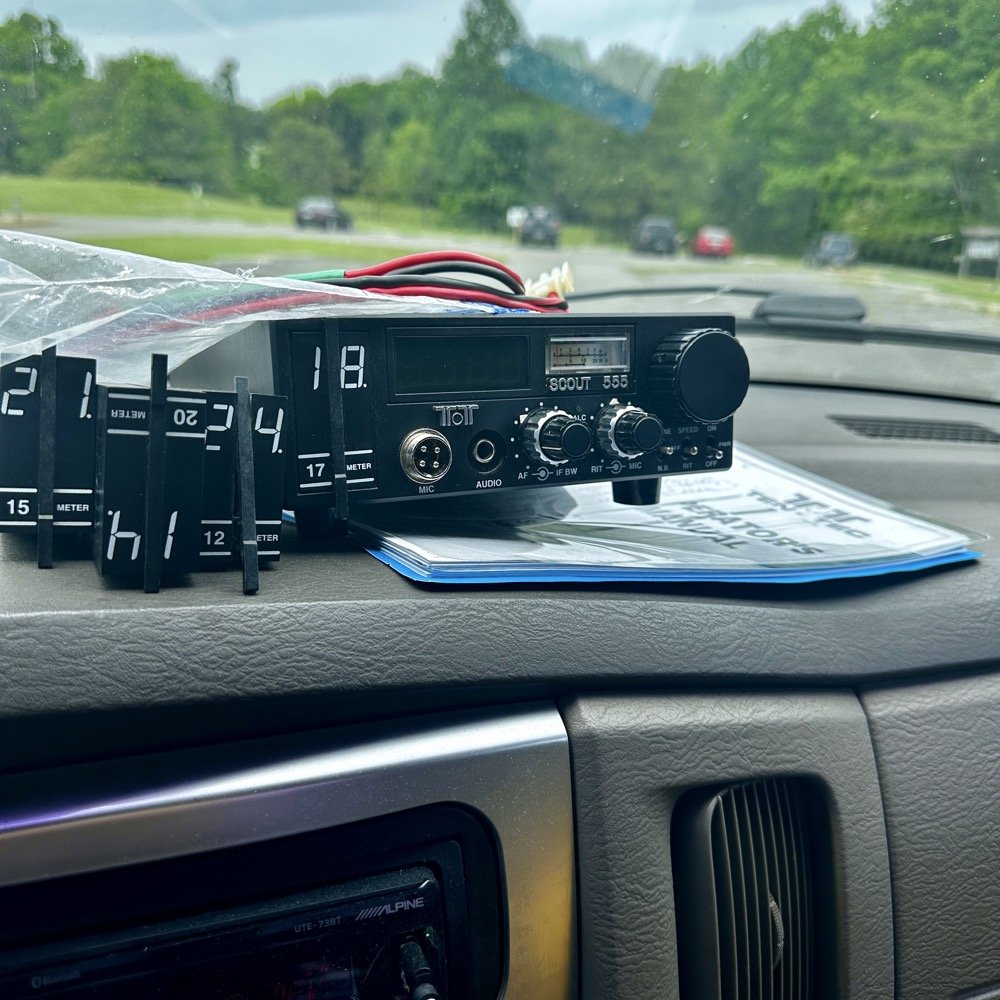
Could I tear into the radio and find the problem in the radio audio chain? Yeah…is the juice worth the squeeze? Not really when I can use this trick instead. Ear buds work better than headphones as they require a much lower level of power. What happens is the internal radio noise is not amplified in the later audio chain when you do this. It is really neat how the signal will just float to the surface as you get the volume just right. It acts almost like a rf gain of sorts. There is a sweet spot as minimum volume will just show you the audio noise in the radio. But it you look at the volume knob in the above photo, you can see where I was running it at. I also find that if you open up the Jones filter a little, weak signals will get louder too. You can see where I run this adjustment as well in the photo above.
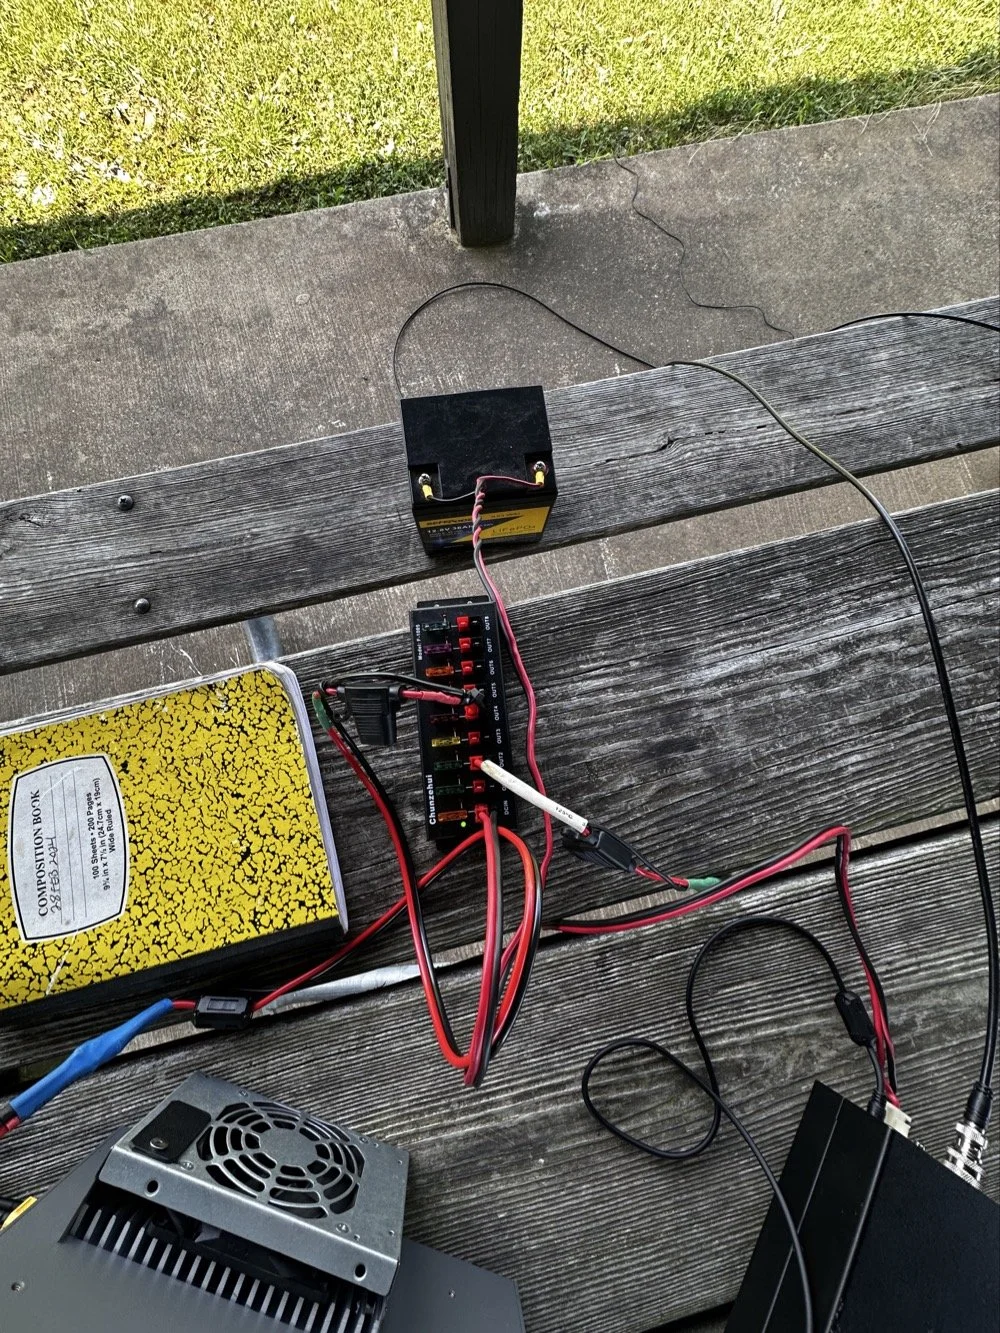
These two photos show the power system and the antenna matching system. The power was delivered via a 36aH LiFeP battery from Amazon, which is plenty of power for a radio running 40 watts. Like 4 hours of constant transmit levels of energy. All day for normal operation…
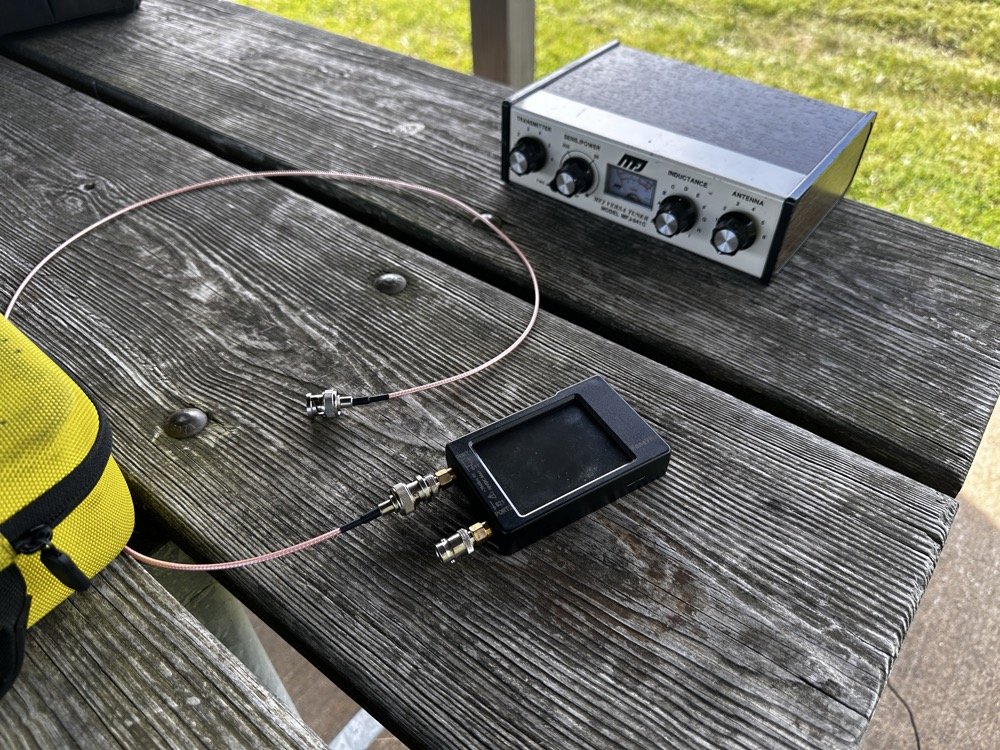
The antenna tuner is the MFJ941 as it has connections for a wire antenna built into it. I like this tuner as it will match a pretty bad antenna to your radio pretty easily. I use the nanoVNA to set the tuner and just plug the radio back into it when I get the trace happy on the VNA. These things are the best antenna analyzers on the market in my opinion. I can buy litearlly a half a dozen of these instruments for the cost of one commercial antenna analyzer. Not to mention they willl do many more things that a analyzer will not do…lots of things.
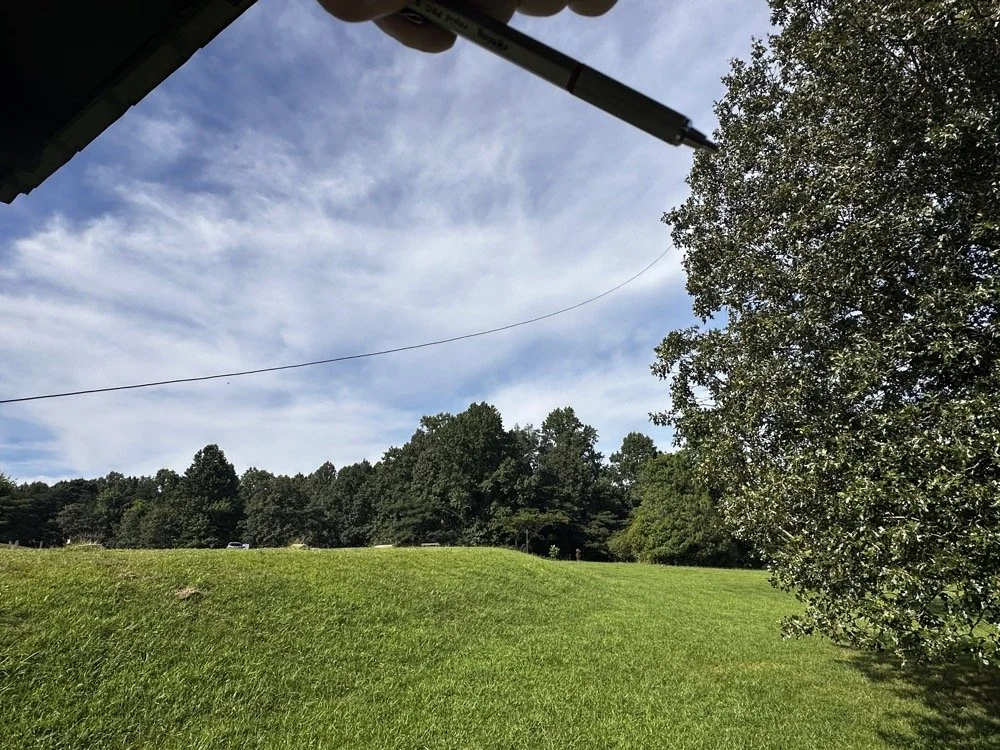
Below shows the antenna and I am pointing out where it is attached to the tree. The top of the wire is probably 25’ off the ground and comes down to the corner of the pavilion at about 7’ above grade. This worked well today but I have no idea what the radiation lobes look like. Since the wire is 41’ long, it has to be crazy on 12 and 10 meters but I was able to make some contacts so it was good enough. I like running wire antennas when I can, they seem to pull in weak signals better than my telescoping vertical.
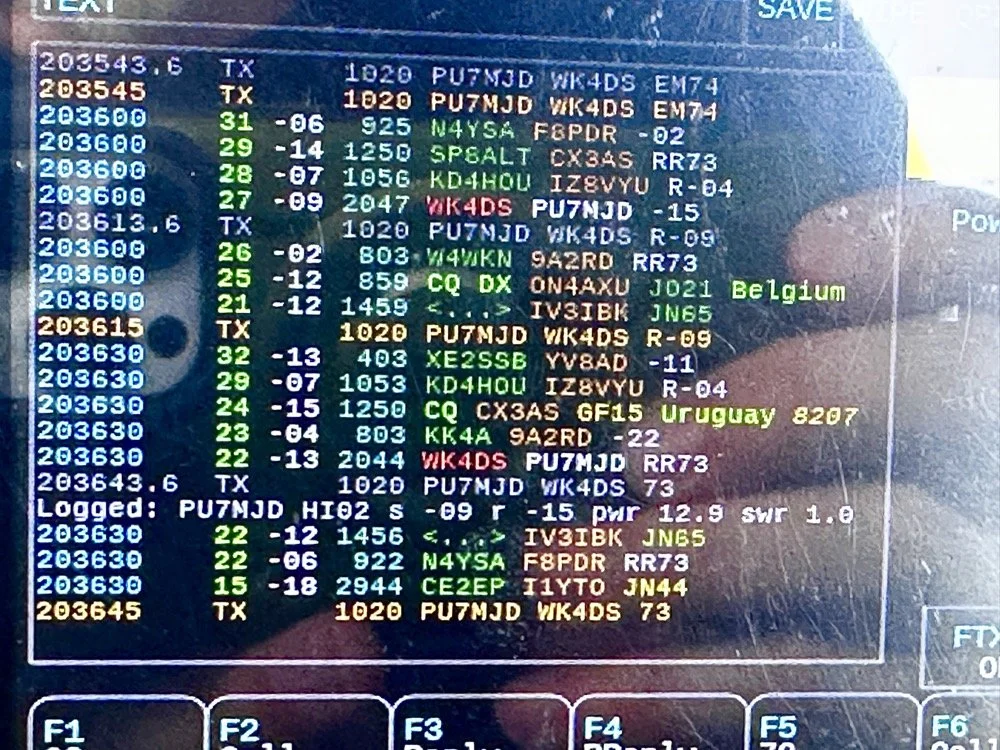
The next two photos show the display of the sBitx running version 5.4 software. There is alot of data, but it isnt too much. I am running the native FT8 application here and the bottom photo shows me working PU7MJD in Brazil on 12 meters. This is why I wanted this radio. When the other modes are dead (no one was running CW on 12 meters) then I can still work someone.
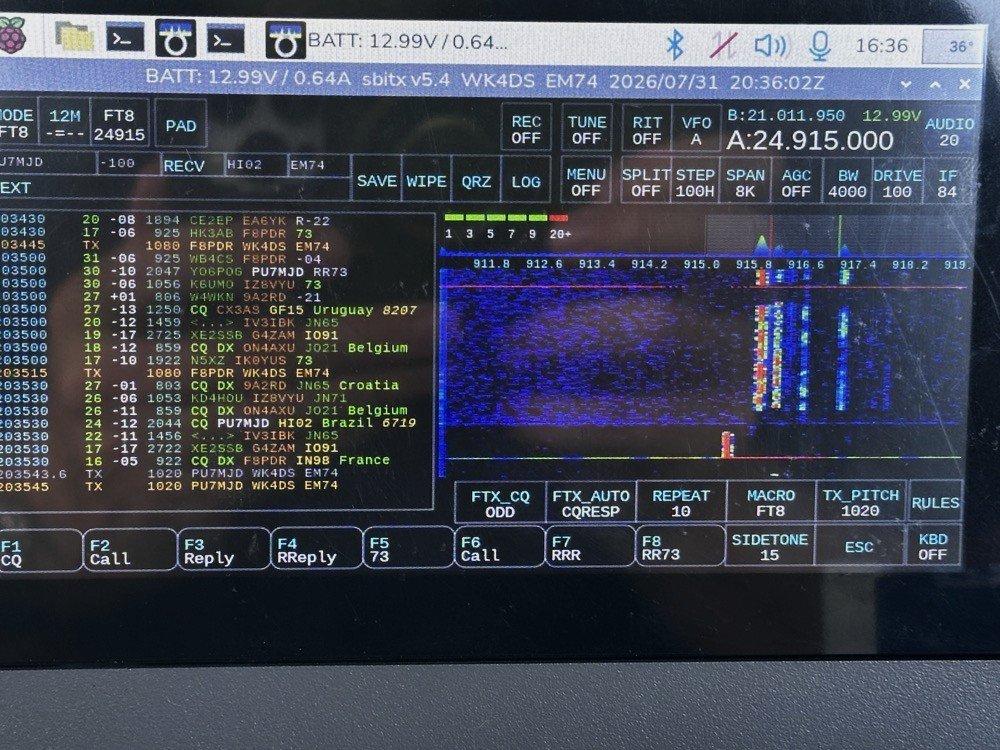
The color coding of the display is great and easy to use!
After a couple of hours of operating, I called it quits for the day and packed up. These are the kinds of activations that I actually enjoy. There was no pile ups today and I made over 20 QSOs too. FT8 is an easy mode to use on the sBitx and allows me to do things like get photos for my blog while it sends CQ and such. I still like to drive the radio though so I dont just let it run free. I need to test the CW keying on my next outing to see how much it also improved.
You can help support this channel by using these Amazon Affiliate Links as well:
QRP/Portable Radios:
Antennas & Tuning:
CW Equipment:
Power & Accessories:
Organization & Transport:
BONUS ITEMS (Optional 16-20):
Until next time…73,
David
WK4DS
Back on the Air for a POTA Activation
Today saw me back at US-2169 for the first time in a while…
Today saw me take the old Dodge over to my local park (US-2169) for a short activation. I have been busy in the machineshop these last few weeks so there has not been much time for POTA. I have actually not been to a park in several weeks and was starting to miss it.
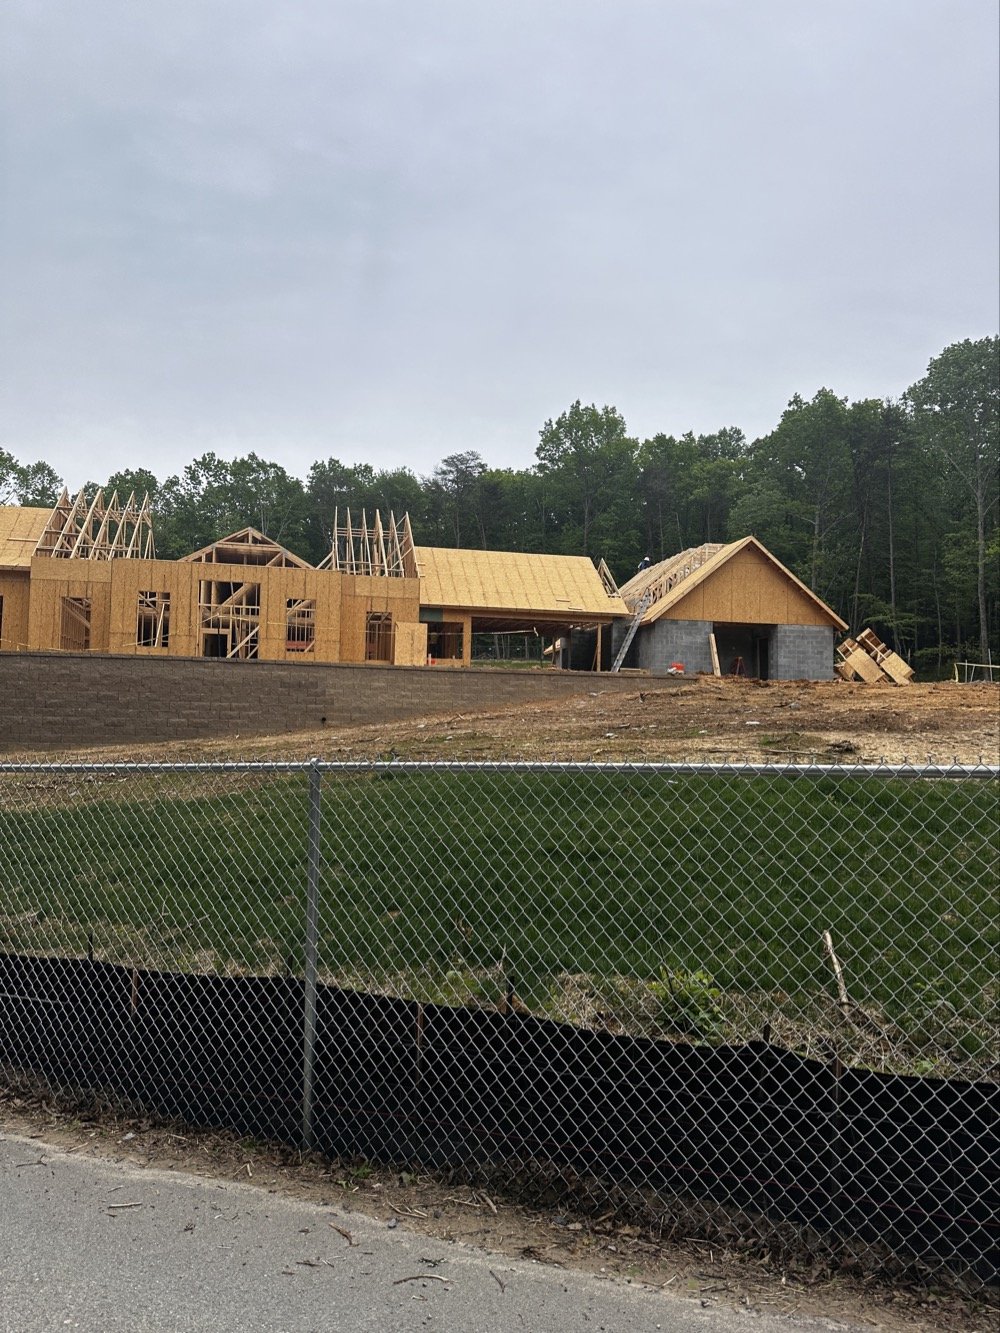
Update on the park visitor center upgrade in progress. The grade work is done and they are framing the new building at this point. It is coming along nicely too.
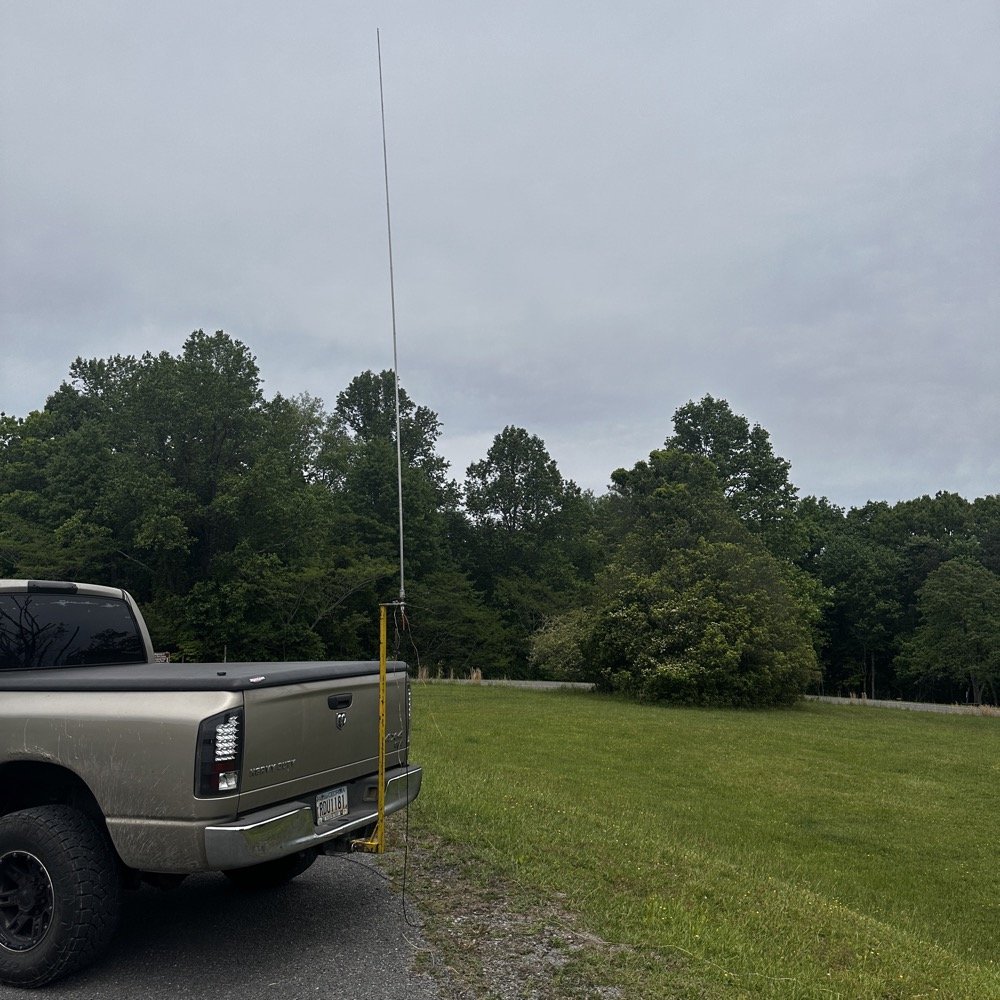
Setup of my POTA rig for HF operation
I went up to the frisbee golf course again as this is a great place to setup for POTA. A lot of people will use the nearby pavilion when they setup, but my antenna mount, being attached to the truck, makes it alot easier to operate from the truck. This is an amazon 18’4” whip that I bought, you can get one too at this link: Link to 18’4” whip on amazon Now, to just let you know, this is an affiliate link, but it doesn’t change the price from what I can tell… At the time of this writing, they were on sale for 27$, which is incredible!
Today I used the 18’ 4” foot vertical telescoping antenna and two radials attached to the base. Then ran a coax into the cab of the truck to the front seat where I normally set up the radio in the front passenger seat. Something I noticed today was that no matter what band I was on, the SWR plot would never get better than 1.5:1 (which is perfectly fine BTW) but I can normally get way better matches with different radials, which tells me that the radial length is more important that people let on…
Next, I chose the TenTec Scout 555 as it is a wonderful CW machine. It does have a little bit of drift in the VFO, while it warms up, but it is not enough for me to worry about. I started on 20 m in the CW portion of the band and hunted stations to start with. I worked another POTA site for a park to park contact before finding my own space and setting up there. I made 19 CW contacts on 20 m before I decided to move to 15 m to see what I could find there next.
Pay attention to bad antenna connectors…
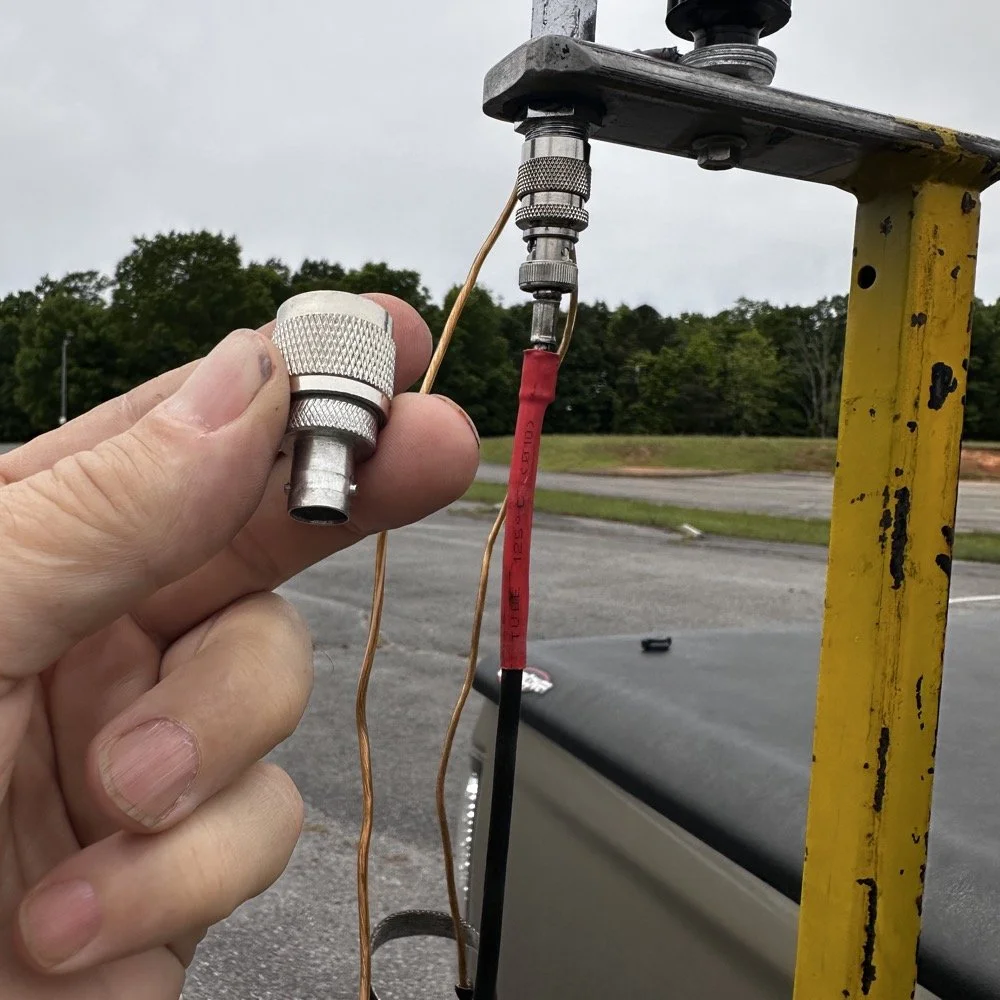
When connecting the antenna today, I had trouble getting the BNC to attach, upon closer inspection I had found that it was crushed from impacting something in the truck… Probably when it was in the red Chevy as there is less protection in the back of that truck as compared to how I store it in the Dodge. Oh, and yes, my heat shrink tubing on the coax has slipped back for some reason. I noticed it when I was breaking down and simply slid it back into place…haha. I did not notice this until I attempted to use it today to operate this activation.
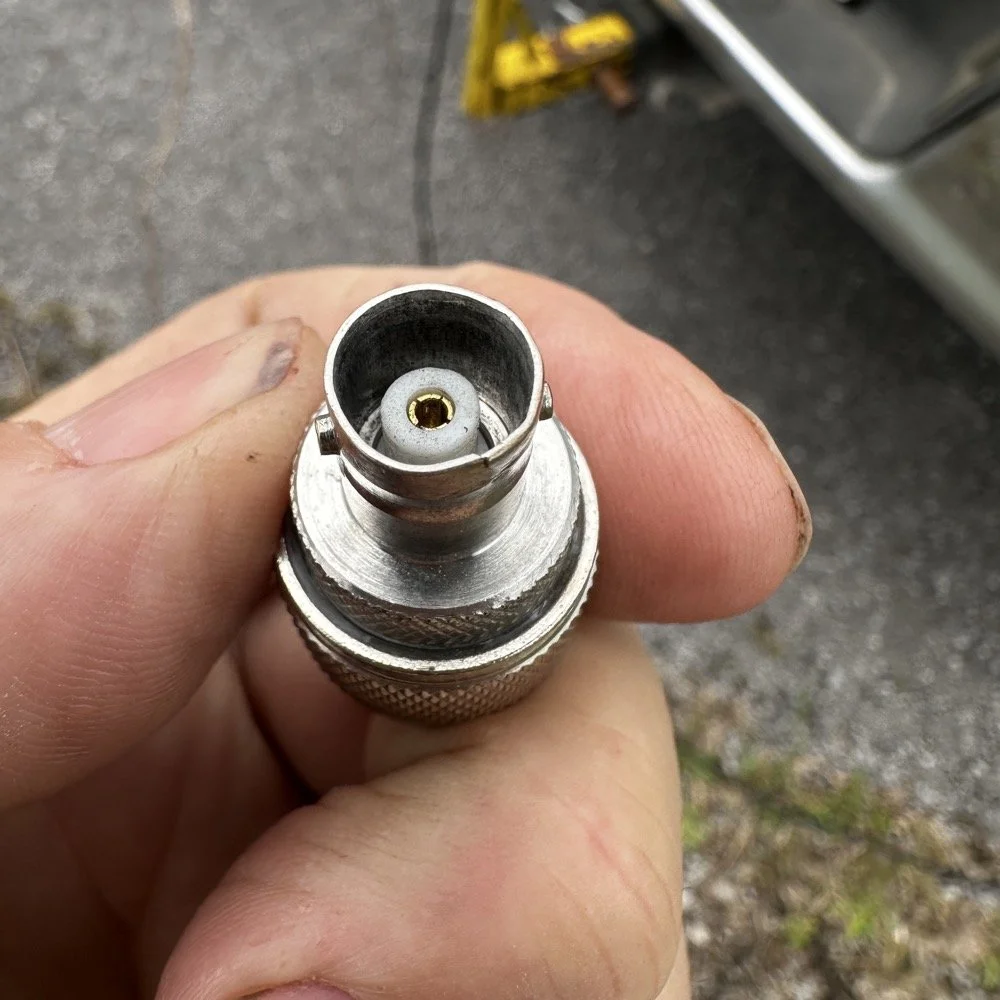
I attempted to straighten the damaged BNC connector with my Leatherman as best as I could, but it didn’t work really all that well so I got in my adapters for my nano VNA and robbed the one that was in that pack and used it instead.
This is a great example of why you always carry spare parts for all of your connections so that you don’t get shut down because of something getting broken unintentionally that you are not aware of.
The HF Signals sBitx V3 and native internal FT8
Once I finished working CW on the Scout 555, I decided to get the sBitx out for a while to work some FT8. I really love using this radio for FT8 and CW in parks, it works so well and with the version 5.3 software, it has a metric ton of great features. The waterfall works well and the automatic modes in FT8 are really handy too. This radio is 25 watts on the lower bands and trails off to about 12 watts on 10 meters. This is plenty for me as I work a lot of QRP anyway so little to no power output is fine for the most part. Would it be nice to work with more, yes, but I can manage without it just fine.
Today I only used it for FT8, but I also will use it for CW from time to time. It is a little temperamental in CW since it is a Raspberry Pi 4 running in the background, but once you learn the keying, it works fine up to about 23WPM for me without too much issue. Using something like the Begali Traveler CW Key in the photo below also makes it more fun too. A really nice key is always a good thing to have with you.
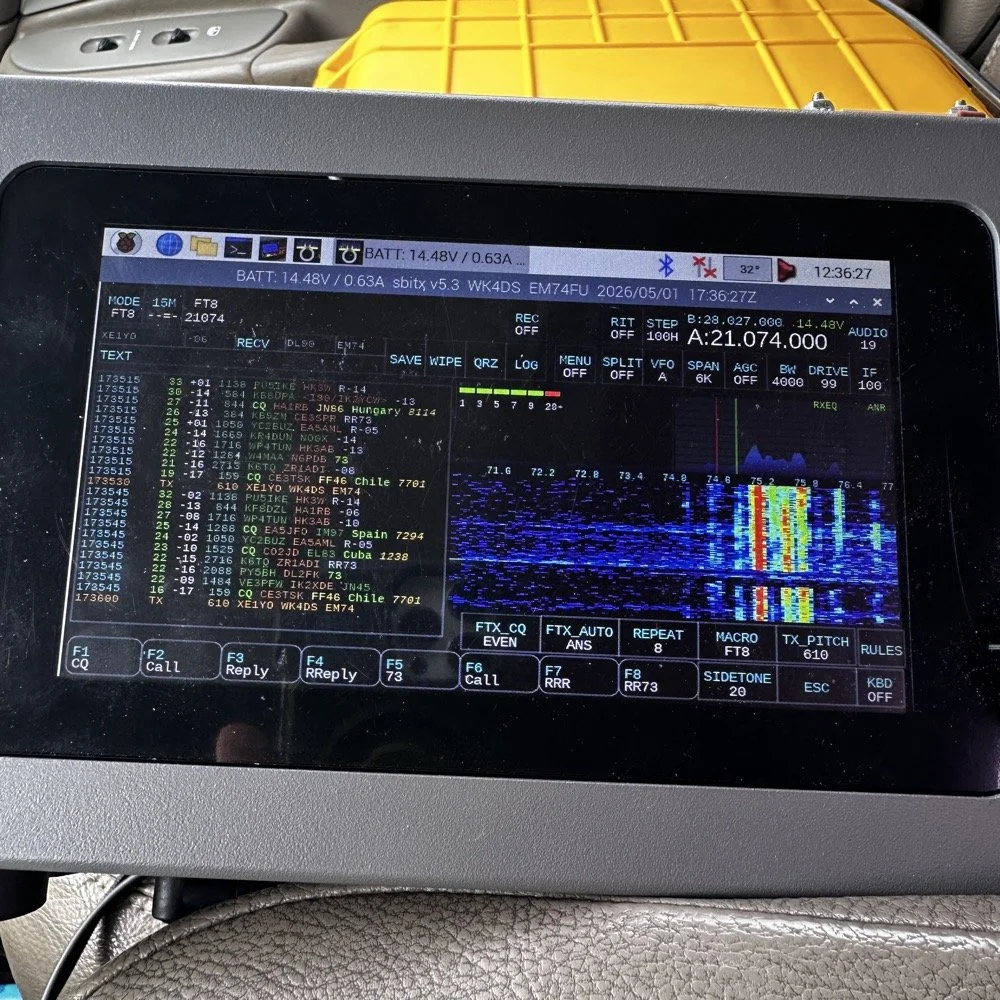
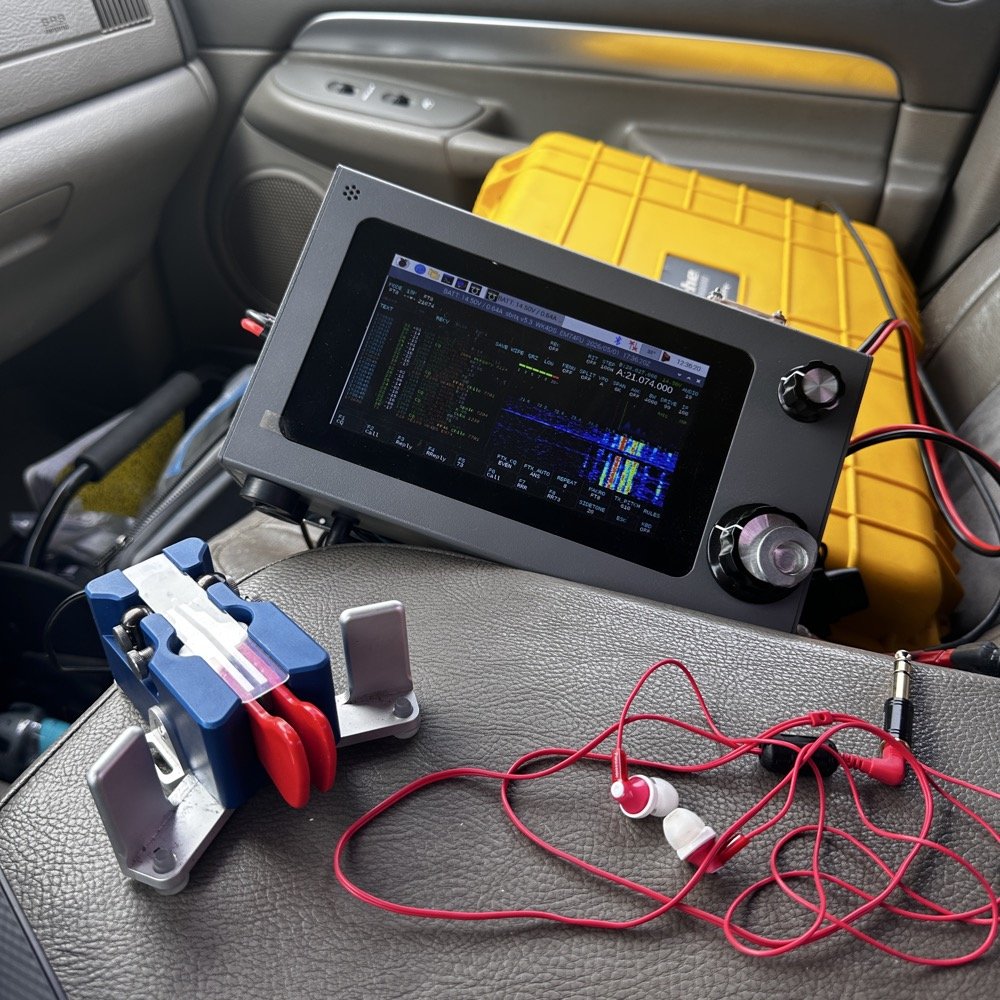
Once I worked a few FT8 contacts on 15 meters, I dropped down to 17 meters and worked a few more there before shutting down for the day and heading home.
I noticed when I was getting ready to leave that the truck motor was “squeaking” when it was idling and when I investigated further, I found that it was a pulley on my fan belt had a bad bearing in it. So I went to the auto-part store and got a new one to replace it with. Once home I was able to replace it in short order so that I would be ready for the next POTA outing that I wanted to go on. Sometimes things just come up and you have to take action…haha.
Thank you for following along and I look forward to sharing something with you again soon, till then 73!
You can help support this website by using these Amazon Affiliate Links:
QRP/Portable Radios:
Antennas & Tuning:
CW Equipment:
Power & Accessories:
Organization & Transport:
BONUS ITEMS

Multi-Band POTA Strategy: Ten-Tec Scout 555 + sBitx FT8 on 15m/17m/20m/40m
The location is all too familiar, but I set out to do a sort of special operation today. I wanted to complete a POTA activation using two radios, 3 modes and 4 bands in one sitting. This doesn’t sound like a tall order but since I am operating inside the truck cab, this does involve a little logistics to not just have stuff piled everywhere while I am operating. As you will see in the photos below, I still ran into this problem somewhat, but it was manageable.
Today was a fun day…

The location is all too familiar, but I set out to do a sort of special operation today. I wanted to complete a POTA activation using two radios, 3 modes and 4 bands in one sitting. This doesn’t sound like a tall order but since I am operating inside the truck cab, this does involve a little logistics to not just have stuff piled everywhere while I am operating. As you will see in the photos below, I still ran into this problem somewhat, but it was manageable.
I setup at the disc golf parking lot again, but this time there were quite a few people there and some of them actually quizzed me about what I was doing. One gentleman, Jerry as noted in my log, actually chatted for a good bit about how he has been looking to get into ham radio but the Atlanta area is kinda tough on locating local hams for some reason. I gave him a card and told him to email me and I would give him as much info on it as I could find to get him on the right path…
As you can see in the photos, I set up ham sticks and this time I started on 40 meters FT8. I wanted to get the FT8 portion of my “sprint” if sorts out of the way first as the other two modes were going to be on the Ten Tec Scout 555. I had recently activated with it and it was acting up with chirping on CW and reports of RF noise on my audio on SSB. I attributed this to poor connection of the 20 meter band module as it was fine on 15 meters. Armed with this knowledge, before I left out for the park, I took the radio to the shop and use the Deoxit for gold contacts and a tooth brush to clean the contacts on the band modules. I even wetted one module pretty good and used it to “clean the contacts in the radio by plugging and unplgging the module a bunch of times.
This improvised procedure worked as I got good reports and the CW ran flawlessly as you will see later. Deoxit is magical stuff, if you dont have any, it is work your investment to grab a small can of it.


I really enjoy using this radio for my FT8 operating and with the upgraded finals and RF deck, it runs flawlessly now with SWRs in the 2:1 and even slightly higher range without problem. Today saw SWR levels on transmit of about 1.7:1 and it happily skipped right along making several contacts in a row at one point.
After completing 6 QSOs on FT8 I figured it was time to get the Ten Tec Scout 555 out of the case and see what I could scare up on CW.
The 40m Ham stick that I have must have a really high Q as it is very narrow banded. So I have it tuned for the CW portion of the band and the SWR in the SSB area can be quite bad at times. For this reason, I chose not to hunt any SSB contacts on 40 meters today. Once on CW (this was about 1/2 hour later as this is when I talked to Jerry) the band must have been closing or the band noise was getting so bad that I could not hear many stations. I was able to work Alabama and Tennessee before the call signs faded into the noise. That is something you will learn pretty quick about HF radio propagation, if you want to work closer in stations, use the lower bands, but if you want to reach the west coast from Georgia on a ham stick, use the higher bands like 15 and 20 meters. When 10 meters is open I have worked other continents with ease… Don’t discount those higher bands, they are truly magical.

In the above photo I have the CW key and keyer staged but not connected. The mouse is actually driving the FT8 machine and makes working FT8 so much easier to be honest.

In these two photos you can see what you have to work on constantly. The above photo shows the cable that came with my Ten Tec Scout 555 when I bought it. This is a common issue you will find with home shop made cables. These were stripped back way too far and as I used the cable, the conductors started breaking and I was beginning to worry about blowing fuses.
I happen to own a tool that is designed to remove these pins from the connector, so I am able to dismantle this connector properly. I dismantled it, then took it apart and cleaned it up, properly stripped and re-soldered the pins, then put heat shrink tubing on it all to insulated and protect it better. Now I am not so worried about it either shorting and melting the wire or blowing the fuses and shutting down the activation over something as simple as a cable…


Once I finished on 40 meters and had two modes in the bag on one band, I switched over to 15 meters CW to see what was happening there. There was a contest going on so it was a little crowded and I didn’t understand the exchange so I didn’t jump into the contest, but rather setup on a clear spot and calledCQ and worked a couple of stations there, one station of which is DX!!!
At this point. I got a phone call from KG4WBI about a completely unrelated matter, which we discussed and I told him to fire up his HF rig and we would see if ground wave would make the trip to his house from the park so I could get Georgia in the log as well as a 2nd mode on 15 meters! Well, it worked just fine and we had a great QSO on 15 meters SSB before he had to sign off and go run errands. So having confidence that SSB was going to work better I started calling CQ on SSB.
I got literally zero replies to my calls… so I went hunting instead. I found two more ops that could hear me and I was able to bag a couple more QSOs and these were Park to Park contacts to boot!


These three photo show me installing the band module into the Ten Tec Scout 555 transceiver. It really is that simple to change bands on this radio. Now to be fair, this is not as simple as just turning a knob, but it really isn’t that bad.
To remove the module you pull out the bottom of the little lever on the front of the module and it will pop out enough to be able to slip it out, then you grab a different one off of the pile and stick it back in the slot in the radio. Push it to seat it and then your ready to go.
At this point, I switched over to 20 meters and since the PTO (notice it is not a VFO) was still up in the SSB area, I decided to see if I could hunt some contacts with that mode. I landed one contact in SSB on 20 meters and was happy to get them in the log.
After working the one lonely SSB contact on 20 meters, I decided to give CW a try as well… Remember me mentioning a contest? Well, it was here too. It was going strong as well and because of this I was only able to work one contact on CW as well. If nothing else it netted me another band!

My last stop of the day was 17 meters. The 17 meter band is a WARC band and therefore it is off limits to contesting. Now, to be fair, POTA has been called contesting of sorts, but as of right now it is not considered a contest but is more in the spirit of something similar to a rare DX station activating on the same band and developing a huge pileup there. So I proceeded to hunt me an empty spot (18.078mhz) and started calling CQ.
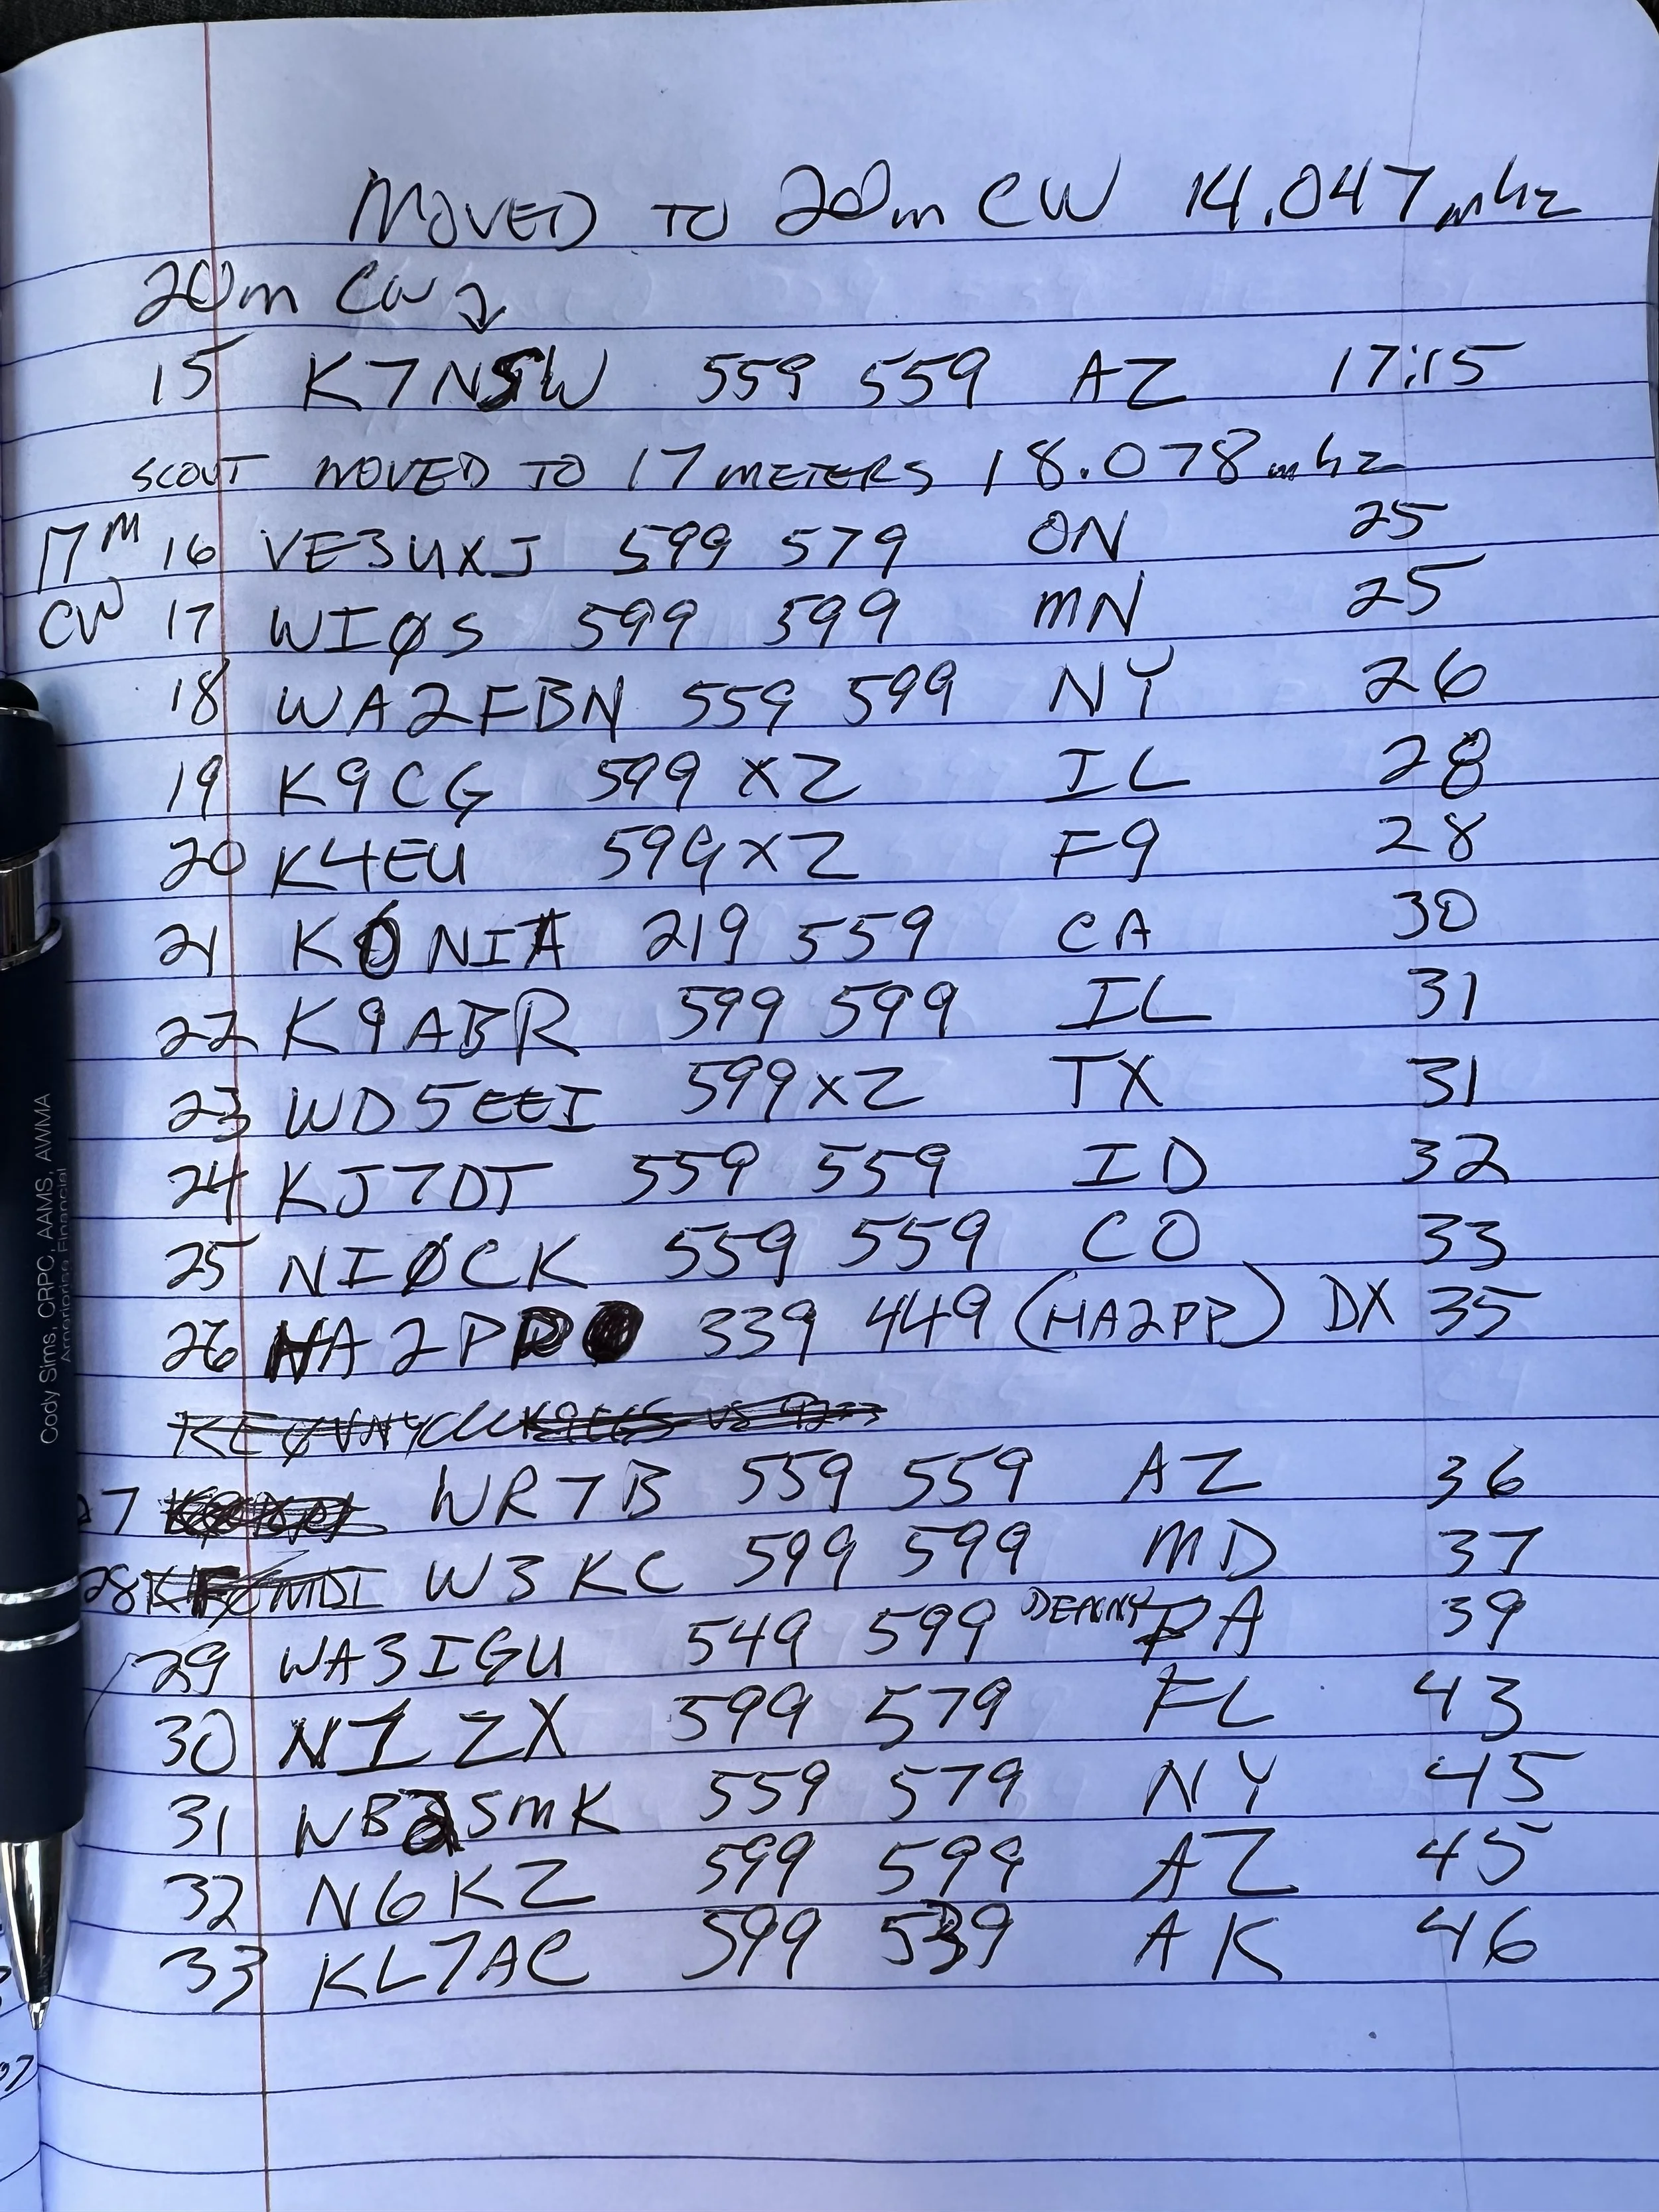
This is when things literally took off! I netted a whole page of contacts in about a 1/2 hour span of time! What a day! 4th band in the books and I was stoked!!! 17 meters must have been where all the POTA ops had went due to the contest and I didn’t get the memo…lol. The Scout worked flawlessly after the cleaning and I cant be happier now with the old girl.

One of the great things about 17 meters is the propagation is really anybodys call. I worked Hungary at one point as well as California, Alaska and Idaho, then there is a ton of east coast stations too, it was everywhere today on 17 meters. Ham radio is so cool…


Before closing today I wanted to mention that Aaron KV9L and I have a youtube channel and we just hit 2000 subscribers (as of this writing)! If you are into ham radio and watching videos about it, then we would love for you to come over! I am currently doing a series of short form videos that are teaching CW one letter per day. There is no limit to the number ofd times you can watch them so I am hoping these become long term training aids for people.
Once I get the letters, numbers and punctuation done, I am going to start doing words next. After words will come sentences so we will see how it goes. Anyway, I just wanted to thank the 2000 people that made us as successful as we are!
You can help support this website by using these Amazon Affiliate Links:
QRP/Portable Radios:
Antennas & Tuning:
CW Equipment:
Power & Accessories:
Organization & Transport:
BONUS ITEMS
73
David -WK4DS
![Ten-Tec Scout 555 POTA: 74 CW Contacts at Raccoon Creek WMA [US-9875]](https://images.squarespace-cdn.com/content/v1/5d17806ce65eba00011667cb/fe9e1368-6e59-44e9-9c7e-d01d02e14fe8/IMG_7569.jpg)
Ten-Tec Scout 555 POTA: 74 CW Contacts at Raccoon Creek WMA [US-9875]
As you can see from the QSO map above, the bands were alive and well on this day from Raccoon Creek WMA (US-9875). The calls just kept coming in and I finally had to got QRT, with people still calling, and pack up as I had to meet the wife for a dinner date! I normally clear the little pile up I will draw in and then I can simply power down. I really felt bad about having to shut down with stations still calling me. I now know what those rare DX station feel like… It is surreal to experience that to be honest… especially from Alabama.
Today got so fast paced that I forgot how to do CW properly! Let me explain…
As you can see from the QSO map above, the bands were alive and well on this day from Raccoon Creek WMA (US-9875). The calls just kept coming in and I finally had to got QRT, with people still calling, and pack up as I had to meet the wife for a dinner date! I normally clear the little pile up I will draw in and then I can simply power down. I really felt bad about having to shut down with stations still calling me. I now know what those rare DX station feel like… It is surreal to experience that to be honest… especially from Alabama.
You see, today I activated US-9875 Raccoon Creek WMA and I went at a different time of day. I wanted to spend several hours here today as I dont get over to the area often and I wanted to try to get as many contacts as I could in the afternoon. My goal was 60 QSOs today which is way more than I usually worry about, but like I said, this park is a solid 40 minutes in one direction and I dont go this way too often so I wanted to “make it count” if you know what i mean.
I rolled into the WMA at about 14:30 local time and set out to build the radio down by the Tennessee river. This is a small parking lot at the end of one of the gravel roads into the WMA and a lot of locals come to this spot to fish in the river from the shore. Did I mention it started raining right after I got the antenna setup and I got into the truck? Well, let me tell you, the rain set in and it didnt stop the whole time. I even broke down the antenna and stuff out in the rain today!!!


The above photo shows what the station looks like right before I plug all that stuff in and turn the power on. Everything I need to get on the air is in that pile for both SSB as well as CW. To be fair, I can get by without the Picokeyer and the 1/8 mono to 1/8 mono cable and I could simple plug the paddle right into the radio and it would work just fine. So there is really excess here above what is absolutely needed.
I did get the nanoVNA out and look at the antenna to make sure the rain didn’t do something to it like push it out of band due to the conductivity of the wet earth or what ever. Turns out it was just fine… It was a little low with the water on everything but the null was really close to the bottom of the 15 meter band edge so I used it and didnt worry about it. If you will notice, it was only 1.233:1 SWR at the band edge so it was plenty happy and we never checked it again after this on 15 meters. When I switched to 20 meters, the SWR had moved up to about 1.8:1 or maybe it was at 2:1 but I ran it and as you can see in the log, that didn’t seem to matter at all.

I setup shop on 15 meters SSB for a change and wanted to see what I could get before 15 faded out, but I noticed almost immediately that the ALC light wasn’t coming on at all when I would transmit audio. This lamp should just blink on the energy peaks but it wasn’t coming on at all. I messed with the mic gain and nothing. I did notice that I could wiggle the cord at the plug and it would make all sorts of stuff happen. This pointed me to the connector being faulty somehow but workable to some degree.
I made a few contacts with it like this and basically yelling at the radio would barely get the ALC to illuminate. I asked the last person for a report and they told me the audio was muffled and weak. Armed with all this knowledge, I decided to open the connector and see if a wire was broken. Well, they were not broken…but they were also not connected either. There were two cold solder joints from the factory…figures. I got a pretty decent photo of the green wire in the below photo. Well…that shuts down the SSB portion of this activation so onto 15 meters CW!

The 15 meter band has two things that make it unique. It is quieter than the lower bands for me and the “skip distance” is MUCH further with mobile, or improvised antennas. I didn’t make many CW contacts on 15 but check out the locations! Washington state is pretty common for me on 15 meters, in fact the entirety of the western United States is easier for me to work on 15 meters during the day. But a lot of people apparently don’t know this so lots of times the band will be open but there wont be anyone on it. Case in point today, I worked 4 ops in 11 minutes of calling CQ.
After vacuuming the bands of CW ops, I moved to FT8 to see what was happening and this is my “yardstick” of how open the band is. Turns out it was REALLY open! 15 meters FT8 netted a nice dozen contacts and got me almost half way to my original goal of 60 QSOs! This didn’t take long either and just goes to show that the higher bands are great if you will just go check them.

I had switched radios to use the sBitx V4 (I did the software upgrade and got some new features like the color coding of FT8 information you see below) You can also see that I was transmitting with 17 watts too. This is not precise, but it is close and I use it for my logbook notes.

After finishing on 15 meters I moved down to 20 meters to finish out the day. The sun was starting to set at this point and I knew 20 meters would serve me better at this point. after hunting W9XT, I set up shop on a clear frequency and started calling CQ, this is when things got a little crazy. I had a nice little pileup form pretty quick that took me about half an hour to clear, then nothing… It must be band fading at this point as the stations just vanished. I figured I would switch over to FT8 for a few minutes at this point too and see what I could get in that mode. I didn’t mention that I used the sBitx for CW at this point and to be honest, I dont think I will use it for CW seriously till there is a software change to make it work better. If you try to use it much past 18WPM it is like it fights you and induces mistakes for some reason. The people smarter than me in the email reflector seem to think is has to do with how the software scans the inputs on the radio, but I do know it will induce mistakes in your sending if you are not very attentive and send a very specific way. It will work if your careful and go about 18WPM max. I can use a keyboard to send CW but that really isnt all that much fun to be honest.
I struggled with FT8 today on 20 meters for some reason. The QSO could not complete to the 73 so it would not autolog the QSO. It would also not finish the exchange many times either. I could get it to send the signal report then they would send back and they would just get stuck in that step and never move past it. It got really frustrating towards the end, but I did manage to net some contacts here too.
At this point I had made 48 contacts which is a phenomenal day out for me, but I wanted 12 more to have that 60 that I started out my goal with! So at this point I move back down into the CW portion but this time on the Ten Tec Scout 555 instead since the CW mode on it works beautifully.


It took me a couple minutes to switch the radios out and to find a clear frequency and get started, but once I did, it didn’t take long to get a HUGE PILE UP going!!!! I got so excited during this part that I was racing the clock to see how many I could work before having to shut down the radio and go home as I was almost out of time. I started rushing the closing and it was here that I got sloppy with my CW. You see, I normally use QRP power levels for the most part, just the sBitx and the Ten Tec Scout are QRO by the rules and the sBitx is borderline to me. I will usually turn the power down to 5 watts or so anyway to preserve the finals in the radio but today I had the Scout and it is set at 50 watts and is not easily field adjusted from that power level.
As the pile up raged on, I got so lost in the process that I started sending 72 intermingled with contacts getting 73 instead and finally someone stopped me and asked why I am signing both modes and this is when it hit me. I had been running on autopilot about half the time just logging contacts and the muscle memory would just send the 72 and I would not even think about it. I would then called QRZ and get another call, rinse and repeat… Here is the next problem for me. My ragchew copy and my POTA copy are very different levels. He sent me the message at the speed I was working POTA contacts. Your brain will learn how to copy the formatted style exchanges without even thinking about it. I know that I am going to get a two letter state after the signal report and I can copy callsigns really well for some reason up to about 25 WPM, but send me a full sentence question and it breaks my brain. I cant copy half of it without writing it down. I can ragchew comfortably at 18 WPM max at this time, but if you ask me a question about my radio or something that isn’t part of the usual banter in a POTA contact and I am lost… I apologized for this mistake I had been making for probably 20 minutes without even realizing it and it was really close to when I had to leave anyway so I went ahead and called QRT to get the radio put away as it was raining really well at this point too…
To everyone that reads this that I didn’t get to work on this day, I am sorry to have to had shut down the rig and leave, I was having a wonderful time and wanted to stay longer!!!


The moral of this part of the story is dont get in such a hurry that you cause confusion with the hunters, take your time and be sure in what you are actually sending out over the airwaves.
On a brighter note, I got my 60! and 14 more!!! I dont know how long it has been since I got that many calls in the log in one day. Until next time I hope to work you on the air!
Read more Ten-Tec Scout 555 POTA activations:
- [Another Scout 555 POTA post]
You can help support this website by using these Amazon Affiliate Links:
QRP/Portable Radios:
Antennas & Tuning:
CW Equipment:
Power & Accessories:
Organization & Transport:
BONUS ITEMS
73
WK4DS - David

Ten-Tec Scout 555 POTA Activation: 26 Contacts in 15 Minutes CW & SSB Setup Guide
Looking for a reliable POTA activation setup? Here's my complete guide to activating parks using the Ten-Tec Scout 555 transceiver. In this activation, I made 26 SSB contacts in just 15 minutes, plus worked several stations on CW using ham stick antennas and portable power. Whether you're new to Parks on the Air or looking for equipment ideas, this post covers my portable ham radio setup, antenna tuning tips, and real-world activation results.
Looking for a reliable POTA activation setup? Here's my complete guide to activating parks using the Ten-Tec Scout 555 transceiver. In this activation, I made 26 SSB contacts in just 15 minutes, plus worked several stations on CW using ham stick antennas and portable power. Whether you're new to Parks on the Air or looking for equipment ideas, this post covers my portable ham radio setup, antenna tuning tips, and real-world activation results.
My Ten-Tec Scout 555 POTA Equipment Setup
My setup process has gotten pretty streamlined over the years. I pull into the parking spot, grab the Scout case and antenna bag from the truck bed, and I'm usually on the air within 15 minutes. First thing I do is get the hamsticks mounted and run the radials - usually just two per antenna is enough for POTA work. While those are getting situated, I'll set up the radio in the truck cab, connect power, and do a quick SWR check with the nanoVNA. If the SWR is under 2:1 I'm happy enough to start making contacts. The key is keeping it simple - I've learned the hard way that complicated setups mean more things that can go wrong in the field. Harbor Freight cases have been a game changer for organizing everything too. Everything has a place and I can just grab the case and go.
Today saw me use the Ten Tec Scout again to great effect. Below is the case I carry it in showing the full compliment of band modules (I keep one in the radio and today that is the 20 meter module). Under the radio is the power cable in a pocket just for it and next is the spot for the microphone in a more permanent role. You can see the impression from where it sits in the case currently. This Ten-Tec Scout 555 POTA activation demonstrates why this radio is popular for portable ham radio operations.
These hard cases come from Harbor Freight and make wonderful travel cases for my POTA radios to be quite honest about it. I need to get two more and kit out my Ten Tec Argonaut 5 and my Penntek TR-35 and the set will be complete. The Argonaut has a nice hard case, but it is really large and kinda hard to maneuver with. I thought it would be a great kit for POTA and it does work, but I would really like something different… As an aside, I store the owners manual to each radio behind the lid foam on all of these. That way I have a instruction book should I forget how to do something obscure that I dont use all that often.

My Ten-Tec Scout 555 travel case showing all band modules for POTA activations

Scout 555 band modules - simple to swap for different frequencies during activation
I have not dismantled a band module to see what all is inside it but there is a good bit of stuff going on in each one. They are about 3” long and the circuit board goes all the way to the front. So there is plenty of widgets inside them to make the magic happen.
Today, I only used the 15 and 20 meter modules as I was being a little lazy and only put out radials for these two ham sticks. A quick SWR check with the nanoVNA and I was off to the races.
N3ZN straight key with Picokeyer adding memory functions for CW POTA activations
POTA CW Equipment: N3ZN Key and Picokeyer Setup
The above shows my CW key and keyer. The key is made by N3ZN and if you have not tried one then I highly recommend them. It works beautifully for me. The keyer is a Picokeyer from Hamgadgets.com and works way better than it should for what it costs. Since Ten Tec radios traditionally dont have memories for the CW keyers, this is the way to have those memories really easily. For Parks on the Air activations, having a portable CW key with and a electronic keyer with memory functions is essential (at least to me it is…).
Operating SSB on POTA: Hand Mic and Voice Contacts
The next thing I did that was out of my usual character is to get the hand mic out and work some SSB today as well. It worked OK, but there were times when the audio was odd and I would get little hints to something being wrong but all in all it worked fine.

Hand mic for SSB operation - made 26 contacts in 15 minutes with this setup

Quick SWR check with nanoVNA before starting the POTA activation
Choosing a POTA Activation Location
When I scout out parks for POTA activations, I'm looking for a few key things. First, low RF noise is critical - no nearby power lines, businesses with switching power supplies, or heavy traffic. This park checked all those boxes and then some. The parking lot being empty is a huge bonus as it means no ignition noise from cars starting up or idling nearby. I also look for parks that allow me to set up antennas without disturbing other visitors. Some parks get really busy on weekends, so I'll often activate during weekdays or early mornings. Having good cell coverage helps too, though it's not required - I like being able to spot myself on POTA.app without relying solely on the Reverse Beacon Network. This particular spot has become one of my go-to locations because it's quiet, accessible, and the park staff are friendly to hams.
As per my usual outings, I had the place to myself today with only a couple of cars rolling by during the entirety of my activation. I like it like this though as there is no ignition noise to deal with or inverters making RF hash, just the peace and quiet of the park and my radio chattering in the truck. During this time of day, the sun will beam into my door if I roll down the window beside me so I usually just roll down the other three and the one beside me just a little so the air still moves through the truck taking away the heat from the radio and making it nice and pleasant.
Just look at that parking lot all for me! HaHa! That never gets old! There is just something magical about the peace and quiet of a park like this.

Perfect POTA location - empty park means no ignition noise or RF interference
Ten-Tec Scout 555 CW Operation Tips and Side Tone Settings
A few operating tips I've picked up over my POTA activations - start on CW if you can work it, as the Reverse Beacon Network will auto-spot you and save you from needing cell service. Once you've got 10 contacts in the log, switch modes or bands to see what else is happening. Don't be afraid to QSY (change frequency) if things go quiet. During this activation, moving from 15 meters to 20 meters made all the difference - 15 was fading out but 20 was on fire. When you get a pile-up like I did on SSB, just work them as fast as you can log them. Don't worry about being perfect, just get the call sign and signal report down. You can clean up the log later if needed. And always, always bring spare coax and adapters. Murphy's Law is real in the field!
Something I learned today that is different between the Argonaut 5 and the Scout is that I have to use the key jack to make this radio transmit a side tone in CW. I can key the transmitter with the “mic jack cable” that I made for the Argonaut 5 but it wont produce a side tone with the Scout for some reason. So I instead used this port on the back of the radio to get it to work right (see photo below). Another special thing about this radio to me is that it has a Curtis keyer chip in it and you can plug a set of paddles directly into it and it will work as you would expect, but it is in a different port… Go figure. All these options are hot all the time too. Plug a straight key into it and key it to send CW then you could (theoretically) just pick up the microphone and talk to someone on SSB without changing anything else on the radio. It appears that it is in SSB mode all the time and CW is just the side tone being transmitted instead of the audio from the microphone. This does cause one little issue that a user will notice pretty quickly. The zero beat is the display frequency plus or minus (depending on band) the side tone frequency. The filter is simply a bandpass knob that adjust the filter bandwidth and that is it. A very simple radio that just works.
An example of the side tone offset in CW can been seen in the photo above where I am tuned up on 15 meters. It displays 21.0523mhz but the radio is actually operating on 21.053mhz when transmitting. So if you are near the band edges on say 40 meters CW, just keep this in mind so you are not transmitting out of band. The owners manual even mentions this to make sure you stay compliant with FCC regulations.

CW key jack on Scout 555 back panel - required for proper side tone in CW mode

First page of activation log - starting on 15 meters CW and SSB

20 meter SSB pile-up - 26 contacts in just 15 minutes!

Final page showing all contacts from the activation
POTA Activation Results: 26 Contacts in 15 Minutes
As you can see from the log above, I started out on 15 meters CW and worked several stations there before moving to 15 meters SSB till the band essentially faded out. At that point I decided to see what would happen if I went down to 20 meters SSB and called CQ… Well the log speaks for itself. I made 26 contacts in 15 minutes! This has to be some sort of world record!!! LOL…for me that is… It was wild how big the pile up was and how quick it happened! The people were super nice and courteous and really helpful so I thank all of you that called me this day and I really appreciate you stopping by to say hello! This POTA activation shows what's possible with a simple portable ham radio setup."
Frequently Asked Questions About POTA Activations
What equipment do I need for a POTA activation?
For a basic POTA activation, you need a portable ham radio transceiver (like the Ten-Tec Scout 555, Icom IC705, or the like), an antenna (ham sticks work great for portable use), a power source (battery or vehicle power), some interconnect cabling such as coax and things like that, and a way to log contacts. Optional but very helpful equipment includes: a CW key for Morse code operation, a portable table or chair for comfort, an antenna analyzer like the nanoVNA for precise tuning, and a keyer with memory functions for repetitive CW exchanges. The beauty of POTA is you can start simple and add equipment as you learn what works for your operating style.
How many contacts do you need for a valid POTA activation?
You need a minimum of 10 QSOs (contacts) for a valid Parks on the Air activation. These contacts can be made on any amateur radio band and any mode - CW (Morse code), SSB (voice), or digital modes like PSK31 or FT8. Park-to-park contacts (when you work another station who is also activating a park) count double for hunters, but still count as just one contact toward your activation total of 10. Remember VHF and UHF contacts count too as long as they are simplex only.
What is the best radio for POTA activations?
The "best" POTA radio depends on your operating style and preferences. The Ten-Tec Scout 555 is excellent for CW operation thanks to its clean receiver, simple design, and reliable performance. Other popular choices among POTA activators include the Yaesu FT-891 for 100-watt capability, the Elecraft KX2 or KX3 for QRP portable operation, and the Icom IC-705 for all-mode including VHF/UHF. Choose based on your preferred operating modes, power requirements, portability needs, and budget.
How do you tune a ham stick antenna for POTA?
The easiest way to tune a ham stick antenna is with an antenna analyzer like the nanoVNA, or you can use your radio's built-in SWR meter. Start by adjusting the length of the whip section - make it longer to lower the frequency, shorter to raise it. Make small adjustments (just a fractions of an inch at a time) and recheck your SWR reading. For POTA activations, an SWR under 2:1 is generally acceptable and will work fine, though under 1.5:1 is ideal for maximum power transfer. Anything under 2:1 will not damage your radio though so don’t stress too much over this part.
Can you operate POTA from inside your vehicle?
Yes! Parks on the Air rules allow operation from inside your vehicle, which is different from SOTA (Summits on the Air) that requires outdoor setup away from vehicles. Operating from inside your car or truck is actually quite common during POTA activations, especially in bad weather, extreme temperatures, or when dealing with insects. As long as you and your entire station are physically located within the park boundaries, you're good to go. Just make sure you're parked in an authorized area.
What is the best band for POTA activations?
20 meters is often the most productive band for POTA activations because it provides a good mix of both local and DX (long distance) contacts throughout the day. 40 meters works exceptionally well for regional and NVIS contacts, especially in the early morning and evening. 15 and 10 meters can produce excellent DX contacts when conditions are right and solar activity is favorable. Many experienced POTA activators work multiple bands during a single activation to maximize their contact count and variety. In my activation with the Scout 555, 20 meters SSB produced 26 contacts in just 15 minutes - that's the power of picking the right band at the right time!
Whether you're new to Parks on the Air or an experienced POTA activator, the Scout 555 makes for an excellent field radio.
Have you tried POTA with a Ten-Tec Scout? Share your activation stories in the comments below! If you're planning your first Parks on the Air activation and have questions about equipment setup, feel free to ask.
Want more POTA content?Subscribe to my ham radio blog for more activation reports, equipment reviews, and portable operating tips.
---
## POTA Activation Summary
Equipment Used:
- Radio: Ten-Tec Scout 555 (50 watts)
- Antenna: Ham sticks on 15m and 20m with tuned radials
- Power: Vehicle electrical system
- CW Key: N3ZN paddle key with Picokeyer
- Microphone: Ten-Tec hand mic
- Accessories: NanoVNA for antenna tuning, Harbor Freight case
Operating Details:
- Bands Worked: 15 meters and 20 meters
- Modes Used: CW and SSB
- Total Contacts: 30+ QSOs
- Best Run: 26 contacts in 15 minutes on 20m SSB (that was wild!)
- Setup Time: Approximately 15 minutes from arrival to first contact
- Activation Duration: About 90 minutes total
Key Takeaways:
The Scout 555 continues to prove itself as a solid POTA radio. Simple, reliable, and the receiver is clean even with nearby RFI sources. The band module system makes it easy to swap bands, though it's not as fast as just turning a knob. The big lesson today was remembering which key jack to use for proper CW sidetone - small details like that can save you troubleshooting time in the field. Also, 20 meters SSB was absolutely on fire today - sometimes you just catch the band at the right time and everything clicks.
---
You can help support this website by using these Amazon Affiliate Links:
QRP/Portable Radios:
Antennas & Tuning:
CW Equipment:
Power & Accessories:
Organization & Transport:
BONUS ITEMS
73, WK4DS - David